USER MANUAL POWERBASE 60 AEG
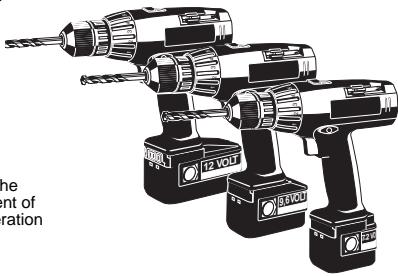
BS2E 7.2 T
BS2E 9.6 T
BS2E 12 T
BS2E 14.4 T
POWERBASE 60
Instructions for use Please read and save these instructions.
D Gebrauchsanleitung Bittle lesen und aufbewahren.
F Instruction d'utilisation Priere de dire et de conserver.
Istruzioni d'uso Si prega di leggere le istruzioni e di conservarle.
E Instrucciones de uso Leay conserve estas instrucciones por favor.
P Instruções de service Por favor leia e conserve em seu poder.
NL Gebruiksaanwijzing Lees en let goed op deze adviezen.
DK Brugsanvising Vær venlight at læse og opbevare.
s Bruksanvising Var god läs och tag tillvara dessa instruktioner.
SF Käyttoohje Lue ja sailytö
RUS Hnctpykunno NCIOJIb3OBaHIO IoxaJyIcTa, npOHTnte n COxpaHNTe NaCToAuyu INHCTpyKcNIO
TR Kullanim kilavuzu Lutfen okuyun ve saklayin
使用說明書請詳細閱讀並妥善保存
| Introduction | You are demanding and expect to purchase quality goods - quality offered by Atlas Copco.
We have built a durable and reliable electric power tool for you.
Please read the instructions for use before first operation so you can handle your power tool effectively and safely.
We are sure that buying an AEG Electric Power Tool from Atlas Copco was the right choice! |
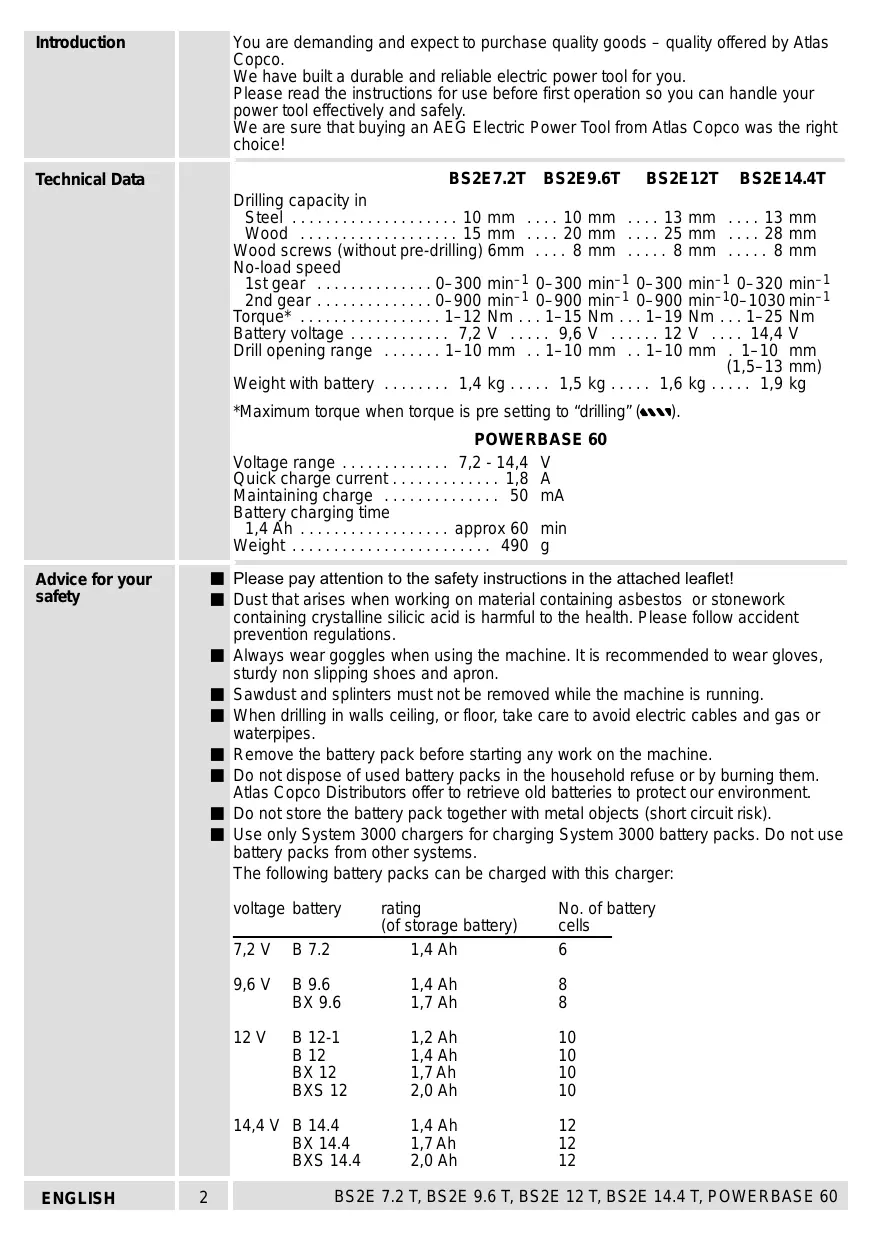
| Technical Data | BS2E7.2T BS2E9.6T BS2E12T BS2E14.4T
Drilling capacity in Steel 10 mm 10 mm 13 mm 13 mm
Wood 15 mm 20 mm 25 mm 28 mm
Wood screws (without pre-drilling) 6mm 8 mm 8 mm 8 mm
No-load speed
1st gear 0-300 min-1 0-300 min-1 0-300 min-1 0-320 min-1
2nd gear 0-900 min-1 0-900 min-1 0-900 min-10-1030 min-1
Torque* 1-12 Nm 1-15 Nm 1-19 Nm 1-25 Nm
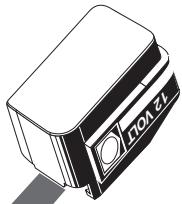
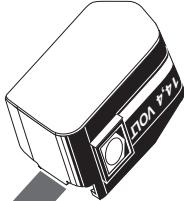
Battery voltage 7,2 V 9,6 V 12 V 14,4 V
Drill opening range 1-10 mm 1-10 mm 1-10 mm 1-10 mm (1,5-13 mm)
Weight with battery 1,4 kg 1,5 kg 1,6 kg 1,9 kg
*Maximum torque when torque is pre setting to "drilling" (▲▲).
POWERBASE 60
Voltage range 7,2-14,4 V
Quick charge current 1,8 A
Maintaining charge 50 mA
Battery charging time
1,4 Ah approx 60 min
Weight 490 g |
| Advice for your safety | Please pay attention to the safety instructions in the attached leaflet!
Dust that arises when working on material containing asbestos or stonework containing crystalline silicic acid is harmful to the health. Please follow accident prevention regulations.
Always wear goggles when using the machine. It is recommended to wear gloves, sturdy non-slipping shoes and apron.
Sawdust and splinters must not be removed while the machine is running.
When drilling in walls ceiling, or floor, take care to avoid electric cables and gas or waterpipes.
Remove the battery pack before starting any work on the machine.
Do not dispose of used battery packs in the household refuse or by burning them.
Atlas Copco Distributors offer to retrieve old batteries to protect our environment.
Do not store the battery pack together with metal objects (short circuit risk).
Use only System 3000 chargers for charging System 3000 battery packs. Do not use battery packs from other systems.
The following battery packs can be charged with this charger:
voltage battery rating (of storage battery) No. of battery cells
7,2 V B 7.2 1,4 Ah 6
9,6 V B 9.6 1,4 Ah 8
BX 9.6 1,7 Ah 8
12 V B 12-1 1,2 Ah 10
B 12 1,4 Ah 10
BX 12 1,7 Ah 10
BX 12 2,0 Ah 10
14,4 V B 14.4 1,4 Ah 12
BX 14.4 1,7 Ah 12
BX 14.4 2,0 Ah 12 |
| ENGLISH | 2 BS2E 7.2 T, BS2E 9.6 T, BS2E 12 T, BS2E 14.4 T, POWERBASE 60 |
| ■ Do not try to charge non-chargeable batteries with this charger.
■ No metal parts must be allowed to enter the battery section of the charger (short circuit risk).
■ Never break open battery packs and chargers and store only in dry rooms.
Keep dry at all times.
■ Please pay attention to the following symbol on the label of the charger:
This tool is only suitable for indoor use. Never expose tool to rain.
■ The battery clamps of the charger are fed by the mains supply. Do not touch the tool with conducting objects.
■ Never charge a damaged battery pack. Replace by a new one.
■ Before use check machine, cable, and plug for any damages or material fatigue.
Repairs should only be carried out by authorised Service Agents. |
| Measured sound value | Typically the A-weighted sound pressure level of the tool is less than 70 dB (A). The noise level when working can exceed 85 dB (A). Wear ear protectors! |
| Measured vibration value | Typically the hand-arm vibration is below 2.5 m/s². |
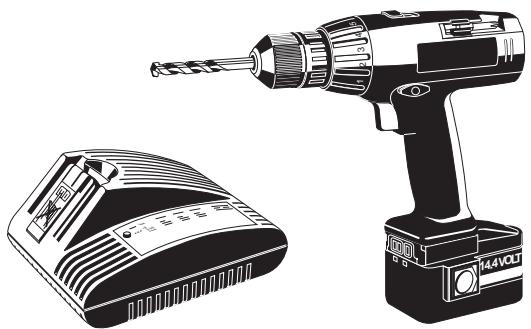
| Use | The battery drill/screwdriver is designed for drilling and screwdriving for independent use away from mains supply.
The quick charger can charge AEG System Accu 3000 batteries from 7.2 V to 14.4 V.
Do not use this product in another way as stated for normal use. |
| Mains connection POWERBASE 60 | Connect charger only on single phase AC current and only with mains voltage given on rating plate. Connection is also possible to sockets without earthwire, as appliance is double insulated in accordance with DIN 57 700/VDE 0700 or IEC 335. Radio suppression complies with European standard EN 55014.
When fitting the plug, make sure that the brown (live) wire of this appliance is connected to the plug terminal marked L or coloured red, and the blue (neutral) wire of this appliance is connected to the plug terminal marked N or coloured black.
Under no circumstances must the wires of this appliance be connected to the earth terminal of the plug marked either E, with the earth symbol or coloured green or green/yellow. |
| Maintenance | The contacts of chargers and battery packs must be kept clean.
If the supply cord of this appliance is damaged, it must only be replaced by a repair shop appointed by the manufacturer, because special purpose tools are required.
Use only AEG accessories and spare parts. Should components need to be replaced which have not been described, please contact one of our AEG service agents (see our list of guarantee/service addresses).
If needed, an exploded view of the tool can be ordered. Please state the ten-digit No. as well as the machine type printed on the label and order the drawing at your local service agents or directly at: Atlas Copco Electric Tools GmbH, Postfach 320, D-71361 Winnenden. |
| Accessories | The range of accessories with part numbers is shown in our catalogue. |
| ENGLISH | 3 BS2E 7.2 T, BS2E 9.6 T, BS2E 12 T, BS2E 14.4 T, POWERBASE 60 |
Brief description
BS2E 7.2 T
BS2E 9.6 T
BS2E 12T
BS2E 14.4 T
Two-speed gears, changeable under no-load at the gear lever.
Bit storage for compartment screwdriver bits
Keyless chuck for tightening without a key.
Variable torque pre-selection at adjustment ring for correct screwing depth when working with different screws or different material.
Switch trigger for switching the machine on and off, and for smooth starting and varying speed.
QUICKSTOP - the speed of the working spindle is immediately reduced when releasing the switch.
Reversing lever for changing from forward to reverse rotation - due to a lockout mechanism, switching the lever is only possible if the On-/Off switch is not depressed.
Powerful battery pack with reverse battery protection, negative and positive pole cannot be mistaken.
Modifications: Text, diagrams and data are correct at the time of printing. In the interest of continuous improvement of our products, technical specifications are subject to alteration without prior notice.
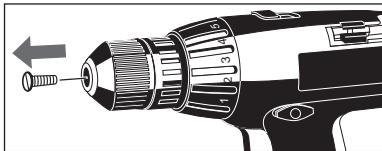
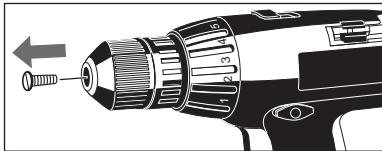
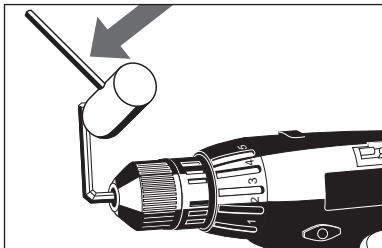
Changing the keyless drill chuck
The chuck is easier to remove when 1st gear is engaged as the gears tend not to rotate as easily.
- To remove the chuck first take off the safety screw by turning to the right.
- Lock Allen key* in chuck.
- Loosen the keyless chuck by hitting the inserted Allen key lightly with a plastic hammer.
Mount the chuck in reverse order.

Aways re-fasten the locking screw after mounting the chuck. Otherwise thchuck might become loose in anti-clockwise operation.
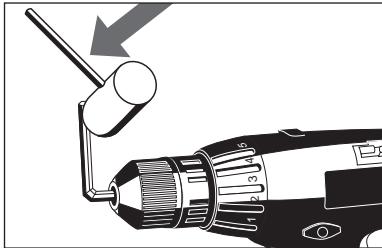
*Keys are not included as standard equipment.
| Inserting tools | | The chuck can be used for drill bits or screwdriver bits.
For this purpose, Open chuck, insert the selected bit and tighten chuck. | → |
| Battery pack | | Fully charge new or long stored battery packs before using your battery tool. Battery packs only reach full capacity after 4 - 5 chargings. |
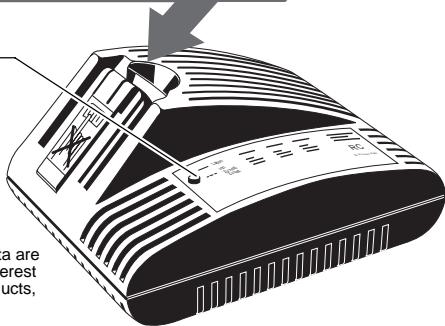
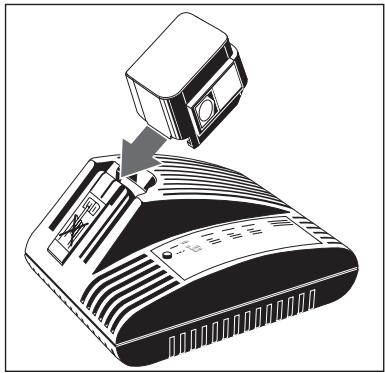
| Battery pack reception | | Insert the battery pack from behind into the machine until it engages (as shown in illustration). |
| (only applicable for BS2E 12 T BS2E 14.4 T: | The battery pack can be inserted either way into the holding device: From the front: The shape of the machine is more compact and therefore well suited for working in restricted space. From the back: Due to the optimum weight distribution the machine is ideally balanced. This protects the wrist when driving screws or drilling horizontally. |
| Removing the battery pack | | Press together the clamps and remove the battery pack in direction of arrow. |
| Changing gear | | The gears can be changed when the machine is switched off or is running under no load.
Gear change lever in position 1: 1st gear
Gear change lever in position 2: 2nd gear |
| Switching between forward and reverse rotation | | Select direction of rotation with reversing lever.
Due to a lockout mechanism, the reversing lever can only be switched when the On-/off switch is not depressed. |
| ENGLISH | 5 | BS2E 7.2 T, BS2E 9.6 T, BS2E 12 T, BS2E 14.4 T, POWERBASE 60 |
| On-off switch | Switching on: Press on-off switch
Switching off: Release on-off switch
The speed can be infinitely varied by slowly releasing/pressing the switch trigger. | |
| Torque Adjustment | For drilling twist the adjustment ring such that the symbol faces the marking; the safety clutch is now locked and the maximum torque available.
For screwdriving at constant cutting depth torque speed pre-selection with torque adjustment ring is possible. For this turn torque adjustment ring until the desired torque level faces the marking.
Torque level 1: minimum torque speed for screwdriving
Torque level 7: maximum torque speed for screwdriving
When often screwing in the "drilling" setting, the motor can overheat. Please choose a torque which is suited to the working material and size of the screw. By doing so you can avoid the bit sliding of the screw head and damaging the screwdriver bit. |
| Bit storage | Bit storage for compartment screwdriver bits | |
| Advice for operation | Temperatures in excess of 50°C (122°F)reduce the performance of the battery pack. Avoid extended exposure to heat or sunshine (risk of overheating). |
| Tips on drilling in metal | Center punch the point you have marked for drilling.
Always hold sheet metal firmly in a vice.
Lay a block of wood under thin metal to prevent it from distorting.
Use HSS spiral drill bits. (For white cast iron, use drill bits with special tips.)
Before drilling large-diameter holes, first drill a small pilot hole.
Use lubricant:
Steel: Oil
Aluminium: Turpentine, paraffin
Brass, copper, cast iron: no lubricant, but take the drill out of the hole frequently to cool it off. |
| Tips on drilling into wood | Center punch the point you have marked for drilling. To prevent the wood from splintering when the drill bit tip breaks through, lay a piece of scrap wood underneath it, or drill from both sides. The maximum drill-diameter can only be reached with a Forstner-drill bit. |
| Tips for screw-driving | Use screwdriver bits of the appropriate size and shape.
Suitable screws can be driven into softwood without pre-drilling.
Pre-drill into hardwood or for screws of large diameter.
Pre-drill further for countersunk screws.
For woodscrews threaded less than their full length, pre-drill approx. half the length of the screw. |
| ENGLISH | 6 | BS2E 7.2 T, BS2E 9.6 T, BS2E 12 T, BS2E 14.4 T, POWERBASE 60 |
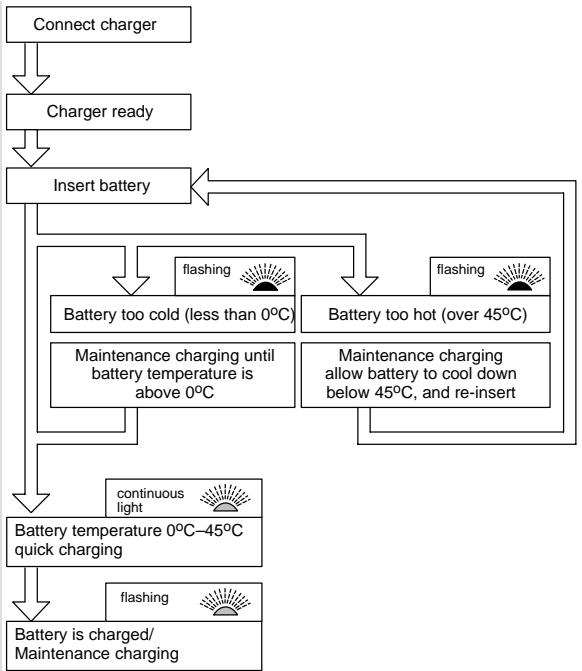
Indication of the control light after mains connection:
-Off
-indicating
-continuous
charger ready
battery pack is charged maintenance charging battery pack too hot/too cold quick charging
Modifications: Text, diagrams and data are correct at the time of printing. In the interest of continuous improvement of our products, technical specifications are subject to alteration without prior notice.
Characteristics
After inserting the battery into the reception of the charger the battery will automatically be charged.
If the battery is too hot (over approx. 45^ ) the charger switches to maintenance charge. Remove battery, allow to cool down and insert again.
If the battery is too cold (less than approx. 0^ ) no charging takes place. After warming up of the battery charging takes up automatically; the battery can stay in the charger.
The battery's charging time is between 10 min and 60 min (at 1,4 Ah), depending on the state of discharge.
As soon as charging is completed, the charger switches over to "trickle" charge to maintain the full capacity.
The battery can be stored permanently in the charger without the danger of being overcharged.
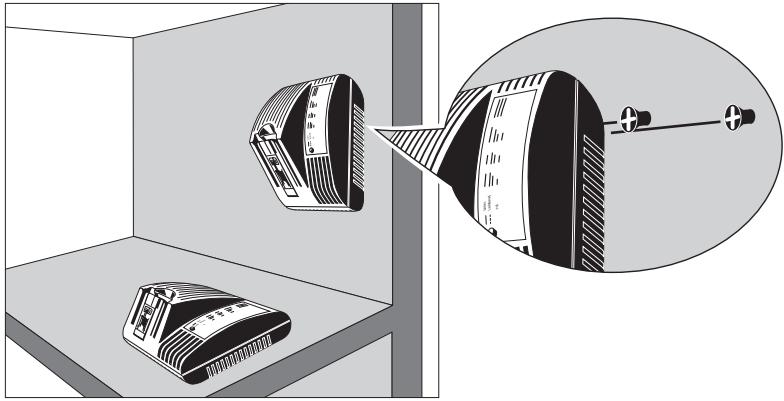
The battery charger can be used either standing up or fixed to a wall (see illustration).
Charging of batteries
Battery pack reception

New battery packs reach full loading capacity after 4 - 5 chARGs and discharges. Battery packs which have not been used for some time should be recharged before use.

Note the correct position when inserting the battery pack. Make sure it is fully inserted.
The battery clamps of the charger are fed by mains supply. do not touch the tool with conducting objects.
Description
BS2E 7.2 T
BS2E 9,6 T
BS2E 12T
BS2E 14.4 T
Accu interchangeable charge
Mode de charge de maintain
Breve descrição
BS2E 7.2 T
BS2E 9.6 T
BS2E 12T
BS2E 14.4 T
BS2E 7.2 T
BS2E 9.6 T
BS2E 12T
BS2E 14.4 T
Kisa tanimlama
BS2E 7.2 T
BS2E 9,6 T
BS2E 12T
BS2E 14.4 T
YCTaHOBtB NaTPOH Ha MecTo B 06paTHOM nopRdke.

Bcerda 3aTarynBaIte KpeEeXhbl BVHT nOcIe yctAHOBKn npToHa. B pOTINBHOM Clyuae npTOH MoKET OcLn6Hyb npu o6paTHOM BpaUeHnn.
*KIOU B CtaHdApTHyIO KOMIIeKTAuIIO He BxOJaT.
We declare under our sole responsibility that this product is in conformity with the following standards or standardized documents. EN 50144, EN 55014-1, EN 55014-2, HD 400 in accordance with the regulations 98/38/EC, 73/23/EC, 89/336/EC
DEUTSCH
D-71361 Winnenden Germany
http://www.atlascopco.de