
SP 7 Dirt Inox - Water pump KARCHER - Free user manual and instructions
Find the device manual for free SP 7 Dirt Inox KARCHER in PDF.


| Product type | Dirty water pump |
| Brand | Kärcher |
| Model | SP 7 Dirt Inox |
| Category | Water pump |
| Housing material | Stainless steel |
| Max flow rate | 7 000 l/h |
| Max discharge head | 7 m |
| Max immersion depth | 7 m |
| Rated power | 400 W |
| Supply voltage | 230 V ~ 50 Hz |
| Cable length | 10 m |
| Net weight | 8,6 kg |
| Dimensions (L × W × H) | 220 × 280 × 420 mm |
| Switch type | Automatic float switch |
| Thermal protection | Yes, automatic shut-off in case of overheating |
| Integrated filter | Yes, for particles up to 5 mm |
| Discharge connection | Universal connection 1" (inch) or 1 1/2" |
| Delivery contents | Pump, connection sleeve, adapter, manual |
| Manufacturer warranty | 2 years |
| Maintenance | Clean the filter regularly, rinse with clear water |
| Repairability | Spare parts available (seals, impeller, float) |
Frequently Asked Questions - SP 7 Dirt Inox KARCHER
User questions about SP 7 Dirt Inox KARCHER
0 question about this device. Answer the ones you know or ask your own.
Ask a new question about this device
Download the instructions for your Water pump in PDF format for free! Find your manual SP 7 Dirt Inox - KARCHER and take your electronic device back in hand. On this page are published all the documents necessary for the use of your device. SP 7 Dirt Inox by KARCHER.
USER MANUAL SP 7 Dirt Inox KARCHER
Deutsch 5
English 10
Français 15
Italiano 20
Nederlands 25
Español 30
Português 36
Dansk 41
Norsk 46
Svenska 51
Suomi 56
Ελληνικά 61
Türkçe 67
Русский 72
Magyar 78
Čeština 83
Slovenščina 88
Polski 93
Românește 98
Slovenčina 103
Hrvatski 108
Srpski 113
Български 118
Eesti 124
Latviešu 129
Lietuviškai 134
Українська 139
Қазақша 145
中文 151


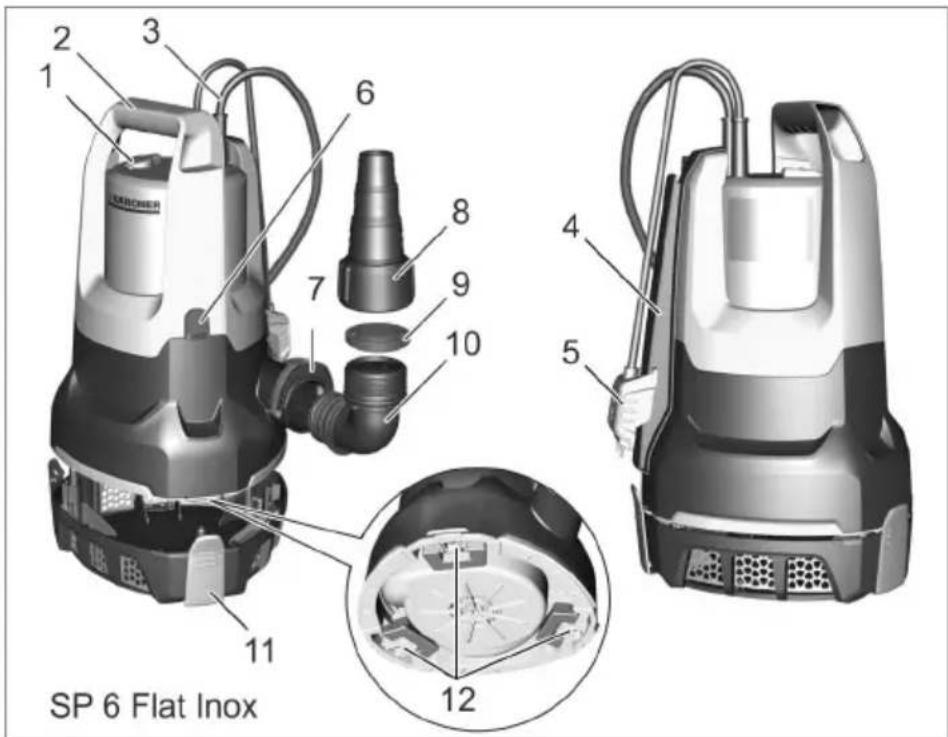




SP 6 Flat Inox

SP 6 Flat Inox
SP 7 Dirt Inox

Please read and comply with these original operating instructions and the enclosed safety instructions. Proceed ac-
cordingly. Keep both booklets for future reference or subsequent owners.
Contents
Contents EN 1
Warranty EN 1
Environmental protection EN 1
Description of the Appliance EN 1
Proper use EN 1
Approved feed fluids ..... EN 1
Start up EN 2
Operation EN 2
General EN 2
Automatic venting device ..... EN 2
Automatic operation.... EN 2
Manual operation.... EN 3
Flat vacuuming (SP 6 Flat Inox) EN 3
Finish operation EN 3
Maintenance EN 3
Transport EN 3
Storage EN 3
Storing the pump ..... EN 3
Special accessories EN 4
Troubleshooting EN 4
Specifications EN 5
Warranty
The warranty terms published by the relevant sales company are applicable in each country. We will repair potential failures of your appliance within the warranty period free of charge, provided that such failure is caused by faulty material or defects in manufacturing. In the event of a warranty claim please contact your dealer or the nearest authorized Customer Service centre.
Please submit the proof of purchase.
The adhesive type label must not be removed from the device. Warranty is no longer granted if the label is removed.
Environmental protection

The packaging material can be recycled.
Please do not place the packaging into the ordinary refuse for disposal, but arrange for the
proper recycling.

Old appliances contain valuable materials that can be recycled. Please arrange for the proper recycling of old appliances. Please dispose your old appliances using appropriate collec-
tion systems.
Note
The oil used to seal the ceramic slide ring is biodegradable. No negative effects are expected for humans or the environment if the oil smears or leaks.
Notes about the ingredients (REACH)
You will find current information about the ingredients at:
www.kaercher.com/REACH
Description of the Appliance
1 Switch (automatic mode / manual operation)
2 Carrying handle
3 Power cord with plug
4 Rail (level sensor)
5 Level sensor
6 Automatic venting device
7 Quick-Connect
8 Pump connecting piece (1", 1¼" and 1½" hose connection and G1½ - thread)
9 Check valve (SP 6 Flat Inox)
10 Connection nozzle (G1½ - thread)
11 Pre-filter (SP 6 Flat Inox removable)
12 Support legs (SP 6 Flat Inox)
Proper use
This appliance has been designed for use in private households and is not intended for commercial use.
The manufacturer is not responsible for any damages that may occur on account of improper use or wrong operations.
The device is mainly intended for draining building parts in case of flooding, but also for pumping over or out containers, for water removal from wells and shafts as well as for draining water from boats and yachts, provided that it is fresh water.
NOTICE
The device is not suitable for continuous pump operation (e.g. continuous circulation in a pond) or as a stationary installations (e.g. lifting device, fountain pump).
Approved feed fluids
■ Fresh water up to a certain degree of soiling
■ Water from swimming pool (provided the dosing of additives is proper)
■ Washing lye, e.g. leaked washing machine load. Then clean with clear water.
Sp 7 Dirt Inox (wastewater pump)
■ Water with a degree of contamination up to a grain size of 30 mm
SP 6 Flat Inox (clean water pump)
■ Water with a impurities up to a maximum grain size of 5mm
DANGER
Risk of injury, risk of damage! Caustic, slightly inflammable and other explosive substances (such as petrol, petroleum, diluted nitrogen), greases, oils, salt water and waste water from toilets as well as sludgy water that has a slower flow capacity than water, must not be transported with this pump. The temperature of the delivered fluid must be between 5 °C and 35 °C.
Start up Operation
NOTICE
The shorter the hose length and the larger the hose diameter, the higher the pump capacity.
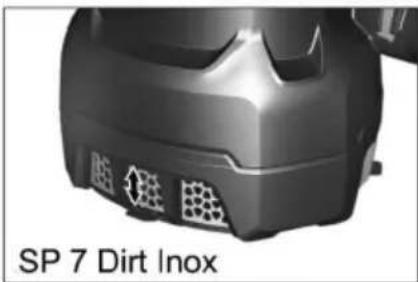
In order to prevent the pump from clogging, use the enclosed pre-filter (SP 6 Flat Inox) or slide down the integrated pre-filter (SP 7 Dirt Inox) with hose diameters of less than 1 1/4 .
The pump connection is equipped with a plug system (Quick-Connect).
The unmounted connection nozzle with pump connecting piece is enclosed in the device.
Illustration A
→ To remove the connection nozzle, press the Quick-Connect (grey button).
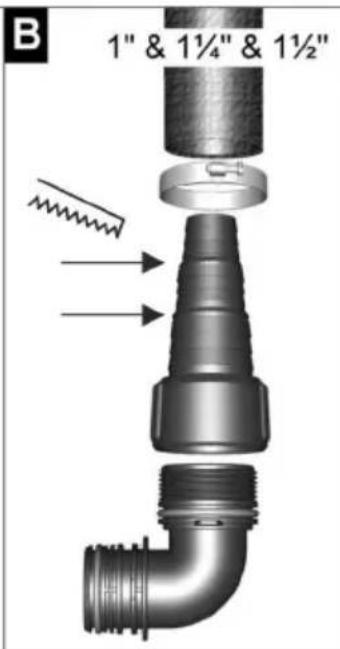
Illustration B
→ Screw the pump connecting piece onto the connection nozzle.
→ Slide the hose clamp onto the hose.
→ Slide the hose onto the pump connecting piece and secure it by means of a hose clamp.
→ Slide the connection nozzle into the Quick-Connect.
NOTICE
Hoses with a diameter of 1", 1¼" and 1½" can be connected to the pump connecting piece.
A sufficiently large hose diameter must be selected and the pump connecting piece must be shortened according to the grooves so that the required particle size can be used. A large hose diameter is also recommended for smaller particle sizes to allow a high flow volume.
Illustration C
Illustration D
→ Slide the level sensor onto the rail from the top.
→ Fold out or fold in the support legs (SP 6 Flat Inox) for the pump start.
NOTICE
It is not mandatory to fold out the support legs; a higher pump capacity is achieved by folding out the support legs.
Folding in the support legs enables the flat vacuuming of the fluid up to a residual fluid height of up to 1 mm.
→ Install or uninstall pre-filter (SP 6 Flat Inox).
→ Slide down or up the pre-filter (SP 7 Dirt Inox).
NOTICE
It is not necessary to install the pre-filter, but a higher pump capacity is reached by installing the pre-filter (only for SP 6 Flat Inox).
The feed fluids are pre-filtered by the pre-filter to protect the pump from heavy contamination. Particles up to 5 mm can still be used in the filter.
Disassembly of the pre-filter allows for the flat vacuuming of the fluid up to 1 mm residual fluid height (SP 6 Flat Inox).
→ Safely place the pump on a stable surface in the feed fluid or immerse it using a rope tied to the carrying handle.
NOTICE
The suction area must not be blocked by soiling.
In case of muddy ground, place the pump on a brick or the like.
Ensure that the pump is level.
Do not carry the pump on the cable or the hose.
△DANGER
Risk of mortal danger on account of electric shock! Do not touch feed fluids, the rope attached to the carrying handle as well as objects that are in contact with the feed fluid (e.g. pipelines extending into the water, railings, etc.).
General
Illustration

NOTICE
In order for the pump to draw independently, the fluid level must be at least 50 mm (SP 7 Dirt Inox) or 7 mm (SP 6 Flat Inox).
The pump can pump up to a residual fluid height of 35 mm (SP 7 Dirt Inox) or 1 mm (SP 6 Flat Inox).
Automatic venting device
Illustration E
With a low fluid level, possibly drawn air or air that is present in the pump escapes via the automatic venting device. In addition, fluid may leak at this spot.
If the pump has suction problems with a low fluid level, unplug and plug in the mains plug repeatedly in order to support the suction process.
Automatic operation
Illustration

NOTICE
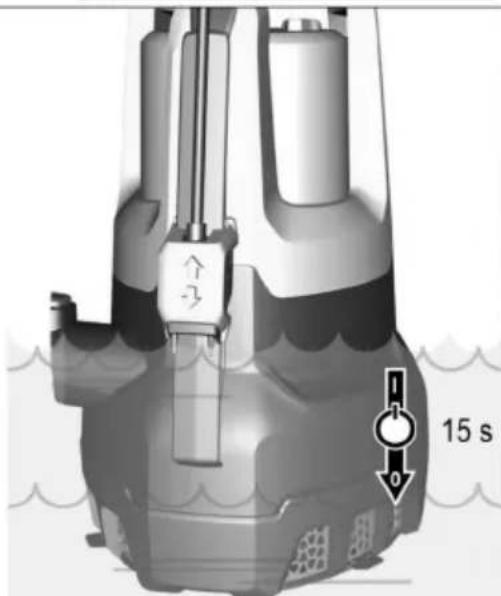
In the automatic mode, the level sensor automatically controls the pumping operations.
As soon as the level sensor has contact with the rising feed fluid the pump switches on.
The pump switches off as soon as the level sensor loses contact with the falling feed fluid and an after-running time of 15 s has passed.
Switching on:
Minimum fluid level required to enable the pump to suction independently (=minimum switch-on point):
SP 6 Flat Inox: 7 mm (57 mm when using the pre-filter)
SP 7 Dirt Inox: 50 mm
Highest adjustable switching height of the level sensor:
SP 6 Flat Inox: 190 mm without pre-filter (240 mm when using the pre-filter)
SP 7 Dirt Inox: 237 mm
Minimum residual fluid height/max. Extraction depth:
The pump can pump out up to a residual liquid height of SP 6 Flat Inox: 1 mm (without pre-filter, with folded base)
SP 7 Dirt Inox: 35 mm
NOTICE
It is recommended to use the pre-filter.
NOTICE
Ensure that the pump is level.
Otherwise it can happen that the level sensor does not lose the fluid contact and the pump runs dry.
→ Push the level sensor to the desired switch-on height (contact with feed fluid).
NOTICE
The higher the level sensor is adjusted, the higher the switch-on and switch-off point.
See the following table for application examples:
| Min / Max SP 6 Flat | Inox SP 7 Dirt | nox |
| Shaft with a diameter < of approx. 1 m (e.g. drainage) | Level sensor in the upmost position | Level sensor in the upmost position |
| It is recommended to use the pre-filter. | Pre-filter flaps closed (protec-tion against soil-ing) | |
| Float basin, pond (only SP 7 Flat In-ox) or something similar | Level sensor in the lowest position | Level sensor in the lowest position |
| Start pumping operations with pre-filter or folded out support legs | Pre-filter flaps closed (protec-tion against soil-ing) | |
| Continuation pumping operations without pre-filter and folded in support legs (residual fluid height 1 mm is reached)NotePerform in manual mode. Check the switch-off/shal-low suction. | - |
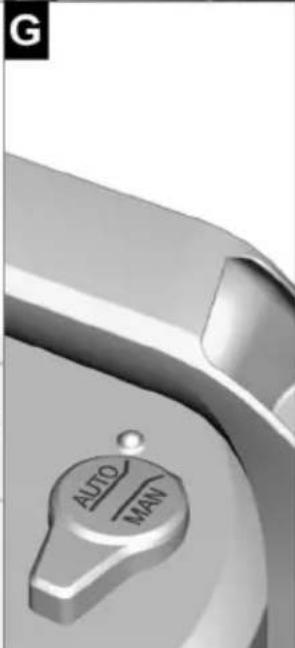
→ Set the switch to automatic mode (AUTO).
→ Insert the mains plug into the socket.
Manual operation
NOTICE
In manual operation the pump remains switched on continuously.
Illustration G
→ Set the switch to manual operation (MAN).
→ Insert the mains plug into the socket.
ATTENTION
Risk of damage! Dry running leads to increased wear; never leave the pump unattended during manual operation. Unplug immediately in case of dry running
Flat vacuuming (SP 6 Flat Inox)
It is recommended to use manual mode to reach the min. residual fluid height of 1 mm.
A check valve is installed for the SP 6 Flat Inox. This prevents residual fluid in the hose from flowing back after the pumping process finishes.
Finish operation
NOTICE
Soiling can deposit and lead to malfunctions.
→ Pump clear water or thoroughly rinse the pump after every use.
This especially applies after pumping chlorinated water or other liquids that leave residue.
→ Disconnect the main plug from the socket.
Maintenance
The pump is maintenance-free.
Transport
△CAUTION
In order to prevent accidents or injuries, keep in mind the weight of the appliance during transport (see Specifications).
→ Lift and carry the pump on the carrying handle.
→ If you want to transport the appliance on a vehicle secure it from slipping.
Storage
△CAUTION
In order to prevent accidents or injuries, keep in mind the weight of the appliance when selecting a storage location for it (see Specifications).
Storing the pump
→ Completely drain the pump and allow it to dry.
→ Store the pump in a frost-free place.
Special accessories
| 2.997-100.0 | Braided hose set | Flexible 1 1/4" braided hose with hose clamp (30 - 40 mm) with wing screw for a connection without tools.Especially recommendable for the immersion pumps when removing large water quantities.Max. operating pressure: 5 bar |
| 6.997-346.0 Spiral hose, by the meter, 25 m, 1" | By the meter for cutting hoses to individual lengths. | |
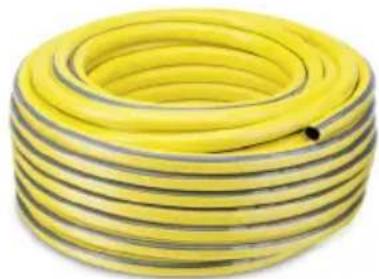
| 2.645-247.0 | Hose PrimoFlex, 50 m, 1" | Phthalate-free 1" garden hose for draining away the water. |
Troubleshooting
△DANGER
Risk of mortal danger on account of electric shock!
To avoid risks, all repairs and replacement of spare parts may only be carried out by the authorised customer service personnel.
| Fault Cause Remedy | ||
| Pump runs but does not transport Air | in the pump Unplug and plug in the mains | ins plug of the pump repeatedly until the fluid is drawn |
| Suction area blocked Pull out the mains | ins plug and clean the suction area | |
| Water level below the minimum fluid level | Immerse, whenever possible, the pump deeper into the feed fluid or proceed as described in Chapter Operation. | |
| Pump does not run or suddenly comes to a standstill during operations | Power supply interrupted Check fuses | and electrical connections |
| Thermal protection switch has switched off the pump due to over-heating | Pull out the mains plug, let the pump cool down, clean the suction area, prevent dry running | |
| Dirt particles have got jammed into the suction area | Pull out the mains plug and clean the suction area | |
| Level sensor stops pump Check the position of the level sensor and correct it if necessary.The pump stops 15 s after the level sensor has no water contact anymore. | ||
| The level sensor does not react as it is soiled | Clean the level sensor. | |
| Pumping capacity is reducing Suction | area blocked Pull out the mains plug and clean the suction area | |
| Pumping capacity too low The pumping | capacity depends on the flow height, hose diameter and hose length. | Observe the maximum delivery height, see technical data. If necessary, use a larger hose diameter or a shorter hose length. |
| Quick-Connect cannot be opened or closed. | Soiling in the plug system. | Remove and clean clip. |
| The pump is running although there is no water contact with the level sensor | The level sensor does not react as it is soiled | Clean the level sensor. |
| The switch is on manual operation (MAN) | Set the switch to automatic mode (AUTO). | |
| After-running time is extended. | Level sensor contaminated. | Clean level sensor. |
Specifications
| SP 6 Flat Inox SP 7 Dirt Inox | |||
| Mains voltage V 230 - 240 V | 230 V | ||
| Mains frequency Hz 50 50 | |||
| Output Pnom | W 550 750 | ||
| Max. flow rate l/h 14000 15500 | |||
| Max. pressure bar 0.9 0.8 | |||
| Max. flow height m 9 8 | |||
| Max. immersion depth | m | 7 7 | |
| Max. grain size of the dirt particles that can be transported | mm | 5 30 | |
| Minimum fluid height | mm | 7 50 | |
| Residual fluid height | mm | 1 35 | |
| Weight (without accessories) kg 5.7 6.7 | |||
| Length of connecting cable | m | 10 10 | |
Subject to technical modifications!

The possible delivery rate is even larger:
— the lower the delivery height
— the larger the diameter of the hose used
- the shorter the hose used
— the lower the pressure loss caused by the connected accessories

www.kaercher.com/REACH
www.kaercher.com/REACH
www.kaercher.com/REACH
www.kaercher.com/REACH
www.kaercher.com/REACH
www.kaercher.com/REACH
Pumpeoppbevaring ..... NO 3
Tilleggsutstyr NO 4
Feilretting NO 4
Tekniske data NO 5
Garanti
www.kaercher.com/REACH
SP 7 Dirt Inox (smussvannpumpe)
■ Vann med en tilsmussingsgrad med kornstørrelse inntil 30 mm
SP 6 Flat Inox (rentvannspumpe)
■ Vann med tilsmussing med kornstørrelse inntil 5 mm
⚠️FARE
Flat suging (SP 6 Flat Inox)
www.kaercher.com/REACH
www.kaercher.com/REACH
www.kaercher.com/REACH
Cihaz tanýmý
1 Şalter (Otomatik mod / Manüel mod)
2 T a ş i m a k o l u
www.kaercher.com/REACH
Описание прибора
www.kaercher.com/REACH
www.kaercher.com/REACH
Popis přístroje
www.kaercher.com/REACH
Opis naprave
www.kaercher.com/REACH
Opis urządzenia
www.kaercher.com/REACH
www.kaercher.com/REACH
Popis prístroja
www.kaercher.com/REACH
Opis uređaja
1 Prekidač (automatski način rada / ručni način rada)
2 Ručka za nošenje
3 Strujni kabel s utikačem
4 Šina (senzor razine)
5 Senzor razine
6 Automatski sklop za odzračivanje
7 Quick-Connect
www.kaercher.com/REACH
Opis uređaja
1 Prekidač (automatski / ručni način rada)
2 Ručka za nošenje
www.kaercher.com/REACH
Описание на уреда
Madala tasemega pumpamine (SP 6
Flat Inox) ET 3
Töö löpetamine ET 3
Tehnohooldus ET 3
Transport ET 3
Hoiustamine ET 3
Pumba säilitamine ..... ET 3
Erivarustus ET 4
www.kaercher.com/REACH
Seadme osad
SP 7 Dirt Inox (musta vee pump)
www.kaercher.com/REACH
Aparāta apraksts
www.kaercher.com/REACH
Prietaiso aprašymas
1 Jungiklis (automatinis / rankinis režimas)
2 Rankena nešimui
3 Elektros laidas su kištuku
4 Bégelis (lygio jutiklis)
5 Lygio jutiklis
www.kaercher.com/REACH
Опис пристрою
www.kaercher.com/REACH
Буйым сипаттамасы
www.kaercher.com/REACH
设备说明
1 开关 (自动运行 / 手动运行)
2 手柄
3 带插头的电源电缆线
4 导轨 (水平传感器)
5 水平传感器
6 自动通风装置
7 Quick-Connect
www.kaercher.com/REACH
AR ...... حم Representative
2.997-100.0
2.645-247.0

THANK YOU!
MERCI! DANKE! iGRACIAS!

Register your product and benefit from many advantages.
www.kaercher.com/welcome


Rate your product and tell us your opinion.
www.kaercher.com/dealersearch
Alfred Kärcher SE & Co. KG
Alfred-Kärcher-Str. 28-40
71364 Winnenden (Germany)
Tel.: +49 7195 14-0
Fax: +49 7195 14-2212


- CONTENTS
- WARRANTY
- ENVIRONMENTAL PROTECTION
- NOTE
- NOTES ABOUT THE INGREDIENTS (REACH)
- DESCRIPTION OF THE APPLIANCE
- PROPER USE
- NOTICE
- APPROVED FEED FLUIDS
- SP 7 DIRT INOX (WASTEWATER PUMP)
- SP 6 FLAT INOX (CLEAN WATER PUMP)
- DANGER
- START UP OPERATION
- ILLUSTRATION A
- ILLUSTRATION B
- ILLUSTRATION C
- ILLUSTRATION D
- △DANGER
- GENERAL
- ILLUSTRATION
- AUTOMATIC VENTING DEVICE
- ILLUSTRATION E
- AUTOMATIC OPERATION
- SWITCHING ON
- HIGHEST ADJUSTABLE SWITCHING HEIGHT OF THE LEVEL SENSOR
- MINIMUM RESIDUAL FLUID HEIGHT/MAX. EXTRACTION DEPTH
- MANUAL OPERATION
- ATTENTION
- FLAT VACUUMING (SP 6 FLAT INOX)
- FINISH OPERATION
- MAINTENANCE
- TRANSPORT
- △CAUTION
- STORAGE
- STORING THE PUMP
- TROUBLESHOOTING
- GARANTI
- SP 7 DIRT INOX (SMUSSVANNPUMPE)
- SP 6 FLAT INOX (RENTVANNSPUMPE)
- ⚠️FARE
- FLAT SUGING (SP 6 FLAT INOX)
- CIHAZ TANÝMÝ
- WWW.KAERCHER.COM/REACH
- ОПИСАНИЕ ПРИБОРА
- POPIS PŘÍSTROJE
- OPIS NAPRAVE
- OPIS URZĄDZENIA
- POPIS PRÍSTROJA
- OPIS UREĐAJA
- ОПИСАНИЕ НА УРЕДА
- SEADME OSAD
- SP 7 DIRT INOX (MUSTA VEE PUMP)
- APARĀTA APRAKSTS
- PRIETAISO APRAŠYMAS
- ОПИС ПРИСТРОЮ
- БУЙЫМ СИПАТТАМАСЫ
- 设备说明
- THANK YOU
- MERCI! DANKE! IGRACIAS
Brand : KARCHER
Model : SP 7 Dirt Inox
Category : Water pump