
RC4000 - Lawn mower robot KARCHER - Free user manual and instructions
Find the device manual for free RC4000 KARCHER in PDF.

| Product type | Indoor cleaning robot |
| Brand | KARCHER |
| Model | RC4000 |
| Components | Cleaning robot + charging and suction station |
| Robot dimensions | 280 x 105 mm (diameter x height) |
| Robot weight | 2.0 kg |
| Station dimensions | 500 x 250 x 230 mm |
| Station weight | 5.8 kg |
| Station power supply | 220-240 V ~ 50 Hz |
| Station suction power | 600 W |
| Robot battery voltage | 12 V |
| Battery capacity | 1.7 Ah (NiMH) |
| Runtime per charge | Up to 60 minutes |
| Charging time | 10-20 minutes (first charge up to 60 minutes) |
| Dust bin capacity (robot) | 0.2 L |
| Filter bag capacity (station) | 2 L |
| Noise level | 60 dB(A) (54 dB(A) in quiet mode) |
| Navigation method | Random with obstacle detection and anti-drop sensors |
| Cleaning programs | 4 automatic programs according to dirt level |
| Special modes | Silent mode, scheduled parking |
| Compatible surfaces | Hard floors (tile, parquet) and carpets (pile up to 20 mm) |
| Safety | Anti-drop sensors (4x), contact sensor, automatic stop on blocking obstacle |
| Maintenance | Cleaning and replacement of flat filter, rotating brush, batteries |
| Spare parts available | Filter bags (ref. 6.904-257.0), rotating brush (ref. 4.250-075.0), batteries (ref. 4.810-012.0) |
| Warranty | According to retailer's conditions |
Frequently Asked Questions - RC4000 KARCHER
User questions about RC4000 KARCHER
0 question about this device. Answer the ones you know or ask your own.
Ask a new question about this device
Download the instructions for your Lawn mower robot in PDF format for free! Find your manual RC4000 - KARCHER and take your electronic device back in hand. On this page are published all the documents necessary for the use of your device. RC4000 by KARCHER.
USER MANUAL RC4000 KARCHER
natural_image
Illustration of a cleaner machine with open lid and internal components (no text or symbols)| Deutsch | 5 |
| English | 19 |
| Français | 33 |
| Italiano | 48 |
| Nederlands | 62 |
| Español | 76 |
| Português | 91 |
| Dansk | 106 |
| Norsk | 120 |
| Svenska | 134 |
| Suomi | 148 |
| Ελληνικά | 162 |
| Türkçe | 177 |
| Русский | 191 |
| Magyar | 206 |
| Čeština | 220 |
| Slovenščina | 234 |
| Polski | 247 |
| Româneşte | 261 |
| Slovenčina | 275 |
| Hrvatski | 289 |
| Srpski | 303 |
| Български | 317 |
| Eesti | 332 |
| Latviešu | 346 |
| Lietuviškai | 360 |
| Українська | 374 |
Register and win! www.karcher.com
flowchart
graph TD
    A["Grid Layout"] --> B["Open Grid Layout"]
    style A fill:#f9f,stroke:#333
    style B fill:#bbf,stroke:#333
flowchart
graph TD
    A["Room 4"] --> B["Room 1"]
    B --> C["Room 2"]
    C --> D["Room 3"]
    D --> E["Room 4"]
    E --> F["Room 5"]
    F --> G["Room 6"]
    G --> H["Room 7"]
    H --> I["Room 8"]
    I --> J["Room 9"]
    J --> K["Room 10"]
    K --> L["Room 11"]
    L --> M["Room 12"]
    M --> N["Room 13"]
    N --> O["Room 14"]
    O --> P["Room 15"]
    P --> Q["Room 16"]
    Q --> R["Room 17"]
    R --> S["Room 18"]
    S --> T["Room 19"]
    T --> U["Room 20"]
    U --> V["Room 21"]
    V --> W["Room 22"]
    W --> X["Room 23"]
    X --> Y["Room 24"]
    Y --> Z["Room 25"]
flowchart
graph TD
    A["Room 5"] --> B["Window"]
    B --> C["Central Tower"]
    C --> D["Building Area"]
    D --> E["Directional Arrow"]
    E --> F["Arrow to Room"]
    style A fill:#f9f,stroke:#333
    style B fill:#ccf,stroke:#333
    style C fill:#cfc,stroke:#333
    style D fill:#fcc,stroke:#333
    style E fill:#ffc,stroke:#333
natural_image
Illustration of a hand operating a computer mouse next to a bowl (no text or symbols visible)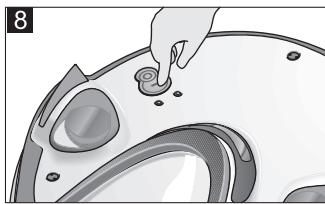
natural_image
Illustration of a hand placing a small component into a car dashboard (no text or symbols visible)Inhaltsverzeichnis
Bedienfeld Station (3)

S. Reiser
Head of Approbation
71364 Winnenden (Germany)
Tel.: +49 7195 14-0
Fax: +49 7195 14-2212
Winnenden, 2010/12/01
Description of the Appliance EN .. 3
Function and Mode of Operation ..... EN .. 3
Operating elements ... EN .. 4
Preparing for start-up ..... EN .. 4
Unpacking the Appliance EN .. 4
Installing the access ramp of the station.... EN .. 4
Installation Notes for the Station ..... EN .. 4
Operation.... EN .. 5
Preparation for cleaning EN .. 5
Tips and Tricks..... EN .. 5
Start up.... EN .. 6
Selecting the cleaning duration ..... EN .. 6
Quiet mode.... EN .. 7
Operating Programs... EN .. 7
Parking the cleaning robot EN .. 7
Terminate operation / switch off .... EN .. 7
Maintenance and care .... EN .. 7
Station for cleaning robot EN .. 7
Cleaning robot ..... EN .. 8
Technical specifications... EN .. 9
Station for cleaning robot EN .. 9
Cleaning robot ..... EN .. 9
Disposing of old device and battery pack. EN . . 9
Remove battery pack and dispose of.... EN .. 9
Troubleshooting ..... EN . 10
CE declaration ..... EN . 12
Helpline ..... EN . 12
Frequently Asked Questions EN . 13
General information
Dear Customer,
Please read and comply with these original instructions prior to the initial operation of your appliance and store them for later use or subsequent owners.
Proper use
The RoboCleaner consists of two units: a station and a battery-operated cleaning robot.
It is intended for the fully automated cleaning of the interior area and can be used on all common floor coverings for the autonomous, continuous routine cleaning.
■ This appliance has been designed for use in private households and is not intended for commercial use.
Use the RoboCleaner exclusively for:
– the cleaning of textile and hard floor coverings in private households.
Caution: To prevent scratches, test the appliance in an inconspicuous area first if you are working with very sensitive floor coverings (such as soft marble).
Do not use the RoboCleaner to clean the following:
- wet floor coverings,
- wash-rooms or other wet rooms,
- stairs,
- tabletops and shelves,
– cellars or attics,
– storage rooms, industrial buildings, etc. - in the open air
The manufacturer is not responsible for any damages that may occur on account of improper use or wrong operations.
Environmental protection

The packaging material can be recycled. Please do not place the package to the ordinary refuse for disposal, but ge for the proper recycling.

Old appliances contain valuable materials that can be recycled. Please arrange for the proper recycling of old appliances. Batteries and accumulators contain substances that must not enter the environment. Please dispose of your old appliances, batteries and accumulators using appropriate collection systems.
Disposing the filters and filter bags
Filters and filter bags are made from environment-friendly materials.
They can therefore be disposed off through the normal household garbage provided you have not sucked in substances that are not permitted to be thrown into household garbage.
Notes about the ingredients (REACH)
You will find current information about the ingredients at:
www.kaercher.com/REACH
Warranty
The warranty terms published by the relevant sales company are applicable in each country. We will repair potential failures of your appliance within the warranty period free of charge, provided that such failure is caused by faulty material or defects in manufacturing. In the event of a warranty claim please contact your dealer or the nearest authorized Customer Service centre.
Please submit the proof of purchase.
(See address on the reverse)
Safety instructions
The operation of this appliance is prohibited in rooms:
– protected by alarm systems or motion sensors,
- where the air contains inflammable gases of benzene, heating oil, paint thinner, solvents, kerosene, or spirit (risk of explosion),
– with a burning or glowing fire in an open fireplace without supervision,
– in rooms with burning candles without supervision,
⚠️ Danger
- The appliance may only be connected to alternating current. The voltage must correspond with the type plate on the appliance.
- Check the power cord with mains plug for damage before every use. If the power cord is damaged, please arrange immediately for the exchange by an authorised customer service or a skilled electrician.
- Never touch the mains plug and the socket with wet hands.
- Always hold the plug rather than the cable when disconnecting the power cord.
- Keep packaging film away from children - risk of suffocation!
Caution
- This device is not intended for use by persons (including children) with reduced physical, sensory or mental abilities or lacking experience and/or knowledge, unless they are supervised by a person responsible for their safety or are instructed by these persons on the use of the device. Children should be supervised, to ensure that they do not play with the device.
- Only use accessories and spare parts which have been approved by the KÄRCHER. The exclusive use of original accessories and original spare parts
ensures that the appliance can be operated safely and troublefree.
- The appliance should only be repaired by a qualified customer service technician.
- Switch the appliance off after every use and prior to every cleaning/maintenance procedure.
Caution
- The appliance contains rotary brush roller; please never touch them with the fingers or any other tool when the appliance is in operation!
- Do not leave children unattended in the same room while the cleaning robot is running.
- Do not stand or sit on the station/the cleaning robot.
– There is a risk of tripping by the roaming cleaning robot. - Objects may fall down if the cleaning robot bumps into them (this also applies to objects on tables or smaller pieces of furniture).
- The cleaning robot may get stuck in telephone cables, electrical cables, tablecloths, strings, belts, etc., which can lead to the dropping of objects.
Tips for charging the charging station and the cleaning robot
- The charging device located on the station must only be used to power the cleaning robot.
- The batteries of the cleaning robot may only be charged at the station's charging device.
- Short circuit hazard! Keep conductive objects (such as screwdrivers or similar) away from the charger contacts.
Description of the Appliance
Function and Mode of Operation
The RoboCleaner consists of two units: a station and a battery-operated cleaning robot.
Cleaning robot
The mobile cleaning robot is powered by built-in rechargeable batteries. If the battery is charged completely, the cleaning robot can clean up to 60 minutes.
The cleaning robot is connected to the station via infrared. If the battery charge weakens, the robot will seek out its station to get a charge. If it has to search for an extended time, the cleaning robot will shut off the cleaning units to save energy during its search.
The cleaning robot moves randomly, if it bumps into an obstacle, it changes its direction at a random angle. Then, it goes straight ahead until it bumps into the next obstacle.
The flat design of the cleaning robot allows it to also clean the floor underneath pieces of furniture, such as beds, sofas, cupboards, and wardrobes.
The cleaning robot works with optical sensors that detect stairs and steps and prevent the robot from falling down.
The cleaning robot provides 4 operating programmes that allow him to automatically adjust to the various degrees of dirt accumulation on the floor. These are controlled automatically by means of sensors located in the dirt receptacle, depending on the detected degree of dirt accumulation.
Station for cleaning robot
The station serves to charge the batteries of the cleaning robot and to suck off the dirt from the dirt receptacle of the cleaning robot. The dirt is collected in a filter bag (2 l). Once the charging process is completed, the robot autonomously leaves the station and continues the cleaning.
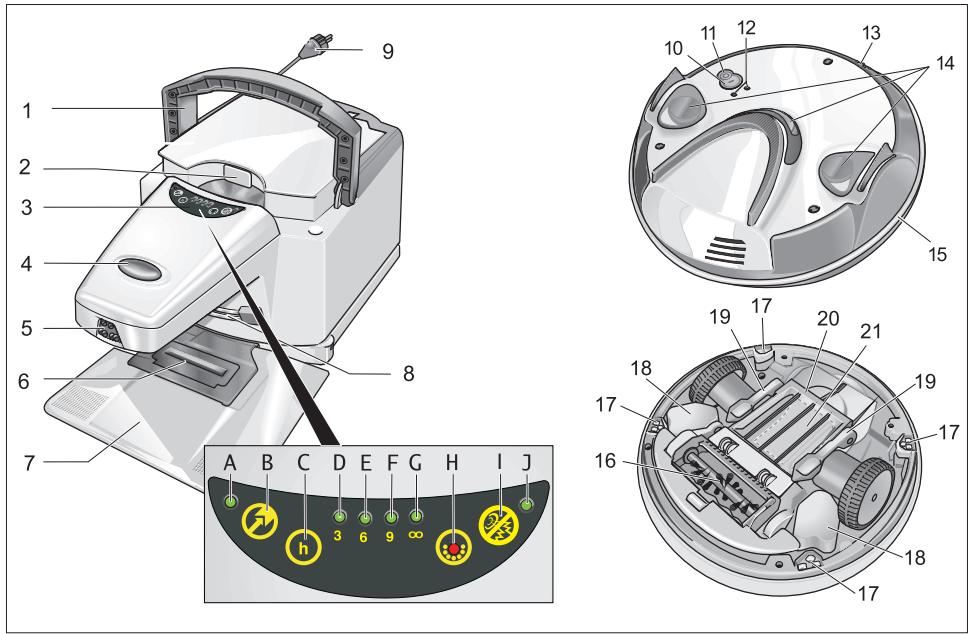
Operating elements
Illustrations on fold-out pages!
Station for cleaning robot
1 Transport handle, retractable
2 Recessed grip to open the filter cover
3 Operating panel of the station
4 ON/OFF switch of the station
5 IR sender
6 Suction hole
7 Access ramp for the cleaning robot (to dock onto the station)
8 Battery contacts
9 Power cord
Operating panel of station (3)
A Indicator lamp (green) - parking the cleaning robot
B "Parking the cleaning robot" button – ON/OFF
C "Select cleaning duration" button
D Indicator lamp (green) – 3 hours of cleaning
E Indicator lamp (green) – 6 hours of cleaning
F Indicator lamp (green) – 9 hours of cleaning
G Indicator lamp (green) - continuous cleaning
H Indicator lamp (red) - filter full
I Button "quiet mode" – ON/OFF
J Indicator lamp (green) – quiet mode
Cleaning robot
10 Button "Switch on cleaning robot"
11 Button "Switch off cleaning robot"
12 LEDs
(Green - operation / red - failure)
13 Battery contacts
14 IR receiver
15 Safety bumper
16 Brush roller
17 Optical sensors (4x)
18 Battery packs (2x)
19 Locking lever dirt receptacle (2x)
20 Cover of the dirt receptacle
21 Dirt receptacle
Preparing for start-up
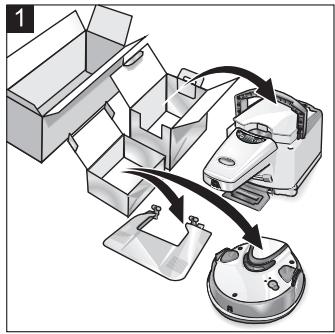
Unpacking the Appliance
The packaging material can be recycled. Please do not place the packaging into the ordinary refuse for disposal, but arrange for the proper recycling.
Illustration 1
→ When you unpack the system, check that everything is complete.
If there are any missing parts or you detect any transport damage when unpacking, please inform your dealer immediately.
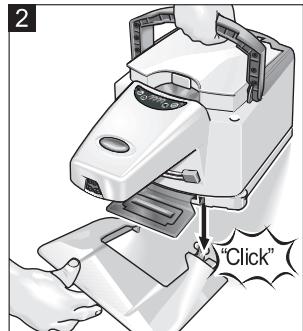
Installing the access ramp of the station
Illustration 2
→ Hold the access ramp tilted. Insert the cut-outs of the station into the pins of the access ramp.
→ Press the station and the access ramp downwards until the connection locks into place.
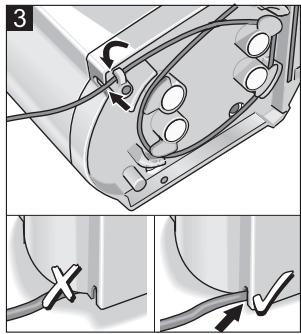
Installation Notes for the Station
When you select the location of the station, please make sure that the cleaning robot is very likely to pass the infrared beam again and again to easily find its way back to the station.
Illustration 3
→ Secure the power cord in the cable hooks. Please make sure that the power cord is guided through the opening in the housing.
Note: Uncoil the power cord only to the required length.
→ Place the station on a level surface.
Caution:
For galleries and steps, the interior corners must be protected, in case the drive-through height under the railing is higher than 10 cm.
→ Connect the mains plug to a suitable socket.
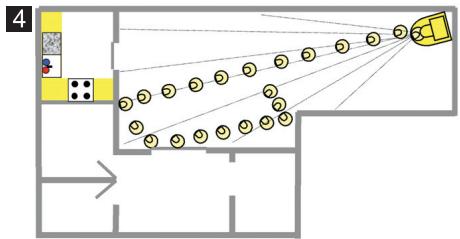
Cleaning a single room
Illustration 4
→ Set up the station in the room to be cleaned, e.g. as shown in the illustration.
Note: The appliance can be adjusted to changing room sizes by means of selecting the cleaning duration (see Chapter "Selecting the Cleaning Duration").
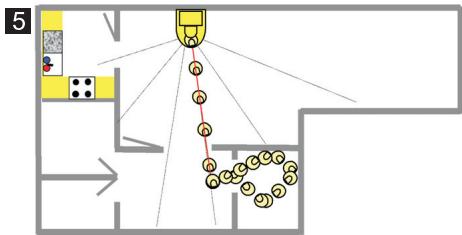
Cleaning a complete floor
Illustration 5
→ Select the site to set up the station so that the cleaning robot is able to reach several rooms.
Note: Adjust the required cleaning duration (see Chapter "Select cleaning duration").
Caution:
For galleries and steps, the interior corners must be protected, in case the drivethrough height under the railing is higher than 10 cm.
Note: The cleaning robot normally passes thresholds between rooms between 2 cm and 8 cm down but not up.
Operation
Preparation for cleaning
Caution:
Prior to using the cleaning robot, please make sure that there are no obstacles, such as on steps or thresholds.
Obstacles can be, for example:
– Newspapers, books, magazines, paper
- Clothes, toys, CDs
- Plastic bags
- Bottles, glasses
– Curtains hanging down on the floor
- Bathroom mats
The following objects are, for example, not considered obstacles:
– Single cables in the room
– Thresholds up to 1 cm high
- Carpet fringes that are shorter than 10 cm
Tips and Tricks
- Observe the cleaning robot during the initial cleaning process. Obstacles in the room that cannot be overcome by the appliance, should be removed ahead of time. This will avoid undesired interruptions.
■ Clean up the room just like you would if you were vacuuming prior to using the cleaning robot. Do not leave loose objects on the floor.
■ Tie up cables, strings, and curtains to prevent the robot from pulling them down.
If you store the appliance for more than 4 months, please make sure that the batteries are charged completely.
If you let the cleaning robot work while you are on the phone or watching TV, activate the "Quiet mode" on the station.
■ When cleaning a room, make sure all doors are closed.
■ When cleaning a whole level, make sure that the cleaning robot will not be able to travel behind doors.
If you want to move the cleaning robot to another place, it is recommended to turn off the robot when it is placed in the station for charging (after the evacuation of the dirt receptacle).
In order to become more familiar with the RoboCleaner, we recommend reading the Chapter "Frequently asked questions and answers" at the end of these instructions.
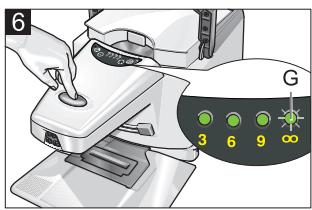
Start up
Illustration 6
→ Switch on the station.
The indicator lamp - continuous cleaning lights up.
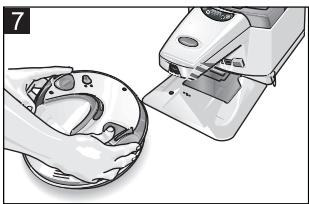
Illustration 7
→ Put the cleaning robot on the floor in front of the station.
Illustration 8
→ Switch on the cleaning robot.
Note: The cleaning robot will first travel to the station to empty the dirt receptacle and to check the charging state of the batteries. If required, the batteries are charged. Then, the cleaning robot starts its cleaning run.
| Indicator lamps on the cleaning robot | ||
| Green | Permanent light | Cleaning run |
| Blinks slowly | Cleaning robot is searching for the station | |
| Fast flashing | Batteries are charged | |
| Red | See Chapter "Troubleshooting" | |
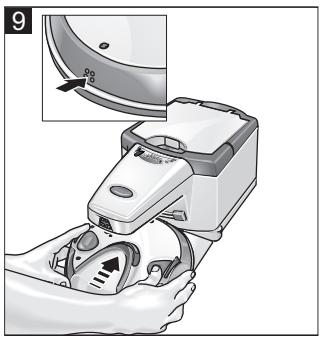
Operation after a long rest period or after a depleted battery
If the cleaning robot is turned on with completely empty batteries, the appliance is not operative. Perform the following steps to put the appliance into operation:
Illustration 9
→ Place the cleaning robot near the station, and press the battery contacts of the robot against the battery contacts of the station for approximately 60 seconds. This will evacuate the dirt receptacle.
→ Place the cleaning robot at a distance of 50 cm in front of the station, and turn it on.
Note: The cleaning robot autonomously goes to the station and is charged. The charge will take about 60 minutes.
Selecting the cleaning duration
Select the cleaning duration on the station using the following table. (Basic setting: continuous operation).
Illustration 10
→ Press the “Select cleaning duration” button until the desired cleaning duration is set.
Note: The indicator lamps indicate the selected cleaning duration.
| Selecting the cleaning duration | |
| Press once | Cleaning duration 3 hours for rooms smaller than 45 m^2 |
| Press twice | Cleaning duration 6 hours for rooms between 45 and 90 m^2 |
| Press three times | Cleaning duration 9 hours for rooms between 80 and 135 m^2 |
| Press four times | back to continuous operation (basic setting) |
The cleaning process will start. If the selected cleaning duration has elapsed, the cleaning robot is emptied and charged and then comes to a standstill in front of the station.
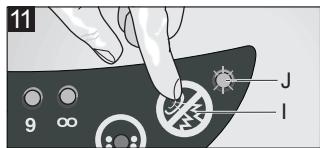
Quiet mode
Ideal for cleaning runs during the night or if you are at home.
Illustration 11
→ Press the "Quiet mode" button.
The indicator lamp lights up. The station empties the cleaning robot, works for 8 hours with a reduced noise level and a reduced performance. Then, the station returns to normal operation.
Operating Programs
The cleaning robot provides of four operating programmes that allow him to automatically adjust to the various degrees of dirt accumulation on the floor. The dirtier the floor, the more extensive the cleaning performed by the robot.
The selection of the operating programme is automatically controlled by sensors located in the dirt receptacle. The selection is made according to the detected degree of dirt accumulation. This selection is made automatically and is not displayed.
If the degree of dirt accumulation has been reduced, the 1st operating programme is selected again.
| Operating Programmes of the cleaning robot | |
| 1 | Normal cleaningRobot runs according to the random method at normal speed. |
| 2 | Individual spot with normal degree of contaminationRobot slowly moves across the dirty area. |
| 3 | Individual, more contaminated spotRobot slowly runs forward/backwards across the dirty area. |
| 4 | Extensive, very dirty areaRobot runs slowly and radially across the dirty area describing a star. |
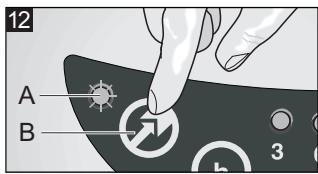
Parking the cleaning robot
If the cleaning robot should terminate its work after the subsequent charging process: Illustration 12
→ Press the “Parking the cleaning robot” button.
The indicator lamp lights up.
Note: After its next return to the station, the cleaning robot is emptied and charged. Then, the robot is turned off and comes to a standstill in front of the station.
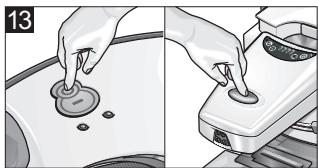
Terminate operation / switch off
If you want the cleaning robot to immediately interrupt the cleaning, i.e., if you want to move the appliance to a different location: Illustration 13
→ Switch off the cleaning robot.
→ Then, switch off the station.
Note:
If you do not want to use the cleaning robot for a longer period of time, allow the batteries to charge completely (see Chapter "Start-up").
Maintenance and care
Caution:
Turn off the station and the cleaning robot before performing any maintenance work!
Station for cleaning robot
Exchanging the filter bag of the station
The filter bag needs to be replaced when the red indicator lamp - filter full - is illuminated.
Illustration 14
→ Open the filter cover.
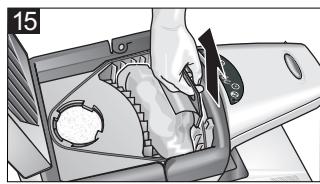
Illustration 15
→ Pull the filterbag upwards by the flap to remove it from its holder. Place the filter bag into the ordinary refuse for disposal.
Spare filter bag kit: (5 filter bags, 1 motor protection filter)
Order number: 6.904-257.0
Illustration 16
→ Push the new filter bag all the way into the holder.
Caution: Never operate the appliance without a filter bag!
→ Close the filter cover.
Exchange the motor protection filter
Illustration 17
→ If you have replaced the filter bag 5 times, also exchange the motor protection filter (included in the spare filter bag kit).
Cleaning robot
Cleaning the wheels
→ Clean the running surfaces of the wheels when these become dirty. Dirt particles (such as sand, etc.) can collect on the running surface and damage sensitive, smooth floor surfaces.
Begin all maintenance work on the cleaning robot with the following steps:
→ Empty the dirt receptacle; see Chapter "Start-up".
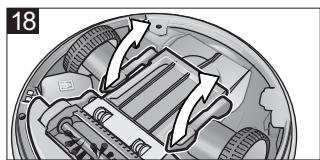
→ Opening the dirt receptacle:
Rotate the cleaning robot and place it on a soft surface.
Illustration 18
Open both locking levers of the dirt receptacle.
Illustration 19
Remove the cover of the dirt receptacle.
Cleaning the flat filter
Clean the flat filter in the cleaning robot every time you exchange the filter bag in the station.
→ Empty the dirt receptacle and open it (refer to the description above).
Illustration 20
→ Remove the flat filter from the dirt receptacle.
→ Shake out the flat filter, or clean it using a small soft brush.
Illustration 21
→ Reinsert the flat filter, the flaps should point toward the locking lever.
Remove, clean, replace and install the brush roller
→ Empty the dirt receptacle and open it (refer to the description above).
■ Remove the brush roller
Illustration 22
→ Pull the brush roller out of the right guide. Afterwards, pull the brush roller out of the lateral holder.
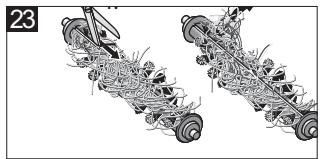
■ Cleaning the brush roller
The dirty brush roller is automatically cleaned during each cleaning operation in the station. You can manually remove remaining hairs and wrapped up threads. Illustration 23
→ Use a pair of scissors to cut along the cutting edge of the brush roller.
→ Remove the wrapped up threads and hairs.
■ Replacing the brush roller
→ Replace the brush roller when its bristles are worn out.
Order number: 4.250-075.0
Spare brush roller:
Illustration 24
■ Install the brush roller
→ Insert the brush roller first into the left holder.
→ Then press the brush roller into the right hand side holder with the hook facing down; ensure that it locks into place.
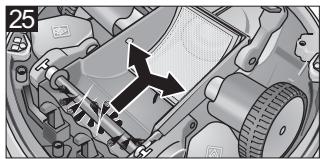
Clean dust sensors
→ Empty the dirt receptacle and open it (refer to the description above).
Illustration 25
→ Clean the dust sensors using a soft cloth or a soft paintbrush.
Finish all maintenance work on the cleaning robot with the following steps:
→ Installing the dirt receptacle cover:
Illustration 26
Put the cover onto the dirt receptacle.
Illustration 27
Close both locking levers.
In addition, press on the front side of the cover to ensure the dirt receptacle is closed safely.
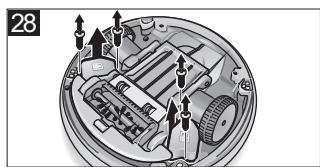
Exchanging the batteries
Illustration 28
→ Release the two screws on the two batteries, and remove the old batteries.
→ Insert the new batteries, and fasten them with the screws.
Spare battery pack (1 ea.):
Order number: 4.810-012.0
Technical specifications
Station for cleaning robot
| Operating voltage | 220 - 240 V |
| 1~50 Hz | |
| Cleaning power | 600 W |
| Sound level (quiet mode) | 60 (54) dB(A) |
| Filter bag volume | 2 l |
| Dimensions | 500 x 250 x 230 mm |
| Weight | 5.8 kg |
Cleaning robot
| Battery voltage | 12 V |
| Battery capacity | 1.7 Ah |
| Battery type | NiMH |
| Battery charge time | 10 - 20 min |
| Cleaning duration per battery charge up to | 60 min |
| Dirt receptacle volume | 0.2 l |
| Dimensions | 280 x 105 mm |
| Weight | 2.0 kg |
Disposing of old device and battery pack
The cleaning robot includes two built-in battery packs; please remove these before disposing of the old appliance.
→ Please arrange for the proper disposal of the old appliance.
Remove battery pack and dispose of
→ Remove both battery packs of the cleaning robot; see Chapter "Replace batteries".
→ Dispose of the batteries properly (at a collection site or the dealer).
Danger!
Do not open the battery, as there is a risk of an electrical short; also, irritating or caustic vapors can escape.
Do not expose the battery to direct sunlight, heat or fire, there is a risk of explosion.
Troubleshooting
| Indicator lamp displays: | ||
| Green | Permanent light | Normal operating state |
| Blinks slowly | Cleaning robot is searching for the station | |
| Fast flashing | Batteries are charged | |
| Red | Fast flashing | Cleaning robot is stuck |
| Blinks slowly | Cleaning robot is dirty | |
| Red | Permanent light | Contact authorised Customer Service! |
| Problem | Display | Consequence | Remedy |
| Cleaning robot does not find its way out of niches between pieces of furniture | Red Fast | Cleaning robot comes to a halt. | Move furniture if necessary.Switch the cleaning robot off and remove it from in between the furniture.Place it back on the floor and switch it on. |
| Gently rising furniture | Red Fast | Cleaning robot gets stuck and stops | Turn off the cleaning robot and remove it from the object on which it got stuck.Place it back on the floor and switch it on. |
| Cleaning robot got stuck underneath items of furniture | Red Fast | Cleaning robot comes to a halt. | Switch the cleaning robot off and release it.Place it back on the floor and switch it on. |
| Loose objects have been taken up by the brush roller and are now blocking the brush | Red Slowly | Cleaning robot comes to a halt. | Switch the cleaning robot off and turn it around.Carefully remove the blocking objects; loose objects include: Toys, clothes, ... |
| Cleaning robot comes to a halt after charging/vacuuming process | Red Slowly | Dirt receptacle is full | Empty and clean the dirt receptacle. |
| Red Slowly | Brush roller is too dirty | Clean the brush roller. | |
| Red Slowly | Brush roller is blocked | Carefully remove blocking objects from the brush roller. | |
| Red Slowly | Brush roller has not been inserted correctly | Check the seat of the brush roller. | |
| Red Slowly | Suction outlet of the station is clogged | Check the suction outlet of the station and clean it, if necessary. | |
| Cleaning robot runs unevenly on carpets, bobs up and down | Green Perma-nent light | Uneven cleaning | This is normal on deep-piled carpets >20 mm. |
| Cleaning robot only runs in star-shaped pattern | Green Perma-nent light | Only a specific area/location is cleaned | Clean the dust sensors using a soft cloth or a soft paintbrush. |
| Cleaning robot cannot find the station | Green Slowly | Station is place in an unfavourable location in the room | Reposition the station, observe installation instructions. |
| Cleaning robot does not dock onto the station | Green Slowly | Cleaning robot is not vacuumed | Check the seating of the cover of the dirt receptacle. Place the station on a level surface.Install the access ramp of the station. |
| Cleaning robot has absorbed wet dirt | - | The brush roller and the flat filter in the cleaning robot are glued | Remove the brush roller and the flat filter and clean them thoroughly.Caution: Do not install a wet filter. |
| Cleaning robot makes a creaking sound during the cleaning process | - | Bad cleaning result | Brush roller is not seated correctly.Switch the cleaning robot off and check its seating. |
| Bad cleaning result | - | Brush roller worn | Replace the brush roller. |
| Cleaning robot blocked in station | Station: All LEDs blink | The cleaning robot remains in the station after the charging process is complete. | Remove the object blocking the appliance. Switch the station off and back on.Contact authorised Customer Service! |
| Internal or external short circuit of the charger contact strips | Station: All LEDs blink | - | Contact authorised Customer Service! |
CE declaration
We hereby declare that the machine described below complies with the relevant basic safety and health requirements of the EU Directives, both in its basic design and construction as well as in the version put into circulation by us. This declaration shall cease to be valid if the machine is modified without our prior approval.
Product: Robo Cleaner
Type: RC 4.000
Relevant EU Directives
2006/95/EC
2004/108/EC
Applied harmonized standards
EN 55014-1: 2006 + A1: 2009
EN 55014-2: 1997 + A2: 2008
EN 60335-1
EN 60335-2-2
EN 61000-3-2: 2006 + A2: 2009
EN 61000-3-3: 2008
EN 62233: 2008
Applied national standards
Year of CE marking
2004
The undersigned act on behalf and under the power of attorney of the company management.
H. Jenner
CEO
S. Reiser
Head of Approbation
Authorised Documentation Representative S. Reiser
71364 Winnenden (Germany)
Phone: +49 7195 14-0
Fax: +49 7195 14-2212
Winnenden, 2010/12/01
Helpline
Karcher (UK) Limited operate a helpline allowing customers to discuss any problems experienced with our products.
The helpline operates during normal business hours, if you have difficulty getting through, please understand that there are peak periods during the day when our consultants are unable to take all calls coming in. In these circumstances we would ask that you try to contact us again later in the day.
The helpline number is 01295 752200, open from 8.30am to 5.00pm Monday to Friday.
It helps us if you have the model number and data plate details to hand before making your call.
Alternatively you may write or E-mail to the address below:
Karcher (UK) Limited
Karcher House
Beaumont Road
Banbury
Oxon, OX16 1TB
E-mail:
info@karcher.co.uk
Frequently Asked Questions
Which floor coverings is the robot suitable for?
The robot can be used on all common surfaces, such as carpets and hard surfaces (tiles, parquetry, etc.). With respect to extremely deep-piled carpets (> 20 mm), specific restrictions apply. The moving sweeping edge is automatically adjusted to different floor coverings.
Is it difficult to clean underneath pieces of furniture?
No. Due to its compact and flat design the robot is able to clean underneath pieces of furniture, such as beds, sofas, and wardrobes.
How does the robot transport the absorbed dirt to the station?
The robot is equipped with a dirt receptacle that is regularly emptied by the station.
How is the dirt absorbed in the station?
In the station, the dirt is collected in a conventional filter bag (2 litres).
The exchange intervals are flexible and are reported to the user in a timely manner by means of a indicator lamp on the display.
How much dirt can the robot absorb?
In case of a normal degree of soiling, the dirt receptacle is sufficient for one hour of cleaning. If this should not be sufficient in the individual case, the robot simply returns to the station earlier, disposes of the dirt and carries on working.
How is the absorption of dirt in the robot performed?
The dirt is swept into the dirt receptacle of the robot by means of vacuum-supported sweeping.
Can the robot clean in the apartment / house without supervision?
Yes, this is possible without any problems. The robot is an autonomous system and does not require any intervention. The dirt receptacle is emptied at the station.
How long does it take until the robot is charged or operative?
The charging time is between 15 and 60 minutes according to the charging state of the battery before the charging. In case of the initial operation, the robot certainly has the longest charging time.
At which speed does the robot move?
By default, the robot runs at 20 cm per second. If it cleans very dirty spots, the speed is reduced by half to intensify the cleaning. The same applies to the final approach to the station to allow the robot to precisely manoeuvre in.
How many square meters can the robot clean within one hour?
The robot can clean up to 15 qm per hour. Many spots, in particular the frequently used paths are cleaned repeatedly from different directions.
How does the robot know when it must return to the station?
The robot returns to the station as soon as the battery voltage has reached a specific level or if the dirt receptacle is full.
How long does it take to empty the robot at the station?
The process takes approximately 30 seconds.
Where is the robot programmed? What do I have to pay attention to?
The robot can only be turned on or off. You can select the cleaning duration at the station. In addition, you can specify that the robot should not leave the station after the next approach to the station (parking function).
According to which principle does the robot move?
The robot moves through the room according to the random principle. If he bumps into an obstacle, it turns at any angle and then goes straight until it bumps into the next obstacle.
Which tools are present that help the robot to cope with obstacles?
The robot is equipped with sensors that detect stairs and prevent the robot from falling down.
Using a special carpet fringe program the robot does not get stuck in carpet fringes.
Thanks to the different angles, it also finds it way out of narrow corners.
What is the most efficient way to operate the robot (individual rooms, entire apartment)?
It is most efficient to let the robot clean individual rooms, i.e. station and robot are located within the same room. This reduces the searching time during the return to the station, the share of the effective cleaning time is, therefore, the highest possible.
If you want to clean entire floors, the station should be placed at a central spot of the apartment to enable the robot to easily return to the station.
Are corners cleaned without any problems (the robot is round)?
No, but due to the continuous cleaning, the formation of dirt is substantially reduced.
Thus, an accumulation of dirt in corners is effectively avoided.
What happens at stairs/steps?
Stairs: The robot works with optical sensors that detect half-landings and signal the robot that it must change its direction.
Steps: The robot is able to deal with hard steps up to 10 mm and soft steps up to 20 mm in both directions.
Caution:
Do not leave loose objects (e.g.: newspapers, clothing) on stairs or steps, as this will inhibit the function of the sensors. – Risk of falling!
Can the furniture etc. be damaged?
No. Damages of the items of furniture can be excluded.
Please note, however, the lightweight and fragile objects may be touched and moved by the robot. Objects that are equipped with a cable, may be pulled down from furniture (e.g. telephone). It is important to prepare the room in such a manner that it is suitable for robots.
How do pets react to the robot?
As the robot is not noisy and does not work with ultrasound, problems with pets are not to be expected. The self-movement behaviour only arises the mistrust of the pets.
What is important with respect to children?
The robot should not be left unattended if children are playing in the same room. Mechanical damages are likely if children sit on the robot while it is in operation.
Why does the robot stop in some situations?
The robot is only able to get out of tricky situations to a certain degree. Piled cables can induce him to hopeless manoeuvres. In this case the robot turns off automatically after a specific period of time. The red signal on the robot lights up quickly.
The best solution is to place the robot on a free area and turn it off and on again. Then, it continues its cleaning run without problems.
How do I transport my robot properly?
You can lift the robot from the floor using both hands, or you carry it by putting one hand into the relief of the brush.
What happens if the robot has swept up wet dirt?
As a result, the filter becomes blocked. You have to remove the filter from the robot and clean it (see Chapter "Cleaning flat filter").
What happens if the robot gets stuck while I am not at home?
Nothing can happen. The robot stops at this point and displays the signal for being stuck. If no more light is blinking, the batteries are depleted and must be recharged.
Table des matières
www.kaercher.com/REACH
Garantie
Zone de commande station (3)
71364 Winnenden (Germany)
www.kaercher.com/REACH
Garanzia

S. Reiser
Head of Approbation
71364 Winnenden (Germany)
Tel.: +49 7195 14-0
Fax: +49 7195 14-2212
Winnenden, 2010/12/01
www.kaercher.com/REACH
Garantie
Product: Robo Cleaner
Type: RC 4.000
71364 Winnenden (Germany)
Tel.: +49 7195 14-0
Fax: +49 7195 14-2212
Winnenden, 2010/12/01
www.kaercher.com/REACH
Garantía

S. Reiser
Head of Approbation
71364 Winnenden (Germany)
Tfno.: +49 7195 14-0
Fax: +49 7195 14-2212
Winnenden, 2010/12/01
www.kaercher.com/REACH
Garantia

S. Reiser
Head of Approbation
71364 Winnenden (Germany)
Tel.: +49 7195 14-0
Fax: +49 7195 14-2212
Winnenden, 2010/12/01
www.kaercher.com/REACH
Garanti
Betjeningsfelt station (3)
A Kontrollampe (grøn) - parkering af renserobotten
B Knap "Parkèr robotten" - Til/Fra
C Knap "Vælg rensetid"
D Kontrollampe (grøn) – 3 timers rensning
E Kontrollampe (grøn) – 6 timers rensning
F Kontrollampe (grøn) – 9 timers rensning
G Kontrollampe (grøn) - permanent rensning
H Kontrollampe (rød) – filter fyldt
I Tast „stille drift (Quiet mode)“ – Til/Fra
J Kontrollampe (grøn) - stille drift
Renserobot
Stille drift (Quiet mode)

S. Reiser
Head of Approbation
71364 Winnenden (Germany)
Tlf.: +49 7195 14-0
Fax: +49 7195 14-2212
Winnenden, 2010/12/01
www.kaercher.com/REACH
Garanti
Forberedelser for drift
Pakke ut maskinen
Materialet i emballasjen kan resirkuleres. Ikke kast emballasjen i husholdningsavfallet, men lever den inn til resirkulering.
Figur 1
Stille drift (Quiet mode)
Ideellt for rengjøring om natten, eller när du selv er tilstede.
Figur 11
71364 Winnenden (Germany)
Tlf: +49 7195 14-0
Winnenden, 2010/12/01
www.kaercher.com/REACH
Garanti
Tyst drift (Quiet mode)

S. Reiser
Head of Approbation
71364 Winnenden (Germany)
Tel.: +49 7195 14-0
Fax: +49 7195 14-2212
Winnenden, 2010/05/01
www.kaercher.com/REACH
Takuu
S. Reiser
Head of Approbation
71364 Winnenden (Germany)
Puh.: +49 7195 14-0
Winnenden, 2010/12/01
www.kaercher.com/REACH
Εγγύηση
71364 Winnenden (Germany)
Tηλ.: +49 7195 14-0
Φαξ: +49 7195 14-2212
Winnenden, 2010/12/01

S. Reiser
Head of Approbation
71364 Winnenden (Germany)
Tel.: +49 7195 14-0
Winnenden, 2010/12/01
www.kaercher.com/REACH
Гарантия

S. Reiser
Head of Approbation
71364 Winnenden (Germany)
Тел.: +49 7195 14-0
Факс: +49 7195 14-2212
Winnenden, 2010/12/01
www.kaercher.com/REACH
Garancia

S. Reiser
Head of Approbation
71364 Winnenden (Germany)
Tel.: +49 7195 14-0
Fax: +49 7195 14-2212
Winnenden, 2010/12/01
www.kaercher.com/REACH
Záruka
71364 Winnenden (Germany)
Tel.: +49 7195 14-0
Fax: +49 7195 14-2212
Winnenden, 2010/12/01
www.kaercher.com/REACH
Garancija
S. Reiser
Head of Approbation
71364 Winnenden (Germany)
Tel.: +49 7195 14-0
Winnenden, 2010/07/01
Pogosto postavljena vpraša- nja in odgovori
www.kaercher.com/REACH
Gwarancja
S. Reiser
Head of Approbation
71364 Winnenden (Germany)
tel.: +49 7195 14-0
faks: +49 7195 14-2212
Winnenden, 2010/07/01
Mult stimate client,

www.kaercher.com/REACH
Garantie
Directive EG respectate:
2006/95/CE
2004/108/CE
Norme armonizate utilize:
EN 55014-1: 2006 + A1: 2009
EN 55014-2: 1997 + A2: 2008
EN 60335-1
EN 60335-2-2
EN 61000-3-2: 2006 + A2: 2009
EN 61000-3-3: 2008
EN 62233: 2008
71364 Winnenden (Germany)
Tel.: +49 7195 14-0
Fax: +49 7195 14-2212
Winnenden, 2010/12/01
www.kaercher.com/REACH
Záruka

S. Reiser
Head of Approbation
71364 Winnenden (Germany)
Tel: +49 7195 14-0
Fax: +49 7195 14-2212
Winnenden, 2010/12/01
www.kaercher.com/REACH
Jamstvo
71364 Winnenden (Germany)
Tel.: +49 7195 14-0
www.kaercher.com/REACH
Garancija
U svakoj zemlji važe garantni uslovi koje je izdala naša nadležna distributivna organizacija. Eventualne smetnje na uređaju za vreme trajanja garancije uklanjamo besplatno, ukoliko je uzrok greška u materijalu ili proizvodnji. U slučaju koji podleže garanciji obratite se sa potvrdom o kupovini Vašem prodavcu ili najbližoj ovlašćenoj servisnoj službi. (Adresu ćete naći na poleđini)
Sigurnosne napomene
Zabranjen je rad u prostorijama:
- u kojima su instalirani alarmni sistemi ili detektori pokreta.
- u kojima vazduh sadrži zapaljiva isparenja benzina, ulja za loženje, razređivača, rastvarača, petroleja ili špiritusa (opasnost od eksplozije).
– sa vatrom ili žarom u otvorenom kaminu bez nadzora.
– sa svećama koje gore bez nadzora.
⚠️ Opasnost
- Uređaj priključujte samo na izmeničnu struju. Napon se mora podudarati sa tipskom pločicom uređaja.
- Pre svake upotrebe proverite da li na strujnom kablu sa utikačem ima oštećenja. Oštećen strujni kabl odmah dajte na zamenu ovlašćenoj servisnoj službi/električaru.
– Strujni kabl i utičnicu nikada ne dodirujte vlažnim rukama. - Kabl držite direktno za utikač i ne vucite za kabl kako biste ga izvadili iz utičnice.
- Ambalažne folije čuvajte van dohvata dece, jer postoji opasnost od gušenja!
⚠️ Pažnja

S. Reiser
Head of Approbation
71364 Winnenden (Germany)
Tel.: +49 7195 14-0
Winnenden, 2010/12/01
www.kaercher.com/REACH
Гаранция
S. Reiser
Head of Approbation
71364 Winnenden (Germany)
Тел.: +49 7195 14-0
Факс: +49 7195 14-2212
Виненден, 2010/12/01
www.kaercher.com/REACH
Garantii

S. Reiser
Head of Approbation
71364 Winnenden (Germany)
Tel: +49 7195 14-0
Winnenden, 2010/07/01
www.kaercher.com/REACH
Garantija

S. Reiser
Head of Approbation
71364 Winnenden (Germany)
Tālr.: +49 7195 14-0
Fakss: +49 7195 14-2212
Winnenden, 2010/12/01
www.kaercher.com/REACH
Garantija
71364 Winnenden (Germany)
Tel.: +49 7195 14-0
Faksas: +49 7195 14-2212
Winnenden, 2010/12/01
www.kaercher.com/REACH
Гарантія
S. Reiser
Head of Approbation
71364 Winnenden (Germany)
Тел.: +49 7195 14-0
Факс: +49 7195 14-2212
natural_image
Illustration of a hand using a device to press or install a circular component, with an inset showing the device's rotation (no text or symbols present)
natural_image
Two-step illustration showing a hand pressing down on a circular object into a container, with no visible text or symbols.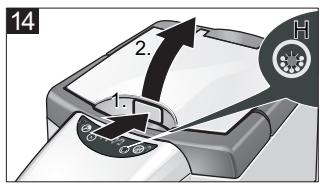
natural_image
Illustration of a hand using a tool to clean or store items on a machine (no text or symbols visible)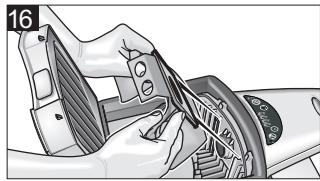
natural_image
Illustration of a hand gripping a mechanical component, possibly a steering wheel or gear, with no visible text or symbols.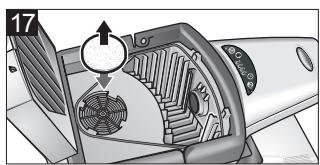
natural_image
Diagram of a mechanical device with internal components and directional arrows, no readable text or symbols present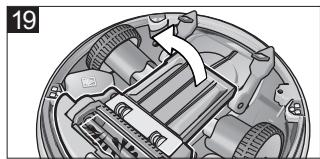
natural_image
Mechanical assembly diagram showing internal components and a directional arrow (no text or symbols)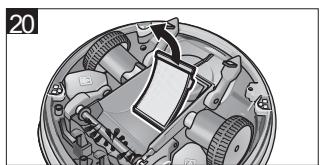
natural_image
Mechanical assembly diagram showing internal components and a paper airplane (no text or labels)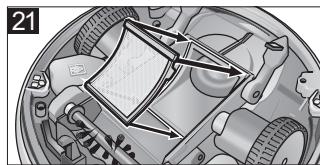
natural_image
Mechanical assembly diagram showing internal components and motion arrows (no text or labels)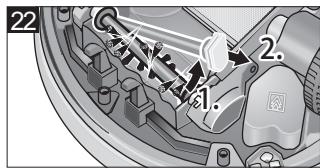
natural_image
Mechanical assembly diagram showing two vehicle chassis with motors and wheels (no text or labels)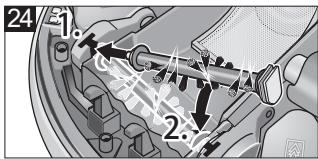
natural_image
Mechanical assembly diagram showing gear and motor components with directional arrows (no text or labels)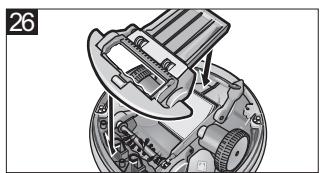
natural_image
Mechanical assembly diagram showing a gear and housing component (no text or labels)
natural_image
Mechanical assembly diagram showing internal components with arrows indicating motion (no text or labels)
natural_image
Icon of a gear and wrench inside a square frame (no text or symbols)- Inhaltsverzeichnis
- Bedienfeld Station (3)
- General information
- Dear Customer,
- Proper use
- The RoboCleaner consists of two units: a station and a battery-operated cleaning robot.
- Environmental protection
- Disposing the filters and filter bags
- Notes about the ingredients (REACH)
- Warranty
- Safety instructions
- The operation of this appliance is prohibited in rooms:
- ⚠️ Danger
- Caution
- Tips for charging the charging station and the cleaning robot
- Description of the Appliance
- Function and Mode of Operation
- Cleaning robot
- Station for cleaning robot
- Operating elements
- Illustrations on fold-out pages!
- Operating panel of station (3)
- Preparing for start-up
- Unpacking the Appliance
- Illustration 1
- Installing the access ramp of the station
- Illustration 2
- Installation Notes for the Station
- Illustration 3
- Caution:
- Cleaning a single room
- Illustration 4
- Cleaning a complete floor
- Illustration 5
- Operation
- Preparation for cleaning
- Obstacles can be, for example:
- The following objects are, for example, not considered obstacles:
- Tips and Tricks
- Start up
- Illustration 6
- Illustration 7
- Illustration 8
- Operation after a long rest period or after a depleted battery
- Illustration 9
- Selecting the cleaning duration
- Illustration 10
- Quiet mode
- Operating Programs
- Parking the cleaning robot
- Terminate operation / switch off
- Note:
- Maintenance and care
- Exchanging the filter bag of the station
- Illustration 16
- Exchange the motor protection filter
- Illustration 17
- Cleaning the wheels
- Begin all maintenance work on the cleaning robot with the following steps:
- Cleaning the flat filter
- Illustration 20
- Illustration 21
- Remove, clean, replace and install the brush roller
- ■ Remove the brush roller
- Illustration 22
- ■ Cleaning the brush roller
- Spare brush roller:
- Illustration 24
- ■ Install the brush roller
- Clean dust sensors
- Illustration 25
- Finish all maintenance work on the cleaning robot with the following steps:
- Exchanging the batteries
- Illustration 28
- Technical specifications
- Disposing of old device and battery pack
- Remove battery pack and dispose of
- Danger!
- Troubleshooting
- CE declaration
- Relevant EU Directives
- Applied harmonized standards
- Applied national standards
- Year of CE marking
- Helpline
- Alternatively you may write or E-mail to the address below:
- Frequently Asked Questions
- Which floor coverings is the robot suitable for?
- Is it difficult to clean underneath pieces of furniture?
- How does the robot transport the absorbed dirt to the station?
- How is the dirt absorbed in the station?
- How much dirt can the robot absorb?
- How is the absorption of dirt in the robot performed?
- Can the robot clean in the apartment / house without supervision?
- How long does it take until the robot is charged or operative?
- At which speed does the robot move?
- How many square meters can the robot clean within one hour?
- How does the robot know when it must return to the station?
- How long does it take to empty the robot at the station?
- Where is the robot programmed? What do I have to pay attention to?
- According to which principle does the robot move?
- Table des matières
- Garantie
- Zone de commande station (3)
- Garanzia
- Garantía
- Garantia
- Garanti
- Betjeningsfelt station (3)
- Renserobot
- Stille drift (Quiet mode)
- Forberedelser for drift
- Pakke ut maskinen
- Figur 1
- Figur 11
- Tyst drift (Quiet mode)
- Takuu
- Εγγύηση
- Гарантия
- Garancia
- Záruka
- Garancija
- Pogosto postavljena vpraša- nja in odgovori
- Gwarancja
- Mult stimate client,
- Jamstvo
- Sigurnosne napomene
- Zabranjen je rad u prostorijama:
- ⚠️ Opasnost
- ⚠️ Pažnja
- Гаранция
- Garantii
- Garantija
- Гарантія
Brand : KARCHER
Model : RC4000
Category : Lawn mower robot