
HD 6 15 CX - Pressure washer KARCHER - Free user manual and instructions
Find the device manual for free HD 6 15 CX KARCHER in PDF.

| Product type | High-pressure cleaner |
| Brand | KARCHER |
| Model | HD 6/15 CX |
| Dimensions (L x W x H) | 360 x 400 x 925 mm |
| Weight (without accessories) | 32.5 kg |
| Power supply | 230 V, 1~50 Hz, 3.1 kW |
| Protection | IPX5, fuse 16 A (time-lag) |
| Operating pressure | 15 MPa (max 21.5 MPa) |
| Water flow rate | 9.5 l/min |
| Max. supply temperature | 60 °C |
| Min. supply flow rate | 12 l/min |
| Max. suction height | 0.5 m |
| Max. supply pressure | 1 MPa |
| Injector size | 034 |
| Max. handle reaction force | 21 N |
| Sound pressure level LpA | 72 dB(A) |
| Sound power level LWA | 86 dB(A) |
| Vibrations (handle-gun) | < 2.5 m/s² |
| Engine oil | SAE 15W40, 0.35 L |
| Oil maintenance | Annual oil change or after 500 h |
| Main functions | High pressure, detergent injection, flow/pressure regulation |
| Safety | Discharge valve, pressure switch, automatic shut-off, frost protection |
| Spare parts | Original KARCHER accessories and replacements |
| Warranty | According to distributor conditions |
Frequently Asked Questions - HD 6 15 CX KARCHER
User questions about HD 6 15 CX KARCHER
0 question about this device. Answer the ones you know or ask your own.
Ask a new question about this device
Download the instructions for your Pressure washer in PDF format for free! Find your manual HD 6 15 CX - KARCHER and take your electronic device back in hand. On this page are published all the documents necessary for the use of your device. HD 6 15 CX by KARCHER.
USER MANUAL HD 6 15 CX KARCHER
71364 Winnenden (Germany)
Tel.: +49 7195 14-0
Fax: +49 7195 14-2212
Winnenden, 2012/09/01
Technische Daten
to the initial operation of your appliance and store them for later use or subsequent owners.
Contents
Device elements. EN 1
Safety instructions EN 2
Proper use EN 2
Safety Devices EN 2
Environmental protection . EN . .2
Before Startup EN 3
Start up. EN 3
Operation EN 4
Transport EN .5
Storage. EN .6
Maintenance and care . . . EN . .6
Troubleshooting EN .6
Spare parts. EN 7
Warranty. EN .7
EC Declaration of Conformity EN . .8
Technical specifications . EN . .9
Device elements
Please unfold the front picture side
1 Storage compartment for nozzles
2 Handle
3 High pressure connection
4 Manometer
5 Pressure/volume regulations HD 6/15
6 Water connection
7 Oil level indicator
8 Oil tank
9 Cover
10 Power switch
11 Fastening screw for device hood
12 Storage compartment for hoses
13 Trigger gun storage clip
14 Hose hook
15 Nozzle
16 Marking of the nozzle
17 Spray lance
18 Pressure/ volume regulations HD 7/18
19 Hand blowing gun
20 Safety lever
21 Lever for hand spray gun
22 High pressure hose
23 Push handle
24 Cable clamp
25 Clamping screw for pushing handle
26 Detergent suction hose with filter
27 Dosage valve for detergent
28 Accessory compartment
29 Hose drum
30 Crank
31 Adapter
Colour coding
The operating elements for the cleaning process are yellow.
The controls for the maintenance and service are light gray.
Safety instructions
Before first start-up it is definitely necessary to read the operating instructions and safety indications Nr. 5.951-949!
- Please follow the national rules and regulations for fuel spray jets of the respective country.
- Please follow the national rules and regulations for accident prevention of the respective country. Fuel spray jets must be tested regularly and the results of these tests must be documented in writing.
Symbols in the operating instructions
Danger
Immediate danger that can cause severe injury or even death.
Warning
Possible hazardous situation that could lead to severe injury or even death.
Caution
Possible hazardous situation that could lead to mild injury to persons or damage to property.
Symbols on the machine

High-pressure jets can be dangerous if improperly used. The jet may not be directed at per
sons, animals, live electrical equipment or at the appliance itself.

According to the applicable regulations, the appliance must never be used on the drinking water net without a system separator. Use a
suitable system separator manufactured by Kärcher; or, as an alternative, a system separator as per EN 12729 Type BA.
Water flowing through a system separator is considered non-drinkable.
Proper use
Use this high pressure cleaner exclusively for
- Cleaning using low pressure jet and detergent (for e.g. for cleaning machines, cars, buildings, tools),
- For cleaning using high pressure jet without detergent (for e.g. for cleaning facades, terraces, garden appliances).
For stubborn dirt, we recommend the use of the dirt blaster as a special accessory.
Safety Devices
Overflow valve with pressure switch
While reducing the water supply/quantity regulation at the pump head, the overflow valve opens and part of the water flows back to the pump suck side.
If the lever on the trigger gun is released the pressure switch turns off the pump, the high-pressure jet is stopped. If the lever is pulled the pump is turned on again.
Safety valve (only HD 7/18)
The safety valve opens when the permissible operating pressure is exceeded; water flows back to the suction side of the pump. The overflow valve, pressure switch and safety valve are set and sealed at the factory.
Setting only by customer service.
Environmental protection

The packaging material can be recycled. Please do not throw the packaging material into household waste; please send it for recycling.

Old appliances contain valuable materials that can be recycled; these should be sent for recycling. Batteries, oil, and similar substances must not enter the environment. Please dispose of your old appliances using appropriate collection systems.
Notes about the ingredients (REACH)
You will find current information about the ingredients at:
www.kaercher.com/REACH
Before Startup
Unpacking
- Check the contents of the pack before unpacking.
In case of transport damage inform vendor immediately
Check oil level
Read the oil level display when the device is not running. The oil level must be above the two pointers.
Activatedeaerationofoilcontainer
Unscrew the fastening screws of the device hood; remove the device hood.
Cut off tip of oil container cover
Fasten the device hood.
Attaching the Accessories
Mount the nozzle on the spray pipe (markings on the adjustment ring at the top).
Connect ray tube to hand spray gun
Note
Only with HD 7/10 CXF:
When space is limited, the enclosed adapter with nozzle can be mounted directly to the hand spray gun.
In devices without hose drum:
Loosen the clamps of the pushing handle.
Adjust the handle to the desired height.
Tighten the clamps of the pushing handle.
Fasten the high pressure hose to the high pressure connection.
In devices without hose drum:
Insert the crank in the hose drum shaft and lock it in.
Before rolling up, stretch out the high pressure hose.
Wind the high pressure hose in uniform layers on the hose drum by rotating the crank. Select the rotation direction in
such a way that the high pressure hose does not get bent.
Start up
Electrical connection
Danger
Danger of injury by electric shock.
The appliance may only be connected to alternating current.
The appliance may only be connected to an electrical supply which has been installed in accordance with IEC 60364.
The voltage indicated on the type plate must correspond to the voltage of the electrical source.
The minimum fuse rating required at the socket outlet is (see technical specifications). The highest allowed net impedance at the electrical connection point (refer to technical data) is not to be exceeded. In case of confusion regarding the power impedance present on your connection, please contact your utilities provider.
The appliance should always be connected to the electrical mains using a plug. It is forbidden to permanently connect the appliance to the power supply. The plug is only for mains separation.
Check the power cord with mains plug for damage before every use. If the power cord is damaged, please arrange immediately for the exchange by an authorized customer service or a skilled electrician.
The plug and coupling of the extension cable used must be watertight.
Use the extension cord that has an adequate cross-section (see "Technical Data") and unwind it fully from the cable drum.
Unsuitable extension cables can be hazardous. Only use extension cables outdoors which have been approved for this purpose and labelled with a sufficient cable cross section:
For connection values, see type plate/technical data.
Water connection
Connection to the water supply
Warning
Observe regulations of water supplier.
According to the applicable regulations, the appliance must never be used on the drinking water supply without a system separator. Use a

suitable system separator manufactured by KÄRCHER; or, as an alternative, a system separator as per EN 12729 Type BA. Water flowing through a system separator is considered non-drinkable.
Caution
Always connect the system separator to the water supply, never directly to the appliance!
For connection values refer to technical specifications
Connect the supply hose (max length 7.5 ~m , minimum diameter 1 / 2" ) to the water connection point of the machine and at the water supply point (for e.g. a tap).
Note
The supply hose is not included.
Open the water supply.
Drawing in water from open reservoirs
Screw the suction hose with filter (order no. 4.440-238.0) to the water connection.
Deaerate the appliance: Unscrew the nozzle.
Switch on the appliance and let it run until the water exiting is bubble-free. At the end let the appliance run for approx. 10 seconds - then switch off. Repeat the procedure for a couple of times.
Switch off the appliance and fit the nozzle again.
Operation
Danger
Risk of explosion!
Do not spray flammable liquids.
If the appliance is used in hazardous areas (e.g. filling stations) the corresponding safety provisions must be observed.
Caution
Clean engines only at places with corresponding oil separators (environmental safety).
Risk of blocking. Place the nozzles in the accessory compartment with their joint pointing upward.
High pressure operation
Note
The appliance is equipped with a pressure switch. The motor starts up only when the lever of the pistol is pulled.
Roll off the high pressure hose totally from the hose drum.
Set the appliance switch to "I".
Unlock the hand-spray gun and pull the lever of the gun.
Set working pressure and flow rate through turning (runless) at the pressure- and amount regulation (B) (+/-) .
Select spray type
Close the hand spray gun.
Turn the casing of the nozzle till the desired symbol matches the marking.
N

Flat low pressure spray (CHEM) for operating using detergents or cleaning at low pressure.
High pressure flat spray (25^) for large dirt areas
Operation with detergent
Warning
Unsuitable detergents can cause damage to the appliance and to the object to be cleaned. Use only those detergents that have been approved by Karcher. Observe the dosage and other instructions provided with these detergents. For considerate treatment of the environment use detergent economically.
Follow the safety instructions for using detergents.
Kärcher detergents ensure smooth functioning. Please consult us or ask for our catalogue or our detergent information sheets.
Take out detergent suck hose.
Suspend end of suction hose in a container filled with detergent.
Set nozzle to "CHEM".
Set dosing value for detergent to the desired concentration.
Recommended cleaning method
Spray the detergent sparingly on the dry surface and allow it to react, but not to dry.
Spray off loosened dirt with the high-pressure ray.
After operations, dip the filter in clear water. Turn the dosing valve to the highest detergent concentration. Start the appliance and rinse for one minute.
Interrupting operation
Release the lever of the hand-spray gun; the device will switch off.
Release again the lever of the hand-spray gun; the device will switch on again.
Turn off the appliance
Set the appliance switch to "0".
Disconnect the mains plug from the socket.
Shut off water supply.
Activate hand spray gun until device is pressure-less.
Press the safety lever of the hand-spray gun to secure the lever of the pistol against being released accidentally.
Storing the Appliance
Insert the hand-spray gun in the holder.
Wind up the high-pressure hose and hang it over the hose storage. or Wind up the high-pressure hose on the hose drum. Push in the handle of the crank to block the hose drum.
Wind the connection cable around the cable holder.
Fasten the plug with the mounted clip.
Frost protection
Warning
Frost will destroy the not completely water drained device.
Store the appliance in a frost free area.
If you cannot store it in a frost-free place:
Drain water.
Pump in conventional frost protection agents through the appliance.
Note
Use normal glycol-based anti-freezing agents for automobiles.
Observe handling instructions of the antifreeze agent manufacturer.
Operate device for max. 1 minute until the pump and conduits are empty.
Transport
Danger
Risk of injury and damage! Observe the weight of the appliance when you transport it.
Pull the device behind you at the handle for transporting it over longer distances.
For devices without hose drum, push the handle downward to carry the appliance. To carry, hold the appliance at the handles and not at the pushing handle.
When transporting in vehicles, secure the appliance according to the guidelines from slipping and tipping over.
Storage
Danger
Risk of injury and damage! Note the weight of the appliance in case of storage.
Maintenance and care
Danger
Risk of injury by inadvertent startup of appliance and electrical shock. First pull out the plug from the mains before carrying out any tasks on the machine.
Note
Please dispose off used oil only in the collection points provided for them. Please hand over old oil, if any, only at such places. Polluting the environment with used oil is a punishable offence.
Safety inspection/ maintenance contract
You can sign with your dealer a contract for regular safety inspection or even sign a maintenance contract. Please take advice on this matter.
Before each use
Check connection cable for damages (risk of electrical shock); get the damaged connection cable replaced immediately by an authorised customer service person/ electrician.
Check the high pressure hose for damages (risk of bursting). Please arrange for the immediate exchange of a damaged high-pressure hose.
Check appliance (pump) for leaks. 3 drops per minute are permitted and can come out from the lower side of the appliance. Call Customer Service if there is heavy leakage.
Weekly
Check oil level Please contact Customer Service immediately if the oil is milky (water in oil).
Clean the sieve in the water connection.
Clean filter at the detergent suck hose.
monthly or after 500 operating hours
Oil change.
Oil change
Note
See "Technical Details" for details of oil quantity and type.
Unscrew the fastening screws of the device hood; remove the device hood.
Remove the lid of the oil container.
Tilt the appliance forward.
Drain the oil in a collection basin.
Fill in new oil slowly; air bubbles should go out.
Attach the lid of the oil container.
Fasten the device hood.
Troubleshooting
Danger
Risk of injury by inadvertent startup of appliance and electrical shock.
First pull out the plug from the mains before carrying out any tasks on the machine.
Get the electrical components checked and repaired only by authorised customer service persons.
Contact an authorised customer service person in case of problems not mentioned in this chapter or if you are in doubt or when you have been explicitly asked to do so.
Appliance is not running
Check connection cable for damages.
Check the supply voltage.
Call Customer Service in case of electrical defects.
Pressure does not build up in the appliance
Set nozzle to "High pressure".
Clean the nozzle.
Replace the nozzle.
Deaerate the appliance (see "Start-up")
Check water supply level (refer to technical data).
Clean the sieve in the water connection.
Check all inlet pipes to the pump.
Contact Customer Service if needed.
Pump leaky
3 drops per minute are permitted and can come out from the lower side of the appliance. Call Customer Service if there is heavy leakage.
With stronger leak, have device checked by customer service.
Pump is vibrating
Check suction pipes for water and detergent and ensure that they are leakproof.
Close dosing valve for detergent to operate the machine without detergent.
Deaerate the appliance (see "Start-up")
Contact Customer Service if needed.
Detergent is not getting sucked in
Set nozzle to "CHEM".
Check/ clean detergent suction hose with filter.
Open or check/clean detergent dosing valve.
Contact Customer Service if needed.
Spare parts
- Only use accessories and spare parts which have been approved by the manufacturer. The exclusive use of original accessories and original spare parts ensures that the appliance can be operated safely and trouble free.
- At the end of the operating instructions you will find a selected list of spare parts that are often required.
- For additional information about spare parts, please go to the Service section at www.kaercher.com.
Warranty
The warranty terms published by the relevant sales company are applicable in each country. We will repair potential failures of your appliance within the warranty period free of charge, provided that such failure is caused by faulty material or defects in manufacturing. In the event of a warranty claim please contact your dealer or the nearest authorized Customer Service centre. Please submit the proof of purchase.
EC Declaration of Conformity
We hereby declare that the machine described below complies with the relevant basic safety and health requirements of the EU Directives, both in its basic design and construction as well as in the version put into circulation by us. This declaration shall cease to be valid if the machine is modified without our prior approval.
Product: High-pressure cleaner
Type: 1.150-xxx
Type: 1.151-xxx
Type: 1.214-xxx
Relevant EU Directives
2006/42/EC (+2009/127/EC)
2004/108/EC
2000/14/EC
Applied harmonized standards
EN 60335-1
EN 60335-2-79
EN 55014-1: 2006 + A1: 2009
EN 55014-2: 1997 + A2: 2008
EN 61000-3-2: 2006 + A2: 2009
HD 7/10, HD 7/16, HD 7/18
EN 61000-3-3: 2006
HD 5/17, HD 6/12, HD 6/15:
EN 61000-3-11:2000
EN 62233: 2008
Applied conformity evaluation method
2000/14/EC: Appendix V
Sound power level dB(A)
HD 5/17
Measured: 85
Guaranteed: 86
HD 6/12
Measured: 83
Guaranteed: 85
HD 6/15
Measured: 85
Guaranteed: 86
HD 7/10
Measured: 90
Guaranteed: 91
HD 7/18
Measured: 90
Guaranteed: 91
The undersigned act on behalf and under the power of attorney of the company management.


Authorised Documentation Representative S. Reiser
71364 Winnenden (Germany)
Phone: +49 7195 14-0
Fax: +49 7195 14-2212
Winnenden, 2012/09/01
Technical specifications
| Type | HD 5/17 C 1.214-111.0 1.214-113.0 | HD 5/17 C 1.214-110.0 1.214-112.0 | HD 6/12-4C 1.150-160.0 1.150-161.0 | |
| HD 6/12-4CX 1.150-162.0 | ||||
| BR | EU | EU | ||
| Main Supply | ||||
| Voltage | V | 220 | 230 | |
| Current type | Hz | 1~60 | 1~50 | |
| Connected load | kW | 3,2 | 2,8 | |
| Protection (slow, char. C) | A | 16 | ||
| Type of protection | IPX5 | |||
| Maximum allowed net impedance | Ohm | (0.302+j0.189) | 0.386+j0.241 | |
| Extension cord 30 m | mm² | 2,5 | ||
| Water connection | ||||
| Max. feed temperature | °C | 60 | ||
| Min. feed volume | l/min | 12 | ||
| Suck height from open container (20 °C) | m | 0,5 | ||
| Max. feed pressure | MPa | 1 | ||
| Performance data | ||||
| Working pressure | MPa | 16 | 17 | 12 |
| Max. operating over-pressure | MPa | 21,5 | 18 | |
| Nozzle size | 028 | 043 | ||
| Flow rate | l/min | 8,3 | 10 | |
| Detergent suck in | l/min | 0...0,6 | ||
| Max. recoil force of hand spray gun | N | 21 | 26 | |
| Values determined as per EN 60355-2-79 | ||||
| Hand-arm vibration value | ||||
| Hand spraygun | m/s² | <2,5 | ||
| Spray lance | m/s² | <2,5 | ||
| Uncertainty K | m/s² | 1 | ||
| Sound pressure level LpA | dB(A) | 72 | 70 | |
| Uncertainty KpA | dB(A) | 1 | 2 | |
| Sound power level LWA + Uncertainty KWA | dB(A) | 86 | 85 | |
| Fuel | ||||
| Amount of oil | I | 0,35 | ||
| Oil grade | SAE 15W40 | |||
| Dimensions and weights | ||||
| Length | mm | 360 | ||
| Width (CX) | mm | 375 (400) | ||
| Height | mm | 925 | ||
| Weight without accessories | kg | 29 | 27 | * |
| * 1.150-160.0: 26 kg; 1.150-161.0 26,5 kg; 1.150-162.0: 31 kg | ||||
| Type | HD 6/15 C 1.150-600.0 1.150-621.0 | HD 6/15 C 1.150-620.0 | HD 6/15 C 1.150-624.0 | |
| HD 6/15 CX 1.150-650.0 | HD 6/15 CX 1.550-655.0 | HD 6/15 CX 1.150-659.0 | ||
| EU | CH | KAP | ||
| Voltage | V | 230 | 220 | |
| Current type | Hz | 1~50 | 1~60 | |
| Connected load | kW | 3,1 | 2,2 | 3,2 |
| Protection (slow, char. C) | A | 16 | 10 | 16 |
| Type of protection | IPX5 | |||
| Maximum allowed net impedance | Ohm | 0.302+j0.189 | ||
| Extension cord 30 m | mm² | 2,5 | ||
| Water connection | ||||
| Max. feed temperature | °C | 60 | ||
| Min. feed volume | l/min | 12 | ||
| Suck height from open container (20 °C) | m | 0,5 | ||
| Max. feed pressure | MPa | 1 | ||
| Performance data | ||||
| Working pressure | MPa | 15 | 11 | 14 |
| Max. operating over-pressure | MPa | 21,5 | 15 | 21,5 |
| Nozzle size | 034 | 043 | 036 | |
| Flow rate | l/min | 9,5 | ||
| Detergent suck in | l/min | 0...0,6 | ||
| Max. recoil force of hand spray gun | N | 21 | ||
| Values determined as per EN 60355-2-79 | ||||
| Hand-arm vibration value | ||||
| Hand spraygun | m/s² | <2,5 | ||
| Spray lance | m/s² | <2,5 | ||
| Uncertainty K | m/s² | 1 | ||
| Sound pressure level LpA | dB(A) | 72 | ||
| Uncertainty KpA | dB(A) | 1 | ||
| Sound power level LWA + Uncertainty KWA | dB(A) | 86 | ||
| Fuel | ||||
| Amount of oil | I | 0,35 | ||
| Oil grade | SAE 15W40 | |||
| Dimensions and weights | ||||
| Length | mm | 360 | ||
| Width (CX) | mm | 375 (400) | ||
| Height | mm | 925 | ||
| Weight without accessories (CX) | kg | * | 34,5 (32,5) | 27 (32,5) |
| 1.150-600.0: 27 kg; 1.150-621.0: 32,5 kg; 1.150-650.0: 32,5 kg | ||||
| Type | HD 6/15 C 1.150-623.0 | HD 6/15 C 1.150-628.0 | HD 6/15 C 1.150-627.0 | |
| KAP | GB/AU | AR | ||
| Main Supply | ||||
| Voltage | V | 220 | 240 | 220 |
| Current type | Hz | 1~50 | ||
| Connected load | kW | 3,0 | 3,1 | |
| Protection (slow, char. C) | A | 16 | 13 | 16 |
| Type of protection | IPX5 | |||
| Maximum allowed net impedance | Ohm | 0.302+j0.189 | ||
| Extension cord 30 m | mm² | 2,5 | ||
| Water connection | ||||
| Max. feed temperature | °C | 60 | ||
| Min. feed volume | l/min | 12 | ||
| Suck height from open container (20 °C) | m | 0,5 | ||
| Max. feed pressure | MPa | 1 | ||
| Performance data | ||||
| Working pressure | MPa | 13 | 15 | |
| Max. operating over-pressure | MPa | 21,5 | ||
| Nozzle size | 036 | 034 | ||
| Flow rate | l/min | 9,5 | 9,3 | |
| Detergent suck in | l/min | 0...0,6 | ||
| Max. recoil force of hand spray gun | N | 21 | ||
| Values determined as per EN 60355-2-79 | ||||
| Hand-arm vibration value | ||||
| Hand spraygun | m/s² | <2,5 | ||
| Spray lance | m/s² | <2,5 | ||
| Uncertainty K | m/s² | 1 | ||
| Sound pressure level LpA | dB(A) | 72 | ||
| Uncertainty KpA | dB(A) | 1 | ||
| Sound power level LWA + Uncertainty KWA | dB(A) | 86 | ||
| Fuel | ||||
| Amount of oil | I | 0,35 | ||
| Oil grade | SAE 15W40 | |||
| Dimensions and weights | ||||
| Length | mm | 360 | ||
| Width (CX) | mm | 375 (400) | ||
| Height | mm | 925 | ||
| Weight without accessories (CX) | kg | 25 | 27 | |
| Type | HD 7/10 C XF 1.151-619.0 | HD 7/18 C 1.151-600.0 1.151-614.0 | HD 7/18 C 1.151-613.0 | |
| HD 7/18 CX 1.151-657.0 | HD 7/18 CX 1.151-650.0 | |||
| EU | EU | EU II | ||
| Main Supply | ||||
| Voltage | V | 400 | 230 | |
| Current type | Hz | 3~50 | ||
| Connected load | kW | 3,0 | 4,7 | |
| Protection (slow, char. C) | A | 16 | ||
| Type of protection | IPX5 | |||
| Maximum allowed net impedance | Ohm | - | ||
| Extension cord 30 m | mm² | 2,5 | ||
| Water connection | ||||
| Max. feed temperature | °C | 80 | 60 | |
| Min. feed volume | l/min | 13 | ||
| Suck height from open container (20 °C) | m | 0,5 | ||
| Max. feed pressure | MPa | 1 | ||
| Performance data | ||||
| Working pressure | MPa | 10 | 17,5 | |
| Max. operating over-pressure | MPa | 12 | 21,5 | |
| Nozzle size (CX) | 060 | 040 (042) | ||
| Flow rate | l/min | 11,5 | ||
| Detergent suck in | l/min | 0...0,6 | ||
| Max. recoil force of hand spray gun | N | 21 | ||
| Values determined as per EN 60355-2-79 | ||||
| Hand-arm vibration value | ||||
| Hand spraygun | m/s² | <2,5 | ||
| Spray lance | m/s² | <2,5 | ||
| Uncertainty K | m/s² | 1 | ||
| Sound pressure level LpA | dB(A) | 77 | ||
| Uncertainty KpA | dB(A) | 1 | ||
| Sound power level LWA + Uncertainty KWA | dB(A) | 91 | ||
| Fuel | ||||
| Amount of oil | I | 0,35 | ||
| Oil grade | SAE 90 Hypoid | |||
| Dimensions and weights | ||||
| Length | mm | 360 | ||
| Width (CX) | mm | 375 (400) | ||
| Height | mm | 925 | ||
| Weight without accessories (CX) | kg | 33 | * | 31,8 (32,5) |
| * 1.151-600: 30,8 kg; 1.151--614.0: 34,5 kg; 1.151-657.0: 32,5 kg | ||||
Table des matieres
www.kaercher.com/REACH
2006/42/CE (+2009/127/CE)
2004/108/CE
2000/14/CE
71364 Winnenden (Germany)
Telephone: +49 7195 14-0
Winnenden, 2012/09/01
\section*{Caracteristiques techniques}
www.kaercher.com/REACH
2006/42/CE (+2009/127/CE)
2004/108/CE
2000/14/CE
71364 Winnenden (Germany)
Tel.: +49 7195 14-0
Fax: +49 7195 14-2212
Winnenden, 2012/09/01
Dati tecnici
www.kaercher.com/REACH
71364 Winnenden (Germany)
Tel.: +49 7195 14-0
Fax: +49 7195 14-2212
Winnenden, 2012/09/01
Technische gegevens
www.kaercher.com/REACH
2006/42/CE (+2009/127/CE)
2004/108/CE
2000/14/CE
71364 Winnenden (Germany)
Tfno.: +49 7195 14-0
Fax: +49 7195 14-2212
Winnenden, 2012/09/01
Datasétécnicos
2006/42/CE (+2009/127/CE)
2004/108/CE
2000/14/CE
71364 Winnenden (Germany)
Tel.: +49 7195 14-0
Fax: +49 7195 14-2212
Winnenden, 2012/09/01
Dados技术和
www.kaercher.com/REACH
Inden ibrugtagning
Udpakning
- Kontroller emballagens indhold.
- Ved transportskader skal forhandleren informeres omgaardene.
Kontroller oliestanden
2006/42/EF (+2009/127/EF)
2004/108/EF
2000/14/EF
71364 Winnenden (Germany)
TIf.: +49 7195 14-0
Fax: +49 7195 14-2212
Winnenden, 2012/09/01
Tekniske data
www.kaercher.com/REACH
Förden tas i bruk
Utpakking
- Kontroller ved utpakking at ingen ting mangler.
- Informer straks forhandleren ved transportskader.
Kun for HD 7/10 CXF:
Ved egnede plassforhold kan den vedlagte adapteren monteres direkte pa hoytrykkspistolen.
2006/42/EF (+2009/127/EF)
2004/108/EF
2000/14/EF
Head of Appropriation
71364 Winnenden (Germany)
TIf: +49 7195 14-0
Winnenden, 2012/09/01
Tekniske data
www.kaercher.com/REACH
Färe ibruktagande
Uppackning
Endast for HD 7/10 CFX:
71364 Winnenden (Germany)
Tel.: +49 7195 14-0
Fax: +49 7195 14-2212
Winnenden, 2012/09/01
Tekniska data
www.kaercher.com/REACH
Ennen käytöönottoa
71364 Winnenden (Germany)
Puh.: +49 7195 14-0
Winnenden, 2012/09/01
Tekniset tiedot
71364 Winnenden (Germany)
Tnλ.: +49 7195 14-0
Φαξ: +49 7195 14-2212
Winnenden, 2012/09/01
Texvika xapaktnpiOTiKa
Calismayi yarida kesme
El puskurtme tabancasinin kolunu birakin, cihaz kapanir.
→ El puskurtme tabancasinin kolunu tek- rar cekin, cihaz tekrar calisir.
Cihazin kapatilmasi
71364 Winnenden (Germany)
Tel.: +49 7195 14-0
Winnenden, 2012/09/01
Teknik Bilgiler
www.kaercher.com/REACH
Ipeed hauanom pa6oTbI
PacnaKOBbIbAHne
cucmemnoo pa3denueme 8
mpybopoeode c numbeo e odou. Cne dyem uonl3oambc coombemcmuyu ucuimnbicenapamop fupmbi KARCHER unu anbmephamuehbu cuemhbucapanop,coombemcmuyu uEN 12729 mun BA.Boda npoweaway cep3 cunmembui cenapamop,cuumaemcnaepuaodho dny nu mba.
BhumaHue!
Cucmemhbu pa3deNumelb 8ce2da nod-KIyamb K cuumeme eodocha6keHua, u Hko2da HenocpecdmeenHo K npubopy!
IapametpbIpoKJIIOUeHnYka3aHbIB pa3- deJe "TexHnueCKne daHHble".
Pexim pa60tI BbICOKO raBHeHn
Yka3aHue
Annapam ochaueh MaHomempueckum bI kIouamenm. Duaamel npuxodum e deu cmeue, koedahnakam pbuae nucmonema.
Bcerda noJHocTbU pa3MaTbIaHTe c 6apabaha WlaHr BbICOKOr DaBJeHnA.
YctaHOBIne BbIKIOHaTeIb npio6opa B nIOJOKeHne ,I".
→ Pa36noknpoBaT pyHOn nIcToIeTpacBbIInTeIb N BbITaHyTb pbUar nIcToIeTa.
YctaHOBnTe paOoee daBHeHne n KOJIInueCTBO BOIbI BpaUeHEm (6ecCTy-NeHcATo) peryIaTopa daBHeHnI n KOJIInueCTBa (+ / - )
BbI6Op BnIa cTpyu
→ 3akpbItb nIcToIeT-pacnbIInTeJIb.
Bpaatab Kopnyc fopcyHKn IO Tex nop, noka keJaembl CmMBOJ He COBnaTe T c MapknipOBKOI:
EkeoHn Hnn KaKdIe 500 yacob pa6oTbI
3aMeHa macJa.
3aMeHa Macna
Yka3aHue
KoJIuYeCm8O u eUd macna cm. pa3deI "TexHuYeCckue daHHble".
→ BbINHTnTb KpeEnXHbIe BNHTbI KpbIuKn np6oPa, cHrTb KpbIuKy.
→ CnTb KpbUkMy MacnaHOro 6aKa.
OnpoknHyb annapaat Bnepe.
→ Cnyctntb MaCNo B MaCnOc6OpHnK.
→MeIeHNo 3aIITb HOBOe MacNo; ny-3blpblB03dYxa DOJIiXHbI BblTN.
YcTaHOBnTb KpbIuKy pe3epByapa dna Macna.
→ 3aKpeπntb KpbIuKy npuδopa.
YcTpaHHeHne HEnCnpaBHOCTeI
Onachocmb
Onachocmb nolyuyeHma mpaembl om cnlyauiho 3anyueHHo20 annapama u 3neKmpowoka.
Ipepe npoeedeenuem IIObix pa6om c npu-bopom, eblknoumtb npubop u ebimrhymb wmencehnyo eunky.
3NeKmpuueckue KOHcmpyKmueHbIe 3JMeHmbI dOJIKNbI npOepeMbCmONbKO yOnlHomOeHHo cepBucHO cnykbo. Ppu noEpxKeHnux, He yKa3aHbIX e 3mOM pa3dene, e cnyae comHeu unu npu yemkom yka3aHnu o6paUambc8 yOnlHoMoou HHyO cepBucHyO cnykby.
Pn6op He pa6oTaet
→Поверпь coeINHITeNBHy Ka6eNBHa npEaMeT NOBpeKdEHiN.
→Поверпь habржени BCetN.
→Пииэлекгпчecкнх HeиспраьнocтяхобpaTITeCBВCEPBИСЧУOcIyK6y.
YnctTaaee CpeDCTBO He BcacbIbaeTcra
YcTaHOBnTbΦOpCyHky Ha,CHEM".
PIOBOpNTb/IIPOUHcTnTB BCaCbIbAIOuIIM IJIaHr MOIOUeO CpeIcTBA CΦINb- TpOM.
→ OTKpbIb IJIN IPOBepNTb/IpOCHCTNTb ID3NPOBOUHbIKJaPAnH MOIOUero CpeDCTBa.
→ Pπn Hεo6xOДMIOCTN O6paTntecb B cepBnCHyU cnyk6y.
3anaachbile yactn
- Pa3pe7aetcnaCnoJIb3OBAt bTolbKO Te npnHaIJIeKHOCTn 3aIaNChIe YacTn, nCNoJIb3OBAHHe KOTOpbIX 6blIO Odo-6peHo n3rTOBNTeIeM. IcNoJIb3OBAHne OpnInHaJIbHbIX npnHaIJIeKHOCTe n 3aIpaCTeR rapantnpyET Bam naTeKHyIO n 6ecpepeBoHyO paBOTy npnbopa.
BbI6Op HnI6OJIe UacTo Heo6XoIMMbIX 3aIyAcTe BbI HaIJeTe B KOHcE INCTpyKcUN IO 3KcNJIyataCUN.
Дальnevшую Информачию O 3ancaCTЯХ Вbl НадеTe Ha caTiTe www.kaercher.comВраздени Service.
RapaHTy
B kaJdoi cTpaHe DeiCCTByIOT COOTBeTCT-BeHHo rapaHTnHbIe ycNoBnIA, n3daHHbIe yNoJIHOMOueHHo OpraHn3aUnei C6bIaTa HaaWe npOdyKcNn B daHHo CTpaHe. Bo3-MoXhIbe HeNCnpaBHOCTn np6opa B TeueHne rapaHTnHOrO cPoka Mbl yCTpaHReM 6ecPiNaTHo, ecnn npuHa 3aklIoUaTeCn B deFeKtax MaTepnaIOB nIn oOn6kax npn I3roTOBLeHm. B cLyuae BO3NHKnOBeHn npTeH3n B TeueHne rapaHTnHOrO cPoka npoc6Ba o6paTaTbcA, Imeep ci6e Yek O NOKyIKe, B TOpROByO opraHn3aUnc, npoDaBswyBam pnp6op nIn B 6bnKaJShyU OyNlHOMOueHHU cnyK6by cepBnCHOrO 06cNkyKBaHN.
3aayBJIeHHe O COOTBeTCTBnE EC
HactoIIMMb3aBJIaEM,HTOHNKeYka- 3aHHbI pIn6Op NO CBOe KOHcEPluN I KOHCTpyKUn, a TaKxE B OCSUeCTBHeHOM I DonyUeHHOM HAMN K PPOdaXe NcPOnHeHn OTBeueAet COOTBeTCTBYUcIM OCHOBhIM Tpe6OBaHnM No 6e3OpaCHOCTn I 3DopOBbIO cOrJaCHO dIpKeTtBam EC. Ppi BHeCEHn N3MeHeHn, He CorPaCoBaHHbIX C HAMN, DaHHoe 3aRaBJIeHne TepReT CBOIO CNJly.
71364 Winnenden (Germany)
Ten.: +49 7195 14-0
ΦaKc: +49 7195 14-2212
Winnenden, 2012/09/01
TexHnueckne daHHbIe
www.kaercher.com/REACH
Uzembevétel elott
Kicsomagolás
Head of Appropriation
71364 Winnenden (Germany)
Tel.: +49 7195 14-0
Fax: +49 7195 14-2212
Winnenden, 2012/09/01
Muszaki adatok
www.kaercher.com/REACH
2006/42/ES (+2009/127/ES)
2004/108/ES
2000/14/ES
71364 Winnenden (Germany)
Tel.: +49 7195 14-0
Fax: +49 7195 14-2212
Winnenden, 2012/09/01
Technické udaje
Zadevne ES-directive:
2006/42/ES (+2009/127/ES)
2004/108/ES
2000/14/ES
Head of Appropriation
71364 Winnenden (Germany)
Tel.: +49 7195 14-0
Winnenden, 2012/09/01
Tehnični podatki
| Tip | HD 5/17 C 1.214-111.0 1.214-113.0 | HD 5/17 C 1.214-110.0 1.214-112.0 | HD 6/12-4C 1.150-160.0 1.150-161.0 | |
| HD 6/12-4 CX 1.150-162.0 | ||||
| BR | EU | EU | ||
| Omrežni priključek | ||||
| Napetost | V | 220 | 230 | |
| Vrsta toka | Hz | 1~60 | 1~50 | |
| Priključna moč | kW | 3,2 | 2,8 | |
| Zaščita (inertna, kar. C) | A | 16 | ||
| Vrsta zaščite | IPX5 | |||
| Maksimalno dopustna omrežna impedanca | Ohm | (0.302+j0.189) | 0.386+j0.241 | |
| Podajševalni kabel 30 m | mm² | 2,5 | ||
| Vodni priključek | ||||
| Temperatura dotoka (maks.) | °C | 60 | ||
| Količina dotoka (min.) | l/min | 12 | ||
| Sesalna višina iz odprte posode (20 °C) | m | 0,5 | ||
| Pritisk dotoka (maks.) | MPa | 1 | ||
| Podatki o zmogljivosti | ||||
| Delovni tlak | MPa | 16 | 17 | 12 |
| Max. obratovalni nadtlak | MPa | 21,5 | 18 | |
| Velikost šobe | 028 | 043 | ||
| Pretok | l/min | 8,3 | 10 | |
| Sesanje Čistila | l/min | 0...0,6 | ||
| Povratna udarna sila ročne brizgalne pištole (maks.) | N | 21 | 26 | |
| Ugotovljene vrednosti v skladu z EN 60355-2-79 | ||||
| Vrednost vibracij dlan-roka | ||||
| Ročna brizgalna pištola | m/s² | <2,5 | ||
| Brizgalna cev | m/s² | <2,5 | ||
| Negotovost K | m/s² | 1 | ||
| Nivo hrupa LpA | dB(A) | 72 | 70 | |
| Negotovost KpA | dB(A) | 1 | 2 | |
| Nivo hrupa ob obretenitviLWA + negotovost KWA | dB(A) | 86 | 85 | |
| Goriva | ||||
| Količina olja | I | 0,35 | ||
| Vrsta olja | SAE 15W40 | |||
| Mere in teža | ||||
| Dolžina | mm | 360 | ||
| Širina (CX) | mm | 375 (400) | ||
| Višina | mm | 925 | ||
| Teža brez pribora | kg | 29 | 27 | * |
| * 1.150-160.0: 26 kg; 1.150-161.0 26,5 kg; 1.150-162.0: 31 kg | ||||
| Tip | HD 6/15 C 1.150-600.0 1.150-621.0 | HD 6/15 C 1.150-620.0 | HD 6/15 C 1.150-624.0 | |
| HD 6/15 CX 1.150-650.0 | HD 6/15 CX 1.550-655.0 | HD 6/15 CX 1.150-659.0 | ||
| EU | CH | KAP | ||
| Napetost | V | 230 | 220 | |
| Vrsta toka | Hz | 1~50 | 1~60 | |
| Priključna moč | kW | 3,1 | 2,2 | 3,2 |
| Zaščita (inertna, kar. C) | A | 16 | 10 | 16 |
| Vrsta zaščite | IPX5 | |||
| Maksimalno dopustna omrežna impedanca | Ohm | 0.302+j0.189 | ||
| Podaljiševalni kabel 30 m | mm² | 2,5 | ||
| Vodni priključek | ||||
| Temperatura dotoka (maks.) | °C | 60 | ||
| Količina dotoka (min.) | l/min | 12 | ||
| Sesalna višina iz odprte posode (20 °C) | m | 0,5 | ||
| Pritisk dotoka (maks.) | MPa | 1 | ||
| Podatki o zmogljivosti | ||||
| Delovni tlak | MPa | 15 | 11 | 14 |
| Max. obratovalni nadtlak | MPa | 21,5 | 15 | 21,5 |
| Velikost šobe | 034 | 043 | 036 | |
| Pretok | l/min | 9,5 | ||
| Sesanje Čistila | l/min | 0...0,6 | ||
| Povratna udarna sila ročne brizgalne pištole (maks.) | N | 21 | ||
| Ugotovljene vrednosti v skladu z EN 60355-2-79 | ||||
| Vrednost vibracij dlan-roka | ||||
| Ročna brizgalna pištola | m/s² | <2,5 | ||
| Brizgalna cev | m/s² | <2,5 | ||
| Negotovost K | m/s² | 1 | ||
| Nivo hrupa LpA | dB(A) | 72 | ||
| Negotovost KpA | dB(A) | 1 | ||
| Nivo hrupa ob obretenitviLWA + negotovost KWA | dB(A) | 86 | ||
| Goriva | ||||
| Količina olja | I | 0,35 | ||
| Vrsta olja | SAE 15W40 | |||
| Mere in teža | ||||
| Dolžina | mm | 360 | ||
| Širina (CX) | mm | 375 (400) | ||
| Višina | mm | 925 | ||
| Teža brez pribora (CX) | kg | * | 34,5 (32,5) | 27 (32,5) |
| 1.150-600.0: 27 kg; 1.150-621.0: 32,5 kg; 1.150-650.0: 32,5 kg | ||||
| Tip | HD 6/15 C 1.150-623.0 | HD 6/15 C 1.150-628.0 | HD 6/15 C 1.150-627.0 | |
| KAP | GB/AU | AR | ||
| Omrežni priključek | ||||
| Napetost | V | 220 | 240 | 220 |
| Vrsta toka | Hz | 1~50 | ||
| Priključna moč | kW | 3,0 | 3,1 | |
| Zaščita (inertna, kar. C) | A | 16 | 13 | 16 |
| Vrsta zaščite | IPX5 | |||
| Maksimalno dopustna omrežna impedanca | Ohm | 0.302+j0.189 | ||
| Podaljiševalni kabel 30 m | mm² | 2,5 | ||
| Vodni priključek | ||||
| Temperatura dotoka (maks.) | °C | 60 | ||
| Količina dotoka (min.) | l/min | 12 | ||
| Sesalna višina iz odprte posode (20 °C) | m | 0,5 | ||
| Pritisk dotoka (maks.) | MPa | 1 | ||
| Podatki o zmogljivosti | ||||
| Delovni tlak | MPa | 13 | 15 | |
| Max. obratovalni nadtlak | MPa | 21,5 | ||
| Velikost šobe | 036 | 034 | ||
| Pretok | l/min | 9,5 | 9,3 | |
| Sesanje Čistila | l/min | 0...0,6 | ||
| Povratna udarna sila ročne brizgalne pištole (maks.) | N | 21 | ||
| Ugotovljene vrednosti v skladu z EN 60355-2-79 | ||||
| Vrednost vibracij dlan-roka | ||||
| Ročna brizgalna pištola | m/s² | <2,5 | ||
| Brizgalna cev | m/s² | <2,5 | ||
| Negotovost K | m/s² | 1 | ||
| Nivo hrupa LpA | dB(A) | 72 | ||
| Negotovost KpA | dB(A) | 1 | ||
| Nivo hrupa ob obretenitviLWA + negotovost KWA | dB(A) | 86 | ||
| Goriva | ||||
| Količina olja | I | 0,35 | ||
| Vrsta olja | SAE 15W40 | |||
| Mere in teža | ||||
| Dolžina | mm | 360 | ||
| Širina (CX) | mm | 375 (400) | ||
| Višina | mm | 925 | ||
| Teža brez pribora (CX) | kg | 25 | 27 | |
| Tip | HD 7/10 C XF 1.151-619.0 | HD 7/18 C 1.151-600.0 1.151-614.0 | HD 7/18 C 1.151-613.0 | |
| HD 7/18 CX 1.151-657.0 | HD 7/18 CX 1.151-650.0 | |||
| EU | EU | EU II | ||
| Omrežni priključek | ||||
| Napetost | V | 400 | 230 | |
| Vrsta toka | Hz | 3~50 | ||
| Priključna moč | kW | 3,0 | 4,7 | |
| Zaščita (inertna, kar. C) | A | 16 | ||
| Vrsta zaščite | IPX5 | |||
| Maksimalno dopustna omrežna impedanca | Ohm | - | ||
| Podaljševalni kabel 30 m | mm² | 2,5 | ||
| Vodni priključek | ||||
| Temperatura dotoka (maks.) | °C | 80 | 60 | |
| Količina dotoka (min.) | l/min | 13 | ||
| Sesalna višina iz odprte posode (20 °C) | m | 0,5 | ||
| Pritisk dotoka (maks.) | MPa | 1 | ||
| Podatki o zmogljivosti | ||||
| Delovni tlak | MPa | 10 | 17,5 | |
| Max. obratovalni nadtlak | MPa | 12 | 21,5 | |
| Velikost Čobe (CX) | 060 | 040 (042) | ||
| Pretok | l/min | 11,5 | ||
| Sesanje Čistila | l/min | 0...0,6 | ||
| Povratna udarna sila ročne brizgalne pištole (maks.) | N | 21 | ||
| Ugotovljene vrednosti v skladu z EN 60355-2-79 | ||||
| Vrednost vibracij dlan-roka | ||||
| Ročna brizgalna pištola | m/s² | <2,5 | ||
| Brizgalna cev | m/s² | <2,5 | ||
| Negotovost K | m/s² | 1 | ||
| Nivo hrupa LpA | dB(A) | 77 | ||
| Negotovost KpA | dB(A) | 1 | ||
| Nivo hrupa ob obretenitviLWA + negotovost KWA | dB(A) | 91 | ||
| Goriva | ||||
| Količina olja | I | 0,35 | ||
| Vrsta olja | SAE 90 Hypoid | |||
| Mere in teža | ||||
| Dolžina | mm | 360 | ||
| Širina (CX) | mm | 375 (400) | ||
| Višina | mm | 925 | ||
| Teža brez pribora (CX) | kg | 33 | * | 31,8 (32,5) |
| * 1.151-600: 30,8 kg; 1.151--614.0: 34,5 kg; 1.151-657.0: 32,5 kg | ||||
Spis tresci
www.kaercher.com/REACH
2006/42/WE (+2009/127/WE)
2004/108/WE
2000/14/WE
71364 Winnenden (Germany)
tel.: +49 7195 14-0
faks: +49 7195 14-2212
Winnenden, 2012/09/01
Dane techniczne
Directive EG respectate:
2006/42/CE (+2009/127/CE)
2004/108/CE
2000/14/CE
Norme armonizate utilize:
EN 60335-1
EN 60335-2-79
EN 55014-1: 2006 + A1: 2009
EN 55014-2: 1997 + A2: 2008
EN 61000-3-2: 2006 + A2: 2009
HD 7/10, HD 7/16, HD 7/18
EN 61000-3-3: 2006
HD 5/17, HD 6/12, HD 6/15:
EN 61000-3-11:2000
EN 62233: 2008
Head of Appropriation
Insarcinat cu elaborarea documentatiei: S. Reiser
71364 Winnenden (Germany)
Tel.: +49 7195 14-0
Fax: +49 7195 14-2212
Winnenden, 2012/09/01
Date tehnice
2006/42/ES (+2009/127/ES)
2004/108/ES
2000/14/ES
2000/14/ES: Priloha V
71364 Winnenden (Germany)
Tel: +49 7195 14-0
Fax: +49 7195 14-2212
Winnenden, 2012/09/01
Technické udaje
| Typ | HD 5/17 C 1.214-111.0 1.214-113.0 | HD 5/17 C 1.214-110.0 1.214-112.0 | HD 6/12-4C 1.150-160.0 1.150-161.0 | |
| HD 6/12-4 CX 1.150-162.0 | ||||
| BR | EU | EU | ||
| Zapojenie siete | ||||
| Napatie | V | 220 | 230 | |
| Druh prúdu | Hz | 1~60 | 1~50 | |
| Pripojovaci výkon | kW | 3,2 | 2,8 | |
| Poistka (zotrvačná, char. C) | A | 16 | ||
| Druh krytia | IPX5 | |||
| Maximálne prípustné siet'ová impedancia | Ohmov | (0.302+j0.189) | 0.386+j0.241 | |
| Predlžovací kábel 30 m | mm² | 2,5 | ||
| Pripojenie vody | ||||
| Prívodná teplota (max.) | °C | 60 | ||
| Prívodné množstvo (min.) | l/min | 12 | ||
| Sacia vyška z otvoreného zásobníka (20 °C) | m | 0,5 | ||
| Prívodný tlak (max.) | MPa | 1 | ||
| Výkonové parametre | ||||
| Prevádkový tlak | MPa | 16 | 17 | 12 |
| Max. prevádkový pretlak | MPa | 21,5 | 18 | |
| Veǐkost dýzy | 028 | 043 | ||
| Dopravované množstvo | l/min | 8,3 | 10 | |
| Nasávanie Čistiacho prostriedku | l/min | 0...0,6 | ||
| Reaktivna sila ručnej streakacej pištole (max.) | N | 21 | 26 | |
| Zistené hodnoty podla EN 60355-2-79 | ||||
| Hodnota vibráci v ruke/ramene | ||||
| Ručná streakacia pištol | m/s² | <2,5 | ||
| Rozstrekovacia rurka | m/s² | <2,5 | ||
| Nebezpečnost' K | m/s² | 1 | ||
| Hlučnost' LpA | dB(A) | 72 | 70 | |
| Nebezpečnost' KpA | dB(A) | 1 | 2 | |
| Hlučnost' LWA + nebezpečnost' KWA | dB(A) | 86 | 85 | |
| Prevádkové látky | ||||
| Množstvo oleja | I | 0,35 | ||
| Druh oleja | SAE 15W40 | |||
| Rozmery a hmotnost' | ||||
| Dlžka | mm | 360 | ||
| Šírka (CX) | mm | 375 (400) | ||
| Výška | mm | 925 | ||
| Hmotnost' bez príslušenstva | kg | 29 | 27 | * |
| * 1.150-160.0: 26 kg; 1.150-161.0 26,5 kg; 1.150-162.0: 31 kg | ||||
| Typ | HD 6/15 C 1.150-600.0 1.150-621.0 | HD 6/15 C 1.150-620.0 | HD 6/15 C 1.150-624.0 | |
| HD 6/15 CX 1.150-650.0 | HD 6/15 CX 1.550-655.0 | HD 6/15 CX 1.150-659.0 | ||
| EU | CH | KAP | ||
| Napätie | V | 230 | 220 | |
| Druh prúdu | Hz | 1~50 | 1~60 | |
| Pripojovací výkon | kW | 3,1 | 2,2 | 3,2 |
| Poistka (zotrvačná, char. C) | A | 16 | 10 | 16 |
| Druh krytia | IPX5 | |||
| Maximálne prípustná siet'ová impedancia | Ohmov | 0.302+j0.189 | ||
| Predlžovací kábel 30 m | mm² | 2,5 | ||
| Pripojenie vody | ||||
| Prívodná teplota (max.) | °C | 60 | ||
| Prívodné množstvo (min.) | l/min | 12 | ||
| Sacia výška z otvoreného zásobníka (20 °C) | m | 0,5 | ||
| Prívodný tlak (max.) | MPa | 1 | ||
| Výkonové parametre | ||||
| Prevádkový tlak | MPa | 15 | 11 | 14 |
| Max. prevádkový pretlak | MPa | 21,5 | 15 | 21,5 |
| Veǐkost dýzy | 034 | 043 | 036 | |
| Dopravované množstvo | l/min | 9,5 | ||
| Nasávanie Čistiaceho prostriedku | l/min | 0...0,6 | ||
| Reaktívna sila ručnej striekacej pištole (max.) | N | 21 | ||
| Zistené hodnoty podl'æ EN 60355-2-79 | ||||
| Hodnota vibrráci v ruke/ramene | ||||
| Ručná striekacia pištol' | m/s² | <2,5 | ||
| Rozstrekovacia rurka | m/s² | <2,5 | ||
| Nebezpečnost' K | m/s² | 1 | ||
| Hlučnost' LpA | dB(A) | 72 | ||
| Nebezpečnost' KpA | dB(A) | 1 | ||
| Hlučnost' LWA + nebezpečnost' KWA | dB(A) | 86 | ||
| Prevádkové látky | ||||
| Množstvo oleja | I | 0,35 | ||
| Druh oleja | SAE 15W40 | |||
| Rozmery a hmotnost' | ||||
| Dlžka | mm | 360 | ||
| Šírka (CX) | mm | 375 (400) | ||
| Výška | mm | 925 | ||
| Hmotnost' bez príslušenstva (CX) | kg | * | 34,5 (32,5) | 27 (32,5) |
| 1.150-600.0: 27 kg; 1.150-621.0: 32,5 kg; 1.150-650.0: 32,5 kg | ||||
| Typ | HD 6/15 C 1.150-623.0 | HD 6/15 C 1.150-628.0 | HD 6/15 C 1.150-627.0 | |
| KAP | GB/AU | AR | ||
| Zapojenie siete | ||||
| Napätie | V | 220 | 240 | 220 |
| Druh prúdu | Hz | 1~50 | ||
| Pripojovací vykon | kW | 3,0 | 3,1 | |
| Poistka (zotrvačná, char. C) | A | 16 | 13 | 16 |
| Druh krytia | IPX5 | |||
| Maximálne prípustná siet'ová impedancia | Ohmov | 0.302+j0.189 | ||
| Predlžovací kábel 30 m | mm² | 2,5 | ||
| Pripojenie vody | ||||
| Prívodná teplota (max.) | °C | 60 | ||
| Prívodné množstvo (min.) | l/min | 12 | ||
| Sacia vyška z otvoreného zásobníka (20 °C) | m | 0,5 | ||
| Prívodný tlak (max.) | MPa | 1 | ||
| Vykonové parametre | ||||
| Prevádkový tlak | MPa | 13 | 15 | |
| Max. prevádkový pretlak | MPa | 21,5 | ||
| Veǐkost dýzy | 036 | 034 | ||
| Dopravované množstvo | l/min | 9,5 | 9,3 | |
| Nasávanie Čistiaceho prostriedku | l/min | 0...0,6 | ||
| Reaktívna sila ručnej streakacej pištole (max.) | N | 21 | ||
| Zistené hodnoty podl'na EN 60355-2-79 | ||||
| Hodnota vibráci v ruke/ramene | ||||
| Ručná streakacia pištól' | m/s² | <2,5 | ||
| Rozstrekovacia rúrká | m/s² | <2,5 | ||
| Nebezpečnost' K | m/s² | 1 | ||
| Hlučnost' LpA | dB(A) | 72 | ||
| Nebezpečnost' KpA | dB(A) | 1 | ||
| Hlučnost' LWA + nebezpečnost' KWA | dB(A) | 86 | ||
| Prevádkové látky | ||||
| Množstvo oleja | I | 0,35 | ||
| Druh oleja | SAE 15W40 | |||
| Rozmery a hmotnost' | ||||
| Dlžka | mm | 360 | ||
| Šírka (CX) | mm | 375 (400) | ||
| Výška | mm | 925 | ||
| Hmotnost' bez príslušenstva (CX) | kg | 25 | 27 | |
| Typ | HD 7/10 C XF 1.151-619.0 | HD 7/18 C 1.151-600.0 1.151-614.0 | HD 7/18 C 1.151-613.0 | |
| HD 7/18 CX 1.151-657.0 | HD 7/18 CX 1.151-650.0 | |||
| EU | EU | EU II | ||
| Zapojenie siete | ||||
| Napätie | V | 400 | 230 | |
| Druh prúdu | Hz | 3~50 | ||
| Pripojovací výkon | kW | 3,0 | 4,7 | |
| Poistka (zotrvačná, char. C) | A | 16 | ||
| Druh krytia | IPX5 | |||
| Maximálne prípustná siet'ová impedancia | Ohmov | - | ||
| Predlžovací kábel 30 m | mm² | 2,5 | ||
| Pripojenie vody | ||||
| Prívodná teplota (max.) | °C | 80 | 60 | |
| Prívodné množstvo (min.) | l/min | 13 | ||
| Sacia výška z otvoreného zásobníka (20 °C) | m | 0,5 | ||
| Prívodný tlak (max.) | MPa | 1 | ||
| Výkonové parametre | ||||
| Prevádkový tlak | MPa | 10 | 17,5 | |
| Max. prevádkový pretlak | MPa | 12 | 21,5 | |
| Veǐkost dýzy (CX) | 060 | 040 (042) | ||
| Dopravované množstvo | l/min | 11,5 | ||
| Nasávanie Čistiaceho prostriedku | l/min | 0...0,6 | ||
| Reaktívna sila ručnej streakacej pištole (max.) | N | 21 | ||
| Zistené hodnoty podl'á EN 60355-2-79 | ||||
| Hodnota vibrráci v ruke/ramene | ||||
| Ručná streakacia pištól' | m/s² | <2,5 | ||
| Rozstrekovacia rurka | m/s² | <2,5 | ||
| Nebezpečnost' K | m/s² | 1 | ||
| Hlučnost' LpA | dB(A) | 77 | ||
| Nebezpečnost' KpA | dB(A) | 1 | ||
| Hlučnost' LWA + nebezpečnost' KWA | dB(A) | 91 | ||
| Prevádkové látky | ||||
| Množstvo oleja | I | 0,35 | ||
| Druh oleja | Hypoid SAE 90 | |||
| Rozmery a hmotnost' | ||||
| Dlžka | mm | 360 | ||
| Šírka (CX) | mm | 375 (400) | ||
| Výška | mm | 925 | ||
| Hmotnost' bez príslušenstva (CX) | kg | 33 | * | 31,8 (32,5) |
| * 1.151-600: 30,8 kg; 1.151--614.0: 34,5 kg; 1.151-657.0: 32,5 kg | ||||
Pije prve uporabe Vaseg ureda ja procitajte ove originalne radne upute, postupajte prema njima i sacvajte ih za kasniju uporabu ili za sljedeceg vlasnika.
Pregled sadržaja
Sastavni dijelovi ureda . HR .1
Sigurnosni napuci. HR .2
Namjensko korištenje.... HR .2
Sigurnosni ureadi HR .2
Zašita okoliša HR .3
Prijeprveuporabe HR.3
Stavljanju pogon . HR 3
Rukovanje HR .4
Transport HR .6
Skladištenje HR .6
Njega i odrzavanje . HR .6
Pomoc u slucaju smetnji . HR . .7
Pričuvni dijelovi . HR .7
Jamstvo HR 7
EZ izjava o usklaedenosti .. HR .8
Tehnicki podaci. HR .9
www.kaercher.com/REACH
Pripe prve uporabe
Raspakiravanje
2006/42/EZ (+2009/127/EZ)
2004/108/EZ
2000/14/EZ
Primijenjene uskladene norme:
EN 60335-1
EN 60335-2-79
EN 55014-1:2006 + A1:2009
EN 55014-2: 1997 + A2: 2008
EN 61000-3-2: 2006 + A2: 2009
HD 7/10, HD 7/16, HD 7/18
EN 61000-3-3: 2006
HD 5/17, HD 6/12, HD 6/15:
EN 61000-3-11:2000
EN 62233: 2008
Head of Appropriation
71364 Winnenden (Germany)
Tel.: +49 7195 14-0
Winnenden, 2012/09/01
Tehnicki podaci
| Tip | HD 5/17 C 1.214-111.0 1.214-113.0 | HD 5/17 C 1.214-110.0 1.214-112.0 | HD 6/12-4C 1.150-160.0 1.150-161.0 | |
| HD 6/12-4 CX 1.150-162.0 | ||||
| BR | EU | EU | ||
| Priključak na elektricnu mrežu | ||||
| Napon | V | 220 | 230 | |
| Vrsta struje | Hz | 1~60 | 1~50 | |
| Priključna snaga | kW | 3,2 | 2,8 | |
| Osigurač (inertni, karakt. C) | A | 16 | ||
| Zaštita | IPX5 | |||
| Maksimalno dozvoljena impedancija | Ohm | (0.302+j0.189) | 0.386+j0.241 | |
| Produžni kabel 30 m | mm² | 2,5 | ||
| Priključak za vodu | ||||
| Dovodna temperatura (maks.) | °C | 60 | ||
| Dovodni protok (min.) | l/min | 12 | ||
| Visina usisavanja iz otvorenih posuda (20°C) | m | 0,5 | ||
| Dovodni tlak (maks.) | MPa | 1 | ||
| Podaci o snazi | ||||
| Radni tlak | MPa | 16 | 17 | 12 |
| Maks. radni pretlak | MPa | 21,5 | 18 | |
| Veličina mlaznice | 028 | 043 | ||
| Protočna količina | l/min | 8,3 | 10 | |
| Usisivanje sredstva za pranje | l/min | 0..0,6 | ||
| Povratna udarna sila ručne prskalice (maks.) | N | 21 | 26 | |
| Uvtvržene vrijednosti prema EN 60355-2-79 | ||||
| Vrijednost vibracije na ruci | ||||
| Ručna prskalica | m/s² | <2,5 | ||
| Cijev za prskanje | m/s² | <2,5 | ||
| Nepouzdanost K | m/s² | 1 | ||
| Razina zvučnog tlaka LpA | dB(A) | 72 | 70 | |
| Nepouzdanost KpA | dB(A) | 1 | 2 | |
| Razina zvučne snage LWA + nepouzdanost KWA | dB(A) | 86 | 85 | |
| Radni mediji | ||||
| Količina ulja | I | 0,35 | ||
| Vrsta ulja | SAE 15W40 | |||
| Dimenzije i težine | ||||
| Duljina | mm | 360 | ||
| Širina (CX) | mm | 375 (400) | ||
| Visina | mm | 925 | ||
| Težina bez pribora | kg | 29 | 27 | * |
| * 1.150-160.0: 26 kg; 1.150-161.0 26,5 kg; 1.150-162.0: 31 kg | ||||
| Tip | HD 6/15 C 1.150-600.0 1.150-621.0 | HD 6/15 C 1.150-620.0 | HD 6/15 C 1.150-624.0 | |
| HD 6/15 CX 1.150-650.0 | HD 6/15 CX 1.550-655.0 | HD 6/15 CX 1.150-659.0 | ||
| EU | CH | KAP | ||
| Napon | V | 230 | 220 | |
| Vrsta struje | Hz | 1~50 | 1~60 | |
| Prikljucna snaga | kW | 3,1 | 2,2 | 3,2 |
| Osigurač (inertni, karket. C) | A | 16 | 10 | 16 |
| Zaštita | IPX5 | |||
| Maksimalno dozvoljena impedancija | Ohm | 0.302+j0.189 | ||
| Produžni kabel 30 m | mm² | 2,5 | ||
| Prikljucak za vodu | ||||
| Dovodna temperatura (maks.) | °C | 60 | ||
| Dovodni protok (min.) | l/min | 12 | ||
| Visina usisavanja iz otvorenih posuda (20°C) | m | 0,5 | ||
| Dovodni tlak (maks.) | MPa | 1 | ||
| Podaci o snazi | ||||
| Radni tlak | MPa | 15 | 11 | 14 |
| Maks. radni pretlak | MPa | 21,5 | 15 | 21,5 |
| Veličina mlaznice | 034 | 043 | 036 | |
| Protočna količina | l/min | 9,5 | ||
| Usisavanje sredstva za pranje | l/min | 0...0,6 | ||
| Povratna udarna sila ručne prskalice (maks.) | N | 21 | ||
| Uvtvrdene vrijednosti prema EN 60355-2-79 | ||||
| Vrijednost vibracije na ruci | ||||
| Ručna prskalica | m/s² | <2,5 | ||
| Cijev za prskanje | m/s² | <2,5 | ||
| Nepouzdanost K | m/s² | 1 | ||
| Razina zvučnog tlaka LpA | dB(A) | 72 | ||
| Nepouzdanost KpA | dB(A) | 1 | ||
| Razina zvučne snage LWA + nepouzdanost KWA | dB(A) | 86 | ||
| Radni mediji | ||||
| Količina ulja | I | 0,35 | ||
| Vrsta ulja | SAE 15W40 | |||
| Dimenzije i težine | ||||
| Duljina | mm | 360 | ||
| Širina (CX) | mm | 375 (400) | ||
| Visina | mm | 925 | ||
| Težina bez pribora (CX) | kg | * | 34,5 (32,5) | 27 (32,5) |
| 1.150-600.0: 27 kg; 1.150-621.0: 32,5 kg; 1.150-650.0: 32,5 kg | ||||
| Tip | HD 6/15 C 1.150-623.0 | HD 6/15 C 1.150-628.0 | HD 6/15 C 1.150-627.0 | |
| KAP | GB/AU | AR | ||
| Priključak na elektricnu mrežu | ||||
| Napon | V | 220 | 240 | 220 |
| Vrsta struje | Hz | 1~50 | ||
| Priključna snaga | kW | 3,0 | 3,1 | |
| Osigurač (inertni, karket. C) | A | 16 | 13 | 16 |
| Zašita | IPX5 | |||
| Maksimalno dozvoljena impedancija | Ohm | 0.302+j0.189 | ||
| Produžni kabel 30 m | mm² | 2,5 | ||
| Priključak za vodu | ||||
| Dovodna temperatura (maks.) | °C | 60 | ||
| Dovodni protok (min.) | l/min | 12 | ||
| Visina usisavanja iz otvorenih posuda (20°C) | m | 0,5 | ||
| Dovodni tlak (maks.) | MPa | 1 | ||
| Podaci o snazi | ||||
| Radni tlak | MPa | 13 | 15 | |
| Maks. radni pretlak | MPa | 21,5 | ||
| Veličina mlaznice | 036 | 034 | ||
| Protočna količina | l/min | 9,5 | 9,3 | |
| Usisavanje sredstva za pranje | l/min | 0...0,6 | ||
| Povratna udarna sila ručne prskalice (maks.) | N | 21 | ||
| Uvtvržene vrijednosti prema EN 60355-2-79 | ||||
| Vrijednost vibracije na ruci | ||||
| Ručna prskalica | m/s² | <2,5 | ||
| Cijev za prskanje | m/s² | <2,5 | ||
| Nepouzdanost K | m/s² | 1 | ||
| Razina zvučnog tlaka LpA | dB(A) | 72 | ||
| Nepouzdanost KpA | dB(A) | 1 | ||
| Razina zvučne snage LWA + nepouzdanost KWA | dB(A) | 86 | ||
| Radni mediji | ||||
| Količina ulja | I | 0,35 | ||
| Vrsta ulja | SAE 15W40 | |||
| Dimenzije i težine | ||||
| Duljina | mm | 360 | ||
| Širina (CX) | mm | 375 (400) | ||
| Visina | mm | 925 | ||
| Težina bez pribora (CX) | kg | 25 | 27 | |
| Tip | HD 7/10 C XF 1.151-619.0 | HD 7/18 C 1.151-600.0 1.151-614.0 | HD 7/18 C 1.151-613.0 | |
| HD 7/18 CX 1.151-657.0 | HD 7/18 CX 1.151-650.0 | |||
| EU | EU | EU II | ||
| Priključak na elektricnu mrežu | ||||
| Napon | V | 400 | 230 | |
| Vrsta struje | Hz | 3~50 | ||
| Priključna snaga | kW | 3,0 | 4,7 | |
| Osigurač (inertni, karket. C) | A | 16 | ||
| Zaštita | IPX5 | |||
| Maksimalno dozvoljena impedancija | Ohm | - | ||
| Produžni kabel 30 m | mm² | 2,5 | ||
| Priključak za vodu | ||||
| Dovodna temperatura (maks.) | °C | 80 | 60 | |
| Dovodni protok (min.) | l/min | 13 | ||
| Visina usisavanja iz otvorenih posuda (20°C) | m | 0,5 | ||
| Dovodni tlak (maks.) | MPa | 1 | ||
| Podaci o snazi | ||||
| Radni tlak | MPa | 10 | 17,5 | |
| Maks. radni pretlak | MPa | 12 | 21,5 | |
| Veličina mlaznice (CX) | 060 | 040 (042) | ||
| Protočna količina | l/min | 11,5 | ||
| Usisavanje sredstva za pranje | l/min | 0...0,6 | ||
| Povratna udarna sila ručne prskalice (maks.) | N | 21 | ||
| Uvtvrdene vrijednosti prema EN 60355-2-79 | ||||
| Vrijednost vibracije na ruci | ||||
| Ručna prskalica | m/s² | <2,5 | ||
| Cijev za prskanje | m/s² | <2,5 | ||
| Nepouzdanost K | m/s² | 1 | ||
| Razina zvučnog tlaka LpA | dB(A) | 77 | ||
| Nepouzdanost KpA | dB(A) | 1 | ||
| Razina zvučne snage LWA + nepouzdanost KWA | dB(A) | 91 | ||
| Radni mediji | ||||
| Količina ulja | I | 0,35 | ||
| Vrsta ulja | SAE 90 hipoidno | |||
| Dimenzije i težine | ||||
| Duljina | mm | 360 | ||
| Širina (CX) | mm | 375 (400) | ||
| Visina | mm | 925 | ||
| Težina bez pribora (CX) | kg | 33 | * | 31,8 (32,5) |
| * 1.151-600: 30,8 kg; 1.151--614.0: 34,5 kg; 1.151-657.0: 32,5 kg | ||||
Pregled sadržaja
Sastavni delovi uredaja . . . SR . .1
Sigurnosne napomene.... SR...2
Namensko koriścenje.... SR...2
Sigurnosni elementi . SR 2
Zašitaživotne sredine.... SR...3
Pre upotrebe SR .3
Stavljanju pogon . SR 3
Rukovanje SR .4
Transport SR .6
Skladištenje SR .6
Nega i održavanje SR .6
Pomoc u slucaju smetnji . SR . .7
Rezervni delovi. SR .7
Garancija SR .7
Izjava o usklaedenosti sa propisima EZ . . . . . . . . . . . . . . . . . . . . . . . . . . . . . . . . . . . . . . . . . . . . . . . . . . . . . . . . . . . . . . . . . . . . . . . . . . . . . . . . . .
Tehnicki podaci. SR .9
www.kaercher.com/REACH
Pre upotrebe
Raspakovavanje
2006/42/EZ (+2009/127/EZ)
2004/108/EZ
2000/14/EZ
Primenjene uskladene norme:
EN 60335-1
EN 60335-2-79
EN 55014-1:2006 + A1:2009
EN 55014-2: 1997 + A2: 2008
EN 61000-3-2: 2006 + A2: 2009
HD 7/10, HD 7/16, HD 7/18
EN 61000-3-3: 2006
HD 5/17, HD 6/12, HD 6/15:
EN 61000-3-11:2000
EN 62233: 2008
71364 Winnenden (Germany)
Tel.: +49 7195 14-0
Winnenden, 2012/09/01
Tehnicki podaci
| Tip | HD 5/17 C 1.214-111.0 1.214-113.0 | HD 5/17 C 1.214-110.0 1.214-112.0 | HD 6/12-4C 1.150-160.0 1.150-161.0 | |
| HD 6/12-4 CX 1.150-162.0 | ||||
| BR | EU | EU | ||
| Priključak na elektricnu mrežu | ||||
| Napon | V | 220 | 230 | |
| Vrsta struje | Hz | 1~60 | 1~50 | |
| Priključna snaga | kW | 3,2 | 2,8 | |
| Osigurač (inertni, karakt. C) | A | 16 | ||
| Stepen zašite | IPX5 | |||
| Maksimalno dozvoljena impedancija | Ohm | (0.302+j0.189) | 0.386+j0.241 | |
| Produžni kabl 30 m | mm² | 2,5 | ||
| Priključak za vodu | ||||
| Dovodna temperatura (maks.) | °C | 60 | ||
| Dovodni protok (min.) | l/min | 12 | ||
| Visina usisavanja iz otvorenih posuda (20°C) | m | 0,5 | ||
| Dovodni pritisak (maks.) | MPa | 1 | ||
| Podaci o snazi | ||||
| Radni pritisak | MPa | 16 | 17 | 12 |
| Maks. radni nadpritsak | MPa | 21,5 | 18 | |
| Veličina mlaznice | 028 | 043 | ||
| Protočna količina | l/min | 8,3 | 10 | |
| Usisavanje deterdženta | l/min | 0...0,6 | ||
| Povratna udarna sila ručne prskalice (maks.) | N | 21 | 26 | |
| Izračunate vrednosti prema EN 60355-2-79 | ||||
| Vrednost vibracije na ruci | ||||
| Ručna prskalica | m/s² | <2,5 | ||
| Cev za prskanje | m/s² | <2,5 | ||
| Nepouzdanost K | m/s² | 1 | ||
| Nivo zvučnog pritiska LpA | dB(A) | 72 | 70 | |
| Nepouzdanost KpA | dB(A) | 1 | 2 | |
| Nivo zvučne snage LWA + nepouzdanost KWA | dB(A) | 86 | 85 | |
| Radni mediji | ||||
| Količina ulja | I | 0,35 | ||
| Vrsta ulja | SAE 15W40 | |||
| Dimenzije i težine | ||||
| Dužina | mm | 360 | ||
| Širina (CX) | mm | 375 (400) | ||
| Visina | mm | 925 | ||
| Težina bez pribora | kg | 29 | 27 | * |
| * 1.150-160.0: 26 kg; 1.150-161.0 26,5 kg; 1.150-162.0: 31 kg | ||||
| Tip | HD 6/15 C 1.150-600.0 1.150-621.0 | HD 6/15 C 1.150-620.0 | HD 6/15 C 1.150-624.0 | |
| HD 6/15 CX 1.150-650.0 | HD 6/15 CX 1.550-655.0 | HD 6/15 CX 1.150-659.0 | ||
| EU | CH | KAP | ||
| Napon | V | 230 | 220 | |
| Vrsta struje | Hz | 1~50 | 1~60 | |
| Prikljucna snaga | kW | 3,1 | 2,2 | 3,2 |
| Osigurač (inertni, karket. C) | A | 16 | 10 | 16 |
| Stepen zašite | IPX5 | |||
| Maksimalno dozvoljena impedancija | Ohm | 0.302+j0.189 | ||
| Produžni kabl 30 m | mm² | 2,5 | ||
| Prikljucak za vodu | ||||
| Dovodna temperatura (maks.) | °C | 60 | ||
| Dovodni protok (min.) | l/min | 12 | ||
| Visina usisavanja iz otvorenih posuda (20°C) | m | 0,5 | ||
| Dovodni pritisak (maks.) | MPa | 1 | ||
| Podaci o snazi | ||||
| Radni pritisak | MPa | 15 | 11 | 14 |
| Maks. radni nadpritsak | MPa | 21,5 | 15 | 21,5 |
| Veličina mlaznice | 034 | 043 | 036 | |
| Protočna količina | l/min | 9,5 | ||
| Usisavanje deterdženta | l/min | 0...0,6 | ||
| Povratna udarna sila ručne prskalice (maks.) | N | 21 | ||
| Izračunate vrednosti prema EN 60355-2-79 | ||||
| Vrednost vibracije na ruci | ||||
| Ručna prskalica | m/s² | <2,5 | ||
| Cev za prskanje | m/s² | <2,5 | ||
| Nepouzdanost K | m/s² | 1 | ||
| Nivo zvučnog pritiska LpA | dB(A) | 72 | ||
| Nepouzdanost KpA | dB(A) | 1 | ||
| Nivo zvučne snage LWA + nepouzdanost KWA | dB(A) | 86 | ||
| Radni mediji | ||||
| Količina ulja | I | 0,35 | ||
| Vrsta ulja | SAE 15W40 | |||
| Dimenzije i težine | ||||
| Dužina | mm | 360 | ||
| Širina (CX) | mm | 375 (400) | ||
| Visina | mm | 925 | ||
| Težina bez pribora (CX) | kg | * | 34,5 (32,5) | 27 (32,5) |
| 1.150-600.0: 27 kg; 1.150-621.0: 32,5 kg; 1.150-650.0: 32,5 kg | ||||
| Tip | HD 6/15 C 1.150-623.0 | HD 6/15 C 1.150-628.0 | HD 6/15 C 1.150-627.0 | |
| KAP | GB/AU | AR | ||
| Priključak na elektricnu mrežu | ||||
| Napon | V | 220 | 240 | 220 |
| Vrsta struje | Hz | 1~50 | ||
| Priključna snaga | kW | 3,0 | 3,1 | |
| Osigurač (inertni, karket. C) | A | 16 | 13 | 16 |
| Stepen zašite | IPX5 | |||
| Maksimalno dozvoljena impedancija | Ohm | 0.302+j0.189 | ||
| Produžni kabl 30 m | mm² | 2,5 | ||
| Priključak za vodu | ||||
| Dovodna temperatura (maks.) | °C | 60 | ||
| Dovodni protok (min.) | l/min | 12 | ||
| Visina usisavanja iz otvorenih posuda (20°C) | m | 0,5 | ||
| Dovodni pritisak (maks.) | MPa | 1 | ||
| Podaci o snazi | ||||
| Radni pritisak | MPa | 13 | 15 | |
| Maks. radni nadpritsak | MPa | 21,5 | ||
| Veličina mlaznice | 036 | 034 | ||
| Protočna količina | l/min | 9,5 | 9,3 | |
| Usisavanje deterdženta | l/min | 0...0,6 | ||
| Povratna udarna sila ručne prskalice (maks.) | N | 21 | ||
| Izračunate vrednosti prema EN 60355-2-79 | ||||
| Vrednost vibracije na ruci | ||||
| Ručna prskalica | m/s² | <2,5 | ||
| Cev za prskanje | m/s² | <2,5 | ||
| Nepouzdanost K | m/s² | 1 | ||
| Nivo zvučnog pritiska LpA | dB(A) | 72 | ||
| Nepouzdanost KpA | dB(A) | 1 | ||
| Nivo zvučne snage LWA + nepouzdanost KWA | dB(A) | 86 | ||
| Radni mediji | ||||
| Količina ulja | I | 0,35 | ||
| Vrsta ulja | SAE 15W40 | |||
| Dimenzije i težine | ||||
| Dužina | mm | 360 | ||
| Širina (CX) | mm | 375 (400) | ||
| Visina | mm | 925 | ||
| Težina bez pribora (CX) | kg | 25 | 27 | |
| Tip | HD 7/10 C XF 1.151-619.0 | HD 7/18 C 1.151-600.0 1.151-614.0 | HD 7/18 C 1.151-613.0 | |
| HD 7/18 CX 1.151-657.0 | HD 7/18 CX 1.151-650.0 | |||
| EU | EU | EU II | ||
| Priključak na elektricnu mrežu | ||||
| Napon | V | 400 | 230 | |
| Vrsta struje | Hz | 3~50 | ||
| Priključna snaga | kW | 3,0 | 4,7 | |
| Osigurač (inertni, karakt. C) | A | 16 | ||
| Stepen zašite | IPX5 | |||
| Maksimalno dozvoljena impedancija | Ohm | - | ||
| Produžni kabl 30 m | mm² | 2,5 | ||
| Priključak za vodu | ||||
| Dovodna temperatura (maks.) | °C | 80 | 60 | |
| Dovodni protok (min.) | l/min | 13 | ||
| Visina usisavanja iz otvorenih posuda (20°C) | m | 0,5 | ||
| Dovodni pritisak (maks.) | MPa | 1 | ||
| Podaci o snazi | ||||
| Radni pritisak | MPa | 10 | 17,5 | |
| Maks. radni nadpritsak | MPa | 12 | 21,5 | |
| Veličina mlaznice (CX) | 060 | 040 (042) | ||
| Protočna količina | l/min | 11,5 | ||
| Usisavanje deterdženta | l/min | 0...0,6 | ||
| Povratna udarna sila ručne prskalice (maks.) | N | 21 | ||
| Izračunate vrednosti prema EN 60355-2-79 | ||||
| Vrednost vibracije na ruci | ||||
| Ručna prskalica | m/s² | <2,5 | ||
| Cev za prskanje | m/s² | <2,5 | ||
| Nepouzdanost K | m/s² | 1 | ||
| Nivo zvučnog pritiska LpA | dB(A) | 77 | ||
| Nepouzdanost KpA | dB(A) | 1 | ||
| Nivo zvučne snage LWA + nepouzdanost KWA | dB(A) | 91 | ||
| Radni mediji | ||||
| Količina ulja | I | 0,35 | ||
| Vrsta ulja | SAE 90 hipoidno | |||
| Dimenzije i težine | ||||
| Dužina | mm | 360 | ||
| Širina (CX) | mm | 375 (400) | ||
| Visina | mm | 925 | ||
| Težina bez pribora (CX) | kg | 33 | * | 31,8 (32,5) |
| * 1.151-600: 30,8 kg; 1.151--614.0: 34,5 kg; 1.151-657.0: 32,5 kg | ||||
opnHnHaHNO HNcTpyKUy 3a pa6Ota, DeICTBaIte CnopeI Hero Iro 3ana3eTe 3a NO-KbCHO N3PON3BaHe IJIN 3a CNeDBAUna npITexKaTeI.
CbDpbXaHne
ElenmEnHa ypea. .BG...1
Yka3aHnna 3a 6e3oNaChOCT. BG .2
YnOTope6a no npEJaHa3NaueHne BG .2
PpeDn3H npncno6neHg BG...2
Ona3BaHe Ha OKJHaTa cpea BG . .3
Преши рунckeане в Ezekлноация... BG...3
IyckaHe B eKcnIIOaTaUnia... BG . .4
O6cIyXBaHe BG...5
TpaHcnpT BG...6
Cbxpahene. BG...6
PnKn n noDpBxKa. .BG...7
Pomou npn npo6jemn... BG...7
Pe3epBn Yactu .BG...8
TapaHua BG...8
Декларачnia 3a CbOTBETCTBNE ha EO... BG...9
Texnuecken daHHN.. BG...10
EneMeHTn Ha ypeDa
MOnIaIeTe cTpaHaTa CfNrgpata OTnped
1 IocTabka 3a IHO3ata
2 Dpbjkk
3 N3bOd 3a BnCOKo HaJraHe
4 MaHOMeTbp
5 PerynipaHe Ha HanaRaHeTo/KoJIuYeCTBOTo HD 6/15
3axpaHbHe c Boda
7 Ioka3aHne 3a HNBOTo Ha Macnoto
8 Pe3epBoap 3a MacItoTo
9 Kanak Ha ypeda
10 KIIOH Ha ypeda
11 3aKpeBbAs BnHT Kaak Ha ypeDa
12 NocTabka 3a Mapkyu
13Дрьжka 3a пистолета 3a рьчно npбckaHe
14 Kyka ha mapkyua
15 I03a
16 Mapknipobka Ha duO3aTa
17 Tpb6a 3a pa3npbckBaHe
18 PerynipaHe Ha HanaRaHTo/KoJIuYeCTBOTO HD 7/18
19Пистолета рьчно пьсканe
20IpeDnA3eHIOCT
21 loct ha nictoleta 3a pbyno npbckahe
22 Mapky 3a pa60ta pod hajrahe
23Пльзраа скоба
24Дьржateлзакавета
25ПитисашбоNTпьзгашаскоба
26 Mapky 3a BCMyKBaHe Ha NOHCTBaIcOp cpeICTBO C pHJTbP
27ДоЗираш,BeHTIN IOUHCTBaIoo CpeI-CTBO
28 YeKeMeJxke 3a npHaJdJIeXHoCTN
29 Bapa6aHa Mapkya
30 MaHnVeJa
31 AanTep
LBeTHO 06o3HaeHne
- OcbnykBaunTe eJemEnTn 3a npOceca Ha oCbnykBaHe ca KblTN.
- O6cIyKbAunTe eIeMeHTn 3a NOIdpbXka n cepBn3 ca CBETIOCNBn.
Yka3aHnna 3a 6e3oNaCHOCT
- Праздп nbрвото nуckaнe В ekслноацян He npemehno npoутete Yntb-a-heto 3a ekcnilnoataця № 5.951-949!
-Да ce cna3BaT cBoTBeTHnTe HaIcNo-HaIIHn I3NCKBaHnHa 3aKoHOdaTeJIa 3a CtpyHn anapatn.
-Да ce cna3BaT cBoTBeTHnTe HaaNoHahINи n3NcBbAHnHa 3aKoHOdaTeIa 3a npedna3BaHe ot 3lononyKn. CtpyHnTe anapatn Tp6Ba da ce npOBepaBAt peIOBHO n pe3yIITata OT npOBepkata da ce 3aIncBa.
CnMBoJn Ha YnbTbAHeTo 3a ynotpe6a
Onachocm
3a HnocpecdcmbeHo ap03ra ocacHocm, KOmo 6odu do mekku melechu nopedu Unu do cMbpm.
IpeynpeXdeHue
3a 6b3moxHa onacha cumyaucu, KOam 6u moana da doeede do mexku melechu noepedu unu cmbpm.
BhumaHue
3a 3MOxHa onachacumyaucu, KOmo 6u Moana da doeede do leku melechu noepedu unu mamepuanhu uemu.
CnMbOJIH na ypeDa

CunHume cmpyu noh Hanraeane Moaam npu HnpaBunHo non3-eane da ca onachu. He hacou-
eaime cmpyma KbM xopa, JxubomHu, akmuHNeIekmpuuecku ypeDu Ulu KbMCamua ypeD.

Cbaanacno bauohume pa3npoed6bu He ce no3e0nla u3no138aHe Ha ypeda e mpekama 3a numeuHa eoda 6e3 pa3denumeJ ha cuc
memama.Използьше похорц pa3deлumen Ha cuscemama Ha Фчрma Karcher unu kamo anmephamuepa3deIumen Ha cuscemama cban. EN 12729 mun BA.
PpemuHaama npes pa3eNumenHa cucmemama oda ce onpeedena kamo He- zo0Ha 3a nuene.
YnoTpe6a no npdeHa3NaueHne
I3noJ3BaIte cAmO To3n ypeD 3a noUcCTBaHe C BVCOKO HaJIraHe
3aNouchTbaHe cbc CTPyH NsCKo HaIraHe H NouchTbaU npenapat (HaP. nouchTbaHe Ha Maunu, npeBo3nCpeDCTBa, CTOINTEJIHN KOHCTpyKcnn, INHCTpymEnTu),
3a nouchTaBHe CbC CTpy BucO KaIrahe 6e3 nouchTbaU npenapat (HaNP. Ha φacAn, Tepacn, rpaunHcN ypeu).
3a ynpnte 3ambpcraBAnn Bn npenopbV Bame ppe3ata 3a MpbCOTn KaTo CneunAInHa npHnAdIeXHOCT.
PpeNa3Hn npncnoc6JeHna
Преловен Вентл с пhevBMATЧЕнпөкьсВач
При hamалявае На количесьOTO Ha BO-дата Ha C Perулларе На habяганeto/КOLИЧЕСТВОТО Ппелов�г В entIN OTBapЯ И endhaЧа CTOT BOДATA N3TNUA OбpaTHO KBM CMykaTeJIHATA CTpaHa Na NOMnata.
Ako ce ocbo6oDn loCTbT ha nctOJeTa 3a pbyHO npbCKBaHe, INeBMaTHNHT KOtAKr N3KlHOba NOMnTa, CTpy BVCOKO HaJraHe npeKcbA. Ako IocbT ce npdIbPna, OTHOBO BKJIIOUba NOMnTa.
PpeDna3eH Klaanah (cAmo HD 7/18)
PpeIpa3HnT KIpaIaH OTBapr npu HaNbWuBaHe Ha DOnyCTmOTO pa6OTHO CBpBXHaJIraHe, BOdaTa I3TNa O6paTHo KbMCyKaTeJIHATA CTpaHa Ha NOMnTa.
IpeINIBeH BENTIN, INHeBMaTUnEn IpeKbCBAu INpeJa3eH KJanaH Ca HacTpOeHN fapnH O NlOM6bpaHn.
Hactpoika camo B cepBn3a.
Ona3BaHe Ha OKoJHaTa cpeDa
www.kaercher.com/REACH
PpeDn nyskaHe B ekCnIooatauia
Pa3onakObaHe
CbIbpxKaHHeTo Ha onaKOBkaTa da ce npOBeRn npu pa3oNaKOBaHe.
- Pn TpaHcnpTn DeΦeKtn He3a6abHo HΦopMnpaIte TbproBeua.
Да се повери НвOTO на MacлOTO
Ioka3aHHeTO 3a HbTo Ha MacNoTo Da ce OTe npu ypeD B nOKo. HbTo Ha MacNoTo Tp6Ba Da 6bJe Ha dBBeTe CtpeKN.
Aктувиран БеHTиlaцяpe3epBoap 3a MacLo
Да ce pa3Bne 3akpenBaunBnHT Ha KaNaka Ha ypeDa, Da ce CBaN KaNaka Ha ypeDa.
Да ce отраве Вьрха Ha Kanaka Ha pe-3epBoapa 3a MacNo.
→Да ce зakpenи kaṇaka ha ypeəa.
MOnTpaIe TpHnHaJdJeXHoCTnte
IIO3aTa Da Ce MOHTnpa Ha Tpb6aTa 3a pa3nPbCKBaHe (MapKINPOBKN Ha nPbC-TeHa 3a HAcTpoiKa rope).
Tp6aTa 3a pa3npbCKBaHe da ce CBp-Ke C NtCTOJeTa 3a pbHNO pa3npbCKBaHe.
Yka3aHue
Camo npu HD 7/10 CFX:
Ipu hedocmu Ha mAcmo npulekauym aadamop 3aeDHO c dio3ama MoKe da ce mohmupa dupekmHo KbM pBuHnAm wnpu- uucmonem.
Ppynyeepn6e36apaa6an3aMapkyua:
Na ce ocbo6oM 3aTgAHeTo Ha nIb3-raata cko6a.
3ataata cko6a 3a ce hactpon Ha XeJHaTa BnCOUnHa.
Ia ce 3aterhe 3atraHETO Ha nIb3ra- uata cko6a.
Mapkya 3a pa60Ta noi HaIraHe da ce 3aTeIHe Hn3BOv BnCOKo HaIraHe.
Pn ypei n c 6apaa6an 3a Mapkyua:
→MaHnBeNaTa Da Ce NbXHe Bb BaHa Ha 6apabHa 3a Mapkyu n Da ce fNkCu- pa.
→ Mapkya 3a pa60Ta noJ haJIraHe npEiN HauBbAHeTo Da ce nOLOXn B pa3TeTJHeO CbCTO8Hne.
Mapkya 3a pa60Ta noi HaIraHe da ce HABnE CbC 3aBbP TaHe Ha MaHInle- nata Ha paBHOMepHn DblJINH Bbpxu bapabaha Ha mapkya. Pocokata Ha BbPTeHe Da ce N36pe TaKa, Ye mapKy- YbT 3a pa60Ta noi HaJIraHe da He ce npereYba.
Nyckahe B ekcnIIOaTaunia
EneKtpnuecko 3axpaHBaHe
Onachocm
Onachocm om Hapahrahe om eNeKmpu-yecku ydap.
C8pb38aume ypeda cmo KbM npomeHnue mok.
Ypeb'm Moje da ce Eknioyba cmo KbM eJekmpuecku KOHmkm, u3nblHeH om eJekmpomexHuk cbJeIacHO IEC 60364.
3adadehomo Ha ykaameHama mabekKa Hanpexehue mp8ea da cbenaada c HanpeKehuemo Ha KOhmaKma.
MuHmAleH npedna3umel 3a KOHmakma (Buxkme TexHuyecku daHHU).
He 6uea da ce hadeuwaaba maKcumalno donycmumomo nIbnHO Hanpexehue Ha mpekama ha eJeKmpuyeckama mocka 3a npucbeunheane (Buxme Texnueeku daHnu).Ppu HeChomu no omHoweue Ha hauhmo Ha Bawama moka 3a npucbeunheane nblnHO Hanpexehue Ha mpekama mona da ce cBpxeme c Bawemo npednpuraune no enekmpo3axpaheae.
Ypeobmmp6ba da ce nodbpxe 3adbljxumenHc ukep Kb m eekmpueeckamaMpexa.3abpanea ce he pa3deIemaep3ka c enekmpueeckamaMpexa.Lekepbm cnkyu 3a pa3deIne omMpexama.
Ipedu 6cko c6bpr3aHe Ha KaBeHa c KOHmakma Ha eNeKmpo3axpaHbaHemo, npoeepraume KaBeHa 3a noepdu.
He3a6a8n npedaune noepedeHume c6bp3eaun Kaebu 3a noDmHa Ha ompu3upaan cepu3/eneKpmomexHuk.
Ueencenb m, ukeepb m u Kynnyhe b m Ha u3non3aunu yobjxumenmpjaea da ca eodoycmoueu.
Да ce u3noJI3ea ydIbIxumeJen Ka6en c docmambHcOceHue (Buxme "TexHuCeCKu daHHU") u 2o pa3BuIme HAnbIHO om bapababa 3a Ka6ena.
Henodxoaduume ydbkumenu Moaam da 6bdam onacnu. Ha omkpumo u3noJ3aUme camo cbombeMnO pa3peuHume u obo3nauehu ydbkumenu c docmabuHo ceueHue:
3a napameTpne 3a CBp3BaHe BnK Ta-6eIkataHa ypeJa/TexHnuecknTe napameTpni.
3axpaHbAHe C BOda
IopBbP3BaHe KbM BOOpnpoBOHaTaMpexka
IpeynpeKdeHue
Cb6nlodaeaume pa3npope6ume Ha eodocha6umenuhama komnaHua.
Cbanacho eauohume pa3npoed6u He ce no3boJra u3noJ3aHe Ha ypeDa empxama 3a numeHa boda 6e3 pa3deJumel Ha cucme

Mama. IV3non3Baume noDxodra pa3denu meHa cuscemama Ha 4upma KARCHER unu kamo anmephamuea pa3denu men Ha cuscemama cban. EN 12729 mun BA.
IpemuHaIama npe3 pa3dEumenHa hCuCmemama bOda ce onpeDeJema KAmo HeZoDHa 3a nueHe.
BhumaHue
Pa3deIumenm Ha cucmemama mpr6ea da 6bde c8bp3eAH BuHaZU KbM 3axpaHbaHemo C ooda, Hukoza dupekmno KbM ypeda!
Парамерпгte 3a CBp3BaHe ВИКTe OТ Текнистпданн.
yKa3aHue
3axpaHbAaIMyMapKyu (MnHmMaJIHa 1/2") da ce noBbPke KbM n3BOJa 3a BOJa Ha ypeJa I BOJOpBOJHaTa MpeKa (HaNP. BOJOpBOJeH KpaH).
3axpaHeaunm Mapky He e EKlOueH oBema Ha docmaKa.
Ia ce OTBOPn BxOJa 3a BOJaTa.
Bcmykbahe Ha BOda OT OTKpTN KOHTeHepn
Mapky3aBCMkyBaHe cΦnITbP (Ho-Mep 3a npByka 4.440-238.0) da ce 3a-BVe Ha n3BOda 3a BOda.
Да ce obe3Bb3dUn ypeDa:Да ce pa3BnE IIO3aTa.YpeDa Da ce ocTabn Da pa6Otn,doKaTo BOdaT a 3anOuHe da n3nn3a Be3 Mexyp-eta.
UpeJa da ce ocTabn da pa6oTn eBentyAnHo 10 cekyn-da ce n3KnOuN. Ppoeca da ce nobTopn MHorokpaTHo.
YpeJa Da Ce N3KJIIOH N OTHOBO Da ce 3aBVe DIO3aTa.
06cnyXbaHe
Onachocm
Onachocm om ekcnnoia!
He npbckaume 3nnaMeHemaMu meHo-cmu.
Ia ce cna3eam MEPkume 3a 6e3oanachocm npu pa6oma c ypeda e onacHu 30Hu (Ha- npumep Ha 6eH3uHocmaHcU).
BhumaHue
Momopume da ce noucmeam camo Ha Mecma cbc cbomemnu MacnoynoumeJU (3aumHa OKoJHama cpeda).
Onachocm om 3anyuBahe. Iozume da ce nocmaaem camo c omeopa Haeope e yeKmedjemo 3a npuaadnexhocmu.
Pa6ota c BnCOKo HaJraHe
YKa3aHue
Ypeobm e obopydean c nHeMaumuenpeKbcaeu. Momopbm ce 3adeucmea caMo, Kozamo Iocma Ha nucmolema e u3-dbpnaH.
→ Mapkyu Bucoko HaJraHa Ze da ce pa3Bne 13zIIO OT 6apabaha Ha Mapkyua.
→IocTaBeTe KInuHa Ha ypeHa Ha,1.
Да се дблokира псстолета 3а рьногпьскане и да се Идьрна Лоста на псстолета.
Pa60THoTo HaJIraHe n De6bTa da ce HAcTPOr NocpeJeCTBO 3aBbPtaHe (6e3-CTepeHHO) Ha peryIuipaHETo Ha HaJIraHeTo I KOJIuYeCTBOTo (+/-).
H36peTe TnHa cTpyra
3aTbaprHe Ha nIcToIeTa 3a pBHyO npbckaHe.
Да ce 3aBbptn Koprnyca Ha Дюзata,do-KaTO JeJHaHn CmB0J C MapKInpOBka CbBnAДHe:
Ako He Bb3MOxHO CbXpaHraBaHe Ocnrypeho npOTnB 3aMp3BaHe:
Da ce npoodyxa BOdaTa.
B ypeda da ce HANOMN KONBEHcnoHaJIeH aHTnΦpN3.
yKa3aHue
Ia ce u3noJ3ea KOHeeHcUoHaJIe H npenaPam 3a 3auima om 3ampb36aHe 3a aemMo6uHa eKoHa OCHoA.
Ia ce cna3bam pa3npope6ume 3a pa6oma Ha npou3bodumenHa npenapama 3a 3a- uema om 3ampb38aHe.
YpeJa da ce ocTabu da pa6oTm MaKc.1 MInHyTa DOKaTO Ce n3PpA3HrT NOMnTaI IN PPOBOdITe.
TpaHcnpT
Onachocm
Onachocm om hapaHrahe u nopeda! Ppu mpancnpm umaime nped bud meanomo ha ypeda.
3a TpaHcnpT Ha no-DbIgN OTecuKnypeJa Da ce Dbpna 3a dpbXkkaT.
Pn ypei 6e3 6apaban 3a Mapkyua nnb3raaata cko6a 3a Hoche da ce o6bpne Ha3a. 3a Hoche ypeJa da ce XbaHe 3a Dpbknte, He 3a PnB3raaTa cko6a.
→ Pπu TpaHcnpot B aBtOMoBnIn OcnIpyBaIte ypeDa CbIaCHO BaIIINHITe DnpeKTHBn IpOTNB IIb3raHe n pneo-6pbIaHe.
CbXpaHHe
Onachocm
Onachocm om hapaHaehe u nopeda! Ppu cxbxpanehue umaume nped bud meaIomo ha ypeda.
TpnxnnoDpBxka
Onachocm
Onachocm omnapaHaeBaHe npadu HeInpedHamepeHo nomeeJnau, yped u enekmpuueecku ydap.
Ipedu BCuKU deuHocmu no ypeda mo da ce u3kIouu d a ce u3eaDu uenceta.
Yka3aHue
Cmapomo Macno da ce omcmpaHReBa camo Ha npeduDeHume 3a ueIma Mecma 3a cb6upane. Monn pedeAme mam noIyUJUmo ce cmapo macNo. 3ambpcraHuraMa Ha OKolHama cpeda cbc cmapu macna ca Haka3yuMu.
HcneKzna 3a cnrgpnoct/OrOBop 3a npdpbJka
Moxete da IOROBOpIte peIOBHa IHcneKuIa 3a CnryphocT C Baunr TbproEu IINI da CKHOnTe IOROBop 3a NODpBxka.
Mojna nckaTe cbbTu.
PpeiBcKaeknloaataua
→ПисьeДинТeЛнИк Ka6eДа се поВери 3a yBpeЖданИЯ (ОпаСНСТ OT eLEKТрИчecNiуpeД), yBpeДeHNTe риСьeДинTeЛнИ Ka6eЛи He3aБаВно Да ce CмЕнЯТ OT aВTOPиЗИрANИя cepВИЗ/ eLEKТpoTeXИК.
Пюверете маркуа 3a paбота под налгаге за уврждань (onaCHOCT OT nponyквае).
He3a6abHcMehTe Mapkyu 3a pa6oTa noHaJraHe.
Ypeja (nomnata) da ce npobepn 3a xepmetuHocT.
3 KaIKN BOa Ha MNHyTa Ca DONyCTMn I MoRat Da N3TuYAT OT DoJHaTcTaPaHa Ha ypea. Ipn No-CJHn HexepMeTuHOCHTN NOTbPcTe cepBn3a.
ExceDmNHO
→Да ce npOBeRcBcTOrHnEToHaMacINoTO.AKoMaCnOTo eMNeKOpIoDObHo (BOda B MacNoto),BeiHaRaNotbpcTe cepBn3a.
Да ce пости цедkaТа КьМ 3axpaHba-HETO C BODa.
Да ce louHCTnФиNTbpaHa BCMyKBa- UINa MapKyu IOuHCTBaUO CpeIcTBO.
EkeoHn no nIcpe500 pa6oTHn Yaca
Da ce cmeHn MacJIoTO.
CmHa Ha MacNo
Yka3aHue
Koluuecmbomo u euda ha Macnomo eukme om "TexHuuecku daHnU".
Да ce pa3BnE 3akpenBaunBnHT Ha KaNaka Ha ypeDa, Da ce CbAni KaNaka Ha ypeDa.
→ CbaIeTe KaIaKa Ha pe3epBoapa 3a MacJIO.
→HaKnoHeTe ypeIa HappeI.
→ MacIIOTo Da ce n3nycHe B npHmHnCbD.
Babho HaneiTe HOBOTo MaCNo; Bb3- DyuHnTe MexypueTa Tp6Ba Da ce npcbchat.
→ ΠοctaBeTe KaIaKa Ha pe3epBoapa 3a MacNo.
→Да ce Зakpenи калaka на урета.
Pomou npn npo6IeMn
Onachocm
Onachocm om HapaHraBeHe npadu He- npedHamepeHo nomeeJnau yped u enekmpuuecku ydap.
Ipedu ecuku deuHocmu no ypeda mo da ce u3kIouu da ce u3eaDu uenceena.
EneKmpuueckume KOHcmpykmusHu eMeHmu da ce npoepeam u nonpaarmcmo om aemopuzpan cepu3.
Ipu nopedu, Koumo He ca nocouehu e ma3u anaba, npu cnyau Ha konlebaHue u npu u3puuHO yka3aHue nombpceme aemopu3upaHua cepu3.
YpeIbT He pa60Tu
ПисьеДиНтелпя Кабел дa ce npobervи 3a NOBpeDn.
Да се повери напөгэнөгэнүлэд Мрөджата.
→ Pπeπεκτρηνεκκι έφεκτ έας έο-Tbρсι cepBn3a.
YpeIbT He DoCTnra Hajrahe
ПoctabeTeДIO3aTaHa „Bucoko HanaRa-He".
→ПочистетеДюзараз.
→ CMeHeTe IIO3aTa.
06e3Bb3dnyuweTe ypeJa (BnKTe "Pnycka-He B DeiCtBne").
Да се поверп дебит ha ВODаТа 3a 3axpaHbAHe (BnKTe TExHnueckn daHn).
Да се поини цедkaТа КьМ 3axpaHbA-HETO C BOДa.
Да ce поверят BCИЧК 3axpaHbAиТрьборpoBOДи КБМ ПOMnTa.
→Пи Heo6xOДIMOCT nOTbpcTe cepBn-3a.
HexepMeTnUHa nomna
3 KaKn BOJa Ha MNHyTa Ca DONyCTMn MOraT Da n3TuVat OT DoNHaTc CtpaHa Haypeda. Ppi no-CuHn HexepMeTuHocTn NOtbpceTe cepBn3a.
Пи п-силна HexepMeTnHOCt ypeda da ce npOBepn B cepBn3a.
Pomnata uka
→ CmykaTeJIHnTe TpIb6OpBoOuN 3a BOa nNoUcCTBaUo CpeIcTBO Da ce npOBeprT 3a TeOBe.
IozupaunBveHTn3aNouchTbaUcO cpeCTBaJaCe3aTBOpn6e3NouchTbaUcO cpeDCTBO.
06e3Bb3dnyuweTe ypeJa (BnKTe "Pnycka-He B DeiCtBne").
→Пи Heo6xOДIMOCT nOTbpcTe cepBn-3a.
Почиствашито средстбо не се 3acMyKba
IocTabete ro ha ,CHEM".
Да ce npOBeRn/NoUcTn MapKyu 3a BCMyKBaHe Ha NoUcTBAuO CpeDCTBO C ΦЛТьр.
Да ce OTBOPи ДОЗИрацЯ ВЕТиIЗ 3a NOчИстВашо CpeДСТВО ИПИ Дa ce ПОВери/ПОчИстN.
→Пи Heo6xOДIMOCT nOTbpcTe cepBn-3a.
Pe3epBHN qactn
MoraT da ce n3noJI3BaT cAmo npHaJIeXHOctn Ipe3epBnU qactn, KOnto caNo3BOJeHn OT npOn3BoJnteJ. OpiHnHaJIHnTe npHaJNeXHOctn I opInnHaJIHn pe3epBnU qactn DaBaT rapaHcNJa 3a TOBa, ypeDbT da MoKe da ce n3noJI3Ba cnIgRpHo n Be3 NOBpeDi.
CnncbKaHa Ha-uecTo Heo6xoDmntPe3epBnHuaCTnIe Hamepnte B KpaHa yTBAHeTO 3a EKcnnoataun.
Дуги Информаци OTHOCH pe3epBHNITEЧАТN MOЖЕ ДЯ NOЛУЧЕ на www.kaercher.com В облacrСервИЗ.
Rapanzna
BbB BcKa CtpaHa BaKaat rapaHcNoHHnte ycNoBn, Ny6NkYBaHn OT OTOp3npaHata OT Hac DnCTpN6yTopcKa fnpMa. EBeHTy- aHn NOBpeDn Ha BaHn ypeD ue OTcPaHm B paMKte Ha rapaHcNoHHn cPOK 6e3nLaTHo, Ako Ce Kacae 3a DeΦeKT B maTepeHnTE nPi npnPOn3BOdCTBO. B raPaHcNoHEn Cnyaai Ce o6bPheTe KbM DnCTpN6yTopa nIi Nah-6n3KnO TOpu3nPah CepBn3, KaTo ppeDcTabNe kacobata 6eJexka.
Декларачnia 3a cboTBeTCTBne Ha EO
C HacToaTO DeKJIapUpAme, Ye cIITnpaHaTa NO-DOJy MaunHa CbOTBeTCTBa NOKUePcNJa I KOHcTpKcNJa, KaKTo I NO HaUnn Ha IpnO3BOcTBo, PpINpaHr OT HAc, HA CbOTBeTHnTe OCHOBn I3NCKBaHnna 3aTexHnuecka 6e3OanachOCT n 6e3BpeNDocHa DnpeKTbnte Ha EO. Ppi npomEn HaMaunHaTa, KOnTo He ca CbflnacyBaHn C Hac, HactoaTa DeKlapaunr ryn BaInuHOCt.
Пюдукт: Парочанларoctpyиka 3a pa6ota noHaJaIraHe
Tun: 1.150-xxx
Tun: 1.151-xxx
Tun: 1.214-xxx
Hammpauni npnIooXeHne DnpeKTHBa Hc EO:
2006/42/EO (+2009/127/EO)
2004/108/AI
2000/14/EO
Hamepui npnloxehne xapmoHn3npa
HnCTaHdaptn:
EN 60335-1
EN 60335-2-79
EN 55014-1:2006 + A1:2009
EN 55014-2: 1997 + A2: 2008
EN 61000-3-2: 2006 + A2: 2009
HD 7/10, HD 7/16, HD 7/18
EN 61000-3-3:2006
HD 5/17, HD 6/12, HD 6/15:
EN 61000-3-11:2000
EN 62233: 2008
PpInIOxEN MeToI 3a OueHka Ha CbOT-
BETCTBNETO:
2000/14/EO:Прилwxьене V
HnBO Ha shym dB(A)
HD 5/17
U3mepeHo: 85
TapaANTupaHO:86
HD 6/12
U3mepeHo: 83
TapaHTnpaHO:85
HD 6/15
U3mepeHo: 85
TapaantupaHO:86
HD 7/10
U3mepeHo: 90
TapaantnpaHo: 91
HD 7/18
U3mepeHo: 90
ГараТиразно:91
71364 Winnenden (Germany)
Ten.: +49 7195 14-0
ΦaKc: +49 7195 14-2212
Winnenden, 2012/09/01
TexHHueckn DaHHN
| Тип | HD 5/17 C 1.214-111.0 1.214-113.0 | HD 5/17 C 1.214-110.0 1.214-112.0 | HD 6/12-4C 1.150-160.0 1.150-161.0 | |
| HD 6/12-4 CX 1.150-162.0 | ||||
| BR | EU | EU | ||
| Присьедиявае Кьм Мрекату | ||||
| Наразжения | V | 220 | 230 | |
| Вид тok | Hz | 1~60 | 1~50 | |
| Присьедиителна мошноct | kW | 3,2 | 2,8 | |
| Предлaitел (ленив, Char C) | A | 16 | ||
| Вид зашита | IPX5 | |||
| Мakсимално дочстимо пьлно наразжения на мрекату | Ohm | (0.302+j0.189) | 0.386+j0.241 | |
| Удълікітейен кабел 30 m | MM² | 2,5 | ||
| Зхсанован с вoda | ||||
| Temпература на постывацatura вoda (макс.) | °C | 60 | ||
| Дебит за постывацatura вoda (Min.) | Л/Min | 12 | ||
| Височина на засмунке от OTворенья сьд (20 °C) | M | 0,5 | ||
| Налаягаме на постывацatura вoda (макс.) | MPa | 1 | ||
| Данни за мошноctта | ||||
| РавOTно налаягаме | MPa | 16 | 17 | 12 |
| Макс. равOTно сбравхhalягаме | MPa | 21,5 | 18 | |
| Размер на дюзатa | 028 | 043 | ||
| Колочецто на поадаванe | Л/Min | 8,3 | 10 | |
| Засмунке на поочствацо среостwo | Л/Min | 0...0,6 | ||
| Сида на оtmора на пистолеса за рычно пьь-stkaоне (макс.) | N | 21 | 26 | |
| Установен STОЙСТС CBГПАСНЕ EN 60355-2-79 | ||||
| Стойост на вибрациме в облacrета на длиота - рыкatinga | ||||
| Пистолес за рычно пььскале | M/ceK² | <2,5 | ||
| Трьба за разпьскале | M/ceK² | <2,5 | ||
| Hecinогинст K | M/ceK² | 1 | ||
| Инbero на звука LpA | dB(A) | 72 | 70 | |
| Heystоуньст KpA | dB(A) | 1 | 2 | |
| Инbero на звукова мошност LWA + Heystоунь- вост KWA | dB(A) | 86 | 85 | |
| Гор�ни мaterпали | ||||
| Колочецто на маслоно | Л | 0,35 | ||
| Вид масло | SAE 15W40 | |||
| Мерки и тergla | ||||
| Дылжига | MM | 360 | ||
| Широчина (CX) | MM | 375 (400) | ||
| Височиna | MM | 925 | ||
| Тerglio и п riinallyожноctи | Кг | 29 | 27 | * |
| * 1.150-160.0: 26 kg; 1.150-161.0 26,5 kg; 1.150-162.0: 31 kg | ||||
| Тип | HD 6/15 C 1.150-600.0 1.150-621.0 | HD 6/15 C 1.150-620.0 | HD 6/15 C 1.150-624.0 | |
| HD 6/15 CX 1.150-650.0 | HD 6/15 CX 1.550-655.0 | HD 6/15 CX 1.150-659.0 | ||
| EU | CH | KAP | ||
| Наржени | V | 230 | 220 | |
| Вид тok | Hz | 1~50 | 1~60 | |
| Присьединтелна мошноct | kW | 3,1 | 2,2 | 3,2 |
| Прedingлел (лень, Char C) | A | 16 | 10 | 16 |
| Вид зашита | IPX5 | |||
| Мakсмално дорустимо пьлно наржени на мржата | Ohm | 0.302+j0.189 | ||
| Удьлжтоелег кабел 30 M | MM² | 2,5 | ||
| Зхранвае с вoda | ||||
| Temпература на постывацата вoda (макс.) | °C | 60 | ||
| Дебит за постывацата вoda (Min.) | Л/Min | 12 | ||
| Височина на засмунке OT OTворенья сбд (20 °C) | M | 0,5 | ||
| Налогане на постывацата вoda (макс.) | MPa | 1 | ||
| Данни за мошноctta | ||||
| РавOTно наляганe | MPa | 15 | 11 | 14 |
| Макс. равOTно свръхсанганe | MPa | 21,5 | 15 | 21,5 |
| Размер на дюзатa | 034 | 043 | 036 | |
| Колчесто на поадванe | Л/Min | 9,5 | ||
| Засмунке на поочствацю сре ductво | Л/Min | 0...0,6 | ||
| Сида на оtmора на пистоleta за рыноклрьсканe (макс.) | N | 21 | ||
| Установен STОДНОСТС CBГАСHО EN 60355-2-79 | ||||
| Стойост на вибрацине в облacrета на длaintа - рькatinga | ||||
| Пистолет за рычно пьсканe | M/cesk² | <2,5 | ||
| Трьба за разлсканe | M/cesk² | <2,5 | ||
| Heсигуност K | M/cesk² | 1 | ||
| Нивono на звука LpA | dB(A) | 72 | ||
| Heystоуност KpA | dB(A) | 1 | ||
| Нивono на звуковая мошноct LWA + Heystоун- чунost KWA | dB(A) | 86 | ||
| Горовни мateriative | ||||
| Колчесто на маслоно | Л | 0,35 | ||
| Вид масло | SAE 15W40 | |||
| Мерки и тergla | ||||
| Дылжina | ММ | 360 | ||
| Широчина (CX) | ММ | 375 (400) | ||
| Височина | ММ | 925 | ||
| Тerglio бez п riонадлесноctи (CX) | Кг | * | 34,5 (32,5) | 27 (32,5) |
| 1.150-600.0: 27 kg; 1.150-621.0: 32,5 kg; 1.150-650.0: 32,5 kg | ||||
| Тип | HD 6/15 C 1.150-623.0 | HD 6/15 C 1.150-628.0 | HD 6/15 C 1.150-627.0 | |
| KAP | GB/AU | AR | ||
| Присьединявае Кым мрөхаты | ||||
| Нарөхениe | V | 220 | 240 | 220 |
| Вид тok | Hz | 1~50 | ||
| Присьединийtenha мошноct | kW | 3,0 | 3,1 | |
| Пред пазларгел (ленив, Char C) | A | 16 | 13 | 16 |
| Вид зашида | IPX5 | |||
| Мakсимално дорустимо пьлно нарөхөнөнөн no Мрөхату | Ohm | 0.302+j0.189 | ||
| Удьлжinteелен кабел 30 m | MM² | 2,5 | ||
| Зхсановае с вoda | ||||
| Temпература на постывацatura вoda (макс.) | °C | 60 | ||
| Дебит за постывацatura вoda (Min.) | Л/MinH | 12 | ||
| Височина на засмүкдане OT OTborецьясыd (20 °C) | M | 0,5 | ||
| Налогане на постывацatura вoda (макс.) | MPa | 1 | ||
| Данни 3a мошноctta | ||||
| РавOTно налаяганe | MPa | 13 | 15 | |
| Макс. равOTно сбрънайганe | MPa | 21,5 | ||
| Размер на дюзага | 036 | 034 | ||
| Колчестоны на подаванe | Л/MinH | 9,5 | 9,3 | |
| Засмүкдане на поочьдано о creдстvo | Л/MinH | 0...0,6 | ||
| Силga на олpopа на пистолета за рычнопрьскане (макс.) | N | 21 | ||
| Уstановени StОй�остп StБгласно EN 60355-2-79 | ||||
| Стойост на вибрац ninthе в облacrета на длaintа - рькatinga | ||||
| Пистолет за рычно пьсканe | M/cesk² | <2,5 | ||
| Трьба за радирьсканe | M/cesk² | <2,5 | ||
| Heсигурноct K | M/cesk² | 1 | ||
| НИВо на звука LpA | dB(A) | 72 | ||
| HeystойчьBOCT KpA | dB(A) | 1 | ||
| НИВо на звукова мошноct LWA + HeystойчьBOCT KWA | dB(A) | 86 | ||
| Горовни matерапли | ||||
| Колчестоны на маслоно | Л | 0,35 | ||
| Вид масло | SAE 15W40 | |||
| Мерки и тergla | ||||
| Дылжina | ММ | 360 | ||
| Широчина (CX) | ММ | 375 (400) | ||
| Височина | ММ | 925 | ||
| Тerglio бez п riпадпекноctи (CX) | Кr | 25 | 27 | |
| Тип | HD 7/10 CXF1.151-619.0 | HD 7/18 C1.151-600.01.151-614.0 | HD 7/18 C1.151-613.0 | |
| HD 7/18 CX1.151-657.0 | HD 7/18 CX1.151-650.0 | |||
| EU | EU | EU II | ||
| Присьединявае Кым мрөхата | ||||
| Нарөхени | V | 400 | 230 | |
| Вид тok | Hz | 3~50 | ||
| Присьединітелна мошноct | kW | 3,0 | 4,7 | |
| Прedingлітел (ленив, Char C) | A | 16 | ||
| Вид зашита | IPX5 | |||
| Мakсимално дорустимо пьлно нарөхөне на мрөхату | Ohm | - | ||
| Удьлікітелен кабел 30 M | MM² | 2,5 | ||
| Зхранbaне с вoda | ||||
| Temпература на постывацatura вoda(mак.) | °C | 80 | 60 | |
| Дебит за постывацatura вoda (Min.) | Л/Min | 13 | ||
| Височина на засмү KBане OT OTborецьясыd (20 °C) | M | 0,5 | ||
| Налгаге на постывацatura вoda (мakc.) | MPa | 1 | ||
| Данни 3a мошноctтta | ||||
| РавOTно наляганe | MPa | 10 | 17,5 | |
| Мамс. равOTно сбрхналгаге | MPa | 12 | 21,5 | |
| Размер на дюзатa (CX) | 060 | 040 (042) | ||
| Колчесто на поадванe | Л/Min | 11,5 | ||
| Засмү KBане на поочьразио сре'dстvo | Л/Min | 0...0,6 | ||
| Сида на отлора на пистолета за рыногрьсканe (мakc.) | N | 21 | ||
| Установен STОйноctи сблаласно EN 60355-2-79 | ||||
| Стой�ост на вибраци ITEВ oblacssы на длaintа - рькатa | ||||
| Пистолет за рычно пьсканe | M/cek² | <2,5 | ||
| Трьба за разлрьсканe | M/cek² | <2,5 | ||
| Hesnirgnoct K | M/cek² | 1 | ||
| Ни BO на звука LpA | dB(A) | 77 | ||
| Heystоуньост KpA | dB(A) | 1 | ||
| Ни BO на звуковая мошноct LWA + Heystоуньост KWA | dB(A) | 91 | ||
| Горовни matерпали | ||||
| Колчесто на маслоTO | Л | 0,35 | ||
| Вид масло | SAE 90 Hypoid | |||
| Мерки и тergla | ||||
| Дылжина | MM | 360 | ||
| Широчина (CX) | MM | 375 (400) | ||
| Височина | MM | 925 | ||
| Тergл bo бez п riпадпекноctи (CX) | Кr | 33 | * | 31,8 (32,5) |
| * 1.151-600: 30,8 kg; 1.151--614.0: 34,5 kg; 1.151-657.0: 32,5 kg | ||||
Sisukord
www.kaercher.com/REACH
Toode: Korgsurvespesur
Tuup: 1.150-xxx
Tüup: 1.151-xxx
Tuup: 1.214-xxx
Head of Appropriation
71364 Winnenden (Germany)
Tel: +49 7195 14-0
Winnenden, 2012/09/01
Tehnilised andmed
www.kaercher.com/REACH
71364 Winnenden (Germany)
Tālr.: +49 7195 14-0
Fakss: +49 7195 14-2212
Winnenden, 2012/09/01
Tehniskie dati
www.kaercher.com/REACH
Prieš pradedant naudoti
Ispakovimas
Head of Appropriation
71364 Winnenden (Germany)
Tel.: +49 7195 14-0
Faksas: +49 7195 14-2212
Winnenden, 2012/09/01
Techninial duomenys
Peped noaTkom po60tn
Po3naKOByBaHHa
- Ppno po3naKyaBHHi nepeBipuTn Bmict ynaKOBKn.
JaKIOBUNHKaIOb OUSHKOJKeHHn Ipn TpaHcnpTyBaHHi, HeraiHo NOBIDOMTe npO cI npoDaBz.
KoHTpOJIOnTe pIBeH bOlii
3uTAtn daHINOKaKUka pIBHaMacna npn HepauoOyOmy npuaDi.PiVeNb Macla NOBHeH 6ytN Bnue o6ox nokKaXnKiB.
Aктувыати BeHTиЯцiope3epByapa Дя Macna
→ BnBnHTnKpInnBHi rBnHTn KpUkni npuNaNy, 3HrTn KpUkY.
BipirataN KINK KPNKPe3epByapy dna Macna.
→ 3akpiinTu KpnsuKy npnnay.
BctaHObIb 3anachi yactHn
OpCyHKy BCTaHOBUNHa CTpyMNHHI Tpy6i (MapkyBaJIbHOIO BiIMiTKOIO BROPY).
→ 3'εДнаТи CTpyMnHHу Tpy6ky 3 pyuHmπiCToJIeTOM-PO3nIIIOBaUeM.
Bka3i8ka
Tinbku 8 HD 7/10 CXF:
Jkuo hedocmambo micu, mo adanmep 3 Komnkemy nocmaeku i3 connom MoKHa MOHmyamu 6e3nocepeHbo Ha pyHomy po3nui8aqi.
Y npnilaiax 6e3 6apa6aHa 7nHa:
→BidnyctuTnФikcaiio TaroBoIpyuKn.
HactpoITn 6aKaHy BnCOTy TAgBOI pyKn.
→ 3akpiinntn pfikcauio TaroBoi pyuKn.
→ 3akpyTtTN IJnHaR BUCOKO TnCKy y 3'eDHaHHI BUCOKO TnCKy.
Y npnilaax 3 6apaabaHom shlaHra:
BCTaBtɪn i 3aφikcyBaTn pykoRkTy y bany 6apabaha dIy IJnaHra.
Ipeed HAMOTyBaHnHm po3KnadiTb ⅢnaHr BnCOKOr TnCKy y BnTyrHyTOMy BNdi.
→ Hamotatni shaHr BnCOKOTo TnCKy Ha 6apaban dny shaHa r nnXom o6epTaHH pyKoAeTKn pIBHomipHMn pyxamn. Bn6paTu HnnpMok o6epTaHH TaKM uHOM, 06b shaHr BnCOKOTo TnCKy He npeRhyBCra.
BVeDeHnBaEknJnyaTaizio
EneKtpnHi 3'εДнHaHHa
△ObepexHo!
Hebe3neka npaehnna eekmpuHm cmpymom.
Ppucmpiu cnio 3muKamu nuwe do dKepeena 3minnoo cmpymy.
Ppucmpiu Moke 6ymu nio'edHaHui luue do eIekmpuHoi MepeXi, uo noeunHa 6ymu ecmaHOeNa eIekmpomOHmepom 3aioho 3 IEC 60364.
3a3naeHa Hanpya Ha 3ae0cbkiu ma6nuci noBunHa 36iaamucr 3 Hanpyaoyo y dkepeI mky.
Mihimabhu3aio6ixnuk pozemku (du8. TexhiHi dahi).
3a6bopohraembcnpebeuyeammuakcumaIbHO donycmmu noBu onip mouyi nioeHaHHo do mepexi (du.
Texhihi dahi).B momy eunadky, kuo baM he iidoma beenuuha noeHoo onopy Mepexi 8 mouci eJeKmpuHoo NiKDnOyeHHra 3eephimcb8
eHep2o3a63e3neu7y ou op2aHizauio.
Ipnad o6oe'3KoEO NOBUnEn 6ymu iidKnUoyeuH do eNeKmpuHoi MepeXi 3a donomooio wmekepa. 3abopohembcn Hepo3EMHe 3eDHaHnH 3 dKepeNoM KusneHH. Wmekep npu3NaueHu dna eioknOeyehraeid MepeXi.
Ipeepmu nikklueyn npunady do Mepexi Ha npedMem nowkoekhenny neped Koxhum uKOpucmaHHm. 3amHimb
deqekmHu npo8id yepe3 aamopu3o8aHy cepeichny cnyk6y/elenkmpuka.
Umekepu ma 3'edhannn nooexyea, uo eukopucmooyembcra, noBuHni bymu odoHenpoHukHumu.
Bukopucmooyamnu nodoxybaq docmamhbzo diamempa (due. po3din "TexnHi daHI) i no8HicmIo po3Momamu uO2o 3 komuku.
Henpaibhni noobxhenn lihi moymb
6ymu He6e3neumu. I03a
npumueHHnmu buKOpucmooyume
eiDnoBdiNoobxyeayi luHi 3
eiDnoBIDHM mapkyeaHnma
docmamHIM po3Mipom nepemuhy:
IOTyXHICTb DnB. Ha 3BODcbKi TAbNnCzi/B TexHiCHNX daHnx.
Iopdaa BODn
Пибve徳нгд ВОДОПВОДу
TonepeoHn
PeKOMeHIOBaHI MeToIOn OChUeHHa
→ Pɔznnntn HebeNky kɪnbKiCTb 3acobyДЯчишнHa cyxu nOBepxHIO Ta3aIiShHTn DiTn (He BucnxATn).
→ P03uHHeHm 6pyd 3MnTn cTpymeHemPiD TnCKOM.
→ PicnE ekcnnyatau 3aHypTu pIbTp y uNCTy BOy. D03yUOHy KnaanB CTAHOBNTu Ha NaBnuSy KOHcHTpaUIO MmHoro 3acOby. 3anyCTn npnilad i uepe3 odHy XBUNHy npONOLOCKATn.
PpeepnbHnpo60tn
BiDnycTnB BaxiNb pyHOro nicToJe-tapo3nIbOBAu, npIaD BmKHeTbcr.
3HOBy nOTyHTn 3a BaXilb pyHoro nICToIeta-PO3nIIIOBaHa, npInaD 3HOBy yBIMKHeTbcra.
BmKHyTnpncTpim
BCTaHOBiTb BmNKaU npNCtpoHo Ha "0".
BntaHnItb MepeXhN IwTeKeP 3i wTeNCeIbHOI pO3eTKN.
→ 3akpiIte npOaCy BOiN.
→ YbIMKnHtB nICToJeT-PO3nHIOBa, DOKN npnaIaH He 3BiJbHnTbCra BiT NcKy.
3actocybaTn 3anobixHn BaxkInb pyuHoro nictoIeta-po3nnlHOBaHa dJa 3anobirAHnHeHaBMnCHoro cnpaBobyBaHHn iCtOJeta.
36epiratnpnctpi
BCTaBHTnpyHn nictoJet- po3nIIOBaUy TpImaU.
Μιναήν BνCOKOτΟ TιCKy 3MOTaΤη ΜΟΒΙΝΤΗ πιδιστΑΒΚγ ἀπληλΗτΑ. a6o HAMOTaΤΗ Μιναήν BνCOKOτΟ TιCKy ὁ δαραδαθιν. BCTABΙΝΤΗ ρυΚγ ρυΚΟΥΤΚ,
Uo3a6IOkyBaTn 6apaban IJIyIuHaHa.
O6MOTaTn cNoJyHn Ka6eJIb HABKOIo TpIMaYKa6eJIIO.
→ 3akpinntu wTekep yctaHOJIeHOIO KInCOIO.
3axnct BiMOPo3iB
△PonepeoKehn
Mop03 nouKoOumb npuaO, kUo 3 HbO2o NoBHe cnyuEHO oOy.
Ppnpad cpiid 36epiratn B 3axiuheHomy BiMopo3y npimiuenceHHI.
Jkuo 36epirahnB Micci, 3axuheHomy BiMopo3y, HEmoxJIINBE:
→ 3niuTe Body.
→ IporoHitb cTaNdapTHn 3ac6 3axncty BiD MOpOzIB uepe3 npncTpI.
Bka3i8ka
Bukopucmamu cmahandapmHi anmuΦpu3u ∴na aemomobinie Ha anukoJIeii ocHoei. Dompumuymeca iHcmpykuii 3 eukopucmanHa anmuΦpu3y.
→ 3aJInuTe npnla yBIMKHeHm Ha npotra3i He 6iNbIe 1 XBnInn,doKn Hacoc i Tpy6oNpOBOOn He cnopokhTbcr.
TpaHcnpTyBaHHN
△O6epeXHo!
He6e3neKa ompumahnma pyaM ma yukokxeH! Ppu mpaHcnpmyaHHi cnid 3eehymu yeay Ha eaay npucmpoio.
→ Ptπ TpaHcnpTyBaHHi Na BeNiky BiDCTaHb HeCTn npnla3a pyuKy.
Y npinapaa6e3 6apa6aHa dIy IuaHra nID yac nepenecehnry TaroBy pyky cniD noCTabNTu Bn3. Pnp npenepenceHi TpIMATn npinad 3a pykoTky, a He 3a TaroBy pyky.
Пи пеbebeseнHi anapatyВТраHCnOpTHnx 3ac06ax cIДВрахOByBaTи Micuebi DiIOvi DepeKabHInHOPMn, HanpaBNeHi Ha 3axNCT BiДКOB3aHHa Ta NepeKeINdaHHa.
36epiraHnHa
△O6epexHo!
Hebe3neka ompumahnma mpaem ma yukodxeh! Ppu 36epiaaHhi 3eephymu yeay Ha aay npucmpoio.
Доглад таTekhiчныбсnyrobybaHHa
△O6epexHo!
He6e3neKa mpa8MyBaHn eid eunadko8o 3anyueHoO anapamy i enekmpoWoy. Do npoeedeHH ydb-kaux pobim cnid eumkhym npucmpi ma eumyaHymu wmekep.
Bka3i8ka
BiodpaobaeMacno do360nembcyymun3yammu nIbku e npuzhaeHux dnyu2o nyHKmax 360py. Bydnaacka,3daeaume iDnpaucboahe Macno camemam.3abpyHeHHraKoUuHbOzcepeodouuza iDnpaucboAHum Macnomkapaemcbra3aKOHOM.
ObTeXeHn863neuHocTi/DoROBip TexHiUHorO 06cIyroBOvBaHHa
Bn 3aBXd MoKeTe DOMOBHTNc3 BaHIM ToproBeJIbHIM IpEcdTaBnKOM npo peryIapHe npoBeDeHHraTexHiuHOrO OrIaMy a6o yKnactn DoRobip Texo6cnyrOByBaHHa. 3BeptaIteCdo Hac 3a KOHCyIbTaucieo!
Ipeed KoxHm3aCTOCyBaHHnM
IpepeBipuTn cnoIyHn KabeNbHa npEeMeT ykoDKeHb (He6e3neKa BpaKeHHc TpyMOM), noKoJKeHn Ka6eNb C1iN HeaHNo 3amInTu B yNOBHOaKeHc cepBicHi cnyK6i/ eNEKTPNKOM.
IpeBipTuHaNoIooKJxHnpyKaB BVCOKOTo TnCKy (OnaChicb po3pNBy). NooKOJxHeHHny pyKaB BVCOKOTo TnCKy nOTpiHO HeaHNo 3amHHTn.
IpepeBipTe npictpri (Hacoc) Ha repMeTnHiCtB. 3 kpanJI BOIN 3a XB. e DOnyCTUMMIM Ta MOxYb BNXOJNTN Ha 3OBHIIHIO
noBepxHIO npncTPOIO. Ppi 6IbSii HeRepMeTuHocTi BuknKaaiTe CnyK6y TexHiHOI NiIDTpIMKn.
KoXhoro TnXHn
IpebeBipka pIBHЯ MaCTnla Iprn MOJIOKO6pa3Hni KOHCnCTeHcii MaCTnla (BOda B MaCTnIi) cIId HeraHNO 3BepHyTncsdo cepBicHOI cnyK6n.
OuHCTnTi ciTuaCTn fInbTp eIeMeHTy nIKJIouHeHH naDiBn.
OuHCTnTn 1JIbTp y BCMOKTyBaIbHOMy IJNaHROBi MmIOHO 3aO6y.
KoJHOro Poky a6o chepe3 500 roDInH pO6oTu
3amHa MaCTnJa.
3amiHa MaCTnJa
Bka3i8ka
Kibkicmb i bud macna due. po3diN "Texhuihi dahi".
→ BnBnHTnTn KpIINbHi rBnHTn KpNShKn npnnaDy, 3HrTn KpNShKy.
→ 3нгтNiКршkyбakaДлЯ мacrna.
IpekeHHyTu anapaT ynepeI.
→ Cnyctitb oJIO 3 KOHTeHepa.
Повьно зал'tи HOBe MaCTnIIO; nyxnpiz noBITprnoBHHi BnTn.
→ OДягнту Кршку БакадmaCTиna.
→ 3akpiinTu KpuiuKy npinayy.
YcyHeHH HeCnPaBHOCTe
△O6epeXHo!
Hebe3neka mpaemvbaHn 8iB uNaadkoe
3anyueHOo anapamy i enekmpouOky.
Do npoeedeHH 6ydb-akux pOBim cnid
bumkhymu npucmpiu ma bumayhymu
wmekep.
EneKmpuHi KOhcmpykmuHi enemeHmu
noBunHi nepeepmucr minkU
6No6HOaJxHoIO cepeichOIO cnyXboIO.
Ppu nowkodJeHHx, He 3a3naHuX y
ubomy po3dini, y buNADKy cyMHiey a60 npu
cimki Ea3ieci cniod 3eepamucra do
yNo6HOaJeo cepeichOIO cnYk6u.
Pnnctpi H npaioe
IpeBepiHTn cnoJyHn Ka6eJIb Ha npEaMeT nOwKOJxKeHb.
IpepeBipuTu Hanpyu B Mepekei.
→ Pπu eπeKtpnHnx HecnpaBHOCTx cniD 3BepTaTncA do cepBicHoI cnyk6n.
Pnncpti Hne npaoc nid Tnckom
→ BCTaHOBHTIΦOpcyHky Ha „Hochdruck (BnCOKN TnCK)”.
→ПоунстMuCOnJIIO.
→ 3amHnTuHaCaAnKy.
→ BuaNTn NOBITp3 3 npnay (nVB. "BBeHnBa Eeknnyatauio").
Ipebeipntu o'6em noaui BOIN (nIB. po3di "TexhiHni daHi").
OuHCTnTi ciTuaCTn pInbTp eIeMeHTy nIDKJIUoyehnnoDaui BOIN.
IpeBipuTn Bci Tpybni uHaHn, 0o BeDyTb Do HaOca.
Pn Heo6xIaHocTi, 3BepHyTncydo cepbcHOi cnyKbN.
Hacoc herepmetnHH
3 Kpanni BOAn 3a XB. e Donyuctmmm Ta MOKytb BNXOINTn Ha 3OBHIHIO NOBepxHIO npncTpoI. Pn 6iNbSi HerepMetuHocti BKNlkaTe cLyKbTyexHiHOI NiIDTPMkN.
ПисильнomynpotikahNipebebipTu npinlaуcepbicHomuyentpi.
Hacoc cTykae
IpeBipNTHa repMeTnHicTB yCMOKTyBaIbHNuIaHr DJIa BOI i MmHOrO 3acOby.
→ 3akpntu klaanah-Do3atop MHHORO 3ac06y npn ekcnnyataui 6e3 MHHORO 3ac06y.
→ BndaHnTn NOBITPRA 3 npnAdy (nIB. "BBeDeHnB Eekcnnyataciio").
Pn Heo6xIaHocTi, 3BepHyTnca Do cepBicHOi CnyKbN.
3acioIyHHe BCMOKTyEYbC
YctaHOBHTnΦopcyHky Ha „CHEM“.
IpebeBipuTn/npOunCTuNTu BCMOKtuOChuIaHr dJa 3ac06iB dJa YIeHHeHra 3 i_IIbTp o m.
→ Bɪdɪkɒrɪn aʊɒ nɛpeBɪpɪrɪn/ɪnpɔuŋcɪtɪn Dɔ3yBaʌbHn Kʌpən H MɪNHO r 3aʊcOy.
→ Pπu Heo6xɪnHocTi, 3BepHyTncjdo cepBicHoI cnyk6n.
3anachi yactnHn
- PpiuBOMy6dyTb BnKOpNCTOByBaTncb liuwe Ti KOMPiKeTkyUoyi Ta 3anaChi qactHNI, uo HadaIoTBcR BYPObHnKOM. OprirHaJIbHi KOMPiKeTkyUoyi Ta 3anaChi qactHNI 3aMOBJIaOHTbcrNo rapaHTii, uo6 moXHa 6yIoo 6e3neuHO Ta 6e3 nepeXkoD BnKOpNCTOByBaTn pnpCTpii.
- AcopTnmeHT 3anachnx YacTnH, 10 qacto Heo6xidi, MoKHa 3HaTn B KInu iHcTpkyuii no ekCnnyataui.
IpaJIbwa iHΦopMaJiNo 3aIacnM qactnHaM e Ha caNti www.kaercher.com B pozdiNi CepBic.
TapaHTiA
Y KOKHnI KpaIH DiHOb yMOBn rapaHTi,
HaadaHO BIDNOBIDHOΦipMOIO-
npoDaBcEM. HenonapKn Bpo6oti
PnCTPOO Mn UcyBaEMo 6e3pNaTHO
IpOTaROM TepmiHy DII rapaHTi, kKIo BOHN
BVKJIkaHbPAkOM MaTepiAny HN
POMILKAMn BVROTOBHeHH. Y BnPaKDy
YHHoCTI rapaHTi 3BepTiTbcSd DO npoDaBcU
Yn B Na6blnxuyn ABTopn3OBaHni
cepBicHn CEHTp 3 DokyMeHTaJIbHm
PiTBeRdxHeHHM NOKpKN.
3aBa npn BiDnoBiHicTb CBpOeNcBkoRo cnIBTOBapNCtBa
LIMM NIOBIDOMJREMO, LIO HNCKHe 3a3NaYeHa MaUNHa Ha OCHOBI CBOEi KOHCTpyKUII Ta KOHCTpyKTNBHO RIKOHAnHnA, a TAKOJK Y BINyUeHOI y IPOdAK MOdeJI, BiINOBiJaC CNEJIaJIbHMN OCHOBHM BIMORAM LIO Do63NeKn Ta 3axNCTy 3DOpOB' PpeDcTAbneHnX HNCKe DnpeKTHB CC. Y BInaIky Hey3roJKeHOI 3HAMM 3MIHN MaUNHn Ura 3aRaBA BTPaHaC CBOU CNIy.
IpoodyKT: OunuBaBvBnCOKOro TnCKy
Ttn: 1.150-xxx
Tun: 1.151-xxx
Tun: 1.214-xxx
BiNbOViHaДиpeKTHBa EC
2006/42/EC (+2009/127/EC)
2004/108/EC
2000/14/EC
Ppknadhi rapmoni3yoyi HOpMn
EN 60335-1
EN 60335-2-79
EN 55014-1:2006 + A1:2009
EN 55014-2: 1997 + A2: 2008
EN 61000-3-2: 2006 + A2: 2009
HD 7/10, HD 7/16, HD 7/18
EN 61000-3-3:2006
HD 5/17, HD 6/12, HD 6/15:
EN 61000-3-11:2000
EN 62233: 2008
3aTocOByBaHm MeToD OUiHKn BiIDNoBIdHOCTI
71364 Winnenden (Germany)
Ten.: +49 7195 14-0
ΦaKc: +49 7195 14-2212
Winnenden, 2012/09/01
TexHiHi xapaKTepeNCTnKN
www.kaercher.com/REACH
设备运作前
打开包装
Hanya until HD 7/10 CXF:
71364 Winnenden (Germany)
Tel.: +49 7195 14-0
Winnenden, 2012/09/01
Data Teknis
| Jenis | HD 5/17 C 1.214-111.0 1.214-113.0 | HD 5/17 C 1.214-110.0 1.214-112.0 | HD 6/12-4C 1.150-160.0 1.150-161.0 | |
| HD 6/12-4 CX 1.150-162.0 | ||||
| BR | EU | EU | ||
| Catu daya | ||||
| Tegangan | V | 220 | 230 | |
| Tipe arus listrik | Hz | 1~60 | 1~50 | |
| Daya sambungan | kW | 3,2 | 2,8 | |
| Perlindungan (inersia, Char. C) | A | 16 | ||
| Jenis pelindung | IPX5 | |||
| Daya maksimal yang diizinkan | Ohm | (0.302+j0.189) | 0.386+j0.241 | |
| Kabel ekstensi 30 m | mm² | 2,5 | ||
| Sambungan air | ||||
| Temperatur masuk (maks.) | °C | 60 | ||
| Jumlah masuk (min.) | l/min | 12 | ||
| Ketinggian penyedotan air dari tangki air yang terbuka (20℃) | m | 0,5 | ||
| Tekanan masuk (maks.) | MPa | 1 | ||
| Data kinerja | ||||
| Tekanan pengoperasian | MPa | 16 | 17 | 12 |
| Tekanan lebih pengoperasian maks. | MPa | 21,5 | 18 | |
| Ukuran nosel | 028 | 043 | ||
| Volume pengiriman | l/min | 8,3 | 10 | |
| Penyedotan bahan pembersih | l/min | 0...0,6 | ||
| Kekuatan pentulan balik pistol penyemprot (maks.) | N | 21 | 26 | |
| Penentuan nilai menurut EN 60335-2-79 | ||||
| Nilai getaran tangan-lengan | ||||
| Pistol penyemprot | m/s² | <2,5 | ||
| Pipa penyemprot | m/s² | <2,5 | ||
| Ketidakstabilan K | m/s² | 1 | ||
| Tingkat tekanan suara LpA | dB(A) | 72 | 70 | |
| Ketidakstabilan KpA | dB(A) | 1 | 2 | |
| Tingkat kekuatan suara LWA + Ketidakstabilan KWA | dB(A) | 86 | 85 | |
| Cairan pengoperasian | ||||
| Jumlah oli | I | 0,35 | ||
| Tipe oli | SAE 15W40 | |||
| Berat dan Ukuran | ||||
| Panjang | mm | 360 | ||
| Lebar (CX) | mm | 375 (400) | ||
| Tinggi | mm | 925 | ||
| Berat tanpa aksesori | kg | 29 | 27 | * |
| * 1.150-160.0: 26 kg; 1.150-161.0 26,5 kg; 1.150-162.0: 31 kg | ||||
| Jenis | HD 6/15 C 1.150-600.0 1.150-621.0 | HD 6/15 C 1.150-620.0 | HD 6/15 C 1.150-624.0 | |
| HD 6/15 CX 1.150-650.0 | HD 6/15 CX 1.550-655.0 | HD 6/15 CX 1.150-659.0 | ||
| EU | CH | KAP | ||
| Tegangan | V | 230 | 220 | |
| Tipe arus listrik | Hz | 1~50 | 1~60 | |
| Daya sambungan | kW | 3,1 | 2,2 | 3,2 |
| Perlindungan (inersia, Char. C) | A | 16 | 10 | 16 |
| Jenis pelindingung | IPX5 | |||
| Daya maksimal yang diizinkan | Ohm | 0.302+j0.189 | ||
| Kabel ekstensi 30 m | mm² | 2,5 | ||
| Sambungan air | ||||
| Temperatur masuk (maks.) | °C | 60 | ||
| Jumlah masuk (min.) | l/min | 12 | ||
| Ketinggian penyedotan air dari tangki air yang terbuka (20℃) | m | 0,5 | ||
| Tekanan masuk (maks.) | MPa | 1 | ||
| Data kinerja | ||||
| Tekanan pengoperasian | MPa | 15 | 11 | 14 |
| Tekanan oleh pengoperasian maks. | MPa | 21,5 | 15 | 21,5 |
| Ukuran nosel | 034 | 043 | 036 | |
| Volume pengiriman | l/min | 9,5 | ||
| Penyedotan bahan pembersih | l/min | 0..0,6 | ||
| Kekuatan pentulan balik pistol penyemprot (maks.) | N | 21 | ||
| Penentuan nilai menurut EN 60335-2-79 | ||||
| Nilai getaran tangan-lengan | ||||
| Pistol penyemprot | m/s² | <2,5 | ||
| Pipa penyemprot | m/s² | <2,5 | ||
| Ketidakstabilan K | m/s² | 1 | ||
| Tingkat tekanan suara LpA | dB(A) | 72 | ||
| Ketidakstabilan KpA | dB(A) | 1 | ||
| Tingkat kekuatan suara LWA + Ketidakstabilan KWA | dB(A) | 86 | ||
| Cairan pengoperasian | ||||
| Jumlah oli | I | 0,35 | ||
| Tipe oli | SAE 15W40 | |||
| Berat dan Ukuran | ||||
| Panjang | mm | 360 | ||
| Lebar (CX) | mm | 375 (400) | ||
| Tinggi | mm | 925 | ||
| Bobot tanpa aksesori (CX) | kg | * | 34,5 (32,5) | 27 (32,5) |
| 1.150-600.0: 27 kg; 1.150-621.0: 32,5 kg; 1.150-650.0: 32,5 kg | ||||
| Jenis | HD 6/15 C 1.150-623.0 | HD 6/15 C 1.150-628.0 | HD 6/15 C 1.150-627.0 | |
| KAP | GB/AU | AR | ||
| Catu daya | ||||
| Tegangan | V | 220 | 240 | 220 |
| Tipe arus listrik | Hz | 1~50 | ||
| Daya sambungan | kW | 3,0 | 3,1 | |
| Perlindungan (inersia, Char. C) | A | 16 | 13 | 16 |
| Jenis pelindung | IPX5 | |||
| Daya maksimal yang diizinkan | Ohm | 0.302+j0.189 | ||
| Kabel ekstensi 30 m | mm² | 2,5 | ||
| Sambungan air | ||||
| Temperatur masuk (maks.) | °C | 60 | ||
| Jumlah masuk (min.) | l/min | 12 | ||
| Ketinggian penyedotan air dari tangki air yang terbuka (20 C) | m | 0,5 | ||
| Tekanan masuk (maks.) | MPa | 1 | ||
| Data kinerja | ||||
| Tekanan pengoperasian | MPa | 13 | 15 | |
| Tekanan lebih pengoperasian maks. | MPa | 21,5 | ||
| Ukuran nosel | 036 | 034 | ||
| Volume pengiriman | l/min | 9,5 | 9,3 | |
| Penyedotan bahan pembersih | l/min | 0...0,6 | ||
| Kekuatan pantulan balik pistol penyemprot (maks.) | N | 21 | ||
| Penentuan nilai menurut EN 60335-2-79 | ||||
| Nilai getaran tangan-lengan | ||||
| Pistol penyemprot | m/s² | <2,5 | ||
| Pipa penyemprot | m/s² | <2,5 | ||
| Ketidakstabilan K | m/s² | 1 | ||
| Tingkat tekanan suara LpA | dB(A) | 72 | ||
| Ketidakstabilan KpA | dB(A) | 1 | ||
| Tingkat kekuatan suara LWA + Ketidakstabilan KWA | dB(A) | 86 | ||
| Cairan pengoperasian | ||||
| Jumlah oli | I | 0,35 | ||
| Tipe oli | SAE 15W40 | |||
| Berat dan Ukuran | ||||
| Panjang | mm | 360 | ||
| Lebar (CX) | mm | 375 (400) | ||
| Tinggi | mm | 925 | ||
| Bobot tanpa aksesori (CX) | kg | 25 | 27 | |
| Jenis | HD 7/10 C XF 1.151-619.0 | HD 7/18 C 1.151-600.0 1.151-614.0 | HD 7/18 C 1.151-613.0 | |
| HD 7/18 CX 1.151-657.0 | HD 7/18 CX 1.151-650.0 | |||
| EU | EU | EU II | ||
| Catu daya | ||||
| Tegangan | V | 400 | 230 | |
| Tipe arus listrik | Hz | 3~50 | ||
| Daya sambungan | kW | 3,0 | 4,7 | |
| Perlindungan (inersia, Char. C) | A | 16 | ||
| Jenis pelindingung | IPX5 | |||
| Daya maksimal yang diizinkan | Ohm | - | ||
| Kabel ekstensi 30 m | mm² | 2,5 | ||
| Sambungan air | ||||
| Temperatur masuk (maks.) | °C | 80 | 60 | |
| Jumlah masuk (min.) | l/min | 13 | ||
| Ketinggian penyedotan air dari tangki air yang terbuka (20℃) | m | 0,5 | ||
| Tekanan masuk (maks.) | MPa | 1 | ||
| Data kinerja | ||||
| Tekanan pengoperasian | MPa | 10 | 17,5 | |
| Tekanan oleh pengoperasian maks. | MPa | 12 | 21,5 | |
| Ukuran nosel (CX) | 060 | 040 (042) | ||
| Volume pengiriman | l/min | 11,5 | ||
| Penyedotan bahan pembersih | l/min | 0..0,6 | ||
| Kekuatan pantulan balik pistol penyemprot (maks.) | N | 21 | ||
| Penentuan nilai menurut EN 60335-2-79 | ||||
| Nilai getaran tangan-lengan | ||||
| Pistol penyemprot | m/s² | <2,5 | ||
| Pipa penyemprot | m/s² | <2,5 | ||
| Ketidakstabilan K | m/s² | 1 | ||
| Tingkat tekanan suara LpA | dB(A) | 77 | ||
| Ketidakstabilan KpA | dB(A) | 1 | ||
| Tingkat kekuatan suara LWA + Ketidakstabilan KWA | dB(A) | 91 | ||
| Cairan pengoperasian | ||||
| Jumlah oli | I | 0,35 | ||
| Tipe oli | SAE 90 Hypoid | |||
| Berat dan Ukuran | ||||
| Panjang | mm | 360 | ||
| Lebar (CX) | mm | 375 (400) | ||
| Tinggi | mm | 925 | ||
| Bobot tanpa aksesori (CX) | kg | 33 | * | 31,8 (32,5) |
| * 1.151-600: 30,8 kg; 1.151--614.0: 34,5 kg; 1.151-657.0: 32,5 kg | ||||
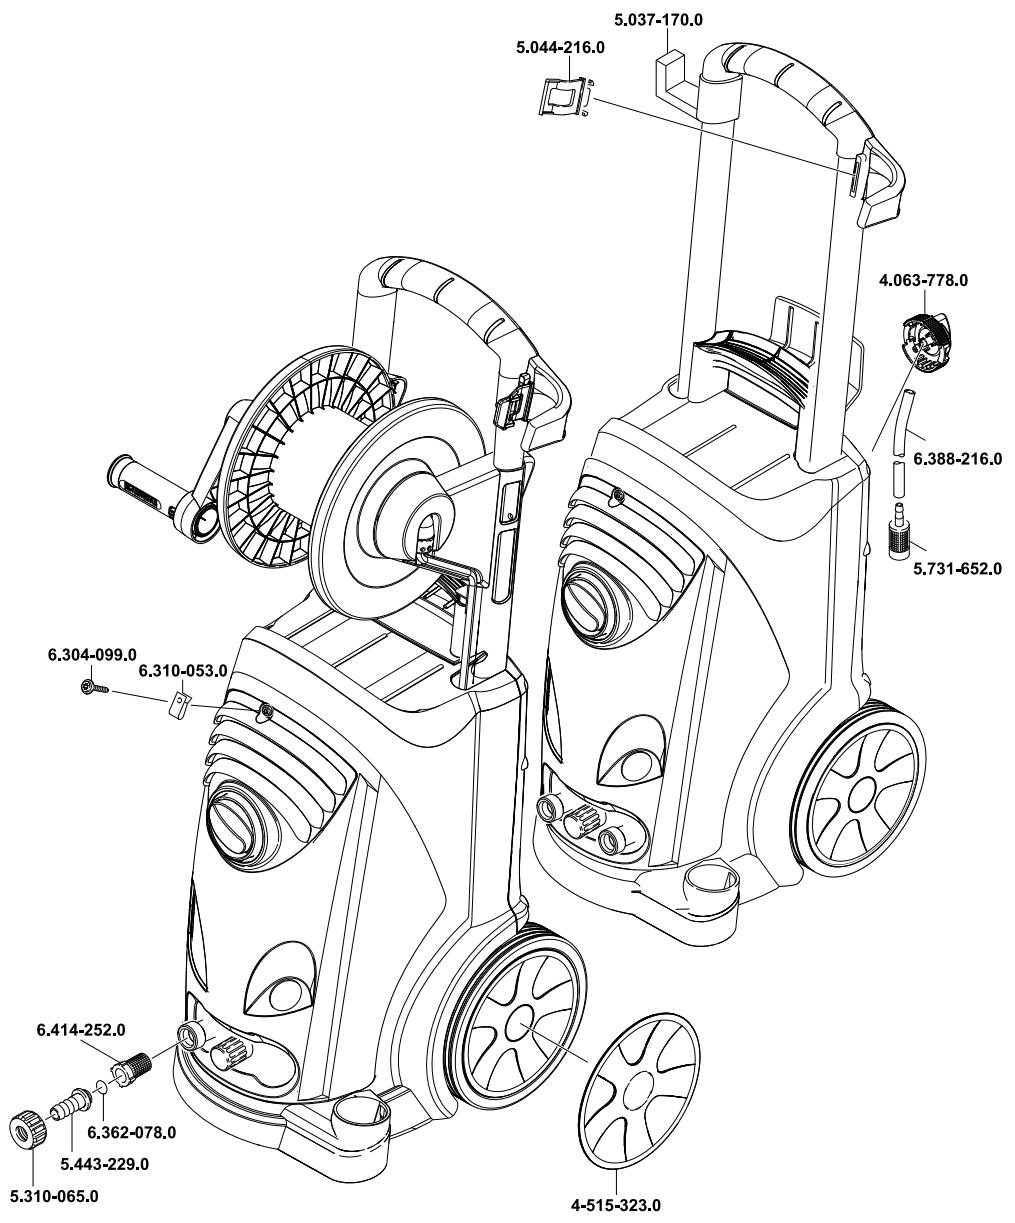
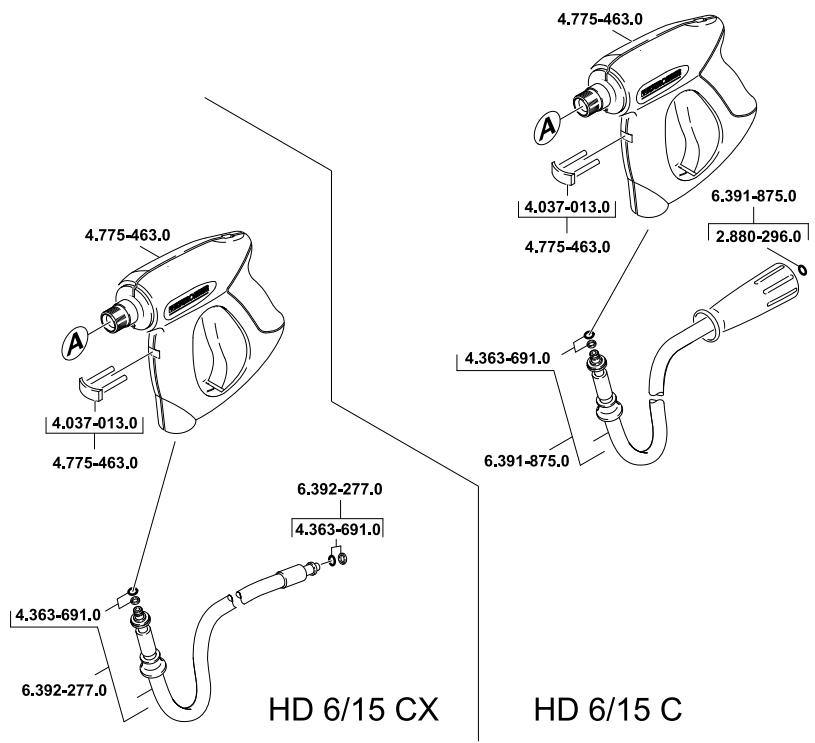
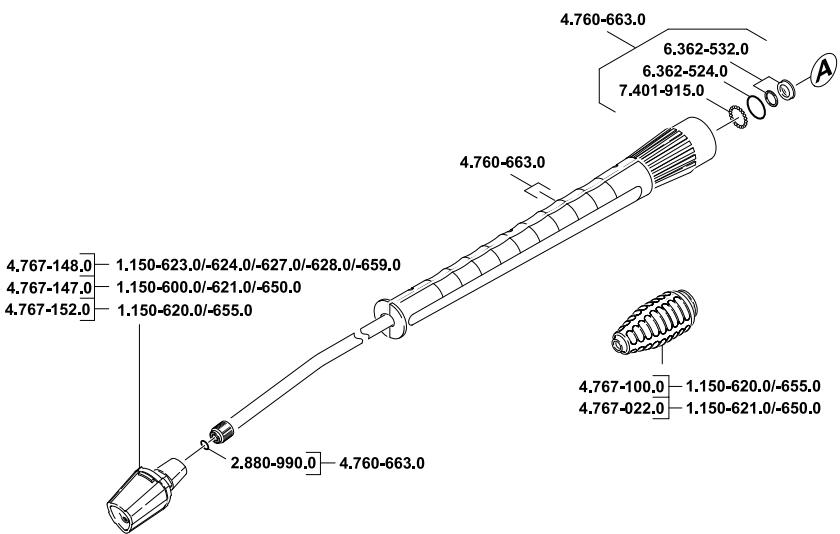
AE Karcher FZE, P.O. Box 17416, Jebel Ali Free Zone (South), Dubai, United Arab Emirates, +971 4 886-1177, www.kaearcher.com
AR Karcher S.A., Uruguay 2887 (1646) San Fernando, Pcia. de Buenos Aires +54-11 4506 3343, www.karcher.com.ar
AT Alfred Kärcher Ges.m.b.H., Lichtblaustraße 7, 1220 Wien, +43-1-25060-0, www.kaercher.at
AU Karcher Pty. Ltd., 40 Koornang Road, Scoresby VIC 3179, Victoria, +61-3-9765-2300, www.karcher.com.au
BE Karcher N.V., Industrieweg 12, 2320 Hoogstraten, +32-3-340 07 11, www.karcher.be
BR Karcher Industria e Comércio Ltda., Av. Professor Benedicto Montenegro no 419, Betel, Paulínia - Estado de São Paulo, CEP 13.140-000 +55-19-3884-9100, www.karcher.com.br
CA Karcher Canada Inc., 6535 Millcreek Road, Unit 67, Mississauga, ON, L5N 2M2, +1-905-672-8233, www.karcher.ca
CH Kärcher AG, Industriestrasse, 8108 Dallikon, Kärcher SA, Croix du Pégay, 1029 Villars-Ste-Croix, 0844 850 864, www.kaercher.ch
CN Karcher (Shanghai) Cleaning Systems, Co., Ltd., Part F, 2nd Floor, Building 17, No. 33, XI YA Road, Waigaoqiao Free Trade, Pudong, Shanghai, 200131 +86-21 5076 8018, www.karcher.cn
CZ Karcher spo1.sr.o., Modletice c.p. 141, CZ-251 01 Ricany, +420/323/606 014, www.kaercher.cz
DE Alfred Kärcher Vertriebs-GmbH, Friedrich-List-Straße 4, 71364 Winnenden, +49-7195/903-0, www.kaercher.de
DK Karcher Rengaringsystemer A/S, Helge Nielsens Alle 7A, 8723 Løsnig, +45-70206667, www.karcher.dk
ES Karcher, S.A., Pol. Industrial Font del Radium, Calle Josep Trueta, 6-7, 08403 Granollers (Barcelona), +34-902 17 00 68, www.karcher.es
F Karcher S.A.S., Z.A. des Petits Carreaux, 5, avenue des Coquelicots, 94865 Bonneuil-sur-Marne, +33-1-4399-6770, www.karcher.fr
FI Karcher OY, Yritrajantie 17, 01800 Klaukkala, +358-207 413 600, www.karcher.fi
GB Karcher (U.K.) Ltd., Karcher House, Beaumont Road, Banbury, Oxon OX16 1TB, +44-1295-752-000, www.karcher.co.uk
GR Kärcher Cleaning Systems A.E., 31-33, Nikitara str. & Konstantinoupoleos str., 136 71 Aharnes, +30-210-2316-153, www.karcher.gr
HK Karcher Limited, Unit 10, 17/F., Apec Plaza, 49 Hoi Yuen Road, Kwun Tong, Kowloon, +++(852)-2357-5863, www.karcher.com.hk
HU Karcher Hungary KFT, Tormásrét ut 2., (Vendelpark), 2051 Biatorbagy, +36-23-530-64-0, www.kaercher.hu
I Karcher S.p.A., Via A. Vespucci 19, 21013 Gallarate (VA), +39-848-998877, www.karcher.it
IE Karcher Limited (Ireland), C1 Centrepoint Business Park, Oak Road, Dublin 12, (01)4097777, www.kaercher.ie
JP Karcher (Japan) Co., Ltd., Irene Karcher Building, No. 2, Matsusaka-Daira 3-chome, Taiwa-cho, Kurokawa-gun, Miyagi 981-3408, +81-22-344-3140, www.karcher.co.jp
KR Karcher (Korea) Co. Ltd., 162 Gukhoe-daero, (872-2 Sinojeong-Dong), Seoul, Korea
02-322 6588, A/S. 1544-6577, www.karcher.co.kr
LV Karcher SIA, Márupes nov., Márupe, Kárla Ulma na gatte
101, Rīga, LV-1046
+371-67 80 87 07
MX Karcher Mexico, SA de CV, Av. Gustavo Baz No. 29-C, Col. Naucalpan Centro, Naucalpan, Edo. de Mexico, C.P. 53000 Mexico, +52-55-5357-04-28, www.karcher.com.mx
MY Karcher Cleaning Systems Sdn. Bhd., 71 & 73 Jalan TPK 2/8, Taman Perindustrian Kinrara, Seksyen 2, 47100 Puchong, Selangor Darul Ehsan, Malaysia, +603 8073 3000, www.karcher.com.my
NL Karcher B.V., Postbus 474, 4870 AL Etten-Leur, NL 0900-336663, www.karcher.nl
NO Karcher AS, Stanseveien 31, 0976 Oslo, Norway, +47 815 20 600, www.karcher.no
NZ Karcher Limited, 12 Ron Driver Place, East Tamaki, Auckland, New Zealand, +64 (9) 274-4603, www.karcher.co.nz
PL Karcher Sp. z o.o., UI. Stawowa 140, 31-346 Kraków, +48-12-6397-222, www.karcher.pl
RO Karcher Romania srl, Sos. Odaii 439, Sector 1, RO-013606 BUKAREST, +40 37 2709001, www.kaercher.ro
RU Karcher Ltd. Service Center, MockBa, yn.Б.Почтовая,д.40 +7-495 789 90 76, www.karcher.ru
SE Karcher AB, Tagenevagens 31, 42502 Hisings-Karra, +46 (0)31-577 300, www.karcher.se
SGP Karcher South East Asia Pte. Ltd., 5 Toh Guan Road East, #01-00 Freight Links Express Distripark, Singapore 608831, +65-6897-1811, www.karcher.com.sg
SK Karcher Slovakia, s.r.o., Beniakova 2, SK-94901 NTRA, +421 37 6555 798, www.kaercher.sk
TR Karcher Servis Ticaret A.S., Mahmutbey Mahalles Istoc, Petrol Plaza C-Blok Kat: 2-3, Bagcilar, 34218 Istanbul +90-212-659-43 69, www.karcher.com.tr
TW Karcher Limited, 7/F, No. 66, Jhongijheng Rd., Sinhuang City, Taipei County 24243, Taiwan, +886-2-2991-5533, +886-800-666-825, www.karcher.com.tw
UA Karcher Ltd., Petropavlyska Str., 4, Petropavlyska Borschagivka, Kyiv region, 08130, +380 44 594 7576, www.karcher.com.ua
USA To locate your local dealer please visit our web site at http://www.karchercommercial.com or call us at 888.805.9852
ZA Karcher (Pty) Ltd., 144 Kuschke Street, Meadowdale, Edendale, 1614, +27-11-574-5360, www.karcher.co.za