
EKF6000 - Coffee maker AEG-ELECTROLUX - Free user manual and instructions
Find the device manual for free EKF6000 AEG-ELECTROLUX in PDF.
| Product type | Filter coffee maker |
| Brand | AEG-ELECTROLUX |
| Model | EKF6000 |
| Voltage | 220-240 V |
| Power | 1000 W |
| Carafe type | Thermos with swivel lid |
| Capacity | 2 to 10 large cups or 4 to 15 small cups |
| Aroma selector | Yes, for reduced quantities (2-4 large cups) |
| Anti-drip system | Yes, integrated into removable filter holder |
| Automatic shut-off | Yes, approximately 1 minute after brewing finishes |
| Water tank | Removable with lid and cup number indicator |
| Filter holder | Removable, compatible with size 1x4 paper filters |
| Power cord | Retractable with storage underneath the appliance |
| Cleaning | Damp cloth, do not immerse, parts not dishwasher safe |
| Descaling | Recommended every 3 months with non-polluting descaler |
| Spare parts | Replacement thermos carafe available |
| Safety | Do not use if cord damaged; repair by approved specialist |
| Compliance | EC directives 2006/95/EC (low voltage) and 89/336/EEC (EMC) |
| Use | Household use only |
| Included accessories | Thermos carafe, filter holder with anti-drip system |
| Rating plate | Under the appliance, indicates voltage and power |
Frequently Asked Questions - EKF6000 AEG-ELECTROLUX
User questions about EKF6000 AEG-ELECTROLUX
0 question about this device. Answer the ones you know or ask your own.
Ask a new question about this device
Download the instructions for your Coffee maker in PDF format for free! Find your manual EKF6000 - AEG-ELECTROLUX and take your electronic device back in hand. On this page are published all the documents necessary for the use of your device. EKF6000 by AEG-ELECTROLUX.
USER MANUAL EKF6000 AEG-ELECTROLUX
natural_image
Line drawing of a portable air fryer with control panel and side buttons (no text or symbols)PAGE
⑤ Bruksanvisning ..... 4
DK Brugsanvisning 8
N Bruksanvisning ..... 12
FIN Käyttöohje....16
GB Instruction book ..... 20
D Gebrauchsanweisung ..... 24
F Mode d'emploi ..... 28
NL Gebruiksaanwijzing.....32
① Istruzione per l'uso ..... 36
E Instrucciones de uso..... 40
P Instruções de utilização ... 44
© CZ Návod k použití ..... 48
PL Instrukcja obsługi ..... 52
H Használati útmutató .....56
⑧ Návod na obsluhu .....60
SLO Navodilo za uporabo .....64
HR Priručnik....68
SRB Priročnik za navodila .....72
RO Instructiuni de utilizare .....76
LV Rokasgrāmata .....80
LT Instrukcija....84
EST Kasutusjuhend....88
TR Kullanma kılavuzu .....92
BG Упътване за работа.....96
RUS Инструкция по эксплуатации101
UA Інструкція з експлуатації ...106


natural_image
Simple line drawing of a pipe or tube with an arrow indicating direction, no text or symbols present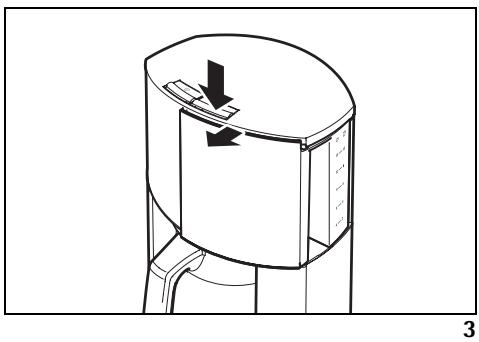
natural_image
Diagram of a cylindrical device with a downward arrow indicating force or movement, no text or symbols present2


natural_image
Technical line drawing of a mechanical device with internal components and a black arrow indicating a specific part (no text or symbols present)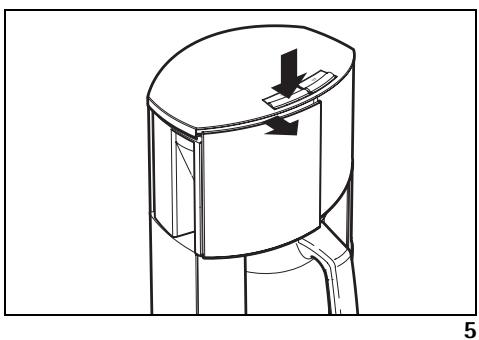
natural_image
Technical line drawing of a mechanical component with a downward arrow indicating force or movement (no text or symbols)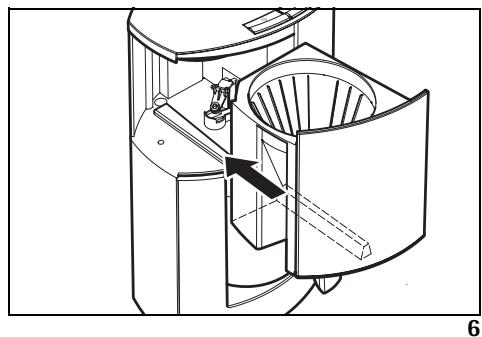
natural_image
Technical diagram of a mechanical device with internal components and directional arrow (no text or symbols)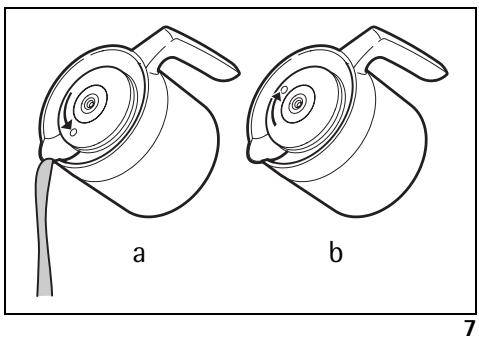
natural_image
Line drawing of two teapot holders labeled a and b, showing internal movement with no text or symbols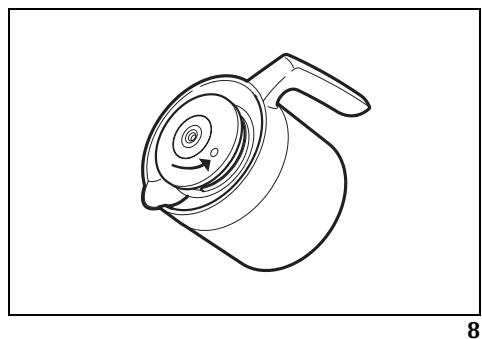
natural_image
Line drawing of a kettle with a circular dial and handle, no text or symbols presentS
S Bästa köpare,
Please read these operating instructions through carefully. Above all, please follow the safety instructions on the first few pages of these operating instructions! Please keep the operating instructions for future reference. If applicable, pass these instructions on to the next owner of the appliance.
!
The warning triangle and/or key words (Danger!, Caution!, Important!), draw your attention to information which is important for your safety or the correct functioning of the appliance. It is essential that this information is observed.
[Non-Text]
This symbol guides you step by step through the operating procedure for your appliance.
i
Next to this symbol you receive additional information and practical tips on using the appliance.
[NO TEXT]
The clover symbol indicates tips and information about the economical and environmentally friendly use of the appliance.
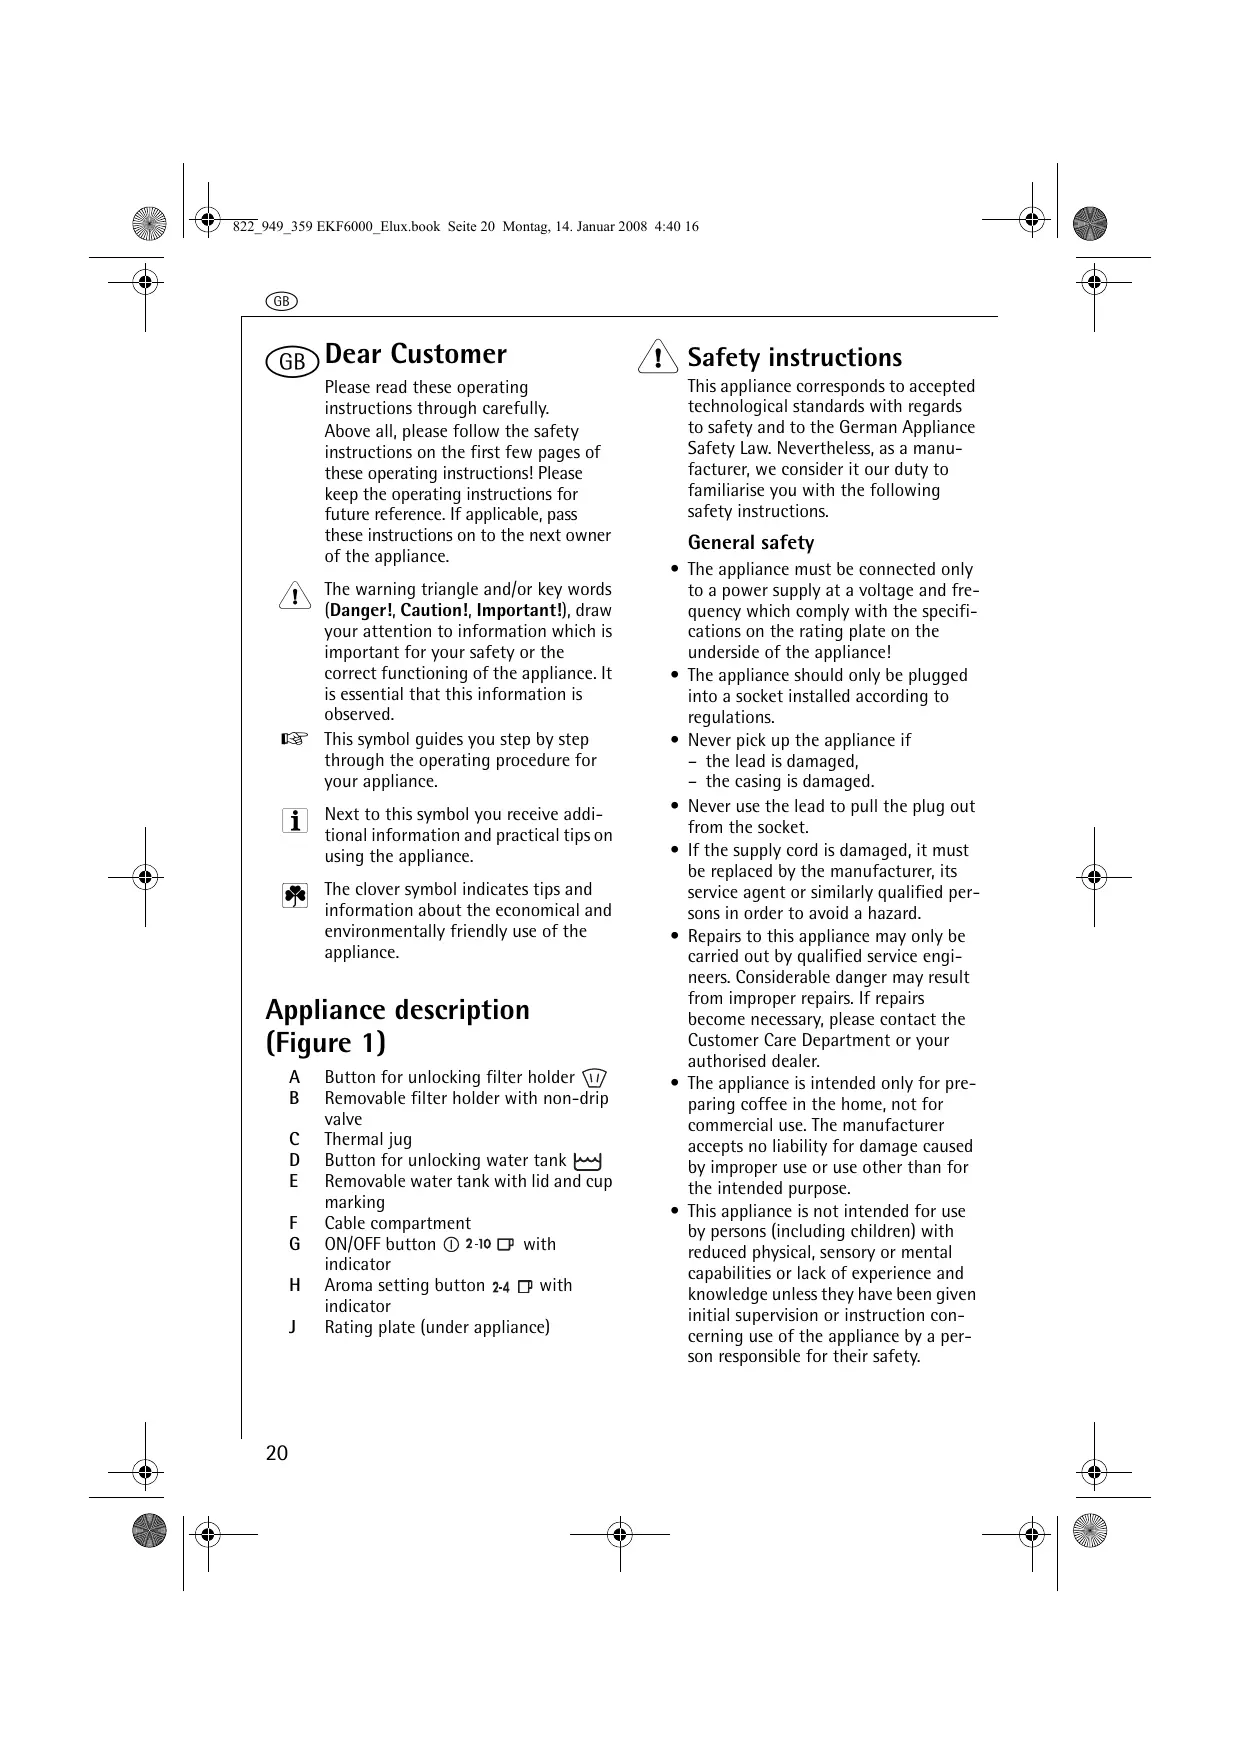
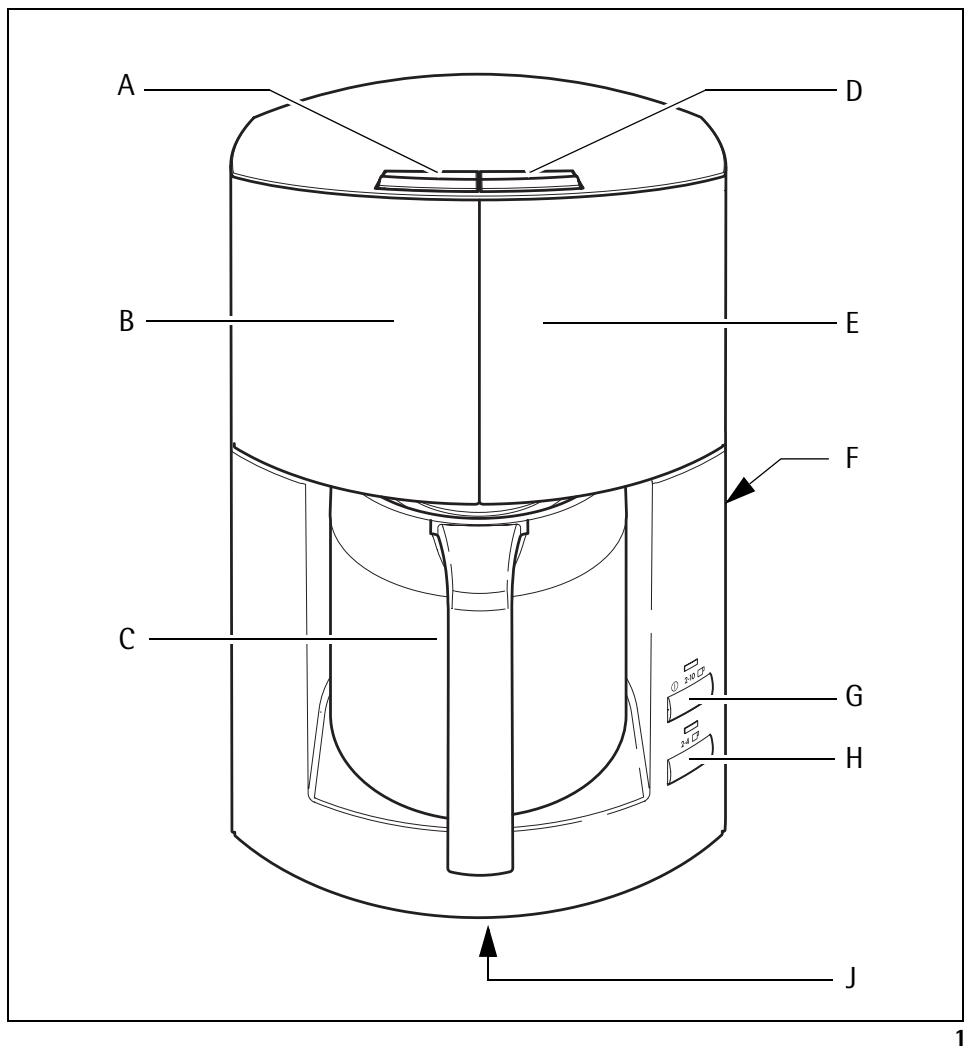
Appliance description (Figure 1)
A Button for unlocking filter holder 📊
B Removable filter holder with non-drip valve
C Thermal jug
D Button for unlocking water tank 📂
E Removable water tank with lid and cup marking
F Cable compartment
G ON/OFF button ① 2-10 □ with indicator
H Aroma setting button 2-4 □ with indicator
J Rating plate (under appliance)
!
Safety instructions
This appliance corresponds to accepted technological standards with regards to safety and to the German Appliance Safety Law. Nevertheless, as a manufacturer, we consider it our duty to familiarise you with the following safety instructions.
General safety
- The appliance must be connected only to a power supply at a voltage and frequency which comply with the specifications on the rating plate on the underside of the appliance!
- The appliance should only be plugged into a socket installed according to regulations.
- Never pick up the appliance if
- the lead is damaged,
- the casing is damaged.
- Never use the lead to pull the plug out from the socket.
- If the supply cord is damaged, it must be replaced by the manufacturer, its service agent or similarly qualified persons in order to avoid a hazard.
- Repairs to this appliance may only be carried out by qualified service engineers. Considerable danger may result from improper repairs. If repairs become necessary, please contact the Customer Care Department or your authorised dealer.
- The appliance is intended only for preparing coffee in the home, not for commercial use. The manufacturer accepts no liability for damage caused by improper use or use other than for the intended purpose.
- This appliance is not intended for use by persons (including children) with reduced physical, sensory or mental capabilities or lack of experience and knowledge unless they have been given initial supervision or instruction concerning use of the appliance by a person responsible for their safety.
GB
Safety of children
- Never leave the appliance running unattended. Take particular care when children are around!
- Packaging material, e.g. plastic bags, should not be accessible to children.
- Children should be supervised to ensure that they do not play with the appliance.
Points to note when using the appliance
- Before cleaning and carrying out maintenance, switch the appliance off and unplug from the mains socket.
- Do not fill the appliance with water when it is hot.
Switch the coffee maker off and wait approx. 5 minutes for it to cool down! - Please follow the instructions for des- caling!
- Never immerse the unit in liquid.
- The manufacturer accepts no liability for any damage caused by improper or incorrect use.
- Do not leave the appliance unattended. Unplug from the mains socket even when leaving the room for a short time.
Disposal

Packaging material
The packaging materials are environmentally friendly and can be recycled. The plastic components are identified by markings, e.g. >PE<, >PS<, etc. Please dispose of the packaging materials in the appropriate container at the community waste disposal facilities.

Old appliance

The symbol 🚗 on the product or on its packaging indicates that this product may not be treated as household waste. Instead it shall be handed over to the applicable collection point for the recycling of electrical and electronic equipment. By ensuring this product is disposed of correctly, you will help prevent potential negative consequences for the environment and human health, which could otherwise be caused by inappropriate waste handling of this product. For more detailed information about recycling of this product, please contact your local city office, your household waste disposal service or the shop where you purchased the product.
Operation
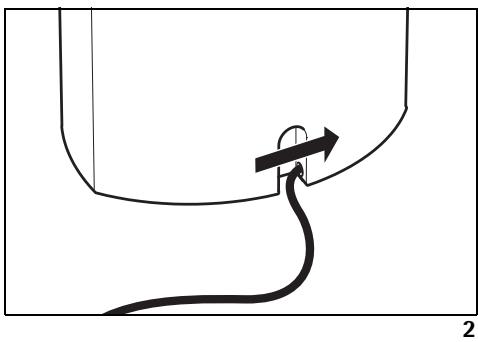
Cable compartment (Figure 2)
Your coffee machine has a cable compartment. If the mains lead is too long, you can push cable that is not needed into the compartment on the rear of the appliance.
Before using your coffee maker for the first time
Before using the appliance for the first time, clean it by running water through it once or twice without using paper filter and coffee.
Making coffee
Press the button to unlock the water tank 🖱 (Figure 1/D).
The water tank (Figure 1/E) will jump out slightly (Figure 3).
Pull the water tank out of the appliance.
Fill the water tank with fresh cold water.
⚠️ Fill the water tank only with fresh cold water. Never fill the water tank with mineral water, distilled water, milk, ready made coffee, tea etc.
GB
There is a gauge for 2-10 large or 4-15 small cups on the water tank.
The markings apply to the amount of fresh water.
The quantity of coffee produced is lower as the ground coffee absorbs water.
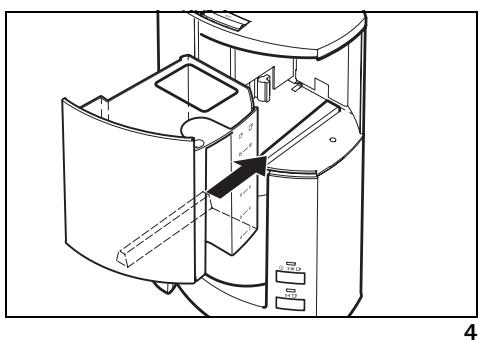
Refit the water tank, ensuring it fits in the guide on the appliance (Figure 4). Press water tank in until it locks.
Press the button to unlock the filter holder ⏻ (Figure 1/A). The filter holder (Figure 1/B) will jump out slightly (Figure 5).
Pull the filter holder out of the appliance.
Insert paper filter.
Insert a size 1x4 paper filter in the filter holder. Please fold the perforated edges before doing this.
Fill with ground coffee.
Please use ground coffee, medium grind. The quantity of coffee is matter of personal taste. For an average strong coffee one measuring spoon (approx. 6-7 g) is sufficient per cup.
Refit the filter holder, ensuring it fits in the guide on the appliance (Figure 6). Press filter holder in until it locks.
Place thermal jug (Figure 1/C) with closed lid (Figure 7/b) in the appliance.
Switch on the appliance with the ON/OFF button ① 2-10 □ (figure 1/G). The indicator lamp lights up. After a few seconds, hot water flows into the filter.
When the flow ends, switch off the appliance at the ON/OFF button ① 2-10 ☐ (Figure 1/G). The indicator lamp goes out.
i About 1 minute after end of flowing the appliance switches off automatically.
Remove the thermal jug.
Whilst boiling, the jug must not be removed for longer than 30 seconds or the filter will overflow.
Once the jug has been removed, the filter valve prevents coffee from dripping.
To pour, turn the lid of the thermal jug so that the marking on the lid is aligned over the spout (Figure 7/a).
To guarantee uniform coffee strength it should be stirred in the jug after preparation.
If the water has stopped flowing and you wish to refill with water for a fresh jug of coffee, switch the appliance off and allow it to cool down for a few minutes.
Aroma setting
The aroma setting guarantees full coffee enjoyment even with small quantities (2-4 large cups or 3-6 small cups).
Switch on the appliance with the ON/OFF button ① 2-10 □ (figure 1/G).
Switch on the aroma setting with the button 2-4 ☐ (Figure 1/H). With aroma setting switched on, the indicator lamp lights.
Cleaning and Care
Unplug the power cord from the mains socket before cleaning.
To clean, unlock filter holder with the button ⏻ (Figure 1/A) and remove (Figures 5 und 6). To clean the filter valve thoroughly, activate it several times whilst it is being rinsed.
To take the lid from the thermal jug, turn the lid so that the marking on the lid is placed as shown in Figure 8.
Clean the appliance with a damp cloth but never immerse it in water!
The parts of the coffee maker are not to be washed in a dishwasher.
GB
Descaling - making your coffee maker last longer
As a precautionary measure, we recommend descaling every three months. Only use an environmentally friendly descaler and follow the instructions on the packet. Please do not use a descaler with a formic base, or any descaler in powder form.
Fill the water tank with water and only then add the descaler. Not vice versa!
Place thermal jug (Figure 1/C) with closed lid (Figure 7/b) in the appliance.
Allow the descaler to act for about 15 minutes, then switch the appliance on. Switch it off when the descaler solution has finished flowing through.
i If necessary repeat the descaling process.
Following this, allow the appliance to run at least twice with fresh water.
Thoroughly rinse the water tank, thermal jug, lid and filter holder under running water, activate the filter valve repeatedly during the rinsing process.
Thermal jug
You can purchase a new thermal jug from your sales dealer or the service centre specifying the model of your coffee maker, see rating plate (figure 1/J).
Technical data
Mains voltage: 220 - 240 V
Power consumption: 1000 W
CE This appliance conforms with the following EC Directives:
- Low Voltage Directive 2006/95/EC
• EMC Directive 89/336/EEC with amendments 92/31/EEC and 93/68/EEC
D
- S
- S Bästa köpare,
- !
- [Non-Text]
- i
- [NO TEXT]
- Appliance description (Figure 1)
- Safety instructions
- General safety
- Safety of children
- Points to note when using the appliance
- Disposal
- Packaging material
- Old appliance
- Operation
- Cable compartment (Figure 2)
- Before using your coffee maker for the first time
- Making coffee
- GB
- Aroma setting
- Cleaning and Care
- Descaling - making your coffee maker last longer
- Thermal jug
- Technical data
Brand : AEG-ELECTROLUX
Model : EKF6000
Category : Coffee maker