
Cafamosa CF 250 - Coffee maker AEG-ELECTROLUX - Free user manual and instructions
Find the device manual for free Cafamosa CF 250 AEG-ELECTROLUX in PDF.


| Product Type | Bean-to-cup espresso machine |
| Brand | AEG-Electrolux |
| Model | Cafamosa CF 250 |
| Dimensions (W x D x H) | 250 x 300 x 350 mm |
| Weight | 4.5 kg |
| Power Consumption | 1450 W |
| Voltage / Frequency | 220-240 V / 50-60 Hz |
| Water Tank Capacity | 1.2 L |
| Bean Hopper Capacity | 200 g |
| Pump Pressure | 15 bar |
| Grinder Type | Ceramic burr grinder |
| Grind Settings | Adjustable (multiple levels) |
| Steam Wand | Yes, for milk frothing |
| Beverages | Espresso, lungo, cappuccino, latte macchiato |
| Water Filter | Optional (compatible with INTENZA+) |
| Self-Cleaning Function | Yes |
| Descaling Program | Yes |
| Auto Shut-Off | Yes (after 30 minutes) |
| Maintenance | Removable brew unit, rinseable under water |
| Warranty | 2 years |
Frequently Asked Questions - Cafamosa CF 250 AEG-ELECTROLUX
User questions about Cafamosa CF 250 AEG-ELECTROLUX
0 question about this device. Answer the ones you know or ask your own.
Ask a new question about this device
Download the instructions for your Coffee maker in PDF format for free! Find your manual Cafamosa CF 250 - AEG-ELECTROLUX and take your electronic device back in hand. On this page are published all the documents necessary for the use of your device. Cafamosa CF 250 by AEG-ELECTROLUX.
USER MANUAL Cafamosa CF 250 AEG-ELECTROLUX
2
3
natural_image
Technical illustration of a mechanical device with cross-sectional views (a and b) showing internal components and assembly (no text or symbols present)
4
5

natural_image
Mechanical assembly diagram showing a lever mechanism with arrows indicating motion (no text or symbols present)6

natural_image
Hand inserting a component into a device with a black arrow indicating the process (no text or symbols visible)7

natural_image
Illustration of a hand using a faucet to lift a circular pipe into a rectangular container (no text or symbols)8

natural_image
Hand pressing a button on a surface with sparkles and dots (no text or symbols visible)9
natural_image
Technical illustration of a speaker or speaker component with a black arrow indicating direction (no text or symbols present)1
natural_image
Illustration of a kitchen appliance with a curved arrow indicating rotation (no text or symbols)0
natural_image
Illustration of coffee beans being poured into a processing bowl (no text or symbols)12

natural_image
Illustration of a coffee machine with two cups on a counter, showing a ramp and directional arrow (no text or symbols)13 14

natural_image
3D rendering of a mechanical component with a conical top and base, showing internal structure and a black arrow indicating direction (no text or symbols)
natural_image
Pure electrical circuit lines without any symbols
natural_image
Illustration of a hand pouring dark granular substance into a bowl on a stove (no text or symbols)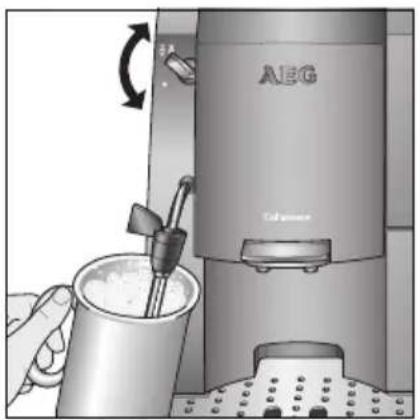
natural_image
Illustration of a milk tea machine with AEG branding and a hand pouring milk from a cup (no text or symbols on the device itself)15 16 17

natural_image
Illustration of a coffee maker with AEG branding and a cup of milk being processed (no text or symbols visible)
18 19 20

natural_image
Hand pressing a button on an electrical panel with buttons and indicators (no text or symbols visible)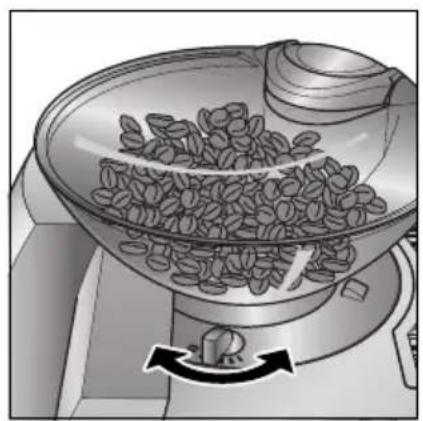
natural_image
Illustration of a cooking pot with seeds inside, showing a rotating knob (no text or symbols)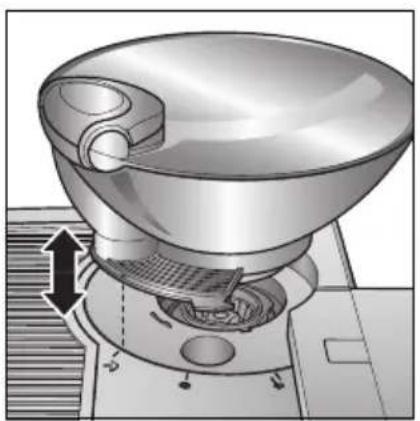
natural_image
Technical illustration of a mechanical device with internal components and an upward arrow indicating motion (no text or symbols)21 22 23


natural_image
Diagram of a gasifier with upward and downward arrows indicating flow or movement (no text or symbols)
24 25 26

natural_image
Illustration of a coffee maker with a hand pouring liquid from a bowl into a tray (no text or symbols visible)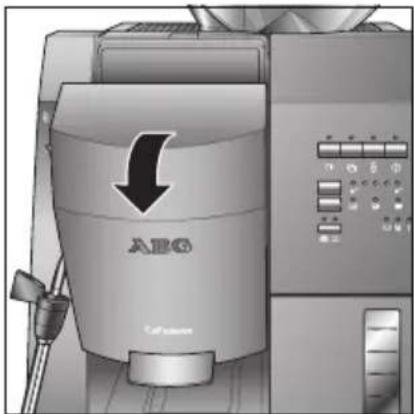

natural_image
Interior view of a mechanical device with internal components and no visible text or symbols27 28 29

natural_image
Illustration of a hand assembling a mechanical component with an inset showing a device being adjusted (no text or symbols present)30 32

natural_image
Hand pressing a mechanical component with a black arrow indicating downward motion (no text or symbols present)31 33

natural_image
Illustration of a hand pouring liquid into a mechanical device (no text or symbols visible)
natural_image
Illustration of a hand using a faucet to lift a mechanical component (no text or symbols visible)
natural_image
Mechanical component diagram showing a curved arrow indicating rotational motion (no text or symbols)
34 35 36

natural_image
Diagram of a mechanical device with a rotating base and internal components, showing no visible text or symbols.
37 38 39

natural_image
Illustration of a mechanical device with a bowl and a gear, showing internal components (no text or symbols)
natural_image
Illustration of a hand pouring liquid into a container with a downward arrow indicating flow or process (no text or symbols)
40 41 42
natural_image
Exterior view of a modern kitchen appliance with AEG branding and control panel (no readable text or symbols)
natural_image
Pure electrical circuit lines without any symbols43 44
natural_image
Four-panel diagram showing star-shaped light sources and circular elements, no text or symbols presentHärtestufe 1
Härtestufe 2
Härtestufe 3
Härtestufe 4
natural_image
Five identical gray panels showing white starburst patterns on black circular holes, no text or symbols present.1 Stunde
2 Stunden
3 Stunden
4 Stunden
5 Stunden
A Top view (see Fig. 2)
B Bean container with lid
C Service cover
D Selection dial for steam and hot water
E Height-adjustable dispenser with outlets
F Swivel nozzle for steam and hotwater with removable frothing aid
G Coffee grounds container (removable)
H Drip grille
I Drip tray float
J Drip tray
K Type plate (at top behind service cover)
L Control panel (see Fig. 3)
M Water tank with fill level indicator (removable)
N Test strip for water hardness
O Measuring spoon with cleaning brush
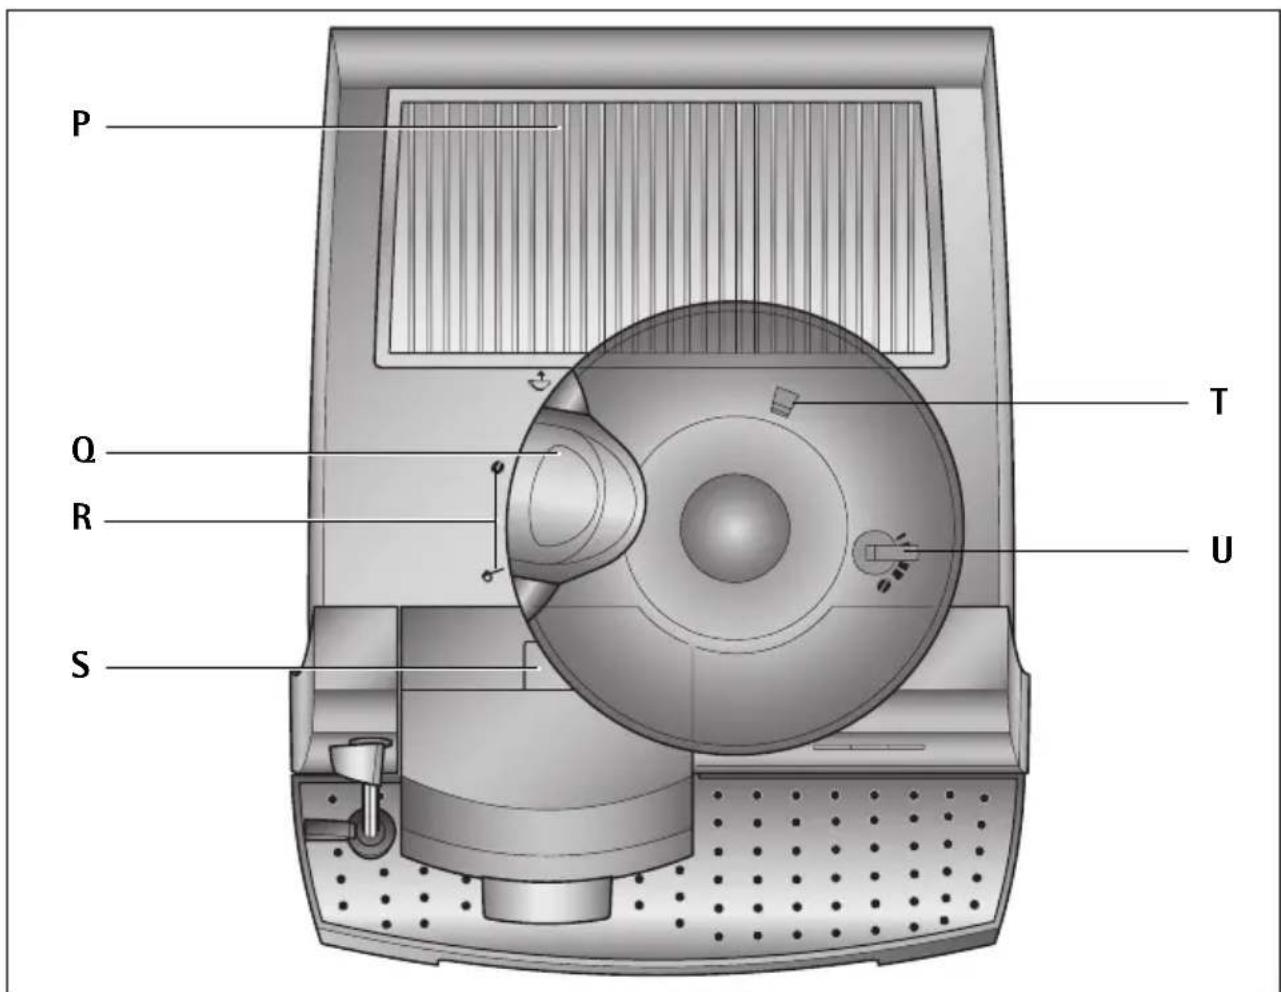
Top View (Fig. 2)
P Cup rack
Q Opening for ground coffee with lid (ground coffee filler)
R Bean-container position setting
S Service cover release button
T Release catch for removing grinding ring
U Lever for setting grinding texture
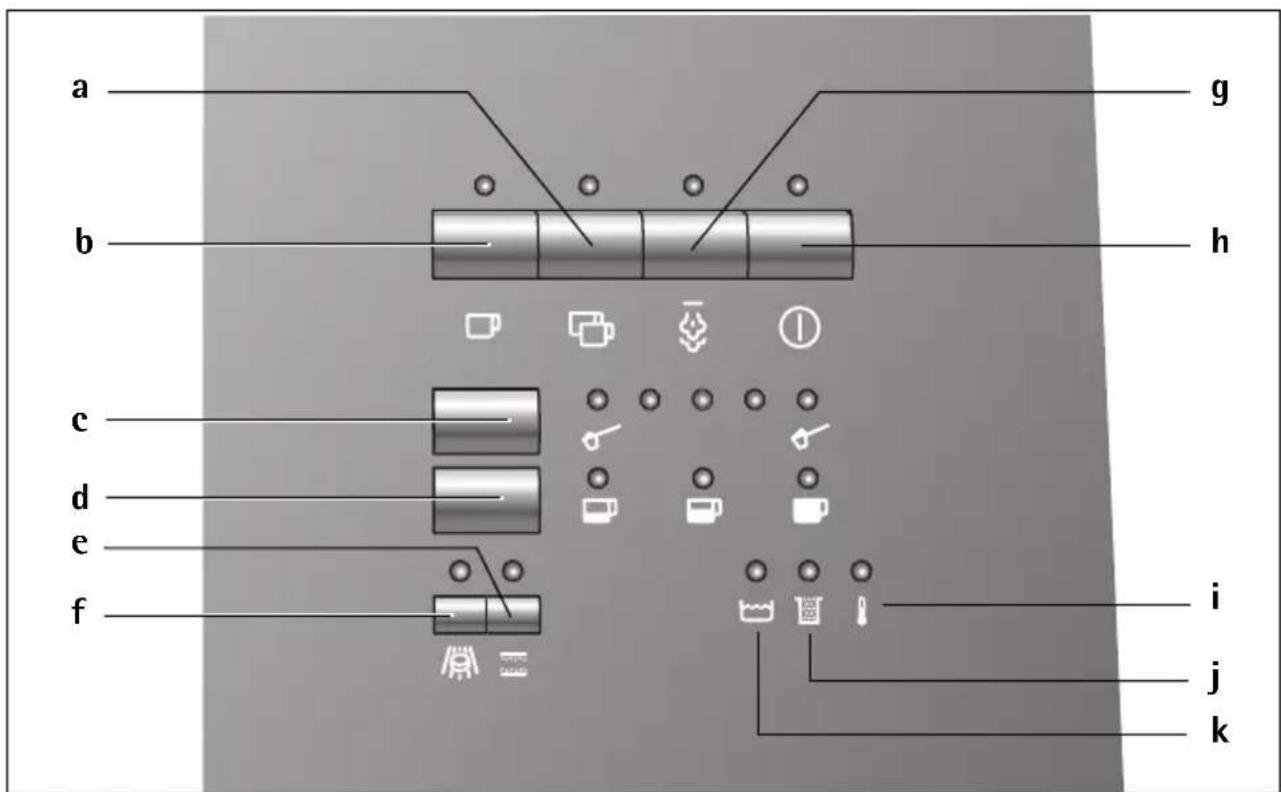
Control Panel (Fig. 3)
a Key for 2 cups of coffee (with indicator)
b Key for 1 cup of coffee (with indicator)
c "Coffee Quantity" key (with indicator)
d "Cup Measure" key (with indicator)
e "Descale" key (with indicator)
f "Clean" key (with indicator)
g "Steam Pre-selector" key (with indicator)
h "On/Off" key (with indicator)
i "Coffee machine heating" indicator
j "Empty grounds container" indicator
k "Fill water tank" indicator
Dear Customer,
Please read this user manual carefully, paying special attention to the safety notes! Keep the manual in a safe place for later reference, and pass it on to any new owner.
Your fully automated AEG coffee machine guarantees you
- Absolute ease of operation, both in making coffee and in maintenance and care
The excellent, individual taste is achieved by - The pre-brewing system: before the coffee is brewed, it is first moistened to extract its full aroma
- The individually controllable amount of water per cup, from a short espresso to a "long" milky coffee
- The individually controllable temperature, at which the coffee is made
• The choice between a normal or a strong cup of coffee - The grinding texture – adjustable to the roast of the coffee beans, and
- Last, but not least, the guaranteed crema, that small crown of froth that makes espresso-coffee so unmatchable for connoisseurs
Did you know? The time the water is in contact with the ground coffee is considerably less for espresso coffee than conventional filter coffee. As a result, less bitterness is released from the ground coffee- making espresso-coffee that much milder!
Contents
1 Safety Information 29
2 Before Using for the First Time 30
2.1 Setting Up and Connecting the Coffee Machine 30
2.2 Filling with Water 30
2.3 Switching the Coffee Machine On 31
2.4 Switching the Coffee Machine Off 31
2.5 Setting the Water Hardness 31
3 Making Coffee with Beans 32
3.1 Filling the Coffee Bean Container 32
3.2 Selecting the Cup Measure 32
3.3 Selecting the Coffee Quantity 33
3.4 Dispensing Coffee 33
4 Making Ready-ground Coffee 33
4.1 Using the Ground Coffee Filler 33
4.2 Selecting the Cup Measure 34
4.3 Dispensing Coffee 34
5 Frothing Milk 34
6 Preparing Hot Water 35
7 Changing and Saving the Cup Measure 35
8 Changing and Saving the Coffee Quantity 35
9 Setting the Grinding Texture 35
10 Setting the Coffee Temperature 36
11 Setting the Switch-off Time 36
12 Resetting the Coffee Machine 37
13 Cleaning and Care 37
13.1 Regular Cleaning 37
13.2 Emptying the Coffee Grounds Container 38
13.3 Cleaning the Grinder 38
13.4 Cleaning the Coffee-making Unit 39
13.5 Running the Cleaning Program 39
13.6 Running the Descaling Program 40
13.7 Ordering Accessories 41
14 What do I do, if ... 42
15 Using the Total Cups Counter 43
16 Technical Data 44
17 Taking Care of the Environment 44
18 Service 44
1 Safety Information
!
The safety of AEG electrical appliances complies with standard engineering practice and appliance safety legislation. As the manufacturer, we nevertheless wish to familiarise you with the following safety information.
General safety
- The coffee machine must be connected only to a mains power supply of which the voltage, type of supply and frequency conform with the details shown on the type plate (this can be found on the upper part, behind the service cover)!
- Never allow the mains lead to come into contact with hot parts of the appliance.
- Never use the mains lead to pull the plug out of the mains socket!
- Do not use the coffee machine, if:
- the mains lead is damaged, or
- the case shows visible signs of damage.
- Ensure that the coffee machine is switched off before plugging into the mains socket.
Child safety
- Do not leave the coffee machine running unattended, and take special care when children are about!
Safety in operation
- Caution! The coffee dispenser, swivel nozzle and cup rack become hot in operation. Keep children at a safe distance!
- Caution! Danger of scalding when the steam nozzle is activated! Hot water or steam output can cause scalding. Activate the steam nozzle only when you are holding a container under the nozzle.
-
Do not use steam to heat inflammable liquids!
-
Only use the coffee machine with water in the system! Fill the water tank with cold water. Do not use hot water, milk or other liquids. Do not exceed the maximum fill level of 1.5 litres.
- Do not put frozen or caramelised coffee beans in the bean container. Use only roast coffee beans! Remove any foreign bodies from the coffee beans. Failure to do this invalidates the guarantee.
- Spoon only ground coffee into the ground coffee filler.
- Do not leave the coffee machine switched on unnecessarily.
- Do not expose the coffee machine to the weather.
- When using an extension cable, ensure that this is an earthed cable with a core diameter of at least 1.5 ~mm^2 .
- To prevent any personal hazard, people with motor disorders should use the coffee machine only in the presence of another adult.
- Operate the coffee machine only with the drip tray and the drip grille fitted!
Safety in cleaning and care
- Follow the cleaning and descaling instructions.
- Switch off the coffee machine and unplug from the mains socket before carrying out any maintenance or cleaning!
- Do not immerse the coffee machine in water.
- Clean the steam nozzle only when the coffee machine is switched off and there is no pressure!
- Do not clean coffee machine parts in the dishwasher.
- Never put water in the grinder. This would damage the grinder.
Never open or repair the coffee machine. Faulty repairs can result in considerable hazard to the user.
Repairs to electrical appliances must be carried out only by qualified service engineers.
If a repair becomes necessary – including replacement of the mains lead, please contact
- the dealer where you bought the coffee machine, or
- an AEG Customer Service Centre.
If the coffee machine is used incorrectly, or for a purpose other than its intended purpose, we cannot accept any liability for damage caused or any guarantee claims. This provision also applies if the cleaning and descaling programs are not run in accordance with the instructions in this manual, immediately after illumination of the "Clean" key (Fig. 3, f) or the "Descale" key (Fig. 3, e).
2 Before Using for the First Time
2.1 Setting Up and Connecting the Coffee Machine
Choose a suitable, horizontal, stable, unheated, dry base. Ensure good air circulation.
Important! If the coffee machine is brought into a warm room from a cold environment, wait about two hours before switching on!
We advise you to place the coffee machine on a suitable mat to prevent damage being caused by spray and splashes.
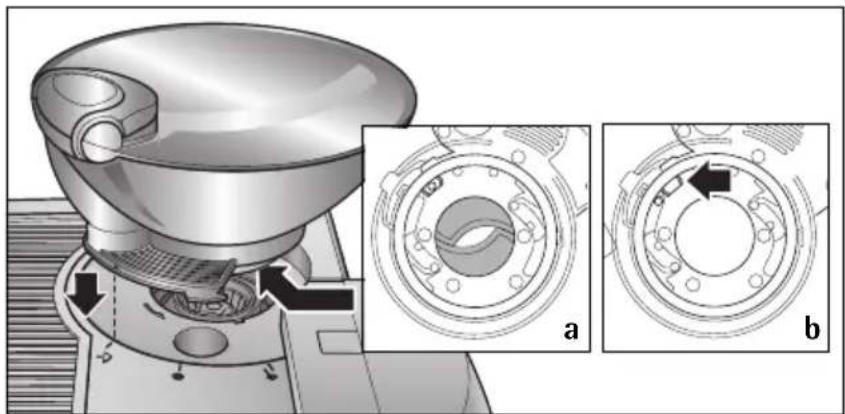
Hold the bean container with the marking on the "Unlockcontainer" position, and set it in place (Fig. 4). The bottom opening of the bean container must be closed (Fig. 4,a). If it is not closed (Fig. 4,b), insert the tip of a ballpoint pen in the small oval hole (arrow), and turn to close the opening.
Now turn the bean container anti-clockwise to one of the two other positions.
Push the drip tray in, until it engages on the right under the water tank (Fig. 5).
Plug the coffee machine into an earthed mains socket. Do not use a socket that is not earthed!
If you do not need the full length of the mains lead, open the cable compartment on the back of the coffee machine, and tidy away the unused lead (Fig. 6).
2.2 Filling with Water
Before each time you switch on the coffee machine, check that there is water in the water tank. The coffee machine requires water for the automatic flushing processes each time the machine is switched on or off.
Remove the water tank from the coffee machine (Fig. 7).
Fill the water tank with fresh cold water (Fig. 8).
Pour only fresh cold water in the water tank. Never put in other liquids, e.g. mineral water or milk.
Replace the water tank (Fig. 7). Press the tank firmly in, to ensure that the water-tank valve opens.
If the water tank is not in place when the coffee machine is switched on, or the water level is low, the "Fill water tank" indicator (Fig. 3, k) illuminates. When this indicator is on, coffee making is not possible or, if started, is interrupted.
To always be sure of a rich coffee, full of aroma, you should:
- change the water in the water tank daily
- wash the water tank at least once per week in normal washing-up water (not in the dishwasher). Then flush with fresh water.
2.3 Switching the Coffee Machine On
Switch the coffee machine on by means of the "On/Off" key (Fig. 3, h) ① (Fig. 9). The red indicator light comes on. While the water is being heated (approx. 25 seconds) the "Coffee machine heating" indicator (Fig. 3, i) flashes.
Once the operating temperature has been reached, the coffee machine carries out an automatic flushing cycle. The water flows out into the drip tray. The "Coffee machine heating" indicator (Fig. 3, i) remains constantly on. The coffee machine is now ready to use.
i Immediately after being switched on, during the heating-up phase, the coffee machine runs through a set-up cycle. The noises this creates are completely normal.
2.4 Switching the Coffee Machine Off
If you switch the coffee machine off with the "On/Off" key (Fig. 3, h) ① after you have finished making coffee, the machine carries out a flush program, during which time the "Empty grounds container" indicator (Fig. 3, j) flashes for about 1 minute as a reminder. If you switch the coffee machine off with the "On/Off" key (Fig. 3, h) while a function is running, all functions are immediately switched off.
2.5 Setting the Water Hardness
Before using the machine for the first time or when using a different water grade, you should set your coffee machine to the water hardness level corresponding to the local water hardness. You can used the included test card to determine the water hardness, or contact your local water supply company.
Determining water hardness
Dip the test strip in cold water for around 1 second. Shake off the excess water, and gauge the hardness by means of the pink bands.
No pink bands or one pink band: Hardness 1, soft up to 1.24 mmol/l, or up to 7° German hardness, or up to 12.6° French hardness
Two pink bands: Hardness 2, medium hard up to 2.5 mmol/l, or up to 14° German hardness, or up to 25.2° French hardness
Three pink bands: Hardness 3, hard up to 3.7 mmol/l, or up to 21° German hardness, or up to 37.8° French hardness
Four pink bands: Hardness 4, very hard over 3.7 mmol/l or over 21° German hardness, or over 37.8° French hardness
Setting and saving the water hardness level
You can set 4 hardness levels. The coffee machine is factory-set to hardness level 3.
Press and hold the "Descale" key (Fig. 3, e).
Now repeatedly press the "Coffee Quantity" key (Fig. 3, c) until you have selected the required hardness level. Release the "Descale" key. The selected value is now saved.
The hardness levels are indicated as follows:

Hardness level 1
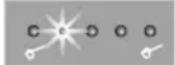
Hardness level 2

Hardness level 3

Hardness level 4
3 Making Coffee with Beans
The following process for making coffee with beans runs completely automatically: Grinding, portioning, pressing, pre-brewing, brewing, ejection of the coffee grounds.
The facility to select the grinding texture and the coffee quantity allows you to individually set up the coffee machine to your own personal taste.

Ensure that you use only pure coffee beans with no caramelised or aromatised additives. Do not use frozen beans.
3.1 Filling the Coffee Bean Container
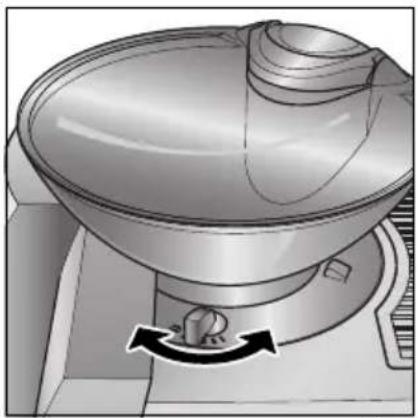
Turn the bean container to the "Coffee Beans" position (Fig. 10). The mechanism sets to the required function.
Set the grinding texture (Fig. 11). Using the grinding texture adjustment (Fig. 2, bottom) you can set the grinding texture of the grinder.
Note! Before putting beans into the coffee machine for the first time, you can set the grinding texture once with the grinder stationary. Once the grinder has been filled with beans, the setting can be changed only while grinding is proceeding. Otherwise the coffee machine could be damaged.
The grinder is factory-set at a medium grinding texture. Notes on changing the grinder setting can be found in "Setting the Grinding Texture" Page 35.
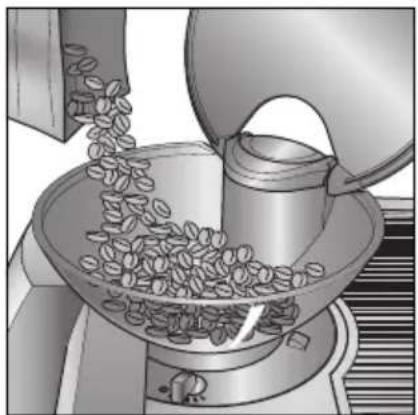
■Raise the lid of the coffee bean container, and fill the container with fresh coffee beans (Fig. 12). Then reclose the lid.
Note! Make sure that no foreign bodies, such as stones, enter the coffee bean container. Damage caused by foreign bodies in the grinder is excluded from the guarantee.
3.2 Selecting the Cup Measure
Depending on your taste, select a "short" espresso or a "long" milky coffee.
The selection is made by repeatedly pressing the "Cup Measure" key (Fig. 3, d) until the desired cup symbol is indicated.
The cup measures are indicated as follows:
Espresso cup
Coffee cup
Coffee mug
The coffee machine is factory-set to standard measures.
Notes on changing the cup measures can be found in „Changing and Saving the Cup Measure" on Page 35.
3.3 Selecting the Coffee Quantity
Repeatedly press the "Coffee Quantity" key (Fig. 3, c) until the desired coffee quantity is indicated.
The coffee quantities are indicated as follows:

natural_image
Five identical panels showing white starburst patterns on gray background, no text or symbols present"extra mild"
"mild"
"normal"
"strong"
"extra strong"
To save having to select the coffee quantity every time you switch on the coffee machine, you can save the coffee quantity in relation to the cup measure. Notes on how to do this can be found in „Changing and Saving the Coffee Quantity" on Page 35.
3.4 Dispensing Coffee
Place one or two cups under the coffee dispenser. The dispenser can be slid up or down to match the height of your cup/mug to reduce heat loss and coffee splashes (Fig. 13).
Press the Key for 1 cup of coffee (Fig. 3, b) or the Key for 2 cups of coffee (Fig. 3, a) When you dispense 2 cups of coffee, the previously set "Coffee Quantity" and "Cup Measure" are doubled.
The coffee is now made.
In the coffee-making process, the ground coffee is first of all wetted with a small quantity of water for pre-brewing. Following a short pause, the actual brewing process commences.
You can stop coffee being dispensed by briefly pressing the coffee dispensing key.
4 Making Ready-ground Coffee
This function allows you to brew pre-ground coffee, e.g. decaffinated coffee.
Note that you must use only the supplied measuring spoon, and never put more than 2 level measuring spoons of ground coffee into the ground coffee filler.
Note! Make sure that no ground coffee has remained in the filler, and that no foreign bodies enter the filler. The ground coffee filler is not a storage container. The ground coffee must be fed directly into the coffee-making unit.
Do not put any water-soluble or freeze-dried instant powders or any other drink powder into the ground coffee filler. Coffee powder, which is too fine, can lead to blockages.
4.1 Using the Ground Coffee Filler
Turn the coffee bean container to the "Ground Coffee" position (Fig. 14). The mechanism sets to the required function. All the coffee quantity indicator lights come on (Fig. 3, c).
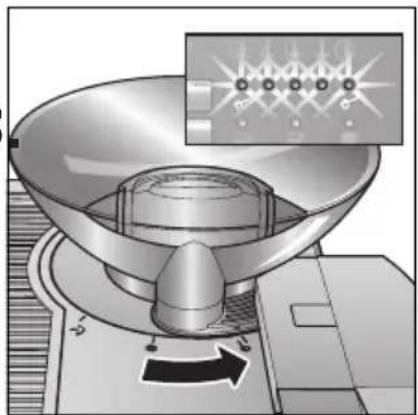
When using ready ground coffee, the "Coffee Quantity" function is inactive. This is shown by all the indicator lights coming on (Fig. 15).
Open the lid of the ground coffee filler, and spoon in the fresh ground coffee (Fig. 16).
Do not add coffee during the brewing process. Only put in ground coffee for the next cup when the brewing process has completely finished and the coffee machine is ready.
Close the lid.
4.2 Selecting the Cup Measure
Repeatedly press the "Cup Measure" key (Fig. 3, d) until the desired cup symbol is indicated.
The cup measures are indicated as follows:
Espresso cup
Coffee cup
Coffee mug
The coffee machine is factory-set to standard measures.
Notes on changing the cup measures can be found in "Changing and Saving the Cup Measure" Page 35.
4.3 Dispensing Coffee
Refer to „Dispensing Coffee" Page 33.
5 Frothing Milk
The steam can be used to froth milk and to heat liquids. Since a higher temperature is needed to produce steam than to make coffee, the coffee machine has an additional steam mode.
To make a cappuccino, fill a large cup 1/2 to 2/3 full with espresso, and then add the frothed milk.
Caution! Danger of scalding when the steam nozzle is activated! Hot water or steam output can cause scalding. Do not activate the steam nozzle until it is immersed in the milk.
To produce steam, press the "Steam Pre-selector" key (Fig. 3, g) The indicator illuminates, and at the same time, the "Coffee machine heating" indicator (Fig. 3, i) flashes. When the heating process is finished, this indicator changes from flashing to constantly on. The coffee machine is now ready for frothing milk.
If the steam function is left unused for more than 1 minute, the coffee machine automatically changes back to coffee-making mode.
Pour approximately 100 ml cold, skimmed or semi-skimmed milk into a small, narrow jug (max. 0.5 l capacity). This must be small enough to fit under the steam nozzle.
The milk should be cold. You should also use a cold jug, and not rinse this with hot water.
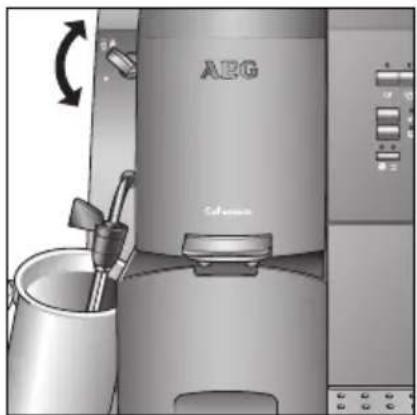
Swivel the steam nozzle out and hold the jug under the steam nozzle so that the end is completely immersed in the milk. Turn the Selection dial for steam and hot water (Fig. 1, D) to the position (Fig. 17). The milk is now frothed up.
Hold the jug steady during the frothing process. The nozzle should not be allowed to touch the bottom of the jug, since this would prevent the steam escaping. Froth the milk until the volume has at least doubled.
To stop frothing, turn the Selection dial for steam and hot water (Fig. 1, D) to the position and remove the jug (Fig. 17).
Caution! Danger of scalding from hot milk spray! Switch the steam off, before removing the jug with the frothed milk.
To finish steam mode, press the "Steam Pre-selector" key (Fig. 3, g) The indicator goes out.
The coffee machine is now ready for making coffee again.
Each time you have frothed milk, let off some hot water through the nozzle for a short time by setting the Selection dial for steam and hot water (Fig. 1, D) to the position. This is necessary to prevent milk residues drying inside the nozzle, and thereby blocking it. Use a suitable container to catch the water.
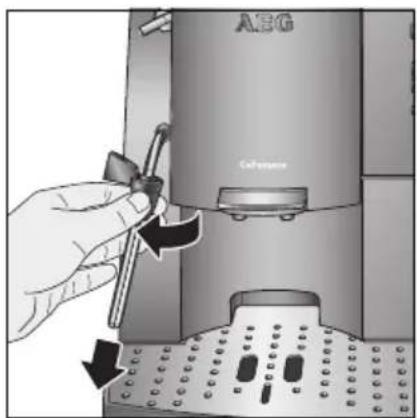
Remove the frothing aid after each use (Fig. 18) and flush the milk residues away under running water. Wipe the steam nozzle off with a damp cloth.

Caution! Danger of burns from the frothing aid! Hold the frothing aid only by the black seal.
6 Preparing Hot Water
The hot water can be used to pre-heat cups and for making hot drinks, e.g. tea or instant soups.

Caution! Danger of scalding when the hot water nozzle is activated! Hot water or steam output can cause scalding. Activate the hot water nozzle only when a container is under the hot water nozzle.

Place a container under the hot water nozzle. Set the Selection dial for steam and hot water (Fig. 1, D) to the position (Fig. 19). Hot water is now prepared.

After you have dispensed the hot water turn the Selection dial for steam and hot water (Fig. 1, D) back to the ● position (Fig. 19) and remove the container.
7 Changing and Saving the Cup Measure
The coffee machine is factory-set to standard measures. These measures can be individually changed to your own taste and saved for each cup size.

Repeatedly press the "Cup Measure" key (Fig. 3, d) until the cup symbol, for which you wish to change the measure, is illuminated.

Place the appropriate cup under the coffee dispenser (e.g. coffee mug).

Press and hold the Key for 1 cup of coffee (Fig. 3, b) until the cup/mug is filled to the desired measure. Release the key. Your new cup measure is now saved.

Repeat the process if you would like to change the measures for the other cup symbols.

The saved measures remain stored when the coffee machine is switched off. If your coffee cups or your taste change, you can easily change the cup measure(s) to your new requirements, whenever you want.
8 Changing and Saving the Coffee Quantity
You can set and save a different coffee quantity for each cup symbol to your individual requirements. This can be done only for use with coffee beans, not for use with ground coffee.

Repeatedly press the "Cup Measure" key (Fig. 3, d) until the desired cup symbol is indicated.

Then repeatedly press the "Coffee Quantity" key (Fig. 3, c) until the desired coffee quantity indicator is illuminated, and hold the key pressed (Fig. 20).
After the key has been held for a few seconds, all the indicators are constantly on – except for the one selected (Fig. 21). Now release the key. The coffee quantity is now saved.

Repeat the process if you would like to save coffee quantities for the remaining cup symbols.

The saved quantities remain stored when the coffee machine is switched off.
9 Setting the Grinding Texture

Note! The grinder settings must be changed only while coffee is being ground. Making adjustments to the stationary grinder can damage the coffee machine.

Press the Key for 1 cup of coffee (Fig. 3, b) to make one cup of coffee. While the coffee is being ground, use the Lever for setting grinding texture
(Fig. 2, U) and (Fig. 22) to change the grinding texture.
The lever positions have the following effects:

Fine grade for intensive taste

Medium grade for normal taste

Coarse grade for mild coffee
Remove foreign bodies from the grinder
Foreign bodies, such as small stones, in the grinder can damage the grinder. The coffee machine includes a stone detector. A foreign body in the coffee causes a loud, even rattle. If you hear this noise while coffee is being ground, immediately switch off the coffee machine and remove the foreign body, as described in „Cleaning the Grinder" Page 38.
10 Setting the Coffee Temperature
There are five temperature levels to choose from. In the "Set Coffee Temperature" mode, the coffee quantity indicator is illuminated, which now acts as the coffee temperature indicator.
The coffee temperature levels are indicated as follows:
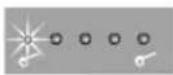
"lukewarm"
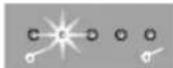
"warm"

"normal"

"hot"

"extra hot"
Switch the coffee machine off.
Simultaneously press and hold the Key for 1 cup of coffee (Fig. 3, b) and the "Steam Pre-selector" key (Fig. 3, g).
While still holding these keys, press the "On/Off" key (Fig. 3, h) ①
Keep all three keys pressed for around 3 seconds, until the "Coffee machine heating" indicator (Fig. 3, i) and one of the coffee temperature indicators are illuminated.
Now release all three keys.
Use the "Coffee Quantity" key (Fig. 3, c) (increase temp.) or the "Cup Measure" key (Fig. 3, d) (reduce temp.) to select the temperature level you require.
When you have selected the temperature, press the "Clean" key (Fig. 3, f) to save and exit the "Set Coffee Temperature" mode.
11 Setting the Switch-off Time
If the coffee machine is not used for a set amount of time, it automatically switches off for safety and economy reasons.
You can choose between five switch-off times (automatic switch-off after 1 to 5 hours).
In the "Set Switch-off Time" mode, the coffee quantity indicator is illuminated, which now acts as the switch-off time indicator.
The switch-off times are indicated as follows:

1 hour
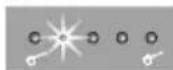
2 hours
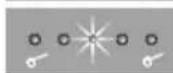
3 hours

4 hours

5 hours
The switch-off time has been factory-set to 3 hours. You can change this setting as follows:
Switch the coffee machine off.
Simultaneously press and hold the Key for 2 cups of coffee (Fig. 3, a) and the "On/Off" key (Fig. 3, h) Keep both keys pressed for around 3 seconds, until the "On/Off" key (Fig. 3, h) indicator and one of the switch-off time indicators are illuminated.
Use the "Coffee Quantity" key (Fig. 3, c) (increase time) or the "Cup Measure" key (Fig. 3, d) (reduce time) to select the switch-off time you require.
When you have selected the switch-off time, press the "Clean" key (Fig. 3, f) to save the setting and exit the "Set Switch-off Time" mode.
12 Resetting the Coffee Machine
This function is used to reset any changes you have made to the factory settings.
The following settings are affected:
- Cup measures
- Coffee quantities
- Coffee temperatures
Simultaneously press and hold the "Descale" key (Fig. 3, e) and the "Clean" key (Fig. 3, f). Keep both keys pressed for around 3 seconds, until the coffee machine switches off for a short time, and then switches back on with the factory settings. The coffee machine is now reset.
13 Cleaning and Care
To ensure consistent coffee quality and faultless operation, always keep your coffee machine clean.
13.1 Regular Cleaning
Caution! Before cleaning, switch off the coffee machine and allow it to cool down. Do not use any abrasive, scouring or corrosive cleaning materials. Wipe the inside and outside of the case only with a damp cloth.
Note! Never put the coffee machine or separate parts of the coffee machine in the dishwasher.
Note! Never put water in the coffee bean container, as this would damage the grinder.
Remove the water tank daily (Fig. 7) and empty any remaining water away. Rinse out the water tank with fresh water. Use fresh water every day.
Empty the coffee grounds container daily, see "Emptying the Coffee Grounds Container" Page 38.
Regularly drain the drip tray. This can be done at any time, but must be done when the red Drip tray float (Fig. 1, I) appears through the opening in the drip grille.
Regularly (at least once per week) clean the Water tank (Fig. 1, M), Drip tray (Fig. 1, J), Drip grille (Fig. 1, H) and Coffee grounds container (Fig. 1, G) with warm water, a mild washing up liquid and possibly a brush.
From time to time, remove the coffee bean container and clear away any residues.
Each time the machine is used for frothing, remove the frothing aid and clean off any milk remains. The air intake opening under the seal must not become blocked. This can be cleaned out with a thin needle.
If the height adjustment of the coffee dispenser becomes stiff, remove the coffee grounds container, open the service cover and remove it. Slide the
height adjuster right down, and off the bottom. To do this, gently raise the inside catch. Use warm water to clean any coffee residues from both parts. Reassemble the two parts. To do this, gently pull up the catch. Check the ease of movement of the height adjuster. Refit the service cover and push the grounds container back in place.
13.2 Emptying the Coffee Grounds Container
At regular intervals, after every 16 coffee brews, the "Empty grounds container" indicator (Fig. 3, j) signals that the container has to be emptied and cleaned.
When the coffee machine is in daily use, empty the container daily. The indicator flashes for around 1 minute each time the machine is switched off, as a reminder to do this.
i Always empty the grounds container with the coffee machine switched on, otherwise the coffee machine does not register that the container has been emptied.
13.3 Cleaning the Grinder
Use the supplied brush to remove ground coffee residues.
Note! Never put water in the grinder. This would damage the grinder.
Press the "On/Off" key (Fig. 3, h) to switch off the coffee machine. Unplug from the mains socket.
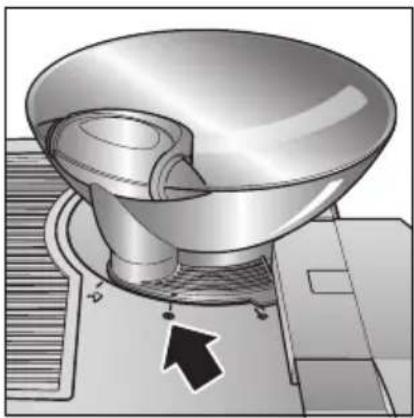
Turn the bean container so that the mark is at the "UnlockContainer" position and remove the container (Fig. 23).
Remove any remaining coffee beans (you could use the vacuum cleaner with the hose or crevice tool attachment for this).
i If a foreign body is impossible to remove, take off the grinding ring.
To do this, proceed as follows (Fig. 24):
-
Push the Release catch for removing grinding ring (Fig. 2, T) forward toward the centre of the grinder.
-
Keep it in this position and turn the Lever for setting grinding texture (Fig. 2, U) approximately one full turn clockwise until it comes up against the stop.
You can continue to turn the Lever for setting grinding texture (Fig. 2, U) only if the Release catch for removing grinding ring (Fig. 2, T) is pressed.
Now release the grinding ring (Fig. 25) and remove the foreign body or bodies.
Caution! Risk of injury from the spinning grinder. Never switch the coffee machine on, when you are working on the grinder. This can lead to severe injuries. Before starting work, ensure that the machine is unplugged from the mains socket.
When refitting the grinding ring, ensure that both catches on the grinding ring holder engage in the corresponding slots (Fig. 25). Failure to do this can lead to damage to the grinder.
Turn the Lever for setting grinding texture (Fig. 2, U) approximately one full turn anticlockwise until it comes up against the stop.
Set the bean container in place at the "UnlockContainer" position and turn it back to the "Coffee Beans" position.
Add a small quantity of coffee beans, and test the proper operation of the grinder by making a cup of coffee. The first time the grinder is used, or after cleaning, less ground coffee will enter the coffee-making unit, because the channel first has to be filled. This can influence the first cup of coffee.
13.4 Cleaning the Coffee-making Unit
We advise you to clean the coffee-making unit regularly (depending on how frequently it is used). It should be cleaned before you start the cleaning program. If your coffee machine is to be left unused for some time (e.g. holidays), empty the coffee grounds container and the water tank, and thoroughly clean the coffee machine, including the coffee-making unit.
Removing the coffee-making unit
Press the "On/Off" key (Fig. 3, h) to switch the coffee machine off. Unplug from the mains socket.
Pull the coffee grounds container completely out of the coffee machine (Fig. 26).
Press the Service cover release button (Fig. 2, S) (Fig. 27).
The service cover opens at the front (Fig. 28).
Remove the service cover.
The coffee-making unit is located behind the service cover (Fig. 29). The three red elements are used for latching and unlatching.
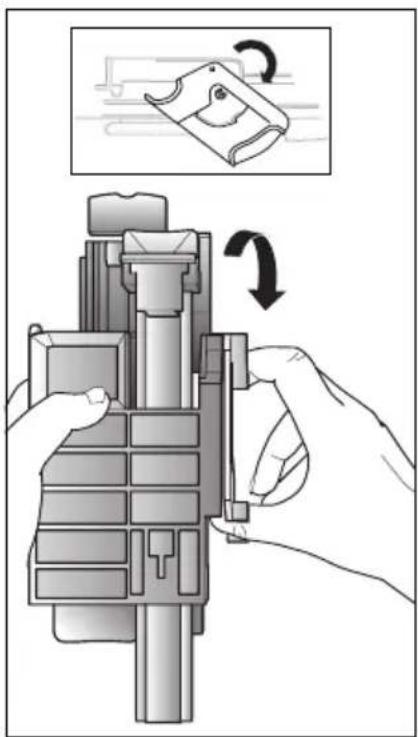
To remove the coffee-making unit, operate the latches in the following order (Fig. 30):
- Push the latching lever up.
- Press and hold the lock button.
- Press and hold the latching button down and pull out the coffee-making unit (Fig. 31).
Cleaning the coffee-making unit
To clear coarse particles (contamination) from the coffee-making unit, pull the white service lever down to the stop and open the coffee-making unit (Fig. 32).
The two strainers and now readily accessible, and the ejector lever drops down.
Rinse the coffee-making unit under warm, running water. It is essential to thoroughly flush the stainless steel strainers to remove all coffee residues (Fig. 33 and 34).
Dry the coffee-making unit off and push the service lever back up to the stop (Fig. 35).
The ejector lever flips in and the coffee-making unit closes.
Inserting the coffee-making unit
Follow these steps to re-insert the coffee-making unit:
- Push the coffee-making unit onto the guide bar and then unit into the coffee machine as far as it will go (Fig. 36).
- Press the latching button down and slide the coffee-making unit back for around another 1 cm until the latching button engages (Fig. 37).
- Press the latching lever down to the stop (Fig. 37).
Replace and close the service cover, and re-insert the coffee grounds container.
The coffee machine can be switched on only when the service cover is closed. After the coffee machine has been switched on, the coffee-making unit runs through the set-up cycle, and this is followed by the normal heating process.
13.5 Running the Cleaning Program
The cleaning program is run to completely remove coffee grease from inaccessible parts. Run the cleaning program no later than when the "Clean" key (Fig. 3, f) indicator flashes.
The cleaning process lasts around 8 minutes and must not be interrupted.
Use only original AEG-cleaning tablets! These can be obtained from AEG Customer Service Centre (ET No. 663 910 480) or your dealer (E No. 950 078 803).
Before starting the cleaning program, clean the coffee-making unit (refer to "Cleaning the Coffee-making Unit" Page 39) and empty the coffee grounds container. Fill the water tank with at least 1 litre fresh water.
Press the "On/Off" key (Fig. 3, h) to switch the coffee machine on.
Turn the coffee bean container to the "Ground Coffee" position (Fig. 38). Wait until the mechanism has set up and all the lights of the Coffee Quantity indicator are illuminated.
Pull the emptied grounds container out until it is under the coffee dispenser (Fig. 39).
It is used to collect the cleaning liquid. The "Empty grounds container" indicator (Fig. 3, j) comes on and remains illuminated for as long as the grounds container is pulled out.
Place a cleaning tablet in the ground coffee filler (Fig. 40).
Press the "Clean" key (Fig. 3, f) for 3 seconds. The indicator changes from flashing to constantly on. The program starts. The cleaning program must not be interrupted.
During the cleaning process, the "Empty grounds container" indicator (Fig. 3, j) is illuminated The program runs six cycles with cleaning liquid. The standing times are used to allow the cleaning tablet to penetrate. In the event of a power failure or interruption, the program must be restarted!
The cleaning process finishes after approximately 8 minutes, when the "Clean" key (Fig. 3, f) indicator comes on and the "Empty grounds container" indicator (Fig. 3, j) flashes.
Empty the coffee grounds container and re-insert it. The indicator light now goes out.
Turn the coffee bean container to the desired position and fill the water tank. The coffee machine is now ready for use.
i After running the cleaning program, you are advised to throw away the first cup of coffee from the machine.
13.6 Running the Descaling Program
The descaling program allows you to simply and effectively descale your coffee machine. The coffee machine should be regularly descaled, every 4-6 months, but no later than when the "Descale" key (Fig. 3, e) indicator flashes.
Note! Formic-acid-based lime scale solvents must not be used. Use only AEG descaling tablets. AEG cannot accept any liability for any damage caused by the use of other descalants. Do not, under any circumstances, use vinegar, citric acid, amidosulphuric acid or descalants containing amidosulphuric acid, as these can damage the coffee machine. The use of powder products is not recommended. Descaling tablets can be obtained from your dealer (E-No. 900 195 537/7) or from an AEG Customer Service Centre. The descaling process runs over two phases, lasting a total of 45 minutes, and must not be interrupted.
Phase 1: descaling phase with 12 cycles, and Phase 2: flushing phase. Between the two phases, the coffee grounds container must be emptied and the water tank refilled with water. In the event of a power failure or interruption, the program must be restarted!
Phase 1: Descaling
Before starting the descaling program, clean the coffee-making unit (refer to "Cleaning the Coffee-making Unit" Page 39) and empty the coffee grounds container.
Pour about 400 ml warm water into the water tank to just below the lips of the tank lid, and place a bag (2 descaling tablets) in the water tank (Fig. 41).
Put the water tank back in place when the tablets have dissolved. This takes approximately 5-7 minutes.
Pull the emptied grounds container out until it is under the coffee dispenser, to collect the descaling solution (Fig. 42).
The "Empty grounds container" indicator (Fig. 3, j) comes on and remains illuminated for as long as the grounds container is pulled out.
Press the "Descale" key (Fig. 3, e) for 3 seconds. The indicator changes from flashing to constantly on. The program is ready. The descaling process must not be interrupted.
You must first descale the hot-water/steam nozzle, before the automatic process can begin.
Place a cup or jug with a capacity of at least 200 ml under the hot-water nozzle. Turn the Selection dial for steam and hot water (Fig. 1, D) to the position (Fig. 43). Keep the selection dial opened until the pump switches off and descaling solution stops running out of the nozzle.
Turn the Selection dial for steam and hot water (Fig. 1, D) back to the ● position (Fig. 43). The automatic des-caling process now starts through the coffee-making unit.
During the descaling process, the "Descale" key (Fig. 3, e) indicator is constantly illuminated.
Preparing the coffee machine for phase 2
Phase 1 of the descaling process finishes after around 36 minutes. This is signalled by the "Fill water tank" indicator (Fig. 3, k) and the "Empty grounds container" indicator (Fig. 3, j) flashing. The indicator flashes (Fig. 44).
Rinse the water tank out and fill with a maximum of 1 litre fresh water.
Empty the grounds container and push it just far enough back into the coffee machine to catch the water which drains out of the coffee dispenser (Fig. 42).
Phase 2: flushing
Place a cup or jug with a capacity of at least 200 ml under the hot-water nozzle.
Turn the Selection dial for steam and hot water (Fig. 1, D) to the position (Fig. 43). Keep the selection dial opened until the pump switches off and flushing water stops running out of the nozzle.
Turn the Selection dial for steam and hot water (Fig. 1, D) back to the position (Fig. 43). The automatic fresh-water flushing process now starts through the coffee-making unit. It takes approximately 5 minutes. The flushing process – and with it the complete descaling program – is finished when the indicator is on and the indicator flashes.
Empty the coffee grounds container.
Thoroughly rinse the water tank and fill with fresh water.
The coffee machine is now ready for use.
i After running the descaling program, you are advised to throw away the first cup of coffee from the machine.
13.7 Ordering Accessories
To ensure years of satisfaction with your coffee machine and prevent faults arising, it is very important to regularly clean and descale the coffee machine. The original cleaning tablets and descalant are obtainable direct from us.
If you live in Germany, please call our Order Hotline
Tel. 0 18 01-20 30 90.
14 What do I do, if ...
- ... coffee-making is interrupted and the "Fill water tank" indicator (Fig. 3, k) 📌 flashes?
- The water tank is empty. Fill the water tank and press the key or the key again.
- The water tank is not properly inserted. Check that the water tank is properly seated.
- The coffee is ground too finely. Clean the coffee-making unit and adjust the grinding texture.
- ... the coffee machine does not operate, and the "Empty grounds container" indicator (Fig. 3, j) flashes?
- The coffee grounds container is full. Empty and thoroughly clean the grounds container.
- ... the coffee machine does not operate, and all 5 indicator lights and or are flashing?
- The coffee-making unit is blocked. Refer to „Cleaning the Coffee-making Unit" Page 39. Completely remove any encrusted coffee remains from the coffee-making unit and reduce the coffee quantity.
- The coffee-making unit is overfilled. Refer to „Cleaning the Coffee-making Unit" Page 39. Completely remove any encrusted coffee remains from the coffee-making unit and reduce the amount of ground coffee spooned in.
- If you are unable to remedy the fault, please contact the AEG Customer Service Centre or phone the Hotline.
• ... the espresso/coffee is not hot enough?
- Preheat the cups with hot water. Increase the coffee temperature as described in this manual
- The coffee machine may need des- caling
• ... the espresso/coffee is too weak?
- Not enough ground coffee. Increase the amount of ground coffee
- The coffee bean container is empty. Add coffee beans
- The coffee quantity is set too low. Increase the coffee quantity
- The grinding texture is set too coarse. Set the grinding texture to a finer grade
• ...milk not frothy enough?
- The milk is too hot or too old or the fat content is too high. Use suitable milk
- Blocked steam nozzle. Clean the steam nozzle
- The air intake in the frothing aid is blocked. Clean the frothing aid
- ... the bean container will not locate on the grinder?
- Coffee bean residue on or around the grinder: Remove coffee bean residue from the grinder
- Coffee bean residue is jammed in the bean container lock. Clear the bean container lock of coffee bean residue
- ... the grinder makes very loud noises when grinding?
- The grinder is blocked by a foreign body. Remove the foreign body as described in this manual, refer to "Cleaning the Grinder" Page 38. If necessary, have the coffee machine checked by the AEG Customer Service Centre.
- You can continue to use your coffee machine with ground coffee.
- ... the coffee-making unit will not come out?
- The coffee-making unit is not in the base position.
-Leave the coffee machine switched on, and set the bean container to "Ground Coffee".
-Switch off the coffee machine and remove the coffee-making unit, refer to "Cleaning the Coffee-making Unit" Page 39
- ... the coffee-making unit will not fit back in?
- The coffee-making unit is not closed. Turn the service lever to close the coffee-making unit.
- The latching lever is not up. Push the metal clip up, and insert the coffee-making unit
• ... the coffee machine has to be transported?
- Keep the original packaging as transport protection.
- Secure the coffee machine against jarring.
- Empty the coffee machine tank and container and allow any remaining moisture in the system to steam off. This will protect your coffee machine from being damaged by freezing in cold weather.
To steam off the system, remove water tank and then select the steam function. When no more steam is released, turn off the steam tap and switch off the coffee machine.
- Care should also be taken with the location of the coffee machine – especially in cold weather, when damage can be caused by freezing.
15 Using the Total Cups Counter
The coffee machine has the facility to display the total number of cups of coffee made.
If the Key for 2 cups of coffee (Fig. 3, a) is used to make 2 cups of coffee at the same time, these are counted as 2 cups.
Switch the coffee machine on.
Simultaneously press and hold the "Steam Pre-selector" key (Fig. 3, g) and the "On/Off" key (Fig. 3, h) Keep both keys pressed for around 3 seconds, until the Key for 1 cup of coffee (Fig. 3, b) indicator and the Coffee Quantity indicator come on.
Now individual indicator lights start to flash in sequence, showing the number of cups made:

1 x flash corresponds to 10,000 cups

1 x flash corresponds 1,000 cups
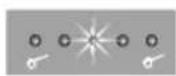
1 x flash corresponds 100 cups

1 x flash corresponds 10 cups

1 x flash corresponds 1 cup
The flashing sequence is continuously repeated.
Count the number of individual flashes by each indicator.
Example: The following flashing sequence corresponds to 1,529 cups.

0 x flash
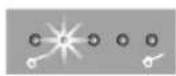
1 x flash
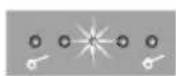
5 x flashes
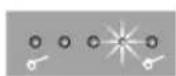
2 x flashes

9 x flashes
To exit this mode, press the "Clean" key (Fig. 3, f)
16 Technical Data
Mains voltage: 220-240 V
Power consumption: 1290-1400 W
CE This coffee machine complies with the following EU Directives:
- 73/23/EEEC of 19.2.1973 "Low Voltage Directive", including Amendment Directive 93/68/EEC.
- 89/336/EEC of 3.5.1989 "EMI Directive", including Amendment Directive 92/31/EEC.
17 Taking Care of the Environment
Do not dispose of the packaging material.
- Please keep the packing box and the foam inserts! They can be re-used as transport protection if the coffee machine needs to be taken for service. If included:
• Take polyethylene (PE) plastic bags to a recycling centre. - The expanded polystyrene (PS) padding blocks are CFC-free.
Please contact your local authority to find your nearest recycling centre.
The coffee grounds make excellent composting material.
18 Service
If a repair becomes necessary, including a replacement of the mains lead, please first telephone one of the AEG Customer Service Centres - in German on the following Hotline:
0 18 05 - 30 60 80 *
^* = EUR 0.12/min.
Please keep the original packaging, including the expanded foam parts. The coffee machine must be securely packed to avoid transport damage.
The guarantee term runs for 2 years from the date of purchase. If the coffee machine is used on a commercial basis, the guarantee is restricted to 12 months. The term "commercial" in this case means use of the machine for more than 3,000 coffee-making cycles per year.
Visit our Cafamosa web site. You will find a wide range of information about coffee, together with additional tips on the use of your Cafamosa:
natural_image
Four identical diagrams showing starburst patterns with circular and petal-like elements, no text or symbols present.Hardheidsniveau 1
Hardheidsniveau 2
Hardheidsniveau 3
Hardheidsniveau 4
natural_image
Five identical gray panels showing starburst patterns with circular elements, no text or symbols presentpiscar 1 x equivale a 10'000 chávenas piscar 1 x equivale a 1'000 chávenas piscar 1 x equivale a 100 chávenas piscar 1 x equivale a 10 chávenas piscar 1 x equivale a 1 c h á v e n a
natural_image
Four-panel diagram showing star-shaped and dot patterns in gray, no text or symbols presentpiscar o x
piscar 1 x
piscar 5 x
piscar 2 x
piscar 9 x
- Top View (Fig. 2)
- Control Panel (Fig. 3)
- Dear Customer,
- Contents
- Safety Information
- !
- General safety
- Child safety
- Safety in operation
- Safety in cleaning and care
- Before Using for the First Time
- Setting Up and Connecting the Coffee Machine
- Filling with Water
- Switching the Coffee Machine On
- Switching the Coffee Machine Off
- Setting the Water Hardness
- Determining water hardness
- Setting and saving the water hardness level
- Making Coffee with Beans
- Filling the Coffee Bean Container
- Selecting the Cup Measure
- Selecting the Coffee Quantity
- Dispensing Coffee
- Making Ready-ground Coffee
- Using the Ground Coffee Filler
- Selecting the Cup Measure
- Dispensing Coffee
- Frothing Milk
- Preparing Hot Water
- Changing and Saving the Cup Measure
- Changing and Saving the Coffee Quantity
- Setting the Grinding Texture
- Remove foreign bodies from the grinder
- Setting the Coffee Temperature
- Setting the Switch-off Time
- Resetting the Coffee Machine
- Cleaning and Care
- Regular Cleaning
- Emptying the Coffee Grounds Container
- Cleaning the Grinder
- Cleaning the Coffee-making Unit
- Removing the coffee-making unit
- Cleaning the coffee-making unit
- Inserting the coffee-making unit
- Running the Cleaning Program
- Running the Descaling Program
- Phase 1: Descaling
- Preparing the coffee machine for phase 2
- Phase 2: flushing
- Ordering Accessories
- What do I do, if ...
- Using the Total Cups Counter
- Technical Data
- Taking Care of the Environment
- Service
Brand : AEG-ELECTROLUX
Model : Cafamosa CF 250
Category : Coffee maker