USER MANUAL CA4805 SOLAC
natural_image
Exterior view of a modern eOla setup with control panel and buttons (no visible text or symbols)
1 IMPORTANTE
natural_image
Close-up of a black electrical outlet with a cable inserted, showing no visible text or symbols
natural_image
Assorted dental tools including a toothbrush, plastic clip, and tool holder (no text or symbols visible)
natural_image
Black plastic mechanical component with mounting holes and a central hole (no visible text or symbols)
8 INSTALACIÓN
natural_image
Close-up of a hand holding a small object over a transparent container (no visible text or symbols)
natural_image
Person holding a transparent container with a small object inside (no visible text or symbols)

natural_image
Hand holding a glass over a transparent container, with no visible text or symbols

natural_image
Exterior view of a modern office building (no signage)
natural_image
Line drawing of a hand pressing a button on an electrical panel (no text or symbols)
natural_image
Two identical diagrams showing explosion and cutting tool illustrations (no text or symbols)
natural_image
Black box containing white boxes with a red X mark, no visible text or symbols
natural_image
Close-up of a transparent container with granular material and a blue arrow pointing to a circular object (no text or symbols visible)
natural_image
Close-up of a container filled with granular material, featuring a small blue arrow and a circular logo (no readable text)
¡IMPORTANTE!
natural_image
Close-up of a laser cutting machine with red arrows indicating direction (no text or symbols visible)
natural_image
Simple line drawing of two sun-shaped objects with circular elements, no text or symbols present
natural_image
Simple line drawing of a sun with a boat inside, no text or symbols present
natural_image
Simple diagram of a horizontal bar with two circular ends and an arrow indicating leftward movement (no text or symbols)
natural_image
Simple line drawing of a hand holding a rectangular object with a small bowl above it (no text or symbols)
natural_image
Simple line drawing of two sun-shaped objects with icons, no text or symbols present
natural_image
Simple line drawing of a hand holding a rectangular object with a droplet above it (no text or symbols)
natural_image
Hand pouring liquid into a white cup on a keyboard (no visible text or symbols)
natural_image
Simple line drawing of a hand holding a rectangular object with a smoke or vapor above it (no text or symbols)
natural_image
Simple line drawing of a hand holding a rectangular object with a smoke or vapor above it (no text or symbols)
natural_image
Close-up of a black and white industrial machine pouring liquid into a white cup on a dark surface (no visible text or symbols)

natural_image
Simple line drawing of a hand pressing a button with a smoke or vapor spike above (no text or symbols)
natural_image
Close-up of a black and white coffee machine with a white cup on a perforated tray (no visible text or symbols)
15 DESCALCIFICACIÓN
natural_image
Simple line drawing of a starburst shape with internal dots (no text or symbols)
natural_image
Simple line drawing of two interlocking circles with coffee cups inside, no text or symbols present
natural_image
Simple line drawing of a hand holding a rectangular object with a smoke or vapor spike above it (no text or symbols)
natural_image
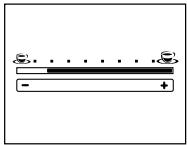
Simple diagram of a horizontal bar with tick marks and a plus sign, no text or symbols present
natural_image
Abstract geometric design with a starburst and triangular shape (no text or symbols)
natural_image
Simple geometric diagram with a central triangle surrounded by radiating lines (no text or symbols)
natural_image
Simple diagram of a horizontal bar with tick marks and a plus sign, no text or symbols present
natural_image
Simple line drawing of two sun-shaped objects with a small boat icon inside (no text or symbols)
natural_image
Close-up of a precision tool tip interacting with a surface (no visible text or symbols)
natural_image
Close-up of a hand inserting a card into a computer keyboard (no visible text or symbols)
LIMPIEZA
natural_image
Close-up of a hand holding a small black object against a dark background (no visible text or symbols)
natural_image
Person inserting a device into a machine (no visible text or symbols)
natural_image
Close-up of a hand holding a small object with a green label, possibly part of a device or tool (no visible text or symbols)
natural_image
Close-up of a mechanical component with a wooden handle and flange, partially visible against a dark background (no text or symbols)

natural_image
Close-up of a small object near a wall, possibly a device or fixture, with no visible text or symbols.
natural_image
Hand holding a small object with blue-green markings, next to a dark surface (no visible text or symbols)
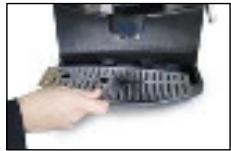
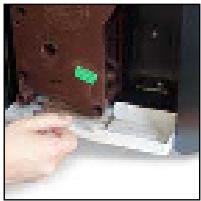
- Extraiga el grupo.

natural_image
Close-up of a hand holding a brown electronic device with a green indicator light, next to a black mechanical component (no visible text or symbols)
natural_image
Person climbing a slope with a ladder, against a plain white background (no text or symbols visible)
natural_image
Exterior view of a black industrial electrical component (no visible text or symbols)
natural_image
Close-up of a hand holding a brown device with a green button, next to a dark mechanical component (no visible text or symbols)
natural_image
Close-up of a brown electronic device with visible components, possibly a motor or fan (no text or symbols)

natural_image
Person using a handheld device to press or install a device (no visible text or symbols)
natural_image
Close-up of a small object near a window with no visible text or symbols
natural_image
Close-up of a mechanical component with a red handle and white base, no visible text or symbols
natural_image
Hand holding a small object with blue arrows pointing to it, next to a dark surface (no visible text or symbols)
natural_image
Close-up of a hand pressing down on a brown electronic device component (no visible text or symbols)
natural_image
Close-up of a hand pressing down on a dark surface with a small object visible (no text or symbols)
natural_image
Close-up of a hand holding a small black object against a dark background (no text or symbols visible)
natural_image
Close-up of a circular object with dark markings on a beige background (no visible text or symbols)
natural_image
Close-up of a wooden door panel with mounting holes and a circular emblem (no visible text or symbols)
natural_image
Interior ceiling view showing a circular vent with blue arrows indicating direction (no text or symbols)
C) AUTO LIMPIEZA
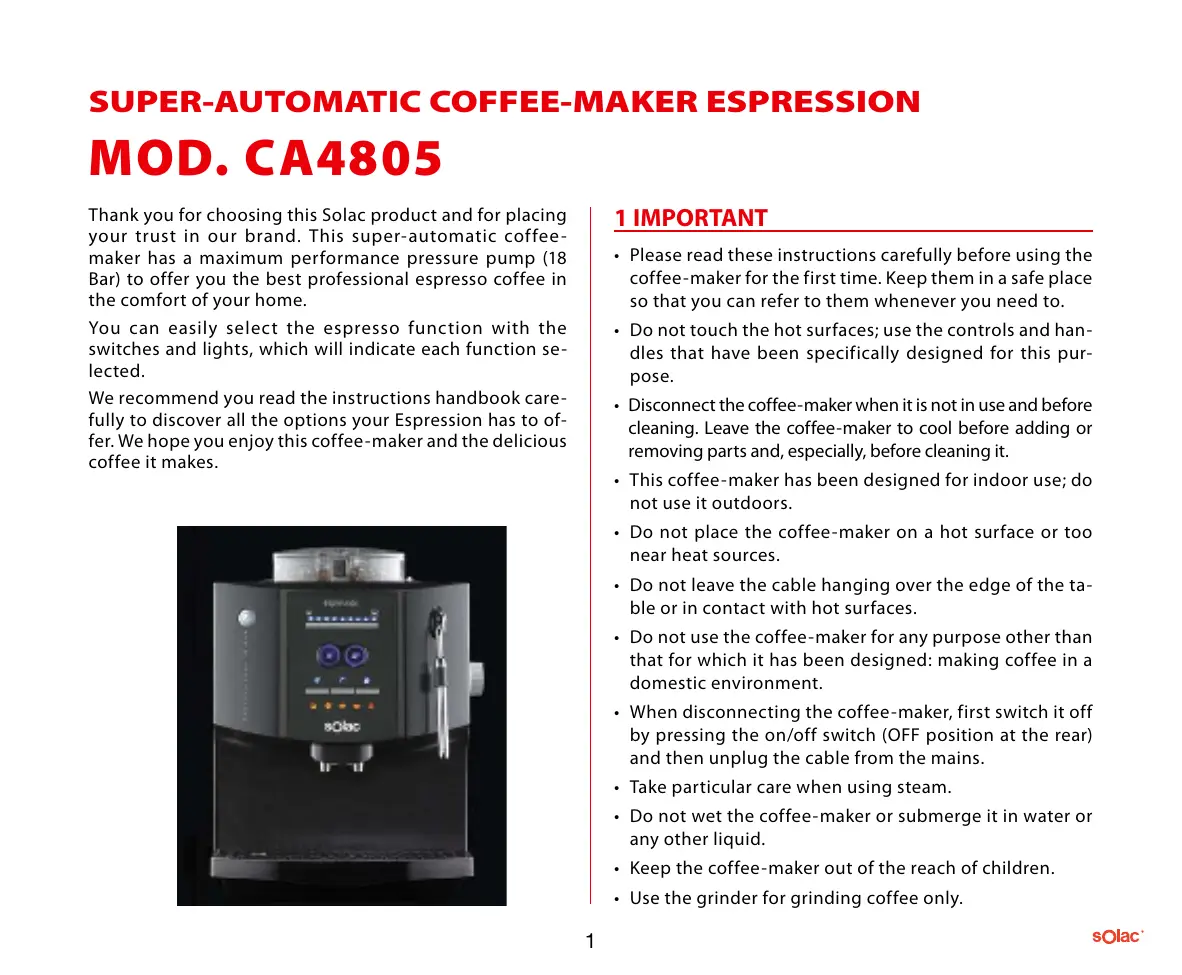
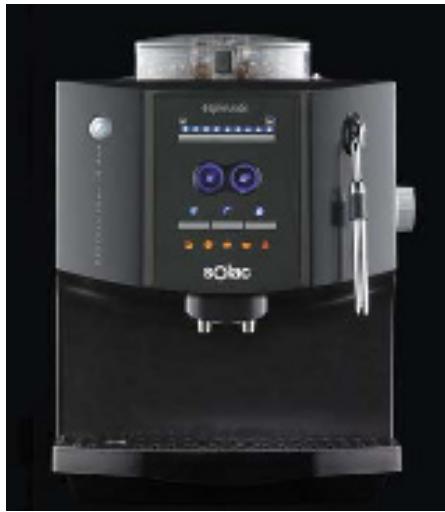
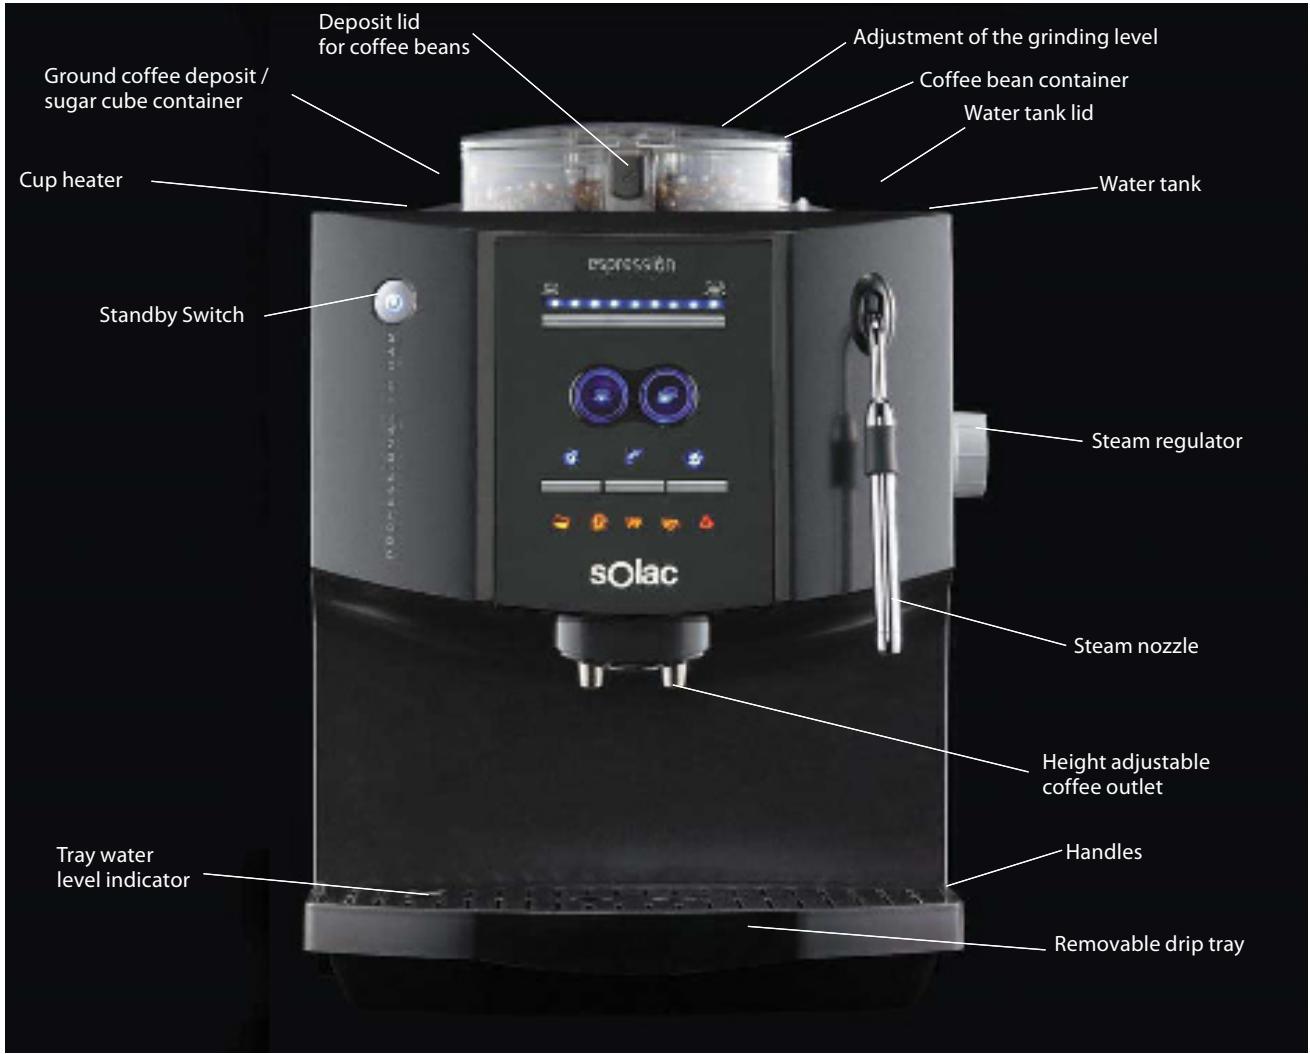
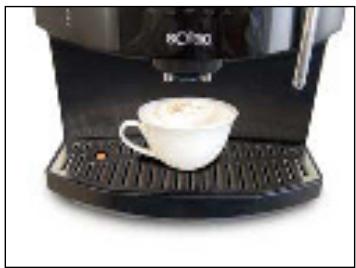
Thank you for choosing this Solac product and for placing your trust in our brand. This super-automatic coffee-maker has a maximum performance pressure pump (18 Bar) to offer you the best professional espresso coffee in the comfort of your home.
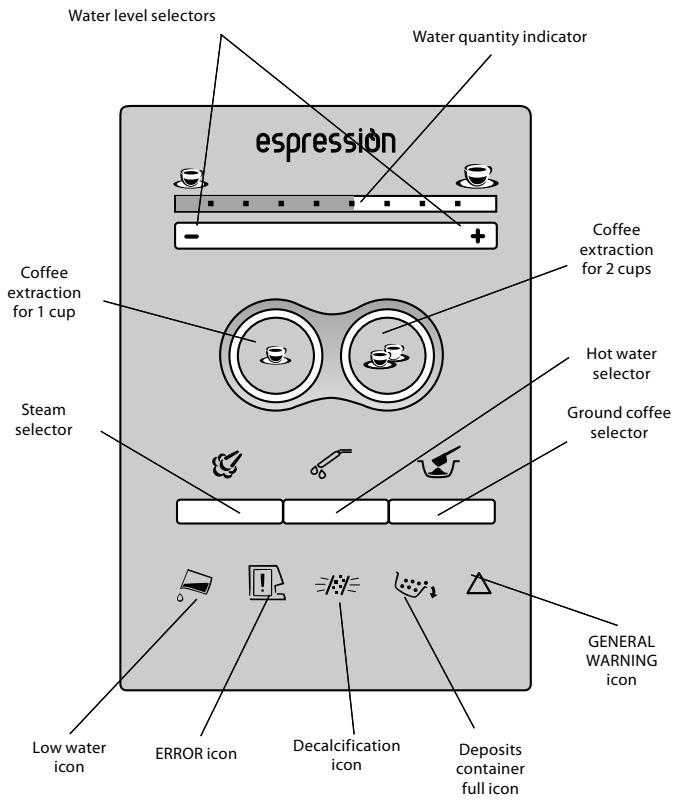
You can easily select the espresso function with the switches and lights, which will indicate each function selected.
We recommend you read the instructions handbook carefully to discover all the options your Espression has to offer. We hope you enjoy this coffee-maker and the delicious coffee it makes.
natural_image
Exterior view of a modern eOlaer machine (no visible text or symbols on the device body)
1 IMPORTANT
- Please read these instructions carefully before using the coffee-maker for the first time. Keep them in a safe place so that you can refer to them whenever you need to.
- Do not touch the hot surfaces; use the controls and handles that have been specifically designed for this purpose.
- Disconnect the coffee-maker when it is not in use and before cleaning. Leave the coffee-maker to cool before adding or removing parts and, especially, before cleaning it.
- This coffee-maker has been designed for indoor use; do not use it outdoors.
- Do not place the coffee-maker on a hot surface or too near heat sources.
- Do not leave the cable hanging over the edge of the table or in contact with hot surfaces.
- Do not use the coffee-maker for any purpose other than that for which it has been designed: making coffee in a domestic environment.
- When disconnecting the coffee-maker, first switch it off by pressing the on/off switch (OFF position at the rear) and then unplug the cable from the mains.
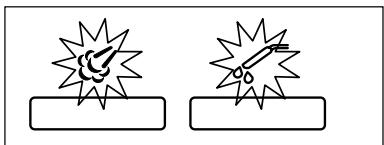
• Take particular care when using steam.
- Do not wet the coffee-maker or submerge it in water or any other liquid.
- Keep the coffee-maker out of the reach of children.
-
Use the grinder for grinding coffee only.
-
This appliance is not intended for use by persons (including children) with reduced physical, sensory or mental capabilities, or lack of experience and knowledge, unless they have been given supervision or instruction concerning use of the appliance by a person responsible for their safety.
- Children should be supervised to ensure that they do not play with the appliance.
CAUTION! When you want to dispose of the appliance, NEVER throw it in the rubbish bin. Take it to your nearest CLEAN POINT or the waste collection centre closest to your home for processing. You will thus be helping to take care of the environment.
2 PRECAUTION
- Remove all the used elements to protect the product during transport, as well as all material used for promotions, such as plastic bags, cardboard, stickers, etc. on both the outside and inside of the coffee-maker. Keep these elements out of the reach of children.
- If the mains cable is damaged, it must be replaced by the manufacturer or by an authorised technical service to prevent any possible danger.
- Do not use warm or hot water to fill the tank under any circumstances.
Use only water at room temperature.
- Never clean the coffee-maker with a scouring pad or a rough sponge. Use only a soft cloth moistened with water.
- To avoid lime scale deposits in the pipes in your coffeemaker, we recommend you use purified water or still mineral water.
3 IMPORTANT
The manufacturer will not accept any liability whatsoever for damage caused by:
- Inappropriate use of the coffee-maker for any purpose other than that for which it has been designed.
• Repairs carried out by unauthorised persons.
- Manipulation of the mains cable.
- Manipulation of any part of the coffee-maker.
- Use of spares or accessories that are not supplied by the manufacturer.
- Removal of lime scale from the coffee -maker using any method that is not in accordance with the instructions given in chapter 15. REMOVAL OF LIME SCALE.
In these cases, the warranty will be void.
4 SAFETY STANDARDS
In the event of an emergency:
Unplug the coffee-maker immediately.
The coffee-maker must be used only:
- Indoors.
- At a room temperature of between 10^ and 40^ .
- To make coffee, hot water, steam milk or heat liquids using steam.
- For domestic use.
- By adults who are in full possession of their physical and mental faculties.
Connect the coffee-maker to an appropriate socket; the voltage must coincide with that indicated on the specifications plate.
IMPORTANT! Check that the socket is connected to the mains.
Installation
- Place the coffee-maker on a completely flat surface. Do not place it on a hot surface under any circumstances.
-
Keep it at a distance of 10 cm from walls and heat sources (gas, oven, etc.).
-
Do not keep the coffee-maker at a room temperature of below 0^ C; the coffee-maker may be damaged by the water inside freezing.
- The mains plug must be accessible at all times.
- The mains plug must not be damaged, hanging or placed on hard surfaces.
- Do not use the power cable to move the coffee-maker by pulling on it under any circumstances.
Hazards
- Do not aim the steam jet or hot water directly at anyone, since there is a risk of burns.
- Do not place any objects inside the coffee-maker under any circumstances (electrical hazard).
- Do not touch the coffee-maker if your hands are wet. Do not unplug the coffee-maker by pulling on the power cable.
Responsibilities.
- Do not use the coffee-maker if it does not work correctly or if you suspect that it may be faulty, e.g. after it has accidentally been dropped.
- Have the product repaired at an authorised centre.
- Turn off the coffee-maker before opening the side cover.
Spares
To guarantee your safety and the correct operation of your coffee -maker, use only spares and accessories that are authorised by the manufacturer.
Switch
natural_image
Close-up of a black electrical outlet with a cable inserted, showing no visible text or symbols
6 ACCESSORIES
For your convenience, all the accessories are in a box with the instructions handbook:
- Ground coffee dispensing spoon. Capacity 8 g, approx.
- Lime scale remover.
- Cleaning brush.
- Strip of reagent to check water hardness. Levels 1 to 5.
- Brewing unit switch.

natural_image
Assorted dental tools including a toothbrush, plastic clip, and tool holder (no text or symbols visible)
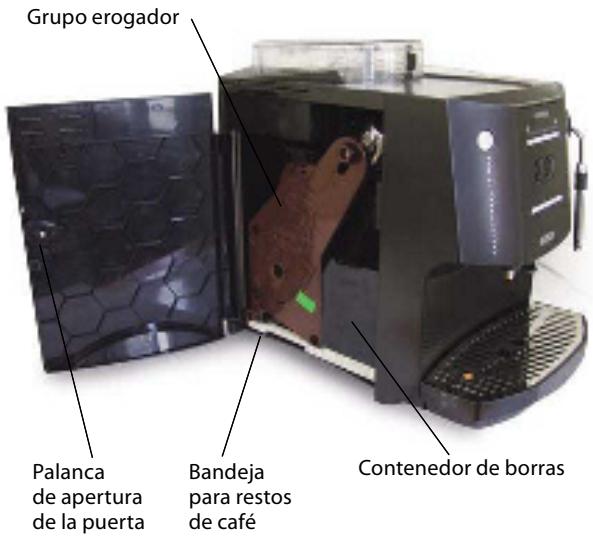
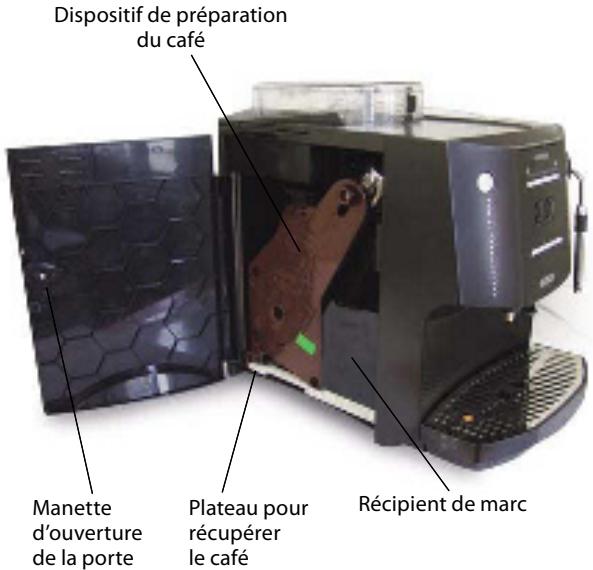
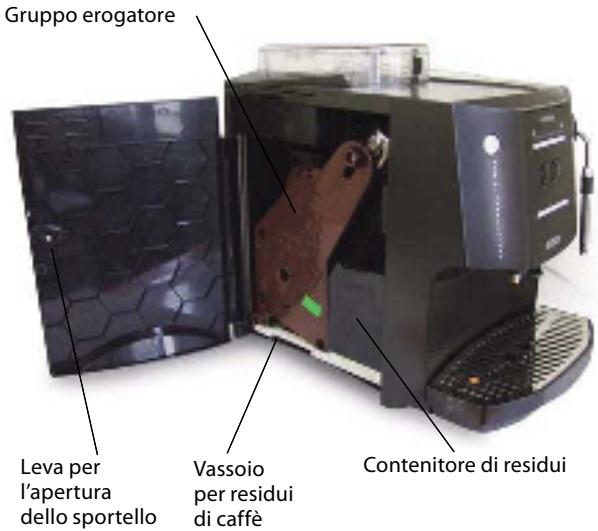
7 BREWING UNIT, THE HEART OF THE COFFEE-MAKER
This super-automatic coffee-maker has a professional unit manufactured and developed by BIANCHI, the best manufacturer of professional machines (vending) in Italy. The brewing unit automatically prepares an excellent espresso coffee and deposits the grounds in a compartment. It has been designed for professional use and, consequently, does not require maintenance work until it has made 6,000 cups.
natural_image
Black plastic mechanical component with mounting holes and a central hole (no visible text or symbols)
8 INSTALLATION
If you find coffee grounds, it is because the coffee-maker has been tested to make sure it works perfectly.
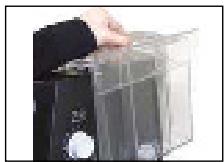
- Fill the coffee bean tank with coffee beans (the tank has a capacity for up to 250 g).
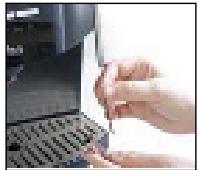
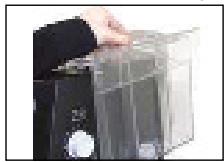
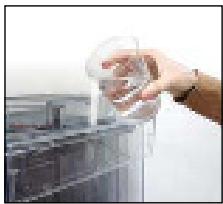
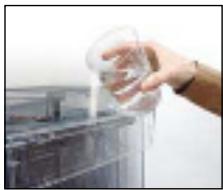
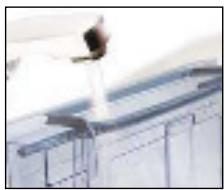
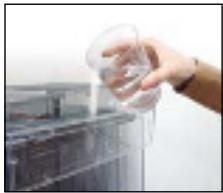
- Fill the water tank with clean, cool water. You can fill it directly (a) or under the tap (b):
a) Lift the water tank cover.

natural_image
Close-up of a hand holding a small object over a transparent container (no visible text or symbols)
b) Remove the tank by the handle.
natural_image
Person holding a transparent plastic enclosure with internal compartments (no visible text or symbols)

natural_image
Hand holding a transparent container over a glass container, with no visible text or symbols.

natural_image
Exterior view of a modern office building (no signage)
When placing the tank back in position, make sure it fits into the flap on the body, so that it is perfectly in place.
- Connect the power cable.
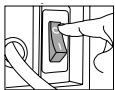
- Turn on the on/off switch at the rear of the coffee-maker. Turn it to the "I" position to switch the coffee-maker on.
natural_image
Line drawing of a hand pressing a button on an electrical panel (no text or symbols)
- The standby button will come on (blue).

- The internal circuits must be filled with water before using the coffee machine for the first time. The steam and hot water icons will be lit.
natural_image
Two identical diagrams showing a tool emitting sparks or smoke from a surface, with no text or symbols present.
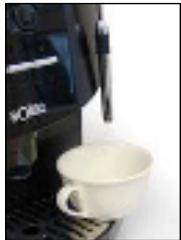
- Place the container (glass or jug) under the coffee outlet. Push both buttons at the same time to fill the system.
IMPORTANT: This operation must be carried out BEFORE carrying out any other operation.
IMPORTANT: The circuit must be filled when the steam and hot water icons are lit at the same time. This will happen when the machine is connected to the main switch.
- After pressing both buttons, they will start to flash and the circuits will be filled. This operation will be completed after the water is driven through the coffee outlet.
- This process will stop automatically when both buttons are pressed at the same time.
-
Remove the compartment with the water.
-
The coffee-maker will turn off and is ready for use. Press the standby button.

- All lights will be lit during one second and the selectors for 1 and 2 coffee cups will start to flash. When the lights stop flashing, the coffee machine is ready for use.
- The coffee-maker auto-cleans the pipes to remove possible remains of coffee or water. During this process, water comes out of the coffee outlet. This enables you enjoy a coffee made with clean, fresh water.
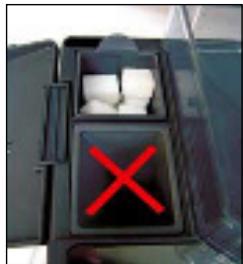
9 SUGAR CUBE COMPARTMENT
natural_image
Black box containing white containers with a red X symbol, no visible text or labels
If you normally use sugar cubes, you can store them in the coffee-maker. Lift the sugar cube compartment cover and place the cubes inside. This compartment can be removed for cleaning and to make the filling process easier.
IMPORTANT! Take care not to place the sugar cubes in the ground coffee dispenser by mistake.
10 ADJUSTMENTS
A) Adjusting the grinding level.
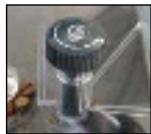
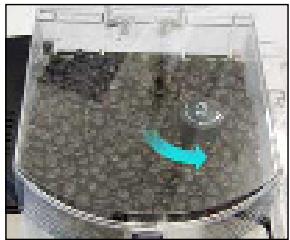
You can regulate the size of the ground coffee. This size has a direct effect on the coffee made by the coffee-maker and it is advisable to test the grinding level until you obtain the type of grind you prefer. To adjust the grinding level, use the regulator inside the coffee bean tank.
* Fine grind: The coffee will brew more slowly since it needs more time and pressure to obtain the coffee. Turn the regulator to the left (anticlockwise). The finer the grind, the creamier the coffee will be.
natural_image
Close-up of a transparent container with a blue arrow pointing to a dark liquid, containing granular material (no text or symbols visible)
Important! If you grind the coffee too finely (grinding level regulator full to the left), the coffee will brew very slowly.
* Coarse grind: The coffee will brew more quickly. Press and turn the regulator to the right (clockwise).
natural_image
Close-up of a container filled with granular material, featuring a small blue arrow and a circular symbol (no readable text or labels)
IMPORTANT!
The adjustment must be made when the grinder is in operation.
Use coffee bean blends specially prepared for espresso coffee. If you do not obtain the desired result, try different blends until you get the one you prefer. Store any coffee not placed in the tank in a hermetically closed compartment in a cool place.
IMPORTANT! Do not use high roast coffee; this type of coffee is roasted with sugar (caramelised) and may damage the coffee-maker.
B) Adjusting the coffee outlet
The coffee outlet can be adjusted to different heights de pending on the size of the cups that are being used:
- To use large cups, slide the coffee outlet up to the top position.
- To use espresso cups, slide the coffee outlet down to the bottom position.

natural_image
Close-up of a mechanical component with red arrows indicating direction, no visible text or symbols
N.B. The coffee outlets can be removed for cleaning.
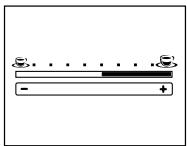
C) Adjusting the amount of water per cup
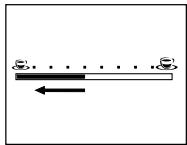
To adjust the quantity of water per cup (between 30ml and 150ml), press:
- To increase the quantity of water per cup
- To reduce the quantity of water per cup
When you press any of the two buttons, the quantity of water will vary by 10ml. Likewise, you can be informed on your choice at any time, since the sections in the bar above the selector will flash or light up.
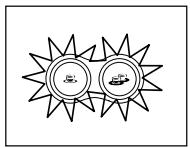
11 OBTAINING THE COFFEE
- Ensure that the coffee machine is ready, i.e., both coffee extraction selectors are lit.
natural_image
Simple line drawing of two sun-shaped objects with circular icons, no text or symbols present
- Ensure that the coffee machine has been adjusted to obtain the coffee as desired.
- Place one or two cups under the coffee outlet.
A) Coffee with coffee beans
WARNING! The first coffee made with the machine will not be of very high quality. Pour it down the kitchen sink. This occurs because the first time the grinder starts to operate, it will not be able to load the full dose needed by the coffee brewing group.
- Press the button for 1 or 2 cups, as desired. The selector that has not been chosen will turn off, so that you can clearly see your choice.
natural_image
Simple line drawing of a sun with two concentric circles and a small boat, no text or symbols present.
-
Next, the coffee-maker performs a preliminary infusion of the ground coffee. The coffee bar is previously injected with hot water that is evenly distributed throughout the coffee. Thanks to the preliminary infusion, all of the coffee's aroma and flavour is obtained.
-
During the coffee extraction process, the light on the bar that indicates the quantity of water will gradually disappear until the extraction process stops.
natural_image
Simple diagram of a horizontal bar with two circular markers and an arrow pointing left (no text or symbols)
- When the coffee machine stops pouring the coffee, the two coffee extraction selectors will light up again and the light on the top bar will return to the pre-selected position.
The coffee extraction process can be stopped at any moment. Simply press the active coffee selector again.
- After pouring the coffee, the coffee machine will be ready to prepare more coffee.
B) Coffee made with previously ground coffee
The coffee machine will be prepared to use ground coffee, without the need to use a coffee grinder. This function is quite useful when you wish to prepare decaffeinated coffee.
- Open the ground coffee dispenser lid.
- Use the dosage spoon to calculate the dose of ground coffee. IMPORTANT: The maximum dose is one tea spoon (8 gr.). Next, close the lid.
- Press the ground coffee button. The icon will light up, indicating your selection.
natural_image
Simple line drawing of a hand holding a rectangular object with a checkmark above it (no text or symbols)
- Select the quantity of water desired.
Note: when you are using ground coffee, you can not prepare two cups at the same time, so that only the selector for one cup will be lit.
- When the coffee machine stops dispensing the coffee, you can pick up your cup.
- If you are not going to prepare any more coffee using ground coffee, press the ground coffee button again. The icon will turn off.
IMPORTANT: While the coffee machine is pouring the coffee, you can stop the extraction process by pressing the extraction selector for 1 coffee cup.
Note: the process will stop if you open the side door or remove the drip tray during the extraction or brewing process.
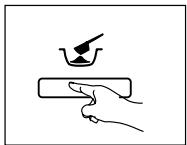
12 HOT WATER
- Ensure that the coffee machine is ready.

natural_image
Simple line drawing of two sun-like shapes with circular elements, no text or symbols present

natural_image
Hand pouring liquid into a white cup with a spoon, placed on a keyboard (no visible text or symbols)
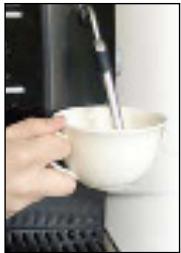
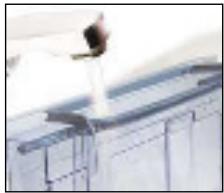
- Place a glass or cup under the steamer.
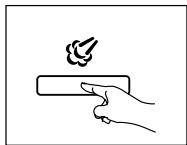
- Press the "hot water" button. The hot water icon will light up and the coffee extraction selector lights will turn off.

natural_image
Simple line drawing of a hand holding a rectangular object with a droplet above it (no text or symbols)
- Turn the steam regulator counter clockwise until it reaches the stop (180°). Close it when the amount of hot water desired is obtained.
- Remove the glass or cup that has been filled with hot water.
- Press the "hot water" button again to deactivate this function. The hot water icon will turn off.
- The two coffee extraction selectors will light up again, indicating that the coffee machine is ready to prepare coffee.
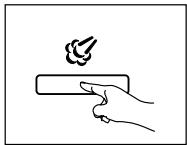
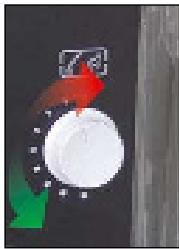
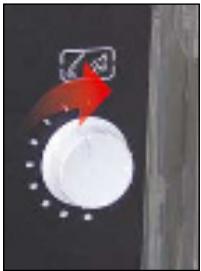
13 STEAM
- Ensure that the coffee machine is ready.
- Place the cup or jug under the steamer.
- Press the "Steam" button. The steam symbol icon will start to flash while the coffee machine is heating up and the light of the two coffee extraction selectors will turn off.

natural_image
Simple line drawing of a hand holding a rectangular object with a droplet above it (no text or symbols)
When the coffee machine is ready to obtain steam, the light will be permanently set.
The maximum steam extraction period will be 4 minutes.
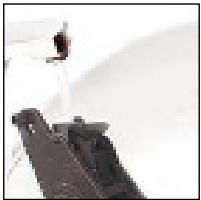
- Place a container under the steamer, open it by turning the steam regulator counter clockwise to drain any residual water that could be present in the steamer. Close the steamer and remove the water.

natural_image
Close-up of a white circular object with red and green arrows pointing to it, against a dark background (no text or symbols)
-
Place the cup or jug with the liquid you wish to heat. To obtain steam, turn the steam regulator counter clockwise. Close the steam regulator when you have heated the liquid. Note: To skim or heat milk, move the jug or cup in circles.
-
Remove the cup or jug with the liquid when it is hot or when the milk has been skimmed or heated.
-
Press the "steam" button again to deactivate the steam function.
-
The coffee machine will stabilise the internal system temperature automatically. This automatic process lasts approximately 25 seconds, during which time the water will be driven through the coffee outlet. During this time, the light on the steam icon will flash.
-
The coffee machine is now ready to prepare the coffee. The lights on the two coffee extraction selectors will be lit to indicate that it is ready.
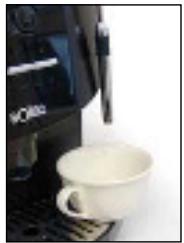
14 CAPPUCCINO
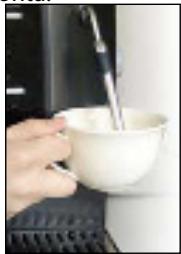
- Fill 1/3 of the cup with cold milk (in a large cup).
- Ensure that you have selected the steam function and that the coffee machine is ready.
natural_image
Simple line drawing of a hand holding a rectangular object with a smoke or vapor above it (no text or symbols)
natural_image
Close-up of a white circular object with red and green arrows pointing to it, against a dark background (no text or symbols)
- Place the cup or jug under the steamer. Open the steam regulator to drain any residual water present in the steamer. When steam is driven through the nozzle, close the steamer.
- Place the cup with the milk under the steamer.
- Open the steamer, turning the steam regulator.
natural_image
Close-up of a black and white coffee maker pouring liquid into a white cup (no visible text or symbols)

natural_image
Close-up of a white circular dial with green arrow and control knob (no text or symbols)
- Move the cup in circular movements to evenly heat up the milk.
- Next, skim or heat the milk. Close the steam output.
natural_image
Close-up of a white circular dial with red pointer and black border, against dark background (no text or symbols)
- Press the "steam" button again to deactivate the steam function.
natural_image
Simple line drawing of a hand holding a rectangular object with a smoke or vapor above it (no text or symbols)
- The coffee machine will stabilise the internal system temperature automatically. This automatic process lasts approximately 25 seconds, during which time the water will be driven through the coffee outlet.
During this time, the light on the steam icon will flash.
- The coffee machine is now ready to prepare coffee. The lights on the two coffee extraction selectors will be lit to indicate that it is ready.
- Place the cup with milk under the coffee outlet.
- Pour the coffee directly into the cup to obtain a delicious cappuccino.
natural_image
Close-up of a black espresso machine with a white cup on a metal tray (no visible text or symbols)
15 LIME SCALE REMOVAL
Lime scale should be removed regularly to clean the deposits from the internal circuits of the coffee-maker. The frequency with which your coffee-maker needs to be cleaned depends on the hardness of the water you use. Consequently, you first of all need to test the hardness of the water. To do this, proceed as indicated in section 17 PROGRAMMING YOUR COFFEE-MAKER.
IMPORTANT!! DO NOT USE VINEGAR OR ANY OTHER LIME SCALE REMOVAL AGENT NOT SUPPLIED BY SOLAC UNDER ANY CIRCUMSTANCES. You will find a sachet of lime scale removal agent containing the exact amount for one removal with the accessories to your coffee-maker.
- The coffee machine will inform you whenever it is necessary to carry out the circuit decalcification process, by lighting up the orange decalcification icon.
natural_image
Simple line drawing of a starburst shape with internal dots (no text or symbols)
NOTE: The decalcification process lasts approximately 35 minutes, so that it does not have to be carried out when the coffee machine turns the icon on.
The machine may be damaged if the decalcification process is not carried out and coffee is prepared.
- Enter the programming menu and press the steam and ground coffee buttons at the same time during one second. The two icons will light up and the coffee extraction selection buttons will be turned off.
- Press the warm water and ground coffee buttons at the same time.
Do not pour water into the tank yet, since you must prepare the decalcification solution first.
- Prepare the lime scale removal solution as indicated on the sachet containing the removal agent supplied by Solac. Pour the content into the water tank and add water up to the lime scale removal mark on the tank.
- Owing to the lengthiness of this process, you need to confirm that you want to carry it out at that time. Before confirming, make sure you have poured the removal agent into the water tank.
a) to confirm that you are going to carry out the decalcification process, press the selector for 1 or 2 coffee cups.

natural_image
Simple line drawing of two interlocking circles with coffee cups inside, no text or symbols present
b) to abort the process, press the steam button.
natural_image
Simple line drawing of a hand holding a rectangular object with a smoke or vapor above it (no text or symbols)
IMPORTANT! If you have poured the removal agent into the water tank, remove it to make sure you do not use it by mistake to prepare a coffee.
N.B. if you exit the lime scale removal process once it has begun, the programme will continue with the rinse cycle, (from step 11). This will prevent traces of the removal agent remaining inside the appliance.
During the decalcification process, the decalcification icon will blink.
- When the bar is fully lit up, the decalcification process will be complete.
natural_image
Simple diagram of a horizontal bar with tick marks and a plus sign, no text or symbols present
-
After completing the decalcification process, the system must be rinsed to eliminate all remains of the decalcification agent.
-
The coffee machine will inform you of the following:
- Need to fill in the water tank with clean water, while the orange "low water" icon is lit.

natural_image
Abstract geometric pattern with starburst and triangular shapes (no text or symbols)
- Need to empty the drip tray, while the red ERROR icon is lit.
natural_image
Simple geometric diagram with a central triangle surrounded by radiating lines (no text or symbols)
- Empty the remains of the deposit and fill it with clean water. Empty the drip tray. When carrying out these operations, press the coffee extraction selectors to continue the process.
natural_image
Hand pressing a button on a keyboard (no visible text or symbols)
- To rinse the machine, press any of the coffee extraction selectors again.
- The coffee machine will show the start of the rinsing process, and the light on the bar will start to blink, which will be completed at the end of the process.
natural_image
Simple diagram of a battery with terminals and polarity indicators (no text or symbols)
- After completing the rinsing process, the coffee machine will be ready to prepare the coffee. The two coffee extraction selectors will light up.
natural_image
Simple line drawing of two sun-shaped objects with a small boat icon inside (no text or symbols)
Note: The "low water" icon may light up during the decalcification and rinsing processes. When the water tank is full, the icon will turn off and the process will continue.
16 CLEANING AND MAINTENANCE
IMPORTANT! Do not place the coffee-maker in water or any other liquid or place any of its parts in a dishwasher.
IMPORTANT! Do not dry the coffee-maker or any of its parts in an oven and/or microwave.
A) BASIC CLEANING
- Turn off the coffee-maker (position '0').
- Unplug the coffee-maker.
- Clean the water tank.
- Remove the drip tray and empty it. Wash it with water.
- Remove the grounds compartment (used coffee) and empty it. Wash it with water.
- Unscrew the steam nozzle together with the outlet and clean all the parts. If it is blocked, clean the air inlet hole of the steam nozzle with a needle to optimise the steam function. When putting it back in place, make sure that this hole is at the top of the steam nozzle.
- Eliminate the coffee remains left in the coffee dispenser with the brush.
- Remove the sugar cube compartment and wash it with water.
- Remove the coffee outlet and wash it with water.
IMPORTANT! The coffee-maker and its parts must be cleaned at least once a week.
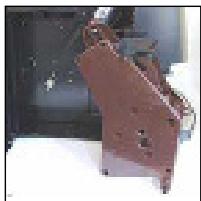
B) BREWING UNIT
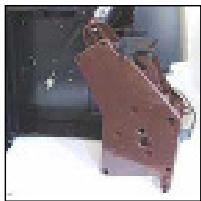
This unit is a professional unit and does not need any special maintenance until it has been operating for five years (6,000 cups), when you should take the coffee-maker for service by authorised personnel.
We recommend you clean the coffee-maker thoroughly every so often, removing and cleaning the brewing unit every 1,000 cups or whenever you consider that the coffee flow has decreased. To do this, proceed as indicated in the following section.
natural_image
Close-up of a precision tool tip interacting with a surface (no visible text or symbols)
In addition, we recommend you eliminate any coffee remains that may have been left in the piston filter using the brush included in the accessories box.
natural_image
Close-up of a hand inserting a small electronic component into a computer keyboard (no visible text or symbols)
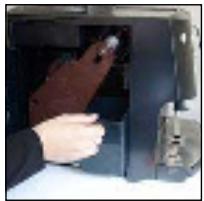
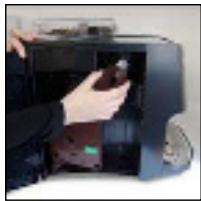
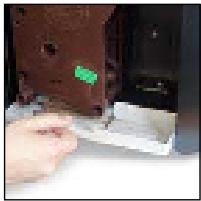
CLEANING
- Open the side cover.
natural_image
Close-up of a hand holding a small black object against a dark background (no visible text or symbols)
- Remove the grounds compartment.
natural_image
Hand inserting a small object into a device (no visible text or symbols)
- Remove the coffee grounds collection tray.
natural_image
Close-up of a hand pressing down on a white surface with a small green object near the center (no visible text or symbols)
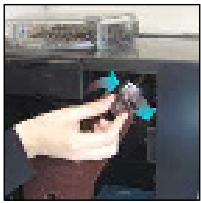
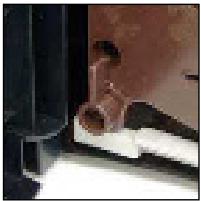
- Move the unit lever to the left.

natural_image
Close-up of a mechanical component with a wooden handle and flange, partially visible against a dark background (no text or symbols)

natural_image
Close-up of a small mechanical component mounted on a wall, possibly a valve or connector (no visible text or symbols)
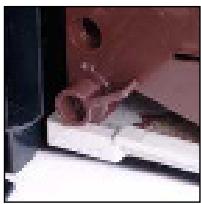
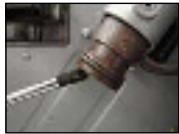
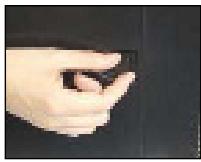
- Unscrew the top of the unit.
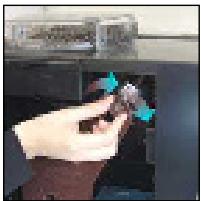
natural_image
Hand holding a small object with blue arrows pointing to it, next to a dark surface (no visible text or symbols)
- Remove the unit.

natural_image
Close-up of a hand holding a small electronic device with a green indicator light (no visible text or symbols)
- Wash the unit under the tap with plenty of hot water.
natural_image
Snowy mountain slope with a small figure standing on top (no visible text or symbols)
- Wait until the unit is completely dry.

natural_image
Exterior view of a mechanical component (no visible text or symbols)
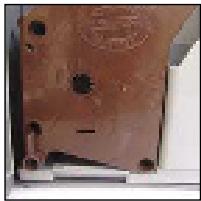
- Replace the unit, making sure the indicated points coincide.
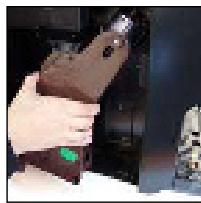
natural_image
Close-up of a hand holding a brown electronic device with a green tag, next to a black cylindrical component (no visible text or symbols)

natural_image
Close-up of a brown metal mechanical part with no visible text or symbols
natural_image
Person holding a device with a green indicator light, no visible text or symbols
- Move the unit lever to the right.
natural_image
Close-up of a person sitting at a desk near a window (no visible text or symbols)
natural_image
Close-up of a mechanical component with a metallic part inserted, showing no visible text or symbols.
- Screw up the top of the unit.
natural_image
Hand holding a small object inside a kitchen appliance (no visible text or symbols)
- Place the tray in position.
natural_image
Close-up of a hand using a sewing machine to press or install a brown electronic device (no visible text or symbols)
- Place the grounds compartment in position.

natural_image
Close-up of a hand pressing down on a dark surface with a small object nearby (no visible text or symbols)
- Close the side cover.
natural_image
Close-up of a hand holding a small black object against a dark background (no text or symbols visible)
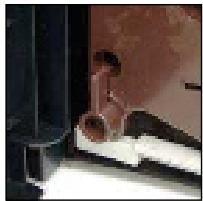
IMPORTANT! When handling the unit for cleaning, the internal system that compacts the coffee may move eas-
ily. To return it to its original position, use the brewing unit spanner supplied with the coffee-maker. Make sure that the marks on the fixed and moving parts coincide. If not, proceed as follows:
natural_image
Close-up of a circular object with dark markings on a beige background (no visible text or symbols)
- Insert the spanner in the lock.
natural_image
Close-up of a wooden electronic component with mounting holes and a circular marking (no visible text or symbols)
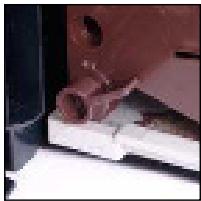
- Turn the spanner to the left (anticlockwise) until the two marks on the fixed and moving parts coincide.
natural_image
Interior ceiling view showing a circular vent with blue arrows indicating direction (no text or symbols)
C) AUTO-CLEANING FUNCTION
The coffee-maker automatically performs three system cleaning processes:
1) When you turn on the coffee-maker, it cleans the pipes with a little hot water to make sure that the coffee it makes does not contain any traces of water left in the pipes from coffee made previously.
2) Before turning off and to prevent the coffee outlet from being blocked with coffee remains, the coffee-maker expels a little water and cleans the coffee outlet. This function has been designed to save you from having to carry out this cleaning process manually.
17 PROGRAMMING THE COFFEE MACHINE
To facilitate the use of the coffee machine, we have designed a simple menu which can be used to define different functions:
- The coffee machine can switch off automatically to save energy, so that you can leave your house knowing that it will switch off on its own. Depending on the use of the coffee machine, you can program the switch off time after use.
- The water in each location has a determined quantity of lime that will affect the working life of the coffee machine. You can check the hardness of the water used and program the coffee machine to warn you when the machine's decalcification process must be carried out.
- You can check the quantity of coffees made.
ACCESSING THE PROGRAMMING MODE
| Sequence | Information |
| 1. To access the different programming options, press the steam and ground coffee buttons at the same time.The icons for both buttons will flash and the coffee extraction selectors will turn off. |  |
| 2. To exit the programming mode, simply press the steam selector. |  |
A) ENERGY SAVING MODE
To select the automatic switch off time after accessing the programming mode:
| Sequence | Information |
| 1. Press the extraction selector for 1 cup. |  |
| 2. Select the time with the + or - buttons of the top bar. |  |
| 3. This bar has 5 positions:0. Deactivate the automatic disconnection1. Automatic disconnection after 1 hour (default position programmed)2. Automatic disconnection after 2 hours3. Automatic disconnection after 3 hours4. Automatic disconnection after 4 hours |  |
| 4. To confirm the selection, press the selector for 1 cup again.When you enter the programming mode, the option will be programmed. |  |
| 5. To exit the programming mode, press the steam button. |  |
| 6. The coffee extraction selectors will light up again, indicating that the coffee machine is ready to prepare the coffee. |  |
B) WATER HARDNESS
The hardness of tap water varies in each region, so we recommend testing the hardness of the water used with the coffee machine. After programming the coffee machine with the water hardness, the machine will warn you about the next decalcification process required by the system.
First, test the hardness of the water. Drop a reagent strip in the water during 1 second. You will see how one box on the strip changes its colour; the hardness will be equal to this colour. Please, check the packaging of this strip to see the hardness of the water.
After accessing the programming mode:
| Sequence | Information |
| 1. Press the extraction selector for 2 cups. | 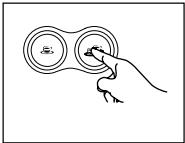 |
| 2. Select the hardness of the water with the + or - buttons of the top bar. | 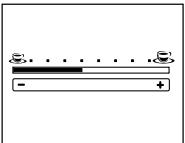 |
3. This bar has 5 positions: ppm (gpg)0. Level 11. Level 22. Level 33. Level 44. Level 5 (default option programmed)  | 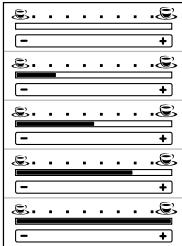 |
| 4. To confirm the selection, press the selector for 2 cups again. When you enter the programming mode, the option will be programmed. |  |
| 5. To exit the programming mode, press the steam button | 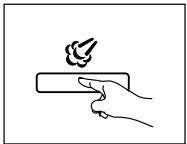 |
| 6. The coffee extraction selectors will light up again, indicating that the coffee machine is ready to prepare the coffee. | 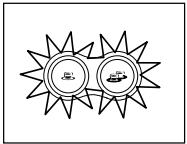 |
C) COFFEE COUNTING SYSTEM
The coffee machine has a coffee counting system to inform you about the number of coffees prepared at any time. This quantity is used for information purposes only and can not be modified.
After accessing the programming mode:
| Sequence | Information |
| 1. Press the hot water button to access the coffee cup counting system. | 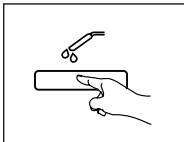 |
| 2. The information will be displayed on the lights of the water quantity bar For this function, the bar is divided in 9 sections, out of which 5 will be active (one will be off between each, to show them clearly). | 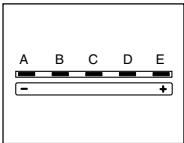 |
| 3.1. The first active section on the left represents the tens of thousands2. the second active section shows the thousands3. The third active section represents the hundreds4. The fourth active section represents the tens5. The fifth active section represents the units All sections will start to blink at the same time. When each section stops flashing, the system will stop for 3 seconds and the process will restart. | 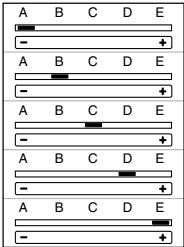 |
| 4. To know the total number of cups, the flashing period must be established for each section, so that you will have to write down the corresponding position (in other words, the last one in units, the next one in tens, etc.).A: 2 times= 2B: 3 times= 3C: 3 times= 3D: 5 times= 5E: 0 times= 0No. cups: 23,350 | 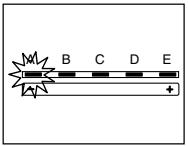 |
| 5. To exit this function, simply press the steam selector. |  |
| 6. The coffee extraction buttons will be lit, informing the user that the coffee machine is ready again. |  |
D) DECALCIFICATION
See section 15 DECALCIFICATION.
18 WARNING SIGNS
The different warning signs displayed by the coffee machine to indicate a problem during its normal use will be represented as follows:
| FUNCTION | MESSAGE | COMMENT |
| No water. |  | - FILL THE WATER TANK. The coffee-maker will not make any more cups of coffee until the water tank has been filled. |
| Main cover open. |  | • The coffee-maker will not make more cups of coffee until the cover is closed. |
| No brewing unit or it is not fitted. | • The coffee-maker will not make any more cups of coffee until the brewing unit has been fitted. |
| No drip tray or it is not fitted. | • The coffee-maker will not make more cups of coffee until the drip tray has been put in position. |
| The steam regulator is opened | • Turn the stream regulator, to close it. |
| Lime scale removal |  | - The coffee-maker will continue to make coffee but indicate that the lime scale needs to be removed from the machine. |
| Grounds compartment full |  | - The coffee-maker will not make any more cups of coffee until the coffee grounds have been emptied |
| Something is not working correctly |  | - RESET THE COFFEE-MAKER SOFTWARE by turning off the main switch (position ‘0’), wait a few seconds and then turn it on again. If, after turning off and turning on the coffee-maker, the symbol continues, THE COFFEE-MAKER NEEDS TO BE REPAIRED AT AN AUTHORISED TECHNICAL SERVICE CENTRE. The coffee-maker will not work until it has been repaired.. |
| Fill the system with water | 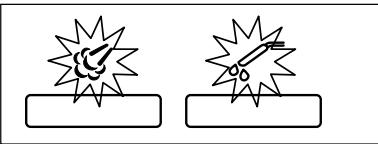 | - The coffee-maker needs to fill its internal circuits with water. Before transporting the coffee-maker, the circuits are emptied to prevent the forming of bacteria and must then be refilled |
19 TROUBLESHOOTING
| PROBLEM | CAUSE | SOLUTION |
| The coffee-maker does not come on. | The coffee-maker is not connected to the mains. | Press the switch, position 'I' (on).Check the cable and the plug.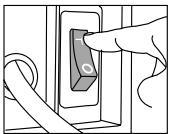 If it still does not come on, take the coffeemaker to an authorised technical service centre. If it still does not come on, take the coffeemaker to an authorised technical service centre. |
| The first coffee is of poor quality | The first time the grinder is started, it does not pour sufficient quantity into the brewing unit. | Throw the coffee away. The other coffees will always be of good quality |
| When I turn the machine on, a little dirty water comes out. | The coffee-maker automatically cleans the pipes to make sure of coffee-maker has performed the optimum quality, free from the remains of previous coffees. | Do not put the cup in position until the auto cleaning process finishes. |
| When I turn the machine off, a little dirty water comes out. | Before turning off and to prevent the coffee outlet from being blocked with coffee remains, the coffee-maker expels a little water and cleans the coffee outlet. | No solution is required; this function has been designed to prevent you from having to clean it manually |
| The coffee is not hot enough. | The cups are cold. | Preheat the cups |
| When coffee made with ground coffee, the coffee-maker pours out only water. | You have not put the ground coffee in the coffee dispenser. | Add ground coffee using the dispensing spoon (maximum one flat spoon. ful) and select the coffee again |
| Ground coffee has been used and no coffee is obtained: | Too much coffee has been placed in the dispenser.* You have not pressed the button and the coffee bean container is empty. | Clean the ground coffee dispenser. Repeat the operation using the dosage spoon and pour in a maximum of one tea spoon.Press the button again. |
| * You have poured ground coffee in the dispenser when the coffee machine was turned off. | Clean the ground coffee dispenser. Repeat the operation by pressing the button again. |
| * Part of the ground coffee is still in the inlet funnel. | Remove the coffee remains with the brush included in the accessories, or with the back of the dosage spoon. |
| - No steam or hot water is obtained. | The steam nozzle is blocked. | Clean the blocked pipe with a needle.IMPORTANT! During this operation, the steam regulator must be closed and the coffee-maker turned off. |
| - The coffee-maker needs a lot of time to make the coffee. | The grind is too fine. | Select a coarser grind. |
| - The brewing unit does not fit in place after it has been removed for cleaning. | The piston that presses down the coffee has moved. | Use the brewing unit spanner to position the piston in place (as indicated in section 16. CLEANING AND MAINTENANCE, section B) BREWING UNIT). |
| No coffee comes out of the outlets. | The coffee outlet is blocked with dry coffee remains. | Remove the coffee outlet and wash it under the tap. |
The pipes through which the coffee comes out of the coffee-maker into the outlet are blocked. | Remove the coffee outlet. Clean the blocked pipe(s) with a needleIMPORTANT! During this operation, the coffee-maker must be turned off. |
| The coffee flow decreases or the brewing time increases. | The brewing unit needs to be cleaned. | Clean the unit as indicated in section 16 CLEANING AND MAINTENANCE. |
MACHINE A CAFE SUPER AUTOMATIQUE ESPRESSION MODÈLE CA4805
natural_image
Exterior view of a modern eQOLAC coffee machine (no visible text or symbols on the device body)
1 IMPORTANT
natural_image
Close-up of a black electrical outlet with a cable inserted, showing no visible text or symbols
natural_image
Assorted dental tools including a toothbrush, plastic clip, and tool holder (no text or symbols visible)
7 BLOC-SYSTEME DE PRÉPARATION DU CAFÉ, LE CŒUR DE LA MACHINE À CAFÉ
natural_image
Black plastic mechanical component with mounting holes and a central hole (no visible text or symbols)
8 INSTALLATION
natural_image
Close-up of a hand holding a transparent plastic object, possibly a device or container (no visible text or symbols)
natural_image
Person holding a transparent plastic enclosure with internal compartments (no visible text or symbols)
natural_image
Hand holding a glass over a transparent container, with no visible text or symbols

natural_image
Exterior view of a modern office building (no signage)
natural_image
Hand pressing a button on an electrical outlet (no text or symbols visible)
natural_image
Two identical line drawings of a tool with spiky spikes and a base, no text or symbols present.
natural_image
Black plastic container with white boxes and a red X mark, no visible text or symbols
natural_image
Close-up of a container with granular material and a blue arrow pointing to a circular feature (no text or symbols visible)
natural_image
Close-up of a container filled with granular material, with a small blue arrow pointing to a circular marker (no visible text or symbols)
IMPORTANT!
natural_image
Close-up of a laser cutting machine with red arrows indicating motion direction (no text or symbols visible)
natural_image
Simple line drawing of two sunburst shapes with a small boat icon inside (no text or symbols)
natural_image
Simple line drawing of a sun with a boat inside, no text or symbols present
natural_image
Simple diagram of a horizontal bar with two circular ends and an arrow below (no text or symbols)
natural_image
Simple line drawing of a hand pressing a button with a checkmark above (no text or symbols)
natural_image
Simple line drawing of two sun-shaped objects with a small boat icon inside (no text or symbols)

natural_image
Hand holding a white cup with a spoon, placed on a keyboard (no visible text or symbols)
natural_image
Simple line drawing of a hand holding a rectangular object with droplets above it (no text or symbols)
natural_image
Simple line drawing of a hand holding a rectangular object with a smoke or vapor above it (no text or symbols)
natural_image
Close-up of a white circular object with red and green arrows pointing to it, against a dark background (no text or symbols)
natural_image
Close-up of a white circular object with red and green arrows pointing to it, against a dark background (no text or symbols)
natural_image
Simple line drawing of a hand holding a rectangular object with a smoke or vapor above it (no text or symbols)
natural_image
Close-up of a white circular dial with green arrow and control buttons, no readable text or symbols
natural_image
Close-up of a black and white industrial machine with a white cup, no visible text or symbols.
natural_image
Close-up of a white circular dial with red pointer and black border, against dark background (no text or symbols)
natural_image
Simple line drawing of a hand holding a rectangular object with a smoke or vapor above it (no text or symbols)
natural_image
Close-up of a black espresso machine with a white cup on a metal tray (no visible text or symbols)
15 DÉTARTRAGE
natural_image
Simple line drawing of a starburst shape with internal dots (no text or symbols)
natural_image
Simple line drawing of two identical circles with coffee cups inside, no text or symbols present
natural_image
Simple line drawing of a hand holding a rectangular object with a smoke or vapor above it (no text or symbols)
natural_image
Simple diagram of a battery with two terminals and a switch, no text or symbols present
natural_image
Abstract geometric starburst pattern with a central triangle and dot (no text or symbols)
natural_image
Simple geometric diagram with a central triangle surrounded by radiating lines (no text or symbols)
natural_image
Close-up of a hand using a pen to write on a laptop keyboard (no visible text or symbols)
natural_image
Close-up of a precision tool tip interacting with a surface (no visible text or symbols)
natural_image
Close-up of a hand holding a small black object against a dark background (no visible text or symbols)
natural_image
Close-up of a hand holding a small object inside a device (no visible text or symbols)
natural_image
Close-up of a hand pressing down on a white surface near a dark interior (no visible text or symbols)
natural_image
Close-up of a mechanical component with a wooden handle and flange, partially visible against a dark background (no text or symbols)
natural_image
Close-up of a small mechanical component mounted on a wall, possibly a valve or connector (no visible text or symbols)
natural_image
Hand holding a small object inside a kitchen appliance (no visible text or symbols)
- Retirez le dispositif.
natural_image
Hand holding a brown device with a green button, next to a black electronic device (no visible text or symbols)
natural_image
Person standing on a snowy slope with a ladder and mountain in the foreground (no visible text or symbols)
natural_image
Exterior view of a black industrial electrical contactor (no visible text or symbols)
natural_image
Close-up of a hand holding a brown electronic device with a green tag, next to a black cylindrical component (no visible text or symbols)

natural_image
Close-up of a brown mechanical component with no visible text or symbols
natural_image
Person holding a device with a green indicator light, no visible text or symbols
natural_image
Close-up of a small object with a brownish tip, possibly a device or tool, against a dark background (no visible text or symbols)

natural_image
Close-up of a hand pressing down on a white surface with a small object nearby (no visible text or symbols)
natural_image
Hand holding a small object with blue arrows pointing to it, next to a dark surface (no visible text or symbols)
natural_image
Close-up of a hand using a sewing machine to press or install a piece of material (no visible text or symbols)
natural_image
Close-up of a hand pressing down on a dark surface with a small object nearby (no visible text or symbols)
natural_image
Close-up of a hand holding an object against a dark background (no visible text or symbols)
natural_image
Close-up of a circular object with dark markings on a beige background (no visible text or symbols)
natural_image
Close-up of a wooden mechanical component with mounting holes and a circular feature (no visible text or symbols)
natural_image
Interior ceiling view showing a circular vent with blue arrows indicating direction (no text or symbols)
C) AUTO-NETTOYAGE
natural_image
Exterior view of a modern eOlaer machine (no visible text or symbols on the device body)
1 WICHTIG
natural_image
Close-up of a black electrical outlet with a cable inserted, showing no visible text or symbols
7 BRÜHGRUPPE, DAS HERZ IHRER ESPRESSION
natural_image
Exterior view of a mechanical bracket component (no visible text or symbols)
8 INBETRIEBNAHME
natural_image
Close-up of a hand holding a transparent plastic container (no visible text or symbols)
natural_image
Close-up of a hand inserting a transparent plastic container into a black device (no visible text or symbols)

natural_image
Hand holding a glass over a transparent container, with no visible text or symbols

natural_image
Exterior view of a modern office building (no signage)
natural_image
Illustration of a hand pressing a button on a device (no text or symbols visible)
natural_image
Two identical diagrams showing a explosion effect on a rectangular object, with no text or symbols present.
natural_image
Black box containing white boxes with a red X symbol, no visible text or labels
natural_image
Close-up of a transparent container with granular material and a blue arrow indicating direction (no text or symbols visible)
natural_image
Close-up of a container filled with granular material, with a small blue arrow pointing to a specific object (no visible text or symbols)
WICHTIG!!
natural_image
Close-up of a laser cutting machine with red arrows indicating motion direction (no text or symbols visible)
natural_image
Simple line drawing of two sun-shaped objects with circular elements, no text or symbols present
natural_image
Simple line drawing of a sun with two circular elements and a boat, no text or symbols present.
natural_image
Simple diagram of a horizontal bar with two circular ends and an arrow pointing left (no text or symbols)
natural_image
Simple line drawing of a hand holding a tool with a brush above it, no text or symbols present.
natural_image
Simple line drawing of two sun-shaped objects with a small boat icon inside (no text or symbols)
natural_image
Hand pouring liquid into a white cup with a spoon, placed on a keyboard (no visible text or symbols)
natural_image
Simple line drawing of a hand holding a rectangular object with a droplet above it (no text or symbols)
natural_image
Line drawing of a hand holding a rectangular object with a smokestack emitting smoke (no text or symbols)
natural_image
Simple line drawing of a hand holding a rectangular object with a smoke or vapor above it (no text or symbols)
natural_image
Close-up of a black and white industrial machine pouring liquid into a white cup on a dark surface (no visible text or symbols)
natural_image
Simple line drawing of a hand holding a rectangular object with a smoke or vapor above it (no text or symbols)
natural_image
Close-up of a black and white coffee machine with a white cup on a perforated tray (no visible text or symbols)
15 ENTKALKUNG
natural_image
Simple line drawing of a starburst shape with internal dots (no text or symbols)
natural_image
Simple line drawing of two interlocking circles containing coffee cups (no text or symbols)
natural_image
Simple line drawing of a hand holding a rectangular object with a smoke or vapor spike above it (no text or symbols)
natural_image
Simple diagram of a horizontal bar with two small icons at the top and bottom, no text or symbols present.
natural_image
Abstract geometric starburst pattern with a central triangle and dot (no text or symbols)
natural_image
Abstract geometric symbol with a central triangle surrounded by radiating jagged lines (no text or labels)
natural_image
Simple line drawing of two sun-shaped objects with a small boat icon inside (no text or symbols)
natural_image
Hand inserting a card into a computer keyboard (no visible text or symbols)
natural_image
Close-up of a precision tool tip interacting with a surface (no visible text or symbols)
natural_image
Close-up of a hand holding a small black object against a dark background (no visible text or symbols)
natural_image
Person holding a device inside a device casing (no visible text or symbols)
natural_image
Close-up of a hand pressing a small electronic component with a green indicator light (no visible text or symbols)
natural_image
Close-up of a mechanical component with a red and white piece, possibly a tool or bracket (no visible text or symbols)
natural_image
Close-up of a small object near a dark wall, possibly a device or component (no visible text or symbols)
natural_image
Hand holding a small object in a kitchen appliance (no visible text or symbols)
natural_image
Close-up of a hand holding a brown device with a green button, next to a dark mechanical component (no visible text or symbols)
natural_image
Close-up of a firearm with a visible trigger, no text or symbols present
natural_image
Exterior view of a mechanical component (no visible text or symbols)
natural_image
Close-up of a hand holding a brown electronic device with a green indicator light, next to a dark mechanical component (no visible text or symbols)

natural_image
Close-up of a brown mechanical component with no visible text or symbols

natural_image
Person operating a printer with a green indicator light (no visible text or symbols)
natural_image
Close-up of a circular object with two dark spots on a beige background (no visible text or symbols)
natural_image
Close-up of a wooden electronic component with mounting holes and a small circular mark (no visible text or symbols)
natural_image
Close-up of a small object with a brownish tip, possibly a tool or device, against a dark background (no visible text or symbols)
natural_image
Close-up of a mechanical component with red and white parts, no visible text or symbols
natural_image
Hand holding a small object with blue arrows pointing to it, next to a dark surface (no visible text or symbols)
natural_image
Close-up of a hand using a sewing machine to press or print a piece of paper (no visible text or symbols)
natural_image
Close-up of a hand holding a small object next to a dark object (no visible text or symbols)
natural_image
Close-up of a hand holding a small object against a dark background (no visible text or symbols)
natural_image
Interior ceiling view showing a circular vent with blue arrows indicating direction (no text or symbols)
C) AUTOMATISCHE REINIGUNG
natural_image
Exterior view of a modern coffee machine (no visible text or symbols on the device body)
1 IMPORTANTE
natural_image
Close-up of a black electrical outlet with a cable inserted, showing no visible text or symbols
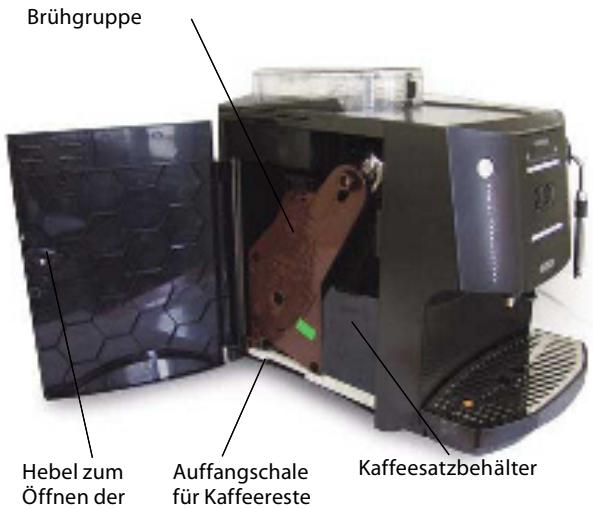
Grupo distribuidor
6 ACESSÓRIOS
natural_image
Assorted dental tools including a toothbrush, plastic clip, and tool holder (no text or symbols visible)
natural_image
Black plastic mechanical component with mounting holes and a central hole (no visible text or symbols)
8 INSTALAÇÃO
natural_image
Close-up of a hand holding a transparent plastic object (no visible text or symbols)
natural_image
Close-up of a hand holding a transparent container with internal compartments (no visible text or symbols)
natural_image
Hand pouring liquid into a container (no visible text or symbols)
natural_image
Exterior view of a modern office building (no signage)
natural_image
Line drawing of a hand pressing a button on an electrical panel (no text or symbols)
natural_image
Two identical diagrams showing explosion effects with a flame and a tool, both without any text or symbols.
natural_image
Black box containing white boxes with a red X mark, no visible text or symbols
natural_image
Close-up of a container with granular material and a blue arrow indicating direction (no text or symbols visible)
natural_image
Close-up of a container filled with granular material, with a small blue arrow pointing to a circular marker (no visible text or symbols)
IMPORTANTE!
natural_image
Close-up of a mechanical component with red arrows indicating motion or force direction (no visible text or symbols)
natural_image
Simple line drawing of two sunburst-like shapes with circular elements containing a small boat icon (no text or symbols)
natural_image
Simple line drawing of a sun with two concentric circles and a small boat, no text or symbols present.
natural_image
Simple diagram of a horizontal bar with two circular ends and an arrow pointing left (no text or symbols)
natural_image
Simple line drawing of a hand holding a rectangular object with a checkmark above it (no text or symbols)
natural_image
Simple line drawing of two sun-shaped objects with car icons, no text or symbols present

natural_image
Hand pouring liquid into a white cup with a spoon, placed on a keyboard (no visible text or symbols)
natural_image
Simple line drawing of a hand holding a rectangular object with a droplet above it (no text or symbols)
natural_image
Simple line drawing of a hand holding a rectangular object with a smoke or vapor above it (no text or symbols)
natural_image
Close-up of a white circular object with red and green markings, against a dark background (no text or symbols visible)
natural_image
Close-up of a white circular object with red and green arrows pointing to it, against a dark background (no text or symbols)
natural_image
Simple line drawing of a hand holding a rectangular object with a smoke or vapor above it (no text or symbols)
natural_image
Close-up of a white circular dial with green arrow and control knob (no text or symbols)

natural_image
Close-up of a black and white industrial machine dispensing coffee into a white cup (no visible text or symbols)
natural_image
Close-up of a white circular object with a red handle and dotted pattern, against a dark background (no text or symbols visible)
natural_image
Simple line drawing of a hand pressing a button with a smoke or vapor spike above (no text or symbols)
natural_image
Close-up of a black and white coffee machine with a white cup on a perforated tray (no visible text or symbols)
15 DESCALCIFICAÇÃO
natural_image
Simple line drawing of a starburst shape with internal dots (no text or symbols)
natural_image
Simple line drawing of two interlocking circles with coffee cups inside, no text or symbols present
natural_image
Simple line drawing of a hand holding a rectangular object with a smoke or vapor spike above it (no text or symbols)
natural_image
Simple diagram of a horizontal bar with tick marks and a plus sign at the end (no text or symbols)
natural_image
Abstract geometric symbol with starburst and triangular shapes (no text or symbols)
natural_image
Simple geometric diagram with a central triangle surrounded by radiating lines (no text or symbols)
natural_image
Hand pressing down on a keyboard (no visible text or symbols)
natural_image
Simple line drawing of two sun-shaped objects with circular elements, no text or symbols present
natural_image
Close-up of a mechanical tool tip interacting with a surface (no visible text or symbols)
natural_image
Close-up of a hand inserting a small electronic component into a computer keyboard (no visible text or symbols)
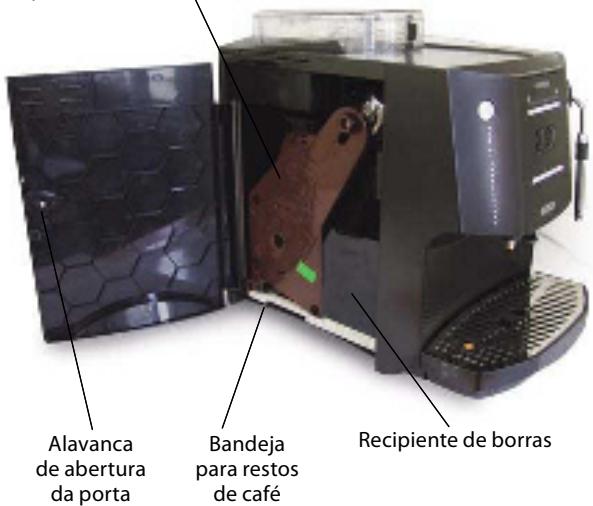
LIMPEZA
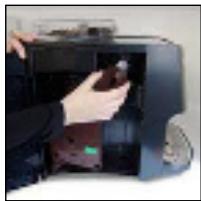
- Abra a porta lateral.

natural_image
Close-up of a hand holding a small black object against a dark background (no text or symbols visible)
- Retire o recipiente de borra.

natural_image
Close-up of a hand inserting a device into a black electronic device (no visible text or symbols)
natural_image
Close-up of a hand holding a small object with a green label, possibly part of a device or tool (no visible text or symbols)
natural_image
Close-up of a mechanical component with a wooden handle and flange, partially visible against a dark background (no text or symbols)

natural_image
Close-up of a small object near a wall, possibly a device or fixture, with no visible text or symbols.
natural_image
Hand holding a small object with blue arrows pointing to it, next to a dark surface (no visible text or symbols)
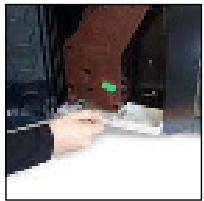
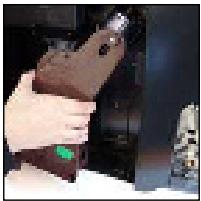
- Retire o grupo.

natural_image
Hand holding a brown electronic device with a green indicator light, next to a dark mechanical component (no visible text or symbols)
natural_image
Person standing on a snowy slope with a ladder (no visible text or symbols)
natural_image
Exterior view of a mechanical component (no visible text or symbols)
natural_image
Close-up of a hand holding a brown device with a green button, next to a dark mechanical component (no visible text or symbols)
natural_image
Close-up of a metallic mechanical component with no visible text or symbols

natural_image
Person holding a device in a black printer case (no visible text or symbols)
natural_image
Close-up of a small object with a curved line and a magnified inset, possibly part of a device or tool (no visible text or symbols)

natural_image
Close-up of a mechanical component with a red cylindrical part inserted, no visible text or symbols
natural_image
Hand holding a small object with blue arrows pointing to it, next to a dark surface (no visible text or symbols)
- Coloque a bandeja no respectivo lugar.
natural_image
Close-up of a hand pressing down on a brown electronic device component (no visible text or symbols)
natural_image
Close-up of a hand pressing down on a dark surface with a small object nearby (no visible text or symbols)
- Feche a porta lateral.
natural_image
Close-up of a hand holding a small black object against a dark background (no visible text or symbols)
natural_image
Close-up of a circular object with dark markings on a beige background (no visible text or symbols)
natural_image
Close-up of a wooden electronic component with mounting holes and a circular marking (no visible text or symbols)
natural_image
Interior ceiling view showing a circular vent with airflow arrows (no text or symbols)
C) AUTO-LIMPEZA
19 PROBLEMA-CAUSA-SOLUÇÃO
natural_image
Exterior view of a modern coffee machine (no visible text or symbols on the device body)
1 IMPORTANTE
natural_image
Close-up of a black electrical outlet with a cable inserted, showing no visible text or symbols
natural_image
Assorted dental tools including a toothbrush, plastic clip, and tool holder (no text or symbols visible)
7 GRUPPO DI EROGAZIONE, IL CUORE DELLA MACCHINA PER CAFFÈ
natural_image
Black plastic mechanical component with mounting holes and a central hole (no visible text or symbols)
8 INSTALLAZIONE
natural_image
Close-up of a hand inserting a transparent plastic container into a black rectangular device (no visible text or symbols)
natural_image
Hand pouring liquid into a plastic cup over a multi-compartment storage unit (no visible text or symbols)
natural_image
Exterior view of a modern office building (no signage)
natural_image
Line drawing of a hand pressing a button on an electrical panel (no text or symbols)
natural_image
Two identical diagrams showing a explosion with a flame and a tool, both on rectangular bases (no text or symbols)
natural_image
Black plastic container with white plastic pieces and a red X mark on the side (no text or symbols visible)
natural_image
Close-up of a transparent container with a blue arrow pointing to a circular object inside, containing granular material (no text or symbols visible)
natural_image
Close-up of a container filled with granular material, with a small blue arrow pointing to a circular marker (no visible text or symbols)
IMPORTANTE:
natural_image
Close-up of a mechanical component with red arrows indicating direction, no visible text or symbols
natural_image
Simple line drawing of two sunburst-like shapes with circular icons, no text or symbols present
natural_image
Simple line drawing of a sun with two concentric circles and a small boat, no text or symbols present.
natural_image
Simple diagram of a horizontal bar with two circular markers and an arrow pointing left (no text or symbols)
natural_image
Simple line drawing of a hand holding a rectangular object with a checkmark above it (no text or symbols)
natural_image
Simple line drawing of two sun-shaped objects with a small boat icon inside (no text or symbols)
natural_image
Hand pouring liquid into a white cup with a spoon, placed on a keyboard (no visible text or symbols)
natural_image
Simple line drawing of a hand holding a rectangular object with droplets above (no text or symbols)
natural_image
Simple line drawing of a hand holding a rectangular object with a smoke or vapor above it (no text or symbols)
natural_image
Close-up of a white circular object with a red arrow pointing to it, against a dark background (no text or symbols visible)
natural_image
Close-up of a white circular object with red and green arrows pointing to it, against a dark background (no text or symbols)
natural_image
Simple line drawing of a hand pressing a button with a smokestack (no text or symbols)
natural_image
Close-up of a white circular dial with green arrow and control buttons, no readable text or symbols
natural_image
Close-up of a white circular dial with red pointer and black border, against dark background (no text or symbols)

natural_image
Close-up of a black and white industrial machine pouring liquid into a white cup (no visible text or symbols)
natural_image
Simple line drawing of a hand holding a rectangular object with a smoke or vapor above it (no text or symbols)
natural_image
Close-up of a black and white coffee machine with a white cup on a perforated tray (no visible text or symbols)
15 DISINCROSTAZIONE
natural_image
Simple line drawing of a starburst shape with internal dots (no text or symbols)
natural_image
Simple line drawing of two identical circles with small cups inside, no text or symbols present.
natural_image
Simple line drawing of a hand holding a rectangular object with a smoke or vapor spike above it (no text or symbols)
natural_image
Simple diagram of a horizontal bar with tick marks and a plus sign, no text or symbols present
natural_image
Abstract geometric pattern with starburst and triangular shapes (no text or symbols)
natural_image
Simple geometric diagram with a central triangle and radiating lines (no text or symbols)
natural_image
Hand pressing down on a keyboard (no visible text or symbols)
natural_image
Simple line drawing of two sun-shaped objects with a small boat icon inside (no text or symbols)
natural_image
Close-up of a precision tool tip interacting with a surface (no visible text or symbols)
natural_image
Close-up of a hand inserting a card into a computer keyboard (no visible text or symbols)
PULIZIA
natural_image
Close-up of a hand holding a small black object against a dark background (no text or symbols visible)
natural_image
Person inserting a device into a machine (no visible text or symbols)
natural_image
Close-up of a hand holding a small object with a green marker, possibly part of a device or tool (no visible text or symbols)
natural_image
Close-up of a mechanical component with a wooden handle and flange, partially visible against a dark background (no text or symbols)

natural_image
Close-up of a small object near a wall, possibly a device or fixture, with no visible text or symbols.
natural_image
Hand holding a small object near a dark surface, with no visible text or symbols
natural_image
Close-up of a hand holding a brown electronic device with a green indicator light, next to a black panel (no visible text or symbols)
natural_image
Close-up of a mechanical component with a metallic lever and attached part (no visible text or symbols)
natural_image
Exterior view of a black industrial electrical contactor (no visible text or symbols)
natural_image
Close-up of a hand holding a brown electronic device with a green tag, next to a black mechanical component (no visible text or symbols)

natural_image
Close-up of a brown mechanical component with no visible text or symbols

natural_image
Person inserting a device into a machine (no visible text or symbols)
natural_image
Interior view of a room with dark walls and a small object on a light surface (no visible text or symbols)
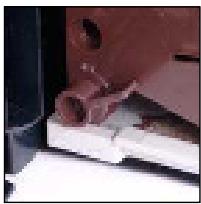
natural_image
Close-up of a mechanical component with a brown cylindrical part attached to a white base (no visible text or symbols)
natural_image
Hand holding a small object with blue-green markers, next to a dark surface (no visible text or symbols)
natural_image
Close-up of a hand using a sewing machine to press or install a brown electronic device (no visible text or symbols)
natural_image
Close-up of a hand pressing down on a dark surface, possibly part of a device or machine (no visible text or symbols)
natural_image
Close-up of a hand holding an object against a dark background (no visible text or symbols)
natural_image
Close-up of a circular object with two dark spots on a beige background (no visible text or symbols)
natural_image
Close-up of a wooden mechanical component with mounting holes and a circular feature (no visible text or symbols)
natural_image
Interior ceiling view showing a circular vent with blue arrows indicating airflow or movement (no text or symbols)
C) PULIZIA AUTOMATICA
natural_image
Exterior view of a modern eOla setup with control panel and buttons (no visible text or symbols)
1 BELANGRIJK
natural_image
Close-up of a black electrical outlet with a cable inserted, showing no visible text or symbols
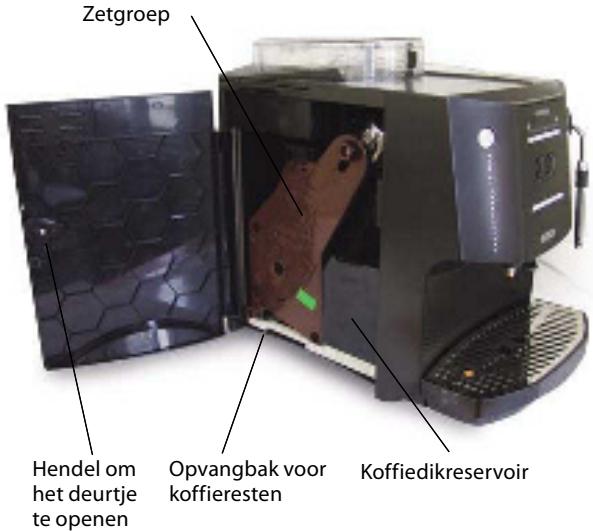
natural_image
Assorted dental tools including a toothbrush, plastic clip, and tool holder (no text or symbols visible)
7 ZETGROEP, HET HART VAN DE EXPRESSO-MACHINE
natural_image
Black metal mechanical component with mounting holes and a central hole (no visible text or symbols)
8 INSTALLATIE
natural_image
Close-up of a hand holding a transparent plastic object, possibly a device or container (no visible text or symbols)

natural_image
Close-up of a hand holding a transparent container with a small object inside (no visible text or symbols)

natural_image
Hand holding a glass over a window with a blurred background (no visible text or symbols)
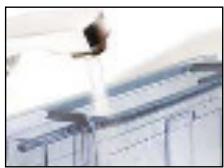
natural_image
Person standing on a metal platform with a ladder, possibly in a technical or industrial setting (no visible text or symbols)
natural_image
Line drawing of a hand pressing a button on an electrical panel (no text or symbols)
natural_image
Two identical diagrams showing a flame symbol emerging from a rectangular base, with no text or labels present.
natural_image
Black plastic container with white boxes and a red X mark, no visible text or symbols
natural_image
Close-up of a container with granular material and a blue arrow pointing to a circular object (no visible text or symbols)
natural_image
Close-up of a container filled with granular material, with a small blue arrow pointing to a circular marker (no visible text or symbols)
BELANGRIJK!
natural_image
Close-up of a laser cutting machine with red arrows indicating direction (no text or symbols visible)
natural_image
Simple line drawing of two sun-shaped objects with circular elements, no text or symbols present
natural_image
Simple line drawing of a sun with a small boat inside, no text or symbols present
natural_image
Simple diagram of a horizontal bar with two circular markers and an arrow below (no text or symbols)
natural_image
Simple line drawing of a hand holding a rectangular object with a brush above it, no text or symbols present.
natural_image
Simple line drawing of two sun-shaped objects with circular symbols, no text or labels present

natural_image
Hand pouring liquid into a white cup with a spoon, placed on a keyboard (no visible text or symbols)
natural_image
Line drawing of a hand holding a rectangular object with droplets above it (no text or symbols)
natural_image
Simple line drawing of a hand holding a rectangular object with a smoke or vapor above it (no text or symbols)
natural_image
Close-up of a white circular object with red and green arrows pointing to it, against a dark background (no text or symbols)
natural_image
Close-up of a white circular object with red and green arrows pointing to it, against a dark background (no text or symbols)
natural_image
Simple line drawing of a hand holding a rectangular object with a smoke or vapor above it (no text or symbols)
natural_image
Close-up of a black and white industrial machine pouring liquid into a white cup (no visible text or symbols)
natural_image
Close-up of a white circular dial with green arrow and control knob (no text or symbols)
natural_image
Close-up of a white circular object with a red pointer and a small square icon above it, against a dark background (no text or symbols)
natural_image
Simple line drawing of a hand pressing a button with a smoke or vapor above (no text or symbols)
natural_image
Close-up of a black and white coffee machine with a white cup on a perforated tray (no visible text or symbols)
15 ONTKALKEN
natural_image
Simple line drawing of a starburst shape with internal lines (no text or symbols)
natural_image
Simple line drawing of two interlocking circles with coffee cups inside (no text or symbols)
b) druk op de knop „Stoom“ om de cyclus te annuleren.

natural_image
Simple line drawing of a hand pressing a button with a smoke or vapor above (no text or symbols)
natural_image
Simple diagram of a horizontal bar with tick marks and a plus sign at the end (no text or symbols)
natural_image
Abstract geometric design with starburst and triangular shapes (no text or symbols)
natural_image
Simple geometric diagram with a central triangle surrounded by eight radiating lines (no text or symbols)
natural_image
Hand pressing a keyboard on a laptop keyboard (no visible text or symbols)
natural_image
Simple diagram of a horizontal bar with tick marks and plus/minus signs, no text or symbols present
natural_image
Simple line drawing of two sun-shaped objects with a small boat icon inside (no text or symbols)
natural_image
Close-up of hands using a handheld tool to press or write on a keyboard (no visible text or symbols)
natural_image
Close-up of a mechanical tool tip interacting with a surface (no visible text or symbols)
natural_image
Close-up of a hand holding a small black object against a dark background (no visible text or symbols)
natural_image
Person inserting a device into a machine (no visible text or symbols)
natural_image
Close-up of a hand holding a small object with a green label, possibly part of a device or tool (no visible text or symbols)
natural_image
Close-up of a hand pressing down on a white surface with a small hole, no visible text or symbols

natural_image
Close-up of a small object inside a dark container or enclosure, possibly a mechanical or electronic component (no visible text or symbols)
natural_image
Close-up of a hand holding a small object with blue arrows pointing to it, next to a dark background (no visible text or symbols)
- Neem de groep uit.

natural_image
Close-up of a hand holding a brown electronic device with a green sensor, next to a dark mechanical component (no visible text or symbols)
natural_image
Person standing on a snowy slope with a ladder (no visible text or symbols)
natural_image
Exterior view of a mechanical component (no visible text or symbols)
natural_image
Close-up of a hand holding a brown electronic device next to a black panel (no visible text or symbols)
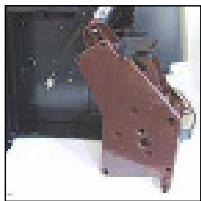
natural_image
Close-up of a mechanical component with no visible text or symbols

natural_image
Person holding a device with a green indicator light, no visible text or symbols
natural_image
Interior view of a room with dark walls and a wall-mounted object, no visible text or symbols

natural_image
Close-up of a mechanical component with red and white surfaces, no visible text or symbols
natural_image
Hand holding a small object in a kitchen appliance (no visible text or symbols)
natural_image
Close-up of a hand inserting a small electronic component into a device (no visible text or symbols)
natural_image
Close-up of a hand inserting a small electronic component into a device (no visible text or symbols)
natural_image
Close-up of a hand holding a small object against a dark background (no visible text or symbols)
natural_image
Close-up of a circular object with two dark spots on a beige background (no visible text or symbols)
natural_image
Close-up of a wooden mechanical component with mounting holes and a circular feature (no visible text or symbols)
natural_image
Interior ceiling view showing a circular vent with blue arrows indicating airflow or movement (no text or symbols)
C) AUTOMATISCHE REINIGINGSFUNCTIE
18 WAARSCHUWINGSMELDINGEN
natural_image
Exterior view of a modern eQMac saqu<|im_start|> Puerto Rico coffee machine (no visible text or symbols on the device body)
1 DŮLEŽITÉ
natural_image
Close-up of a black electrical outlet with a cable inserted, showing no visible text or symbols
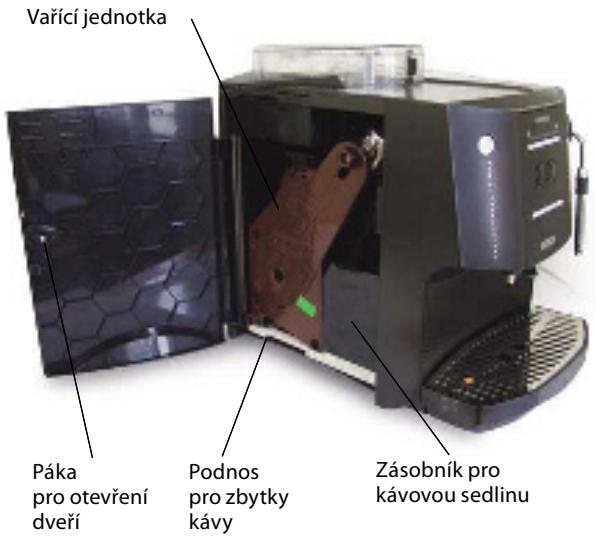
natural_image
Assorted dental tools including a toothbrush, plastic clip, and tool holder (no text or symbols visible)
7 VAŘÍCÍ JEDNOTKA, SRDCE KÁVOVARU
natural_image
Exterior view of a black metal bracket component (no text or symbols visible)
8 INSTALACE
natural_image
Close-up of a hand holding a transparent plastic container with a small white object on the side (no visible text or symbols)

natural_image
Hand holding a glass over a transparent container, with no visible text or symbols
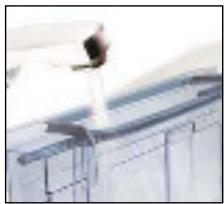
natural_image
Exterior view of a modern office building (no signage)
natural_image
Line drawing of a hand pressing a button on a door panel (no text or symbols)
natural_image
Two identical diagrams showing explosion effects on a rectangular object, with no text or symbols present.
natural_image
Black box containing white plastic containers with a red X symbol, no visible text or labels
natural_image
Close-up of a transparent container with granular material and a blue arrow pointing to a circular object (no text or symbols visible)
natural_image
Close-up of a container filled with granular material, with a small blue arrow pointing to a specific container (no visible text or symbols)
DŮLEŽITÉ!
natural_image
Close-up of a mechanical component with red arrows indicating motion or force direction (no visible text or symbols)
natural_image
Simple line drawing of two sunburst-like shapes with circular elements containing a ship icon (no text or symbols)
natural_image
Simple line drawing of a sun with two concentric circles and a small boat, no text or symbols present.
natural_image
Simple diagram of a horizontal bar with two circular markers and an arrow below (no text or symbols)
natural_image
Simple line drawing of a hand pressing a button with a brush above it (no text or symbols)
natural_image
Simple line drawing of two sun-shaped objects with circular elements, no text or symbols present
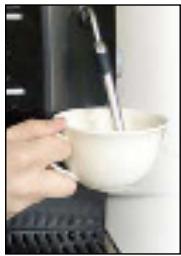
natural_image
Hand pouring liquid into a white cup with a spoon, placed on a keyboard (no visible text or symbols)
natural_image
Simple line drawing of a hand holding a rectangular object with a droplet above it (no text or symbols)
natural_image
Simple line drawing of a hand holding a rectangular object with a smoke or vapor above it (no text or symbols)
natural_image
Close-up of a white circular object with white dots on a dark surface, mounted on a wooden post (no text or symbols visible)
natural_image
Close-up of a white circular object with red and green arrows pointing to it, against a dark background (no text or symbols)
natural_image
Simple line drawing of a hand pressing a button with a small object above (no text or symbols)
natural_image
Close-up of a black and white coffee maker pouring liquid into a white cup (no visible text or symbols)
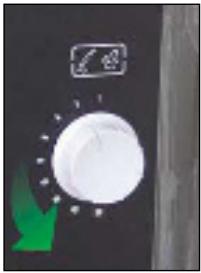
natural_image
Close-up of a white circular dial with green arrow and control buttons, no readable text or symbols
natural_image
Close-up of a white circular object with a red pointer and a small square icon above it, against a dark background (no text or symbols)
natural_image
Simple line drawing of a hand pressing a button with a smoke or vapor above (no text or symbols)
natural_image
Close-up of a black coffee machine with a white cup on a perforated base (no visible text or symbols)
15 ODSTRAŇOVÁNÍ VODNÍHO KAMENE
natural_image
Simple line drawing of a starburst shape with internal dots, no text or symbols present
natural_image
Simple line drawing of two circles with coffee cups inside, no text or symbols present
natural_image
Simple line drawing of a hand holding a rectangular object with a smoke or vapor spike above it (no text or symbols)
natural_image
Simple diagram of a horizontal bar with tick marks and a plus sign, no text or symbols present
natural_image
Abstract geometric symbol with starburst and triangular shapes (no text or symbols)
natural_image
Simple geometric diagram with a central triangle and radiating lines (no text or symbols)
natural_image
Hand pressing down on a keyboard (no visible text or symbols)
natural_image
Simple line drawing of two sun-shaped objects with a small boat icon inside (no text or symbols)
natural_image
Close-up of a precision tool tip interacting with a surface (no visible text or symbols)
natural_image
Close-up of a hand using a handheld device to press or write on a keyboard (no visible text or symbols)
ČIŠTĚNÍ
natural_image
Close-up of a hand holding a small black object against a dark background (no text or symbols visible)
natural_image
Hand inserting a small object into a device (no visible text or symbols)
natural_image
Close-up of a hand holding a small object, possibly a device or tool, with no visible text or symbols.
natural_image
Close-up of a mechanical component with a wooden handle and flange, partially visible against a dark background (no text or symbols)

natural_image
Close-up of a small object near a wall, possibly a device or fixture, with no visible text or symbols.
natural_image
Hand holding a small object in a kitchen appliance (no visible text or symbols)
- Vyjměte jednotku.

natural_image
Hand holding a brown handheld device with a green tag, partially visible against a dark background (no text or symbols)
natural_image
Silhouette of a person standing on a metal structure against a cloudy sky (no text or symbols visible)
natural_image
Exterior view of a mechanical component (no visible text or symbols)
natural_image
Close-up of a hand holding a brown electronic device with a green tag, next to a black cylindrical component (no visible text or symbols)
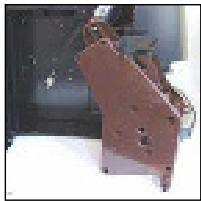
natural_image
Close-up of a brown electronic device with visible components and wiring (no text or symbols)

natural_image
Person operating a printer with a green indicator light (no visible text or symbols)
natural_image
Interior view of a room with dark walls and a wall-mounted object, no visible text or symbols
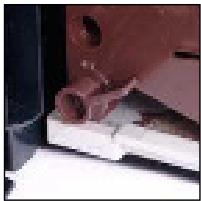
natural_image
Close-up of a mechanical component with a red and white base, no visible text or symbols
natural_image
Hand holding a small object in a kitchen appliance (no visible text or symbols)
natural_image
Close-up of a hand using a sewing machine to press or install a brown electronic device (no visible text or symbols)
natural_image
Close-up of a hand pressing down on a dark surface with a small object visible (no text or symbols)
- Zavřete boční kryt.
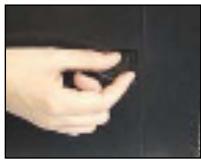
natural_image
Close-up of a hand holding a small object against a dark background (no text or symbols visible)
natural_image
Close-up of a beige surface with a dark circular object and two small dark circles (no text or symbols visible)
natural_image
Close-up of a mechanical component with mounting holes and a circular feature (no visible text or symbols)
natural_image
Interior ceiling view showing a circular vent with airflow arrows (no text or symbols)
C) FUNKCE AUTOMATICKÉHO ČIŠTĚNÍ
natural_image
Exterior view of a modern eOla setup with control panel and buttons (no visible text or symbols)
1 WAŻNE
natural_image
Close-up of a black electrical outlet with a cable inserted, showing no visible text or symbols.
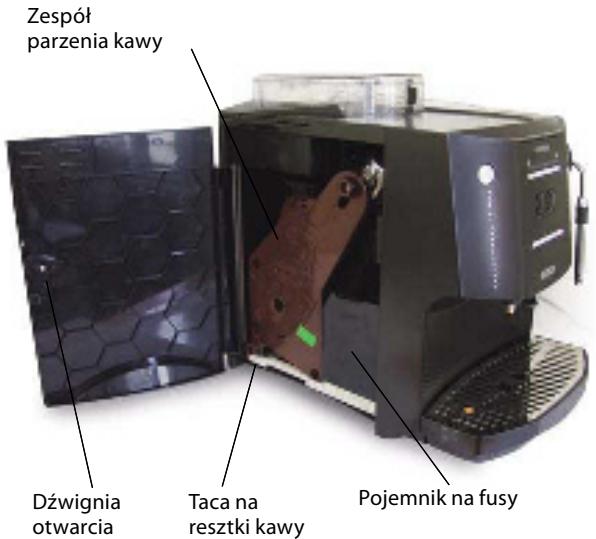
natural_image
Assorted dental tools including a toothbrush, plastic clip, and tool holder (no text or symbols visible)
7 ZESPÓŁ PARZENIA, SERCE EKSPRESU DO KAWY
natural_image
Black plastic mechanical component with mounting holes and a central hole (no visible text or symbols)
8 INSTALACJA
natural_image
Close-up of a hand holding a small object over a transparent container (no visible text or symbols)
natural_image
Person holding a transparent container with internal compartments (no visible text or symbols)
natural_image
Hand holding a glass over an open storage unit (no visible text or symbols)
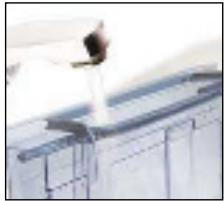
natural_image
Close-up of a metallic shelf with a hand holding a small object above it (no visible text or symbols)
natural_image
Line drawing of a hand pressing a button on an electrical switch (no text or symbols)
natural_image
Two identical diagrams showing a explosion effect on a rectangular object, with no text or symbols present.
natural_image
Black plastic container with white containers and a red X mark, no visible text or symbols
natural_image
Close-up of a container with granular material and a blue arrow indicating direction (no text or symbols visible)
natural_image
Close-up of a container filled with granular material, with a small blue arrow pointing to a circular marker (no visible text or symbols)
WAŻNE!
natural_image
Close-up of a mechanical component with red arrows pointing to features, no visible text or symbols
natural_image
Simple line drawing of two sun-shaped objects with circular icons, no text or symbols present
natural_image
Simple line drawing of a sun with two concentric circles and a small boat, no text or symbols present.
natural_image
Simple diagram of a horizontal bar with two circular markers and an arrow below (no text or symbols)
natural_image
Simple line drawing of a hand pressing a button with a brush above it (no text or symbols)
natural_image
Hand pouring liquid into a white cup with a spoon, placed on a keyboard (no visible text or symbols)
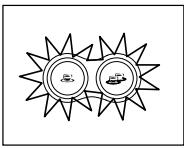
natural_image
Abstract diagram with two circular elements, one containing a ship icon and the other a boat icon, surrounded by radiating starburst shapes (no text or symbols)
natural_image
Simple line drawing of a hand holding a rectangular object with a droplet above it (no text or symbols)
natural_image
Simple line drawing of a hand holding a rectangular object with a smoke or vapor spike above it (no text or symbols)
natural_image
Close-up of a white circular object with red and green markings, against a dark background (no text or symbols)
natural_image
Close-up of a white circular object with red and green arrows pointing to it, against a dark background (no text or symbols)
natural_image
Simple line drawing of a hand holding a rectangular object with a smokestack above it (no text or symbols)
natural_image
Close-up of a white circular dial with green arrow and control buttons, no readable text or symbols
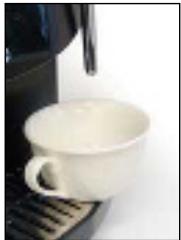
natural_image
White ceramic cup with a black inkjet above it, placed on a saucer (no text or symbols visible)
natural_image
Close-up of a white circular object with a red pointer and a small square icon above it, against a dark background (no text or symbols)
natural_image
Simple line drawing of a hand pressing a button with a smoke or vapor spike above (no text or symbols)
natural_image
Close-up of a black and white coffee machine with a white cup on a perforated tray (no visible text or symbols)
15 USUWANIE KAMIENIA
natural_image
Simple line drawing of a starburst shape with internal lines (no text or symbols)
natural_image
Simple line drawing of two overlapping circles with coffee cups inside, no text or symbols present
natural_image
Simple line drawing of a hand holding a rectangular object with a small smoke or vapor above it (no text or symbols)
natural_image
Simple diagram of a horizontal bar with control buttons and a minus sign, no text or symbols present.
natural_image
Abstract geometric starburst design with a central triangle and dot (no text or symbols)
natural_image
Simple geometric diagram with a central triangle and radiating lines (no text or symbols)
natural_image
Hand pressing down on a keyboard (no visible text or symbols)
natural_image
Simple line drawing of two sun-shaped objects with a small boat icon inside (no text or symbols)
natural_image
Close-up of a mechanical tool tip interacting with a surface (no visible text or symbols)
natural_image
Close-up of a hand using a handheld device to press or write on a keyboard (no visible text or symbols)
CZYSZCZENIE
natural_image
Close-up of a hand holding a small black object against a dark background (no text or symbols visible)
natural_image
Hand inserting a small object into a device (no visible text or symbols)
natural_image
Close-up of a hand holding a small object, possibly a device or tool, with no visible text or symbols.
natural_image
Close-up of a mechanical component with a wooden handle and flange, partially visible against a dark background (no text or symbols)
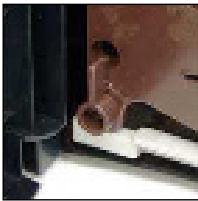
natural_image
Close-up of a small object near a wall, possibly a device or fixture, with no visible text or symbols.
natural_image
Hand holding a small object in a kitchen appliance (no visible text or symbols)
- Wyjąć zespół.

natural_image
Close-up of a hand holding a brown electronic device with a green tag, next to a black mechanical component (no visible text or symbols)
natural_image
Person climbing a snowy slope with a ladder (no visible text or symbols)
natural_image
Exterior view of a mechanical component (no visible text or symbols)
natural_image
Close-up of a hand holding a brown device with a green button, next to a dark mechanical component (no visible text or symbols)
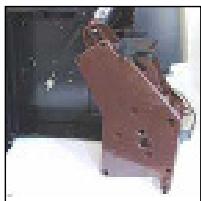
natural_image
Close-up of a metallic mechanical component with no visible text or symbols
natural_image
Person inserting a device into a device (no visible text or symbols)
natural_image
Close-up of a small object with a curved line and a magnified inset, possibly part of a device or tool (no visible text or symbols)

natural_image
Close-up of a mechanical component with a red cylindrical part inserted, mounted on a white base (no visible text or symbols)
natural_image
Hand holding a small object with blue arrows pointing to it, next to a dark surface (no visible text or symbols)
natural_image
Close-up of a hand pressing down on a brown electronic device component (no visible text or symbols)
natural_image
Close-up of a hand pressing down on a dark surface, possibly part of a device or machine (no visible text or symbols)
natural_image
Close-up of a hand holding a small black object against a dark background (no visible text or symbols)
natural_image
Close-up of a circular object with two dark spots on a beige background (no visible text or symbols)
natural_image
Close-up of a wooden mechanical component with mounting holes and a circular feature (no visible text or symbols)
natural_image
Close-up of a mechanical component with blue arrows indicating direction (no visible text or symbols)
C) FUNKCJA AUTOMATYCZNEGO CZYSZCZENIA
natural_image
Exterior view of a modern coffee machine (no visible text or symbols)
1 DÔLEŽITÉ
natural_image
Close-up of a black electrical outlet with a cable inserted, showing no visible text or symbols.
natural_image
Close-up of a black plastic mechanical bracket with mounting holes and a circular hole (no text or symbols visible)
8 INŠTALÁCIA
natural_image
Close-up of a hand holding a small object over a transparent container (no visible text or symbols)
natural_image
Person holding a transparent container with internal compartments (no visible text or symbols)

natural_image
Hand holding a transparent container over a glass container, with no visible text or symbols.
natural_image
Close-up of a person standing on a metal shelf with a glass panel (no visible text or symbols)
natural_image
Illustration of a hand pressing a button labeled 'O' on a device panel (no text or symbols beyond the label)
natural_image
Two identical diagrams showing a explosion with a flame and a cutting tool, both on rectangular bases (no text or symbols)
natural_image
Black plastic container with red X mark, containing white and white pieces (no text or symbols visible)
natural_image
Close-up of a container with granular material and a blue arrow indicating direction (no text or symbols visible)
natural_image
Close-up of a container filled with granular material, with a blue arrow pointing to a small object inside (no visible text or symbols)
DÔLEŽITÉ!
Nastavenie musíte urobit', ked'je mlynček v činnosti.
natural_image
Close-up of a laser cutting machine with red arrows indicating motion direction (no text or symbols visible)
C) Nastavenie množstva vody na jednu šálku
natural_image
Simple line drawing of two sun-shaped objects with a ship icon, no text or symbols present
natural_image
Simple line drawing of a sun with a circular arrow and a small boat, no text or symbols present.
natural_image
Simple diagram of a horizontal bar with two circular markers and an arrow pointing left (no text or symbols)
natural_image
Simple line drawing of a hand holding a rectangular object with a brush above it (no text or symbols)
natural_image
Simple line drawing of two sun-shaped objects with circular elements, no text or symbols present

natural_image
Hand pouring liquid into a white cup with a spoon, placed on a keyboard (no visible text or symbols)
- Pod trubicou na paru vložte pohár alebo šálku.
- Stlačte tlačidlo „hot water“ (horúca voda). Ikona horúcej vody sa rozsvieti a svetlo voliča extrahovania kávy sa vypne.
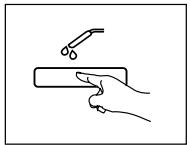
natural_image
Simple line drawing of a hand holding a rectangular object with droplets above it (no text or symbols)
natural_image
Simple line drawing of a hand holding a rectangular object with a smoke or vapor above it (no text or symbols)
natural_image
Close-up of a white circular object with red and green markings, against a dark background (no text or symbols)
natural_image
Close-up of a white circular object with red and green arrows pointing to it, against a dark background (no text or symbols)
natural_image
Line drawing of a hand holding a rectangular object with a smokestack above it (no text or symbols)
natural_image
Close-up of a black and white coffee maker pouring liquid into a white cup on a dark surface (no visible text or symbols)

natural_image
Close-up of a white circular dial with green arrow and control knob (no text or symbols)
natural_image
Close-up of a white circular object with a red handle and dotted pattern, against a dark background (no text or symbols visible)
natural_image
Simple line drawing of a hand pressing a button with a smoke or vapor above (no text or symbols)
natural_image
Close-up of a black and white coffee machine with a white cup on a perforated tray (no visible text or symbols)
15 ODSTRAŇOVANIE VODNÉHO KAMEŇA
natural_image
Simple line drawing of a starburst shape with internal dots (no text or symbols)
natural_image
Simple line drawing of two interlocking circles containing coffee cups (no text or symbols)
natural_image
Simple line drawing of a hand holding a rectangular object with a smoke or vapor spike above it (no text or symbols)
natural_image
Simple diagram of a horizontal bar with control buttons and a minus sign, no text or symbols present.
natural_image
Abstract geometric symbol with starburst and triangular shapes (no text or symbols)
natural_image
Simple geometric diagram with a central triangle surrounded by eight radiating lines (no text or symbols)
natural_image
Hand pressing down on a keyboard (no visible text or symbols)
natural_image
Simple line drawing of two sun-shaped objects with a small boat icon inside (no text or symbols)
natural_image
Close-up of a precision tool tip interacting with a surface (no visible text or symbols)
natural_image
Close-up of a hand using a pen to press or write on a keyboard (no visible text or symbols)
ČISTENIE
- Otvorte bočný kryt.

natural_image
Close-up of a hand holding a small black object against a dark background (no text or symbols visible)
natural_image
Person inserting a device into a machine (no visible text or symbols)
natural_image
Close-up of a hand holding a small object, possibly a tool or device, with no visible text or symbols.
natural_image
Close-up of a mechanical component with a wooden handle and flange, partially visible against a dark background (no text or symbols)

natural_image
Close-up of a small object near a wall, possibly a device or fixture, with no visible text or symbols.
natural_image
Hand cleaning a small object from a computer interface (no visible text or symbols)
- Vyberte jednotku.

natural_image
Close-up of a hand holding a brown electronic device with a green indicator light, next to a dark panel (no visible text or symbols)
- Jednotku umyte tečúcou horúcou vodou.

natural_image
Silhouette of a person standing on a snowy slope with a ladder (no text or symbols visible)
natural_image
Exterior view of a black industrial electrical component (no visible text or symbols)
natural_image
Close-up of a hand holding a brown electronic device with a green tag, next to a black cylindrical component (no visible text or symbols)

natural_image
Close-up of a metallic mechanical component with no visible text or symbols

natural_image
Person inserting a device into a black device (no visible text or symbols)
natural_image
Interior view of a room with dark walls and a wall-mounted object, no visible text or symbols

natural_image
Close-up of a mechanical component with a red handle and white base, no visible text or symbols
natural_image
Hand holding a small object in a kitchen appliance (no visible text or symbols)
- Misku dajte na miesto.

natural_image
Close-up of a hand using a sewing machine to press or install a brown electronic device (no visible text or symbols)
natural_image
Close-up of a hand pressing down on a dark surface with a small object nearby (no visible text or symbols)
natural_image
Close-up of a hand holding a small black object against a dark background (no text or symbols visible)
natural_image
Close-up of a circular object with dark markings on a beige background (no visible text or symbols)
natural_image
Close-up of a wooden door panel with mounting holes and a circular emblem (no visible text or symbols)
natural_image
Interior ceiling view showing a circular vent with airflow arrows (no text or symbols)
C) FUNKCIA AUTOMATICKÉHO ČISTENIA
natural_image
Exterior view of a modern coffee machine (no visible text or symbols on the device body)
1. FONTOS
natural_image
Close-up of a black electrical outlet with a cable inserted, showing no visible text or symbols
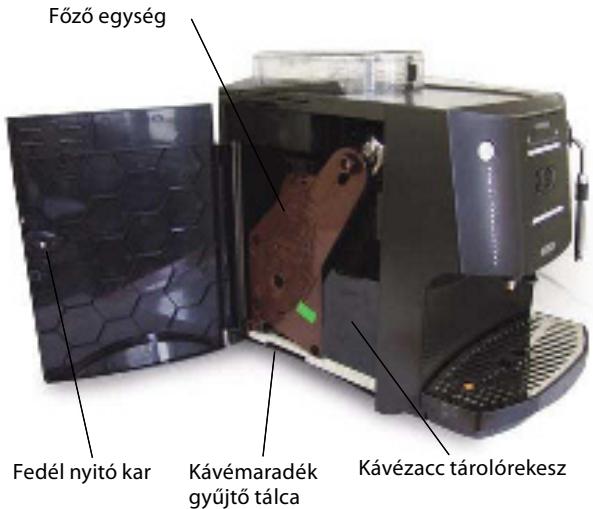
natural_image
Assorted dental tools including a toothbrush, plastic clip, and tool holder (no text or symbols visible)
7. A FÖZÖ EGYSÉG, A KÁVÉFÖZÖ LELKE
natural_image
Exterior view of a black metal mechanical bracket (no text or symbols visible)
8. ÜZEMBE HELYEZÉS
natural_image
Close-up of a hand holding a transparent plastic object, possibly a container or device (no visible text or symbols)

natural_image
Close-up of a hand holding a transparent container with a small object inside (no visible text or symbols)
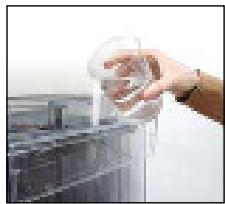
natural_image
Hand pouring liquid into a container (no visible text or symbols)

natural_image
Exterior view of a modern office building (no signage)
natural_image
Line drawing of a hand pressing a button on a device (no text or symbols)
natural_image
Two identical diagrams showing explosion effects on a rectangular object, with no text or symbols present.
natural_image
Black box with white boxes and a red X mark, no visible text or symbols
natural_image
Close-up of a container with granular material and a blue arrow pointing to a circular object (no visible text or symbols)
natural_image
Close-up of a container filled with granular material, featuring a small blue arrow and a white circle on the side (no visible text or symbols)
FONTOS!
natural_image
Close-up of a laser cutting machine with red directional arrows indicating motion (no text or symbols visible)
natural_image
Simple line drawing of two sunburst-like shapes with circular elements containing a boat icon (no text or symbols)
natural_image
Simple line drawing of a sun with two concentric circles and a small boat, no text or symbols present.
natural_image
Simple diagram of a horizontal bar with two circular ends and an arrow indicating leftward movement (no text or symbols)
natural_image
Simple line drawing of a hand holding a rectangular object with a brush above it (no text or symbols)
natural_image
Simple line drawing of two sun-shaped objects with circular elements, no text or symbols present
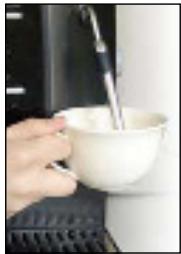
natural_image
Hand pouring liquid into a white cup with a spoon, placed on a keyboard (no visible text or symbols)
natural_image
Simple line drawing of a hand holding a rectangular object with a droplet above it (no text or symbols)
natural_image
Simple line drawing of a hand holding a rectangular object with a smoke or vapor above it (no text or symbols)
natural_image
Close-up of a white circular object with red and green markings, against a dark background (no text or symbols)
natural_image
Close-up of a white circular object with red and green arrows pointing to it, against a dark background (no text or symbols)
natural_image
Simple line drawing of a hand holding a rectangular object with a spiky top (no text or symbols)
natural_image
Close-up of a black and white coffee maker pouring liquid into a white cup (no visible text or symbols)
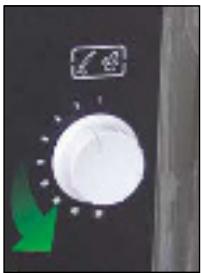
natural_image
Close-up of a white circular dial with green arrow and control knob (no text or symbols)
natural_image
Close-up of a white circular dial with red pointer and black border, against dark background (no text or symbols)
natural_image
Simple line drawing of a hand pressing a button with a magnifying glass above (no text or symbols)
natural_image
Close-up of a black and white coffee machine with a white cup on a perforated tray (no visible text or symbols)
natural_image
Simple line drawing of a starburst shape with internal dots, no text or symbols present
natural_image
Simple line drawing of two overlapping circles with coffee cups inside, no text or symbols present
natural_image
Simple line drawing of a hand holding a rectangular object with a smoke or vapor spike above it (no text or symbols)
natural_image
Simple diagram of a horizontal bar with tick marks and a plus sign, no text or symbols present
natural_image
Abstract geometric symbol with starburst and triangular shapes (no text or symbols)
natural_image
Simple geometric diagram with a central triangle surrounded by eight radiating lines (no text or symbols)
natural_image
Hand pressing a metal tray into a black appliance (no visible text or symbols)
natural_image
Simple line drawing of two sun-shaped objects with a small boat icon inside (no text or symbols)
natural_image
Close-up of a precision tool tip interacting with a surface (no visible text or symbols)
natural_image
Close-up of a hand using a tool to press or write on a keyboard (no visible text or symbols)
TISZTÍTÁS
natural_image
Close-up of a hand holding a small black object against a dark background (no text or symbols visible)
natural_image
Person inserting a device into a machine (no visible text or symbols)
natural_image
Close-up of a hand holding a small object, possibly a tool or device, with no visible text or symbols.
- Mozgassa a kart balra.
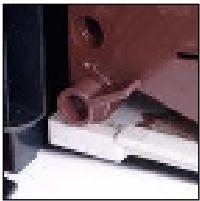
natural_image
Close-up of a mechanical component with a wooden handle and flange, partially visible against a dark background (no text or symbols)

natural_image
Close-up of a small object near a wall, possibly a device or component, with no visible text or symbols.
natural_image
Hand holding a small object with blue arrows pointing to it, next to a dark surface (no visible text or symbols)
natural_image
Close-up of a hand holding a brown electronic device with a green button, next to a black mechanical component (no visible text or symbols)
natural_image
Close-up of a firearm with a small object above it, set against a plain background (no visible text or symbols)
natural_image
Exterior view of a black industrial electrical component (no visible text or symbols)
natural_image
Close-up of a hand holding a brown electronic device with a green tag, next to a black cylindrical component (no visible text or symbols)

natural_image
Close-up of a metallic mechanical component with no visible text or symbols

natural_image
Person inserting a device into a black device (no visible text or symbols)
- Mozgassa a kart jobbra.

natural_image
Interior view of a room with dark walls and a wall-mounted object, no visible text or symbols

natural_image
Close-up of a mechanical component with a red handle and white base, no visible text or symbols
natural_image
Hand holding a small object with blue arrows pointing to it, next to a dark surface (no visible text or symbols)
natural_image
Close-up of a hand pressing down on a brown electronic device component (no visible text or symbols)
natural_image
Close-up of a hand pressing down on a dark surface with a small object visible (no text or symbols)
natural_image
Close-up of a hand holding a small black object against a dark background (no visible text or symbols)
natural_image
Close-up of a circular dark object on a beige background, possibly a lens or button (no text or symbols visible)
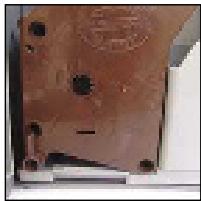
natural_image
Close-up of a wooden door panel with small holes and a circular mark on top (no visible text or symbols)
natural_image
Interior ceiling view showing a circular vent with airflow arrows (no text or symbols)
C) AUTOMATIKUS TISZTÍTÁS FUNKCIÓ
natural_image
Exterior view of a modern coffee machine (no visible text or symbols on the device body)
1 ВАЖНО
natural_image
Close-up of a black electrical outlet with a cable inserted, showing no visible text or symbols
Модул за приготвяне
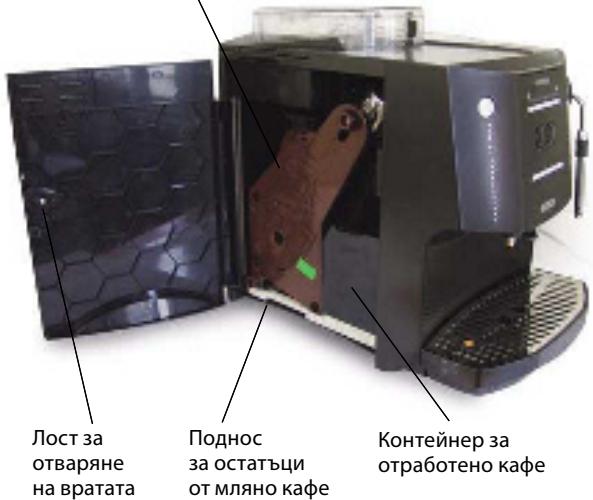
natural_image
Black metal mechanical component with mounting holes and a central hole (no visible text or symbols)
8 МОНТАЖ
natural_image
Close-up of a hand holding a transparent plastic container (no visible text or symbols)
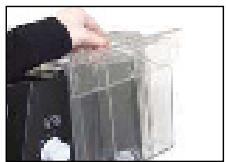
natural_image
Close-up of a hand holding a transparent plastic container with a black base (no visible text or symbols)
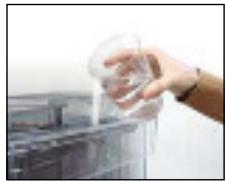
natural_image
Hand pouring liquid into a container (no visible text or symbols)
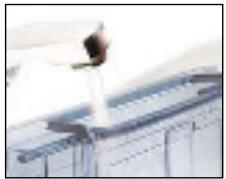
natural_image
Person standing on a metal platform with wires, no visible text or symbols
natural_image
Hand inserting a switch into an electrical outlet (no text or symbols visible)
natural_image
Two identical diagrams showing a flame impact on a rectangular object, with no text or symbols present.
natural_image
Black box containing white containers with a red X symbol, no visible text or labels
natural_image
Close-up of a container with granular material and a blue arrow pointing to a small object inside (no visible text or symbols)
natural_image
Close-up of a container filled with granular material, featuring a small blue arrow and a circular symbol (no readable text or labels)
ВАЖНО!
natural_image
Close-up of a mechanical component with red arrows indicating motion or force direction (no visible text or symbols)
natural_image
Simple line drawing of two sunburst-like shapes with icons, no text or symbols present
natural_image
Simple line drawing of a sun with two concentric circles and a small boat, no text or symbols present.
natural_image
Simple diagram of a horizontal bar with two circular markers and an arrow below (no text or symbols)
natural_image
Simple line drawing of a hand holding a rectangular object with a brush above it, no text or symbols present.
- Изберете желаното количество вода.
natural_image
Simple line drawing of two sun-shaped objects with a small car icon, no text or symbols present

natural_image
Hand pouring liquid into a white cup with a spoon, placed on a keyboard (no visible text or symbols)
natural_image
Simple line drawing of a hand holding a rectangular object with droplets above (no text or symbols)
natural_image
Simple line drawing of a hand holding a rectangular object with a smoke or vapor above it (no text or symbols)
natural_image
Close-up of a white circular object with red and green arrows pointing to it, against a dark background (no text or symbols)
natural_image
Close-up of a white circular object with red and green arrows pointing to it, against a dark background (no text or symbols)
natural_image
Simple line drawing of a hand holding a rectangular object with a small smoke or vapor above it (no text or symbols)
natural_image
Close-up of a white circular dial with a green arrow and starburst pattern, mounted on a dark surface (no text or symbols visible)
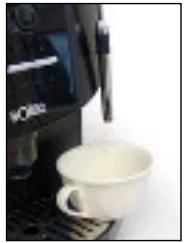
natural_image
Close-up of a black and white industrial machine pouring liquid into a white cup (no visible text or symbols)
natural_image
Close-up of a white circular dial with red pointer and arrow, against dark background (no text or symbols)
natural_image
Simple line drawing of a hand pressing a button with a smoke or vapor spike above (no text or symbols)
natural_image
Close-up of a black and white coffee machine with a white cup on a perforated tray (no visible text or symbols)
natural_image
Simple line drawing of a starburst shape with internal dots, no text or symbols present
natural_image
Simple line drawing of two interlocking circles with coffee cups inside, no text or symbols present
natural_image
Simple line drawing of a hand holding a rectangular object with a smoke or vapor spike above it (no text or symbols)
natural_image
Simple diagram of a horizontal bar with tick marks and a plus sign at the end (no text or symbols)
natural_image
Abstract geometric starburst pattern with a central triangle and dot (no text or symbols)
natural_image
Simple geometric diagram with a central triangle surrounded by radiating lines (no text or symbols)
natural_image
Hand pressing a button on a mechanical device (no visible text or symbols)
natural_image
Simple line drawing of two sun-shaped objects with a small boat icon inside (no text or symbols)
natural_image
Close-up of a mechanical tool tip interacting with a surface (no visible text or symbols)
natural_image
Close-up of a hand using a computer to press a keyboard (no visible text or symbols)
ПОЧИСТВАНЕ
natural_image
Close-up of a hand holding a small black object against a dark background (no text or symbols visible)
natural_image
Person holding a device in a mechanical device (no visible text or symbols)
natural_image
Close-up of a hand holding a small object with a green mark, possibly part of a device or tool (no visible text or symbols)
natural_image
Close-up of a mechanical component with a wooden handle and flange, partially visible against a dark background (no text or symbols)
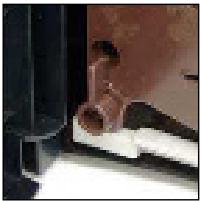
natural_image
Close-up of a small object near a wall, possibly a device or fixture, with no visible text or symbols.
natural_image
Hand holding a small object in a kitchen appliance (no visible text or symbols)
- Свалете модула.

natural_image
Close-up of a hand holding a brown electronic device with a green tag, next to a black mechanical component (no visible text or symbols)
natural_image
Person climbing a snowy slope with a person standing on top (no visible text or symbols)
natural_image
Exterior view of a mechanical component (no visible text or symbols)
natural_image
Close-up of a hand holding a brown electronic device with a green tag, next to a black cylindrical component (no visible text or symbols)
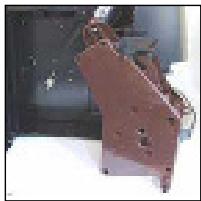
natural_image
Close-up of a metallic mechanical component with no visible text or symbols

natural_image
Person holding a device with a green indicator light, no visible text or symbols
natural_image
Close-up of a mechanical component with a curved pipe or sleeve, possibly part of a tool or device (no visible text or symbols)

natural_image
Close-up of a mechanical component with a red cylindrical part inserted, mounted on a white base (no visible text or symbols)
natural_image
Hand holding a small object with blue arrows pointing to it, next to a dark surface (no visible text or symbols)
natural_image
Close-up of a hand pressing down on a brown electronic device component (no visible text or symbols)
natural_image
Close-up of a hand inserting a small object into a device (no visible text or symbols)
natural_image
Close-up of a hand holding a small object against a dark background (no text or symbols visible)
natural_image
Close-up of a circular object with dark markings on a beige background (no visible text or symbols)
natural_image
Close-up of a wooden mechanical component with mounting holes and a circular feature (no visible text or symbols)
natural_image
Interior ceiling view showing a circular vent with airflow arrows (no text or symbols)
natural_image
Exterior view of a modern eOlaer machine (no visible text or symbols on the device body)
1 VAŽNO
natural_image
Close-up of a black electrical outlet with a cable inserted, showing no visible text or symbols.
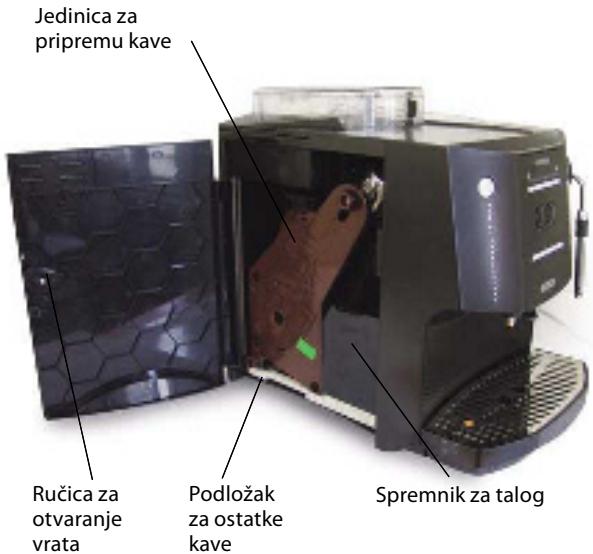
6 PRIBOR
Za vašu pogodnost, sav pribor priložen je u kutiji s uputama za uporabu:
- Žlica za uzimanje mljevene kave. Kapacitet 8 g, otprilike.
- Sredstvo za uklanjanje kamenca.
- Četka za čišćenje.
- Reagens traka za provjeru tvrdoće vode. Razine od 1 do 5.
- Prekidač jedinice za pripremu kave.
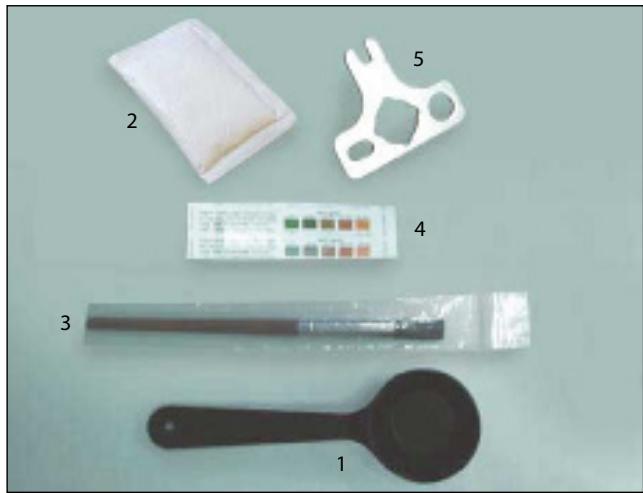
natural_image
Assorted dental tools including a toothbrush, plastic clip, and tool holder (no text or symbols visible)
7 JEDINICA ZA PRIPREMU KAVE, SRCE APA-RATA ZA KAVU
Ovaj super automatski aparat za kavu ima profesionalnu jedinicu za pripremu kave koju je proizvela i razvila tvrtka BIANCHI, najbolji proizvođač aparata (komercijalnih) u Italiji. Jedinica za pripremu automatski priprema izvrsnu espresso kavu odlažući istovremeno ostatke kave u odjeljak. Namijenjen je za profesionalnu uporabu i nije ga potrebno održavati do nakon 5 godina (ili nakon pripremljenih 6000 šalica).

natural_image
Black plastic mechanical component with mounting holes and a central hole (no visible text or symbols)
8 MONTAŽA
Ako u aparatu pronađete ostatke kave, to je zato jer je aparata testiran kako bi se osigurao njegov savršen rad.
- Napunite spremnik za kavu u zrnu zrnima kave (kapacitet spremnika je 250 g).
- Napunite spremnik za vodu čistom, hladnom vodom. Vodu možete uliti izravno (a) ili pod slavinom (b):
a) Podignite poklopac spremnika za vodu
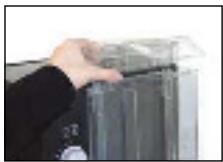
natural_image
Close-up of a hand holding a small object over a dark rectangular frame (no visible text or symbols)
natural_image
Close-up of a hand holding a transparent plastic container with a small white object inside (no visible text or symbols)

natural_image
Hand pouring liquid into a plastic container (no visible text or symbols)

natural_image
Exterior view of a modern office building (no signage)
natural_image
Line drawing of a hand pressing a button on a door panel (no text or symbols)
natural_image
Two identical diagrams showing a explosion effect on a rectangular object, with no text or symbols present.
- Postavite posudu (šalicu ili vrč) ispod otvora za kavu. Napunite sustav pritiskom na oba gumba istovremeno.
VAŽNO: Taj postupak mora se izvesti PRIJE svih drugih postupaka.
VAŽNO: Sustav se mora napuniti kada istovremeno svijetle ikona za paru i toplu vodu. Do toga dolazi kada je aparat spojen na glavnu mrežnu sklopku.
8. Nakon pritiska, oba gumba počinju svijetliti i sustavi se pune. Postupak je završen kada voda prođe kroz otvor za istjecanje kave.
- Proces se automatski zaustavlja istovremenim pritiskom na oba gumba.
- Uklonite posudu s vrućom vodom.
- Aparat za kavu se isključuje i spremna je uza rad. Pritisnite tipku za stanje mirovanja.

natural_image
Black box containing white boxes with a red X symbol, no visible text or labels
natural_image
Close-up of a transparent container with a blue arrow pointing to a circular object inside, containing granular material (no text or symbols visible)
natural_image
Close-up of a container filled with granular material, with a small blue arrow pointing to a circular marker (no visible text or symbols)
VAŽNO!
natural_image
Close-up of a laser cutting machine with red arrows indicating motion direction (no text or symbols visible)
natural_image
Simple line drawing of two sun-shaped objects with icons, no text or symbols present
natural_image
Simple line drawing of a sun with a circular base and a small boat on the right side (no text or symbols)
natural_image
Simple diagram of a horizontal bar with two circular markers and an arrow pointing left (no text or symbols)
- Kada aparat prestane s pripremom kave, ponovno se uključuju dva indikatora pripreme kave, a lampica na gornjoj traci vraća se u početno odabrano stanje.
Pripremu kave možete zaustaviti u svakom trenu. Jednostavno ponovno pritisnite uključeni indikator pripreme kave.
natural_image
Simple line drawing of a hand holding a rectangular object with a brush above it, no text or symbols present.
- Odaberite željenu količinu vode.
natural_image
Simple line drawing of two sun-shaped frames with circular icons, no text or symbols present
natural_image
Hand pouring liquid into a white cup with a spoon, placed on a keyboard (no visible text or symbols)
natural_image
Simple line drawing of a hand holding a rectangular object with a droplet above it (no text or symbols)
natural_image
Simple line drawing of a hand holding a rectangular object with a smoke or vapor above it (no text or symbols)
natural_image
Close-up of a white circular object with red and green arrows pointing to it, against a dark background (no text or symbols)
natural_image
Simple line drawing of a hand pressing a button with a smokestack (no text or symbols)
natural_image
Close-up of a white circular object with red and green arrows pointing to it, against a dark background (no text or symbols)
-
Stavite čašu ili šalicu ispod mlaznice za paru. Otvorite regulator pare kako biste iz mlaznice izbacili preostalu vodu. Zatvorite mlaznicu kada kroz nju počne izlaziti para.
-
Stavite šalicu s mlijekom ispod mlaznice za paru.
-
Otvorite mlaznicu okretanjem regulatora pare.

natural_image
Close-up of a black and white industrial machine pouring liquid into a white cup (no visible text or symbols)

natural_image
Close-up of a white circular dial with green arrow and control buttons, no readable text or symbols
natural_image
Close-up of a white circular dial with red pointer and black border, against dark background (no text or symbols)
natural_image
Simple line drawing of a hand pressing a button with a smoke or vapor spike above (no text or symbols)
natural_image
Close-up of a black and white coffee machine with a white cup on a perforated tray (no visible text or symbols)
15 UKLANJANJE KAMENCA
natural_image
Simple line drawing of a starburst shape with internal lines (no text or symbols)
NAPOMENA: Postupak uklanjanja kamenca traje oko 35 minuta tako da se ne treba pokrenuti odmah nakon uključivanja ikone na aparatu.
natural_image
Simple line drawing of two interlocking circles with coffee cups inside, no text or symbols present
b) za prekid postupka pritisnite gumb za paru.
natural_image
Simple line drawing of a hand holding a rectangular object with a small flame above it (no text or symbols)
VAŽNO! Ako ste ulili sredstvo za uklanjanje kamenca u spremnik za vodu, uklonite ga kako ga ne biste zabunom upotrijebili prilikom pripreme kave.
natural_image
Simple diagram of a horizontal bar with control buttons and a plus sign, no text or symbols present.
-
Nakon uklanjanja kamenca isperite sustav kako biste uklonili sve ostatke sredstva za uklanjanje kamenca.
-
Aparat za kavu će vas upozoriti na sljedeće:
natural_image
Abstract geometric design with a starburst and triangular shape (no text or symbols)
natural_image
Simple geometric diagram with a central triangle surrounded by radiating lines (no text or symbols)
natural_image
Hand pressing down on a mechanical device (no visible text or symbols)
-
Za ispiranje aparata ponovno pritisnite bilo koji gumb za pripremu kave.
-
Aparat za kavu pokreće postupak ispiranja, a lampica na traci počinje titrati i konačno se trajno uključuje na kraju procesa.
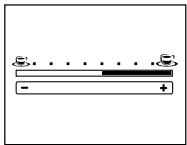
natural_image
Simple diagram of a battery with two terminals and a horizontal bar, no text or symbols present
natural_image
Simple line drawing of two sun-shaped objects with circular elements, no text or symbols present
natural_image
Close-up of a precision tool tip interacting with a surface (no visible text or symbols)
natural_image
Close-up of a hand using a pen on a keyboard (no visible text or symbols)
ČIŠĆENJE
- Otvorite bočni poklopac.
natural_image
Close-up of a hand holding a small black object against a dark background (no text or symbols visible)
natural_image
Person inserting a device into a machine (no visible text or symbols)
- Izvadite pladnja za prikupljanje ostataka kave.

natural_image
Close-up of a hand holding a small object with a green label, possibly part of a device or tool (no visible text or symbols)
natural_image
Close-up of a mechanical component with a wooden handle and flange, partially visible against a dark background (no text or symbols)

natural_image
Close-up of a small object near a wall, possibly a device or fixture, with no visible text or symbols.
- Odvrnite vrh jedinice.

natural_image
Hand holding a small object with blue arrows pointing to it, next to a dark surface (no visible text or symbols)
- Izvadite jedinicu.

natural_image
Close-up of a hand holding a brown electronic device with a green indicator light (no visible text or symbols)
- Operite je pod slavinom s velikom količinom vruće vode.
natural_image
Close-up of a person standing on a metal object against a plain background (no visible text or symbols)
natural_image
Exterior view of a black industrial electrical contactor (no visible text or symbols)
- Vratite jedinicu na mjesto pazeći na oznake.

natural_image
Close-up of a hand holding a brown electronic device with a green tag, next to a black mechanical component (no visible text or symbols)
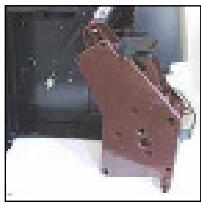
natural_image
Close-up of a brown metal mechanical part with no visible text or symbols
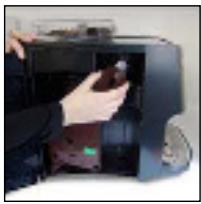
natural_image
Person inserting a device into a machine (no visible text or symbols)
- Pomaknite ručicu jedinice udesno.
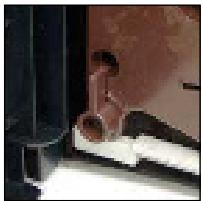
natural_image
Close-up of a small object with a reddish-brown interior, possibly a device or tool, next to a dark rectangular frame (no visible text or symbols)
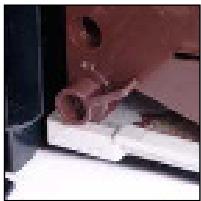
natural_image
Close-up of a red plastic component mounted on a white base, with no visible text or symbols.
- Zavrnite vrh jedinice.
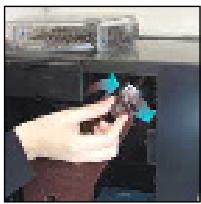
natural_image
Hand holding a small object inside a kitchen appliance (no visible text or symbols)
- Vratite pladanj na mjesto.

natural_image
Close-up of a hand using a sewing machine to press or install a brown electronic device (no visible text or symbols)
- Vratite spremnik ostatke kave na mjesto.
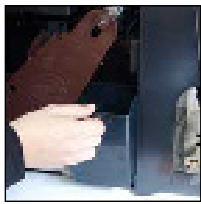
natural_image
Close-up of a hand pressing down on a dark surface with a small object nearby (no visible text or symbols)
- Zatvorite bočni poklopac.
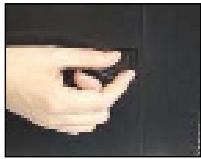
natural_image
Close-up of a hand holding a small object against a dark background (no visible text or symbols)
VAŽNO! Kada rukujete jedinicom prilikom čišćenja, unutarnji sustav za sabijanje kave može se lako pomjeriti. Vra-
natural_image
Close-up of a circular object with dark markings on a beige background (no visible text or symbols)
natural_image
Close-up of a wooden door panel with mounting holes and a circular emblem (no visible text or symbols)
natural_image
Interior ceiling view showing a circular vent with airflow arrows (no text or symbols)
C) FUNKCIJA AUTOMATSKOG ČIŠĆENJA
natural_image
Exterior view of a modern eOlaer machine (no visible text or symbols on the device body)
1 IMPORTANT
natural_image
Close-up of a black electrical outlet with a cable inserted, showing no visible text or symbols.
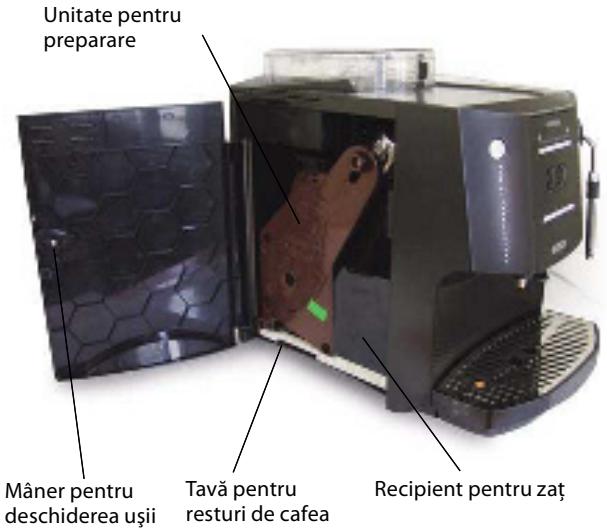
natural_image
Assorted dental tools including a toothbrush, plastic clip, and tool holder (no text or symbols visible)
7 UNITATEA DE PREPARARE, INIMA APARA-TULUI PENTRU PREPARAREA CAFELEI
natural_image
Black metal mechanical component with mounting holes and a central hole (no visible text or symbols)
8 INSTALARE
natural_image
Person holding a transparent container with a small object inside (no visible text or symbols)

natural_image
Hand holding a glass over a transparent container, with no visible text or symbols

natural_image
Exterior view of a modern office building (no signage)
natural_image
Line drawing of a hand pressing a button on an electrical panel (no text or symbols)
natural_image
Two identical line drawings of a stylized object with radiating lines, no text or symbols present.
natural_image
Black plastic container with red X mark, containing white and white objects (no text or symbols visible)
natural_image
Close-up of a container with granular material and a blue arrow indicating direction (no text or symbols visible)
natural_image
Close-up of a container filled with granular material, with a small blue arrow pointing to a circular marker (no visible text or symbols)
IMPORTANT!
natural_image
Close-up of a laser cutting machine with red arrows indicating motion direction (no text or symbols visible)
natural_image
Simple line drawing of two sun-shaped objects with circular elements, no text or symbols present
natural_image
Simple line drawing of a sun with two concentric circles and a small arrow inside (no text or symbols)
natural_image
Simple diagram of a horizontal bar with two circular ends and an arrow pointing left (no text or symbols)
natural_image
Simple line drawing of a hand holding a rectangular object with a brush above it, no text or symbols present.
natural_image
Hand pouring liquid into a white cup with a spoon, placed on a keyboard (no visible text or symbols)
natural_image
Simple line drawing of two sun-shaped frames with circular icons, no text or symbols present
natural_image
Line drawing of a hand holding a rectangular object with droplets above it, no text or symbols present
natural_image
Simple line drawing of a hand holding a rectangular object with a smoke or vapor above it (no text or symbols)
natural_image
Close-up of a white circular object with red and green arrows pointing to it, against a dark background (no text or symbols)
natural_image
Close-up of a white circular object with red and green arrows pointing to it, against a dark background (no text or symbols)
natural_image
Simple line drawing of a hand holding a rectangular object with a smoke or vapor above it (no text or symbols)
natural_image
Close-up of a black and white coffee machine with a cup on a dark surface (no visible text or symbols)

natural_image
Close-up of a white circular dial with green arrow and control buttons, no readable text or symbols
natural_image
Close-up of a white circular dial with red pointer and black border, against dark background (no text or symbols)
natural_image
Simple line drawing of a hand pressing a button with a smoke or vapor above (no text or symbols)
natural_image
Close-up of a black and white coffee machine with a white cup on a perforated tray (no visible text or symbols)
15 ÎNDEPĂRTAREA DEPUNERILOR DE PIATRĂ
natural_image
Simple line drawing of a starburst shape with internal lines (no text or symbols)
natural_image
Simple line drawing of two interlocking circles with coffee cups inside, no text or symbols present.
natural_image
Simple line drawing of a hand pressing a button with a smoke or vapor above (no text or symbols)
natural_image
Simple diagram of a battery with two switches and a progress bar (no text or symbols)
natural_image
Abstract geometric starburst design with a central triangle and dot (no text or symbols)
natural_image
Simple geometric diagram with a central triangle surrounded by radiating lines (no text or symbols)
natural_image
Hand pressing a keyboard on a laptop (no visible text or symbols)
natural_image
Simple line drawing of two sun-shaped frames with icons, no text or symbols present
natural_image
Hand inserting a card into a computer keyboard (no visible text or symbols)
natural_image
Close-up of a mechanical tool tip interacting with a surface (no visible text or symbols)
natural_image
Close-up of a hand holding a small black object against a dark background (no visible text or symbols)
natural_image
Person inserting a device into a machine (no visible text or symbols)
natural_image
Close-up of a hand pressing down on a small electronic device (no visible text or symbols)
natural_image
Close-up of a hand pressing down on a white surface with a small hole, no visible text or symbols
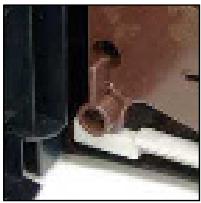
natural_image
Close-up of a small object near a wall, possibly a device or fixture, with no visible text or symbols.
natural_image
Hand holding a small object with blue arrows pointing to it, next to a dark surface (no visible text or symbols)
- Scoateți unitatea.
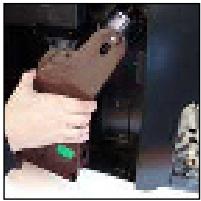
natural_image
Hand holding a brown electronic device with a green indicator light, next to a dark mechanical component (no visible text or symbols)
natural_image
Person standing on a snowy slope with a ladder (no visible text or symbols)
natural_image
Exterior view of a mechanical component (no visible text or symbols)
natural_image
Close-up of a hand holding a brown device with a green button, next to a dark mechanical component (no visible text or symbols)
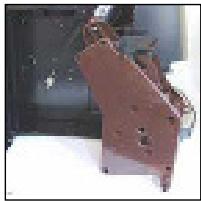
natural_image
Close-up of a metallic mechanical component with no visible text or symbols
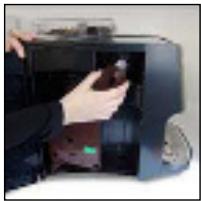
natural_image
Person holding a device with a green indicator light, no visible text or symbols
natural_image
Interior view of a room with dark furniture and a person sitting near a wall (no visible text or symbols)

natural_image
Close-up of a mechanical component with a red-handled handle and white base (no visible text or symbols)
natural_image
Hand holding a small object in a kitchen appliance (no visible text or symbols)
natural_image
Close-up of a hand inserting a card into a computer monitor (no visible text or symbols)
natural_image
Close-up of a hand inserting a device into a black device (no visible text or symbols)
natural_image
Close-up of a hand holding a small object against a dark background (no visible text or symbols)
natural_image
Close-up of a circular object with dark markings on a beige background (no visible text or symbols)
natural_image
Close-up of a wooden panel with holes and mounting holes (no visible text or symbols)
natural_image
Interior ceiling view showing a circular vent with blue arrows indicating airflow or movement (no text or symbols visible)
INTRAREA ÎN MODUL PROGRAMARE