
Taste Slim ProCap CE4523 - Coffee machine SOLAC - Free user manual and instructions
Find the device manual for free Taste Slim ProCap CE4523 SOLAC in PDF.
| Brand | Solac |
| Model | Taste Slim ProCap CE4523 |
| Product type | Espresso coffee machine with pump |
| Power supply | 220-240 V ~ 50/60 Hz |
| Power | 1200 W (estimated) |
| Maximum pressure | 15 bar (estimated) |
| Water tank capacity | 1 L (estimated) |
| Usable coffee types | Ground (single/double filter) and ProCap capsules |
| Main functions | Single coffee, double coffee, hot water, steam/milk foam, capsule coffee |
| Programmable settings | Coffee amount (20-75 s), temperature (70-80°C), water hardness |
| Automatic shut-off | Yes, after 30 minutes of inactivity |
| Cup warming surface | Yes (A) |
| Pressure gauge | Yes (P) |
| Heating system | Thermoblock |
| Descaling indicator | Yes (three lights on) |
| Dishwasher-safe parts | Water tank, drip tray, coffee filters |
| Thermal protection | Yes, with safety shut-off in case of overheating |
| Included spare parts | Filter holder, filters (single, double, capsule), measuring spoon with tamper |
| Repairability | Contact an authorized technical service; do not disassemble yourself |
| Warranty | Compliant with European standards (directives 2014/35/EU, 2014/30/EU, 2011/65/EU, 2009/125/EC) |
Frequently Asked Questions - Taste Slim ProCap CE4523 SOLAC
User questions about Taste Slim ProCap CE4523 SOLAC
0 question about this device. Answer the ones you know or ask your own.
Ask a new question about this device
Download the instructions for your Coffee machine in PDF format for free! Find your manual Taste Slim ProCap CE4523 - SOLAC and take your electronic device back in hand. On this page are published all the documents necessary for the use of your device. Taste Slim ProCap CE4523 by SOLAC.
USER MANUAL Taste Slim ProCap CE4523 SOLAC
natural_image
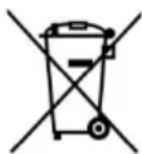
Exterior view of a modern stainless steel coffee machine (no signage or text visible on the device body)CAFETERA ESPRESSO
INSTRUCCIONES DE USO
CAFETERA ESPRESSO
INSTRUCCIONS D'ÚS
ESPRESSO COFFEE MAKER
INSTRUCTIONS FOR USE
CAFETIÈRE EXPRESSO
MODE D'EMPLOI
ESPRESSO-KAFFEEMASCHINE
GEBRAUCHSANWEISUNG
MÁQUINA DE CAFÉ EXPRESSO
INSTRUÇÕES DE USO
MACCHINA PER CAFFÈ ESPRESSO
ISTRUZIONI PER L'USO
ESPRESSO-KOFFIEMACHINE
GEBRUIKSAANWIJZING
ESPRESSO KÁVOVAR
NÁVOD K POUŽITÍ
EXPRESS FO KAWY
INSTRUKCJA UŻYCIA
Καφετιέρα εσπρέσο
ΟΔΗΓΙΕΣ ΧΡΗΣΗΣ
Машина за кафе еспресо
Thank you for deciding to purchase a Solac brand product.
Thanks to its technology, design and operation and the fact that it exceeds the strictest quality standards, a fully satisfactory use and long product life can be assured.
Read these instructions carefully before switching on the appliance and keep them for future reference. Failure to follow and observe these instructions may result in an accident. Failure to follow and observe these instructions may result in an accident.
USE AND CARE:
Do not use the appliance if its accessories are not properly fitted.
Do not switch the appliance on without water.
Do not use the appliance if the ON/OFF switch does not work.
Do not move the appliance while in use.
Respect the MAX and MIN levels.
Disconnect the appliance from the mains when not in use and before undertaking any cleaning task.
Store this appliance out of reach of children and/or those with reduced physical, sensorial or mental abilities or who are unfamiliar with its use.
Do not put the appliance away if it is still hot.
Only use water with the appliance.
Never leave the appliance connected and unattended if not in use. This also saves energy and prolongs the life of the appliance.
Do not remove the filter holder when coffee is being made, as at that time it is under pressure.
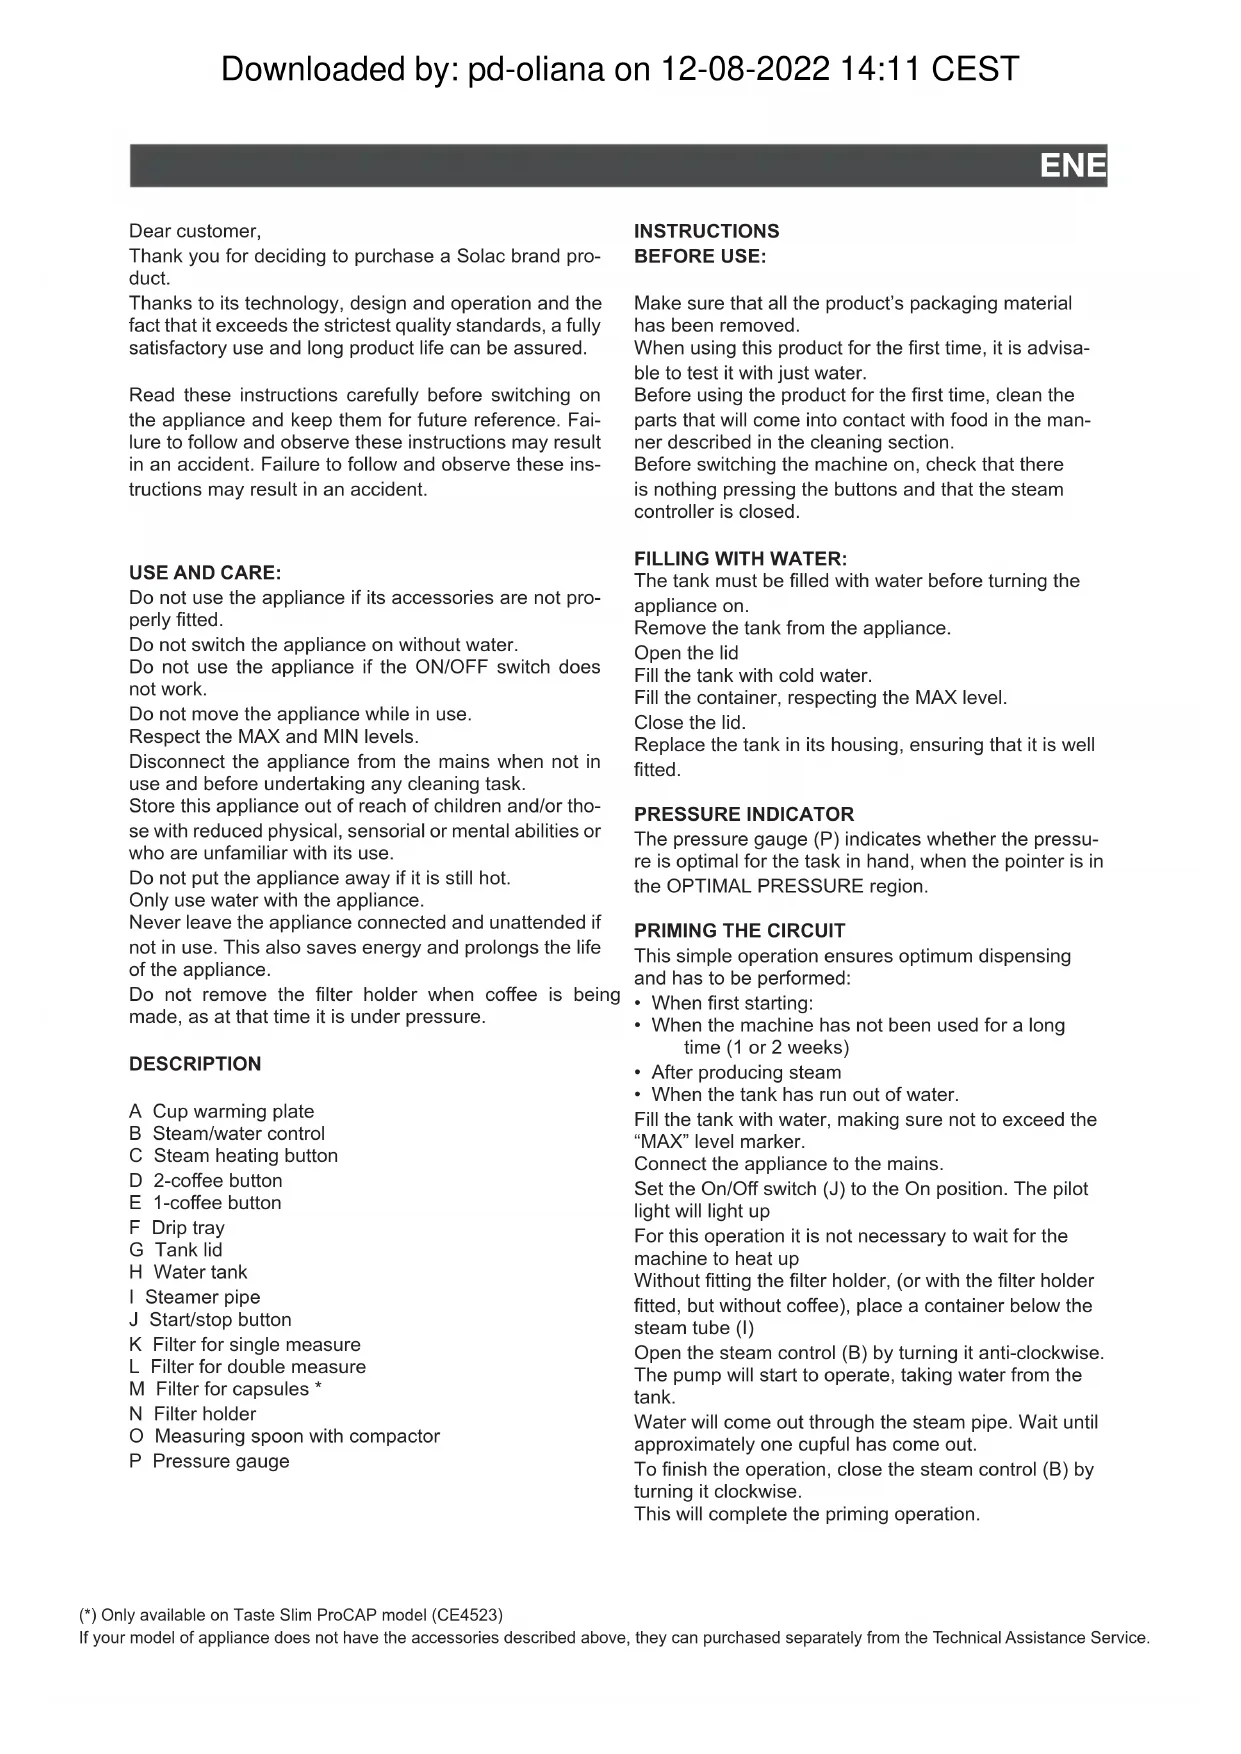
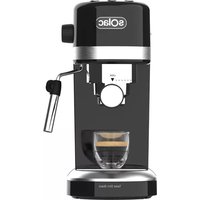
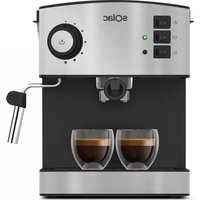
DESCRIPTION
A Cup warming plate
B Steam/water control
C Steam heating button
D 2-coffee button
E 1-coffee button
F Drip tray
G Tank lid
H Water tank
| Steamer pipe
J Start/stop button
K Filter for single measure
L Filter for double measure
M Filter for capsules *
N Filter holder
O Measuring spoon with compactor
P Pressure gauge
INSTRUCTIONS
BEFORE USE:
Make sure that all the product's packaging material has been removed.
When using this product for the first time, it is advisable to test it with just water.
Before using the product for the first time, clean the parts that will come into contact with food in the manner described in the cleaning section.
Before switching the machine on, check that there is nothing pressing the buttons and that the steam controller is closed.
FILLING WITH WATER:
The tank must be filled with water before turning the appliance on.
Remove the tank from the appliance.
Open the lid
Fill the tank with cold water.
Fill the container, respecting the MAX level.
Close the lid.
Replace the tank in its housing, ensuring that it is well fitted.
PRESSURE INDICATOR
The pressure gauge (P) indicates whether the pressure is optimal for the task in hand, when the pointer is in the OPTIMAL PRESSURE region.
PRIMING THE CIRCUIT
This simple operation ensures optimum dispensing and has to be performed:
- When first starting:
- When the machine has not been used for a long time (1 or 2 weeks)
• After producing steam - When the tank has run out of water.
Fill the tank with water, making sure not to exceed the "MAX" level marker.
Connect the appliance to the mains.
Set the On/Off switch (J) to the On position. The pilot light will light up
For this operation it is not necessary to wait for the machine to heat up
Without fitting the filter holder, (or with the filter holder fitted, but without coffee), place a container below the steam tube (I)
Open the steam control (B) by turning it anti-clockwise.
The pump will start to operate, taking water from the tank.
Water will come out through the steam pipe. Wait until approximately one cupful has come out.
To finish the operation, close the steam control (B) by turning it clockwise.
This will complete the priming operation.
USE:
Connect the appliance to the mains.
Use the On/Off switch to switch the appliance on.
The indicator lights on the buttons will flash, indicating that preheating is taking place.
When the preheating operation has finished, the lights will remain lit. The buttons will not work during the preheating operation.
The machine is now ready to make your coffee.
STANDBY MODE
Once the machine is switched on, it automatically goes into Standby mode, awaiting a command.
In Standby mode the 1-coffee and 2-coffee lights stay lit, and the thermoblock technology maintains the temperature.
BREWING COFFEE
One coffee
Remove the filter holder, if it is already fitted.
To enjoy the full aroma of the coffee, we recommend emptying and cleaning the filter with a fine cleaning brush after each use.
Fill the coffee filter with 7-8 g of ground coffee, and press it down using the compactor on the measuring spoon.
Place the filter in the filter holder and fit the filter holder in the machine, turning it anticlockwise to its locking position.
NOTE: We recommend natural roast coffee. Torrefacto coffee may affect the operation of the machine.
Press the 1-coffee button. The machine will start PRE-BREWING by pouring a little water over the coffee to moisten it. It will then brew the coffee and stop automatically, with three beeps to signal the end of the function.
Once the function has finished, proceed to clean the filter.
Two coffees
Repeat all the previous steps, substituting the 1-coffee filter for the 2-coffee one and filling it with approximately 15-16 g of coffee.
Press the 2-coffee button and the machine will operate until brewing is completed.
Coffee capsule (Only on the Taste Slim ProCap model) Open the capsule accessory lid by turning it anti-clockwise.
Place the capsule face up inside the space and close the lid.
Put the accessory into the filter holder, positioning the lid at the bottom of it.
Proceed to brew the coffee as normal.
To extract the capsule, remove the filter holder and allow it to cool.
Take off the lid and recycle the capsule as recommended by the capsule manufacturer.
Hot water
In Standby mode, open the steam/hot water control. The pump will start to work and hot water will come out through the steamer pipe.
Once finished, close the pipe using the steam control. Steam / Frothing Milk
In Standby mode, press the steam button. This will start to flash, indicating that the thermoblock is heating to a temperature of 130 °C to produce dry steam.
Insert the steamer pipe into the container holding the milk or liquid to be heated.
Open the steam/hot water control. The pump will emit small pulse sounds, generating steam.
Once the milk or liquid is hot, close the steam control and wipe the pipe clean with a cloth.
When the function has finished, press the coffee button to lower the temperature and switch back to Standby mode.
COFFEE QUANTITY PROGRAMMING
With this coffee it is possible to set the amount of coffee that each button brews. To do this, make a coffee by following the instructions above, changing only one step:
When pressing the button to brew the coffee, keep it pressed down until you reach the desired quantity and then release it.
The machine saves this setting for subsequent brews.
The time can be set from 20 to 75 seconds. (25 ml – 160 ml)
PROGRAMMING THE COFFEE MAKER
Programming menu
First, make sure that the coffee maker is in Standby mode.
Next, press and hold the steam heating button for 5 seconds.
The lights on the buttons will flash consecutively. The programming menu has now been accessed.
NOTE: If the machine remains inactive for 15 seconds, it automatically switches back to standby mode.
Programming the temperature
Access the programming menu.
Press the 1-coffee button to enter the temperature setting. Once pressed, the machine uses the lights to show which level it was at:
| 1-coffee 2-coffees Steam Level | |||
| X Low | temperature(70 ±5* °C) | ||
| X X Medium | temperature(75 ±5* °C) | ||
| X X X High | temperature(80 ±5* °C) | ||
* Temperature may vary depending on external conditions.
EN
The lights will now flash sequentially. Press the temperature level you require:
1-Coffee - Low temperature
2-Coffees - Medium temperature
Steam - High temperature
Once the button is pressed, the 1-coffee button light will flash quickly to confirm that the temperature has been selected. The coffee maker will beep twice.
Programming water hardness
Access the programming menu.
Press the 2-coffee button to enter the water hardness setting. The lights will show which level it is at:
| 1-coffee 2-coffees Steam | Level | ||
| X Low water | hardness | ||
| X X Average | water hardness | ||
| X X X High water | hardness | ||
Once the level is shown, the lights will flash sequentially.
Select the water hardness for your area based on the following table:
| Measurement Low hardness | Average hardness | High hardness |
| German degrees | <10° 10° - 20° >20° | |
| French degrees | <18° 18° - 36° >36° | |
| mg CaCO3/L <180 180 - 360 | >360 |
Once selected, the coffee maker switches back to Standby mode.
FACTORY SETTINGS RESET
Place a container under the steam pipe.
Access the programming menu.
Open the steam control fully.
Press the 1-coffee button. The buttons will all flash at the same time, indicating that all values have been reset to the factory default settings.
The 1-coffee and 2-coffee buttons will flash to tell you to close the steam control.
ONCE YOU HAVE FINISHED USING
THE APPLIANCE:
Turn the appliance off, using the on/off switch.
Unplug the appliance from the mains.
Clean the appliance
SAFETY THERMAL PROTECTOR
The appliance has a safety device, which protects the appliance from overheating.
When the appliance switches itself on and off repeatedly, for reasons other than the thermostat control, check to ensure that there are no obstacles that impede correct air entry or expulsion.
If the appliance turns itself off and does not switch itself on again, unplug it from the mains supply and wait approximately 15 minutes before reconnecting it. If it fails to switch on again, take it to one of the authorised technical assistance services.
AUTO-OFF FUNCTION
SOLAC machines are designed to save energy.
Consequently, the appliance switches off automatically 30 minutes after the last operation.
To return to normal operation, simply press any button.
CLEANING
BETWEEN COFFEES
To enjoy the best coffee, we recommend always keeping the coffee maker clean.
Empty the coffee out of the filter by giving it a sharp tap or with the help of a spoon or utensil.
Clean the filter with warm water or with a fine cleaning brush to remove any coffee remains. Use a damp cloth to wipe the shower (the filter holder support) to remove any coffee remains.
CAUTION: Make sure not to touch any of the parts involved in the brewing (Filter, Shower) immediately after making a coffee.
BASIC CLEANING
Unplug the appliance from the mains and let it cool before performing any cleaning task.
Clean the equipment using a damp cloth with a few drops of washing-up liquid and then dry.
Do not use solvents or products with an acid or base pH, such as bleach or abrasive products, to clean the appliance.
Do not let water or any other liquid get in through the air vents to avoid damaging the appliance's internal components.
The following parts are dishwasher safe:
- Water tank
- Drip tray
- Coffee filters
Next, dry all the parts before refitting them and storing the appliance.
STEAMER PIPE CLEANING
ATTENTION! All of the steamer components can become very hot.
It is advisable to clean the steamer pipe after generating steam and before switching off the machine to prevent a build-up of dirt.
To do this, take the sleeve off the steamer pipe. Place a glass containing with a little water, under the pipe and submerge the pipe in the water.
Follow the instructions in the "Hot Water" section to make hot water come out through the pipe.
Use a cloth to dry the pipe and put the sleeve back on. If no steam comes out, dry milk may be blocking the outlet. In which case, carefully use a needle to unclog the tip of the steamer pipe.
Once clean, rinse under running tap water and reassemble it. Generate some more steam.
HOW TO DEAL WITH LIME SCALE INCRUSTATIONS:
For the appliance to work correctly it should be kept free of limescale or magnesium deposits caused by using hard water.
To prevent this kind of problem, we recommend the use of water with low lime or magnesium mineralisation.
The coffee maker tells you when descaling is needed by beeping and the three lights switch on without flashing.
When this happens, fill the tank with 1L of water and add a descaling agent (citric acid, descaler...)
Access the programming menu as described earlier in the manual.
Place a large container (enough to hold 1L water) under the steamer pipe.
Open the steam control to the MAX position.
Press the steam heating button again and the machine will begin the descaling process. This process takes about 5 minutes.
A specific anti-lime scale product should be used on this kind of product.
NOTE: Should you also want to clean the entire coffee system, you can alternate the flow of water by using the steam control.
NOTE: Home-made solutions, such as the use of vinegar, are not recommended for de-scaling this appliance. Once the operation has finished, refill the tank with clean water and go through the process again, but without descaling agent, to eliminate any remains left inside the machine.
Once finished, clean the water tank and the machine is now ready for use.
FAULTS AND REPAIR
Take the appliance to an authorised technical support service if problems arise. Do not try to dismantle or repair it, as this may be dangerous. Lit button warnings
| Operation LED indicators | |
| On/Off | The machine is preparing itself. |
| Start of the coffee brewing function | Flashing: Pre-heating.Steady: Ready to make coffee. |
| Start of the steam function | Flashing: Pre-heating.Steady: Ready for steam |
| Open steam control | Flashing: Reminder to close the steam control |
| Thermoblock too hot. | Steady: It needs to cool down. |
| Descale warning. | The 3 lights light up.Proceed with descaling. |
| NTC fault. | The 3 lights flash simultaneously. |
FOR EU PRODUCT VERSIONS AND/OR IN THE CASE THAT IT IS REQUESTED IN YOUR COUNTRY:
ECOLOGY AND RECYCLABILITY OF THE PRODUCT
The packaging materials for this appliance are included in a collection, classification and recycling system. Should you wish to dispose of them, use the appropriate public containers for each type of material.
The product does not contain concentrations of substances that could be considered harmful to the environment

- This symbol means that if you wish to dispose of the product once its useful life has ended, it must be deposited with an authorised waste management agent for the selective collection of Waste Electrical and Electronic Equipment (WEEE)
This appliance complies with Directive 2014/35/EU on Low Voltage, with Directive 2014/30/EU on Electromagnetic Compatibility, with Directive 2011/65/EU on restrictions on the use of certain dangerous substances in electrical and electronic appliances and with Directive 2009/125/EC on the ecological design requirements applicable to products related to energy.
PORTUGUÉS
PT
Caro cliente:
O Maatlepel mer stamper
P Manometer
GEBRUIKSAANWIJZING
OPMERKINGEN VOORAFGAAND AAN HET GE-BRUIK:
PROGRAMAREA ESPRESSORULUI
NIEPRAWIDŁOWOŚCI I NAPRAWA

- USE AND CARE:
- DESCRIPTION
- INSTRUCTIONS
- BEFORE USE:
- FILLING WITH WATER:
- PRESSURE INDICATOR
- PRIMING THE CIRCUIT
- USE:
- STANDBY MODE
- BREWING COFFEE
- One coffee
- Two coffees
- Hot water
- COFFEE QUANTITY PROGRAMMING
- PROGRAMMING THE COFFEE MAKER
- Programming menu
- Programming the temperature
- EN
- Programming water hardness
- FACTORY SETTINGS RESET
- ONCE YOU HAVE FINISHED USING
- THE APPLIANCE:
- SAFETY THERMAL PROTECTOR
- AUTO-OFF FUNCTION
- CLEANING
- BETWEEN COFFEES
- BASIC CLEANING
- STEAMER PIPE CLEANING
- HOW TO DEAL WITH LIME SCALE INCRUSTATIONS:
- FAULTS AND REPAIR
- FOR EU PRODUCT VERSIONS AND/OR IN THE CASE THAT IT IS REQUESTED IN YOUR COUNTRY:
- ECOLOGY AND RECYCLABILITY OF THE PRODUCT
- PORTUGUÉS
- PT
- GEBRUIKSAANWIJZING
- OPMERKINGEN VOORAFGAAND AAN HET GE-BRUIK:
- PROGRAMAREA ESPRESSORULUI
- NIEPRAWIDŁOWOŚCI I NAPRAWA
Brand : SOLAC
Model : Taste Slim ProCap CE4523
Category : Coffee machine