
Squissita Easy CE4503 - Coffee machine SOLAC - Free user manual and instructions
Find the device manual for free Squissita Easy CE4503 SOLAC in PDF.
| Product type | Espresso coffee machine with milk frother |
| Brand | Solac |
| Model | Squissita Easy CE4503 |
| Main functions | Espresso, steam for cappuccino, hot water |
| Water tank capacity | Removable tank with MIN and MAX marks (approx. 1.2 L) |
| Power | Approx. 1100 W |
| Pressure | 15 bars (estimated) |
| Safety | Automatic shut-off after inactivity, overheating protection |
| Included accessories | Portafilter, measuring spoon, 1-cup/POD filter, 2-cup filter, steam wand |
| Maintenance and cleaning | Regular cleaning of the steam wand; descaling every 6 to 12 weeks depending on water hardness |
| Weight | Approx. 4.5 kg (estimated) |
| Dimensions (L × D × H) | Approx. 25 × 30 × 35 cm (estimated) |
| Housing material | ABS plastic |
| Country of origin | China |
| Warranty | 2 years |
Frequently Asked Questions - Squissita Easy CE4503 SOLAC
User questions about Squissita Easy CE4503 SOLAC
0 question about this device. Answer the ones you know or ask your own.
Ask a new question about this device
Download the instructions for your Coffee machine in PDF format for free! Find your manual Squissita Easy CE4503 - SOLAC and take your electronic device back in hand. On this page are published all the documents necessary for the use of your device. Squissita Easy CE4503 by SOLAC.
USER MANUAL Squissita Easy CE4503 SOLAC
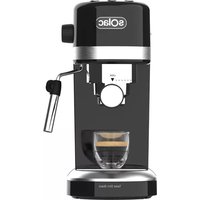
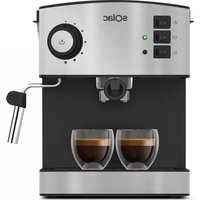
natural_image
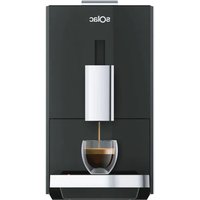
Exterior view of a modern coffee machine (no signage or text visible on the device body)CAFETERA
INSTRUCCIONES DE USO
ESPRESSO MACHINE
INSTRUCTIONS FOR USE
CAFETIÈRE
MODE D'EMPLOI
KAFFEEMASCHINE
GEBRAUCHSANLEITUNG
MÁQUINA DE CAFÉ
INSTRUÇÕES DE USO
MACCHINA PER IL CAFFÈ
ISTRUZIONI PER L'USO
KOFFIEMACHINE
GEBRUIKSAANWIJZING
KÁVOVAR
NÁVOD K POUZITÍ
CAFETIERĂ
INSTRUKCJA OBSŁUGI
KÁVOVAR
NÁVOD NA POUŽITIE
KÁVÉFŐZŐ GÉP
HASZNÁLATI UTASÍTÁS
КАФЕ-МАШИНА
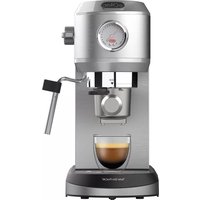
natural_image
Technical line drawing of a mechanical device with a central knob and directional arrow (no text or symbols)Fig.2 Fig.3
natural_image
Simple line drawing of a dental tool with a cross mark above it (no text or symbols)
CAFETERA
CE4502 - CE4503 - CE4504
CE4505 - CE4506
- Fully unroll the appliance's power cable before each use.
- Do not use the appliance if its accessories are not properly fitted.
- Do not switch the appliance on without water.
- Do not use the appliance if the on/off switch does not work.
- Do not move the appliance while in use.
- Respect the MAX and MIN levels.
- Disconnect the appliance from the mains when not in use and before undertaking any cleaning task.
- Unplug the appliance from the mains before refilling the water tank.
- Store this appliance out of reach of children and/or persons with physical, sensory or reduced mental or lack of experience and knowledge.
- Do not store the appliance if it is still hot.
- Only use water with the appliance.
- The use of bottled mineral water adapted for human consumption is recommended.
- Never leave the appliance connected and unattended if is not in use. This saves energy and prolongs the life of the appliance.
- Do not remove the filter-holder when coffee is being made, as at that time it is under pressure.
DESCRIPTION
A Water Tank Level
B Water tank
C Hot plate for warming cups
D Pilot light: ON/OFF
E Pilot light: Temperature
F ON/OFF Switch (Back of the machine)
G0 Central position (Stop)
G1 Coffee/Water Position
G2Heating for Steam position
H Function Selector knob
I Steamer/Hot water pipe
J Filter holder
K Measuring spoon
L Filter for single measure (or POD)
M Ground coffee filter (2 cups)
N Supply cable
O Drip tray
P Silicone tubes
R Steam/Water Knob
INSTRUCTIONS FOR USE BEFORE USE:
- Make sure that all the product's packaging has been removed.
- Remove the protection of the suction tubes from the tank, at the rear of the machine. All machines have been tested with water, that protection is to prevent dripping during transport.
- Before using this product for the first time, it is advisable to test it only with water.
- Before using the product for the first time, clean the parts that will come into contact with food in the manner described in the cleaning section.
- Before connecting the machine, check that Steam/Water Knob (R) is closed.
PRIMING THE CIRCUIT
This simple operation ensures optimum dispensing and must be carried out:
- When first starting.
- When the machine remains a long period without being used (1 or 2 weeks).
- After obtaining steam.
- When the tank has run out of water.
- Fill the receptacle taking care to observe the MAX level.
- Connect the appliance to the mains.
- Push the ON/OFF switch (F) on the back of the machine.
- The (D) pilot light will light, indicating that machine is connected.
- You do not must wait for the machine to heat up for this operation.
- Without fitting the filter holder (J) (or with the filter holder fitted, but without coffee), place a recipient under the steamer tube (I) outlet.
- Open the Steam knob (R) turning anticlockwise.
- Turn the selector knob (H) to the coffee/water position (G1).
- Water will exit through the steam outlet. Wait until approximately one cupful has exited.
- To finish serving, return the function selector (H) to the center position (G0) and close steam knob (R) turning clockwise.
- This will complete the priming operation.
FILLING WITH WATER:
- The tank must be filled with water before turning the appliance on.
- Remove the water tank.
- Fill the tank taking care to observe the MAX level.
- Replace the tank in its housing, ensuring that it is well fitted and silicone tubes well introduced on water tank.
FILLING COFFEE:
- Remove the filter holder (J).
- Position the selected ground coffee filter (L or M) in the filter holder.
- Filter L (smaller one) can be used either for ground coffee or paper pods.
- We recommend using natural toast coffee, as using some roasted coffee may affect the operation of the machine.
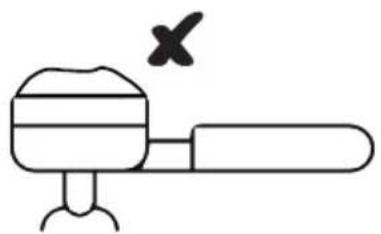
- Fill the chosen removable filter (1 or 2 cups) with ground coffee (6-7 gr. per cup to be prepared).
- Using measuring spoon (I) for 1 coffee, put 1 spoonful.
- For POD (single dose of paper), use the same 1-coffee filter, placing the well-placed mode in the filter.
- For 2 coffees, use 2 cups filter and put in 2 spoonful.
- Next lightly press down the ground coffee with the back of the spoon.
- Before fitting the filter holder in the coffee-maker assembly, turn the ladle-holder backwards.
- Fit the filter holder in the appliance once more.
- Position the filter holder in the coffee assem-
bly by inserting the assembly downwards and turning it anticlockwise, from left to right, until it locks.
USE TIPS:
- 1. The filter holder must be well placed. The correct position is with the handle slightly past the center (Fig1). See the position of the coffee outlet at the bottom to get an idea of the correct position: You will notice that the coffee output is not perpendicular to the handle (to get an idea of the position)
- 2. The filter holder must be closed with the machine hot. If the machine is cold, it could happen that the closure is not correct and there is a small loss above the filter holder.
- 3. Use the appropriate amount of coffee (Fig 2), to be able to properly close the filter holder
- 4. Use medium-fine coffee grinding size (Fig 3). Excessively fine can make it difficult for coffee to escape.
USE
- Before connecting the machine, check that the steam control (R) is closed.
- Plug the appliance into the mains.
- Start the device by pressing the ON / OFF button F, on the back of the machine.
- The D light will illuminate, indicating that the machine is ON and heating.
- Wait until the E indicator will light, indicating that the correct temperature has been reached.
- Fill the filter-holder with coffee.
- Place one or two preheated cups at the outlet of the filter holder.
- Turn the selector knob (H) to the coffee/water position (G1)
- The unit will start with the brewing.
- When you have obtained the desired amount of espresso coffee (short or long), return the function selector to the center position (G0).
- Finishing the supply wait a few seconds, remove the cups with the coffee.
- Remove the filter holder and empty it of the grounds.
- Wash the filter holder with running water and dry thoroughly.
- Check that the removable filter is perfectly placed in the filter holder.
- Reattach the filter holder to the appliance.
OBTAINING HOT WATER
- Put the device on, operating the ON/OFF switch (F), on the back of the machine.
- The pilot light (D) will light up indicating that the machine is ON and water is heating up.
- Wait until the (E) indicator light illuminates. Situation that indicates that the water has reached the right temperature.
- Place a container under the vaporizer.
- Open the steam regulator (R), turning it counter-clockwise to the left.
- Turn the selector knob (H) to the coffee / water position (G1), which operates the pump.
- The hot water will start to come out through the steamer pipe.
- Once the desired amount of hot water has been obtained, return the Function selector (H) to the central position (G0), which will stop the pump.
- Close the knob (R) by turning it clockwise in a clockwise direction.
OBTAINING STEAM:
- The steam is used to froth milk for cappuccino, and can also heat other liquids.
- Start the appliance, by operating the on / off switch (F) on back of the machine.
- Wait until the coffee E light comes on, indicating that the appliance has reached the correct temperature for coffee.
- For steam, turn the function selector knob (H) to the steam position (G2) and it will continue heating until reaching steam temperature.
- While heating, the pilot will flash faster than while heating for coffee.
--The pilot (E) will turn off until the appropriate temperature for steam is reached.
- When it reaches steam temperature, (E) will illuminate again
- Place a container under the steam pipe.
- Open steam control (R) by turning counterclockwise.
- Only steam will start to come out.
- When you have enough, turn the function selector knob (H) to the central position (G0) and close the knob (R) and remove the container.
IMPORTANT
- When you finish doing steam, you must replace the water used to make steam and at the same time, recover the temperature (lower) to make coffee.
- To do this, with the steam knob open, turn the selector knob (H) to the coffee / water position (G1), which will activate the pump.
- Put a container under the tube
- When water starts to flow through the steam pipe, it means that it has recovered the coffee temperature and the boiler has been filled. You can close Steam knob and to return the function selector knob to central position (G0).
- Auto-off feature:
The SOLAC machines are designed to save energy.
To that end, after some minutes, if during this period the user has not performed any action on it, the unit switches to energy saving mode.
To return to normal operation you should just switch on the button (F) in the back of the machine.
ONCE YOU HAVE FINISHED USING THE APPLIANCE:
- Turn the appliance off, pushing the on/off switch (F).
- Unplug the appliance to the mains.
- Remove the water from the water tank.
- Clean the appliance.
CLEANING
BASIC CLEANING
- Disconnect the appliance from the mains and let it cool before undertaking any cleaning task.
- Clean the equipment with a damp cloth with a few drops of washing-up liquid and then dry.
- Do not use solvents, or products with an acid or base pH such as bleach, or abrasive products, for cleaning the appliance.
- Do not let water or any other liquid get into the air vents to avoid damage to the inner parts of the appliance.
- Neither parts of this appliance are suitable for cleaning in the dishwasher.
- After washing, dry all the parts before fitting them together and storing.
CLEANING THE FROTHING WAND
- CAUTION! The frothing wand, and frothing sleeve may be VERY HOT.
- -It is recommended to purge and wipe the frothing wand after steaming milk to prevent deposits of dirt and before turning off the machine.
- To do this, pull the frothing sleeve down and clean under warm running water.
- Fill a cup with a bit of water, immerse the frothing wand into the water.
- Drain hot water through the pipe, following the instructions "Obtaining hot water".
- Use a cloth to dry the frothing wand and replace the frothing sleeve.
- In case no steam comes out of the frothing wand, hardened milk blocks its path. Carefully use a needle to loosen the milk residue from the opening of the frothing tip to remove any blockage,
- -Once clean, rinse with running water from the tap and reassemble it. Then steam again.
HOW TO DEAL WITH LIME SCALE INCRUSTATIONS:
- For the appliance to work correctly it should be kept free of lime scale or magnesium incrustations caused by the use of hard water.
- To prevent this kind of problem, we recommend the use of water with low lime or magnesium mineralisation.
- However, if it is not possible to use the kind of water recommended above, you should periodically remove the lime scale from the appliance:
- Every 6 weeks if the water is "very hard".
- Every 12 weeks if the water is "hard".
- To do so, we recommend the use of the specific product Decal for this kind of machine, which can be found in specialised shops and authorised technical services.
- Homemade solutions are not recommended in the de-scaling of this appliance, such as the use of vinegar.
CAFETIÈRE
CE4502 - CE4503 - CE4504
CE4505 - CE4506
UTILISATION ET PRÉCAUTIONS :
PRODUCTIE VAN WARM WATER
This product enjoys the recognition and protection of the legal guarantee in accordance with current legislation. To enforce your rights or interests you must go to any of our official technical assistance services.
You can find the closest one by accessing the following web link: http://solac.com
You can also request related information by contacting us by phone.
You can download this instruction manual and its updates at http://solac.com
DE) GARANTIE UND TECHNIS- CHER SERVICE
Unit 25 & 26, San Croy Office Park, Die Agora Road, Croydon, Kempton Park, 1619
Johannesburg
(+27) 011 392 5652
sOlac
what we do, we do well
Español / ES
English / EN
Français / FR
Deutsch / DE
Português / PT
Italiano / IT
Nederlands / NL
Česky / CS
Polski / PL
Slovenský / SK
Magyar / HU
българск / BG
Română / RO
العربيya / AR

- CAFETERA
- ESPRESSO MACHINE
- CAFETIÈRE
- KAFFEEMASCHINE
- MÁQUINA DE CAFÉ
- MACCHINA PER IL CAFFÈ
- KOFFIEMACHINE
- KÁVOVAR
- CAFETIERĂ
- KÁVÉFŐZŐ GÉP
- КАФЕ-МАШИНА
- CE4502 - CE4503 - CE4504
- CE4505 - CE4506
- DESCRIPTION
- INSTRUCTIONS FOR USE BEFORE USE:
- PRIMING THE CIRCUIT
- FILLING WITH WATER:
- FILLING COFFEE:
- USE TIPS:
- USE
- OBTAINING HOT WATER
- OBTAINING STEAM:
- IMPORTANT
- ONCE YOU HAVE FINISHED USING THE APPLIANCE:
- CLEANING
- BASIC CLEANING
- CLEANING THE FROTHING WAND
- HOW TO DEAL WITH LIME SCALE INCRUSTATIONS:
- UTILISATION ET PRÉCAUTIONS :
- PRODUCTIE VAN WARM WATER
- DE) GARANTIE UND TECHNIS- CHER SERVICE
- sOlac
Brand : SOLAC
Model : Squissita Easy CE4503
Category : Coffee machine