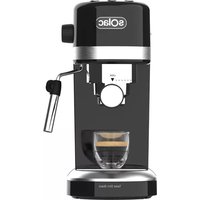
CA4820 - Coffee machine SOLAC - Free user manual and instructions
Find the device manual for free CA4820 SOLAC in PDF.

| Product type | Automatic coffee machine with grinder |
| Brand | Solac |
| Model | CA4820 |
| Water tank capacity | 1.2 L |
| Bean hopper capacity | 170 g |
| Coffee types | Espresso, Long espresso, Americano |
| Hot water | Yes, with volume adjustment (10-150 ml) |
| Grind adjustment | 5 levels (from fine to coarse) |
| Coffee strength | 3 levels (light, moderate, strong) |
| Extraction temperature | 86 °C to 95 °C (adjustable) |
| Programmable coffee volume | Espresso: 25-60 ml; Lungo: 40-120 ml; Americano: 60-125 ml |
| Automatic shut-off | Yes, programmable from 0 to 12 hours |
| Display | Screen with status and maintenance indicators |
| Power | 1350 W (estimated) |
| Voltage | 220-240 V / 50-60 Hz |
| Maintenance | Descaling with programmable alert, cleaning of the brewing unit and grinder |
| Removable parts | Brewing unit, coffee grounds container, drip tray, water tank |
| Coffee counter | Yes, displays total number of coffees prepared |
| Weight | Approximately 8 kg (estimated) |
| Dimensions (W × D × H) | Approximately 28 × 35 × 40 cm (estimated) |
Frequently Asked Questions - CA4820 SOLAC
User questions about CA4820 SOLAC
0 question about this device. Answer the ones you know or ask your own.
Ask a new question about this device
Download the instructions for your Coffee machine in PDF format for free! Find your manual CA4820 - SOLAC and take your electronic device back in hand. On this page are published all the documents necessary for the use of your device. CA4820 by SOLAC.
USER MANUAL CA4820 SOLAC
natural_image
Exterior view of a black SOlac water heater device (no signage or text visible on body)EN. Instructions for use
FR. Mode d'emploi
ES
natural_image
Close-up of a black mechanical component with an upward arrow, no visible text or symbolsLIMIPEZA DEL GRUPO CAFÉ
natural_image
Close-up of a circular industrial control dial with numeric and directional arrows, no readable text or symbols beyond the dial number.natural_image
Close-up of a circular industrial control dial with numeric labels and directional arrows (no readable text or symbols beyond numbers)Pantalla 2:

(Original instructions)
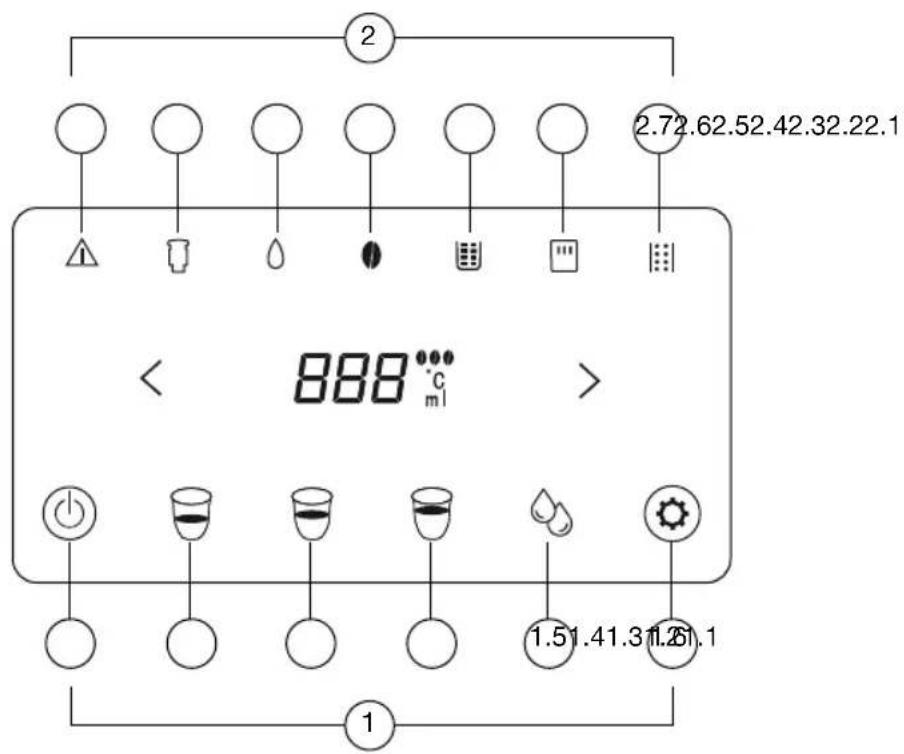
Description
A - Water tank
B - Coffee bean container lid
C - Coffee bean container
D - Grind adjustment wheel
E - Control panel
F - Coffee outlet
G - Side door
H - Coffee group
I - Waste box
J - Drip Tray Cover
K - Drip tray
L - On/off switch
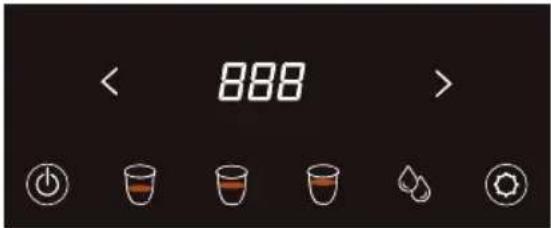
CONTROL PANEL
1 - Buttons
1.1 - On/off
1.2 - Espresso coffee
1.3 - Long espresso coffee
1.4 - American coffee
1.5 - Hot water
1.6 - Settings
2 - Indicators
2.1 - Warning
2.2 - Brewer is not installed or is incorrectly installed
2.3 - Lack of water / Tank incorrectly placed
2.4 - Lack of coffee beans
2.5 - Waste tank full / not placed / incorrectly placed
2.6 - Side door open
2.7 - Descaling is necessary
If your device model does not have the accessories described above, these can also be purchased separately from Technical Assistance Services.
USE AND CARE
Do not use the appliance if its accessories are not properly positioned. Do not use the appliance if the on/off switch does not work. Do not move the appliance while it is in use.
Do not use the appliance if it is tilted upwards and do not turn it over.
Do not turn the appliance over while it is in use or connected to the electrical network.
The use and storage environment of the product should be above 10^ C and below 40^ C.
Leave a minimum distance of 8 cm between the back of the coffee maker and the wall or other furniture.
Respect the MAX and MIN levels of the water tank.
Disconnect the appliance from the mains when not in use and before undertaking any cleaning task.
Unplug the appliance from the mains before refilling the water tank.
Store this appliance out of the reach of children and/or people with reduced physical, sensory or mental disabilities or lack of experience and knowledge.
The use of bottled mineral water adapted for human consumption is recommended. Never leave the device connected and unattended if it is not in use. This saves energy and extends the life of the appliance.
Instructions for use
NOTES PRIOR TO USE
Please read the "Safety Tips and Warnings" leaflet carefully before using it for the first time.
Make sure all packaging has been removed from the product.
Check that all accessories are complete and that the unit is not damaged.
Check and understand all parts and their functions.
It is recommended to keep the original container for future use. And then follow the operations below continuation.
Before first use, remove the water tank and coffee group and rinse them with clean water.
Check and make sure that all removable parts are securely installed in place.
WATER TANK
Remove the water tank from the device. Fill the water tank with fresh water up to the Max mark and reassemble it on the appliance.
The tank has a maximum capacity of 1.2 liters.
COFFEE BEAN TANK
Open the tank cover.
Fill the coffee tank with the appropriate amount of coffee beans, 170g maximum. Close the tank lid.
CAUTION: Always use natural coffee to preserve the life of the grinding element.
GRIND ADJUSTMENT
The coffee maker is adjusted to the proper thickness level before leaving the factory, so you can make coffee without needing to adjust it. If after brewing a few cups of coffee, the coffee is too light and not rich enough, or the coffee flows too slowly (drop by drop), the problem can be solved by following these steps:
- Open the coffee bean container lid.
- Start preparing coffee.
-
Hearing the sound of the grinder operating, adjust the grind adjustment wheel to the appropriate level (gear 1 is the finest, gear 5 is the coarsest). The number of the grind adjustment wheel indicated by the arrow is the grind setting actually selected.
-
Observe the speed of the coffee, if the speed of coffee preparation is very slow or there is no coffee, adjust the wheel to
5; If you need a rich, heavy coffee, adjust the wheel to 1. - After brewing at least 2 cups of coffee, the effect of adjusted bean thickness will appear. If the adjustment still does not achieve the desired effect, turn the adjustment wheel again to another number.
CAUTION: We suggest adjusting only 1 number at a time to avoid damage.
CAUTION: Once you have filled the coffee grinder, it is important that if you wish to adjust the grind setting, you do so while the grinder is running.
COFFEE OUT
The adjustable height of the coffee spout ranges between 80 and 140 mm, with the base properly fitted.
INTERIOR DRIP TRAY AND WASTE COLLECTION CONTAINER
If the waste box or drip tray is not installed properly in place, the indicator (2.5) will light and the
machine will not be able to work.
It will also turn on if the waste tank is full.
DRIP TRAY
The drip tray must be installed well in its place so that the container containing the coffee or hot water can be placed on it.
NOTE: The drip tray collects water from the dispensing nozzle during each rinse and self-cleaning, as well as any coffee that may spill during brewing. It is recommended to clean and empty the drip tray every day.
COFFEE GROUP
Open the door and check if the coffee group is properly installed in its place.
Check if the arrow on the coffee group is aligned with the arrow on the upper support.
An audible click indicates that the coffee group assembly is correct.
The coffee group indicator (2.2) will turn on steadily if the coffee group is not in place or is incorrectly installed.
Close the door.
The door and the body are in the same horizontal plane.
USE
Connect the power cable to the device.
Connect the device to the electrical network.
Press the on/off switch (L) located on the back of the device.
Press the on/off button (1.1) on the control panel.
The control panel will appear as follows, indicating that the appliance is warming up for its function:
![[=] [○] [●] [●] [●] [●]](/content/2026/04/692963/images/81dd130392884402fc3e5b2a1a64a6c20f0ba4f7427347108672cd11f264eff4.jpg)
The device will automatically check if the water tank is short of water, if the coffee group is in place, if the side door is closed, etc. If there is a problem, the corresponding control panel icon will flash. The coffee maker will automatically pump water to clean the coffee maker.
Once cleaning is complete, the device will be ready to make coffee.
ATTENTION: If the coffee maker has not been used for a long time or it is the first time it is used, there may be a pumping process in which the sound of the pump is very loud or it may even be that the water cannot be pumped. This phenomenon is normal. If no water comes out, after turning on the machine, press the hot water button. If the hot water button is pressed and the machine still cannot pump water, you can try several times until the water comes out.
ONCE USE OF THE DEVICE IS FINISHED:
To turn off the device, press the on/off button for 3 seconds.
Before turning off, the device will automatically pump water to clean the coffee maker.
COFFEE PREPARATION
Espresso
Press the espresso button (1.2). The grinder starts working automatically. The grinding concentration is shown on the screen. The < or > button can be pressed to switch between 1, 2 and 3 concentration levels before grinding ends (it is recommended to use level 3 of the 3 default levels, where 1 represents light, 2 represents moderate and 3 represents coarse).

After grinding is completed, the coffee extraction process begins, during which you can press the < or > button to adjust the amount of coffee (25-60 ml). It is recommended to use the default 30 ml.

Long espresso coffee
Press the espresso button for a long time (1.3).
The grinder starts working automatically. The grinding concentration is shown on the screen. The < or > button can be pressed to switch between 1, 2 and 3 concentration levels before grinding ends (it is recommended to use level 3 of the 3 default levels, where 1 represents light, 2 represents moderate and 3 represents coarse).
American coffee
Press the espresso button long (1.4). The grinder starts working automatically. The grinding concentration is shown on the screen. The < or > button can be pressed to switch between 1, 2 and 3 concentration levels before grinding ends (it is recommended to use level 2 of the 3 default levels, where 1 represents light, 2 represents moderate and 3 represents coarse).

After grinding is completed, the coffee extraction process begins, during which you can press the < or > button to adjust the amount of coffee (60-125 ml). It is recommended to use the default 70 ml.

After grinding is completed, the coffee extraction process begins, during which you can press the < or > button to adjust the amount of coffee (40-120 ml). It is recommended to use the default 80 ml.

After the coffee, hot water will come out. In the process, you can press the < or > button to adjust the amount of hot water (0-100 ml). It is recommended to use the default 80 ml.


Hot water
Press the hot water button (1.5).
Hot water will come out automatically.
During this process, you can press the < or > button to adjust the amount of hot water (10-150 ml).
The device will stop automatically after reaching the displayed amount.
If you want to stop the water outlet sooner, press the button (1.5) again and the water pumping will stop.

CONFIGURE COFFEE PARAMETERS
Press and hold the adjustment button (1.6) for 3 seconds.
All buttons except the on/off button will flash, indicating that you have entered settings.
Select the type of coffee you want to configure by pressing the corresponding button (espresso, long espresso or Americano button).
The selected coffee button and the adjustment button will flash.
1. Coffee intensity:
Once the type of coffee is selected, the display indicators will also flash.
Press the < or > button to change the coffee strength (1, 2 or 3).
After selecting the coffee strength level, press the adjustment button (1.6) again to confirm. Next you will move on to setting the coffee extraction temperature.
2. Coffee temperature:
The digits on the screen will flash.
Press the < or > buttons to change the temperature (between 86°C, 89°C, 92°C and 95°C). It is recommended to use the default value 92°C.
After selecting the coffee temperature, press the setting button (1.6) again to confirm.
Next you will move on to setting the coffee volume.
3. Volume
The numbers on the screen will flash.
Press the < or > buttons to change the amount of coffee.
Press the setting button (1.6) again to confirm.
SET WAITING TIME
You can set how long you want the machine to stay in standby mode before turning off.
Press and hold the settings button (1.6) for 3 seconds.
All buttons except the on/off button will flash, indicating that you have entered settings.
Press the settings button (1.6) again for 3 seconds.
The on/off button and setting button will flash, indicating that you have entered the shutdown time setting.

Press the < or > button to select the time you want the machine to take to turn off.
| Shutdown time | Description |
| 0 | Standby mode permanently |
| 15 | 15 min in standby mode, before turning off |
| 20 | 20 min in standby mode, before turning off |
| 30 | 30 min in standby mode, before power off (default mode) |
| 40 | 40 min in standby mode, before turning off |
| 50 | 50 min in standby mode, before turning off |
| 60 | 60 min in standby mode, before turning off |
| 90 | 90 min in standby mode, before turning off |
| 120 | 2h in standby mode, before turning off |
| 180 | 3h in standby mode, before turning off |
| 240 | 4h in standby mode, before turning off |
| 300 | 5h in standby mode, before turning off |
| 360 | 6h in standby mode, before turning off |
| 420 | 7h in standby mode, before turning off |
| 480 | 8h in standby mode, before turning off |
| 540 | 9h in standby mode, before turning off |
| 600 | 10h in standby mode, before turning off |
| 660 | 11h in standby mode, before turning off |
| 720 | 12h in standby mode, before turning off |
CLEANING
Disconnect the appliance from the mains and allow it to cool before undertaking any cleaning tasks.
Clean the equipment with a cloth dampened with a few drops of detergent and dry it.
Do not use solvents or products with an acidic or basic pH, such as bleach, or abrasive products, to clean the appliance. Wipe the exterior surface of the product with a soft, damp cloth to remove stains, but avoid using abrasive cleaning utensils as they will scratch the product. Do not use cleaners with alcohol or solvents.
Drops of water may accumulate in the area on the drip plate or countertop during brewing. To control dripping, wipe the area with a clean, dry cloth after each use of the product.
The coffee group, water tank, drip tray, drip plate, inner drip tray, waste collection container and door cannot be placed in the dishwasher for cleaning.
The following parts of the coffee maker need regular maintenance:
Waste box
When the 2.5 indicator lights up, it means the waste box is full.
Take out the drip tray along with the waste box to clean the grounds.
Replace all the pieces.
Drip tray
When the drip tray buoy floats up, it means the drip tray is full.
Pour out the waste water and clean the drip tray.
Water tank
It is recommended to clean the water tank approximately once a month, with a damp cloth and a neutral cleaner.
Coffee dispenser
Clean periodically with a sponge or cloth. If the coffee flow outlet is blocked, use a toothpick.
Coffee bean deposit
Wipe with a dry cloth about once a month.
Inner ground coffee channel
It is recommended to clean it once a month or when it is clogged.
Clean it with the machine turned off and disconnected from the electrical network.
Open the side door.
Remove the coffee group (see section Cleaning the coffee group)
Use the cleaning brush to clean the channel.
Clean the visible ground coffee inside the machine.
Clean visible stains such as ground coffee.
natural_image
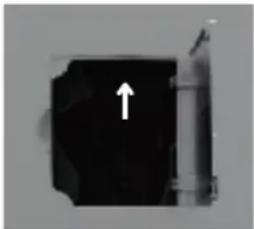
Close-up of a black mechanical component with a white arrow pointing upward, next to a cylindrical object (no visible text or symbols)CLEANING THE COFFEE GROUP
It is recommended to clean the coffee group every 2 weeks.
To clean, the device must be turned off and disconnected from the electrical network.
Open the side door.
Remove the coffee group by pressing the two orange buttons.
Clean the coffee group with water (do not put in the dishwasher or clean with detergent).
Clean visible ground coffee residue with a cleaning brush.
Place the coffee group back into the machine and press the PUSH sign until you hear a click, indicating that the coffee group has been reinstalled correctly.
DESCALING
When it is necessary to descale the appliance, indicator 2.7 will light up. At this time, you can delay the operation by pressing the (<) button for 3 seconds. If the indicator remains on the next time the appliance is used, proceed with descaling as follows:
- Add descaling powder to the water tank. Make sure the tank is full.
- Place a large glass under the coffee spout.
- Press the button (>) for 3 seconds to start the process. The 2.7 indicator will flash quickly and water will begin to come out of the spout.
- During the descaling process, it is necessary to always pay attention to the container that collects the wastewater to ensure that it does not overflow.
- Once the cup is full of water, press any coffee (1.2, 1.3, 1.4) or hot water (1.5) button to pause the operation.
- To resume the operation press the (>) button.
- When the water in the tank runs out, the device will stop pumping. At this time, take out the tank to clean it and fill it with clean water. Put it back.
- The appliance will stop automatically when descaling is finished.
HOW TO PROGRAM THE DESCALING NOTICE
Press and hold the adjustment button (1.6) for 3 seconds.
All buttons except the on/off button will flash, indicating that you have entered settings.
Press the adjustment button (1.6) again for 5 seconds. Indicator 2.7 will flash which means that you have entered the setting of how to program the descaling warning.

Select the level with the < or > buttons, taking into account that:
| Level | Water volume | Comments |
| 0 | / | Does not remind descaling |
| 1 | 80L | |
| 2 | 60L | |
| 3 | 40L | |
| 4 | 20L | Default |
| 5 | 10L |
Example: if level 2 is selected, the appliance will show the descaling reminder when the machine has used 60 liters of water.
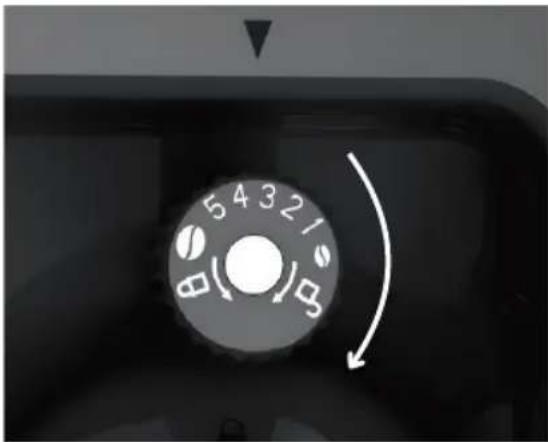
COFFEE GRINDER CLEANING
To clean the coffee grinder, make sure the container is empty.
Open the tank cover.
Turn the grinder lid:

Turn the grind adjustment wheel clockwise until the closed lock is aligned with the arrow. In this way the tooth can be removed.
natural_image
Close-up of a circular industrial control dial with numeric markings and directional arrows (no readable text or symbols)Remove the grinding wheel with the help of the bow and clean the grinder with a brush.
Put the wheel back in its place.
Turn the grind adjustment wheel counterclockwise until the coffee bean symbol is aligned with the arrow.
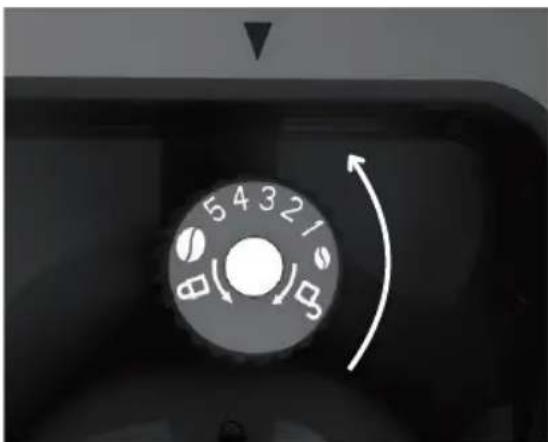
natural_image
Close-up of a mechanical control dial with numeric and directional arrows (no text or symbols beyond numbers)Replace the grinder cover. Turn until you hear a click.

COFFEE COUNTER
This device has a coffee counter.
Press and hold the adjustment button (1.6) for 3 seconds.
All buttons except the on/off button will flash, indicating that you have entered settings.
Press the adjustment button (1.6) again for 8 seconds until the espresso, long espresso and Americano buttons are stationary.
Press the button for the coffee you want to consult.
The number of coffees that the device has dispensed since the first time it was used will appear on the screen.
Example: If you have 888 coffees, the following will appear on the screen:
In the event that you have 18,888 coffees, since the whole number cannot be shown on the screen, it will appear as follows:
Screen 1:

Screen 2:

To move from one screen to another, press the < or > arrows.
TECHNICAL PARAMETERS
| Drinks | Coffee beans | Extraction temperature | Coffee |
| Espresso |  | 86 - 95°C | 25 - 60 ml |
| Default |  | 92°C | 30 ml |
| Drinks | Coffee beans | Extraction temperature | Coffee |
| Long espresso |  | 86 - 95°C | 40 - 120 ml |
| Default |  | 92°C | 80 ml |
| Drinks | Coffee beans | Extraction temperature | Coffee | Hot water |
| Americano |  | 86 - 95°C | 60 - 125 ml | 0 - 100 ml |
| Default |  | 92°C | 70 ml | 80 ml |
| Drinks | Extraction temperature | Hot water |
| Hot water | >80°C | 10 - 150 ml |
| Default | >80°C | 150 ml |
TROUBLESHOOTING
| Problem | Cause | Solution |
| The device does not turn on | The coffee maker is disconnected from the mains or the power switch is OFF | Connect the power supply and press the switch to ON position |
| The coffee maker reports an error or the button does not respond | Internal software and hardware error | Turn off the coffee maker, unplug it, wait half a minute and restart the machine. If it is still not resolved, contact Customer Service |
| Coffee beans make a strange noise during grinder operation | Grinder with debris inside | Contact Customer Service |
| Coffee does not flow or comes out too slowly | Ground coffee is too fine | Adjust the coffee adjustment wheel in the direction of the coarse gear (see section “Grind adjustment button”) |
| There is no water in the return circuit | Press the hot water button. Then make coffee. | |
| The brewer is too dirty | Clean the brewer | |
| The coffee flows too fast or the coffee effect is too poor | Coffee ground too coarsely | Adjust the coffee adjustment wheel in the direction of the fine gear (see section “Grind adjustment button”) |
| Cannot remove the brewer | The brewer is not in the initial position | Turn the machine back on, clear all warning messages and the coffee maker will automatically return to its initial position |
| The coffee comes out like clear water | The coffee beans are not being ground properly | See section “Cleaning the coffee grinder” |
| The coffee beans are wet | ||
| The device indicates that the brewer is not in place, but it is | The brewer is not positioned correctly | Place the brewer in the appliance and press the PUSH sign until you hear a "click", which indicates that the brewer has been installed back into its place |
| The amount of coffee is insufficient | Internal pipe leak | Contact Customer Service |
| The water circuit is clogged with scale | Descale the appliance according to the descaling process explained above |
FR
natural_image
Close-up of a black mechanical component with a white arrow pointing upward, next to a cylindrical shaft (no text or symbols visible)NETTOYAGE DU GROUPE CAFÉ
natural_image
Close-up of a mechanical control dial with numeric and directional arrows (no text or symbols beyond numbers)natural_image
Close-up of a circular industrial control dial with numeric labels and directional arrow (no readable text or symbols beyond numbers)natural_image
Close-up of a black mechanical component with a white arrow pointing upward (no text or symbols visible)LIMPEZA DO GRUPO DE CAFÉ
natural_image
Close-up of a mechanical control dial with numeric and directional arrows (no text or symbols beyond numbers)natural_image
Close-up of a mechanical control dial with rotary buttons and a curved arrow indicating rotation (no text or symbols)natural_image
Black mechanical component with a white arrow pointing upward, next to a cylindrical shaft (no text or symbols visible)PULIZIA GRUPPO CAFFÈ
natural_image
Close-up of a mechanical rotary dial with numeric markings and directional arrows (no readable text or symbols)natural_image
Close-up of a rotary dial with numbers 5, 4, 3, 2, 1 and directional arrows indicating clockwise motion (no text or symbols beyond numeric labels)natural_image
Close-up of a black mechanical component with a white arrow pointing upward, next to a cylindrical shaft (no text or symbols visible)natural_image
Close-up of a mechanical control knob dial with numeric and directional arrows (no text or symbols beyond numbers)natural_image
Close-up of a mechanical control dial with rotary buttons and a curved arrow indicating rotation (no text or symbols)BINNENSTE DRUPBAK EN AFVALBAK
natural_image
Close-up of a black mechanical component with an arrow pointing upward (no visible text or symbols)REINIGING VAN DE KOFFIEGROEP
natural_image
Close-up of a circular mechanical dial with numeric markings and directional arrows (no readable text or symbols)natural_image
Close-up of a mechanical control dial with rotary buttons and a curved arrow indicating rotation (no text or symbols)natural_image
Close-up of a black mechanical component with an arrow pointing upward, next to a cylindrical shaft (no visible text or symbols)CURĂȚAREA GRUPULUI DE CAFEA
natural_image
Close-up of a mechanical control dial with numeric and directional arrows (no text or symbols beyond numbers)natural_image
Close-up of a mechanical control dial with numeric and directional arrows (no text or symbols beyond numbers)natural_image
Close-up of a black mechanical component with a white arrow pointing upward (no text or symbols visible)CZYSZCZENIE ZBIORU KAWOWEGO
natural_image
Close-up of a black industrial rotary dial with numeric markings and a white curved arrow indicating rotation (no text or symbols beyond numbers)natural_image
Close-up of a circular industrial control dial with numeric labels and directional arrows (no readable text or symbols beyond numbers)natural_image
Close-up of a black mechanical component with a white arrow pointing upward (no text or symbols visible)natural_image
Close-up of a black industrial machine dial with rotary knob and indicator lights (no text or symbols visible)natural_image
Close-up of a rotary dial with numbers 5, 4, 3, 2, 1 and directional arrows indicating rotation (no text or symbols beyond numeric labels)natural_image
Black mechanical component with a white arrow pointing upward, no visible text or symbolsnatural_image
Close-up of a black industrial control knob dial with numeric and directional arrows (no text or symbols beyond numbers)natural_image
Close-up of a black industrial machine dial with rotary knob and indicator lights (no text or symbols visible)natural_image
Close-up of a black mechanical component with a white arrow pointing upward, next to a cylindrical object (no visible text or symbols)ČIŠTĚNÍ SKUPINY KÁVY
natural_image
Close-up of a black industrial control knob dial with numeric and directional arrows (no text or symbols beyond numbers)natural_image
Close-up of a mechanical control dial with rotary buttons and a curved arrow indicating rotation (no text or symbols)natural_image
Close-up of a circular industrial control dial with numeric labels and directional arrows (no readable text or symbols beyond numbers)natural_image
Close-up of a circular industrial control dial with numeric markings and directional arrows (no readable text or symbols)natural_image
Close-up of a black mechanical component with a white arrow pointing upward, next to a cylindrical shaft (no text or symbols visible)تنظيف مجموعة القهوة
أ Expected Positive Mgmt Office Quarterly in Africa Agricultural and Forestry