Taste Classic M80 Inox CE4483 - Coffee machine SOLAC - Free user manual and instructions
Find the device manual for free Taste Classic M80 Inox CE4483 SOLAC in PDF.
| Product type | Espresso coffee machine with steam frother |
| Brand | Solac |
| Model | Taste Classic M80 Inox CE4483 |
| Power supply | 230 V, 50/60 Hz, 1000 W (estimated) |
| Water tank capacity | Approximately 1.2 L (estimated) |
| Functions | Espresso (1 or 2 cups), steam, hot water, automatic shut-off |
| Coffee type | Ground coffee (natural roasting recommended) |
| Main material | Stainless steel |
| Color | Stainless steel |
| Included accessories | Portafilter, dosing spoon, filters for 1 and 2 cups, steam tube |
| Maintenance | Manual cleaning after each use; regular descaling |
| Safety | Automatic shut-off, overheat protection, do not use without water |
| Warranty | In accordance with current legislation; approved technical service |
| Repairability | After-sales service via solac.com |
Frequently Asked Questions - Taste Classic M80 Inox CE4483 SOLAC
User questions about Taste Classic M80 Inox CE4483 SOLAC
0 question about this device. Answer the ones you know or ask your own.
Ask a new question about this device
Download the instructions for your Coffee machine in PDF format for free! Find your manual Taste Classic M80 Inox CE4483 - SOLAC and take your electronic device back in hand. On this page are published all the documents necessary for the use of your device. Taste Classic M80 Inox CE4483 by SOLAC.
USER MANUAL Taste Classic M80 Inox CE4483 SOLAC
natural_image
Line drawing of a coffee machine with control panel and side buttons (no text or symbols)EN. Instructions for use
FR. Mode d'emploi
text_image
Technical diagram of a coffee maker with labeled parts and exploded view, showing front, side, and top views with numbered labels.ES
(Original instructions)
USE AND CARE
Do not use the appliance if its accessories are not properly fitted.
Do not switch the appliance on without water.
Do not use the appliance if the on/off switch does not work.
Do not move the appliance while in use.
Respect the MAX and MIN levels
Disconnect the appliance from the mains when not in use and before undertaking any cleaning task.
Unplug the appliance from the mains before refilling the water tank.
Store this appliance out of reach of children and/or persons with physical, sensory or reduced mental or lack of experience and knowledge.
Do not store the appliance if it is still hot.
Only use water with the appliance.
The use of bottled mineral water adapted for human consumption is recommended.
Never leave the appliance connected and unattended if is not in use. This saves energy and prolongs the life of the appliance.
Do not remove the filter holder when coffee is being made, as at that time it is under pressure.
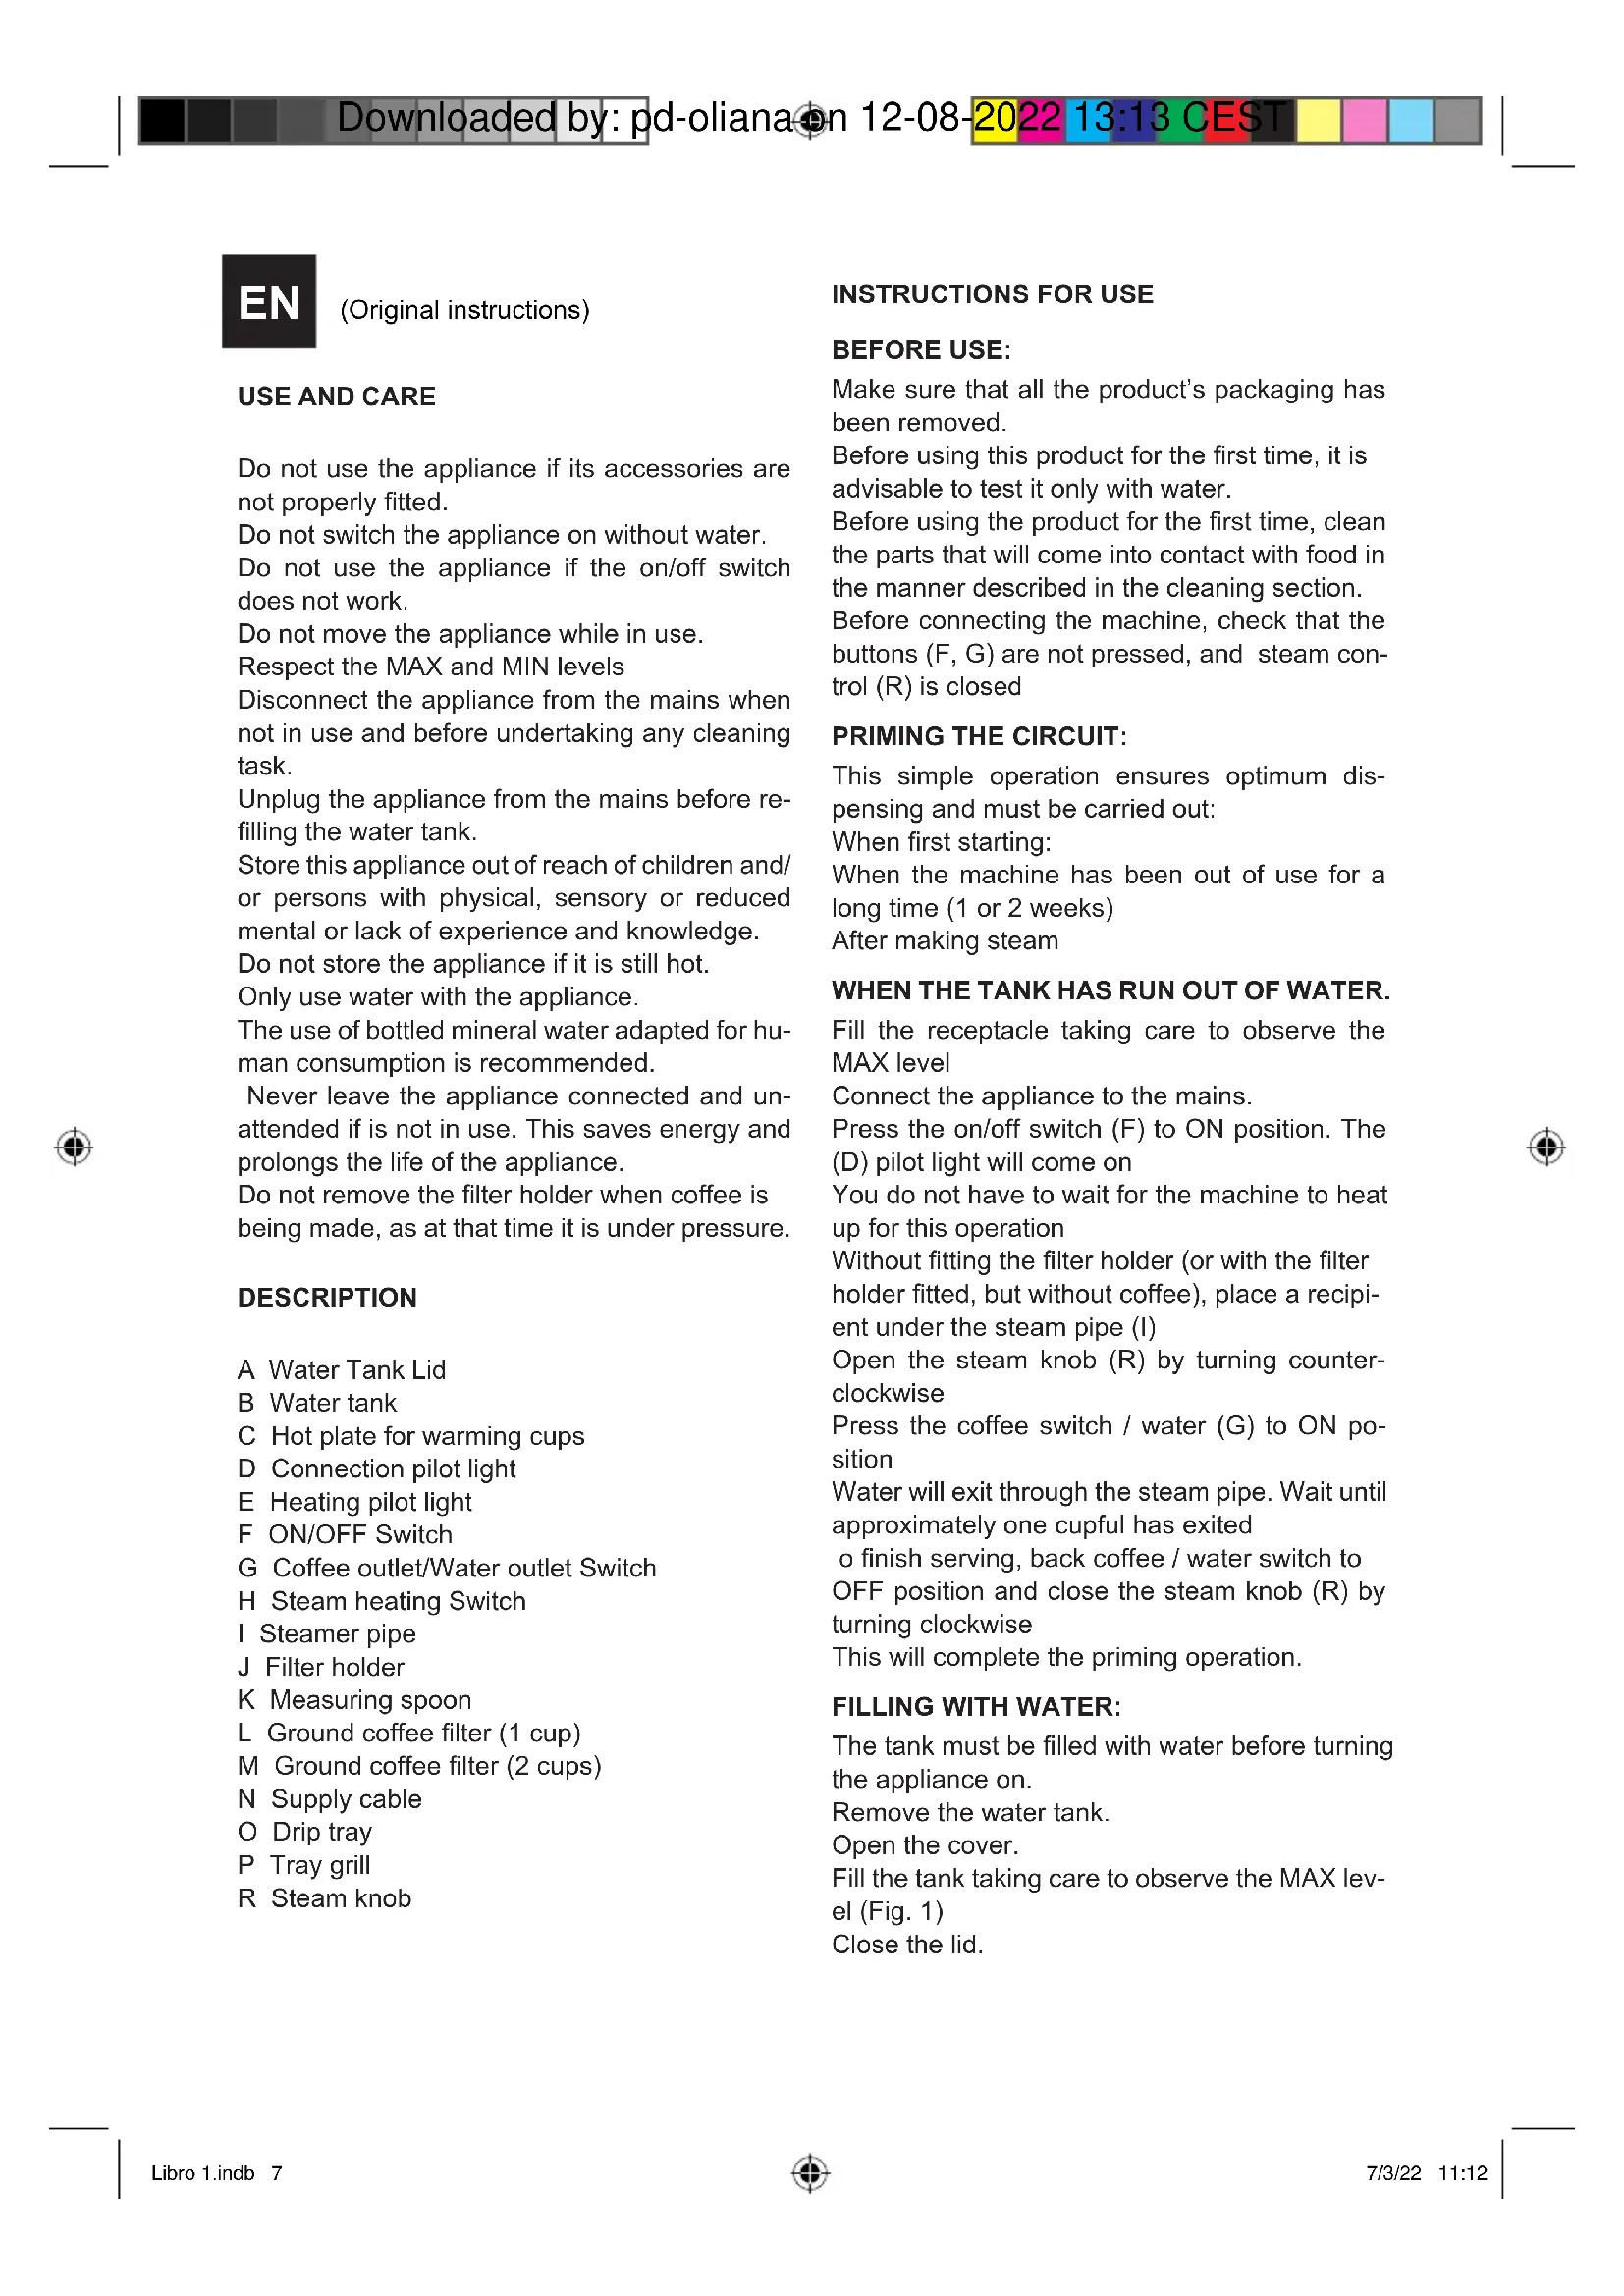
DESCRIPTION
A Water Tank Lid
B Water tank
C Hot plate for warming cups
D Connection pilot light
E Heating pilot light
F ON/OFF Switch
G Coffee outlet/Water outlet Switch
H Steam heating Switch
I Steamer pipe
J Filter holder
K Measuring spoon
L Ground coffee filter (1 cup)
M Ground coffee filter (2 cups)
N Supply cable
O Drip tray
P Tray grill
R Steam knob
INSTRUCTIONS FOR USE
BEFORE USE:
Make sure that all the product's packaging has been removed.
Before using this product for the first time, it is advisable to test it only with water.
Before using the product for the first time, clean the parts that will come into contact with food in the manner described in the cleaning section.
Before connecting the machine, check that the buttons (F, G) are not pressed, and steam control (R) is closed
PRIMING THE CIRCUIT:
This simple operation ensures optimum dispensing and must be carried out:
When first starting:
When the machine has been out of use for a long time (1 or 2 weeks)
After making steam
WHEN THE TANK HAS RUN OUT OF WATER.
Fill the receptacle taking care to observe the MAX level
Connect the appliance to the mains.
Press the on/off switch (F) to ON position. The (D) pilot light will come on
You do not have to wait for the machine to heat up for this operation
Without fitting the filter holder (or with the filter holder fitted, but without coffee), place a recipient under the steam pipe (I)
Open the steam knob (R) by turning counterclockwise
Press the coffee switch / water (G) to ON position
Water will exit through the steam pipe. Wait until approximately one cupful has exited
o finish serving, back coffee / water switch to
OFF position and close the steam knob (R) by turning clockwise
This will complete the priming operation.
FILLING WITH WATER:
The tank must be filled with water before turning the appliance on.
Remove the water tank.
Open the cover.
Fill the tank taking care to observe the MAX level (Fig. 1)
Close the lid.
Replace the tank in its housing, ensuring that it is well fitted.
FILLING OF COFFEE:
Remove the filter holder.
Position the ground chosen coffee filter ((L ó M) in the filter holder
We recommend using natural toast coffee, as using roasted coffee may affect the operation of the machine.
Fill the removable filter with ground coffee (6-7 g per cup to be prepared).
If you wish to make 1 coffee, use 1 filter coffee and, fill the ladle (1 spoonful) and take the capacity of the measuring spoon as the measure for one coffee until half its capacity.
For 2 coffees, use 2 cups filter (M), and put in 2 spoonfuls.
Next lightly press down the ground coffee with the back of the spoon.
Fit the filter holder in the appliance once more.
Position the filter holder in the coffee assembly by inserting the assembly downwards and turning it from left to right until it locks.
USE
Before connecting the machine, check that the buttons (F, G) are not pressed, and steam control (R) is closed
Connect the appliance to the mains.
Turn the appliance on using the on/off switch (F)
The (D) pilot light comes on.
Wait until the pilot light (E) is lighting. It means right temperature is reached
Place one or two preheated cups at the filter holder outlet.
Press the coffee switch (G) to the ON position The coffee infusion will begin to exit. When you have obtained the desired quantity of espresso coffee (short or long), come back switch to OFF position
Once serving has finished, wait a few seconds and remove the cups with the coffee.
Remove the filter holder and empty the grounds from it.
Wash the filter holder with running water and dry it well.
Check that the removable filter is perfectly fitted into the filter holder.
Fit the filter holder in the appliance once more.
GETTING HOT WATER:
Put the device in ON situation, pressing the knob ON/OFF (F)
The Heating indicator light (D) will illuminate indicating that the water is heating up.
Wait Until the pilot light (E) is also highlighted. This situation indicates that the water has reached the right temperature.
Place A container under the nozzle.
Open The steam control (R), turning him to the left, counterclockwise
Press The button coffee /water outlet (G)
The Hot water began to come out of the vaporizer.
Once obtained the desired amount of hot water, press the coffee outlet button (G) again, which stops the pump
Close The turning knob (R) to the right, clockwise
OBTAINING STEAM:
The steam is used to foam milk for cappuccino, and also to heat other liquids.
Turn the appliance on using the on/off switch.
Wait until the pilot light (G) has gone out which will indicate that the appliance has reached an adequate temperature for making coffee
For Steam, press the Steam heating button (H) and continue heating until the steam temperature has been reached.
The warning light (E) will illuminate indicating that the water has reached the necessary temperature for generating steam.
Place a recipient under the steam tube.
Open Steam knob (R) anticlockwise
Steam only will begin to exit.
When you have enough, close the control and remove the recipient.
AUTOOFF FEATURE:
The SOLAC machines are designed to save energy
To that end, after some minutes from the last operation, the unit switches to energy saving mode
To return to normal operation you should just Switch OFF and Switch ON the connect button (F)
ONCE YOU HAVE FINISHED USING THE AP- PLIANCE:
Turn the appliance off, using the on/off switch (F) to OFF
Unplug the appliance to the mains.
Remove the water from the water tank.
Clean the appliance
CLEANING
A. BASIC CLEANING
Disconnect the appliance from the mains and let it cool before undertaking any cleaning task. Clean the equipment with a damp cloth with a few drops of washing-up liquid and then dry.
Do not use solvents, or products with an acid or base pH such as bleach, or abrasive products, for cleaning the appliance.
Do not let water or any other liquid get into the air vents to avoid damage to the inner parts of the appliance.
Neither parts of this appliance are suitable for cleaning in the dishwasher.
After washing, dry all the parts before fitting them together and storing.
B. CLEANING THE FROTHING WAND
CAUTION! The frothing wand, frothing tip, and frothing sleeve may be VERY HOT
It is recommended to purge and wipe the frothing wand after steaming milk to prevent deposits of dirt and before turning off the machine
To do this, pull the black frothing sleeve down
Fill a cup with a bit of water, immerse the froth-ing wand into the water
Drain hot water through the pipe, following the instructions "Getting hot water"
Use a cloth to dry the frothing wand and replace the frothing sleeve
In case no steam comes out of the frothing wand, hardened milk blocks its path.
Carefully use a needle to loosen the milk residue from the opening of the frothing tube to remove any blockage,
Once clean, rinse with running water from the tap and reassemble it. Then steam again
HOW TO DEAL WITH LIME SCALE INCRUSTATIONS:
For the appliance to work correctly it should be kept free of lime scale or magnesium incrustations caused by the use of hard water.
To prevent this kind of problem, we recommend the use of water with low lime or magnesium mineralisation.
However, if it is not possible to use the kind of water recommended above, you should periodically remove the lime scale from the appliance:
Every 6 weeks if the water is "very hard".
Every 12 weeks if the water is "hard".
o do so, we recommend the use of a specific product Taurus Decal for this kind of product which can be found in specialised shops and authorised technical services.
Homemade solutions are not recommended in the descaling of this appliance, such as the use of vinegar.
ANOMALIES
If you detect any anomalies, refer to the following table:
| Anomaly Possible cause Solutions | ||
| Water flows out of the side of the holder | -The filterholder is not fitted correctly.- The Edge of the sieve is covered coffee.-The brewing group is dirty. | -See Section “filling coffee”-Clean the sieve around the edge and clean the brewing of coffee group-Clean With a damp cloth. |
| No coffee comes out | - There is no water- The water tank is not properly placed.- The filter holes are clogged, the coffee is ground too fine or has been pressed too much | -Fill the water tank-Make sure the tank is properly seated, pressing on the top-Empty the filter basket and clean with water.Clean the brewing unit with a damp cloth. Fill the sieve again and press the coffee slightly |
| The coffee comes out slowly or drop by drop | -The coffee grinding is too fine or too pressed | -Make sure grinding is OK and it's not too pressed. |
| The coffee comes without cream | -The used Coffee is out of date-The Coffee has not been pressed enough.-The Ground coffee is too coarse. | -Use Fresh coffee and once opened store in an airtight container.-Press slightly the coffee.-Grind finer the coffee |
| The coffee comes out too fast | -The ground coffee is too coarse.-There is not enough coffee in the sieve.-The Coffee has not been pressed enough | -Grind coffee finer-Ensure that it's the right amount of coffee in the sieve.-Press slightly the coffee |
| No steam escapes from the evaporator tube | -The Tube is clogged Clean the | steam tube with a damp cloth to remove any traces of milk have dried and unblock holes using a needle. Press the corresponding switch and remove steam until it goes out continuously |
FR
C Surface chauffe tasses
This product enjoys the recognition and protection of the legal guarantee in accordance with current legislation. To enforce your rights or interests you must go to any of our official technical assistance services.
You can find the closest one by accessing the following web link: http://solac.com
You can also request related information by contacting us by phone.
You can download this instruction manual and its updates at http://solac.com
DE) GARANTIE UND TECHNISCHER SEVICE
Big distribution society
4 Rue 13 Lot Smara, Oulfa,
Casablanca
(+212) 522 89 40 21
ME) MONTENEGRO - EUROPE
Rastovac bb, 81400
Niksic
+382 40 217 055
Unit 25 & 26, San Croy Office Park, Die Agora
Road, Croydon, Kempton Park, 1619
Johannesburg
(+27) 011 392 5652
sOlac
www.solac.com
Rev: 17/06/2021