Squissita Touch CE4552 - Coffee machine SOLAC - Free user manual and instructions
Find the device manual for free Squissita Touch CE4552 SOLAC in PDF.
User questions about Squissita Touch CE4552 SOLAC
0 question about this device. Answer the ones you know or ask your own.
Ask a new question about this device
Download the instructions for your Coffee machine in PDF format for free! Find your manual Squissita Touch CE4552 - SOLAC and take your electronic device back in hand. On this page are published all the documents necessary for the use of your device. Squissita Touch CE4552 by SOLAC.
USER MANUAL Squissita Touch CE4552 SOLAC
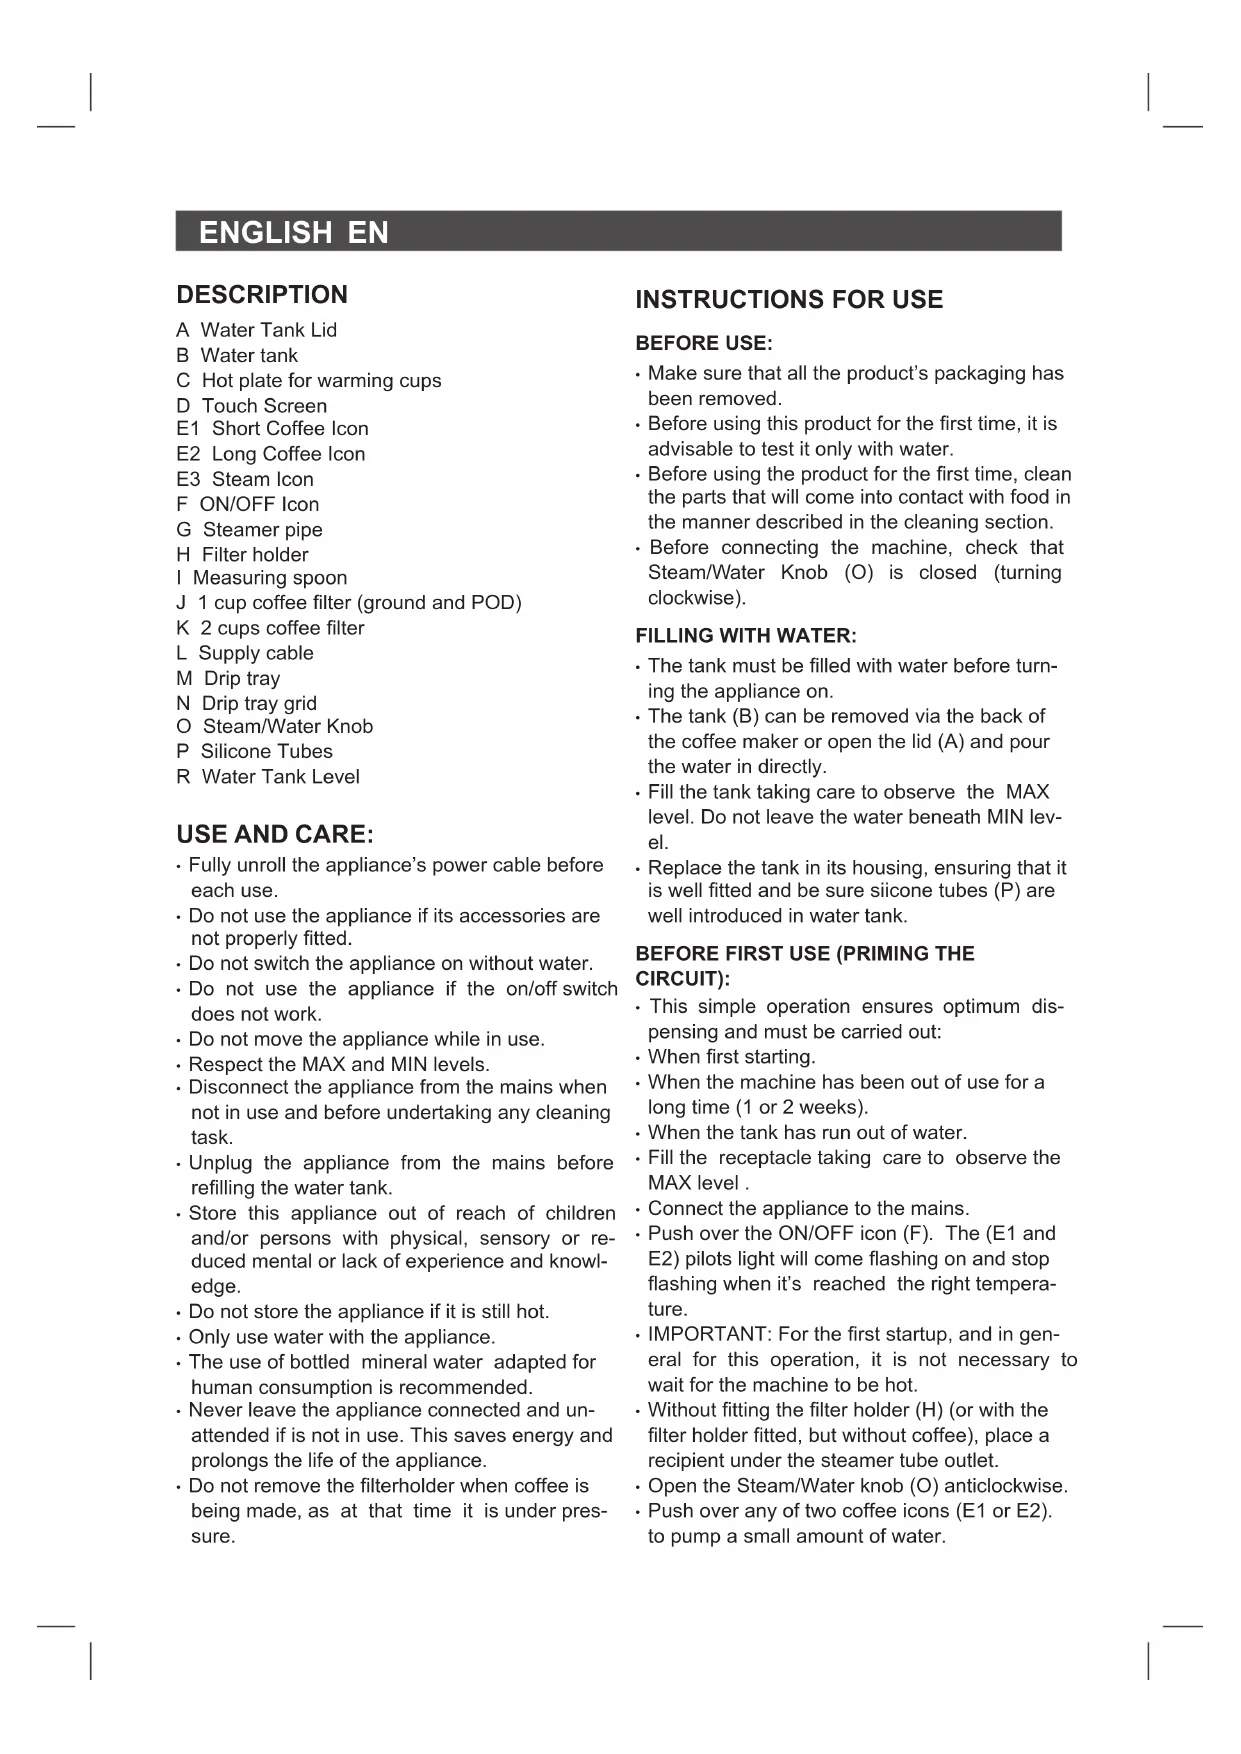
A Water Tank Lid
B Water tank
C Hot plate for warming cups
D Touch Screen
E1 Short Coffee Icon
E2 Long Coffee Icon
E3 Steam Icon
F ON/OFF Icon
G Steamer pipe
H Filter holder
1 Measuring spoon
J 1 cup coffee filter (ground and POD)
K 2 cups coffee filter
L Supply cable
M Drip tray
N Drip tray grid
O Steam/Water Knob
P Silicone Tubes
R Water Tank Level
USE AND CARE:
- Fully unroll the appliance's power cable before each use.
- Do not use the appliance if its accessories are not properly fitted.
- Do not switch the appliance on without water.
- Do not use the appliance if the on/off switch does not work.
- Do not move the appliance while in use.
- Respect the MAX and MIN levels.
- Disconnect the appliance from the mains when not in use and before undertaking any cleaning task.
- Unplug the appliance from the mains before refilling the water tank.
- Store this appliance out of reach of children and/or persons with physical, sensory or reduced mental or lack of experience and knowledge.
- Do not store the appliance if it is still hot.
- Only use water with the appliance.
- The use of bottled mineral water adapted for human consumption is recommended.
- Never leave the appliance connected and unattended if is not in use. This saves energy and prolongs the life of the appliance.
- Do not remove the filterholder when coffee is being made, as at that time it is under pressure.
INSTRUCTIONS FOR USE
BEFORE USE:
- Make sure that all the product's packaging has been removed.
- Before using this product for the first time, it is advisable to test it only with water.
- Before using the product for the first time, clean the parts that will come into contact with food in the manner described in the cleaning section.
- Before connecting the machine, check that Steam/Water Knob (O) is closed (turning clockwise).
FILLING WITH WATER:
- The tank must be filled with water before turning the appliance on.
- The tank (B) can be removed via the back of the coffee maker or open the lid (A) and pour the water in directly.
- Fill the tank taking care to observe the MAX level. Do not leave the water beneath MIN level.
- Replace the tank in its housing, ensuring that it is well fitted and be sure silicone tubes (P) are well introduced in water tank.
BEFORE FIRST USE (PRIMING THE CIRCUIT):
- This simple operation ensures optimum dispensing and must be carried out:
- When first starting.
- When the machine has been out of use for a long time (1 or 2 weeks).
- When the tank has run out of water.
- Fill the receptacle taking care to observe the MAX level.
- Connect the appliance to the mains.
- Push over the ON/OFF icon (F). The (E1 and E2) pilots light will come flashing on and stop flashing when it's reached the right temperature.
- IMPORTANT: For the first startup, and in general for this operation, it is not necessary to wait for the machine to be hot.
- Without fitting the filter holder (H) (or with the filter holder fitted, but without coffee), place a recipient under the steamer tube outlet.
- Open the Steam/Water knob (O) anticlockwise.
- Push over any of two coffee icons (E1 or E2) to pump a small amount of water.
EN
Water will exit through the steamer pipe (G). Wait until water exits continuously, and push again over same coffee icon (E1 or E2) to stop flowing water.
- To finish serving, rotate Steam/Water knob (O) clockwise to close it.
- This will complete the priming operation.
FILLING COFFEE:
- Remove the filter holder (H).
- Position the selected ground coffee filter (J or K) in the filter holder.
- Insert the desired ground coffee filter (J or K) into the filter holder.
- Filter J (smallest) can be used either to ground or to paper coffee pods.
- We recommend using natural toast coffee, as using some roasted coffee may affect the operation of the machine.
- Fill the chosen removable filter (1 or 2 cups) with ground coffee (6 to 7 gr per cup to be prepared).
- Using measuring spoon (I) for 1 coffee, put 1 spoonful.
- For POD (single dose of paper), use the same 1coffee filter, placing the monodose well-placed in the filter.
- For 2 coffees, use 2 cups filter and put in 2 spoonful.
- Next lightly press down the ground coffee with the back of the spoon.
- Before fitting the filter holder in the coffeemaker assembly, move the ladleholder backwards.
- Fit the filter holder in the appliance once more.
- Position the filter holder in the coffee assembly by inserting the filterholder from down. Turn it anticlockwise, from left to right, until it locks.
USE
- Before connecting the machine, check that the steam control (O) is closed.
- With Water tank previously filled.
- Connect the appliance to the mains.
- Turn the appliance ON using the on/off Icon (F).
- The (E1 and E2) icon light will flash intermittently.
- Wait until the Icon light (E1 and E2) stop flashing and keep fixed. It means right temperature is reached.
-
Place one or two preheated cups at the filter holder outlet.
-
Push over desired Coffee Icon (Short, Long).
- Corresponding Light will begin to flash.
- The unit will start the prebrewing and after a brief stop, it will continue with the brewing.
- The coffee infusion will begin to exit.
- When you have got the desired amount of espresso coffee (short or long) the machine will stop automatically.
- You always can Stop brewing of coffee pushing over Coffee Icon again.
- Once serving has finished, wait a few seconds and remove the cups with the coffee.
- Remove the filter holder and empty the grounds from it.
- Wash the filter holder with running water and dry it well.
- Check that the removable filter is perfectly fitted into the filter holder.
- Fit the filter holder in the appliance once more.
CHANGING PRESET BREW TIMES
- Press the corresponding button (short or long) for more than 5 seconds, and keep it pressed. Meanwhile, coffee is exiting until you stop of pressing. When you Stop, the coffee outlet time will remain programmed for subsequent brews.
Always you repeat this operation, machine will memorize that quantity. - The amount of coffee needed for short or long coffee may vary from brew to brew depending on the type of coffee used and how tight it is pressed. Nevertheless, the programmed brewing times will remain constant.
IMPORTANT NOTICE
- The steam tube can be very Hot, Handle with care during operation. Always grasp the frothing grip to direct the milk foam wand.
GETTING HOT WATER:
- Put the device in ON situation, pressing the ON/OFF Icon (F).
- The E1 and E2 icons will flash, indicating that the water is heating up.
- Wait Until the E1 and E2 Icons light stop. This situation indicates that the water has reached the right temperature.
- Place a container under the nozzle.
- Open the steam control (O), turning him to the left, counterclockwise.
- Press over a Coffee icon (E1 or E2).
ENGLISH EN
- The Hot water began to come out of the vaporizer.
- Once obtained the desired amount of hot water, press the coffee icon (E1 or E2) again, which stops the pump.
- Close The turning knob (O) to the right, clockwise.
OBTAINING STEAM:
- The steam is used to foam milk for cappuccino, and also to heat other liquids.
- Turn the appliance on using the on/off Icon (F).
- Place a recipient under the steam tube.
- Place the tube inside the liquid to be heated.
- Select Steam option, pushing over Steam Icon (E3).
- System will reheat (flashing light) until steam temperature is reached (flashing light will stop).
- Open Steam knob (O) turning anticlockwise and steam will start to flow out of the tube.
- To better froth the milk, move the jar with slight movements of the jar from top to bottom.
- When you have enough, turn back the control knob (O) clockwise until to close it and remove the recipient.
- Use a damp cloth to clean the remains in the steam pipe.
IMPORTANT:
- When finished obtaining steam, you must replace the water used to make steam and at the same time, recover the temperature (lower) to make coffee.
- To do this, after doing steam, with the steam knob open, press any of the coffee icons, according to instructions "Obtaining hot water", so you will be activating the pump. When water starts to flow through the steam pipe, it means that the coffee temperature has returned and the boiler has been filled. You can now close the steam control.
AUTO-OFF FEATURE:
- The SOLAC machines are designed to save energy.
- To that end, after some minutes (9), if during this period the user has not performed any action on it, the unit switches to energy saving mode.
- To return to normal operation you should just press the ON/OFF icon (F).
ONCE YOU HAVE FINISHED USING THE APPLIANCE:
- Turn the appliance off, pushing over the ON/OFF Icon (F)
- Unplug the appliance to the mains.
- Remove the water from the water tank.
Clean the appliance.
CLEANING
A. BASIC CLEANING
- Disconnect the appliance from the mains and let it cool before undertaking any cleaning task.
- Clean the equipment with a damp cloth with a few drops of washingup liquid and then dry.
- Do not use solvents, or products with an acid or base pH such as bleach, or abrasive products, for cleaning the appliance.
- Do not let water or any other liquid get into the air vents to avoid damage to the inner parts of the appliance.
- Neither parts of this appliance are suitable for cleaning in the dishwasher.
After washing, dry all the parts before fitting them together and storing.
B. CLEANING THE FROTHING WAND
- CAUTION! The frothing wand, and frothing sleeve may be VERY HOT.
- It is recommended to purge and wipe the frothing wand after steaming milk to prevent deposits of dirt and before turning off the machine.
- To do this, pull the frothing sleeve turning first clockwise and later pulling down, and clean under warm running water.
- Fill a cup with a bit of water, immerse the frothing wand into the water, open the Water/Steam Knob.
- Press one of coffee icons (E1 or E2), and Water will come out. Push again over coffee icon and water will stop.
- Then turn the Water/Steam Knob(O) clockwise, until to close it.
- Use a cloth to dry the frothing wand and replace the frothing sleeve.
- In case no water (or steam) comes out of the frothing wand, hardened milk blocks its path.
- Carefully use a needle to loosen the milk residue from the opening of the frothing tip
- to remove any blockage.
- Once clean, rinse with running water from the tap and reassemble it. Then steam again.
EN
HOW TO DEAL WITH LIME SCALE INCRUSTATIONS:
- For the appliance to work correctly it should be kept free of lime scale or magnesium incrustations caused by the use of hard water.
-
To prevent this kind of problem, we recommend the use of water with low lime or magnesium mineralisation.
However, if it is not possible to use the kind of water recommended above, you should periodically remove the lime scale from the appliance: -
Every 6 weeks if the water is "very hard".
-
Every 12 weeks if the water is "hard".
-
To do so, we recommend the use of the specific product Decal for this kind of machine, which can be found in specialised shops and authorised technical services.
-
Homemade solutions are not recommended in the descaling of this appliance.
FRANÇAIS
FR
DESCRIPTION
| ·العربية الحرفية العربية الحرفية العربية الحرفية العربية الحرفية العربية |
| ·العربية الحرفية العربية الح costa العربية |
| ·العربية الح costa العربية |
| ·العربية الح costa العربية |
| ·العربية |
| ·العربية |
| ·العربية |
| ·العربية |
| ·العربية |
| ·العربية |
| ·العربية |
| ·العربية |
| ·العربية |
| ·العربية |
| ·العربية |
| ·العربية |
| ·العربية |
| ·العربية |
| ·الYG العربية |
| ·العربية |
| ·العربية |
| ·العربية |
| ·الYG العربية |
| ·الYG العربية |
| ·الYG العربية |
| ·الYG العربية |
| ·الYG العربية |
| ·الYG العربية |
| ·الYG العربية |
| ·الYG العربية |
| ·الYG العربية |
| ·الYG العربية |
| ·الYG. العربية |
| ·الYG العربية |
| ·الYG العربية |
| ·الYG العربية |
| ·الYG العربية |
| ·الYG العربية |
| ·الYG العربية |
| ·الYG العربية |
| ·الYG العربية |
| ·الYG العربية |
| ·الYG |
| ·الYG العربية |
| ·الYG العربية |
| ·الYG العربية |
| ·الYG العربية |
| ·الYG العربية |
| ·الYG العربية |
| ·الYG العربية |
| ·الYG العربية |
| ·الYG العربية |
| ·الYG العithe |
| ·الYG العithe |
| ·الYG العithe |
| ·الYG العithe |
| ·الYG العithe |
| ·الYG العithe |
| ·الYG العithe |
| ·الYG العithe |
| ·الYG العithe |
| ·الYG العithe |
| ·الYG العathe |
| ·الYG العithe |
| ·الYG العithe |
| ·الYG العithe |
| ·الYG العithe |
| ·الYG العithe |
| ·الYG العithe |
| ·الYG العithe |
| ·الYG العithe |
| ·الYG العithe |
| ·الYG العTHE |
| ·الYG العithe |
| ·الYG العithe |
| ·الYG العithe |
| ·الYG العithe |
| ·الYG العithe |
| ·الYG العithe |
| ·الYG العithe |
| ·الYG العithe |
| ·الYG العithe |
| ·الYG العophe |
| ·الYG العithe |
| ·الYG العithe |
| ·الYG العithe |
| ·الYG العithe |
| ·الYG العithe |
| ·الYG العithe |
| ·الYG العithe |
| ·الYG العithe |
| ·الYG العithe |
| ·الYG العareth |
| ·الYG العithe |
| ·الYG العithe |
| ·الYG العithe |
| ·الYG العithe |
| ·الYG العithe |
| ·الYG العithe |
| ·الYG العithe |
| ·الYG العithe |
| ·الYG العithe |
| ·الYG العths |
| ·الYG العithe |
| ·الYG العithe |
| ·الYG العithe |
| ·الYG العithe |
| ·الYG العithe |
| ·الYG العithe |
| ·الYG العithe |
| ·الYG العithe |
| ·الYG العithe |
| ·الYG العtle |
| ·الYG العithe |
| ·الYG العithe |
| ·الYG العithe |
| ·الYG العithe |
| ·الYG العithe |
| ·الYG العithe |
| ·الYG العithe |
| ·الYG العithe |
| ·الYG العithe |
| ·الYG العittle |
| ·الYG العithe |
| ·الYG العithe |
| ·الYG العithe |
| ·الYG العithe |
| ·الYG العithe |
| ·الYG العithe |
| ·الYG العithe |
| ·الYG العithe |
| ·الYG العithe |
| ·الYG العbole |
| ·الYG العithe |
| ·الYG العithe |
| ·الYG العithe |
| ·الYG العithe |
| ·الYG العithe |
| ·الYG العithe |
| ·الYG العithe |
| ·الYG العithe |
| ·الYG العithe |
| ·الYG العifle |
| ·الYG العithe |
| ·الYG العithe |
| ·الYG العithe |
| ·الYG العithe |
| ·الYG العithe |
| ·الYG العithe |
| ·الYG العithe |
| ·الYG العithe |
| ·الYG العithe |
| ·الYG العatie |
| ·الYG العithe |
| ·الYG العithe |
| ·الYG العithe |
| ·الYG العithe |
| ·الYG العithe |
| ·الYG العithe |
| ·الYG العithe |
| ·الYG العithe |
| ·الYG العithe |
| ·الYG العotte |
| ·الYG العithe |
| ·الYG العithe |
| ·الYG العithe |
| ·الYG العithe |
| ·الYG العithe |
| ·الYG العithe |
| ·الYG العithe |
| ·الYG العithe |
| ·الYG العithe |
| ·الYG العèt |
| ·الYG العithe |
| ·الYG العithe |
| ·الYG العithe |
| ·الYG العithe |
| ·الYG العithe |
| ·الYG العithe |
| ·الYG العithe |
| ·الYG العithe |
| ·الYG العithe |
| ·الYG الع� |
| ·الYG العithe |
| ·الYG العithe |
| ·الYG العithe |
| ·الYG العithe |
| ·الYG العithe |
| ·الYG ALG |
AR
#
Jg 1
aaiiall jall a
100
a>gsjoll a gell clls bcnill
jlll jll lla 1000000000000000000
1
i 1
cli (yj yj o j) yj yj
aclllb jscoljIwSc
.(E1, E2)
.
E1g) gjz jai jia jia jia
aasallgssglgss
(0)
acluljol
:JzllgJgauu
Jay g. yuuiyul lll a ge Jauai jiuuiy
.5jJlJgJnJnJnJn
y11/1j
.(F)
J 1
i
aie biaaii jie jie jie jie
.(E3)
(jaoalgai)jaoalbail
gai (a)
( x,y) = ( ab + 1,ay)
00
a 1
1
Jr Jn j 1j 1
1
Jai
clics 1000
436! aia gia culli jlae alil (O) saill
e 1
y
.
P 为 AQ
olalil Jlulw l, jlln no aclgl 1ie
aiee
.8gall (gial) 1
E1 E2 1
212^3 + 5b2^2 = 8b2^3 + 5b2
a>ga jall o gell clls lc bnill sij 2
jlll jll lla 1000000000000000000
1
aai jaojoll o gai j 1 j 0
cli (yj yj o j) yj j gjj
LED, i.e., | x - 1| = | x - 2| = | x - 3| ,且 x I ,令 1, ,n
a a a a a a a a a a a a a a a a a a a a a a a a a
15 + 2 + 3 + 4 + ·s + 10 + 19 = 60
·
.0000
.
1 1
Iolai all jJU JJIJI 1000
Jolli
. jie2jie
a
yaiiuu.legle bainally jiuui yjoo jia jie
buiill jie aaii g 2jgai
iio oogall gai gaiu iagill ic
ii 1
( x,y,) = ( ab,52aright)
.
与 g b结合 g j
g 1
a aall 1
A
P
.
a a a a a a a a a a a a a a a a a
S APQ = S AQP + S_ PQR
:JlwlI sJgall
/ON
1.(F) OFF
·
aaii 1
AR
#
This product enjoys the recognition and protection of the legal guarantee in accordance with current legislation. To enforce your rights or interests you must go to any of our official technical assistance services.
You can find the closest one by accessing the following web link: http://solac.com
You can also request related information by contacting us by phone.
You can download this instruction manual and its updates at http://solac.com
DE) GARANTIE UND TECHNISCHER SERVICE
Unit 25 & 26, San Croy Office Park, Die Agora
Road, Croydon, Kempton Park, 1619
Johannesburg
(+27) 0113925652