PLV-125 - Iron FAGOR - Free user manual and instructions
Find the device manual for free PLV-125 FAGOR in PDF.

| Product type | Iron |
| Brand | FAGOR |
| Model | PLV-125 |
| Power supply | 100-120 V / 220-240 V, 50~60 Hz |
| Power | 800 W |
| Tank capacity | 80 cc |
| Voltage selection | 115 V~ or 230 V~ (selector on the device) |
| Ironing functions | Dry ironing, steam, spray |
| Steam regulator | Yes, positions: dry, 0, steam |
| Spray nozzle | Yes, for spray |
| Temperature selector | Yes, from MIN to MAX |
| Indicator light | Yes, indicates the desired temperature |
| Soleplate | Smooth soleplate, clean with a damp cloth |
| Filling opening | Yes, for pouring water |
| Heel rest | Yes, for placing the iron upright |
| Cleaning | Exterior and soleplate with damp cloth, empty tank after each use |
| Self-cleaning | Recommended at least once a month |
| Usage | Domestic use only, do not immerse |
Frequently Asked Questions - PLV-125 FAGOR
User questions about PLV-125 FAGOR
0 question about this device. Answer the ones you know or ask your own.
Ask a new question about this device
Download the instructions for your Iron in PDF format for free! Find your manual PLV-125 - FAGOR and take your electronic device back in hand. On this page are published all the documents necessary for the use of your device. PLV-125 by FAGOR.
USER MANUAL PLV-125 FAGOR
The manufacturer reserves the right to modify the models described in this User's Manual.
natural_image
Line drawing of a steam iron with control knob and buttons (no text or symbols)PLANCHA DE VIAJE / FERRO DE ENGOMAR DE VIAGEM / TRAVEL IRON /
FER À REPASSER DE VOYAGE / REISEBÜGELEISEN /
FERRO DA STIRO DA VIAGGIO / ΣΙΔΕΡΟ ΤΑΞΙΔΙΟΥ / UTAZÓVASALÓ /
CESTOVNÍ ŽEHLIČKA / CESTOVNÁ ŽEHLIČKA / PODRECZNE ŽELAZKO /
natural_image
Diagram of a fan or air conditioner panel with three circular buttons and a dial indicator (no text or symbols)Fig. E E. Ábra Фиг. E Abb. E Obr. E Рис. E Eik. E Rys E
natural_image
Line drawing of a steam iron with control knobs and a dial (no text or symbols)Fig. F F. Ábra Фиг. F Fig. G G. Ábra Abb. F Obr. F Рис. F Abb. G Obr. G Eik. F Rys F Eik. G Rys G
natural_image
Diagram of a fan or vent with four circular control knobs and a dial indicator (no text or symbols)Фиг. G Рис. G
natural_image
Line drawing of a mechanical component with no visible text or symbols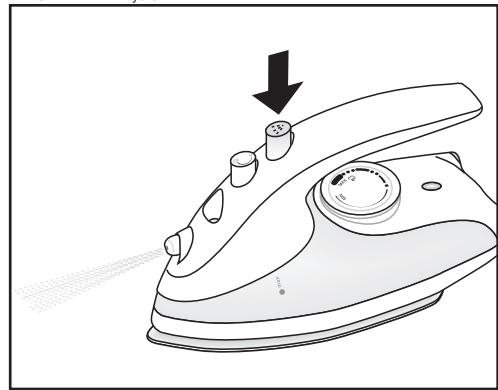
natural_image
Line drawing of a steam iron with a knob and handle, showing a downward arrow indicating motion (no text or symbols)ES
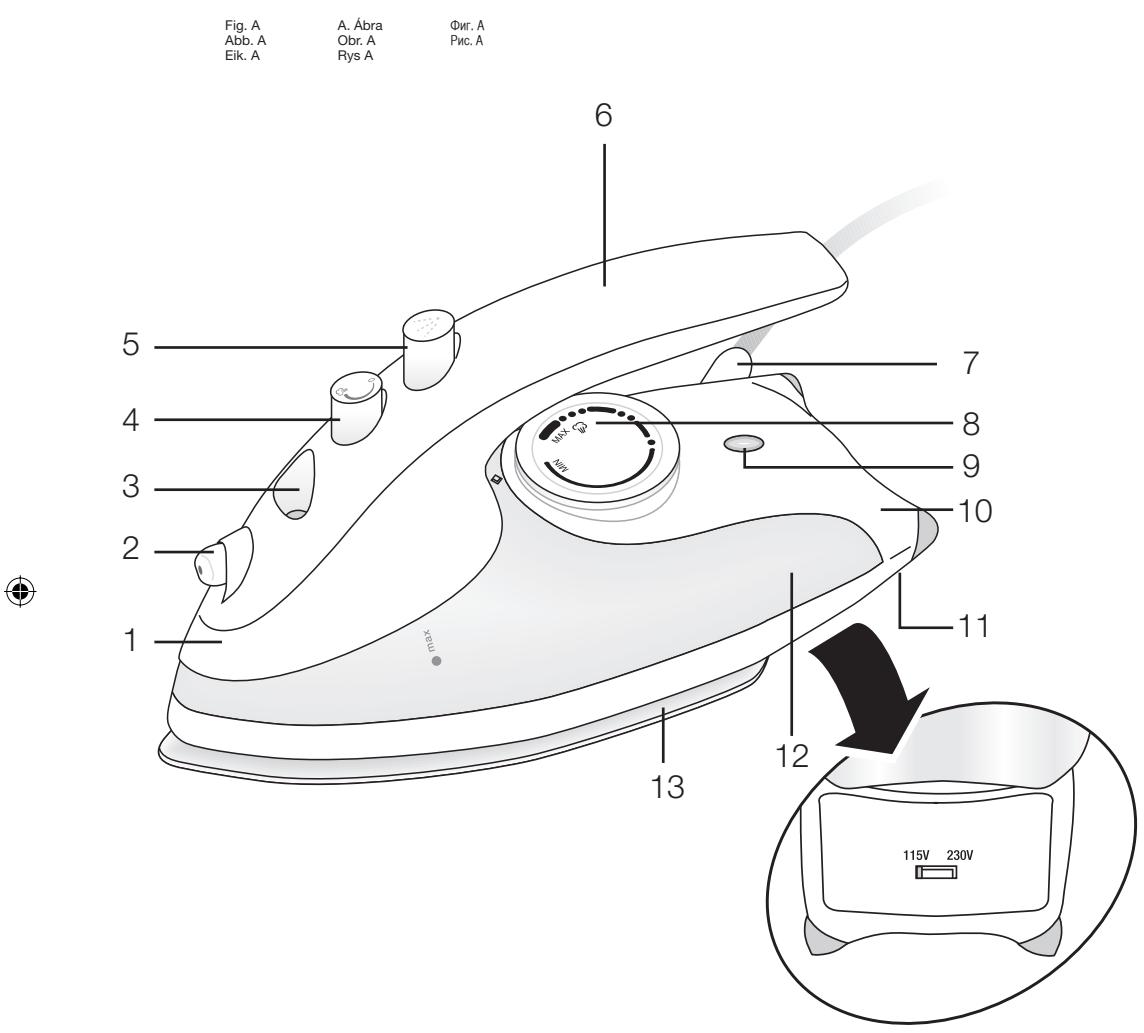
1. DESCRIPCION (Fig. A)
- Body
- Spray nozzle
- Steam regulator
- Spray button
- Grip handle
- Power supply
- Temperature control
- LED indicator
- Stand
- Voltage selector
- Water Tank
-
Soleplate
-
Opening for filling with water
2. TECHNICAL CHARACTERISTICS
Voltage: 100 - 120 V / 220 - 240 V
Frequency: 50 \~ 60Hz
Power: 800W
Tank volume: 80 cc
Selecting voltage: This model may be used with a voltage supply of either 115V\~ or 230V\~. Before using the appliance, check the voltage selected is the same as that of your mains supply. Otherwise, the appliance could be irreparably damaged.
3. SAFETY WARNINGS
- Prior to using this appliance for the first time, read this instruction booklet carefully and keep it in a safe place for future reference. Only then will you get the best results and maximum level of safety during usage.
- Before using the appliance, check that the voltage of your home mains matches that given on the appliance.
- In the event of incompatibility between the power socket and the appliance's plug, get a qualified professional to replace the socket with the right one.
- The appliance's electrical safety is guaranteed only when it is connected to a system with an efficient earth, as laid down in the electrical safety standards in force. The manufacturer cannot be held responsible for damages arising from
the system lacking an earth connection. In the event of doubt, consult a qualified professional.
- After removing the outer packaging, check that the appliance is in perfect condition. In the event of doubt, contact your nearest Technical Support Centre.
- Items of packaging (plastic bags, polystyrene foam, etc.) must not be left within the reach of children since they are potential sources of danger.
- You are advised against using adaptors, multiple sockets and/or extensions. In the event that using these items were strictly necessary, only adaptors and extensions which comply with prevailing safety standards should be used and care should be taken not to exceed the power limit indicated on the adaptor.
- This appliance is for domestic use only. Any other use will be considered inappropriate or dangerous.
- The manufacturer will not be responsible for damage which may arise from inappropriate, incorrect or unsuitable use, or from repairs carried out by unqualified individuals.
Using any electrical appliance requires certain basic rules to be observed.
IN PARTICULAR
- Do not touch the appliance with wet or damp hands or feet.
- Do not submerge the appliance in water or place it under a running tap.
- Do not use the appliance in damp places or bathrooms.
- Do not allow children to use the appliance.
- Do not leave the appliance switched on since it could be a source of danger.
- Never pull on the cable to unplug the appliance.
- Always unplug the appliance before cleaning it or carrying out maintenance.
- Should the appliance stop working and/or not work properly, switch it off and do not try to fix it. Should repairs be needed, consult only a Technical Support Centre authorised by the manufacturer and request that original spare parts be used. Failure to comply with the above will put the appliance's safety in danger.
- The user must not replace the cable. Should the cable get damaged or need
replacing, contact only a Technical Support Centre authorised by the manufacturer.
- Prevent the cable from touching hot parts of the appliance.
- Use of this appliance produces high temperatures. There therefore exists a danger of burns when handling it. For this reason, you must take hold of the appliance by the handle and avoid coming into contact with the metal parts and with the steam.
- Do not direct the jet of steam at people or animals because it is dangerous to do so.
- Do not use the iron on very damp fabrics.
- Do not leave the iron resting on its base while it is still hot. You should wait until it cools down.
- Do not mix together stain-removers or similar products on fabrics which need ironing.
- Unplug the appliance when it is not being used. Only leave it plugged in when necessary.
- Travel irons are not for everyday use.
- When you decide to get rid of the appliance once and for all, you are advised to unplug it and prevent it from being used again by, for example, cutting the power cable.
4. BEFORE USING THE IRON FOR THE FIRST TIME
Remove the stickers or protective covering from the soleplate and casing Unroll and straighten out the mains cable. Follow the instructions in the “Self-cleaning” section of part “9 CLEANING AND MAINTENANCE” to make the iron ready for use.
INSTRUCTIONS FOR USE
5. DRY IRONING
-
Place the iron on a stable, heat-resistant surface
-
Put the temperature control (8) in the MIN position (Fig. B)
- Ensure that the steam regulator (4) is in the dry ironing position (fig. C)
- Stand the iron in the upright position, resting it on its stand (10) and plug it in.
- Select the ironing temperature using the temperature control (8). The LED indicator (9) will light up.
- When the LED indicator (9) switches off, the iron has reached the selected temperature.
This LED indicator will light up and switch off during ironing indicating the thermostat's cycles. Bear in mind that if you lower the temperature, the LED light (9) will remain off until the soleplate (13) has come down to the selected temperature and, at that moment, it will light up again. - Press the spray button (5) to dampen the garment as this makes dry ironing easier. See section eight, sprayer.
- When you have finished, turn the temperature selector to the MIN position and unplug the iron. Let it cool down before proceeding to clean it on the outside and put it away.
Warning: For dry ironing, make sure that the steam regulator is always in the dry ironing position. (Fig. C)
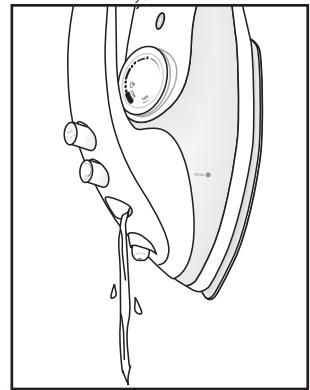
6. FILLING THE WATER TANK
Put the unplugged iron on a stable surface.
- Move the steam regulator (4) to the "0" position.
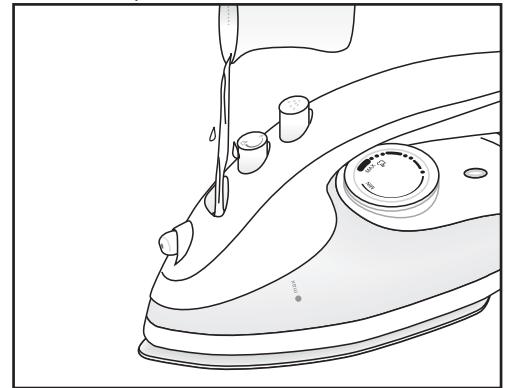
- Slowly pour the water through the opening for water (3) with the help of a glass (Fig. D). Do not pour any cleaning product or solvent into the water tank (12).
- Check that the water does not go beyond the maximum filling level.
- After ironing, empty the water tank (12).
Note: If the water in your area is too hard ( >27^ F) we recommend using distilled water. Do not use battery water or water containing additives such as starch, perfume, fabric conditioner, etc.
7. STEAM IRONING
Before ironing with steam, check that the fabric is suitable for this type of ironing. The appliance works with normal water.
- Place the unplugged iron on a stable, heat-resistant surface.
- Fill the tank with water (refer to section 6, "Filling the Tank").
- Position the temperature control (8) in the MIN position (Fig. B).
- Stand the iron in the upright position, resting it on its stand (10).
- Plug the iron in and turn the temperature selector to the "MAX" position. If the selected temperature is too low, water may drip from the soleplate.
The LED indicator (9) will light up. When the LED indicator switches off, the iron has reached the selected temperature. This LED indicator (9) will light up and switch off at regular intervals during ironing. If you lower the temperature, the LED indicator (9) will remain off until the soleplate has come down to the selected temperature and, at that moment, it will light up again. - Turn the steam regulator (4) to the steam ironing position (fig E). Place the iron in the horizontal position and steam will start to come out through the openings. In the event that the iron does not give out steam, gently knock the soleplate against the ironing surface. Whenever you stand the iron in the upright position, resting it on its stand, steam will stop coming out.
Warning! Avoid contact with the steam and do not direct it at people
When you have finished, turn the temperature selector to the MIN position (Fig. B) move the steam regulator to the dry ironing position (Fig. C), unplug the iron and empty the tank as shown in Fig. F. The tank must be emptied after each use. Leave the iron in the upright position until it cools down.
Note: If during ironing you need to refill the tank, unplug the iron to fill it with water.
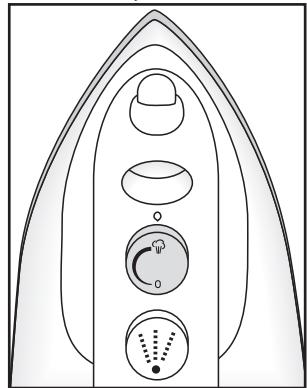
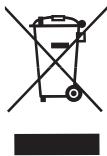
8. SPRAYER (Fig. G)
To use this function, there must be water in the tank. Press the spray button (5) (Fig. G) to spray water for dampening dry or difficult-to-iron fabrics such as linen, cotton or wool, or to act on stubborn creases. It can also be useful for dampening creases left in the garment during ironing. Water sprays out through the spray nozzle (2).
9. CLEANING AND MAINTENANCE
Unplug the iron and wait until it cools down before starting to clean it.
Clean the iron's outside and soleplate with a damp cloth. Do not use detergents or abrasive products for cleaning.
The surface of the soleplate (13) must always be clean. To clean it, simply wipe the surface when it is cold with a damp cloth. To prevent the soleplate from getting scratched, you should avoid ironing zips, metal buttons, etc. You should also not place the iron on metal or rough surfaces.
After each use, empty the water tank (12) (Fig. F) and let the iron cool down before putting it away.
Do not submerge the iron in water or place it under a running tap.
Self-cleaning
With a view to preventing the build-up of harmful minerals which could block up the iron and also to ensure it heats up and vaporizes properly, you are advised to use this function at least once a month, depending on the hardness of the water and how much the iron is used.
- Fill the water tank (12) up to the half-way point (Fig. D)
- Place the iron on the soleplate (13).
- Plug the iron in and turn the temperature selector (8) to the "MAX" position. Wait until the LED indicator (9) switches off then on two or three times to make sure that the established temperature has been reached.
-
Position the steam control (8) in the steam position (Fig. E). Unplug the iron.
-
Place the iron in the horizontal position in a hand basin or the kitchen sink. The dirt will come out of the opening, together with the steam.
- Switch off the steam button (Fig. C)
- Move the iron over a damp cloth to clean the soleplate.
- Empty the water tank (Fig. F)
- Let the iron cool down before putting it away.
10. INFORMATION FOR THE CORRECT DISPOSAL OF ELECTRICAL AND ELECTRONIC APPLIANCES
At the end of its working life, the product must not be disposed of as urban waste. It must be taken to a special local authority differentiated waste collection centre or to a dealer providing this service. Disposing of a household appliance separately avoids possible negative consequences for the environment and health deriving from inappropriate disposal and enables the constituent materials to be recovered to obtain significant savings in energy and resources.
To remind you that you must collaborate with a selective collection scheme, the symbol shown appears on the product warning you not to dispose of it in traditional refuse containers.
For further information, contact your local authority or the shop where you bought the product.