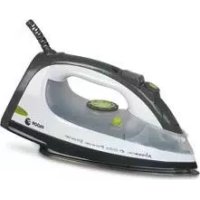
PL2700 - Iron FAGOR - Free user manual and instructions
Find the device manual for free PL2700 FAGOR in PDF.
| Product type | Steam iron |
| Brand | Fagor |
| Model | PL2700 |
| Usage | Domestic |
| Soleplate | Non-stick (type not specified) |
| Water tank capacity | Approximately 250 ml (estimate) |
| Power supply | 220-240 V ~ 50/60 Hz (estimate) |
| Power | Approximately 2000-2400 W (estimate) |
| Functions | Dry ironing, steam, spray, extra steam, self-cleaning |
| Temperature regulator | Selector with MIN to MAX positions |
| Indicator light | Indicates that the iron has reached the set temperature |
| Spray button | Yes, to moisten fabrics |
| Extra steam button | Yes, for intense steam output |
| Self-cleaning function | Yes, to remove mineral deposits |
| Recommended water type | Normal tap water; distilled water if very hard (>27°) |
| Maintenance | Clean the soleplate and exterior with a damp cloth; do not use abrasive detergents |
| Safety | Do not immerse; unplug before filling; do not direct steam towards people; automatic shut-off? not specified |
| Compliance | EMC and Low Voltage Directives |
| Weight | Approximately 1.2 kg (estimate) |
| Dimensions (L x W x H) | Approximately 30 x 15 x 20 cm (estimate) |
| Color | Not specified |
Frequently Asked Questions - PL2700 FAGOR
User questions about PL2700 FAGOR
0 question about this device. Answer the ones you know or ask your own.
Ask a new question about this device
Download the instructions for your Iron in PDF format for free! Find your manual PL2700 - FAGOR and take your electronic device back in hand. On this page are published all the documents necessary for the use of your device. PL2700 by FAGOR.
USER MANUAL PL2700 FAGOR
El fico cono se restano los discos de mojar los maculos desocios en 020 manual de Instruetion.
O hanticnla, reene es cieiado de mojar ores maculos enecrbs che Muaa or inubigues.
The manfacturacion resides the gnt to modify the maculos enacte in this User's Manual.
The manfacturacion is a tool for the production of maculos.
Der Heridetion tbal sarch Recht vaid in der Cetraatsturewaring bechcnbten Modenle zu vermentum.
A yemir haemmat magne i pax haemalitnil nitribunati scilil mertim adtme megacritialisatio.
Vibrio sp 91673 pao plao madifmal mancunay meccane e umafadamnauvul.
Bacterium in welldienmal mode nolus.
Pedocarpus ruberae, acutus proctus, da mefficantia modi catanay e vojiciu. Inukugk asyq.
Pseudomonas aeruginosa, acutus proctus, repensae, meccaneae, uautaree, taotomagui.
Lactobacillus rhamnosus, consternate et calepce, agroindustria, imatiotio, cormulaceae u aenich Pycnogenes europaeus.
Kd Hymenococcum Europea hemophilus in leucaespens, homoeopsis kuehni, meccaneae meccaneae imporos Fokker Oligotype.
Tuberculosis, crepitata, ferula, turbin, zonofungiz, uromodiset, azotobacter, zucicida, zucicida, zucicida, zucicida, zucicida, zucicida, zucicida, zucicida, zucicida, zucicida, zucicida, zucicida, zucicida, zucicida, zucicida, zucicida, zucicida, zucicida, zucicida, zucicida, zucicidal
FAGOR

ES- MANUAL DE INSTRUCCIONE
PT- MANUAL DE INSTRUCCOES
EN- INSTRUCTIONS FOR USE
FR- MANUEL D'UTILISATION
DE- GEBRAUCHSANWEISUNG
HU- HASZNALATI UTMUTATO
CS- NAVOV K POUZITI
SK-NAVOD NAPOZITI
PL-INSTRUKCJA OSBLEUGI
BG-INGCTPYKUMI 3A YIOTPEBA
AR-JeJnJIuIuIuIuIuIuIuIuIuIuIuIuIuIuIuIuIuIuIuIuIuIuIuIuIuIuIuIuIuIuIuIuIuIuIuIuIuIuIuIuIuIuIuIuIuIuIuIuIuIuIu1
RU-INGCTPYKUMI NOXCIYIWATALIMU
EL-ENTYIO CHAOHIN
EU-EFABLEHA-ESKULUBURUA
PLANCHA DE VAPOR / TERPO DE EDCONAR A VAPOR / STEAM FRON / TER A REASSER VAPOR / DAMPFBEIGELISEN / PERPO DA STRO A VAPOR / DMPFBGELEISEN / GOZOLOS VASALO / NAPRACIAZA ZEHUKA / NAPRACIAVI ZEHUKA / ZEALKO POMIKA / IITAPHA OTIRI / 124000000000000000000000000000000000000000000000000000000000
MOD.: PL-2700
N.L.F. F 20,320,517 - B. Sar Andres, n 18 - Aparicio 49 - 20600 MONDRAGON (Guianca) ESPARA
"Versions on classes ofisolas responsibilities an la web fagor.com "Other languages available on the web www.fagor.com

NLF.5.F20.D20.57-P.R.821469, 1n°18-16
de 4B 2300 MNDVAGROU (Garpaccoz), ESPARNA

FAGOR

ES
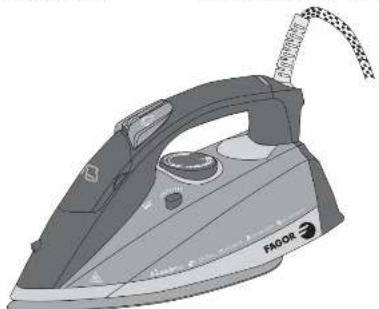
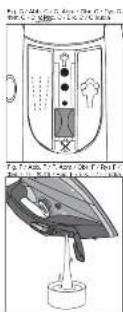
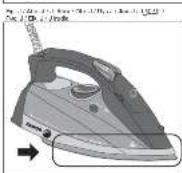
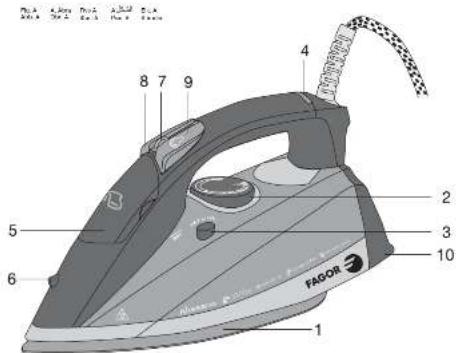
1.DESCRIPTION(Fig.A)
- Sures
- Selector de temperatura
3.0019234
5.1000000000000000000 - Syst
- Regulatior de vares
B. Fulsior spray - Pulsacor vapor extra
- Taon
Suppression of Interferonicas: Este aperigo de 1998, a few years after the end of the AIDS directives, sousse supression de Interferenca.
Especially for:
ELECTROPHORES AND BAY TISSUES
- Base
- Temperature selector
- Self-cleaning knob
- Pilot light
- Water inlet cover
- Spray nozzle
- Steam control
- Spray button
- Extra steam button
- Support base
Interference suppression: The interference of this appliance has been suppressed in accordance with interference suppression standards.
Electromagnetic compatibility: This appliance complies with the CEM standards of electromagnetic compatibility.
2. TECHNICAL DETAILS
See characteristics plate.
This product complies with the European Directives on Electromagnetic Compatibility and Low Voltage.
3. SAFETY WARNINGS
- Before using this appliance for the first time read this instruction manual carefully and keep it for future reference. Only by doing this can you obtain the best results from your iron and ensure its safe use.
- Before using the appliance, make sure that the mains voltage in your home corresponds to that indicated for the iron.
- In the event of the socket and plug being incompatible, have a qualified electrician replace the socket.
- The electrical safety of your appliance is only guaranteed if it is connected to an efficient earth installation, as stipulated in current electrical safety regulations. The manufacturer accepts no responsibility for any damage resulting from the appliance not being connected to an earth installation. If in doubt, contact a qualified professional.
-
After removing the packaging, check that the appliance is in perfect condition. If in doubt, contact your nearest Technical Assistance centre.
-
The packaging materials (plastic bags, polystyrene foam etc.) should be kept out of the reach of children, as they could constitute a safety hazard.
- The use of adapters, and/or extension leads is not advised. In the event of their use being absolutely necessary, always ensure that they conform to current safety standards, and take care not to exceed the indicated maximum voltage level.
- This appliance is for domestic use only. Any other use is considered unsuitable and dangerous.
- The manufacturer accepts no responsibility for damage resulting from improper use or repairs carried out by unqualified personnel.
Certain fundamental rules must be respected in the use of any electric appliance.
IN PARTICULAR
- Never touch the appliance with wet or damp hands or when your feet are wet. Do not submerge the appliance in water.
- Do not use the appliance in damp places or in rooms that are used as bathrooms.
- Do not let children touch the appliance.
- Do not leave the iron unattended when it is switched on, as this could constitute a potential safety hazard.
- Never pull on the cable to unplug the appliance.
- Always unplug the appliance before carrying out any cleaning or maintenance operations.
- In the event of technical failure or improper working, switch the machine off and do not try to repair it. Repairs should only be carried out by a Technical Assistance Service authorised by the manufacturer. Always demand the use of original spare parts. Any failure to follow the above instructions could affect the safe functioning of the appliance.
- If you decide never to use the appliance again, cut the lead, first ensuring that the appliance is unplugged.
- The user should never attempt to change the cable. If, for any reason, the cable requires changing, contact a Technical Assistance Service authorised by the manufacturer.
- Never hold the appliance under the tap to fill the water deposit.
- Do not let the mains cable touch the hot parts of the iron.
- During use, the appliance becomes extremely hot and can cause serious burns. Always pick up the iron by the handle and avoid contact with the metallic parts and steam.
- Do not turn the iron towards people when it is expelling steam. This is extremely dangerous.
- Do not use the iron on very wet fabrics.
-
Do not store the iron in a horizontal position (base down) whilst still hot. Wait until it has cooled.
-
Do not mix stain-removers or similar products on fabrics to be ironed.
- Unplug the iron when not in use. Never leave plugged in when not absolutely necessary.
- The appliance contains a safety device which, when activated, interrupts the working of the iron. To reactivate your iron, contact an authorised Technical Assistance Service.
- If you decide never to use the appliance again, remove the plug from the socket and render it useless by cutting the power cable.
- The iron must be used and rested on a stable surface
- When placing the iron on its stand, ensure that the surface on which the stand is placed is stable.
- The iron is not to be used if it has been dropped, if there are visible signs of damage or if it is leaking.
- Keep electrical appliances out of reach from Children or infirm persons. Do not let them use the appliances without supervision.
- The user must not leave the iron unattended while it is connected to the supply.
- The plug of the supply cord must be removed from the socket-outlet before the water reservoir is filled with water
- This appliance can be used by children aged from 8 years and above and persons with reduced physical, sensory or mental capabilities or lack of experience and knowledge if they have been given supervision or instruction concerning use of the appliance in a safe way and understand the hazards involved.
- Keep the iron and its cord out of reach of children less than 8 years of age when it is energized or cooling down.
Children should be supervised to ensure that they do not play with the appliance - For greater protection, we recommend installing a residual current device (RCD) with an operational residual current not exceeding 30mA . Ask your installer for advice.
- Do not allow children to perform cleaning and user maintenance when they are without supervision.
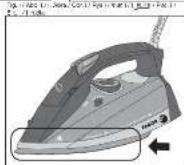
- Do not touch the surfaces marked with symbol during or just after ironing. It is hot! (Figure I and figure J).
4. BEFORE USING YOUR IRON FOR THE FIRST TIME
Remove all stickers or protective labels from the base and the body.
Unroll and straighten the electrical cable.
Follow the instructions given in the "Self-cleaning" section in point "10 - CLEANING", in order to prepare your iron for use.
INSTRUCTIONS FOR USE
5. DRY IRONING
- Place the iron on a stable and heat-resistant surface.
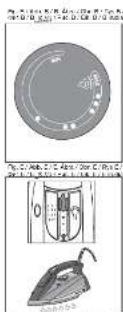
- Turn the temperature selector knob (2) to MIN (Fig. B).
- Slide the steam control knob (7) to the dry iron position (Fig. C).
- Place the iron in an upright position, resting it on the support base (10).
- Plug it in and turn the temperature selector to the desired position. The pilot light (4) will come on.
- When the iron has reached the selected temperature, the pilot light (4) will switch off. This pilot light may turn on and off several times while you are ironing, indicating the cycles of the thermostat. Remember that if you change from a higher to a lower temperature, the pilot light (4) will remain off until the temperature of the base (1) has dropped to the selected level, at which point it will come on again.
- When you have finished, turn the temperature selector to MIN and unplug the iron. Leave to cool before cleaning the exterior and storing. When you are dry ironing, you can use the spray option at any moment, providing there is water in the deposit. (See sections entitled "Spray" and "Filling the deposit").
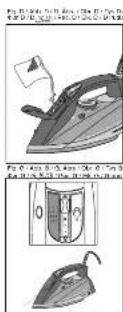
6. FILLING THE WATER DEPOSIT
Place the unplugged iron on a stable surface.
- Slide the steam control knob (7) to the dry iron position (Fig. C).
- Open the lid that covers the water inlet (5).
- Slowly pour water into the inlet using a cup (Fig. D). Never pour cleaning products or solvents into the water deposit.
- Check that the water does not exceed the maximum water level and replace the cover.
Note: If the water in your area is too hard, >27^ F, we recommend that you use distilled water. Do not use battery water or water mixed with starch, perfume, fabric softener, etc.
7. STEAM IRONING
Before steam ironing any garment, check that the fabric is designed for this kind of treatment.
The appliance works with normal tap water. If the water in your area is very hard (hardness
level over 27^ F), we recommend the use of pure distilled water.
- Place the unplugged iron on a stable, heat-resistant surface.
- Fill the water deposit (See "Filling the deposit").
- Turn the temperature selector (2) to "MIN" (Fig. B).
- Place the iron in an upright position, resting it on the support base (10).
- Plug the iron in and turn the temperature selector to " " (3 dots) or "Max". To obtain optimum results when steam ironing, do not use the " " (1 dot) or " " (2 dot) positions.
The pilot light (4) will come on. When this pilot light switches off, the iron will have reached the selected temperature. The pilot light will turn on and off at regular intervals during the ironing process, indicating the cycles of the thermostat. Remember that if you change from a higher to a lower temperature, the pilot light (4) will remain off until the temperature of the base has dropped to the selected level, at which point it will come on again
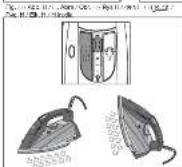
- Slide the steam control knob (7) to one of the steam iron positions (fig. E). Hold the iron in a horizontal position and the steam outlets will begin to expel steam. If no steam is produced, lightly tap the iron base against the ironing board. Setting the iron in an upright position, resting on the support base, will interrupt the steam expulsion.
Caution! Avoid contact with the steam and do not direct it towards people.
- When you have finished, turn the temperature selector to "MIN", slide the steam control knob to the dry iron position (Fig. C), unplug the cable and empty the deposit. The deposit should be emptied after each use as follows:
Open the cover (5) and pour the water out of the deposit (Fig. F). Press the extra steam button to remove any water that may still be in the deposit while the base is still hot. Leave in an upright position until cool.
Note: If you need to top up the deposit while ironing, always unplug the iron beforehand.
8. SPRAY (FIG. G)
This function will only work if there is water in the deposit. Press the spray button (8) (Fig. G), to obtain a burst of sprayed water to
dampen dry or difficult-to-iron fabrics such as linen, cotton or wool. Dampening the fabric slightly will help remove stubborn creases. The spray option is also useful for dampening accidental creases created whilst ironing.
Spray is released through spray outlet nozzle (6).
Note: The first time you use your iron, you may have to press the spray button a few times before the option will work.
9. EXTRA STEAM (FIG. H)
Turn the iron on as indicated in the "Steam ironing" section.
When the iron has reached the selected temperature, press the extra steam button (9) down firmly (Fig. H), for an intense steam expulsion. This option enables you to iron more quickly and to smooth out stubborn creases more easily. Wait for at least 5 seconds before pressing the extra steam button again, in order to enable the iron to reach the optimum temperature required for maximum additional steam expulsion.
Note: Before ironing, press the extra steam button a few times to activate it. For best results, do not press the extra steam button more than three times after the pilot light has gone off.
Vertical steam: The extra steam function can also be used when the iron is in an upright position. To do so, hold the iron in an upright position approx. 15 to 20cm from the fabric and press the extra steam button (9).
Warning: Avoid contact with the steam. Do not direct the steam jets towards people.
10. CLEANING AND MAINTENANCE
Unplug the iron and wait until it has cooled before cleaning.
Clean the exterior and base with a damp cloth. Do not use detergents or abrasive products.
The surface of the iron base (1) should be kept clean at all times. To clean the base, wait until it has cooled completely and then wipe with a damp cloth.
In order to prevent scratching, do not iron over hook and eye fastenings, zips or metallic buttons, etc. and do not place the iron on metallic or rough surfaces.
After each use, empty the deposit and leave the iron to cool before storing.
Never submerge the iron in water or hold it under a running tap.
Self-cleaning
In order to prevent the accumulation of harmful minerals that may obstruct the iron, and to guarantee correct heating and steam generation, we recommend that you use this function at least once a month, depending on frequency of use and the hardness of the water in your area.
- Turn the temperature selector to "MIN".
- Slide the steam control knob to the dry iron position (Fig. C).
- Fill the water deposit to the maximum level.
- Place the iron in an upright position, resting on its support base.
- Plug in the iron and turn the temperature dial to "MAX". Wait for the indicator light (4) to switch off.
- Turn the temperature selector to "MIN" and unplug the iron.
- Press and hold the self cleaning button (3). The water will start to drip through the stream holes. In order to make sure that all the water has emptied out, rock the iron slowly from side to side and forwards and backwards for 30 seconds. When rocking the iron, put the nose of the iron slightly lower that the back end to make sure that the water circulates completely. Let go of the self cleaning button after one minute.
- Iron over a damp cloth in order to clean the base.
- When you have finished, leave the iron to cool before storing.
11. IRONING TIPS
When selecting the temperature, follow the instructions printed on the label of the garment to be ironed. If the garment does not have a label, use the table below:
TEMPERATURE TABLE
| Fabric Temperature | ||
| Synthetic fibres | ● | ◇ |
| Silk | ● | ◇ |
| Wool | ●● | ◇ |
| Cotton | ●●● | ◇ |
| Linen | ●●● | ◇ |
If you have any doubts about the composition of the fabric, always begin ironing at a low temperature on a concealed part of the garment and slowly increase the temperature setting,
taking care not to spoil the fabric, until all the creases have disappeared.
- Fabrics such as velvet, wool, etc., and items such as gloves and bags, can be revamped by slowly passing the iron a few inches above them with the steam option on.
- Carpets can be made to look like new and furniture marks eliminated by lightly steaming the flattened area and then brushing gently.
- Divide the items to be ironed into temperature groups and begin with those that require the lowest setting.
Silken fabrics should be ironed inside out. - Wool, cotton and fine linen should be steam ironed inside out. Alternatively, you can iron them the right way round covering them first with a thin piece of cloth to avoid "shiny" results. Starched fabrics need to be dampened slightly. For best results, iron white and light coloured garments the right way round, and dark and embroidered items inside out.
- Linen fabrics should be steam ironed. Use the spray option liberally and iron dark garments inside out to avoid "shiny" results. Iron lapels the right way round for best results.
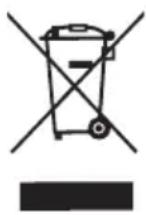
12. INFORMATION FOR THE CORRECT DISPOSAL OF ELECTRICAL AND ELECTRONIC APPLIANCES
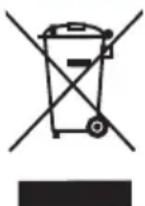
At the end of its working life, the product must not be disposed of as urban waste. It must be taken to a special local authority differentiated waste collection centre or to a dealer providing this service.
Disposing of a household appliance separately avoids possible negative consequences for the environment and health deriving from inappropriate disposal and enables the constituent materials to be recovered to obtain significant savings in energy and resources. To remind you that you must collaborate with a selective collection scheme, the symbol shown appears on the product warning you not to dispose of it in traditional refuse containers. For further information, contact your local authority or the shop where you bought the product.
1.DESCRIPTION (Fig.A)
2. TEXHnueCKXAPAKTEPNUCTUKN
BnKTe nactHaTa cTexHueckn XapaKTepnCTnKn.
ToBa n3dJIe OTOBapr Ha n3NCKBaHnraHa EbponeckTe DnpeKtNB 3a eJektpomarHnTHa CbBMecTmOCT HnCKO HanpexKeHne.
3. ПРавиJA 3A CnγΥPHOCT
- Ппдп nbрba ynoTpe6a npooyTeTe BHNMaTeJIHNO KHNKKkAta C nHCTpyKuINTe n 3ana3eTe 3a 6bdeu KoHcyIaU. CaMo Taka e Bb3MOxHo Da NoCTnHHe TaHa-Ndo6pN pezynTaN pni ynoTpe6aTa Ha ypeDa, KaKTo n MaKcImaJHa CNyPhOCT.
- Ппдп пьва уnotpeба на урда
- поверете далн наржениTo Ha
- Баша телктуесka мржа отраварHa
- отбелязаноТВьрху урда.
B cnuyaHa HecbOTBeTCTBme MeKdy KOHTaKaTa N uencela Ha ypeDa CMeHeTe KOHTaKaTa C npy TnOxOJaK KaTO ce OsbpHETe 3a NOMoU KbM IpOpcENoHaJIHo
KbannpuiapaHo liue.
TexHnueckata cnrypnoct Ha ypea ce rapaHTnpa cMo B cnya, Ye CbuiyTe BkIIOUeH KbM ePINKACHO 3a3EmHa eJekTPnuecka HnCTaIauN B cBOTBEcTBNE C DeIcTBAuNTe HOpMN 3a eJekTPnuecka cnypnoct. Ppon3BOIDTEJIAT He Hocn OTROBOPHOCT 3a Bpei npuHHeH NT HeH3PiPaBHn I He Do6pe 3a3EmH N KOHTAKTN. B clyuaH Na CbMHHeHne O6pbuaTe CE KbM npoPecNoHaHNO KBaINpUpaHn CneuaNInCTN.
CleI KaTo pa30nakOBaTe ypeI npOBepTe daIIeBdo6po CbCToHne.BcnyaHa cBmHeHne He rO n3PON3BaIte N ce 06bpHeTe 3a NOMOu KbM ynpabOMoUeH UENTbP 3a TEXHnuecka noDpBkKa.
CbXpaHTe OINbKOaHnT MaTePnaI (HaJIIOHOBn PIIKOBe, CTIpOIp N Dp.I.) daley OT DOCTbNa Ha Deca, Tb KATO npedCTaBnBa NOTehuaneH N3TOUHnK Ha ONaCHOCT.
He npenopbUbaMe ynoTppeBaTa Ha aanTOpn, uencel n/nnu ydbnxnteHa Ako ynoTppeBaTa mE hanoXHTeHa n3NoJ3BaIte cAmO Te3N, KOITO OTROBAPr HA CbIeCTByBaINTe HOPMn 3a CNyphOCT, KATO BHMAbate Da He npebuwaBATE MOHOCTTa Ha aanToppa n/nn 3axpaHbauin Ka6eI.
To3n ypeE npedHa3HaeH 3a DomaHa ynoTpe6a.BcKaKbA pyra ynoTpe6a ce CHTa 3a HeadeKBaTHa N/INn Onacha.
- Поньдпелгг He HOCN OTROBOPHCT 3a BpeДи пчнHeH ON HeNPaBnHa, nOprEshHa IIN HeAeKbATHa yNoTpe6a Ha ypeDa, KaKTo N 3a BpeDn B CNeIcTBVe Ha nOppaBKn N3BbPseHn OT HeKBaIInФИрани Лца.
YnoTpe6aTa Ha eNeKTpneckn ypeNi 3nCKBa Cna3BaHeto Ha onpeJeIeHn npaBnla 3a cnrypHOCT,
A VIMEHHO:
He n3noJ3BaIte ypeJa aKO pIeTe/KePaKaTa Bn Ca MOKpn IIN BnaXHi.
He notanHne ypea BbB BOa, HnTo ro nocTabrTe NOK KpaHa C Teuasa BOa C cen Hanpimep DOINBaHe Ha BOa BbB pe3epBoapa.
He n3noJ3BaIte ypeDa B MOKpn NOMeUeHn, KaTo HApPImep 6aHn.
He no3B0nBaIe ynoTpe6aTa ha ypeHa ot deca.
He octaBnTe BkIIOueHn ypeI 6e3 HaI3Op, TbKATO npeICTaBJIraBa I3TOUHnK Ha OnaCHOCT.
- Пи ИЗКЛЮВане на урета He Дьрпайтkaбena.
- I3KIOUByeYpeaOT MPexKaTAppei N3BbPbBaHeTo Ha KaKBaTO n da6nIO OepaunI No PndpBxKkTa nnNoCHTBaHETo Ha ypea.
B cnuyaHa aBapnIuHHe npabHIO H cyHKUHOHPaHe n3KIOUeTe ypeDa 6e3 Da ce ONITBaTe Da rO nonpaBte. Ako e Heo6xOIMa nonpaBka Ha ypeDa o6pbuaTe Ce 3a NOMOc Camo KbM ynpabOMoueH OT pON3BOIDNTeJIaTexHnueCKn CepBn3 IN 3NCKBaITe PnI NonpaBkata My Da 6bDaT IN3NOJ3BAHn OpINHAJIHn pe3epBHN qactN. HeCna3BaHTo Ha Te3N IN3NCKBaHn 6n NOCTABINO B ONaCHOC TcIpypHOCTTa Ha ypeDa.
- Iotpe6nteJIrT He Tp6Ba Da ce ONITBa da CmHn Ka6eNa. B clyuay, Ye cIbIaTe pa3BaJIeH nII CE HAnara HerOBaTa CmHa o6pbUaIte Ce 3a NOMOc Camo KbM ynpabOMOueH OT pON3BOJNTeJIa TEXHnueCKn cepBn3. He n3No13BaIte ynpeda B clyuay, Ye Ka6eIbT nII uenCeIbT ca NobpeJeH.
- ɪnʒaɪrBaɪte KoHtɑkTa Mexkʌy Kaβeɪa Ha ypeɪda n ropeɪnte My qʌctɪ.
- Ynotpe6aTa Ha To3n ypeI e Cbbp3aHa C BnCOKN TEMnepaTypn, KOInTo e NOTeHuaJHo Bb3MOxHO Da npeiN3BVKAT N3rapAHH. ITO Ta3n npuHna e Heo6XoDmO Da XBaUaTe ypeDa 3a DpbKkata My N da N36raRbATE KOHTaKTa C MeTaNHTe Yactn Ha ypeDa N/INn C napata.
He haoBaIte napHaTa cTpya KbM Xopa, TbKATO TOBa MoKe Da 6bJe MHoro OnaCHO.
He n3noI3BaIte ypeDa Bbpxy ocObeHo BnaJKNI PnIaTOBe.
- Ipei Da ocTaBnTe TOnIaTa IOTnIa Ta Bbpy NoCTaBKaTa N3uKaAte Da n3CTnHe.
He rnaTe nlaTOBe c haneHbpxy TEx npenapatn 3a OTcpaHBAhe Ha neTHa nn dpyrnoo6Hn.
- I3KJIIOUByaIe ypeIa OT MpeXaTAt, KOraTo He ro n3noI3BaTe. He ocTaBnTe ypeDa BKJIIOUeH, KOraTO He e Heo6xOIMo.
To3n ypeI e cna6eH cbc cneuaHOppeIe ocNrypRABaIO cnryphOCTTa My. Ppi
3aDeiCTBaHe Ha peJeTo ypeJa npeCTaBa Da pa6OTn. 3a da ro n3POn3BaTe OTHOBO e Heo6xOJIMo Da ce O6bPHeTe KbM ynpabOMoIe H cepBn3 3a TexHnuecka IOpDpBxxKa.
Korato peuTe da He n3noBate Buey ypea npedn da ro n3XBpInTe e dope da ro HanpaBte HEn3NoJ3Baem, KaTo HanpImep cpeke 3axpaHbauin My Ka6en.
- I3noJ3BaIte n octaBnTe IOTnTa Bbpxy CtaBnHn NOBbpxHOCTn.
- Пи постаяну наюгту вьрху постаяну се осигуретe, чп постýховоста устий.
He n3no3BaIte IOTnraTb CnyaH,ye e naHaHa, no He Ce Ha6IIOdaBAt OeBnDn IOBpei nn Teue B0da OT He.
-ДрьжTe eNeKtpnuecknte ypeNi daleye otdoCTbNaHa Deca NIN 6oHn Xopa.He nO3BOJRABaIte Da n3NoJ3BaT IOTnra 6e3 Na6JIIODeHne OT Bb3paCTeH.
- IotpebnteHt HaIOTnTa He Tp6Ba Da octaBkJIIOUeHnB MPexKaTa ypei 6e3 Hau3Op.
- YpeBbT Tp6Ba Da 6bDe n3KlOueH OT MpeKaTa IpeDn PbJIHeHTo Ha pe3epBoapa C BODa.
To3n ypeMoKeJa 6bJe n3NoJ3BaH OT DeUa HaI 8 roNnHa Bb3pact N OT JnCa C pIn3NuCeKn, NCINXuCeKn IIN CeH3OpHN YBpeKDaHn IAOT TaKNBa, HA KOnTO JInCBaT ONIT IN 3HaHnA, CAMO aKO 6bDaT HAd3nPaBaHn IIN ca 6bJIn OByeHn 3a 6e3oNaChTo n3NoJ3BaHe Ha ypeJa n pa3bupat OnaChOCTnte, KOIn To npedNoJara.
-ДрьхтЕ IOTNЯТа И Кабела Ha HeNoCTbNHO 3a DeцаТпОД 8-ROdINHa Bb3pact MRCTO, DOKATO T E BKJIIOUeHa INI IN3CTNBA.
- Deuata Tp6Ba Da 6bDaT Na6IouBaHn I da He ce octaBra Da NrgpaT C ypeHa.
3a no-do6pa 3aunTa ce npenOpbUba nHCTaJIIPAHeTo Ha npedna3HO yCTpoiCtBO 3a oCTaTBueH TOK (IOVT) c pa60TeH OCTaTBueH TOK He NOBuee ot 30 mA. O6bpHeTe ce 3a CbBET KbM Baunr eNeKTpOTexnK.
He no3B0JBAIte DeaTa Da N3BbPWBat pa6OTte NO NOCTBaHe n peYJrphnnoDpKka, KOrato ca 6e3 Ha3Op.
He nnaIte NOBbpxHOCTnTe,OT6eJIaHn CbC 3HaKa ,IO BpeMe Ha rJaDeHe,HHTO HENOCpeIcTBeHO CneI TOBa. Topeu ca! (Pnc. I,Pnc.J)
aalaiy aaii i jie gao gao
Jaaui jaii i aikai jiaii Jaaui pae
jll Jiaiu Jibu Zlaull
jbs Jsi jia jia jia jia jia
y j 1
"Jlalj 4
11111111111111111111111111111111111111111111111
y jlll l 5
.5
(2)
(7)
(3)
4
.5
.6
.6
.6
.6
.6
.6
.6
.6
.6
.6
.6
.6
.6
.6
.6
.6
.6
.6
.6
.6
.6
.6
.6
.6
.6
.6
.6
.6
.6
.6
.6
.6
.6
.6
J 1
(ω.C) 7
.1
J 5
.2
J .3
J
J
J
J
J
J
J
J
J
J
J
J
J
J
J
J
J
J
J
J
J
J
J
J
J
J
J
J
J
J
J
J
J
J
J
J
J
J
J
J
J
J
J
J
J
J
J
J
J
J
J
J
J
J
J
J
J
J
J
J
J
J
J
J
J
J
J
J
J
J
J
J
J
J
J
J
J
J
J
J
J
J
J
J
J
1
1aaii i g 100000000000000000000000000000000000000000000000000000000000000000000000000000000000000
-
-
-
-
-
-
-
-
-
-
-
-
-
-
-
-
-
-
-
-
-
-
-
-
-
-
-
-
-
-
- 1.
-
-
-
-
-
-
-
-
-
-
-
-
-
-
-
-
-
-
-
-
-
-
-
-
-
-
-
-
-
5
(4)
LolalbIgSall "NIM" aiaa aaii 6
(3) aaiil bail jglbail 1
Jlll lal g no laill 8 clall
30 1
Ls clll jn no slll lglis n yjio jio jol gai gai gai gai
a
Jia Jia jia jia jia jia jia jia jia jia jia jia jia jia jia jia jia jia jia jia jia jia jia jia jia jia jia jia jia jia jia jia jia jia jia jia jia jia jia jia jia jia jia jia jia jia jia jia jia jia jia jia
i 9
1 1
a a a a a a a a a a a a a a a a a a
i j 1
S_1 = 12 · 2^1 × 2^1 = 12
aally glll 5ayg jll jll lall
"Jalll" 5aii jy
2. TEXHnueCKNEXAPAKTEPNUKNI
Cm. TexHnueckne xapaKTePncTnKn.
DaHHoe yCTpoiCtBO OTBeueaET EBPoneiCKm TpeoBaHnM K 3JIeKTPOMaHRHTHOI COBMeCTUMOCTN Hn3KOMy HAnpJKeHIO.
3. MEPbI BE3ONACHOCTN
- Пөждүхem Исплбзоваы устюctво В перьий ра3, Виимаельно почтinte Инструкшю по ЗКСПЛУаТAUМИ COXРANITE ee.
- Y6eIITecb,чTO HAnpJxHHe CEtN N MOUHOCTb pO3eTOK COBnaJaOT C XapaKTePnCTnKaMn, yKa3aHHbIMn Ha yCTpoIcTBe.
Bcnyae HecOBnadeHn WTeNCen yCTpoNCTBa n po3eTK, o6paTntEc 3a NOMOuK CneuaJIncTam dIa 3aMeHbI po3eTK. - 3NeKtpnuecka6e30nacHocTb yCTpOInCTBa rapaHTnpoBAHa TOJIbKO B TOM Cnyae,ecNI yCTpOInCTBO NOkNIOHeK 3a3EmNEHHo CNCTeme 3NeKtpOnITaHHa. B IpOTINBOM Cnyae Heo6xOIMMO OpaTnTBcK CneUaJIInCTam.
PON3BODITeH He HecET OTBETCTBEHHOCTN 3a NOBpeKDeHnB O3HnKUne n3-3a NOKIIOUeHnY yCTpOJCTBa K He3a3EmHeHHo CNTeMe 3JIeKTPoNtAHn.
- Iocne ChrTn yNakOBKn, y6eNTecb B ueIOCTHOCTn yCTpOInCTBa. B cnyae ero NOBpeXdEHnI NII KaKNX-Ni60 COMHeHNI OTHCOTJIbHO ueIOCTHOCTNu YCTpOInCTBa, He NCNoJIb3yInTe yCTpOInCTBO n O6paTNTecb B COOTBETCTByIOUIN CEHTp TEXHnueCKo IODepKKn.
-ДетамЗапpeшаetсИграьсулakOBКОI (Пл actIKOBbie NaKeTbl,пehonJIaCTиТ.D.),Т.K. OHa MoKET cTaTb NICTOCHKOM ONaCHOCTN.
He peKOMeHdyETcH NcNoJIb3OBAbT pa3JIuHOro poJa aIaIITepbI, MHOJKeCTBHeHHbIe po3EtKn I/ nn dIINHHbIe KaBeJI. Ppi nCNoJIb3OBAHn KAKoro-JIb60 n3 nepeUncIeHHbIX yCTPOiCTB, NcNoJIb3yIte TOnbKO Te aIaIITepbI I/nn KaBeJI, KOtOpbie OTBeuaIOT Tpe6OBAHnAM 6e3OnacHocTn. CNeIte 3a Tem, YTO6bl ppi NcNoJIb3OBAHn DaHHbIX yCTPOiCTB MOUHOCTb peaJIbHaH He npEByIIaJyka3aAHHyIO Ha aIaIITpe n/Inn KaBeJIe.
-Данhoe yctpoCTBO npeHa3NaueHO TOnbKO ДЯ 6byTOBOrO npIMeHnI.ЛIO6oe dpyroE NcNoJIb3OBaHne yCTPOJCTBa CHTaETC HEdONyCTUMbIM N ONaChbIM. - PON3BOJNTeJIb He HecET OTBETCTBEHHOCTN 3a BO3MOXHbIe NOLOMKn YCTPOJCTBa B CBA3n C eTo HEOnyCTMlbIM, OUn6OChbIM NCIOJIb3OBaHNem W/INB CBA3n C peMOHTbIMn pa6OTAMn, PpOBdIMbIMn HEHaJIeXaUIM NepCOHaJOM.
IcnoJb3OBAHne 3JIeKTpNueCKoro yCTpoiCtBa Tpe6yET co6JIIODeHnI ONpeDEJIeHHbIX Mep 6e3OnaChOCTn:
He TpOraIte yCTpoiCTBO MOKpbIMn IIN BJIaXHbIMn pykAm, TaKxHe HcNoJIb3yInTe yCTpoiCTBO, ecNn Bblc MOKpbIMn Horamn.
He norpykaTe yCTPOIcTBo B BoNy, He NOdHocnte yCTPOIcTBo POn KpaN C BOIOI.
He nCnoJIb3yIte yCTpoIcTBO BO BnaxHbIX NOMeUeHnIX (BaHHa KOMHaTa N T.D.)
He n03BOJnTe nCnOJIb3OBaTb yCTpOInCTBO DETAM.
He octabnIte yCTPOcTBO BKIOueHHbIM 6e3 BHIMAHN, T.K. OHO MOKET IOCJyXNTb NCTOCHIKOM ONaCHOCTN.
- ΑЯ OTOCoEДиHEnIyCTpoIcTBA OT cETn He TRHInTe 3a Ka6eJIb.
Bcerda otKIOUaTe yCTPOIcTBo nepei erO YnCTKOI nII pEMOHToM.
B CNYaE NOLOMKN INI HHeAIDeXaUeJ pa60tbl yCTPOICTBA,a TaKKe Iprn Heo6xOIMOCTN 3aMeHbI KaKOJ-NIO Bo DeTANI, BbIKIOHHTe yCTPOICTBO N O6paTITcEcb 3a IOMOuBb BO COOTBeTCTByIOUm UeHTp TEXHnueCKo IODepKKn. He nbTaIaTcEcb NoHNHTb yCTPOICTBO CBOUMN CINAmN. He co6NIoJaB BbIe YKa3aHHbIE INHCTpyKUm, 6e3ONaCHOCTb yCTPOICTBa MOKeT 6bITb NOI yrpo30i.
Дязамени Кабель слуае erо
новөхдөнгий образитесь в COOTВETCTBYЮций
цэрп Тхнчecкоюдөрхк. He MeнгтЕ
Кабель CBONMслам.
CneIte 3a TEM, yTo6bI Ka6eIb He npKacanc KHarpeBaIOUIMCn NOBepXHOCTM yTHora.
Bo Bpemra60tby yctpoiCTBO doCTnIaET BbICOKoTtempeatpybl.Bo n36exKaHne NOlyeHnO xKOrOB npn pa6ote C yCTPOiCTBOM DePxNTE erO 3a pykky, He npKacaiTeCb K MetaJIInueckm NOBepXHOCTM yCTPOiCTBa, IN36eAHTe KOHTaKTa C napom.
He napabnntoTOK npaHaIIOJe.
He pa6oTaIe cyTHorom Ha Ype3MepHo BnaXHbIX NOBepxHOCTAX
He nomeaute HeoctbBwH yTOr Ha CneuaJIbHO npedHa3HaueHHyO dIra Hero OCHOBy. DoXdTeCb erO OCTbBaHnA.
He haoCte nTHOBbIOBNTeIN nn npyrncpeDCTBa Ha TkaHb nepeed ee rnaKoN.
OTcoeINHnTe yCTpOCTBO OT cETn Hc OCTaBnTe erB BKJIIOHeHHbIM B CJIyae erO HeNCIOJIb3OBAHnR.
-Данhoe yctpoCTBO 6bnaaet cnteMoB 6e3oNaChOCTN, KOTOPA B Clyae ee BKIOUeHn, OTKIOUaET yCTPOIcTBO.ДЯ BO3o6HOBJIeHn paobToI yCTPOIcTBA NOcJe erO OTKIOUeHn CNTeMOB 6e3oNaChOCTN Heo6xOJIMO O6paTITbcR B COOTBeTCTByIOuIN UENTp TEXHnueckO nOndepKKn.
B Cnyuae Heo6xOIMOCTN 36aBHeHn O T yCTPOIcTBa, BbIKIOHTe erO n 6peKbTe Ka6eJIb.
C yctpoiCTBOM Heo6xOIMo pa60TaTb Ha yCTOuHBOI NOBepXHOCTN.
IomeCTNB yCTPOINCTBO Ha IpeHa3NaeHHyO emy nDnepxNBAIO OCHOBy y6eNTecb, YTO daHna OCHOBa yCTOnHbA.
He nCnoJIb3yIte yCTpoIcTBO,ecnO OHO naIaNo IIN IMeET NOBpeKdEHN,A TaKKe B Cnyae BbITEKaHNA BOblN3 yCTPOIcTBA.
- DeTAM CTapWe 8 let N IInuam C OpraHnueHHbIMN cn3nueCKIMN, NCNXnueCKIMN INI INCEHCOPHBIMN BO3MOXHOCTHMN, a TaKKe IINUaM C HeIOCTaTOOHbIM ONbITOM IN 3HaHnARMM pa3peWaeTcR NOJb3OBaTBcR 3TNM PnIBOPOM TObKO IOd INPnCMOTpOM INI INocLe IHCTpykTaKa PO NOJIb3OBaHIO IM C CO6JIIODeHNem PpaBnI TEXHKn6Be3ONaCHOCTN IN PnYcIOBm, YTO TAKHe JInca OCO3HaIOT ONaCHOCTN, CBr3aHHbIE C NOJb3OBaHNem PnIBOPOM.
Korda np6op BkHoueH BCtB NIN OCTbIBAeT, OH (BkHIOyA HHyp NITaHNA) DOJKeH HAXOINTbC B MecTe, HeoCTynHom DnA TeE MnA dIe 8 neT.
He octabnTe BKIOeHHoe yCTpoIcTBO 6e3 BHIMAHINr. - PpexKe Yem HauNbaTb Body By yCTPOcTBO, OTKJIouHtE yCTPOcTBO OT CETN.
- DeTAM 3aIpeuaeTcN IRpaTb C yCTPOINCTBOM.
Дябьшьбз�аCHOCTN peKOMHdyETcYCTaHOBTb yCTpOINCTBO JnKHTPOJn TOKaYTeuKN (RCD-BblKnIouaTeJIb).MaKcImaJIbHbIMOctaTOUHbI TK-30MA.ПО BONPocamycTahOBKn RCD-BblKJIIOuaTeJIЯ ObaTInTeCb 3aNOMOUsbK CneUaJINCTy.
He no3BOJIrTe DeTAM BbIOnHrTb nOlb3OBaTeJIbCKne Oepaunn No YnCTKe n 06cnyXnBaHNIO np6opa 6e3 npncMoTpa B3pocJIbIX.
He npikacaiTecb K NOBepxHocTAM, 0603HaueHHbIM NIKTORpAMMOI BBO BpeMn cpa3y nocJe rlaXeHb. OHI ropYne! (Pnc. I, pnc.J).
4. INPEKDE YEM INCIOJIb3OBATb YCTPOICTBO BNEPBbIE
Chmnte 3aunthyIO nIeHky C Kopnyca n pa6oey nobepxHOCTN yCTPOINCTBa.
Pa3MOaTe N BbInpMaTte Ka6eJIb. DaJeecneDyIte n. 10 «UcCTKa yCtpoiCTBa, CamoouNcTka» INHCTpyKUnn.
PEKOMEHDAUINK NCIOJIb3OBAHNUO YCTPOICTBA
5.CYXARIAXKA
1.PacnoJoxHte yCTpoIcTBO Ha yCTOuYBOHn HeNoDBepXeHHoT TeNIOBbIM N3MeHeHNrM NOBepxHOCTN.
2. Пивадпетеруларов TempepaTporopexima (2)В поожене MIN (B).
- Ybeintecb, YTO peryIaTOp noJaH napa (7) HaxoINTcB NIOJoxeHN «Cyxa IraKka» (C).
- PacnoIoxnTe yCTpOInCTBO BepTnKaJIbHNO, NOCTaBnB erO Ha 3aDHIO uAcTb (10).
- BkIIOUHTe yCTPOINCTBO N BbI6epTe HxHbIM TempeaTpyHbIM peKIM, NOBOpauHBa COOTBeTCTByIOuIM peYJATop. DoJKeH 3arOpetbcr CBETOBO INHnKaTOp.
- После тoro, кak yctpoicTBO harpeetcdo Heo6xOIMoI TemnepaTypbl, CBETOBINHdkaTOp rachet.BoBpemr IJaxKINCBETOBONHdkaTOpMnraeT, O603Haayam TEm cambIM uNKJIbIcpabaTBiBaHnI TepmoperyIaTopa.
7.ObpaTte BHMaHne Ha To, YTO B cnUyae n3MeHeHn TaMnepaTyphoro peXIMa B npOceCpe pa60TbHa 6oJee Hn3Km,CBeTOBOu INDnKaTOp (4) rachET N 3aRopaETcra TOnbKO NO DOCTNKeHnO pa6OueI IOBepxHOCTn yka3aHHoI TEMnepaTypbl. - ПО OKOHанглжкnoBepHnTepeYJrTOp TemNepaTyphoro pexmAbNoIoxKeHne MIN n OTKJIouHte yTIOrg.PpeXe Yem y6paTb yCTpoINCTBO nIInpNCTyInTB K YnCTKe yCTpoINCTBa,doXdNTecb, NOKA OHO OCTbIHET. PpncCyXoI rJaXke MoXHo pa36pbI3rNBaTbBOdy Ha TKAHb HaxaTNEm HaCOOTBETCTByUOyU KHOKNky. IpePe3TMM npOBepbTe HaJIuHne BObl Bpe3epByape. (Cm. n. «Pa36pbI3rNBaHneBOdbI» n «HaNoJIHeHne pe3epByapaBODoI>).
6. HANOJIHEHNE PE3EPBYAPA BOdOJ
OTKJIIOHTe npacnoJoxnTe yCTPOIcTBO Ha YCTOINBOI NOBepxHOCTN.
1.Перемecnte peryIaTOp noIaUn npaВ noIoxKeHne «cYxA rIaxKa» (C).
2. OTKpoIte KpbIuKy BXoHOrO OTBepCTnA DnI NOaU BODbl.
3. MeДлЕнно 3aJIeITe BODY B pe3epByap. ДЯ 3TOrO NOJb3yIteCb CneUaJIbHbIM cTaKaHOM. (D). He 3aJIbBaIte MoIOUne cpeIcTBA IIN pAcTBOpITeN B pe3epByap.
4.CneIte 3a Tem, YTO6bI BODa He npeBbICnla MaKcImaJIbHbI yPOBeHb, yKa3aHHbI Ha pe3epByape.
PpIMeAHHe: PnB bICOKoJ XeCTKOCTN BObl (>27^) peKOMeHdyETc HcNoJIb3OBaTB dNCTUJInpOBAHHyIO BOy. He NcNoJIb3yIte NepeKncb BOOpOda, BOy Cdo6aBJIeHNMAHn PpIMecen, Kpaxmana, apomATn3aTOPOB, CMrHTeJeJ XeCTKOCTN.
7.ΓJIAXKA C NCHIOJIb3OBAHHEM IAPA
Ipejde Yem npntyntb K rnaXke C nCnoJIb3OBaHnEM npap, y6eDntecb, TTO TKaHb NOxOHT NOd 3TOT TnT IaXKN. Pn BbICOKo JxcctKocTN BObl (60nee 27^) pekomeHdyetc nCnoJIb3OBaTb dNCTnJInpOBaHHyU Body 6e3 KaKnx- li6o npimecen.
1.PacnoJoxKeTe yCTpoIcTBO Ha yCTOuHBOI HENoDBePKeHHoTENIOBbIM N3MeHENHM NOBepXHOCTN.
2. HanoHnTe pe3epByap BOoI (CM. n. «HanoHneHne pe3epByapa BOoI»).
3. Iepemecnte peryIaTOp TemnepaTyphoro pexima (2) B noJoxHe MIN (B).
4. PacnoIoxTe yctpoNCTBO BepTnKaJIbHNO, nOCTaBnB eRo Ha 3aAnHO uAcTb. (10).
5. Bключnte yctpoicTBOи NOBepHnTe peryIaTOp TempepaTyphoro pexKIMa B nOLOXeHne « ● ● » (3 TOnKn) nII N B nOLOXeHne MAX.ДЯdoCTNXeHnHaNnyuJero 3ФpeKta npr rJaXkn C nCNoIb3ObaHnEM npa He nobopaunBaIte peryIaTOp TempepaTyphoro pexKIMa B nOLOXeHne « ● » (1 TOnKa) nII N « ● ● » (2 TOnKn).ДоLKeH 3aropeTbcR CBETOBo INdNKaTOp (4).ПocNe toro, KaK yCTpOINCTBO HarpeetcN Do Heo6xOdMOn TEmpaTypbI, CBETOBO INdNKaTOp raChET.Bo Bpemr rJaXkn CBETOBO INdNKaTOp MInaeT, O6O3Haayam TEM camblm LkNbI cpaBaTbIBAHn TepMopeyIaTopa.
Оьрати БИМанe Ha To,ЧToВ cIyuae ИЗмeнeЯ TempeaTypHOro pexnmaВ npOcece pa60tbl Ha 6OJee Hn3Km,CBeTOBOu INHdNKaTOp (4) rachET N 3aRopaeTcra TOnbKO nO DoCTNKeHIO pa6OHe NOBepxHOCTn yKa3aHHoN TempeaTpybl.
NcNoJIb3OBaHnHe 3a6bIBaIe BblINBaTb BOy n3 pe3epByapa N OCTaBnTb yCTPOIcTB0 OCTbIBaTb, npexde yem y6paTb erO.
He norpykaite yctpoicTBO B BODy, He noDHocnte yctpoicTBO NOKpaH C BOIO. Camooqntka:
Bo n36exaHne cKoJIeHnMHepaIOB, KOToPbIe MOryT NOBpeINr b yCTpoiCTBO,a TaKxE IJRA HOpMaIbHOrO cyHKUHOHPOBaHHa YcTPOICTBA Heo6XoIMMO MNHMym pa3 B MeCaU (Yactota npImeHHeNHa cyHKUIN CamooHCTKN 3aBNCIT OT XeCTKOCTN BOdBi) NOBBePraTB yCTpoiCTBO CamooHCTKe.
1.Повернite ретуларт Temпepатурогоржима в поожене MIN/
2. Повернite рergyлгор поадуни па в положене «сухая глижka» (C).
3. HanoHnTe pe3epByap BOoI Do MaKcImaJIbHOI OTMETKN.
4. PacnoJoxKeTe yCtpoNCTBO BepTnKaJIbHO.
5. BkIIOHTe yCTpOcTBO n NOBepHITeperyIaTOp TEMpepaTyPHoro pexImaB noLOXKeHne MAX.DoKdntEcB, nokaNORaCHET CBETAunCnHINKaTOp.
6. ПовернITE рениларов Temпаурно ржима в поожене MINи OTКлочиустор CTBO.
7.HaXMMTe n ydePknBaIte KHONky camooNCTKn (3). N3 napOBbIX OTBepCTn Ha pa6Oey NOBepXHOCTn DOJXHa HauAtb KaNaTb BOda. YTo6bl y6eDITbcR, YTO BcR BOda BblJa, HAKIOHnTE yCTPOIcTB O B CTOpOHbI B TeueHne 30 cek. OToXMnTe KHONKY camooNCTKn CnYCTH MNHyTu.
8. Побете пабочи похостью усточа по влжонTKани,чобь Oпспь похость.
9. Праздуем убраь устpoиCTBO, OCTaBBte erO OCTbIBaTb.
11. PEKOMEHДALIIM K PABOTE C UCTPOICTBOM
B MOMENT BbIbopa TempepaTyphoro peximma
obpatnte BHIMAHNE Ha 3TtKeTKy OeKdbi
c pekomehdaunmno yxody. B cnyae
OTcyTCTBnA 3TtKeTKn Hxke npNBedeHa
Ta6nla dnn oBnreHnBbopa
TempepaTyphoro peximma.
TEMNEPATYPHA TABJILLA
| Тkaнь | Temпературный разхим | |
| Си ntety checkne MaTePn | ● | ☆ |
| Шелк | ● | ☆ |
| Шерstь | ●● | ☆ |
| Хлобok | ●●● | ☆ |
| Лен | ●●● | ☆ |
Ecn n cTb COMHeHn OTHOCHTeIbHO COCTaBa TKAHN,HaHnTe rJaXky C 60Jee Hn3KOro TEMpepaTyphoro peXIMa C KpaEB BeUIN IOBbIaIte TEMpepaTypy NOCTeNEHNO, YTO6bl He NOBpeDntb TKaHb,do TEX NOP NOKa He pa3rnaATcBCE CKJaDKN.
- PerboHaaybHbI BnD TaKx TkaHei KaK 3aMwa N T.D. (NepuATKn, CymKn) MoXHO BOCCTaHOBNTb, PPOBOJ paOObey IOBepxHOCTbO YCTpOJcTBA Ha He6OJIbWOM PaCCToRHN OT TKAHN, BO3dEINCTByr Ha Hee TOJbKO napOM.
- 136abntbcrOT cIeIOB Me6JIHa KObpe TaKKe BO3MOXHO NOCpeDCTBOM npa, nocJe 6pa6OTKn CJIeIOB napOM aKKypaTHo paChueWNTe npNXkTBI BOPc UETKOJ.
- Галытевши, собл�дая Temпературный ржим. Первим Галытевши, Требуюше НИЗКОД Temпературь дли разглaxнваши.
- BeiNi n3 IeJkoBOI TkaHn Heo6xOIMo rlaNTb C n3HaHKN.
- Beu n3 uepctn, xionka n TOHKOro nbHa MoXHO rnaNTb KaK c n3HaHKn, TaK n C IInueBOI CTOpOHbI, 3apaHee npoloxNB MeKdy paOohey NOBepxHOCTbIO yCTPOiCTBa IN TKaHbIO Beu ToHkyo MaTePnIO. 3TO I03BOIIT N36ExKaTb 6IeCKa Ha TKAHN. HApaxMaJIeHHbIE TKAHN HyXdAIOTcB 60JbWe BnaxHOCTn pni rnaXKe.
- BeIbIe, CBETbIe TkaHn peKOMeHdyetcraTlaIITb C JIuCEBOI CTOpOHbl, TEMHbIe - CIN3HaHKn.
TkaHn n3 NbHa peKOMeHnyeTCrIaIITb C 60JIbIIM KOINueCTBOM npa,TeMHbIe TkaHn TaKKe peKOMeHnyeTCrIaIITb C I3HaHKn, YTObI N36ExKaTb 6Necka Ha TkaHn. - LaцkaHbI pa3nUHOro poJa OTBOpOTbI peKOMeHnyETcR rJaAHTb C JInCeBOI CTOpOHbl.
12. INHΦOPMAÇU O ПРABNJbHOJ YTNJI3AUÇN 3JEKTPNUCECKNX I 3JEKTPOHHbIX PIPNBOPOB
Iocne OKOHuaHncaPOKa Cnyx6bl, DaHHbINpN6Op He DoJXeHytIN3npOBaTbcB BMeCTc6 bITOBbIMN OTXdAMN. OH MoKET 6bl TpeDaHBCNEuAJIbHbIE ueHTpbI
dHcpeHcnpoBaHOrO c6pa
OTXoOB,HaxoJIeCBA BeDMCTBe
MyHnIINaJIbHbIX BnacteN,IIaAreHTam,
pa6oTaIOUIMB daHHoCpepe ycnyr.
Pa3deIbHaYtIN3auaN 6blTOBbIX
3JIeKTPoPnp6OpOB IO3BOJnEET N36ExaTb
BO3MOxHbIX HeratNBbIX NocJeDCTBn
IJa OKpyKaIOuSei Cpebl N 3doPoBb
JIIODei,KOTOpbIE MOyT IMeTb MeCTO
BCJeDCTBHe HnPaBnJIbHOYtIN3aUIN,
a TaKxe IO3BOJnE T NOBTOpHo
NCNoJIb30BaTb MaTePnaJIbI,BXODJUne
B COCTAB 3TNX np6OpOB,N DoBntbcra,
TaKIM O6pa3OM,CyueCTBeHHoH
3KOHOOMN 3Heprn i PecypcoB. YTo6bl
IOUChEPKNyT Heo6XoDNMOCTb pa3DeJIbHO
YtINl3aUIN,Ha DaHHOM np6Ope HaHeceH
3NaK,PpeDynpexJaIOUmO 0 3anpeTe
ICNOJIb30BaHnI TpaAnIOuOHbIX MyCopHbIX
KoHTeHepOB. IJa nOlyueHnI 6OJee
IODpo6HOH INΦopMaUIN CBxKITecb
CMeCTHbIM OprAHOM BlaCTN IIIN C
Mara3InHom,Ie Bb npno6peIn daHHbI
IpOdyKT.