CR-14 - 2008 - Coffee machine FAGOR - Free user manual and instructions
Find the device manual for free CR-14 - 2008 FAGOR in PDF.
| Product type | Espresso coffee machine |
| Brand | FAGOR |
| Model | CR-14 (2008) |
| Power supply | 220-240 V ~ 50/60 Hz |
| Power | 1000 W (estimated) |
| Water tank capacity | 1.2 L (estimated) |
| Pressure | 15 bar (estimated) |
| Number of cups | 1 or 2 cups |
| Main functions | Coffee preparation, steam for milk, cup warmer, automatic shut-off, coffee quantity adjustment |
| Dimensions (L x P x H) | 30 x 25 x 35 cm (estimated) |
| Weight | 5 kg (estimated) |
| Material | Plastic and stainless steel |
| Color | Black (estimated) |
| Maintenance and cleaning | Regular cleaning of filters, water tank, drip tray; periodic descaling |
| Safety | Automatic shut-off, overheat protection, filter holder lock |
| Spare parts and repairability | Filters, filter holder, dosing spoon, steam wand, drip tray |
| General information | Household use only; complies with European directives |
Frequently Asked Questions - CR-14 - 2008 FAGOR
User questions about CR-14 - 2008 FAGOR
0 question about this device. Answer the ones you know or ask your own.
Ask a new question about this device
Download the instructions for your Coffee machine in PDF format for free! Find your manual CR-14 - 2008 - FAGOR and take your electronic device back in hand. On this page are published all the documents necessary for the use of your device. CR-14 - 2008 by FAGOR.
USER MANUAL CR-14 - 2008 FAGOR
The manufacturer reserves the right to modify the models described in this User's Manual.
PT - MANUAL DE INSTRUÇões
EN - INSTRUCTIONS FOR USE
FR - MANUEL D'UTILISATION
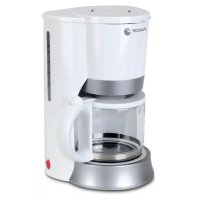
- Tank cover
- Filter housing
- Cup-warmer plate
- Pilot light
- Steam adjustment
- 1 cup button
- 2 cup button
- Start/stop button
- Steam outlet
- Drip tray
- Drip tray mesh
- Measuring scoop
- Water tank
- Filter holder
- Filter for 1 cup
- Filter for 2 cups
2. TECHNICAL CHARACTERISTICS
See characteristics plate.
This product complies with the European Directives on Electromagnetic Compatibility and Low Voltage.
3. SAFETY PRECAUTIONS
- Before using this appliance for the first time, read the following instructions carefully and keep them for future reference.
- Make sure that the mains voltage in your home corresponds to that indicated on the appliance.
- In the event of incompatibility between the mains socket and the appliance plug, replace the socket with a suitable one, using a qualified professional.
- The electrical safety of the appliance is only guaranteed if it is connected to an efficient earth installation, as foreseen in applicable electrical safety regulations. If in doubt, contact a qualified professional.
- The use of adaptors, multiple sockets and or extension cables is not recommended. Where it is not possible to avoid their use, only adaptors or
extensions that comply with applicable safety regulations should be used, and ensuring that the indicated voltage limit is not exceeded.
After removing the packaging, check that the appliance is in perfect condition, if in doubt, contact the nearest Technical Support Service.
- Packaging elements (plastic bags, polystyrene foam, etc.), should not be left within the reach of children because they can be dangerous.
- The appliance is for domestic use only. Any other use is considered unsuitable or dangerous.
- The manufacturer shall not be responsible for any damages that may arise from improper or inadequate use, or for repairs conducted by non-qualified personnel.
- Do not touch the appliance with wet or damp hands or feet.
- Keep the appliance separate from water or other liquids, to avoid electric shock; do not connect the appliance to the mains if it is on a damp surface.
- Place the appliance on a dry, firm and stable surface.
- Do not allow children or the disabled to handle the appliance unsupervised.
- This appliance should not be used by physically, sensorially or mentally handicapped people or people without experience or knowledge of it (including children), unless they are supervised or instructed in the use of the appliance by a person responsible for their safety.
Children should be watched to ensure they do not play with the appliance.
- For greater protection, we recommend installing a residual current device (RCD) with an operational residual current not exceeding 30mA . Ask your installer for advice.
- Do not leave the appliance unattended when it is turned on because it can be dangerous.
- When removing the plug never pull on the cable.
- Unplug the appliance before cleaning or maintenance.
- In the event of fault or malfunction where the appliance is not to be used, turn off
the appliance and do not attempt to repair. If a repair is required, contact a Technical Assistance Service authorised by the manufacturer and request the use of original spare parts.
- If the cable for this appliance is damaged, contact an authorised Technical Assistance Service for it to be replaced.
- Do not leave the appliance exposed to the elements (rain, sun, ice, etc.).
- Do not use or let any part of the appliance come into contact or near hot surfaces (kitchen gas or electric hobs or ovens).
- Do not use detergents or abrasive sponges to clean the appliance.
- Do not touch the hot surfaces. Use the handles.
- Do not let the cable come into contact with the hot parts of the appliance.
- Never use the appliance with no water in the tank.
- Do not heat inflammable liquids with the steam.
- The drip tray and mesh must be correctly fitted before operating the coffee maker.
- Warning! The steam outlet and the filter holder heat up when the coffee maker is working and there is a risk of scalding.
- When the coffee maker is working under pressure there is a risk of scalding. When preparing coffee, the filter holder must be correctly fitted.
- Do not remove the filter holder when the appliance is working.
- When the appliance is working the water in the tank must always be above the MIN level.
4. BEFORE USING FOR THE FIRST TIME
Before using the coffee machine for the first time wash the filters (15 and 16), the measuring scoop (12), the water tank (13) and the steam outlet (9) with soapy water. Rinse all the components well.
The inside of the coffee machine must also be cleaned. To do so fill the tank (13) with water and operate the machine without coffee several times one after the other.
5. STARTING UP
- Open the tank cover (1) and remove the tank (13). Fill the tank (13) with clean fresh water up to the MAX mark, and insert into the coffee machine again.
- Plug the coffee machine into the electrical supply and push the start/stop button (8). The pilot light (4) will start to flash.
- When connecting the coffee machine for the first time, it should be preheated. To do so push the button for 1 and 2 cups (6 and 7) at the same time for 3 seconds. The coffee machine will start to heat up and the pilot light (4) will flash until a suitable temperature for making coffee is reached.
- When the pilot light remains constant, the coffee machine will have reached a suitable temperature and will be ready to make coffee.
6. PREPARING A COFFEE
- Once the coffee maker has been started up, select a filter (15 or 16), place it in the filter holder (14) and fill it depending on the amount of coffee you wish to make.
One cup of coffee: Fill the filter for 1 cup (15) with a scoopful of ground coffee (7g).
- Two cups of coffee: Fill the filter for 2 cups (16) with two scoops of ground coffee (14g).
We recommend you use the scoop (12) provided as a measurement for a cup (7g) Press the coffee into the filter with the rear part of the scoop (12) and ensure that any loose coffee remaining on the outer edge of the filter holder is removed.
- Insert the filter holder into the machine (14) at the crown and turn it firmly from left to right (fig. B).
- Place one or two cups on the drip tray (11), under the filter holder (14) coffee spouts
- Push the button for 1 cup (6), if one cup of coffee is required (50cc); or the two-cup button (7) if we want to make two cups of coffee (100cc).
The coffee will start to be dispensed and will stop when the amount of coffee
programmed has been reached. Push the same button again to stop the coffee outlet.
- When the desired amount of coffee has been brewed, push the stop/start button (8) to stop the coffee maker and unplug the appliance from the mains.
7. ADJUSTING THE VOLUME OF THE COFFEE
The coffee maker will adjust the volume of the coffee for one or two cups.
- Push the button for one or two cups (6 or 7) for 3 seconds. The pilot light (4) will flash and the coffee will start to be dispensed.
- Push the same button again to stop the coffee being dispensed.
- The coffee machine will memorize the quantity of coffee it has dispensed and when the button for one or two cups is pressed, the adjusted amount will be obtained.
N.B.:
Maximum adjustment volume: 200cc
Minimum adjustment volume: 30cc
To return to the original adjustment push the button for 1 and 2 cups (6 and 7) at the same time for 3 seconds. The pilot light (4) will flash and the adjustment will change when the pilot light remains on.
8. WARMING CUPS
Place the coffee cups upside down on the hotplate (3). When the coffee maker is hot, the plate will heat the cups which are on it. The hot cups help create and maintain froth.
9. STEAM
- Turn the steam adjustment (5) to the position so that the coffee machine reaches the temperature to generate steam. The pilot light (4) will start to flash.
-
When the pilot light remains constant, the coffee machine will have reached a suitable temperature and will be ready to generate steam.
-
Place the steam outlet into (9) the liquid we want to heat and turn the steam adjuster (5) to the position. The steam will be released and the pilot light (4) will flash at the same time.
- When the liquid is hot enough, turn the steam adjuster (5) to the O position and steam will no longer be released and the pilot light will remain constant.
10. CLEANING AND MAINTENANCE
Before carrying out any cleaning or maintenance operations, unplug the coffee machine and wait until the coffee machine cools down.
Never immerse the coffee machine in water or use abrasive cleaning products.
- Clean the outside of the coffee machine with a soft damp cloth and dry well afterwards.
- Wash the water tank (10), the drip tray mesh (11), the drip tray (10) and the filters (15 and 16) with warm water and neutral soap.
- Clean the steam outlet (9) with a damp cloth.
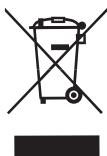
11. INFORMATION FOR THE CORRECT DISPOSAL OF ELECTRICAL AND ELECTRONIC APPLIANCES
At the end of its working life, the product must not be disposed of as urban waste. It must be taken to a special local authority differentiated waste collection centre or to a dealer providing this service.
Disposing of a household appliance separately avoids possible negative consequences for the environment and health deriving from inappropriate disposal and enables the constituent materials to be recovered to obtain significant savings in energy and resources. To remind you that you must collaborate with a selective collection scheme, the symbol shown appears on the product warning you not to dispose of it in traditional refuse containers.
For further information, contact your local authority or the shop where you bought the product.
1.DESCRIPTION
4. IPIN THN IIPQTH XPHSH
Pniv xnpoioutoiroTe Tnv kaepetepa yia Tpwtn opor, TpeTcVa Tluve tvepo kai aattouvi ta qiltpa (15 kai 16), to 0o0eptikokoutal (12), to doxio vepou (13) kai to mtek atou (9). ETTauve tkaa ola ta eapntmaata.
2. TEXHnueCKn XAPAKTEPNCTKN
BnKTe PnactHaTa C TexHueeKn XapakTepeCTnKn.
ToBa n3dJeIne OTROBAPHa n3NCKBaHnTHa Ha EbponeeCKNTe DnpeKtBN 3a eNeKTpOMarHNTHa CbBMecTmOcT HNCKO HanpeJxHe.
3.ИHCTPYKUIM 3A BE3OPIACHOCT
- П既是Да пОЛЗВATEза пьВИ пБТ apapaTа,прочTeTe BнIMaTeJIHо TОЗи НарчИК сИНСТPyкUMI И Го 3апазеТe 3a посLEДВаци спраВКИ.
- YBepete ce,Ye HnpejxehneTo Ha eJektpuyeckaT MaPexa B Doma Bn mOuHocCTTa Ha KOHTaKTA OTRObApT Ha NOCOueHnte Ha anapaTa.
B CnyaHa HecbBMcTmOCT MeKdy KOHTaTa N UeIeNlHa anapaTa, CMeHeTe KOHTaTa C NOxOJaU, KaTo NoJ3BaTe ycNITe Ha KBaIINPhiUpaH IpocsecnoHaJIInCT. - Be3oNaChocTt Ha anapaTa e rapaHTnpaHa cAmO, KOraTo ToI e BKJIuOeH KbM eΦnKaChO 3a3EmeH KOHTaKT, KaKTo N3NCKBaT DeiCTBaUITe HOpMn Ha eJEkTPuYeCa 6e3oNaChocT. B CnyaH Ha cbMHeHne, o6bPHeTe Ce KbM KBaIINΦnUpaH npocceNoHaJIncT.
He ce npenopbUba n3noJI3BaHepTo Ha aIaIaTOpN, paKJIOHnTeIN N/IIIn yIbJIKteIN. B clyaye e HanoXnTeHNO 3noJI3BaHepTO IM, Tp8Ba Da ce noJI3BaT caMo aIaNTOpN uYdJIJKteIN, KOITO OTROBaprHa JeicCTBaunTE HopMN Ha 6eONaCHOCT, KaTO o6bpHete BHIMAHne Da He ce IpeBnIaBA MaKcImaIHaTa MoUHOCT, 06o3NaueHa Ha aIaTOnpa.
CneI KaTo OTCpaHnTe oNaKOBkTa, npoBepTe DaJIa anapaTbE B OTJNUHO cbCTOHAHE.AKO eMaTe CbMHeHnA, 06bPHeTe Ce KbMa Hai-6JIIN3KnRA TeXHHueCKn cepBN3.
- OnakobbHnTE MaTePmaJI (HaJIIOHOBn IIIMKOBe, CTIpOIpOp I dp.) He TpIbBa Da ce OCTaBrt Ha IOCTbIIHN 3a DeIca MeCTa, TbJ KaTO Ca N3TOUHHK HA ONaCHOCTN.
To3n anapat trp6BaJa ce n3noJ3Ba cmo 3a domaknHcNcIeJI. BcraJa pyra ynoTpeBa Ice Ce CHTa 3a HeaJeKbatha HIn Onacha.
- IpoIN3BODIITeJIrT He HOCN OTROBOPHOCT 3a UcETn, KOnTO MOrAT Da Ce IbJXkaT Ha HeaJeKBaTHa INI INHePaNIIHa yNtpe6a INI Ha peMOHT, IN3BbPseHOT HeKBaJIINΦiUInpAH nepcoHaJI.
To3n ypeI He e npEHa3NaueH 3a nIIOJI3BaHe O T IuCa (B TOBa YncIo N DeCa) C fN3NuCeKn, CETNBn IIN yMCTBeHN yBpeJdAHn IIN Be3 ONIT N03HaHnO COBEN AKO He Ca KOHTpOJImpaHN IIN o6yEHn Da I3IOJI3BaT ypeA O T IINIeTO, KOEt OTOBapar 3a TExHaTa CInpyPHoCT.
- DeçaTÀ TPRÉBA Α Da 6bДaT HαBJIIOJàBaHи, 3a Da He CE DoNYCsa IYpIaR T cypèda.
3a no-io6pa 3aunTa ce npenopbYBa INHCTaIIpaHeTo Ha npedn3Ho yctpoiCTBO 3a OCTaTbUeH TOK (IOYT) c paOteH OcTaTbUeH TOK He IOBuee OT 30 mA. ObpHeTe ce 3a CbbET KbM BaIIN eJIeKTPOTEXHIK.
He bopabete c anapaTc c MOKpn IIN BnaJHn pbue INI CTbIaJIa.
3aДаизбгнTe TOKOB ydap,ДрьхTe anapapaДалачOT BODa ИЛДpyrTN TeHOCTN. He ro BKJIIOUBAIte, aKо се habIMpa Bbpxy BIAxHa IOBbpxHOCT.
- ПостаБеTe anapaTa Bbpy Cyxa, Tbpya И CTabnHa NOBbpxHocT.
He no3B0JIaBaIte Dea IIN HENpBaOcIOco6HnIuCa Da 6opBaTc aIapata Be3 HaI3Op.
He ocTae anapa TbkHueh, Tb KaTo MoKe Da bDe n3TOuHn HA ONaCHOCT.
CneI KaTo KaFemaunHaTa eNoIroTBeHa, n36epeTe eHINФmITbP (15nn16), NOCTaBete Ro Ha pBkoXBaTkata (14) n Iro HAnbJIHeTe B 3aBcIMoCT OT KOJInYeCTBOTo KaFe, KoEtO JeJaTe Da npiroTbITE:
- Edna yawa kafe: HanbIhete ΦnITbpa 3a 1 yawa (15) c eHa JbXuKa CmJHOn Kafe (7 r).
-ДBEЧИΝΚΑΦe:HAПБЛΗΝΕ ΦΙΝΤΒρа 3a2ЧИΝ(16)cДBEЛБЖИΚΝСΜΥΑΝΟΚΑΦe(14r).
IpeopbUbaMe Bn Da n3noB3BaTe npInIOxHeHaTa KbM KOMJIeKTA MePntEJIHa JbXuKa (12), KATo MApka 3a eJaHa Yaa (7 r).PiNTUCHeTe KaFeTO BBb FmTTbpa CbC 3aHnata CTpHa Ha MePntJIHaTAt JbXuKa (12) n3NCTeTe p6a Ha FmTTbpa OT N3NIULHO To KaFe.
- NocTaBeTe pBkoXbTaKaTc cΦnITbpa (14) B rHe3dTo, KaTo eHeprNHO ro 3aBbPTNTe OTJIABO HaJrCHO. (ΦnR.B).
IocTaBeTe eHa nIIM DBe yAaMn BbPxy npEiINBhATA peUeTka (11), noJ yIeNueTata 3a KaFe Ha pBkoXbATkata (14). - HataHcHe 6yToHa 3a 1 yaaa (6), ako jKeJaTe da HapabnTe eHa HaaHa KaPe (50 c³), nIn 6yToHa 3a 2 YaAa (7), ako KeJaTe da HapabnTe dBe KaPeTa (100 c³).
- Kafo 3aNoHc Da Teue Ncpe, KOrato 3teye 3aJaDeHTo KOJIYeCTBO. HaTnChTe OTHoBcBun6yToh,3a Da cPpeKafo Da Teue.
Korato cBbpuHte da pa6oTnTe c KaFemaunHaTa, HATNCHe 6yToHa NyckaHe/ cnIPAhe (8), 3a Da Jn3KJIouHte, n 3BaTe UeNCEJa OT KOHTaTa.
7. HACTPOINBAHE HA KOJIINCTBOTO KAΦE
KaΦeMaùnHaTa Bn IIOZBoJЯBa JI Na HAcTpOnTe KOLIIYeCTBOTO KaΦe 3a eHNa IJI NDe YauSiN.
- Hatnche6byToHa 3a eHa nIe Bc Ye aIi (6nn7) 3a 3ceKyHn. CBeTINHHnT INnKaTOp (4) 3e 3aOnue He mIra n KaFeto 3aOnue He TeYe.
- HatncheTe OTHOBO cbuINa 6yToH, 3a da cnpeTe KafoTo.
KafeMaunHaTa 3aNaMeTn KOINcTeBOTo KaFe, KOEt e HApBaNla, n, KOraTO HaTINChETe 6yTOHnTE 3a EdHa INI INBe YauIN, Ie NOLYInTe KOINcTeBOTo, 3a KOEt OCTe RaHCTPOINJ.
BENEXKA:
MaKImaJIHO KOJIInueCTBO: 200 c³
MInHMaJIHO KOJIInueCTBO: 30 c³
3a da ce BbPheTe KbM opnHaHaTa HAcTPOkA, HaTNCHeTe OTHOBeHOBpeMeHHo 1DaTa 6yToHa 3a eHa n 3a DBe YaSi (6u7) 3a 3 cekyni. CBeTINHnI rNIMKaTOp (4) 3e 3anoHe da mra n HAcTPOkTa 3e Ce CMeHn, KOraTo ToI 3anoHe Da CBETn 6e3 npEkbCBAHe.
8. 3ATONJIЯHE HA YALINTE
IocTaBeTe HЯKJIO YaShu, ObPHaTn HaDony, BByxpeWetKaTa 3a 3aToNpIHe Ha YaShu (3). Korato KaFemaUHATA e 3aRpyTa, peWetKaTa 3e 3aToNpI YaShiTe, KOITo Ca BByx HeJ. TonPiTe YaShi CnOMarat 3a 6paZyBaHeto n NoDlbPxJaHTo Ha KaIMak .
9. ΠAPA
3aДа Достигне КадмшинотammpepaTypa,TpN KOrTo npOn3BExJa napa,3aBbptepepylaTopa 3a napata (5)doNoJIOKeHne .CBeTINHHnIT HnIKKaTOP(4)иze3anoHne da MInra.
Korato CBETINHHIAT INHINKaTOp (4) 3aNoUHe Da CBETN 6e3 ppeKcbAHe, KaFemaunHaTa e DocTNHaJa IoXoJraTAtempePaTpa 3a reHepnPaHe Ha napa.
- ПьхhteВанориЗатopa(9)Вту"HOCТа, KОТTOЖЕЛаTe 3a 3aIpeeTe,ИЗaBbPteTe peRyIaTopa 3a napTa(5)doNoIoxKeHne .Пapata ue 3anOчHe 3a ИЗЛИзА И endHOBpemeHc TOBa CBeTJIINHHЯТ INHДИKaTOp (4) ue 3anOчHe Дa MIna.
Korato TeuHocTta e DocTaBHyO 3aRpyTa, 3aBbPteTe peryaTopa 3a npaTa (5) Do no3nua O,napaTa ue cnpe,a CBETJINHHIa INHdkatop Ue 3aNoUHe da CBETn 6e3 npeKcbAhe.
10. NOUHCTBAHE IN NOIDPbJxKA
IpeDn Da IpeDnpmeMe Te KaBnto N da ca DeiCTBna IO NOIDpbjXka NIN NIOCTBaHe, N3KJIIOHcTe KaΦemaunHaTa OT KOHTaKaTaN3UaKaJte Da N3CTInE.
Hikora He noTaanIe KaΦemaunHaTa BvB BoJa Hne H3No13BaIte a6pa3nBn IpenapaTu 3a nouNCtBaHe.
Почисте OTвьн Кафемшина Т мека Влжна Крпи и сдед TOВЯ ПОДсушete Добpe.
Измийтpeзервогазвога(10),преловата ршета(11),преловатаТавчka(10)ифлгпт(e 15и16)cхладьогаи Heytrpaenсanyh.
-Почисте Валористopa(9)с Влжнад Кьрпа.
11. INΦOPMAÇIÀ 3A IPIPABNJHOTO EJIIMHHPAHE HA EJEKTPUÇECKN I EJEKTPOHNI DOMAKINHCKN YPEДN
B KpaHa NoJpe3HnJa XbOT Ha anapaTa He 6nBa Da ro N3XbBpJIaTe B KOHTeHepa 3a O6nKHOBeHn DOMaSHN OTnaDbu. MoKe Da ce OCBo6oDiTe OT Hero, KaTo rO OTHeceTe B CneuaHnTE
IeHTPOBE 3a BTOpUHn CypOBuHN KbM MeCTHNTe aDMHHNCtPaUm INIIN BaUJN IIOCTaBvNK, KOINTO Ca IJIbXHn Da YLeChrBAt Ta3I DeHocT. Pa3DeJIHnOTo N3XBpJNe Ha eJIeKTPo-DOMaKInHcN ypeDn PpeDToBpaTaBaPeI HeRaTINH NocJIeDNi 3a OKOIHaTa CpeA n 3dPaBeTo, POnI3TNaUg OT HeaJeKBaTHOTOM N3XBpJNe, KaKTo I IO3BOJIyBa peUKNIPAHe To HA MaTePnaJIte, OT KOINTo e HApBaBeH ypeDa, KaTO NO TO3n HaUnH Ce IOCTIra YUbCTBHTeJIHa IKOHOMn Ha CypOBuHN IeHepTJ.
C cen da ce nochepTae oce BeHbK 3aBJIkeHHeTo 3a pa3dJIHo I3XBpIYe Ha OTnAIDUHTe Ha BCEKN IPOyKT e OTeJIa3AH CneuaJIeH 3NaK, KOITo BN IpeDyIpeJxDaBa I IOIcEua Da He To IN3XBpJIte B KOHTeHepa 3a O6NKHOBEHN DOMaUHN OTnAIDuN. 3a NOBeue INHOpMaunCe O6bPHeTe KbM MecTHInTe BIACTN ININ KbM MaRa3INHa,OT KbDeTO CTe KUYININ POdykTA.
RU
1.0603HAUHIN
- KpbIiKhA eMKoCTH
- MecTo yctaHOBKn qnlbtpa
- PeWeTeKa IJnI noOOrpeBa YauWeK
- CBetOBOинДиKaTOp
- PerynTop napa
- KhoIIka «1aUka»
- KhoNka «2yaUKN»
- KhoNka nycka/OctaHOBKn
9.Исnapить
10.Подун KaJIpe6OpHnka - PeiTeKa KaIIne6OpHnka
- Мерная Ложецka
- EMKOCbI DJIa BObl
14.Дерхателфпьтра
15.Фильтдя1чашки
16.Фильтдя2ашек
2. TEXHnueCKNE XAPAKTEPNUCTIKN
IocMoTpnte NaCnOpTHyu Ta6JiUky npi6opa.
JaHHbI npH6Op COOTBeTCTByeT HopMaM EC KacaTeJIbHO 3JeKtPOMaRHTHOI COBMeCTUMOCTn I COBMeCTUMOCTn I npH6OpOB Hn3KOro HaprrJxHeHr
3. MEPbI IPEdoCTOPOXHOCTN
IpeepnepBbIM nCIOJIb3OBAHHeM DaHHoro npIN6opa BHNMaTeJIbHO IPOuHTNe HAcTOJUeE pyKOBOdCTBO IO 3KcIJIyTaUIn N COxpaHNTe eO JnIaN CIOJIb3OBAHnB KaueCTBe cPbaOboHOr MaTePnaJa B 6yduJeM.
- 乙6eIITecb,чTO HAnpЯЖeHne B cETN B NOMeUeHnIM MOUHOCtB pO3eTKN COOTBeTCTByIOT 3HaueHnIO, yKa3aHHOMy Ha npi6ope.
Bcnyae HecoBMeCTUMOCTn po3eTKn nctOCHNkA TOKA CO 7TeTceJIbHOI BUNKO npi6oPa npOn3BeJnte Heo6xOaMHyo 3aMeHy po3eTKn, pnp6eRhyK POMOuK KbaINΦHmPOBaHHbIX CneuaJIACTOB.
3NeKtpnueckar6e30nacHocbI np6oopa rapaHTnpyeTcraTOlbKO B Cnyae,ecNI OH NOkJIIOUeH K aDeKBaTHOMY ICTOHNKY 3a3eMJIeHNA, COJNaCHO DeICTBYOUIIM
HOpMaM 3JIeKTPnueckoB63OpaNacHOCTN. PnHaJIuNm COMHeHnOBpaTInTeb K KBaIINФИцPobAHHbIM CpeUaIInCTam.
He pekomeHnyetcN cnoIb3oBaTb aanTepbl, TpOHNK N/INy ydInHnTeN. B cnUyae Heo6xOIMocTn CneDyET nCIOJIb3oBaTb TOnbKO aanTepbl N ydInHnTEJI, COOTBeTCTBvIoUe NeiCTByIOUHM HopMaM 6e30NaChOCtN. Pn3TOM HxKHO CNeIITb, YTObI He 6bln IpeBbISeH ppeJe MoUHocTn, yka3aHHbHa aanTpe.
Iocne n3BJIeueHnI n3 ynaKOBKn y6eJntEcB, YTO npIbOp haxoJNTcB 6e3yIpueHOM COCTOHH. Iprn HauHH comHeHH ObaTnTeCb B 6JIHXaJHmI cHTp TEXHnueCKOrO o6ClyXnBaHH.
- KomnoheBtI ynaKOBKn (PnactIKOBbIe NaKeTbI, NOINCTnPOJbHra NHeHa N T.D.) CNeDyET XpaHnTB BdAni OT DeTeN, TAK KAK OHN MOYT CTaTB NOTEHuaJIbHbIMN ICTOCHKAMN ONACHOCTN.
-Даньл пибор сеудует рименит bToIbko ДЯ 6byTOBOrO ИСПОЛБЗВАнИ. IIOBOe IpyrOe ИСПОЛБЗВАнe paCCMaTpNBAeTcR KaK HeaAKeKBaTHoe IJIOn OпаСhoe.
- ПюиЗВоДиТь He HeCET OTBETCTBHeHOCHTn 3a ПОВржДeHЯ, HaHeCEHbIe BCJIeDCTBVe HeIpaBnIbHOrO, OUnIObUHOrO nIIn HeZeIeBOrIO NcIOnIb3OBaHnIpyIbopa, a TaKxke 3a peMOHT, ПюиЗБeHdHbI HeKBaINΦiZuPObaHbIM NepcoHaJOM.
He npikacaiTecb K npibopy MokpbIMn IIN BlaJXhIMN pykamN HOraMn.
Bo n36eKaHne 3JIeKTPnueCko pa3praJa dePjNITe pnp6op BdaJIN OT BoDbl INI npYrInx KnuKocTe. He BKJIuOaJIte np6Op B cTb, ecn OH yCTaHOBJIEN HA BlaXHOI NOBepxHOCTn.
- YctaHaBJIbBaIte IpiN6Op Ha cyXyH, TBepdyIO uYcToHUNByIO NOBepxHOCTb.
He n03B0JrTe TeTcM ININ INBaIINdAM nCIOJIb3OBAIT np6Op 6e3 npncMOtpa.
- 3ToT aannapat He npedHa3haueH DnIaNcNoB3OBAHnI LInaMn C OrpaHneHHbIMn DBIrTaTeJIbHbIMn IIN YmCTBeHHbIMn CnOCo6HoCTaMn (B Tom YncIe JeTbMn), a TaKxE IIncaMn, He IMeIOUIMM COOTBeTCTByIOUx 3HaHnI OonIta. Pa3peShaetcI NlB3OBAtbc8
aannapatom TToIbKO IOI NaHbIOHeHEm IIN pyKOBODCTBOM IINca,OTBeTCTBEHHOrO 3a erO be3oNaChOE pImeHHeHne.
- DeTAM 3aPpeUaeTcR INrpaTb C aannapatOM.
Для NOвьшени CTeнени 6e3oNaChOCTN ИСПОЛБЗOBАнHAпriбopa peKOMeHДуeТСЯ УСТАНБКа YСТРОДСТВА 3aUNTHOrO OTКЛЮЧЕни (Y3O) Для сИЛы TOKA, He превышаноши 30 mA. BOCNoJIb3yITeCь ПРИ 3TOM COBETOM MOHTaЖИнka.
HeocTabnIte BkJIOUeHHbIyYTOg6e3 npICMOtpa,Tak KAK OH MOKeT CtaTb nCTOuHnikOM ONaCHOCTN.
BbHIMaJ WTeNCeJIbHyO BUNKy I3 po3eTKI, HNKoRJa He TcHInTe 3a WHyp NITaHIN. - OTKJIIOUaIte npIbOpOT cTeI nepeI NaHauJIOM JIO6bIX ONEpaIeI IIO YIcTKe I O6CJIyXKINBaHIIO.
B cnyae nolomkn nInn He npabnblho npabtoI np6bopa npekpatnte erO nCNoIb3OBaHne, BbIKJIOUHTe erO nHe PbITaIteCb nouHNITb. B cnyae Heo6xOIMOCt n peMOHTa, oBaPauTecb NCKJIIOHTeNbHO B CEHTp TEXHNUeCKORO 06cnyXINBAHn, cepTnФNUPoBaHHbI npON3BOIDTeJIEM, C 3aIPoCoM Ha 3aMeHy opINHaJIbHbIX DeTaJIe.
Прип повржденишнуразитаняданною рпбора образайтесь В сертуфцицрованьи цHTp Тхнчecкогообслухжваня дя erо заменbl.
He npOBeRpaIte npB6Op Bo3DeIcTBIO npuPoINbIX YBJIeHn (TaKnx KaK DoJXDb, coJIHcE,JeI N T.D.).
He nCnoIb3yIte n He paCnIaIaTe HnKaKHe Yactn DaHnHO npB6Opa Ha TropaNX NOBepxHocTAX (ra30BbIX ININ 3JIeKTPnuecknx BapOHyBX NOBepxHocTAX ININ PIIITax).
He nCIOJIb3yIte MOIOUIe cpeIcTBA IIN abpa3nBhIe TkaHIN IIN YIcTKn IpI6Opa.
He npikacaiTecbKtopaHm noBepxHocTbM. IcIob3yIte pyuKn nn pyKoTkn.
He donyckaTte, YtObI shHyp nItaHnKaKacanCra roparyx yacte npnbopa.
He BKJIOUaIe KoOeBapKy,ecnB EMKOCTN HeT BObl.
He paoorpeBaIte XnIDKoCTn,napbIKOTOpblX MOYT BOCJIJaMeHHTbcra.
IopDOnH npseTeKa KaJIeSc6OpHnKa DOJIxHbI 6bITb HaJIpeKaUIM O6pa3OM
yCTaHOBJIeHbI Npeep ICNoJIb3OBAHnEM KoFeBaPKn.
BHHMaHHe!IcnapnteInbNepKaTeInb cnIbTpaCnIbHoHaIpeBaIOTCB nIpoCeCEpa60TbI KoΦeBapKn, INMOyT cTaTb npuHHO OxKOrOB.
B Ipouece pa6oTbI KoFeBaPka HaxOINTCa NOD DaBHeHnEM, TaK YTO cyUeCTByET ONaChocTb OxorOB. Bo BpEmr PnIrTOToBVeHnR KoFe CneJeTte 3a TeM, YTObI DepeXaTeJIbФnIbTpA 6blI npaBnIbHo yCTaHOBnEh.
He ChImaTe DepeKtaTeIb FInIbTpa BO Bpempa60tbl yCtpoiCTBa.
Bo Bpempa60bI yCTPOINCTBa Heo6xOIMOCJIeNTb 3a TeM, YTO6bI yPoBEHb BOdBIBEMKoCTn He OnyCKaICn HNXe OTMeTKn MIN.