
CG2010 - Coffee machine FAGOR - Free user manual and instructions
Find the device manual for free CG2010 FAGOR in PDF.
| Product type | Filter coffee maker |
| Brand | Fagor |
| Model | CG2010 |
| Voltage / Frequency | 220-240 V ~ 50/60 Hz |
| Water tank capacity | 1.25 liters |
| Number of cups | 12 cups |
| Permanent filter included | Yes, washable cone filter |
| Glass carafe | With lid and handle |
| Hot plate | Keeps coffee warm |
| Anti-drip system | Nozzle flap to serve during brewing |
| Illuminated switch | On/off with indicator light |
| Main material | Plastic and stainless steel |
| Maintenance and cleaning | Clean the filter holder, filter and carafe with soapy water; exterior with damp cloth; regular descaling |
| Recommended descaling | With vinegar or specific descaling product |
| Safety | Do not immerse; automatic shut-off after use; grounding required |
| Country of origin | Not specified in the manual |
| Dimensions (L x W x H) | Not specified |
| Weight | Not specified |
Frequently Asked Questions - CG2010 FAGOR
User questions about CG2010 FAGOR
0 question about this device. Answer the ones you know or ask your own.
Ask a new question about this device
Download the instructions for your Coffee machine in PDF format for free! Find your manual CG2010 - FAGOR and take your electronic device back in hand. On this page are published all the documents necessary for the use of your device. CG2010 by FAGOR.
USER MANUAL CG2010 FAGOR
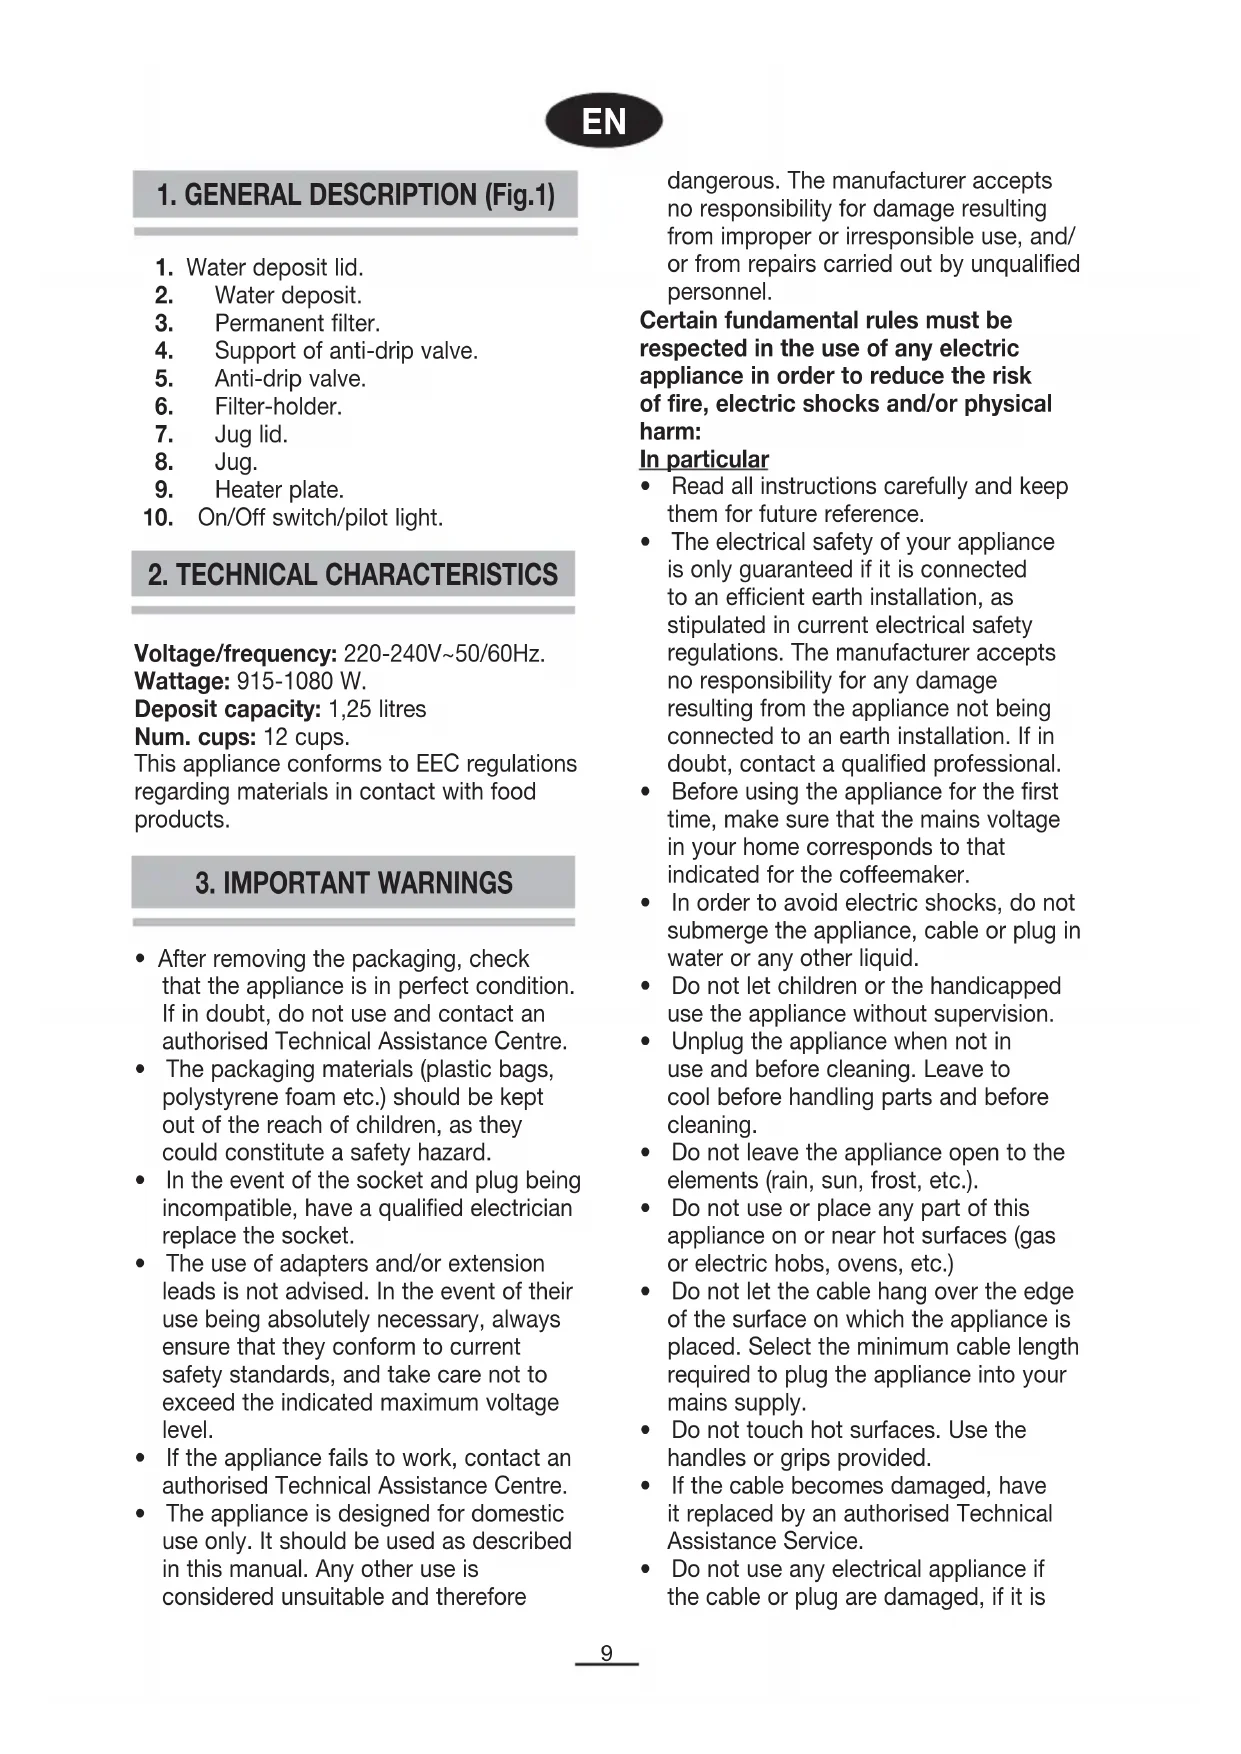
- Water deposit lid.
- Water deposit.
- Permanent filter.
- Support of anti-drip valve.
- Anti-drip valve.
- Filter-holder.
- Jug lid.
- Jug.
- Heater plate.
- On/Off switch/pilot light.
2. TECHNICAL CHARACTERISTICS
Voltage/frequency: 220-240V~50/60Hz.
Wattage: 915-1080 W.
Deposit capacity: 1,25 litres
Num. cups: 12 cups.
This appliance conforms to EEC regulations regarding materials in contact with food products.
3. IMPORTANT WARNINGS
- After removing the packaging, check that the appliance is in perfect condition. If in doubt, do not use and contact an authorised Technical Assistance Centre.
- The packaging materials (plastic bags, polystyrene foam etc.) should be kept out of the reach of children, as they could constitute a safety hazard.
- In the event of the socket and plug being incompatible, have a qualified electrician replace the socket.
- The use of adapters and/or extension leads is not advised. In the event of their use being absolutely necessary, always ensure that they conform to current safety standards, and take care not to exceed the indicated maximum voltage level.
- If the appliance fails to work, contact an authorised Technical Assistance Centre.
- The appliance is designed for domestic use only. It should be used as described in this manual. Any other use is considered unsuitable and therefore
dangerous. The manufacturer accepts no responsibility for damage resulting from improper or irresponsible use, and/or from repairs carried out by unqualified personnel.
Certain fundamental rules must be respected in the use of any electric appliance in order to reduce the risk of fire, electric shocks and/or physical harm:
In particular
- Read all instructions carefully and keep them for future reference.
- The electrical safety of your appliance is only guaranteed if it is connected to an efficient earth installation, as stipulated in current electrical safety regulations. The manufacturer accepts no responsibility for any damage resulting from the appliance not being connected to an earth installation. If in doubt, contact a qualified professional.
- Before using the appliance for the first time, make sure that the mains voltage in your home corresponds to that indicated for the coffeemaker.
- In order to avoid electric shocks, do not submerge the appliance, cable or plug in water or any other liquid.
- Do not let children or the handicapped use the appliance without supervision.
- Unplug the appliance when not in use and before cleaning. Leave to cool before handling parts and before cleaning.
- Do not leave the appliance open to the elements (rain, sun, frost, etc.).
- Do not use or place any part of this appliance on or near hot surfaces (gas or electric hobs, ovens, etc.)
- Do not let the cable hang over the edge of the surface on which the appliance is placed. Select the minimum cable length required to plug the appliance into your mains supply.
- Do not touch hot surfaces. Use the handles or grips provided.
- If the cable becomes damaged, have it replaced by an authorised Technical Assistance Service.
- Do not use any electrical appliance if the cable or plug are damaged, if it is
not working properly or if it is damaged in any way. Take it to an authorised Technical Assistance Service to be examined, repaired or modified.
- In the event of technical failure or improper working, switch the machine off and do not try to repair it. Repairs should only be carried out by an authorised Technical Assistance Service. Always demand the use of original spare parts.
- If you decide never to use the appliance again, it is a good idea to cut the cable, first ensuring that the appliance is unplugged.
The liquid that drips into the jug is hot and may cause burns if the jug is accidentally broken. To avoid breakage, take the following safety precautions:
- Do not allow all the liquid to evaporate.
Do not heat the jug when empty. - Do not use a broken jug or a jug whose handle is loose or weak. Replace if any signs of damage are detected. A tiny crack or breakage of a small piece of the glass may cause the jug to shatter and to contaminate the liquid with splinters of glass.
- Do not clean the jug with an abrasive scourer or any cleaning products that may scratch or otherwise weaken the glass.
- The jug is designed for use with this appliance. Do not place it on or near hot surfaces (heaters, burners, hobs, hot ovens, microwaves, etc.).
- Do not place the jug on wet or cold surfaces.
- Handle gently and avoid knocking.
- This appliance should not be used by physically, sensorially or mentally handicapped people or people without experience or knowledge of it (including children), unless they are supervised or instructed in the use of the appliance by a person responsible for their safety.
Children should be watched to ensure they do not play with the appliance.
4. BEFORE USING FOR THE FIRST TIME
- Before using for the first time, familiarise yourself with all the components. Read all instructions carefully.
- Remove the filter holder (6) and wash it together with the carafe (8) and the permanent filter (3) in warm soapy water. Rinse and dry them well and then fit them back onto the coffee-maker. To correctly fit the filter holder (6), hold it vertically above the anti-drip valve support (4) with the handle in vertical position, and place the filter holder (6) in the space in the anti-drip valve support (4) (Fig. 2). Then turn the filter holder handle (6) to horizontal position, and correctly insert it onto the pins in the anti-drip valve support (4) (Fig. 2, 3). The carafe (8) must not be standing on the warming plate (9) when you assemble the coffee-maker.
- To clean the inside of the appliance, run a coffee-making cycle twice without adding ground coffee to the filter. To do this, follow the instructions given in the section entitled "Making coffee".
5. MAKING COFFEE
With the appliance unplugged:
- Place the coffeemaker on a flat, stable surface.
- Open the deposit lid (1) and make sure that the deposit is empty. Fill with clean, cold water to the required level. Do not exceed the indicated maximum level mark.
- Make sure the carafe lid opens the antidrip valve (5), as otherwise the filtered coffee will not drip down into the carafe and the filter will overflow. Remove and replace the carafe to observe the difference.
- Stand the carafe (8) on the warming plate (9).
- Fill the filter (3) with the required quantity of ground coffee and close the lid. We recommend one dessertspoon of
coffee per cup. Fill the coffee-maker with approximately 80 gr. of ground coffee. After using the coffeemaker a few times, you may wish to adjust the amount of coffee used according to individual taste.
- Plug the appliance into the mains and press the start/stop switch (10). The switch pilot light will indicate that the appliance is ON.
Water will begin to filter down through the coffee into the jug. When the filtering process is completed, the heater plate will keep the coffee warm. - If you wish to pour a cup of coffee before the filtering process has finished, remove the jug from the heater plate, pour and then replace immediately.
- When the jug is empty, turn the start/stop switch off (the pilot light will go out), unplug the appliance leave to cool for 10 minutes before repeating the coffee-making operation or cleaning.
Precautions to be taken while using the appliance
- Do not use warm or hot water. Always use cold water. Do not use any other liquid except water.
- To prevent the water in the filter from overflowing the jug lid should be correctly fitted in order to ensure that the anti-drip value is opened, enabling the water to pass through to the jug.
- Leave the coffeemaker to cool before refilling the deposit. If the deposit is filled while hot, steam may be generated that could cause burns.
- Keep the lid of the deposit closed so that the water falls onto the coffee in the filter. Do not open during the filtering process. Do not move the coffeemaker while in use.
Anti-drip valve
The anti-drip value is activated when the jug is removed from the heater plate. It enables the jug to be removed to pour a cup of coffee during the filtering process. Make sure that the equivalent of at least two cups of coffee has filtered into the jug before removing during the filtering process.
Warning: replace the jug immediately after pouring the cup of coffee to enable the filtering process to continue. If the jug is not returned immediately, the filter may overflow.
Filters
The coffeemaker is supplied with a permanent filter. However, if you prefer disposable filters, use cone filters 1x4.
6. HOW TO MAKE A PERFECT CUP OF COFFEE
For an even more delicious taste and aroma, use freshly ground coffee.
Use medium, not fine ground coffee.
Store coffee in a dry place. Once the packet has been opened, close firmly and store in the refrigerator in order to conserve its aroma.
The heater plate will keep the freshly made coffee warm, but it tastes better if drunk immediately after filtering.
Reasons for the coffee overflowing in the filter holder:
- the coffee is too fine.
- there is too much coffee.
- the coffee has been over-compressed.
7. CLEANING AND MAINTENANCE
Always leave the appliance to cool before cleaning and make sure that the start/stop switch has been turned off and the coffeemaker unplugged from the mains. Clean the filter-holder, jug and jug lid in warm soapy water. Rinse well and dry thoroughly before replacing.
Clean the outside of the coffeemaker with a damp cloth. Do not use detergent or abrasive cleaning products.
Do not submerge the appliance in water or place under an open tap.
8. DECALCIFICATION
Depending on the hardness of the water in your area and the frequency of use, the appliance's tubes may become obstructed by lime. You will know that this has occurred when the filtering process starts taking longer than normal. To prevent this, you should decalcify your coffeemaker by either using a commercial decalcifying agent specially designed for coffeemakers, or by following the instructions given below:
- Fill the jug with a 1/4 vinegar 3/4 water solution.
- Pour the solution into the deposit and switch the coffeemaker on. Allow the solution to drip down into the jug.
- Repeat this process 2 or 3 times, depending on the extent of calcification.
After the lime has been removed, run an empty filtering process (with water but no coffee) 2 or 3 times to remove any remains of the water/vinegar solution.
We recommend that you decalcify your coffeemaker once every 4 weeks.
9. INFORMATION FOR THE CORRECT DISPOSAL OF ELECTRICAL AND ELECTRONIC APPLIANCES


At the end of its working life, the product must not be disposed of as urban waste. It must be taken to a special local authority differentiated waste collection centre or to a dealer providing this service. Disposing of a
household appliance separately avoids possible negative consequences for the environment and health deriving from inappropriate disposal and enables the constituent materials to be recovered to obtain significant savings in energy and resources.
To remind you that you must collaborate with a selective collection scheme, the
symbol shown appears on the product warning you not to dispose of it in traditional refuse containers.
For further information, contact your local authority or the shop where you bought the product.
1.DESCRIPTION GENÉRALE (Fig.1)
Puissance: 915-1080 W.
4. PPIN ANO THN INPQTH XPHSEH
Ppota xnpaonoioe yia npwtn opa tyn kaepiepa oac, maote ola ta e np ano tn v onoia autn anotaleitai. diaaote npooektka oaes tic odnyiesc.
Apaipoe Tn 0kN piaTPO (6) kai kaapio Tn mazi E to doxieo (8) kai to moviio piItpo (3) eXiaapo oattouvovepo, 5eByalte kala, OTEyVwote ta kai ouvapmooynte ta gava. Ia va toTOtOeTNOEe Tn 0hkn piaItpou (6) oWot, TAnoiAOTe Tn Ka0eTa OTN Bao n Tns BaBIOAC TTPOATAIC aTTO CTAcIO (4), KpatovTac nlaBn Tns Oe KAeTn 0Eon, kai OtaOePOTOIuvTAC Tn 0hKn piaItpou (6) OTN 0Eon TNS OTO KEVO TPOU UAPXei OTN Bao n Tns BAIBiOAC TPOOIAIAC aTTO OTAIO (4) (2). 'ETTEITA, YupioTe Tn laBn Tns 0hKnC FIATPOU (6) MEXPI Tnv opizovTIA 0EON, BEBAIWovTAC OTI EIAVETAI OWA tAOTIC KOIIAECS TPOU UAPXOUV OTN Bao n TNS BAIBIOAC TPOOIAIAC aTTO OTAIO (4) (2.3). Ia va TTpayuatoTIOINOETE autn tn suvaipoLoynon, to doxio (8) DEV PPETIEVA EXI TOTT0EtN0E1 OTN 0EmuavTKN 0TIA (9).
Tia va kaθapiετe Tny kaΦεTIεpa Εωτερικα, θεοτe Tny σε λειουργia δuo φορες Μυνεόμενα, χωπic va βαλετe αλεμενo kaΦ μεσa στο φιλτρο. Γia Tn διαδικαίαia autη, ακολουθήσε TIC Εθηγίες TNC ενότητac "Πapaσκεύŋ tou kaΦ".
2. TEXHnueCKn XAPAKTEPNCn
HanpexeHne/VecToTa: 220-240V~50/60 Hz.
MouhocT:915-1080W.
KanaunTeHa pe3epBoapa: 1,25 nItpa
Bp.uaans: 12
To3n ypei CbOTBeTCTBa Ha n3nCKBaHnHa Na Ebponeckata IkoHOMuecka O6uHocT OTHOCHOypei KONTaKtYBaunC XpaHa.
3. BAXHIN PPEyPExEHHN
Cnei otctpaHBAHe Ha onaKOBkata, npOBepTe daIypeDa e B n3npabHO cbCTOAHNE. Pn CbMHeHne, He rnoN3BaInTe n ce CBpbXeTe c yIbJHOMOueH cepBn3.
- OnakobbHnTe MaTePnAn (nlaactMaCn, Top6nK, nnonecTePna HnHa n Dp.) Tpr6Ba da ce CbXpaHbAT Ha HeIOCTbHN 3a Deca MeCTa.
BcnyaHa HeCbBMeCTMmocT MeKdy ⅢeNceNa I KOHTaKa, Tpr6Ba KBAInuPnIpaH eJIeKTPoTeXnK, Da CMeHn ⅢeNceNa.
He ce npenopbUba n3noJ3BaHeto Ha aanTopn u yIbJnxTeJI. B cnyaante, koraTOBa e HANOxAIO, BNHarN ce yBepraite B CbOTBETCBNETo IM Cbc CTaNdapTnte 3a 6e3ONaCHOCT N BHIMaBAITE Da He npebuWITE OT6eJI3aHOT MaKcImaHHO HanpeXeHne.
Ako ypea cnpe da pa6oTu, ce CBpXeTe c yIbIhOMOuH cepBn3EH eHTbp.
- Ypeda e npoeKtnpaH cAmo 3a DomaHa ynoTppe6a. Tp6Ba da ce noJ3Ba no OnicaHn B Ta3n INHCTpyKUn Haunh. BcKaBn dpyr n yNoTppe6n ca HeNoDxOJaU
I CNEIOBATeHNO ONaCHN. Ipn3BODHTeJIrT He HOCN OTROBOPHOCT 3a NOBpeDN B CNEICTBHe Ha He npabUNHO NIN 6e3OTROBOPHO N013BaHe, N/INN OT pEMONTN N3BbPWeHN OT HEKBALINuipAHNIua.
OE BC
8.8
10
[A = \left{ {{4k} - 2 \mid k \in {N}^{A}}\right} ]
220-240V\~50/60Hz.
915-1080 W.
1,25 1:1
12:
jglalil 1 J 1 j a lal l bll J wJ J a J
EU
1. DESKRIBAPEN OROKORRA (1. irudia)

- TECHNICAL CHARACTERISTICS
- IMPORTANT WARNINGS
- Certain fundamental rules must be respected in the use of any electric appliance in order to reduce the risk of fire, electric shocks and/or physical harm:
- In particular
- The liquid that drips into the jug is hot and may cause burns if the jug is accidentally broken. To avoid breakage, take the following safety precautions:
- BEFORE USING FOR THE FIRST TIME
- MAKING COFFEE
- Precautions to be taken while using the appliance
- Anti-drip valve
- Filters
- HOW TO MAKE A PERFECT CUP OF COFFEE
- CLEANING AND MAINTENANCE
- DECALCIFICATION
- INFORMATION FOR THE CORRECT DISPOSAL OF ELECTRICAL AND ELECTRONIC APPLIANCES
- 1.DESCRIPTION GENÉRALE (Fig.1)
- PPIN ANO THN INPQTH XPHSEH
- TEXHnueCKn XAPAKTEPNCn
- BAXHIN PPEyPExEHHN
- EU
- DESKRIBAPEN OROKORRA (1. irudia)
Brand : FAGOR
Model : CG2010
Category : Coffee machine