
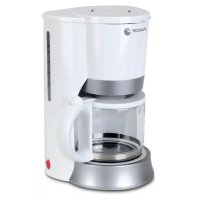
CR-18 - Coffee machine FAGOR - Free user manual and instructions
Find the device manual for free CR-18 FAGOR in PDF.
| Product type | Espresso coffee machine |
| Brand | FAGOR |
| Model | CR-18 |
| Supply voltage | 230 V ~ / 50 Hz |
| Power | 1100 W |
| Water tank capacity | 1.4 L |
| Pump pressure | 15 bars |
| Types of filters included | 1-dose filter, 2-dose filter, E.S.E. capsule filter |
| Main functions | Espresso preparation, steam for cappuccino, liquid heating |
| Controls | On/off switch, coffee switch, steam regulator |
| Dimensions (approx.) | 30 x 25 x 35 cm (L x D x H) |
| Weight (approx.) | 3.5 kg |
| Maintenance and cleaning | Regular cleaning of filters, tank and drip tray; descaling every 3 months |
| Descaling | Use a commercial descaling product or citric acid; do not use vinegar |
| Safety | Lockable brew head, burn protection (hot steam nozzle) |
| Accessories included | Dosing tool, cappuccino accessory, steam wand |
| Repairability | Contact an approved technical service center |
| Compliance | EU Directives 89/336/EEC and 73/23/EEC |
Frequently Asked Questions - CR-18 FAGOR
User questions about CR-18 FAGOR
0 question about this device. Answer the ones you know or ask your own.
Ask a new question about this device
Download the instructions for your Coffee machine in PDF format for free! Find your manual CR-18 - FAGOR and take your electronic device back in hand. On this page are published all the documents necessary for the use of your device. CR-18 by FAGOR.
USER MANUAL CR-18 FAGOR
The manufacturer reserves the right to modify the models described in this User's Manual.
natural_image
Line drawing of a coffee maker with control panel and power plug (no text or symbols)CAFETERA EXPRESS / CAFETEIRA EXPRESS / ESPRESSO COFFEE MACHINE /
CAFETIÈRE EXPRESS / CAFFETTIERA ESPRESSO / BILANCIA DA CUCINA /
natural_image
Technical illustration of a kitchen appliance with a grater and handle (no text or symbols)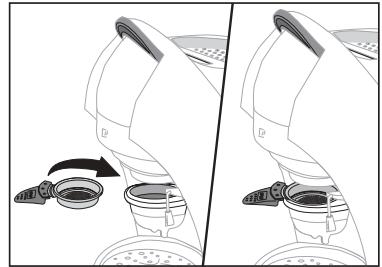
natural_image
Diagram showing a device being processed with a lid and fan, no text or symbols present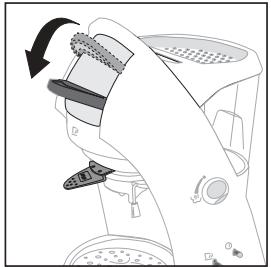
natural_image
Diagram of a robotic arm with a scroll wheel and control panel, showing motion direction (no text or symbols)Fig. 5Obr.5Abb.5Rys 5Eik.5Фиг.55. ÁbraРис. 5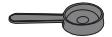  | Fig. 6Obr.6Abb.6Rys 6Eik. 6Фиг. 66. ÁbraРис. 6   | Fig. 7Obr.7Abb.7Rys 7Eik. 7Фиг. 77. Ábra_Pис. 7 | Fig. 8Obr.8Abb.8Rys 8Eik. 8Фиг. 88. ÁbraРис. 8[IMAGE][IMAGE] | Fig. 9Obr.9Abb.9Rys 9Eik. 9Фиг. 99. ÁbraРис. 9[IMAGE][IMAGE] |
Fig. 10 Obr. 10
Abb.10 Rys 10
Eik. 10 Фиг. 10
- Ábra Рис. 10
Fig. 11 Obr. 11
Abb.11 Rys 11
Eik. 11 Фиг. 11
- Ábra Рис. 11
natural_image
Cross-sectional diagram of a mechanical device showing internal components (no text or labels)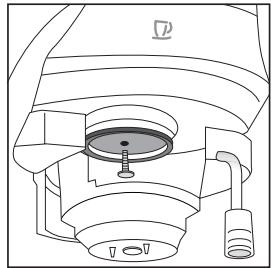
natural_image
Technical line drawing of a mechanical component with concentric layers and a central hub (no text or symbols)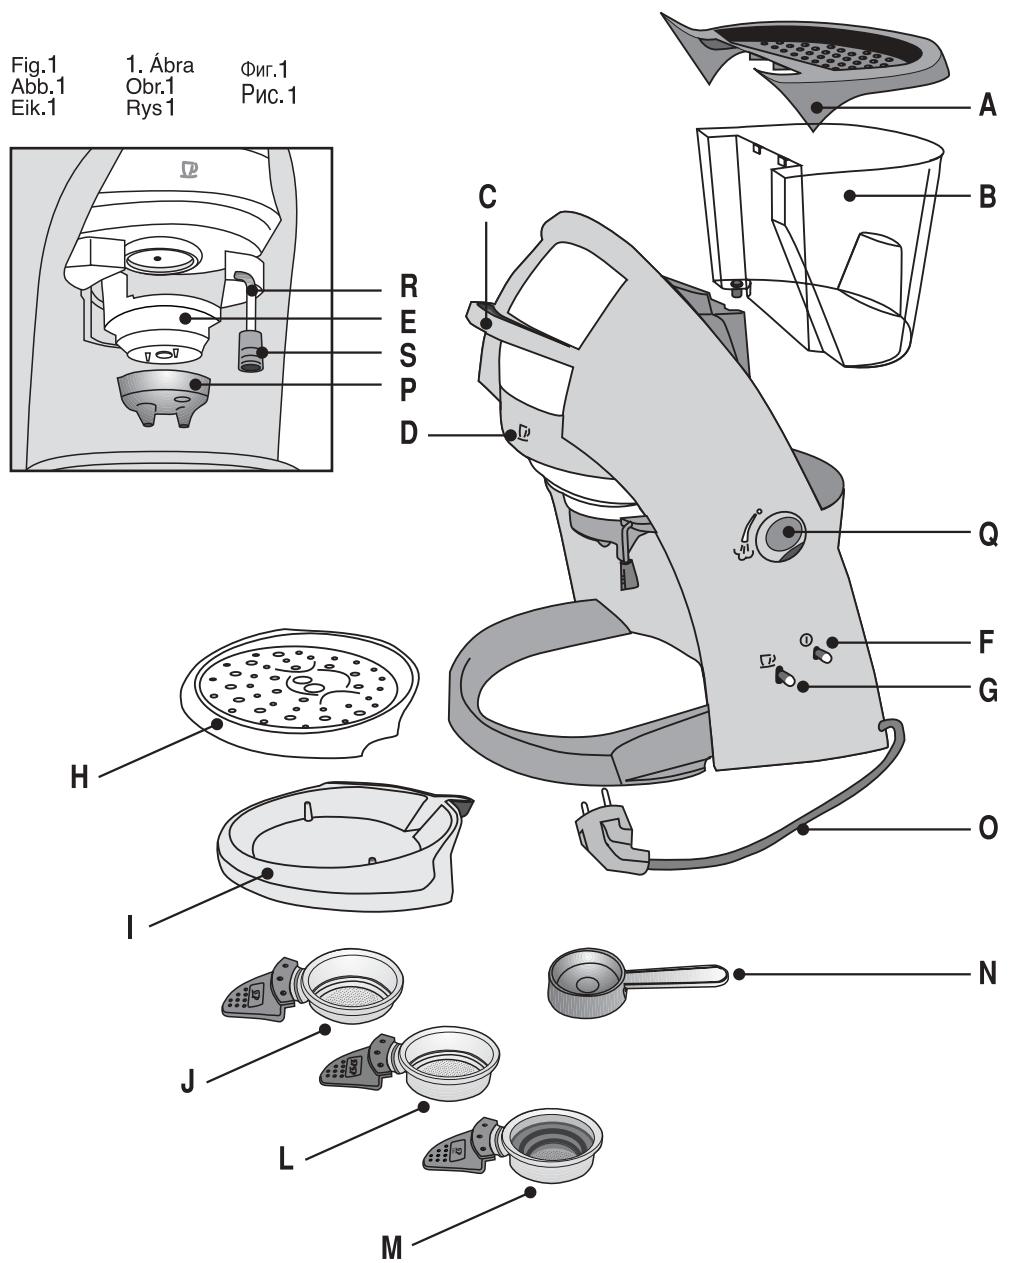
Estimado cliente:
The Ground Truth image displays a single, solid horizontal line. According to Rule 2 (UNDERSCORE & LINE RULES), this is a stylistic or background line, not a placeholder underscore. Therefore, the OCR result must ignore it and output nothing or only meaningful text. The provided OCR content is "____", which consists of four underscores. This is an incorrect interpretation of the line as a placeholder, violating the rule that stylistic lines must be ignored. The OCR has hallucinated underscores where none should exist based on the GT's visual context. Hence, the OCR result is inconsistent with the Ground Truth.
At first, preparing an espresso coffee requires a little skill and patience. Take all the time you need to find out how your espresso coffee machine works and how to make a good espresso coffee. Read the instructions for use carefully before using the appliance and keep them for future consultation.
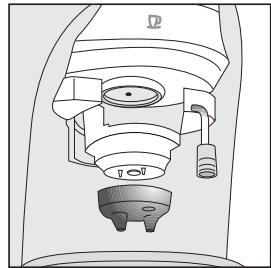
1. DESCRIPTION OF THE PRODUCT (Fig. 1)
A. Tray for cups
B. Water deposit
C. Control lever – Open/close system
D. Pilot light 0 / l and temperature
E. Filter holder
F. On / off switch
G. Coffee switch
H. Drip grille
I. Drip tray
J. Filter 1 measure of coffee / 1 weak measure
L. Filter 2 measures of coffee / 2 weak measures
M. Filter for capsules, "E.S.E." tablet
N. Coffee measurer
0. Power cable
P. Coffee outlet
Q. Steam regulator
R. Steamer
S. Accessory for cappuccino
2. TECHNICAL DATA
Voltage: 230 V \~ / 50 Hz.
Wattage: 1100 W
Deposit capacity: 1,4L
Pump pressure: 15 bars
This coffee machine is adapted to EU directives 89 / 336 / CEE related to electromagnetic compatibility and 73 / 23 / CEE on electrical appliance safety.
3. SAFETY RECOMMENDATIONS
The instructions contain important information on safety and on correct operation of the appliance. Read the instructions, keep them in a safe place and transfer them to the coffee machine's next owner.
Safety instructions which must be observed when connecting the appliance
- If the cable for this appliance is damaged, please consult an authorised technical Assistance Centre for a replacement.
- Make sure that the mains voltage in your home corresponds to that indicated on the coffee machine.
- Connect the appliance to an efficient earth installation. If in doubt, consult a qualified professional.
- Do not let the cable rub against sharp edges or let it hang down. Do not leave the cable in a hot or damp place.
- Put the coffee machine on a flat stable surface, away from hot places or heat sources.
- Unplug the cable at the socket when the coffee machine is switched off
- Do not use or place any part of this appliance on or close to hot surfaces (gas or electric cooker hobs or ovens).
Safety instructions which should be observed when the coffee machine is switched on
- Do not leave the coffee machine unattended when in operation. Keep out of reach of children.
- People with nervous dysfunctions should not use the appliance if they are unaccompanied.
- Before switching the appliance on, fill the deposit with water.
- The drip tray and the grille must be correctly fitted before switching the coffee machine on.
- Do not expose it to the elements (rain, wind, etc.)
-
When closing the control lever, take care not to put your hands in the filter holder.
-
Caution! The steam duct and the filter holder heat up whilst the coffee machine is working and there is a risk of burning.
- Warning! Whilst the coffee machine is working under pressure there is a danger of burning. When you prepare coffee, the control lever must be completely closed as shown in the OPERATION section.
- Do not heat inflammable liquids with the steamer.
- Only clean the steamer when the coffee machine is disconnected.
Safety instructions for cleaning and maintenance tasks
- In the event of a fault and/or poor operation, switch the appliance off, unplug it and do not try to repair it. Go to an authorised technical Assistance Centre and request that original spares and accessories are used.
- Do not use the coffee machine if the cable or the plug is damaged.
- Do not attempt to substitute the cable as this can be dangerous. Send it to an authorised technical Assistance Centre immediately.
- Disconnect the appliance from the network after each use and before any maintenance and cleaning.
- Never plug in or unplug the appliance with wet hands.
- Do not unplug the coffee machine by pulling on the cable.
- Do not allow the coffee machine, the cable or the plug to get damp.
- Never submerge the appliance in water or any other liquid.
- The coffee machine can only be used to make coffee, to froth milk or heat water according to these instructions.
- This coffee machine is only for domestic use. Responsibilities will not be accepted for damage caused by using the appliance for other ends, incorrect use or repairs by who are not experts.
4. APPLICATION
The coffee machine has been designed for several applications depending on the different types of coffee available on the market. Consequently, it can be used to prepare exquisite espresso coffee, white coffee, espresso coffee with frothy milk or any other type of coffee drink.
The taste of the coffee will always depend on several factors which should always be taken into account when selecting the coffee, namely:
- The origin of the coffee
- The type of grinding
- The type of measure
Other aspects which should be considered when preparing coffee are:
- Use an appropriate measure of coffee
- Press the coffee properly
- Use good quality water Combine these factors according to your taste.
You can also prepare a cappuccino or heat a drink with the steamer.
Below there are a few suggestions which we're sure you'll love.
ITALIAN "STRETO" ESPRESSO: 1 cup
- Coffee:
- 1 measure of ground coffee, well pressed, or
- 1 single weak measure, or
- 1 hard single measure (E.S.E)
- Water: 30-40ml
"STRETO" ESPRESSO: 1 cup
- Coffee:
- 1 measure of ground coffee, well pressed, or
- 1 single weak measure, or
- 1 hard single measure (E.S.E)
- Water: 40-50ml
"STRETO" ESPRESSO: 2 cups
- Coffee:
- 2 measures of ground coffee, medium pressed, or
- 2 single weak measures, or
- 2 hard single measures (E.S.E)
• Water: 40-50ml / per cup
"LUNGO" ESPRESSO: 2 cups
- Coffee:
- 2 measures of ground coffee, medium pressed, or
- 2 single weak measures,
- Water: 80ml
WHITE COFFEE: 1/2 cups
- Coffee:
- 1/2 measures of ground coffee, without pressing or
- 1/2 weak measures,
• Water: 100-120 ml / per cup
"LATTE" ESPRESSO COFFEE: 1/2 cups
- Coffee:
- 1/2 measures fo ground coffee, medium pressed or
- 1/2 weak measures,
• Water: 80ml / per cup
- Hot milk to taste
CAPPUCCINO: 1 cup
- Coffee:
- 1 measure of ground coffee, well pressed
- Water: 30-40 ml
- 100ml skimmed milk
5. ADJUSTMENT
Before using the coffee machine for the first time, clean the filters with water. It is also necessary to clean the coffee machine inside. To do this, fill the deposit with water and run it through without coffee until the deposit is empty. Do this twice.
Method:
- Remove the deposit to fill it with cold water and fit it back in the coffee machine (Fig 2).
- Then lower the control lever until it locks down (Fig. 4).
- Plug in the coffee machine and switch it on using the on / off switch (F). The pilot light (D) will come on showing a red light whilst the coffee machine is heating up.
- Position a container under the coffee outlet and move the switch (G), to the □ position so that the water starts to
come out. Let most of the water out the deposit by connecting and disconnecting the coffee switch (G) at regular intervals.
- To clean the inside of the steamer, disconnect the switch (G). Fit the steamer (R) on the drip grille (H) and insert it in an empty container to collect the water and the steam.
- Open the steam regulator by turning it to the ⏚ position. Let the remaining water go through from the deposit at regular intervals by opening and closing the pressure regulator.
- Repeat the complete process twice and the coffee machine will be ready to use.
- This adjustment must also be done when first using the coffee machine for a long period.
6. OPERATION
- Fill the deposit with water and fit it in place. Plug the coffee machine in and move the switch (F) to the "I" position. The pilot light (D) will come on and glow red.
- Select the filter depending on the type of coffee you are going to prepare remembering that:
- Filter (J) for one cup
1 measure of coffee: one slightly rounded measure of coffee (N) (Fig. 5)
1 single weak measure (Fig. 6)
- Filter (L) for 2 cups
2 measures of coffee: two slightly rounded measures of coffee (N) (Fig. 7)
2 single weak measures (Fig. 8)
- Filter (M) for one cup
1 single hard measure (E.S.E). (Fig. 9)
-
Insert the quantity of coffee or your chosen measure in the filter. IMPORTANT
-
Press the coffee with the measurer (N). Once pressed, the level must be below the maximum level indicated inside the filter
-
Put the single weak measure in using the coffee measurer (N)
-
Fit the selected filter inside the filter holder (E) (Fig. 3).
-
Clean off any coffee which can remain on the top part of the filter holder (E).
- Close the system by lowering the control lever (C) until it locks down completely (Fig. 4).
- Put one or two cups under the drip grille (H).
- When the pilot light (D) turns green, move the switch (G) to the position for it to be able to start dispensing.
- When sufficient coffee has come out, disconnect the switch (G).
- Afterwards, remove the filter from the holder (E) by raising the control lever (C).
- When you have finished using the coffee machine, put the switch (F) on "0" and unplug the coffee machine at the socket.
Preparing hot drinks
In order to heat liquid, you must follow these steps:
- Fill the water deposit and plug the coffee machine in. Move the switch (F) to the "I" position and the pilot light will come on red.
- Close the system by lowering the control lever (C) until it locks down completely (Fig.4).
- Put the steamer (R) on the drip grille (H). The switch (G) the switch must be disconnected.
- When the pilot light turns green, turn the steam regulator (Q) to the steam position 🌐 The pilot light (D) will turn red whilst the steam regulator is open.
Note: At first only water will come out of the steamer so it is advisable to have a container to hand to collect the water. - When steam starts to come out, close the steam vapour momentarily (Q), insert the accessory for cappuccino (S) in the liquid which you wish to heat and open the steam regulator (Q) again positioning it on 🏠
- When the chosen temperature has been reached, close the steam regulator (Q).
- Remove the steamer (R) from the container and put it on the drip grille (H).
To prepare a cappuccino you must:
• Use cold skimmed milk.
- Insert the cappuccino accessory (S)
approximately 3 cm into the milk and hold it in this position.
Secrets for preparing a good coffee
- Use good quality coffee which has been properly ground. You can also use weak single measures and ESE type hard single measures
• Pre-heat the filter and the cups.
• Use good quality water. - As coffee is a natural product, the flavour will vary according to its origin, mixture and degree of toasting. Try different mixtures of special coffee for espresso coffee machines until you find the one which best suits your taste.
- Keep open packets of coffee in a container in the fridge.
- Put an appropriate quantity of coffee in the filter and press it down properly.
- A small variation in the measure of coffee and in the degree of grinding, as well as pressing it down more or less will alter the intensity of the coffee and its aroma.
- The greater the quantity of coffee, the finer it is ground and the better it is packaged, the slower the coffee machine will dispense it. If the coffee comes out very quickly, change the type of coffee and use one which is finer ground.
- The coffee should come out evenly and not in drips.
7. CLEANING AND MAINTENANCE
Periodic maintenance must be done on the coffee machine keep it in good condition.
Important: When you have to handle the filter holder, make sure that the control lever is completely open.
Cleaning
- Clean the outside of the coffee machine with a soft damp cloth and dry it afterwards. Do not use solvents or abrasive products.
- Clean the water deposit (B) and the drip tray (I) often with warm water and neutral soap. After cleaning them, rinse them carefully with non soapy water.
- Every time you use the coffee machine, clean off any coffee remains. To do this, follow these steps:
- Fit an empty filter in the holder (E).
- Put the coffee switch (G) in position 7 and let the water circulate for several seconds.
- In the meantime, raise and lower the lever (C) without closing it completely.
- Remove the filters and clean them with water after use.
- Clean the steamer (R) with a damp cloth.
Maintenance
- Periodically, or whenever necessary, clean the coffee outlet (P) and inside the filter holder (E).
- Turn the coffee outlet (P) clockwise until it comes away from the from filter holder (E), (Fig. 10).
- Clean the coffee outlet (P) with running water.
- If necessary, put the switch (G) in the position and let the water flow for a few seconds to clean inside the filter holder (E).
- Fit the coffee outlet (P) in the filter holder (E) and turn it anti-clockwise until it locks completely.
- If necessary, also clean the filter block (Fig. 11). Do this in the following way:
Cleaning scale
Clean the limescale off the coffee machine from time to time. The frequency will depend on the hardness of the water (ask your supply company). Normally it should be cleaned every three months at least.
Use normal water softening products on the market for coffee machines (follow the instructions on the packet) or dissolve two teaspoons of tartaric acid or citric acid in half a litre of lukewarm water.
Do not use vinegar as it will reduce the life of the appliance.
How to remove limescale from the coffee machine
- Fill the deposit with a descaling solution. Then place a container which is large enough on the drip grille under the filter holder.
• Plug the coffee machine in. - Put in the switch (G) on and let around 1/3 of the deposit flow out through the coffee outlet (P) at regular intervals.
- The disconnect th switch (G) and let the solution work for around 15 minutes.
- Put switch (G) back on and let the water flow out at regular intervals.
- In order to descale the steamer (R), disconnect the switch (G) from time to time and put the steamer pipe (S) in a container and operate the steamer.
- Repeat the process as many times as required.
- When the descaling process has finished, clean the water deposit (B) thoroughly.
-
Fill the deposit with drinking water and let it circulate round the coffee machine until it has completely emptied twice.
-
TROUBLE SHOOTING
| The coffee does not come out or drips slowly: | ·The water deposit is badly positioned.·The water deposit is empty or contains very little water.·The coffee outlet is blocked.·The coffee is ground very finely.·The coffee is pressed down too much.·There is too much coffee in the filter.·There is scale and the coffee machine needs to be descaled |
| The coffee comes out very fast and does not form cream: | ·The filter selected is not appropriate.·The coffee is not correctly pressed.·The weak single measure is not properly fitted.·There is not enough coffee in the filter.·The coffee is roughly ground.·Used or inappropriate coffee. |
| The coffee flows over the top of the filter: | ·The control lever was not closed properly.·The top part of the filter holder is not clean.·The filter block is not clean. |
| The coffee comes out cold | ·The temperature indicator was not on green when the coffee was prepared. |
| The pump makes a lot of noise: | ·The water deposit is badly fitted.·The water deposit is empty or contains very little water.·The water outlet is blocked. |
| The control lever will not open: | Important: Disconnect the coffee machine and leave it to cool completely before opening it.·There is residual pressure within the filter.·Soft single measure badly fitted in the filter. |
| The filter is fixed to the block after opening the lever | Important: With the lever open, connect the pump and let the water flow a few seconds until the filter comes loose.·If the situation continues, after preparing the coffee wait a few seconds before opening the handle. |
For any other operation problem or in the event of a fault, request help from an Authorised Technical Assistance Service or your local supplier
9. INFORMATION FOR THE CORRECT DISPOSAL OF ELECTRICAL AND ELECTRONIC APPLIANCES
At the end of its working life, the product must not be disposed of as urban waste. It must be taken to a special local authority differentiated waste collection centre or to a dealer providing this service. Disposing of a household appliance separately avoids possible negative consequences for the environment and health deriving from inappropriate disposal and enables the constituent materials to be recovered to obtain significant savings in energy and resources.
To remind you that you must collaborate with a selective collection scheme, the symbol shown appears on the product warning you not to dispose of it in traditional refuse containers. For further information, contact your local authority or the shop where you bought the product.
FR
Cher client,
WHITE COFFEE: 1/2 tasse
"LATTE" ESPRESSO COFFEE: 1/2 tasse
ESPRESSO "STRETO": 1 Tasse
- Kaffee:
ESPRESSO "STRETO": 2 Tassen
- Kaffee:
CAFÉ CREME: 1/2 Tassen
- Kaffee:
- DESCRIPTION OF THE PRODUCT (Fig. 1)
- TECHNICAL DATA
- SAFETY RECOMMENDATIONS
- Safety instructions which must be observed when connecting the appliance
- Safety instructions which should be observed when the coffee machine is switched on
- Safety instructions for cleaning and maintenance tasks
- APPLICATION
- ITALIAN "STRETO" ESPRESSO: 1 cup
- "STRETO" ESPRESSO: 1 cup
- "STRETO" ESPRESSO: 2 cups
- "LUNGO" ESPRESSO: 2 cups
- WHITE COFFEE: 1/2 cups
- "LATTE" ESPRESSO COFFEE: 1/2 cups
- CAPPUCCINO: 1 cup
- ADJUSTMENT
- Method:
- OPERATION
- Preparing hot drinks
- To prepare a cappuccino you must:
- Secrets for preparing a good coffee
- CLEANING AND MAINTENANCE
- Cleaning
- Maintenance
- Cleaning scale
- How to remove limescale from the coffee machine
- INFORMATION FOR THE CORRECT DISPOSAL OF ELECTRICAL AND ELECTRONIC APPLIANCES
- FR
- WHITE COFFEE: 1/2 tasse
- "LATTE" ESPRESSO COFFEE: 1/2 tasse
- ESPRESSO "STRETO": 1 Tasse
- ESPRESSO "STRETO": 2 Tassen
- CAFÉ CREME: 1/2 Tassen
Brand : FAGOR
Model : CR-18
Category : Coffee machine