
59G608 - Vacuum Cleaner Graphite - Free user manual and instructions
Find the device manual for free 59G608 Graphite in PDF.


| Product type | Workshop vacuum cleaner |
| Brand | Graphite |
| Model | 59G608 |
| Supply voltage | 230 V AC |
| Frequency | 50 Hz |
| Rated power | 1500 W |
| Max receiver power (tool outlet) | 2000 W |
| Total tank capacity | 40 L |
| Useful tank capacity | 32 L |
| Height | 840 mm |
| Outside diameter | 340 mm |
| Weight | 11.2 kg |
| Suction hose length | 4 m |
| Suction hose diameter | 35 mm |
| Suction power | 18 kPa |
| Min. air flow | 58 L/s |
| Protection class | I |
| IP rating | IPX4 (splash-proof) |
| Operation modes | Dry, wet, blow, automatic with power tool |
| Filter types | Pleated filter, dust bag (paper), foam membrane (wet) |
| Accessories included | Suction hose, floor attachments (2), crevice attachment, castors (4), telescopic pipe, dust bag, foam membrane, pleated filter, support for wheels, adapter, auxiliary handle parts, bolts, screws |
| Special features | Float valve for wet operation, drain plug, 3-position switch, power outlet for tools, transport handle, blow function |
Frequently Asked Questions - 59G608 Graphite
User questions about 59G608 Graphite
0 question about this device. Answer the ones you know or ask your own.
Ask a new question about this device
Download the instructions for your Vacuum Cleaner in PDF format for free! Find your manual 59G608 - Graphite and take your electronic device back in hand. On this page are published all the documents necessary for the use of your device. 59G608 by Graphite.
USER MANUAL 59G608 Graphite
natural_image
Line drawing of a vacuum cleaner with attached sensors and a circular vent (no text or symbols)59G608


natural_image
Completely dark image with no visible content, text, or symbols.PL INSTRUKCJA OBSŁUGI 6
GB INSTRUCTION MANUAL....14
SR UPUTSTVO ZA UPOTREBU....100
ODKURZACZ WARSZTATOWY
59G608
UWAGA: PRZED PRZYSTĄPIENIEM DO UŻYTKOWANIA URZĄDZENIA NALEŻY UWAŻNIE PRZECZYTAĆ NINIEJSZĄ INSTRUKCJĘ I ZACHOWAĆ JĄ DO DALSZEGO WYKORZYSTANIA.
SZCZEGÓŁOWE PRZEPISY BEZPIECZEŃSTWA


CAUTION: BEFORE USING THE DEVICE READ THIS MANUAL CAREFULLY AND KEEP IT FOR FUTURE REFERENCE.
DETAILED SAFETY REGULATIONS

WARNING. Do not collect dust harmful to health, e.g. dust of hard wood, beech, oak, crystalline silica and asbestos. These materials are considered carcinogenic.
- This equipment is not intended for use by persons with restricted physical, sensory or mental capabilities (including children) or persons who have no experience or are unfamiliar with the equipment, unless work is supervised or carried out in accordance with equipment use instructions handed over by persons responsible for safety.
- Pay attention to children so they don't play with the equipment.
- Before connecting the vacuum cleaner to a power network ensure the supply voltage matches the voltage on the rating plate of the tool.
- Connect the vacuum cleaner only to electrical system equipped with residual current circuit breaker that will cut the power off when earth leakage current exceeds 30 mA in less than 30 ms.
- Switch off the vacuum cleaner when the tank is filled with water.
- Keep the power cord of the device away from moving parts of other tools at all times.
- To connect the vacuum cleaner with power supply and external device use appropriate power cord designed for outdoors operation and appropriate capacity.
- Protect power cord against spilled water, oil and other chemical substances.
- Do not use the vacuum cleaner in environment with explosive vapours, gases and in proximity of explosive materials.
- Do not use the vacuum cleaner to gather glowing ash, or corrosive, explosive or flammable materials or liquids, e.g. oils, solvents, petrol.
- Use filter appropriate for the planned task.
- Do not operate with full tank or dust bag. Empty the tank and replace dust bag regularly.
- Do not use the vacuum cleaner to clean fur on animals, clothes on persons, and drain water from aquaria (risk for human and animal health).
- Protect the vacuum cleaner from rain.
- Do not expose the device to direct sunlight or other source of heat.
- Do not bring the suction attachment of the vacuum cleaner close to objects, which may be caught by sucked air (risk of damage of objects and the vacuum cleaner).
- Do not open dirt receptacle during operation of the vacuum cleaner.
- If the power cord is damaged during operation, disconnect the power supply immediately. DO NOT TOUCH POWER CORD BEFORE DISCONNECTING FROM THE POWER SUPPLY.
- Remove plug from mains socket:
—whenever you go away from the tool;
—before checking, cleaning or repairing the device.
- Only authorised persons should repair the vacuum cleaner.
- Use only spare parts recommended by the manufacturer.
Maintenance and storing
- Keep all parts of the vacuum cleaner in good technical condition.
- To keep the operation safe, replace worn out and damaged parts.
- Keep the tool beyond reach of children.
CAUTION! This device is designed to operate indoors.
The design is assumed to be safe, protection measures and additional safety systems are used, nevertheless there is always a small risk of injuries at work.
Explanation of used symbols

1

2

3

4
- Read instruction manual, observe warnings and safety conditions therein.
- Disconnect the power cord before starting maintenance or operation.
- Keep the tool away from children.
- Protect against rain.
CONSTRUCTION AND USE
Workshop vacuum cleaner is designed to suck and collect non-flammable dusts, shavings etc. in dry operation mode, or non-flammable liquids and water-air mixtures in wet operation mode.
The vacuum cleaner can work with power tools and suck off shavings and dusts appearing during power tool operation. The device is designed for greater loads in industry applications, e.g. craft and repair workshops and all works from the scope of individual, amateur activities (tinkering).


The tool can be used for gypsum dust. When collecting gypsum dust, use both pleated filter and dust bag.
Use the tool according to its purpose only.
DESCRIPTION OF DRAWING PAGES
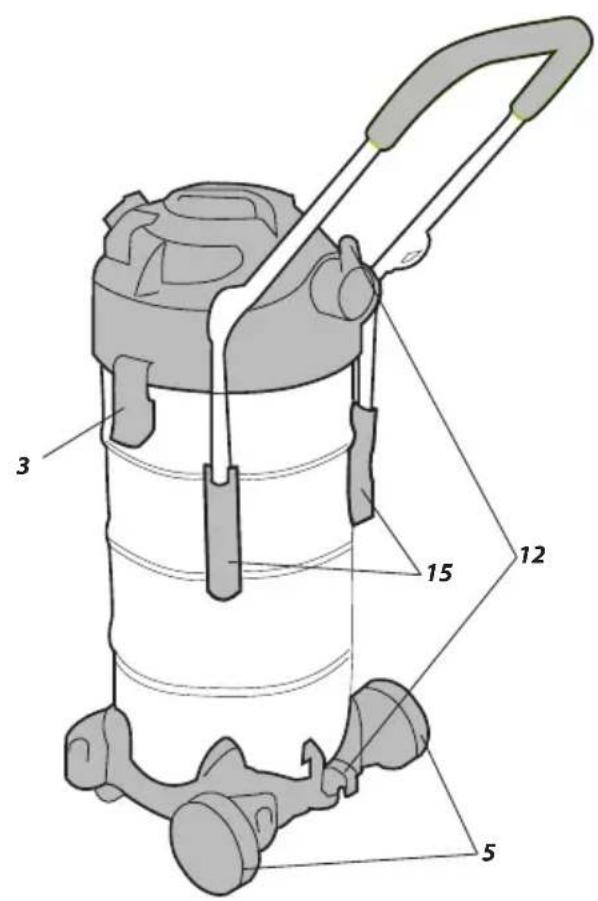
Below enumeration refers to the device elements depicted on the drawing pages of this manual.
- Transport handle
- Power supply socket
- Fixing clamp
- Connection socket
- Wheels
- Tank
- Upper body
- Switch
- Drain plug
- Support for wheels
- Base
- Power cord hook
- Auxiliary handle
- Special nut
- Guides
* Differences may appear between the product and drawing.
MEANING OF SYMBOLS

CAUTION

WARNING

ASSEMBLY / SETTINGS

INFORMATION
EQUIPMENT AND ACCESSORIES
- Suction hose - 1 pce
- Floor attachment - 2 pcs
- Crevice attachment - 1 pce
- Castor - 4 pcs
- Telescopic pipe - 1 pce
- Dust bag - 1 pce
- Foam membrane - 1 pce
- Pleated filter - 1 pce
- Support for wheels - 4 pcs
- Adapter - 1 pce
- Lower part of auxiliary handle - 2 pcs
- Auxiliary handle - 1 pce
- Bolts + special nuts - 2 sets
- Screws - 6 pcs
Use of wheels facilitate transportation of the vacuum cleaner. Smaller castors located in front base facilitate manoeuvring, while large back transport wheels provide greater stability of the vacuum cleaner.

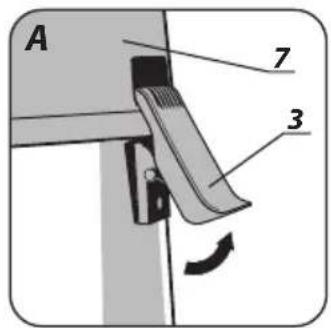
- Release fixing clamps (3) on both sides of the device and remove upper body (7) (fig. A).
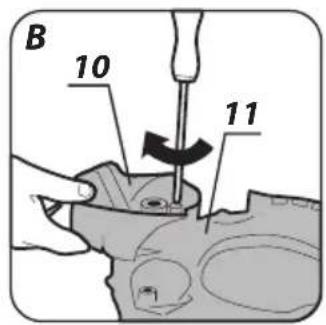
- Turn the tank (6), place support for wheels (10) in the base sockets (11) and fix with screws (fig. B).
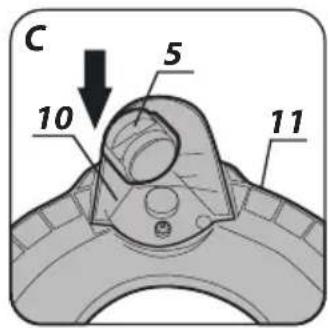
- Install front castors (5) by pushing them into holes in the support for castors (10) (fig. C).
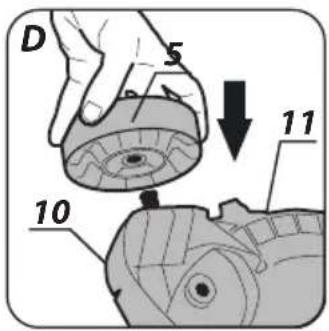
- Install rear wheels (5) by pushing them onto axis in the support for wheels (10) (fig. D).
- Turn the tank again and install upper body (7).
INSTALLATION OF ADDITIONAL HANDLE

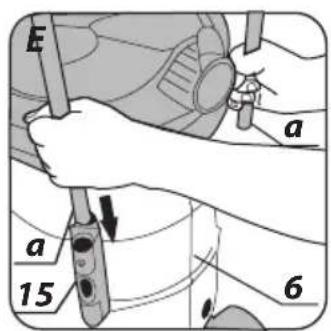
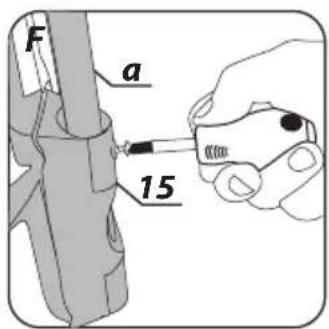
- Place lower part of auxiliary handle (a) in the guides (15) located on the tank (6) (fig. E), then secure with included screws (fig. F).
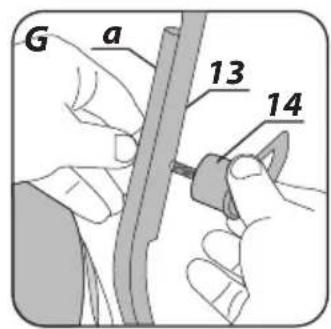
- Use bolts and special nuts (14) to join lower parts of the auxiliary handle (a) and the handle (13) (fig. G).

The vacuum cleaner can be transported to the work place by rolling on castors with the use of transport handle (1) or auxiliary handle (13).
INSTALLATION / REPLACEMENT OF PLEATED FILTER

Disconnect the tool from power supply.
- Release fixing clamps (3) on both sides of the device and remove upper body (7).
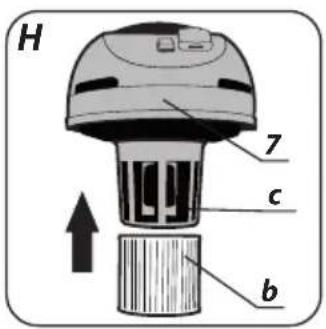
- Place pleated filter (b) on the float body (c). Ensure it is installed properly (fig. H).
• Install upper body (7) and secure with fixing clamps (3).

Once damaged, pleated filter must be replaced with a new one.
INSTALLATION / REMOVAL OF DUST BAG

Dry cleaning requires dust bag. Using the dust bag prevents clogging of the pleated filter and extends its lifetime, and facilitates emptying the dirt later.
- Release fixing clamps (3) on both sides of the device and remove upper body (7).
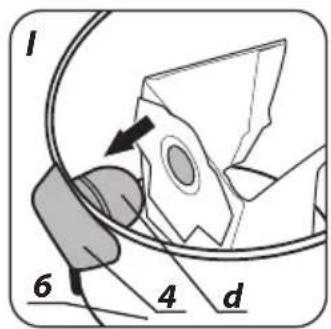
- Slide the dust bag hole onto connector pipe (d) located in the tank (6) (fig. 1).
- Ensure the dust bag adheres to inner wall of the tank in its whole length.
- Put upper body in place (7) and secure with fixing clamps (3).
- To remove the dust bag, proceed with above procedure in reverse order.

Check filling of the dust bag regularly. When the dust bag is full, replace it with a new one.

When using the vacuum cleaner to gather materials which are not harmful to health, they can be collected in the tank (6) directly, use of pleated filter or dust bag is not necessary.
INSTALLATION OF SUCTION HOSE

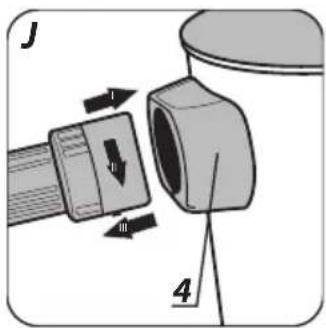
- Slide the suction hose into the connection socket (4), turn clockwise and gently pull back (fig. J).
- Connect the other end of the suction hose to telescopic pipe.
Deinstallation of the suction hose is similar to installation, only the sequence of actions is reversed.
INSTALLATION OF TELESCOPIC PIPE AND ATTACHMENTS

- Push the suction hose connection to the telescopic pipe holder so the latches snap in place.
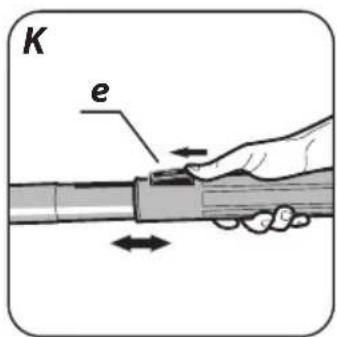
Move the slider (e) down and extend the telescopic pipe to desired length (fig. K). - Put appropriate attachment onto telescopic pipe.

Floor attachments are especially useful for cleaning large areas and in wet operation mode. Crevice attachment is suitable for cleaning edges, corners and crevices.

INSTALLATION OF UPPER HOOK FOR POWER CORD
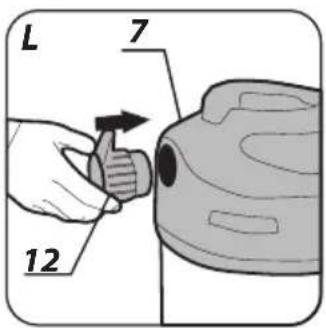
- Push the upper hook for power cord (12) into hole in the upper body (7) (fig. L).
SWITCHING ON / SWITCHING OFF
The mains voltage must match the voltage specified on the rating plate of the vacuum cleaner.

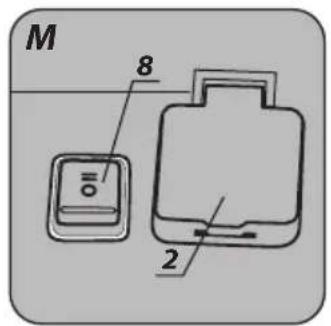
Vacuum cleaner features 3-position switch (8). Depending on the work performed, set the switch in appropriate position (fig. M).
- Pos I = (upper position of the switch) – device operates like regular vacuum cleaner.
- Pos 0 = (middle position of the switch) – switched off.
- Pos II = (bottom position of the switch) – vacuum cleaner can only be used with external device (power tool) connected to power socket of the vacuum cleaner.
EXTRACTION OF DUSTS AND SHAVINGS PRODUCED DURING POWER TOOL OPERATION

- Place the pleated filter (b) and/or dust bag on the vacuum cleaner.
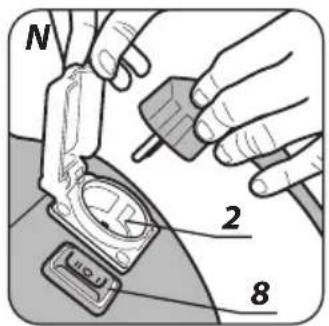
- Connect power tool plug in the power supply socket (2) (power consumption of the connected power tool must not exceed 2000 W) (fig. N).
- Switch on the vacuum cleaner – press the switch (8) to pos. II.

In this mode of operation vacuum cleaner can only be used with power tool connected. Remember that the vacuum cleaner will be switched on automatically (with short delay) by power tool connected to the socket.
Vacuum cleaner socket can be used only for purposes specified in this instruction manual.

When collecting gypsum dust, you must use both pleated filter and dust bag.
WET OPERATION

Do not use the vacuum cleaner to suck off flammable or explosive liquids, such as petrol, oils, alcohols, solvents etc. and hot or glowing dusts and materials.

Foam membrane filters out large contaminations from liquids.
- Release fixing clamps (3) on both sides of the device and remove upper body (7).
- Remove pleated filter (b) and/or dust bag.
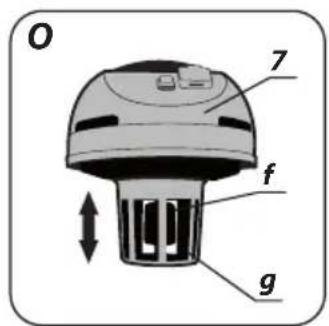
• Empty the tank from dirt. - Ensure the float (f) can elevate in its ring in straight line (g) (fig. O).
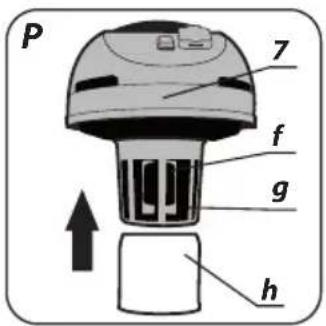
- Put foam membrane (h) onto the ring (g) of the float (f) (fig. P).
• Install upper body (7) and secure with fixing clamps (3).

When water reaches its maximum allowable level in the tank, sound produced by motor changes noticeably. Switch off the vacuum cleaner immediately and empty the tank.
EMPTYING DIRTY WATER FROM THE TANK

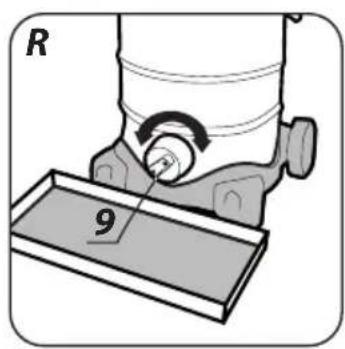
- Place tray or other vessel and unscrew the drain plug (9) (fig. R).
- Once the water has been drained screw in the drain plug (9).
BLOWING THROUGH

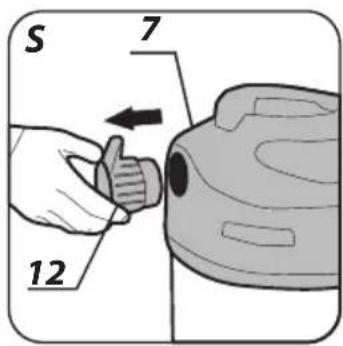
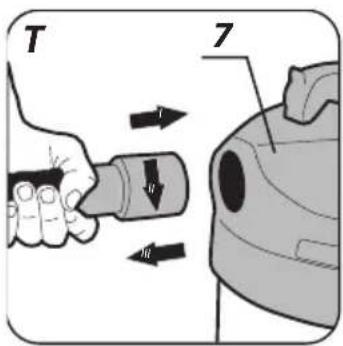
Before blowing through (e.g. dirt depositions in corners), remove upper hook for the power cord (12) located on the upper body (7) (fig. S). Remove suction hose from the connection socket (4) and attach it to hole in the upper body (7) (fig. T).
Disconnect the tool from power supply network before starting any adjustment, maintenance or repair.
MAINTENANCE AND STORAGE
- Regular cleaning ensures longer maximum suction efficiency.
- Clean dirt and dust off the vacuum cleaner body with damp cloth. Do not allow water to get inside the motor.
- Empty, clean and dry carefully the tank each time after cleaning wet dirt and liquids. Liquids and wet dirt speeds up growth of bacteria.
- If pleated filter was used, remove and clean with a brush. Frequency of pleated filter cleaning depends on type and amount of dusts. Replace filter with a new one when necessary. Use only original pleated filters.
- Float and foam membrane must be cleaned and dried thoroughly to avoid growth of mould.
- Regular cleaning ensures longer maximum suction efficiency.
- Clean dirt and dust off the vacuum cleaner body with damp cloth. Do not allow water to get inside the motor.
- Empty, clean and dry carefully the tank each time after cleaning wet dirt and liquids. Liquids and wet dirt speeds up growth of bacteria.
- If pleated filter was used, remove and clean with a brush. Frequency of pleated filter cleaning depends on type and amount of dusts. Replace filter with a new one when necessary. Use only original pleated filters.
- Float and foam membrane must be cleaned and dried thoroughly to avoid growth of mould.
- If dust bag was used, replace with a new one when it is full.
- Store the vacuum cleaner in dry place, beyond reach of children.
- Entrust replacement of power cord and other repairs only to authorized service workshop.
CLEANING AFTER WET OPERATION

- When the work is finished, suck 1 to 2 litres of clean water, this will flush telescopic pipe and suction hose.
- Switch off the vacuum cleaner with the switch (8) and remove plug from mains socket.
- Lift the suction hose so water contained can flow into the tank (6).
- Unscrew the drain plug (9) to empty the dirty water from the tank.
- Disconnect the suction hose, release fixing clamps (3) on both sides of the device and remove upper body (7).
- Clean the tank, leave to dry.
STORAGE

Special incisions on the wheels support (10) allow to put the vacuum cleaner accessories in them for convenient storage and allow convenient changes during operation.

All defects should be repaired by service workshop authorized by the manufacturer.
TECHNICAL PARAMETERS
RATED PARAMETERS
| Workshop vacuum cleaner | |
| Parameter Value | |
| Supply voltage 230 V AC | |
| Power supply frequency 50 Hz | |
| Rated power 1500W | |
| Max. receiver power 2000 W | |
| Height 840 mm | |
| Outside diameter 340 mm | |
| Tank total capacity 40 l | |
| Tank useful capacity 32 l | |
| Length of suction hose 4 m | |
| Diameter of suction hose attachment | 35 mm |
| Suction power 18 kPa | |
| Min. air flow 58 l/s | |
| Protection class I | |
| Protection class of the receiver circuit I | |
| Protection level IPX4 | |
| Weight 11,2 kg | |
| Year of production 2021 | |
ENVIRONMENT PROTECTION
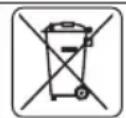
Do not dispose of electrically powered products with household wastes, they should be utilized in proper plants. Obtain information on waste utilization from your seller or local authorities. Used up electric and electronic equipment contains substances active in natural environment. Unrecycled equipment constitutes a potential risk for environment and human health.
* Right to introduce changes is reserved.
"Grupa Topex Spółka z ograniczoną odpowiedzialnością" Spółka komandytowa with seat in Warsaw at ul. Pograniczna 2/4 (hereinafter Grupa Topex) informs, that all copyrights to this instruction (hereinafter Instruction), including, but not limited to, text, photographs, schemes, drawings and layout of the instruction, belong to Grupa Topex exclusively and are protected by laws accordingly to Copyright and Related Rights Act of 4 February 2004 (ustawa o prawie autorskim i prawach pokrewnych, Dz. U. 2006 No 90 item 631 with later amendments). Copying, processing, publishing, modifications for commercial purposes of the entire Instruction or its parts without written permission of Grupa Topex are strictly forbidden and may cause civil and legal liability.
WERKSTATT-STABUSAUGER
59G608
INTRODUCEREA / DETAŞARE SACULUI PENTRU PRAF

POSEBNI PROPISI O SIGURNOSTI

REINIGING NA "DROOG" WERK


- ODKURZACZ WARSZTATOWY
- 59G608
- SZCZEGÓŁOWE PRZEPISY BEZPIECZEŃSTWA
- DETAILED SAFETY REGULATIONS
- WARNING. Do not collect dust harmful to health, e.g. dust of hard wood, beech, oak, crystalline silica and asbestos. These materials are considered carcinogenic.
- Maintenance and storing
- CAUTION! This device is designed to operate indoors.
- Explanation of used symbols
- CONSTRUCTION AND USE
- The tool can be used for gypsum dust. When collecting gypsum dust, use both pleated filter and dust bag.
- DESCRIPTION OF DRAWING PAGES
- MEANING OF SYMBOLS
- EQUIPMENT AND ACCESSORIES
- INSTALLATION OF ADDITIONAL HANDLE
- INSTALLATION / REPLACEMENT OF PLEATED FILTER
- INSTALLATION / REMOVAL OF DUST BAG
- INSTALLATION OF SUCTION HOSE
- INSTALLATION OF TELESCOPIC PIPE AND ATTACHMENTS
- INSTALLATION OF UPPER HOOK FOR POWER CORD
- SWITCHING ON / SWITCHING OFF
- EXTRACTION OF DUSTS AND SHAVINGS PRODUCED DURING POWER TOOL OPERATION
- WET OPERATION
- EMPTYING DIRTY WATER FROM THE TANK
- BLOWING THROUGH
- MAINTENANCE AND STORAGE
- CLEANING AFTER WET OPERATION
- STORAGE
- TECHNICAL PARAMETERS
- ENVIRONMENT PROTECTION
- WERKSTATT-STABUSAUGER
- INTRODUCEREA / DETAŞARE SACULUI PENTRU PRAF
- POSEBNI PROPISI O SIGURNOSTI
- REINIGING NA "DROOG" WERK
Brand : Graphite
Model : 59G608
Category : Vacuum Cleaner