
Trio11 Be - Monitor FOCAL - Free user manual and instructions
Find the device manual for free Trio11 Be FOCAL in PDF.

| Product type | Professional studio monitor 3-way / 2-way (Focus) |
| Brand | Focal |
| Model | Trio11 Be |
| Dimensions (HxWxD) | 635 x 345 x 450 mm |
| Weight | 37.3 kg |
| Power supply | 230 V / 115 V selectable via switch; fuse T 1.6 A (230 V) or T 3.5 A (115 V) |
| Internal amplification | Subwoofer 300 W class G, midrange 150 W class G, tweeter 100 W class AB |
| Frequency response (3-way mode) | 30 Hz - 40 kHz (±3 dB); 40 Hz - 20 kHz (±1 dB) |
| Frequency response (Focus 2-way mode) | 90 Hz - 20 kHz (±3 dB) |
| Max SPL level | 118 dB SPL peak at 1 m (3-way mode); 105 dB SPL peak at 1 m (Focus mode) |
| Drivers | Subwoofer 10" (25 cm) 'W' composite sandwich cone; midrange 5" (13 cm) 'W' composite sandwich cone; tweeter 1" (25 mm) pure Beryllium inverted dome with protective grille |
| Audio input | Balanced XLR, impedance 10 kOhms, adjustable sensitivity +4 dBu or -10 dBV |
| EQ adjustments | LF Shelving (35-250 Hz, ±3 dB); LMF EQ (160 Hz, Q=1, ±3 dB); HF Shelving (4.5-40 kHz, ±3 dB) |
| Focus mode | Activable via footswitch (6.35 mm jack); switches to 2-way (midrange + tweeter) |
| Auto Stand-by | Enable/disable device; goes to standby after ~15 min without signal; power consumption <0.5 W in standby |
| Safety | Beryllium tweeter: do not touch the dome; if damaged, cover with the supplied adhesive and contact dealer; mandatory grounding; thermal protection and limiter |
| Orientation of the midrange/tweeter plate | 360° rotation in 90° steps; requires removal of 4 screws (Allen key No. 4) and reinstallation |
| Cleaning | Dry cloth only |
| Package contents | 1 power cord, 4 rubber feet, 1 Allen key No. 4, 2 protective grilles, warranty card, manual |
| Warranty | 2 years (France); registration possible at www.focal.com/garantie |
| Spare parts and repairability | Tweeter and drivers replaceable only by a qualified technician; no user-serviceable parts |
Frequently Asked Questions - Trio11 Be FOCAL
User questions about Trio11 Be FOCAL
0 question about this device. Answer the ones you know or ask your own.
Ask a new question about this device
Download the instructions for your Monitor in PDF format for free! Find your manual Trio11 Be - FOCAL and take your electronic device back in hand. On this page are published all the documents necessary for the use of your device. Trio11 Be by FOCAL.
USER MANUAL Trio11 Be FOCAL
natural_image
Line drawing of two speaker units with circular speakers and control knobs, shown from different angles (no text or symbols present)Français : page 8
English : page 19
Deutsch : seite 30
Italiano : pagina 41
Español : página 52
The Trio11 Bes use a tweeter with an inverted dome made from pure beryllium, with the capacity to augment the bandwidth to 40 kHz. In its solid form, beryllium is harmless. However, given its nature, certain precautions should be taken to avoid exposure to unnecessary risks:
- The beryllium dome must never come into contact with abrasive materials.
- If the beryllium dome is damaged in any way, you should cover up the entire surface area of the dome using the protective adhesive strip supplied, as soon as possible. You will find the adhesive strip in the plastic packet containing the leaflet for the tweeter with an inverted dome made from pure beryllium. Contact the retailer to have the tweeter dismantled and replaced by trained personnel at the distributor.
- If the dome is broken, any beryllium particles should be carefully collected using sticky tape and then placed in a hermetically sealed plastic bag and sent back to the retailer along with the loudspeaker. For more information, please refer to the safe use manual in the box.
You can also address your questions directly to:
beryllium@focal.com
Thank you for choosing Focal loudspeakers. We are pleased to share with you our philosophy: "Listen Beyond". These high-tech loudspeakers benefit from the last Focal improvements in terms of speaker drivers design for studios and audio professionals. In order to enjoy the maximum of their performance, we advise you to read this user's manual and to keep it carefully so that you can consult it later.

natural_image
Technical line drawing of two speaker modules with circular components and a control panel (no text or symbols)Installation

natural_image
Technical line drawing of a box containing two circular components with internal gauges (no text or symbols)Orientation de la platine médium/tweeter
natural_image
Line drawing of a speaker tower with dual speakers and control panel (no text or symbols)
natural_image
Line drawing of a hand operating a speaker into a box, showing mechanical components (no text or symbols)
natural_image
Line drawing of a hand operating a speaker into a box with a circular speaker base (no text or symbols)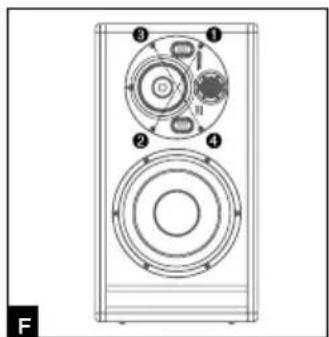
TRIO11 BE™

natural_image
Line drawing of a person facing a control panel with two cameras above, no text or symbols present

Pin 1 = masse (blindage)
Pin 2 = point chaud (signal en phase)
Pin 3 = point froid (signal hors phase)
2 - INPUT SENSITIVITY
IMPORTANT SAFETY INSTRUCTIONS!
 | CAUTIONRISK OF ELECTRIC SHOCKDO NOT OPEN |  |
| The bolt of lightning in an equilateral triangle warns the user that the device has high voltage that could result in a risk of electric shock. | Warning: To prevent any risk of electric shock, do not remove the cover (or the back) from the device. There are no user-serviceable parts in this device. For maintenance or repairs, contact a qualified professional. | The exclamation mark in an equilateral triangle warns the user that the manual contains important instructions on how to use and look after the device. |
1. Read these instructions.2. Keep these instructions.3. Heed all the warnings.4. Follow all the instructions.5. Risk of electric shock. Do not open. Do not submerge your headphones in water or expose them to humidity.6. Only clean with a dry cloth.7. Do not obstruct ventilation openings. Follow the manufacturer's instructions for installing the device. Leave a distance of at least 5 cm around the product for proper ventilation.8. Do not install the device close to a heat source such as a radiator, cooker, heat vents or any other appliance (including amplifiers) that gives out heat.9. Follow the safety instructions for the power supply cord. This product is a device belonging to Class 1. Only plug in the device using the mains plug provided, which incorporates an earth connection. The device must be plugged into an earthed mains socket.10. Make sure the power cable can't be trodden on, crushed or pinched. Take particular care with the plug and the cable connection to the device.11. Only use accessories recommended by the manufacturer.12. Only use handling equipment, stands, tripods, mounts or tables recommended by the manufacturer or sold with the device.If using a trolley, take extra care when moving the trolley and device together, to prevent the device from falling off and causing injury.13. Unplug the device during storms or long periods when it is not in use. | 14. All maintenance tasks should be performed by a qualified professional. Maintenance is required in case of any kind of damage to the device(damaged cable or plug, spillages or objects inserted into the device, exposure to rain or humidity, if the device malfunctions or overturns, etc.).15. The product should only be connected to the mains power type shown on the label on the device. If you're not sure what type of mains electrical supply you have, ask your retailer or your electricity supplier. For devices intended for use with a battery or another power source, see the user manual.16. Do not use this device in tropical climates.17. Do not use this device at altitudes of more than 2,000 m.18. Do not overload wall sockets, extension leads or multiple socket outlets as this could cause fire or electric shock.19. Do not insert any objects into the device's ventilation openings. They could come into contact with one of the high-voltage components or short-circuit them and cause a fire or electric shock. Do not spill liquid on the device.20. Do not attempt to repair this device yourself. Opening it may expose you to hazardous voltages or to other risks. Contact a qualified professional for all maintenance work. | 21. When replacement components are needed, make sure that the maintenance technician uses the components recommended by the manufacturer or components with the same technical features as the original product. Using non-compliant components could cause fires, electric shocks or other risks.22. After any maintenance or repair work on the device, ask the maintenance technician to test it to check that it works safely.23. The appliance should only be mounted on a wall or ceiling if the manufacturer allows for this.24. The On/Off switch on the back of the device cuts off the mains power supply to the device. The user should be able to access it at all times.25. To avoid damaging your hearing, do not listen to loudspeakers at high volumes for long periods of time.Listening to speakers at high volumes can cause damage to the user's ears and may lead to hearing problems (temporary or permanent deafness, buzzing in the ears, tinnitus, hyperacusis).Exposure to excessive volumes (over 85 dB) for more than one hour can cause irreparable damage to your hearing. (CEI 60417-6044) (CEI 60417-6044) |
USA:
Federal Communication Commission Interference Statement
This device complies with Part 15 of the FCC Rules. Operation is subject to the following two conditions: (1) This device may not cause harmful interference, and (2) this device must accept any interference received, including interference that may cause undesired operation.
This equipment has been tested and found to comply with the limits for a Class B digital device, pursuant to Part 15 of the FCC Rules. These limits are designed to provide reasonable protection against harmful interference in a residential installation. However, there is no guarantee that interference will not occur in a particular installation.
Canada:
Industry Canada Statement:
This device complies with ISED's licence-exempt RSSs. Operation is subject to the following two conditions: (1) This device may not cause harmful interference, and (2) this device must accept any interference received, including interference that may cause undesired operation.
Please validate your Focal-JMlab warranty, it is now possible to register your product online: www.focal.com/warranty

Conditions of guarantee
All Focal loudspeakers are covered by guarantee drawn up by the official Focal distributor in your country. Your distributor can provide all details concerning the conditions of guarantee. Guarantee cover extends at least to that granted by the legal guarantee in force in the country where the original purchase invoice was issued.
Package contents
Each monitor is provided with the following items (besides this manual):
- 1 power cable
- 4 rubber feet
• 1 N° 4 Allen key - 1 warranty card
• 2 protective grilles
Check none of these items are missing, and remove all the accessories from the box. To avoid damaging your product when removing it from the packaging, proceed as follows: open the flaps of the box fully, folding them over to the side. Then, remove the protection. Carefully lift the monitor out of the box. Inspect the packaging for any possible damage. If there are signs of damage, contact the carrier and the supplier. It is important to conserve the packaging for possible future use.
Recommendations
We insist on emphasising that your equipment can generate high sound pressure levels, especially in a 5.1 configuration. As the distortion levels remain low and the auditory fatigue incurred on the user is minimal, it is not always easy to realise how high the sound pressure level actually is. Remember that exposure to high volumes over a sustained period of time may lead to permanent hearing loss.
Quick set-up guide:
- First of all, check that the monitors and all audio sources (mixing console...) are turned off and that all settings at the rear panel of the monitor are set to 0.
- Connect the audio signal from the source to the monitors using the XLR input.
- Check that the correct voltage is selected according to the mains power voltage chosen using the voltage selector, check the fuse and replace if necessary. The amperage of the fuse depends on the operating voltage (see fuse characteristics in specifications table). The monitor speakers absolutely must be grounded using the power cable provided. See page 18 for more information.
- Turn on the audio source and check that the output level of the audio source connected to the monitor is set to - or to a very low level.
- Turn on the power to your monitors. The monitors are now in "Standby" mode.
- Turn up the output level of the audio source until a signal is detected by the monitors in order for them to turn on automatically.

After turning on the power to the monitors, and once the automatic Standby mode has been activated, the audio signal detection circuit within the monitor will automatically switch from "Standby" to "On" after a few seconds. You can select to deactivate this Standby mode (see page 19 for more information about this function).
- Once you have finished recording, mixing or mastering, we recommend turning off your equipment in the following order:
a. Turn off the monitors
b. Turn off the audio sources
Trio11 Be
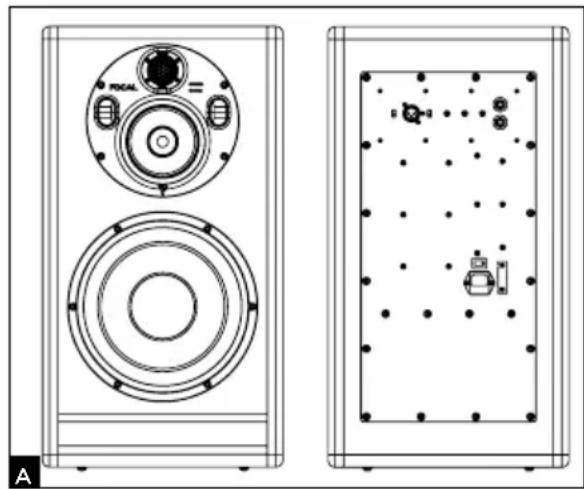
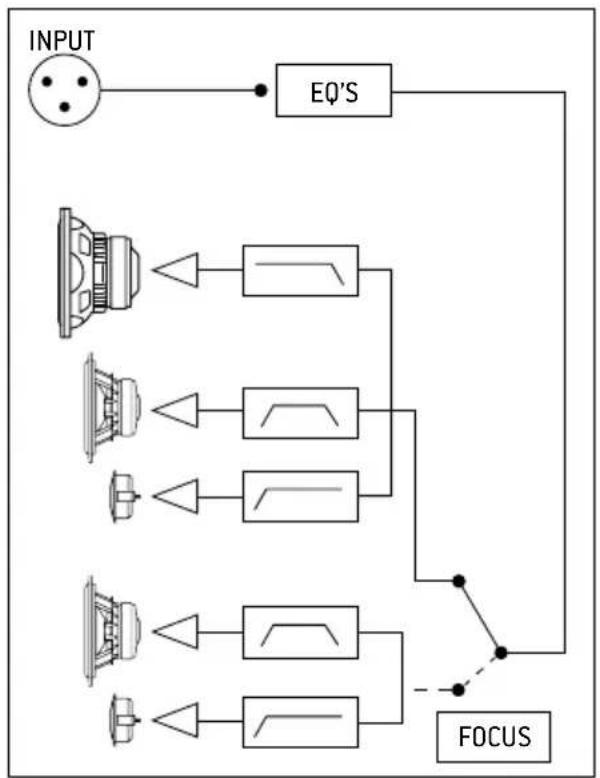
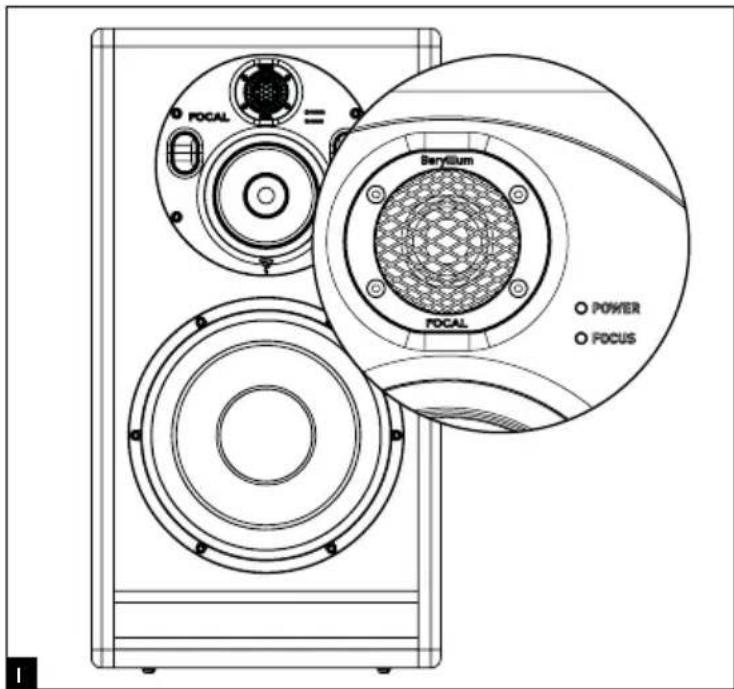
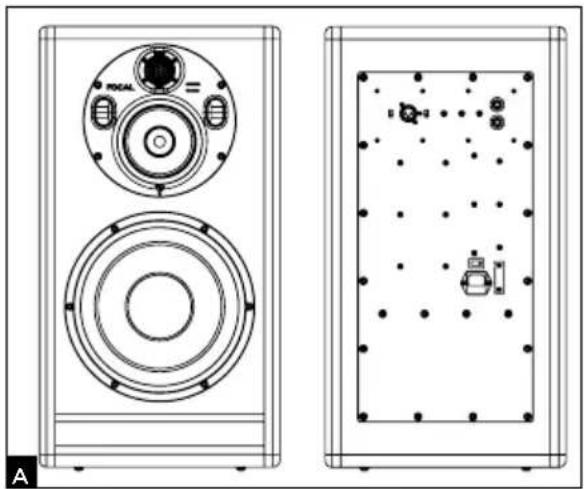
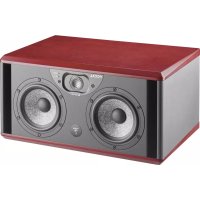
Trio11 Be is a professional near-field monitor with 2 monitor speakers within the same cabinet. Trio11 Be is composed of an 10-inch subwoofer with a "W" composite sandwich cone, a 5-inch woofer with "W" composite sandwich cone and a 1-inch pure Beryllium inverted dome tweeter fitted with a protective grille. The purpose of this grille is to protect the tweeter. Trio11 Be's acoustic tuning was carried out with the tweeter grille in place. For the Trio11 Be to work at its acoustic best and to provide the best level of protection, leave the grille in place.
In 3-way mode, the monitor has a frequency response of 30Hz to 40kHz (+/- 3dB) and 40Hz to 20kHz (+/- 1dB). In 2-way mode, only the 5-inch woofer and the tweeter are activated. The 2-way monitor speaker has a frequency response of 90Hz to 20kHz (+/- 3 dB) and is very efficient for checking the transfer quality of mixes carried out using systems with a limited bass range frequency response. These modes are controlled using a footswitch (see page 18).
The Trio11 Be monitor speaker is equipped with 3 internal amplifiers:
1 x 300W powering the 10-inch subwoofer
1 x 150W powering the 5-inch woofer
1 x 100W powering the 1-inch tweeter
natural_image
Technical line drawing of two speaker modules with circular components and a control panel (no text or symbols)Installation

Mains power
Your products absolutely must be grounded using the power cable.
Positioning
Trio11 Be monitors are near-field professional monitoring loudspeakers which require positioning facing the listener at a distance between 1.5 and 4 meters (4.9 to 13.1 feet) They can perfectly be positioned on a mixing console or they can be mounted to appropriate stands. Whichever position you choose, it is highly recommended to place the tweeter at about the same height as the listener's ears.
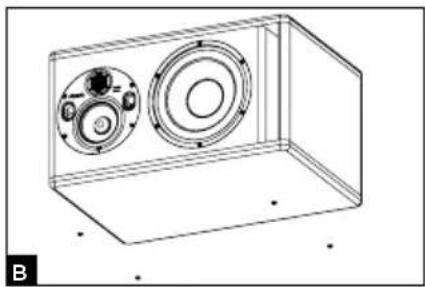
Positioning of the rubber feet
Trio11 Be monitor speakers are supplied with 4 rubber feet so that the monitor can be detached from its support (mixing console, stand...). We recommend positioning the rubber feet as to keep the distance between them according to the dimensions of the support as big as possible (fig. B).
natural_image
Technical line drawing of a rectangular enclosure containing two circular components with internal rings and mounting holes (no text or symbols)Orientation of the midrange/tweeter plate
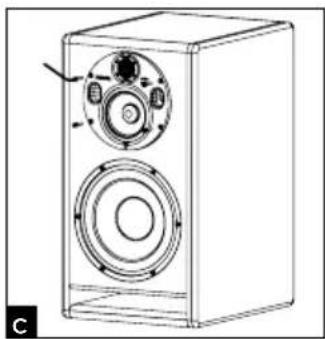
The midrange/tweeter plate on the Trio11 Be monitor speaker can be rotated 360°, 90° at a time. This allows the user to optimise the set-up according to the room acoustics and installation constraints.
Procedure for rotating the midrange/tweeter plate
- Remove the 4 screws using the n° 4 Allen key (fig. C).
- Pull the plate 10 cm out whilst inclining it (fig. D).
- Using the vents, rotate the plate to the desired position. Check that the retention pins are in line with the holes on the plate to ensure the screws are perfectly in line with the holes on the plate (fig. E).
- For a proper implementation of the horn, always observe the following 3 points:
4.1. Position the horn. Place and tighten by hand the 4 screws respecting the order shown on the diagram (fig. F).
4.2. Respecting the order in cross, tighten the screws again. Adjust the screwdriver on a low speed.
4.3. Still respecting the order in cross, tighten more. Adjust the screwdriver to a faster speed now. Then, make sure the screws are tighten enough. - The monitor speaker is now ready to use.
natural_image
Line drawing of a speaker tower with dual speakers and control panel (no text or symbols)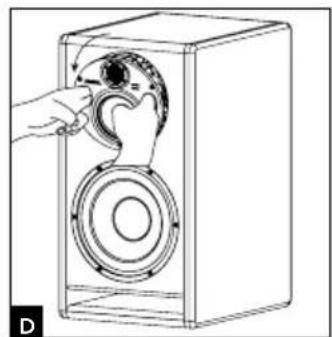
natural_image
Line drawing of a hand operating a speaker into a box (no text or symbols)
natural_image
Line drawing of a hand operating a speaker into a box (no text or symbols)
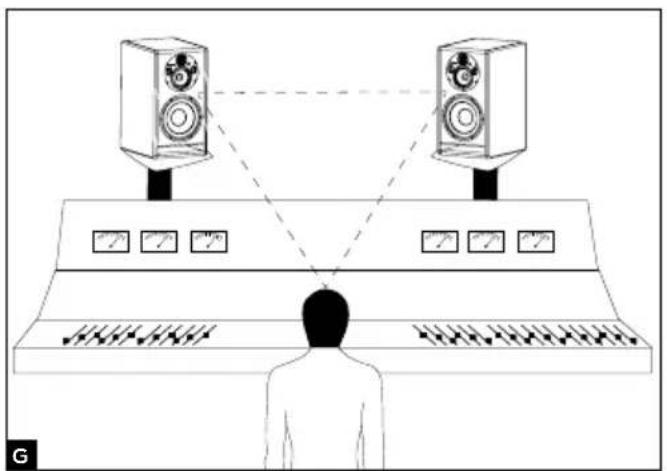
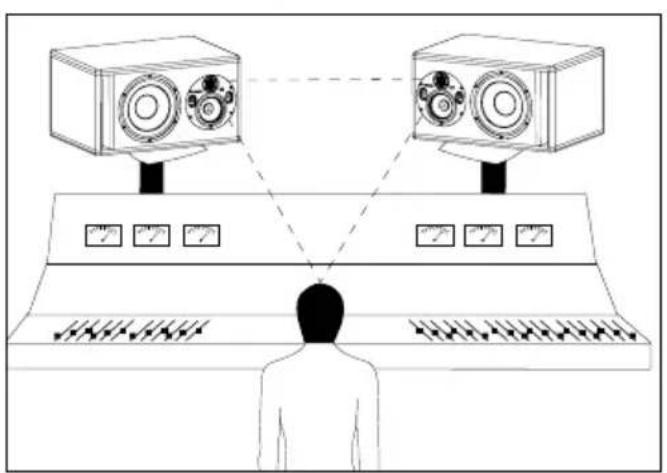
Stereo position
We recommend positioning the monitors to form an equilateral triangle with the listening area. The listener being at one corner and the left and right monitors at the other two corners (fig. G). The pure Beryllium inverted dome tweeter has one major advantage: its very low directivity. When using the monitors at less than 1.5 m (5 ft) away, it is highly recommended to widen the stereo image by increasing the distance between the two monitor speakers (the distance from tweeter to tweeter) to between 1.8 m and 2 m (6 ft and 6.5 ft) so as to balance integration constraints and working precision. If needed, point the tweeters outwards to increase the width of the stereo image.

natural_image
Diagram of a person standing at a console with two cameras above, connected by dashed lines to the screen (no text or symbols present)

Multichannel position
When using a 5.1 configuration, we recommend positioning the monitors around the listener so that the monitors are equal distance away from the listening position. Position the centre channel at 0^ , the front right channel at 30^ , the back right channel at 110^ , the back left channel at 250^ and the front left channel at 330^ (fig. H).
Breaking-in
The transducers used in the Trlo11 Be monitors are complex mechanical elements which require a breaking-in period to operate at their best and to become acclimatised to the temperature and humidity of the environment. The length of time this takes can vary depending on the conditions, and can sometimes last several weeks. Avoid listening at high volume during the first few hours of use. In order to shorten the breaking-in period, we advise you to let your equipment operate for about twenty hours at medium volume with programmes having significant low-frequency content. Once the transducers' characteristics have totally stabilised, you will be able to enjoy the full performance of your Focal products.
Settings and connections
1 - INPUT
The XLR connector enables you to connect a source with a balanced signal and has a standard wiring layout: Pin 1 = ground (cable shield)
Pin 2 = in-phase signal (aka hot)
Pin 3 = reverse-phase signal (aka cold)
2 - INPUT SENSITIVITY
This selector allows you to adjust the input sensitivity of the monitor speaker according to the source (mixing console, sound card...). If the source transmits an audio signal via an unbalanced line, set the input sensitivity of the monitor speaker to -10 dBV. If the audio signal is transmitted via a balanced line, set the input sensitivity of the monitor speaker to +4dBu.
3 - LF SHELVING
The LF SHELVING potentiometer allows you to activate or deactivate the volume correction below 250Hz. We recommend setting the LF SHELVING potentiometer to +2dB when the acoustics of the listening room naturally soften that frequency range. We recommend setting the LF SHELVING potentiometer to 0 when the acoustics of the listening room are neutral. We recommend setting the LF SHELVING potentiometer to -2dB when the monitors are placed near a wall or a corner.
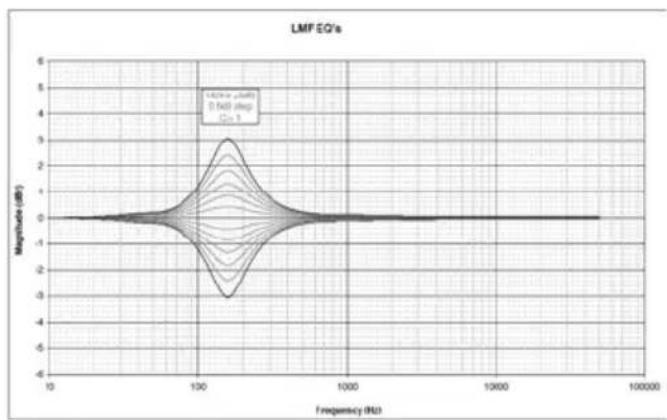
4 - LMF EQ
This potentiometer allows you to adjust the level of the low-mid frequencies. The centre frequency is 160Hz and the Q factor is 1. The corrections are made on a range of +/- 3dB. This correction is also useful if the monitor speaker is installed on top of a mixing console. Activating this function will diminish the reflections generated by the mixing console.
5 - HF SHELVING
The HF SHELVING potentiometer allows you to activate or deactivate the volume correction above 4.5kHz. We recommend setting the HF SHELVING potentiometer to +2dB when the acoustics of the listening room naturally soften this frequency range (mat environment). We recommended setting the LF SHELVING potentiometer to 0 when the acoustics of the listening room are neutral. We recommend setting the LF SHELVING potentiometer to -2dB or -3dB when the acoustics of the listening room naturally increase this frequency range (clear environment).
line
| Frequency (Hz) | Magnitude (dB) | | -------------- | -------------- | | 10 | 0 | | 100 | 3 | | 1000 | 0 | | 10000 | 0 | | 100000 | 0 |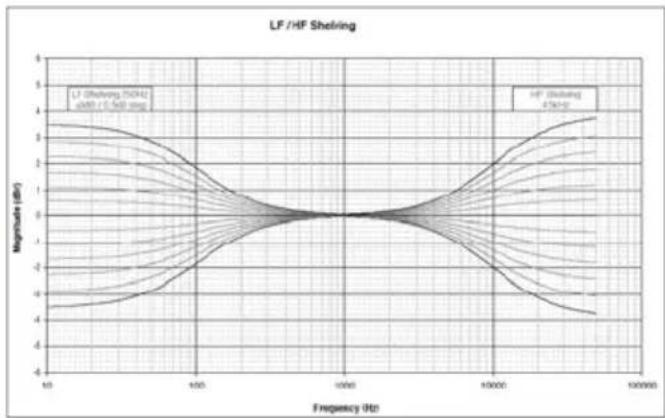
line
| Frequency (Hz) | Magnitude (dB) | | -------------- | -------------- | | 10 | -4.5 | | 100 | 0.0 | | 1000 | 0.0 | | 10000 | 0.0 | | 100000 | 4.5 |
FOCUS MODE
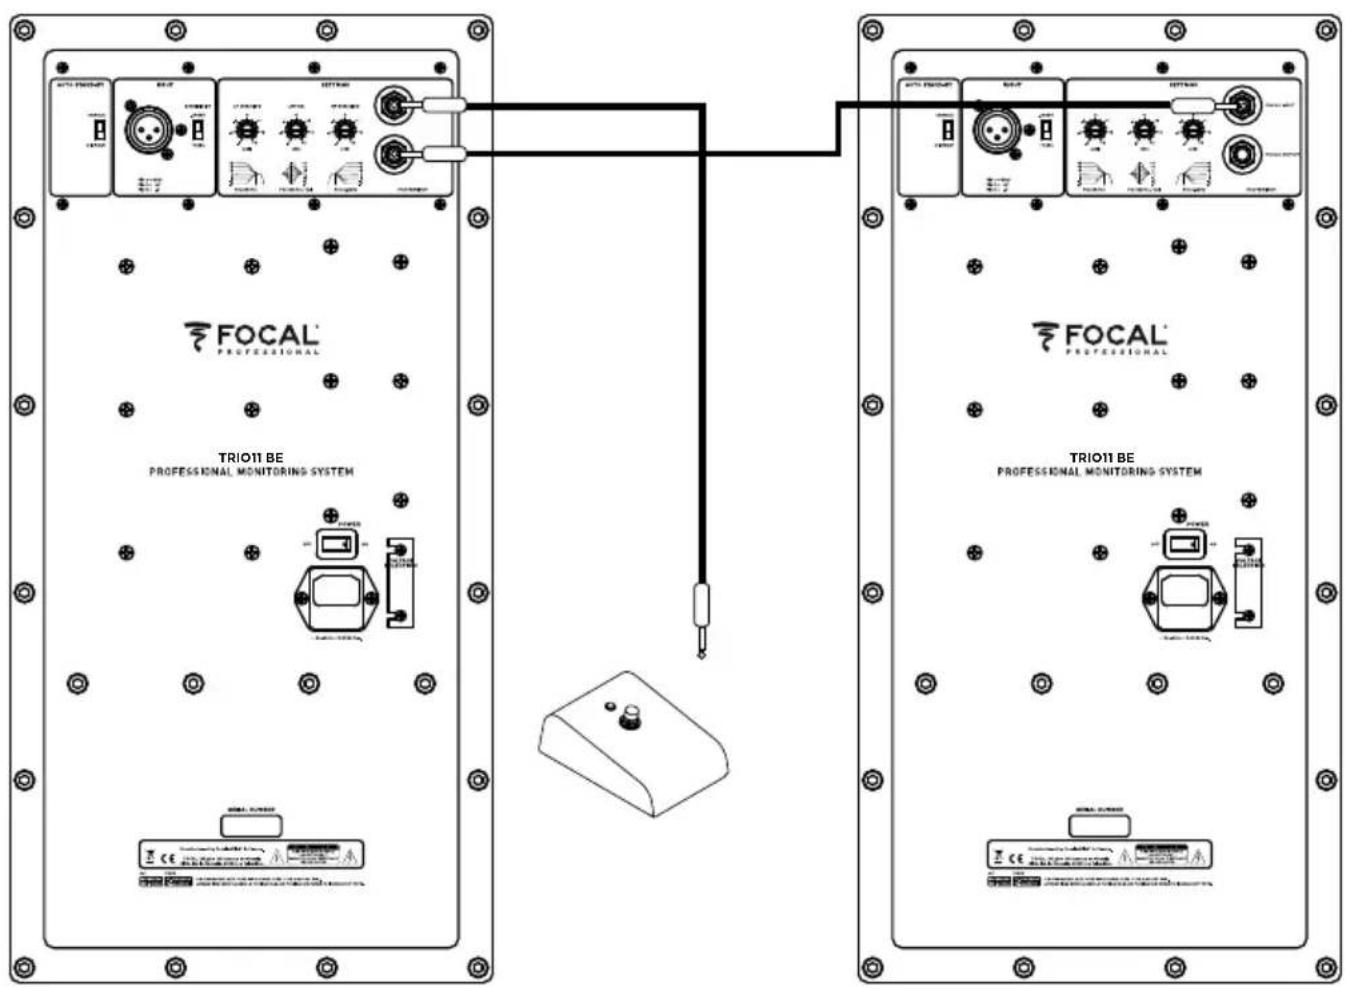
6 - INPUT
This input is for connecting the footswitch controller or for receiving the signal from the OUTPUT of the FOCUS mode of a Trio11 Be monitor.
7 - OUTPUT
This output is for connecting a Trio11 Be monitor to another Trio11 Be monitor.
Make sure you use an instrument-type cable with 2x 6.35 mm mono jacks to connect the footswitch to a Trio11 Be, and to connect two Trio11 Be monitors.
flowchart
graph TD
    A["INPUT"] --> B["EQ'S"]
    B --> C["FOCUS"]
    C --> D["Output"]
    subgraph Inputs
        E1["Speaker 1"]
        E2["Speaker 2"]
        E3["Speaker 3"]
        E4["Speaker 4"]
        E5["Speaker 5"]
    end
    E1 --> G["Logic Gate"]
    E2 --> H["Logic Gate"]
    E3 --> I["Logic Gate"]
    E4 --> J["Logic Gate"]
    E5 --> K["Logic Gate"]
    G --> L["Feedback to E1"]
    H --> L
    I --> L
    J --> L
    K --> L
Trio11 Be FOCUS mode diagram.
8 - ON/OFF
The ON/OFF switch turns the internal amplifiers on or off.
9 - VOLTAGE SELECTION
This slide switch allows you to select the voltage according to the mains power supply depending on the country you're in. There are two options: 115V or 230V. To change the voltage, proceed as follows:
- Turn off the monitor and unplug the power cable
- Using a flat-head screwdriver, remove the fuse situated below the power socket (11).
- Replace the fuse with one having the appropriate values:
a. 115V: class T fuse, value 3.15A
b. 230V: class T fuse, value 1.6A - Using a Phillips screwdriver, slightly loosen the screws (12), and remove the protection cover from the voltage selector.
- Switch the voltage selector (9) to the appropriate setting using a flat-head screwdriver.
- Using a Phillips screwdriver, put the protection cover for the voltage selector back into place and slightly tighten the screws (12).
- Reconnect the power cable (10).
- Turn on the power to the monitor using the Power ON/OFF switch (8).
10 - POWER SOCKET
Connect the power supply cable supplied to this connector socket.
11 - FUSE HOUSING
This is where the fuse is located to protect the monitor. If necessary, replace the fuse as explained in section 9 - VOLTAGE SELECTION.
12 - SCREWS
Two screws protect access to the voltage selector (9).
13 - POWER LED (front panel)
There are three possible states for the POWER LED:
- Off: no power/monitor off
- Green: monitor on
- Red: the limiter is activated
14 - FOCUS LED (front panel)
There are three possible states for the FOCUS LED:
- Off: the monitor is in standby mode or in 3-way mode
- Green: the monitor is in FOCUS mode
- Red: the monitor's heat protection is activated
15 - AUTO STAND-BY
Trio11 Be monitors are equipped with a selectable Standby mode. By default, the speakers are set to "ENABLE". In this mode, Standby is activated. When you switch the speakers on, Standby mode is active. To exit Standby mode, send an audio signal to the monitor, gradually increasing the sound level of the audio source. After approximately 15 minutes without receiving an audio signal, the monitors automatically go into Standby mode. In Standby, power consumption is less than 0.5 W.
Automatic Standby can be disabled. To do this, place the selector in the "DISABLE" position. When the selector is in the "DISABLE" position, the speaker remains fully powered up at all times when the "ON-OFF" switch is in the "ON" position.
> State of the Trio11 Be monitor
Colour State Solution
| POWER LED | Illuminated green | Monitor ON - | |
| Illuminated red The limiter is activated Reduce volume | |||
| FOCUS LED | OFF The monitor | is in 3-way mode or standby mode OR it is in standby in FOCUS mode | Send an audio signal to turn on ORPress the footswitch to activate FOCUS mode |
| Illuminated green | FOCUS mode activated | Press the footswitch to activate 3-way mode | |
| Illuminated red Heat protection Reduce volume | |||
Performance
| • Frequency response | 3-way mode | 30Hz - 40kHz (+/- 3dB) |
| 2-way mode(Focus) | 90Hz - 20kHz (+/- 3dB) | |
| • Maximum SPL | 3-way mode | 118dB SPL (peak at 1m) |
| 2-way mode(Focus) | 105dB SPL (peak at 1m) | |
| Electronics | ||
| • Inputs | Type/ImpedanceConnectorsSensitivity | Electronically balanced / 10 KOhmsXLRAdjustable, +4dBu ou -10dBv |
| • BassMidrangeTreble | 300W, class G150W, class G100W, class AB | |
| • Power supply | Mains voltageWiring | 230V (class T fuse 1.6A fuse rating) - 115V (class T fuse 3.5 A fuse rating)Detachable IEC power cable |
| • Indicators and controls | Rear panel Input sensitivity selector (+4dBu/-10dBV)Low frequency shelving (+/- 3dB from 35 to 250Hz)High frequency shelving (+/- 3dB from 4.5 to 40kHz)EQ low-mid frequencies (+/- 3dB at 160Hz, Q factor = 1)FOCUS input / FOCUS output | |
| • LED | Focus mode on, audio clipping and protection indicated by LED on front panel | |
| Transducers | ||
| • Subwoofer | 10W96701D10-inch Focal driver with W composite sandwich cone | |
| • Woofer | 5W047025-inch Focal driver with W composite sandwich cone | |
| • Tweeter | TB872,1-inch Focal pure Beryllium inverted dome tweeter | |
| Cabinet | ||
| • Structure | 21mm (0.82") and 30mm (1.2") reinforced panels | |
| • Dimensions including 4 rubber feet(HxWxD) | 25" x 13.6" x 17.7" (635 x 345 x 450mm) | |
| • Weight | 82.2 lbs (37.3 kg) | |
BITTE ZUERST LESEN!
natural_image
Technical line drawing of two speaker modules with circular components and a control panel (no text or symbols)Installation

Netzversorgung
natural_image
Technical line drawing of a two-cylinder speaker enclosure with no text or symbolsnatural_image
Line drawing of a speaker tower with dual speakers and control panel (no text or symbols)
natural_image
Line drawing of a hand operating a speaker into a box, showing mechanical components (no text or symbols)
natural_image
Line drawing of a hand operating a speaker into a box (no text or symbols)
TRIO11 BE™
Gebrauchsanleitung

natural_image
Diagram of a person standing at a console with two cameras above, connected by dashed lines to the screen (no text or symbols present)

natural_image
Technical line drawing of two speaker modules with circular components and a grid-patterned panel (no text or symbols)Installazione

natural_image
Technical line drawing of a 3D box containing two circular components with internal rings and mounting holes (no text or symbols)Orientamento del pannello medi/tweeter
natural_image
Line drawing of a speaker chamber with two speakers and a central speaker (no text or symbols)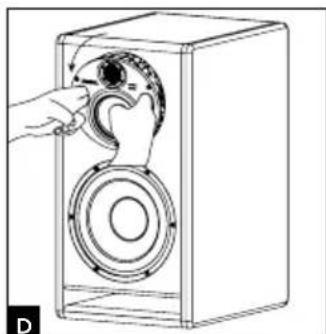
natural_image
Line drawing of a hand opening a speaker into a box, showing mechanical components and fan (no text or symbols)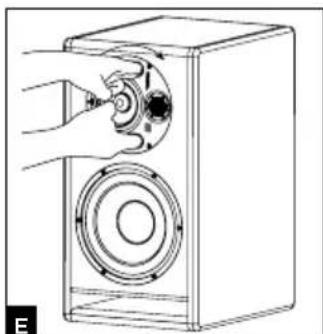
natural_image
Line drawing of a hand inserting a component into a speaker into a box (no text or symbols)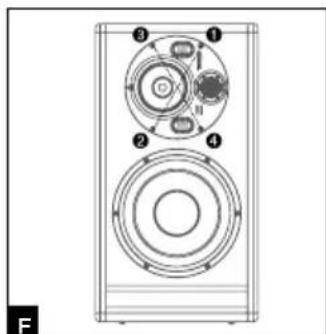
natural_image
Technical line drawing of a speaker or audio device with four circular components and numbered labels (1-4), no readable text or symbols beyond labels.
natural_image
Diagram of a person standing at a console with two cameras above, connected by dashed lines to the screen (no text or symbols present)

natural_image
Technical line drawing of two speaker modules with circular components and a control panel (no text or symbols)Instalación

natural_image
Technical line drawing of a two-cylinder speaker enclosure with circular components and mounting holes (no text or symbols)natural_image
Line drawing of a speaker tower with dual speakers and control panel (no text or symbols)
natural_image
Line drawing of a hand operating a speaker into a box (no text or symbols)
natural_image
Line drawing of a hand operating a speaker into a box (no text or symbols)
natural_image
Diagram of a person standing at a console with two cameras above, connected by dashed lines to the screen (no text or symbols present)

natural_image
Technical line drawing of two speaker modules with circular components and a control panel (no text or symbols)Instalação

natural_image
Technical line drawing of a rectangular enclosure containing two circular components with mounting holes (no text or symbols)natural_image
Line drawing of a speaker tower with two speakers and a front panel (no text or symbols)
natural_image
Line drawing of a hand operating a speaker into a box, showing mechanical components (no text or symbols)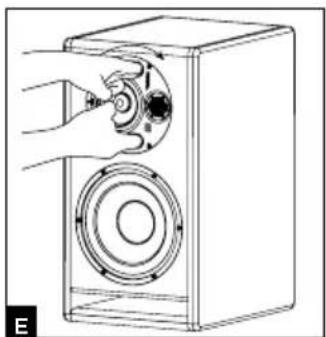
natural_image
Line drawing of a hand operating a speaker into a box with a circular speaker base (no text or symbols)
TRIO11 BE™

natural_image
Line drawing of a person facing a control panel with two cameras above, no text or symbols present

Posicionamento multicanal
MODO FOCUS
6 - INPUT
natural_image
Technical line drawing of two speaker modules with circular components and a grid-patterned panel (no text or symbols)Installatie

Netsnoer
natural_image
Technical line drawing of a two-cylinder speaker enclosure with no text or symbolsnatural_image
Line drawing of a speaker tower with dual speakers and control panel (no text or symbols)
natural_image
Line drawing of a hand operating a speaker into a box, showing mechanical components (no text or symbols)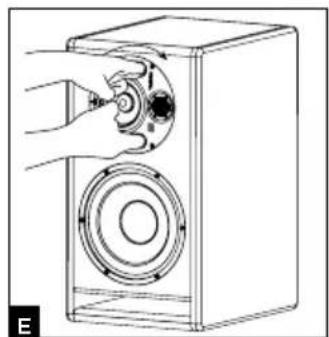
natural_image
Line drawing of a speaker inside a box with a hand operating the speaker (no text or symbols)
TRIO11 BE™

natural_image
Line drawing of a person facing a control panel with two cameras above, no text or symbols present

Multikanaal-positionering
natural_image
Technical line drawing of two speaker panels with circular components and a control panel (no text or symbols)TRIO11 BE™
natural_image
Technical line drawing of a two-cylinder speaker enclosure with no text or symbolsnatural_image
Line drawing of a speaker tower with dual speakers and control panel (no text or symbols)
natural_image
Line drawing of a hand opening a speaker into a box with a circular component (no text or symbols)
natural_image
Line drawing of a hand operating a speaker into a speaker chamber (no text or symbols)
natural_image
Technical line drawing of a speaker with four circular components and numbered labels (1-4), no readable text or symbols beyond labels.TRIO11 BE™

natural_image
Line drawing of a person facing a control panel with two cameras above, no text or symbols present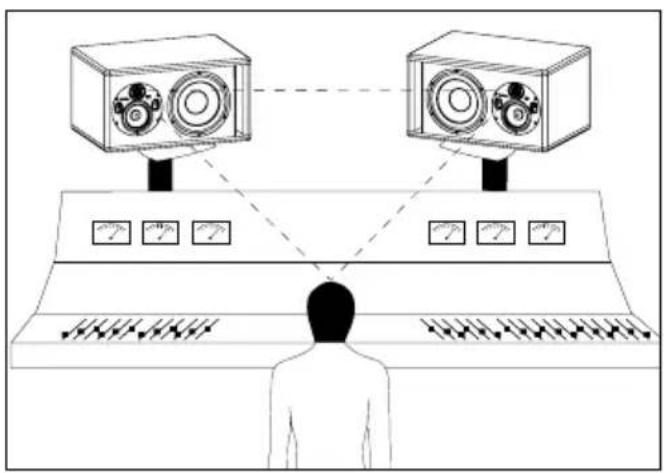

natural_image
Technical line drawing of two speaker modules with circular components and a grid-patterned panel (no text or symbols)安装安装

主电源
产品使用的电源线必须接地。
位置
natural_image
Technical line drawing of a rectangular enclosure containing two circular components with internal gauges (no text or symbols)natural_image
Line drawing of a speaker tower with two speakers and a central speaker (no text or symbols)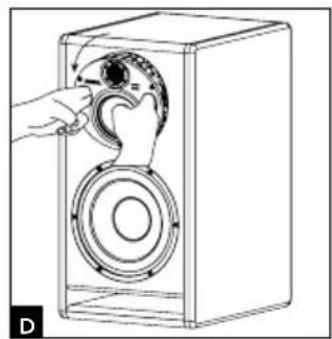
natural_image
Line drawing of a hand opening a speaker into a box, showing mechanical components (no text or symbols)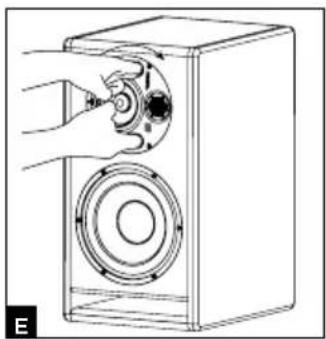
natural_image
Diagram of a hand operating a speaker into a speaker chamber (no text or symbols present)
natural_image
Technical line drawing of a speaker with four circular components and numbered labels (1-4), no readable text or symbols beyond labels.立体声位置立体声位置

natural_image
Line drawing of a person facing a control panel with two cameras above, no text or symbols present

多通道配置多通道配置
8 - ON/OFF8 - ON/OFF
1 x 300 W powering the 10-inch subwoofer
1 x 150 W powering the 5-inch woofer
1 x 100 W powering the 1-inch tweeter

natural_image
Technical line drawing of two speaker modules with circular components and a display panel (no text or symbols)설치설치

메인전원메인전원
natural_image
Technical line drawing of a mechanical housing with two circular components and directional arrows (no text or symbols)Midrange/tweeter plate 지향 Midrange/tweeter plate 지향
natural_image
Line drawing of a speaker tower with dual speakers and control panel (no text or symbols)
natural_image
Line drawing of a hand operating a speaker into a box, showing mechanical components (no text or symbols)
natural_image
Line drawing of a hand operating a speaker into a box (no text or symbols)
natural_image
Technical line drawing of a speaker or audio device with four circular components and numbered labels (1-4), no readable text or symbols beyond labels.스테레오 포지션스테레오 포지션

natural_image
Line drawing of a person facing a control panel with two cameras above, no text or symbols present

멀티채널 포지션멀티채널 포지션
Pin 3 = reverse-phase signal (다른 말로 cold)
2 - INPUT 2 - INPUT 잡도감도
3 - LF SHELVING3 - LF SHELVING
8 - ON/OFF8 - ON/OFF
| Frequency response | 3-way mode | 30Hz - 40kHz (+/- 3dB) |
| 2-way mode (Focus) | 90Hz - 20kHz (+/- 3dB) | |
| SPL maximum | 3-way mode | 118dB SPL (peak at 1m) |
| 2-way mode (Focus) | 105dB SPL (peak at 1m) | |
| Electronics Electronics | ||
| Inputs • Inputs | Type /ImpedanceConnectorsSensitivity | Electronically balanced / 10 KOhmsXLRAdjustable, +4dBu ou - 10dBv |
| Bass • BassMidrange • MidrangeTreble • Treble | 300W, class G150W, class G100W, class AB | |
| Power supply • Power supply | Mains voltageWiring | 230V (class T fuse 1.6A fuse rating) - 115V (class T fuse 3.5 A fuse rating)Detachable IEC power cable |
| Indicators and controls • Indication and output sensitivity selector (+4dBu/-10dBV)Low frequency shelving (+/- 3dB from 35 to 250Hz)High frequency shelving (+/- 3dB from 4.5 to 40kHz)EQ low-mid frequencies (+/- 3dB at 160Hz, Q factor = 1)FOCUS input / FOCUS output | ||
| LED • LED | Focus mode on, audio clipping and protection indicated by LED on front panel | |
| Transducers Transducers | ||
| Subwoofer • Subwoofer | 10W96701D10-inch Focal speaker driver with W composite sandwich cone | |
| Medium • Medium | 5W047025-inch Focal driver with W composite sandwich cone | |
| Tweeter • Tweeter | TB872,1-inch Focal pure Beryllium inverted dome tweeter | |
| Cabinet Cabinet | ||
| Structure • Structure | 21mm and 30mm (0.82" and 1.2") reinforced panels | |
| Dimensions including 4 rubber feet (HxWxD) | 25" x 13.6" x 17.7" (635 x 345 x 450 mm) | |
| Weight | 82.2 lbs (37.3 kg) | |
はじめにお読みください!
安全に関する重要な指示です!
Conditions of guarantee
1 x 300 W powering the 10-inch subwoofer
1 x 150 W powering the 5-inch woofer
1x 100 W powering the 1-inch tweeter
natural_image
Technical line drawing of two speaker modules with circular components and a control panel (no text or symbols)Installation

natural_image
Technical line drawing of a two-cylinder speaker enclosure with circular components (no text or symbols)natural_image
Line drawing of a speaker tower with two speakers and a front panel (no text or symbols)
natural_image
Line drawing of a hand opening a speaker into a box, showing mechanical components (no text or symbols)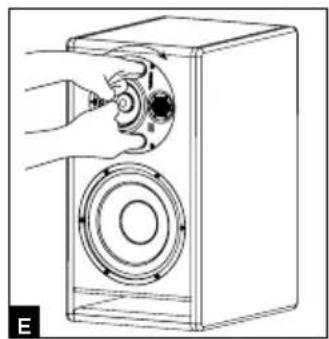
natural_image
Line drawing of a hand inserting a speaker into a speaker chamber (no text or symbols)
natural_image
Technical line drawing of a speaker with four circular components and numbered labels (1-4), no readable text or symbols beyond labels.ステレオ・ポジション

natural_image
Line drawing of a person facing a control panel with two cameras above, no text or symbols present

マルチチャンネル・ポジション
| • Frequency response | 3-way mode 30Hz - 40kHz (+/- 3dB) | |
| 2-way mode (Focus) 90Hz - 20kHz (+/- 3dB) | ||
| • SPL maximum | 3-way mode 118dB SPL (peak at 1m) | |
| 2-way mode (Focus) 105dB SPL (peak at 1m) | ||
| Electronics | ||
| • Inputs | Type /Impedance | Electronically balanced / 10 KOhms |
| Connectors | XLR | |
| Sensitivity | Adjustable, +4dBu ou -10dBv | |
| • Bass | 300W, class G | |
| • Midrange | 150W, class G | |
| • Treble | 100W, class AB | |
| • Power supply | Mains voltage | 230V (class T fuse 1.6A fuse rating) - 115V (class T fuse 3.5 A fuse rating) |
| Wiring | Detachable IEC power cable | |
| • Indicators and controls | Rear panel Input sensitivity selector (+4dBu/-10dBV) | |
| Low frequency shelving (+/- 3dB from 35 to 250Hz) | ||
| High frequency shelving (+/- 3dB from 4.5 to 40kHz) | ||
| EQ low-mid frequencies (+/- 3dB at 160Hz, Q factor = 1) | ||
| FOCUS input / FOCUS output | ||
| • LED | Focus mode on, audio clipping and protection indicated by LED on front panel | |
| Transducers | ||
| • Subwoofer | 10W96701D | |
| 10-inch Focal speaker driver with W composite sandwich cone | ||
| • Medium | 5W04702 | |
| 5-inch Focal driver with W composite sandwich cone | ||
| • Tweeter | TB872, | |
| 1-inch Focal pure Beryllium inverted dome tweeter | ||
| Cabinet | ||
| • Structure | 21mm and 30mm (0.82" and 1.2") reinforced panels | |
| • Dimensions including 4 rubber feet (HxWxD) | 25" x 13.6" x 17.7" (635 x 345 x 450mm) | |
| • Weight | 82.2 lbs (37.3 kg) | |
natural_image
Technical line drawing of two speaker modules with circular components and a grid-patterned panel (no text or symbols)natural_image
Technical line drawing of a mechanical housing with two circular components and a central hub (no text or symbols)natural_image
Line drawing of a speaker tower with two speakers and a front panel (no text or symbols)
natural_image
Line drawing of a hand opening a speaker into a box, showing mechanical components (no text or symbols)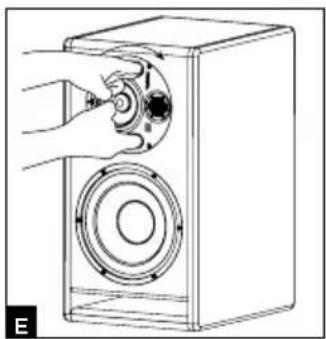
natural_image
Line drawing of a hand inserting a speaker into a speaker chamber (no text or symbols)
natural_image
Technical line drawing of a speaker with four circular components and numbered labels (1-4), no readable text or symbols beyond labels.تحديد 示ضع الاستيريو

natural_image
Diagram of a person standing at a console with two cameras above, connected by dashed lines to the screen (no text or symbols present)

FOCUS وضع
INPUT مدخل - 6
1.ita dispense, as hab kabl theirar men la
Correct elimination of this product.
This marking indicates that within the EU this product should not be disposed of with other household wastes. To prevent any risk to the environment or human health, please recycle them responsibly to encourage the reuse of material resources. To return your used device, please use the return and collection systems available, or contact the retailer where you purchased the product. They can recycle this product safely.


- Installation
- Orientation de la platine médium/tweeter
- TRIO11 BE™
- - INPUT SENSITIVITY
- IMPORTANT SAFETY INSTRUCTIONS!
- USA:
- Canada:
- Conditions of guarantee
- Package contents
- Recommendations
- Quick set-up guide:
- Trio11 Be
- Positioning
- Positioning of the rubber feet
- Orientation of the midrange/tweeter plate
- Procedure for rotating the midrange/tweeter plate
- Stereo position
- Multichannel position
- Breaking-in
- Settings and connections
- - INPUT
- - LF SHELVING
- - LMF EQ
- - HF SHELVING
- FOCUS MODE
- - INPUT
- - OUTPUT
- - ON/OFF
- - VOLTAGE SELECTION
- - POWER SOCKET
- - FUSE HOUSING
- - SCREWS
- - POWER LED (front panel)
- - FOCUS LED (front panel)
- - AUTO STAND-BY
- > State of the Trio11 Be monitor
- BITTE ZUERST LESEN!
- Gebrauchsanleitung
- Installazione
- Orientamento del pannello medi/tweeter
- Instalación
- Instalação
- Posicionamento multicanal
- MODO FOCUS
- Installatie
- Multikanaal-positionering
- 安装安装
- 立体声位置立体声位置
- 多通道配置多通道配置
- 스테레오 포지션스테레오 포지션
- 멀티채널 포지션멀티채널 포지션
- - INPUT 2 - INPUT 잡도감도
- - LF SHELVING3 - LF SHELVING
- はじめにお読みください!
- 安全に関する重要な指示です!
- ステレオ・ポジション
- マルチチャンネル・ポジション
- Correct elimination of this product.
Brand : FOCAL
Model : Trio11 Be
Category : Monitor