Twin6 Dual - Monitor FOCAL - Free user manual and instructions
Find the device manual for free Twin6 Dual FOCAL in PDF.
User questions about Twin6 Dual FOCAL
0 question about this device. Answer the ones you know or ask your own.
Ask a new question about this device
Download the instructions for your Monitor in PDF format for free! Find your manual Twin6 Dual - FOCAL and take your electronic device back in hand. On this page are published all the documents necessary for the use of your device. Twin6 Dual by FOCAL.
USER MANUAL Twin6 Dual FOCAL
natural_image
Line drawing of a speaker chamber with circular vent and label 'FOCAL' (no text or symbols on the device itself)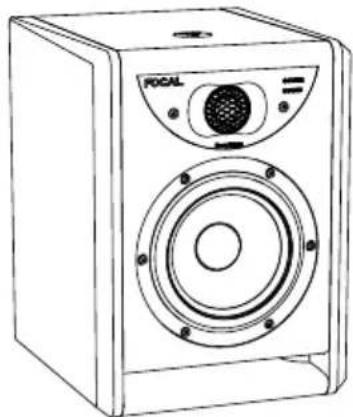
natural_image
Line drawing of a speaker with a circular speaker and a circular head (no text or symbols)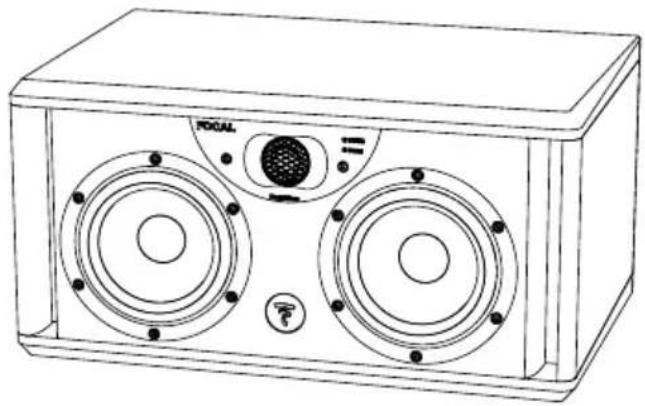
natural_image
Line drawing of a two-tiered audio amplifier with speaker holes and a control panel (no text or symbols)À LIRE EN PREMIER !
INSTRUCTIONS DE SÉCURITÉ IMPORTANTES !
natural_image
Line drawing of a speaker with two concentric circles and a speaker grille (no text or symbols)Position B
Gauche/Droite
natural_image
Line drawing of a speaker with concentric rings and a base (no text or symbols)Position C
Gauche

natural_image
Technical line drawing of a speaker or audio device with two circular components and a central hub (no text or symbols)Position C
Droite
natural_image
Technical line drawing of a speaker or audio device with concentric circles and a side panel (no text or symbols)Position A
Gauche/Droite
natural_image
Line drawing of a speaker chamber with two speakers and a central speaker (no text or symbols)Position B
Gauche/Droite
natural_image
Line drawing of a speaker chamber with two speakers and a central speaker (no text or symbols)Position C
natural_image
Top-down schematic of a speaker with two circular speakers and a play button (no text or labels)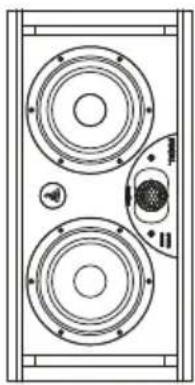
natural_image
Technical line drawing of a speaker chamber with two circular speakers and speaker components (no text or labels)Gauche Droite
LEFT

RIGHT
SPEAKER
natural_image
Technical line drawing of a speaker chamber with two concentric speakers and a central speaker (no text or symbols)Midrange
LEFT

RIGHT
SPEAKER
natural_image
Technical line drawing of a speaker chamber with two main speakers and a central speaker (no text or symbols)Midrange
natural_image
Technical line drawing of a speaker chamber with two concentric circles and a central speaker (no text or symbols)LEFT

RIGHT
SPEAKER

natural_image
Technical line drawing of a speaker chamber with two speakers and a central speaker (no text or symbols)LEFT

RIGHT
SPEAKER

natural_image
Technical line drawing of a speaker with two concentric circles and a speaker icon, no text or symbols present.Gauche Droite
natural_image
Technical line drawing of a speaker tower with two speakers and an external speaker (no text or symbols)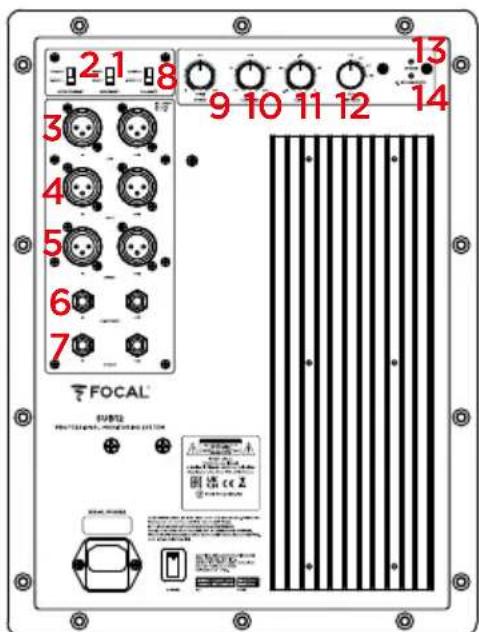
text_image
2 1 8 3 9 10 11 12 13 4 5 6 7 FOCAL SUBST 刷新 cc 2line
| Frequency (Hz) | IPF Full gain: 25Hz @ -3dB | IPF 45 Hz @ -3dB | IPF 60 Hz @ -3dB | IPF 90 Hz @ -3dB | | -------------- | -------------------------- | ---------------- | ---------------- | ---------------- | | 10/100/1000/10000 | -12 | -12 | -12 | -12 | | 10/100/1000/10000 | 0 | 0 | 0 | 0 | | 10/100/1000/10000 | 3 | 3 | 3 | 3 | | 10/100/1000/10000 | 6 | 6 | 6 | 6 | | 10/100/1000/10000 | 9 | 9 | 9 | 9 | | 10/100/1000/10000 | 12 | 12 | 12 | 12 |
flowchart
graph TD
    A["INPUT"] --> B["EQ"]
    B --> C["FOCUS"]
    C --> D["Camera 1"]
    C --> E["Camera 2"]
    C --> F["Camera 3"]
    C --> G["Camera 4"]
    D <--> H["Camera 5"]
    E <--> I["Camera 6"]
    F <--> J["Camera 7"]
    G -.-> K["Focus"]
Pin 1 = masse (blindage)
Pin 2 = point chaud (signal en phase)
Pin 3 = point froid (signal hors phase)
IMPORTANT SAFETY INSTRUCTIONS!
 | CAUTIONRISK OF ELECTRIC SHOCKDO NOT OPEN |  | |||
| The bolt of lightning in an equilateral triangle warns the user that the device has high voltage that could result in a risk of electric shock. | WARNING:To prevent any risk of electric shock, do not remove the cover (or the back) from the device. There are no user-serviceable parts in this device. For maintenance or repairs, contact a qualified professional. | An exclamation mark in an equilateral triangle warns the user that the manual contains important instructions on how to use and look after the device. | |||
| 1. Read these instructions.2. Keep these instructions.3. Take note of all the warnings.4. Follow all the instructions.5. Do not use this device near water.6. Only clean with a dry cloth.7. Do not obstruct ventilation openings. Follow the manufacturer's instructions for installing the device.8. Do not install the device close to a heat source such as a radiator, cooker, heat vents or any other appliance (including amplifiers) that gives out heat.9. Do not bypass the safety device of the polarised plug. A polarised plug has two prongs, one of which is wider than the other. The wider prong is provided for your safety. If the plug provided does not fit into your socket, consult an electrician to replace the obsolete socket.10. Make sure the power cable cannot be trodden on, crushed or pinched. Take particular care with the plug and the cable connection to the device.11. Only use accessories recommended by the manufacturer.12. Only use trolleys, stands, tripods, mounts or tables recommended by the manufacturer or sold with the device. If using a trolley, take extra care when moving the trolley and device together, to prevent the device from falling off and causing injury.13. Unplug the device in the event of a storm or if the device is to remain unused for long periods.14. All maintenance tasks should be performed by a qualified professional. Maintenance is required in case of any kind of damage to the device (damaged cable or plug, spillages or objects inserted into the device, exposure to rain or humidity, if the device malfunctions or overturns, etc.). | ! | 15. This product is a Class 1 appliance.Only plug in the device using the mains plug provided, which incorporates an earth connection. The device must be plugged into an earthed mains socket.16. When either the mains plug, an adapter connected to the product or the On/Off switch is used as a power cut-off device, this device must remain readily accessible.17. WARNING: To reduce the risk of fire or electric shock, do not expose this device to water, rain or moisture. In addition, the device must not be exposed to dripping or splashing liquid and no objects filled with liquids, such as vases, should be placed on the device.18. Do not insert any objects into the device's ventilation openings. They could come into contact with one of the high-voltage components or short-circuit them and cause a fire or electric shock. Never pour liquid on the device.19. Do not attempt to repair this device yourself. Opening the device may expose you to dangerous voltages or other risks. Contact a qualified professional for all maintenance work.20. When using the device, the ambient temperature should not exceed 95°F (35 degrees Celsius).21. Do not use this device in tropical climates.22. Do not use this device at altitudes of more than 2,000m.23. Do not overload wall sockets, extension leads or multiple socket outlets, as this could cause fire or electric shock.24. The appliance should only be mounted on a wall or ceiling if the manufacturer allows for this.25. If the device has been transported from a cold environment to a warm environment, make sure no condensation has accumulated before connecting the power cable. | ! | 26. No naked flame sources, such as lit candles, should be placed on top of the device.27. Only connect this product to the type of mains electrical supply indicated on the device. If you are unsure what type of mains electrical supply is required for the product or your electrical installation, ask your retailer or your electricity supplier. For devices intended for use with a battery or another power source, see the user manual.28. Always leave a distance of at least 2" (5cm) around the product for proper ventilation29. When replacement components are needed, make sure that the maintenance technician uses the components recommended by the manufacturer or components with exactly the same technical features as the original product. Using non-compliant components could cause fires, electric shocks or other risks.30. After any maintenance or repair work on the device, ask the maintenance technician to test it to check that it is working safely.31. To avoid damaging your hearing, do not listen to loudspeakers at high volumes for long periods of time. Listening to loudspeakers at an excessive volume can cause damage to the user's ears and may lead to hearing problems (temporary or permanent deafness, buzzing in the ears, tinnitus, hyperacusis). Exposing your ears to a volume higher than 85dB SPL-LAeq for several hours can irreversibly damage your hearing.32. This device cannot be used by children under 14, people with physical or mental disabilities or people with inadequate experience or knowledge, unless they are supervised or have received prior instruction on how to use this device safely and in compliance with this user manual and safety instructions. Do not leave children near the products unsupervised. | |
-
Audio signal input connector
-
Automatic stand-by switch
-
Input sensitivity switch
-
Crossover control
-
Focus mode input
-
Focus mode output
-
Power switch - On/Off
-
Voltage selector
-
Fuse box/mains socket
-
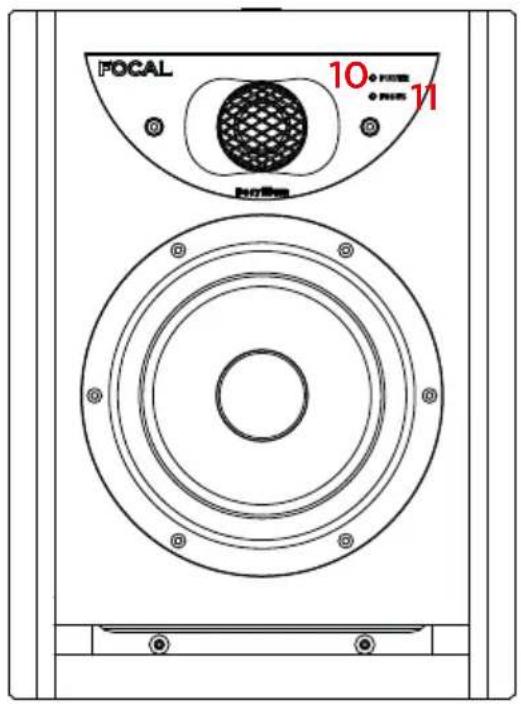
On/off mode indicator POWER LED:
-
on (continuous green)
- stand-by (continuous red)
-
protection (flashing red)
-
Focus mode indicator FOCUS LED:
- on (continuous green)
- Inserts for wall fastening
- Midrange speaker driver selection switch
SOLO6 - TWIN6 - SUB12
Professional Analogue Monitoring System - User Manual
Position A Left/Right
natural_image
Line drawing of a speaker with two concentric circles and a top panel (no text or symbols)Position B Left/Right
natural_image
Technical line drawing of a speaker with concentric circles and a base (no text or symbols)Position C Left
natural_image
Technical line drawing of a speaker or fan assembly with circular components and mounting holes (no text or symbols)Position C Right

natural_image
Technical line drawing of a speaker or speaker assembly with concentric circles and a side panel (no text or symbols)Position A Left/Right
natural_image
Line drawing of a two-tiered audio amplifier with speaker holes and a central button (no text or symbols)Position B
Left/Right
natural_image
Top-down schematic of a speaker chamber with two speakers and a central speaker (no text or labels)Position C
natural_image
Top-down schematic of a speaker or audio device with two circular speakers and a speaker icon (no text or labels)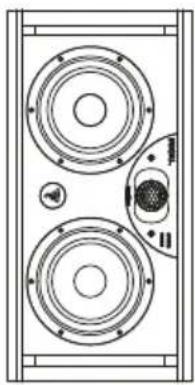
natural_image
Technical line drawing of a speaker chamber with two circular speakers and speaker components (no text or labels)Left Right
LEFT

RIGHT
SPEAKER
Speaker driver chosen to reproduce the midrange with the switch set to "left speaker"
natural_image
Technical line drawing of a speaker chamber with two speakers and a central speaker (no text or symbols)Midrange
LEFT

RIGHT
SPEAKER
Speaker driver chosen to reproduce the midrange with the switch set to "right speaker"

natural_image
Technical line drawing of a speaker chamber with two speakers and a central microphone (no text or symbols)Midrange
natural_image
Technical line drawing of a speaker chamber with two speakers and a central speaker (no text or symbols)LEFT

RIGHT
SPEAKER
natural_image
Top-down schematic of a speaker with two speakers and a central microphone (no text or labels)LEFT

RIGHT
SPEAKER
natural_image
Technical line drawing of a speaker tower with two main speakers and a speaker, showing no text or symbols.Left Right
Recommended choice for positioning the midrange speaker driver.
Midrange speaker driver positioned inside.
natural_image
Top-down schematic of a speaker tower with two main speakers and sound equipment (no text or labels)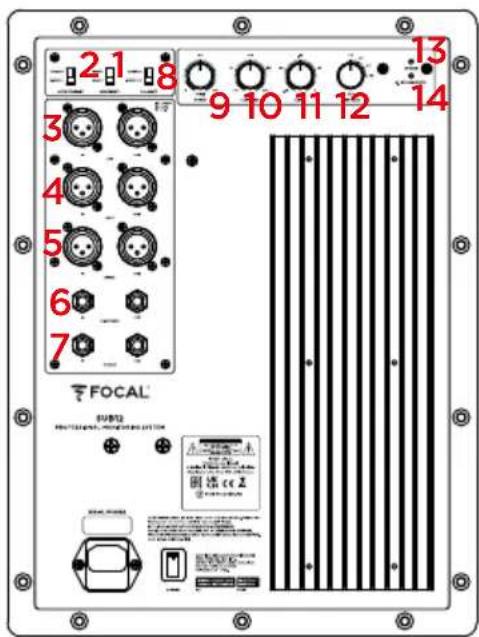
text_image
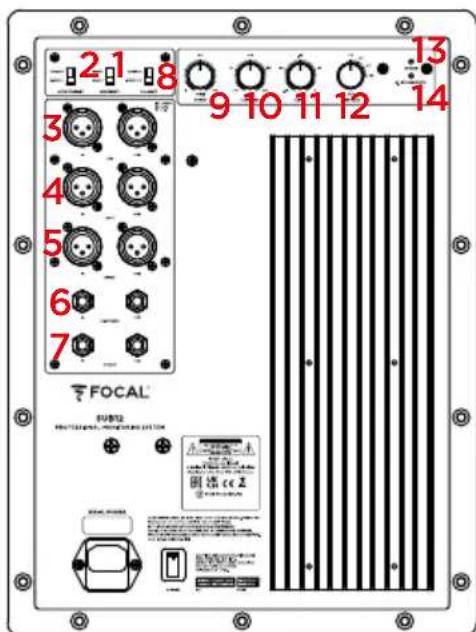
2 1 8 3 9 10 11 12 13 4 5 6 7 FOCAL SUBS PROFESSIONAL CONTROL Panel 刷新 CC 2 © PROFESSIONAL CONTROL Panel- Input sensitivity switch
- Automatic stand-by switch
- LEF input and output switches
- Left signal input and output switches
- Right signal input and output switches
- 1/4" (6.35mm) jack connector for 2.1 Bypass remote control
- Focus mode input and output switches
- Polarity switch
- Phase control
- Low-pass crossover potentiometer
- Volume control
- High-pass crossover switch
- On/off mode indicator POWER LED:
- on (continuous green)
- stop (continuous red)
- protection (flashing red)
- 2.1 BYPASS/mute LED: on (continuous green)
SOLO6 - TWIN6 - SUB12
Professional Analogue Monitoring System - User Manual
line
| Frequency (Hz) | Magnitude (dB) | | -------------- | -------------- | | 10/100/030/10000/03000 | -4.0 |Z
line
| Frequency (Hz) | Magnitude (dB) | | -------------- | -------------- | | 160 Hz | 3.0 |
line
| Frequency (Hz) | Magnitude (dB) for Full gain 25Hz @ -3dB | Magnitude (dB) for 45Hz @ -3dB | Magnitude (dB) for 60Hz @ -3dB | Magnitude (dB) for 60Hz @ -3dB | Magnitude (dB) for 90Hz @ -3dB | | -------------- | ---------------------------------------- | ------------------------------- | ------------------------------ | ------------------------------ | ------------------------------ | | 10/100/1000/10000 | -12.0 | -12.0 | -12.0 | -12.0 | -12.0 | | 10/100/1000/10000 | 0.0 | 0.0 | 0.0 | 0.0 | 0.0 |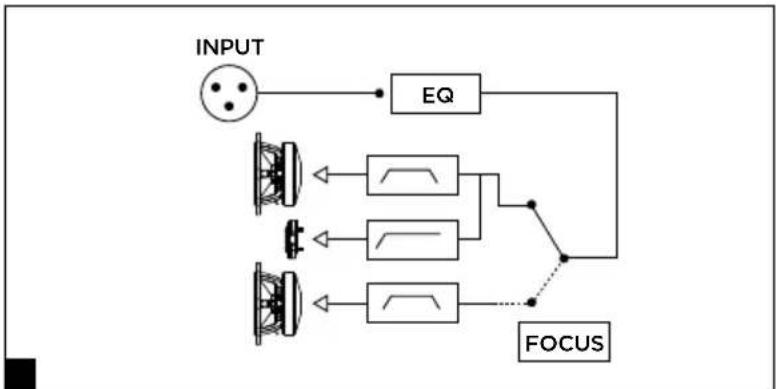
flowchart
graph TD
    A["INPUT"] --> B["EQ"]
    B --> C["FOCUS"]
    C --> D["Car 1"]
    C --> E["Car 2"]
    C --> F["Car 3"]
    C --> G["Car 4"]
    D <--> H["Vehicle Sensor 1"]
    E <--> I["Vehicle Sensor 2"]
    F <--> J["Vehicle Sensor 3"]
    G -.-> K["Focus"]
Please validate your Focal-JMlab warranty, it is now possible to register your product online: www.focal.com/warranty

Thank you for purchasing a Focal product. Welcome to our High-Fidelity world. Innovation, tradition, excellence and pleasure are our values; our one and only aim is to bring you a sound that is rich, pure and true. To get the most out of your product, we recommend that you read the instructions in this booklet, then store it in a safe place to refer to in the future.
Package contents
Loudspeakers are delivered with the following items:
- 1 quickstart guide
- 1 power cable
- A plastic wallet containing a user manual (inverted dome Beryllium tweeter) and an adhesive strip to affix to the tweeter in case of damage to the dome
Check that nothing is missing and remove all the accessories from the box. In order not to damage your products while unpacking them, please follow these steps: open the flaps of the cardboard box completely. Fold them back down the sides. Remove the top protective packaging. Lift out the loudspeaker carefully. Check that the packaging does not show any signs of damage. If the packaging has been damaged, let the carrier and the supplier know. It is important to keep the packaging in good condition for any future use. For the Sub12, refer to the unpacking instruction leaflet.
Recommendations
We would like to point out that our products can generate high sound pressure, particularly in the 5.1 configuration. As the distortion level is low and user fatigue is minimal, it is not always easy to realise how high the sound pressure actually is. Remember that exposure to high volumes beyond a certain amount of time can lead to irreversible hearing loss.
Warranty terms and conditions
In the event of a problem, please contact your Focal dealer.
The warranty for France on any Focal equipment is 2 years, non-transferable in the event of resale, from the date of purchase. In the event of faulty equipment, you must send it in its original packaging and at your own expense to the dealer, who will analyse the equipment and determine the nature of the fault. If it is under warranty, the equipment will be returned to you or replaced. Otherwise, you will be offered an estimate for repair.
The warranty does not cover damage resulting from inappropriate use or incorrect wiring (burnt out voice-coils, for example). Outside France, Focal equipment is covered by a warranty for which the terms and conditions are determined locally by the official FOCAL-JMLab distributor for each country, in accordance with the laws in force in the region in question.
SOLO6 - TWIN6 - SUB12
Professional Analogue Monitoring System - User Manual
21
Quick-start guide
- Before you do anything, check that the loudspeakers and audio source (console, etc.) are in the Off position and that all settings at the back of the loudspeakers are in the 0 position. Ensure that the sensitivity switch is in the +4dBu position.
- Connect the audio signal from the source to the loudspeakers, using the XLR inputs.
- Use the power cable supplied to connect the loudspeaker to the mains.
- Power on the audio source and check that the output level of the audio source connected to loudspeaker is set to - or a very low level.
- Switch on the loudspeakers. The loudspeakers are now in "Stand-by" mode.
- Increase the level of the audio source until the signal is detected by the loudspeakers, so that they automatically switch into "On" mode.

After the loudspeakers are powered on and after the automatic stand-by mode is enabled (see page 21 for more information on this function), the audio signal detection circuit in the loudspeaker will automatically switch from "Stand-by" to "On" mode, a few seconds after a signal is received.
- Once you have finished your recording, mixing or mastering session, we recommend switching off the equipment in the following order:
a. Switch off the loudspeakers
b. Switch off the audio sources
Solo6
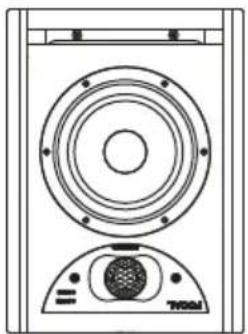
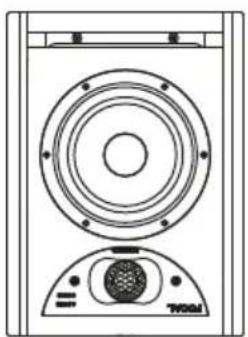
Solo6 is an active 2-way near-field professional loudspeaker (2 internal amplifiers), comprising a Focal 6^1/2n (16.5cm) bass/midrange speaker driver with 'W' composite sandwich cone, fitted with a large-section laminar port and a Focal pure Beryllium inverted dome tweeter (fig. A).
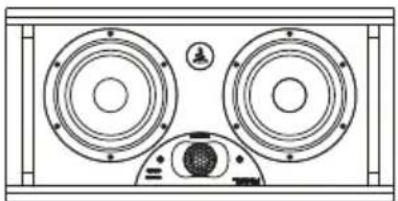
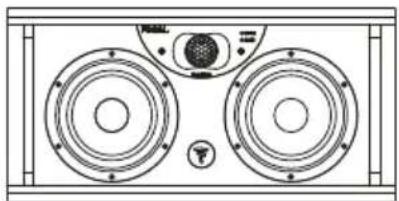
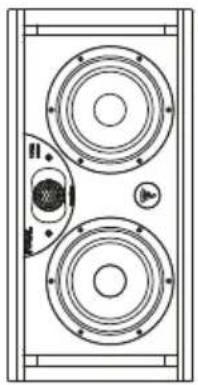
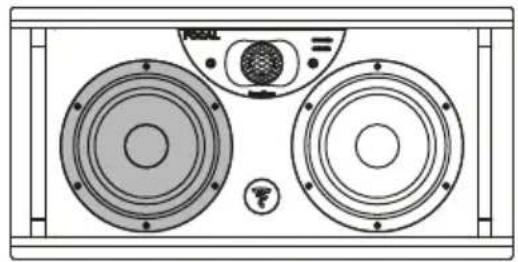
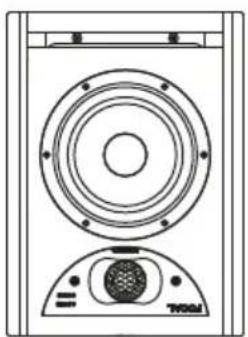
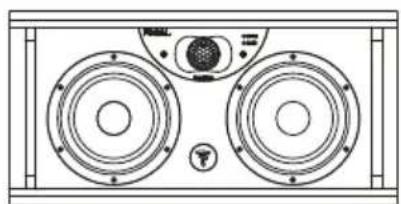
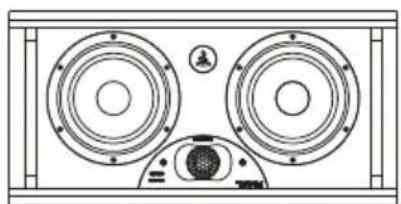
Twin6
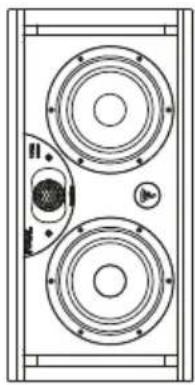
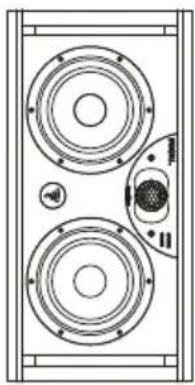
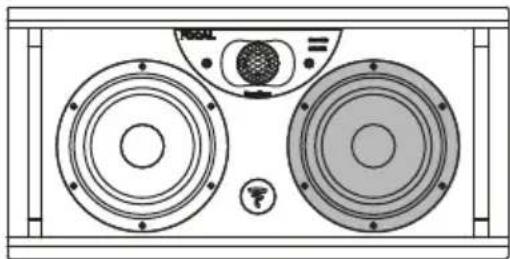
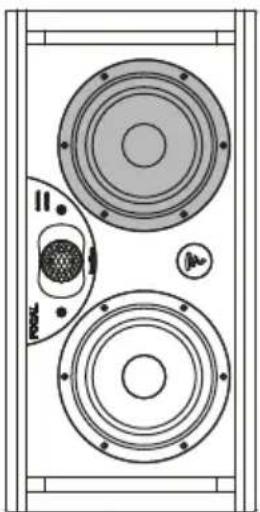
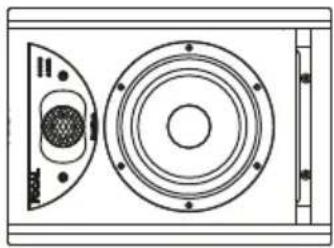
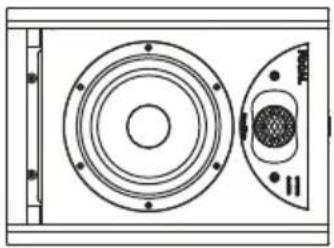
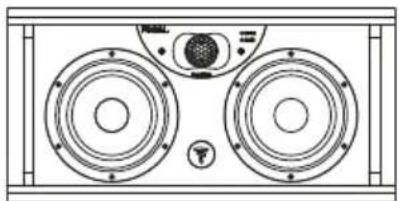
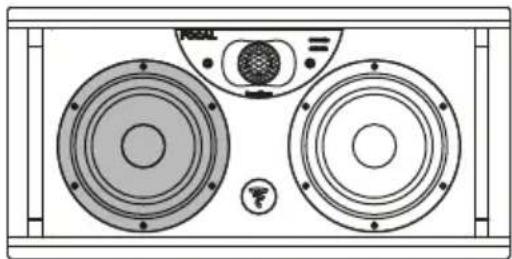
Twin6 is an active 2.5-way semi near-field professional loudspeaker (3 internal amplifiers), comprising two Focal 6^1/2 " (16.5cm) speaker drivers with 'W' composite sandwich cone, fitted with a large-section laminar port and a Focal pure Beryllium inverted dome tweeter. Both 6^1/2 " (16.5cm) speaker drivers reproduce the bass but only one of them (you can choose the positioning) reproduces the "midrange" frequencies (fig. B).
Sub12
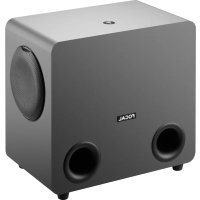
Sub12 is an active subwoofer (1 internal amplifier) for professional monitoring systems. The transducer used is a Focal 13" (33cm) subwoofer with 'W' composite sandwich cone, fitted with a large-section laminar port (fig. G).
Sub12 can be used:
- in addition to bass or sub-bass for stereo + subwoofer installations (2.1 or 2.2). For this purpose, the rear panel connectivity of the Sub12 allows you to connect a traditional stereo source (Left In and Right In), but also to pick up a signal (Left Out and Right Out) processed via the "high-pass" crossover included in the Sub12, designed to supply any linked "satellite" loudspeakers.
- as an LFE (Low Frequency Effect) channel for use in a multichannel system (5.1, 5.2, 6.1, etc.) via a specific LFE input located on the rear panel of the Sub12. As an LFE channel, the low-pass crossover is no longer active.
INSTALLATION
Mains power
After unpacking your products, first check that the selected operating voltage is correct, depending on the supply voltage chosen using the selector, also check (and if necessary replace) the fuse, whose amperage is dependent on the operating voltage (see fuse characteristics in the specifications table).
Warning
Your products must be earthed using the power cable supplied for that purpose. Check that your electrical system (circuit breaker, plugs, extension cord, extension block, etc.) is compatible with the power consumed by Solo6, Twin6 and, in particular, Sub12.
Audio input connections
The audio signal is input via a female XLR socket. This connector allows you to connect a balanced signal source and uses a standard cabling diagram:
Pin 1 = earth (shield)
Pin 2 = hot point (in-phase signal)
Pin 3 = cold point (out-of-phase signal)
When the input signal source is unbalanced, the "cold point" (Pin 3) is usually connected to the earth (Pin 1). This connection is usually made with cables.
Automatic stand-by
The monitors in the ST6 range are equipped with a "Stand-by" mode. When you switch on the monitors, the "Stand-by" mode is enabled. To disable it, send an audio signal to the monitor by gradually increasing the volume of the audio source. After around 15 minutes without receiving an audio signal, the monitors automatically switch to "Stand-by" mode. In "Stand-by" mode, the power consumption is less than 0.5W. This "Stand-by" function can be disabled using the stand-by switch (page 17).
Connections specific to the Sub12 (fig. G)
Using the Sub12 in a stereo + subwoofer configuration (2.1 or 2.2)
Left IN: this input is intended to receive the left output from your source (mixing desk, etc.). Right IN: this input is intended to receive the right output from your source (mixing desk, etc.).
Left OUT: this output is reserved for the power from the left loudspeaker of your 2.1 system. The signal picked up will have been previously filtered by the high-pass crossover of your Sub12.
Right OUT: this output is reserved for the power from the right loudspeaker of your 2.1 system. The signal picked up will have been previously filtered by the high-pass crossover of your Sub12.
Using the Sub12 as an LFE channel
LFE: this input is intended for powering your Sub12 for a multichannel application (5.1, 5.2, 6.1, 6.2, 7.1, 7.2 etc.). The LFE input is used exclusively for low frequencies.
Positioning
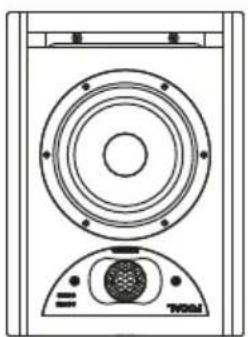
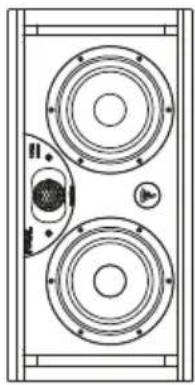
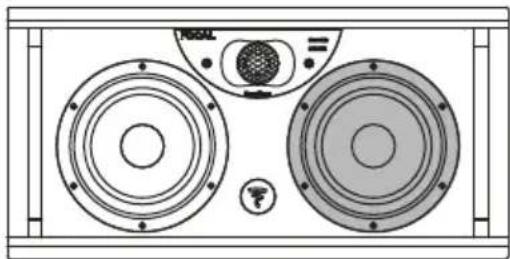
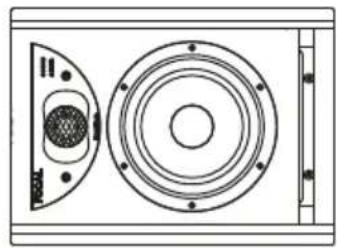
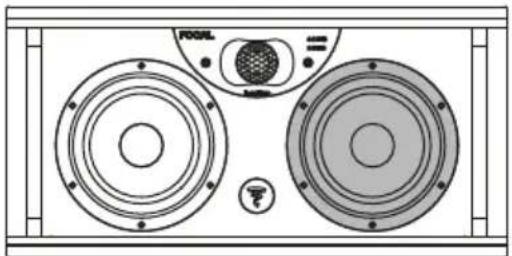
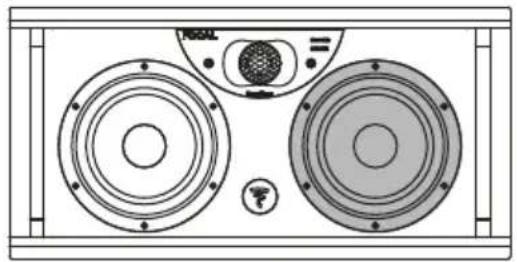
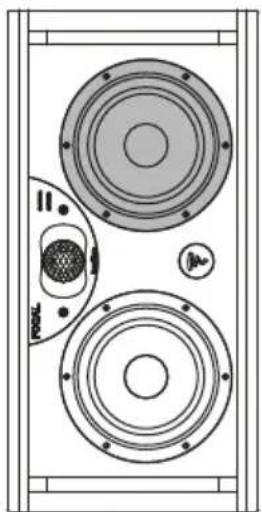
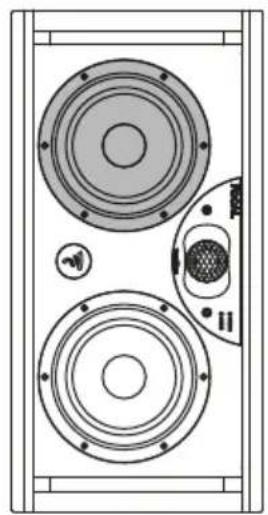
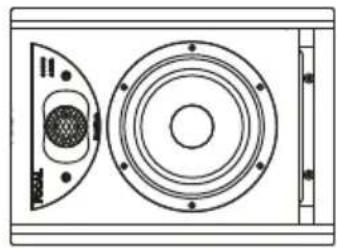
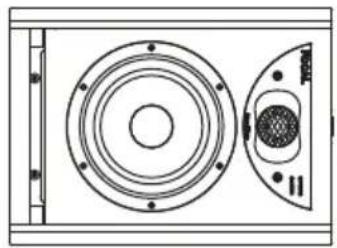
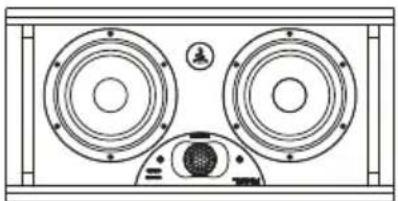
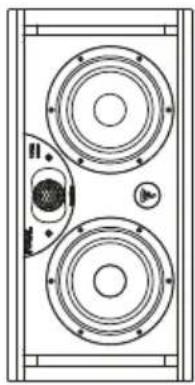
The Solo6 and Twin6 have been designed for use as near-field loudspeakers and therefore to be positioned at a distance of around 1 to 3 metres from the listener, pointing towards him or her. They can be easily positioned above a mixing desk or placed on suitable stands, bearing in mind that in all scenarios we strongly recommend locating the tweeter at a similar height to that of the listener's ears. If necessary you can easily reverse the normal layout of the loudspeakers and position the tweeter at the bottom to bring it closer to the recommended height (fig. C, D).
You can position both of the Solo6 either vertically or horizontally (fig. C) depending on the environment, preferably pointing towards the listener. We do, however, recommend the vertical position.
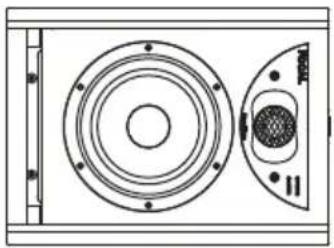
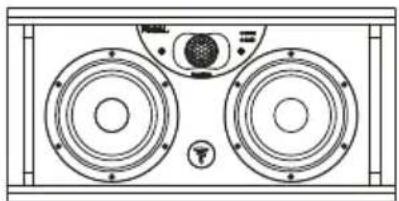
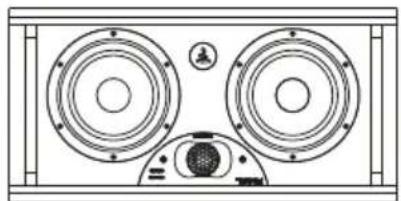
The Twin6 are designed to be listened to horizontally, however, they can also be used vertically in some cases. The Twin6 has a “switch” to choose the location of the speaker driver intended to reproduce the midrange frequencies (See Use - Controls - Speaker Left/Right Switch) - (fig. E). Consequently, you should always choose a “balanced” or “mirror” configuration with respect to the listener. Generally, we would choose to position the “midrange speaker driver” inside for a better image (fig. F). In all cases, the listening quality will take precedence.
SOLO6 - TWIN6 - SUB12
Professional Analogue Monitoring System - User Manual
23
Wall/ceiling mounting
The mounting points allow you to fix the Solo6 monitors to the wall and/or ceiling using the K&M ^® accessories. The centre-to-centre distance is 70mm. Use M6 screws. Please refer to the table below for the compatible K&M ^® products.

As with any wall or ceiling mounting, installing the monitors can involve risks and the methods of drilling and mounting to walls, ceilings and other surfaces depend on the conditions and standards of construction, refurbishment, safety and cabling in force and applicable to the brackets involved. For this reason, the relevant drilling, mounting and installation operations must be performed by a qualified professional who is familiar with the installation and safety standards.
Focal does not provide any end-of-use warranty for a given bracket or installation, as installing the monitors is the customer's sole responsibility. Focal is therefore not liable in any capacity whatsoever in the event of unhooking, fall, accident and/or any other result or damage of any kind related to the installation of monitors.
| Wall mounting Ceiling mounting | ||
| SOLO6 K&M® 24471 | fixing kit+ K&M® 24359 adapter | K&M® 24496 fixing kitK&M® 24491 fixing kit+ K&M® 24359 adapter |
Stereo positioning
We recommend that you position the loudspeakers so as to achieve an equilateral triangle. The 3 corners are formed by the listening position, the right loudspeaker and the left loudspeaker.
Multi-channel positioning
In the case of a 5.1 installation, we recommend you position the loudspeakers in a circle so that they are equidistant from the listening point. The central channel will be positioned at 0°, the front right channel at 30°, the rear right channel at 110°, the rear left channel at 250° and the front left channel at 330°.
The optimum positioning of the Sub12 varies depending on the size, shape and acoustics of the listening room. We recommend that you try various possible positions and select whichever one delivers the best listening quality. It is not unusual to get the best results by positioning the Sub12 in a corner.
Running-in
The transducers used in the Solo6, Twin6 and Sub12 are complex mechanical assemblies that require a running-in period to operate at their best and to become acclimatised to the temperature and humidity conditions of your environment. The length of time this takes can vary depending on the conditions and may extend over several weeks. To reduce the process, we recommend operating the different products for about twenty consecutive hours at medium volume, with music that is rich in bass frequencies. Once the transducers' characteristics have stabilised, you will be able to enjoy the full potential of your Focal products.
CONTROLS
Controls specific to the Solo6 and Twin6
Speaker switch (Left / Right) - Only on Twin6
This switch allows you to choose which of the two 6.5" (16.5cm) speaker drivers will reproduce the midrange. By convention, choosing the "Speaker Right" position will effectively select the left speaker driver (when facing the loudspeaker) as the one intended to reproduce the midrange. Conversely, the right speaker driver (when facing the loudspeaker) will be selected when the switch is set to "Speaker Left". It is clear to see how valuable such a control is to achieving the best possible image by how it balances the two loudspeakers, regardless of the devised layout (fig. E, F).
Input sensitivity switch
The input sensitivity can be adjusted using this two-position switch. The +4dBu position is best for standard professional audio equipment, whereas -10dBV can be used for other types of sources providing a lower level.
Z
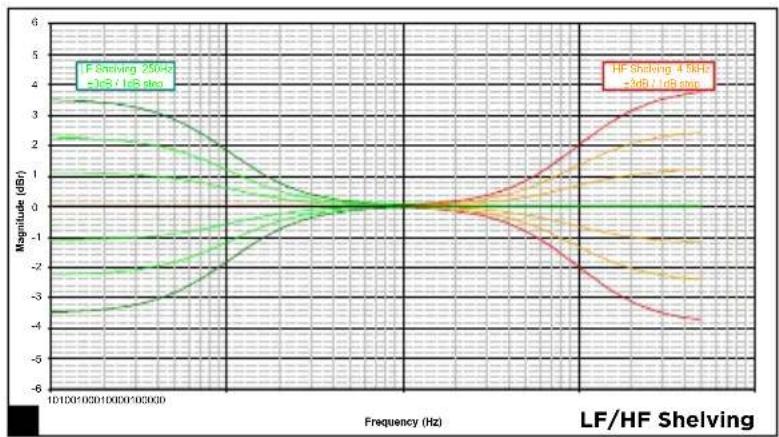
"HF" SHELVING
This control adjusts the level of high frequencies above 4.5kHz to ±3dB (fig. H).
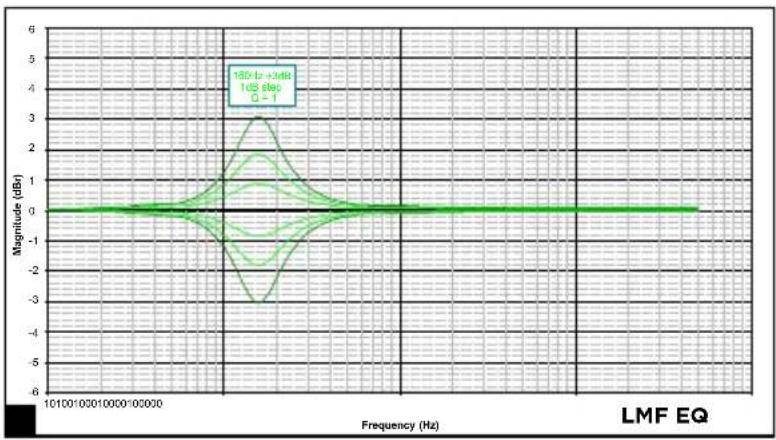
"LMF" EQ
The LMF EQ knob activates or deactivates a volume correction at a central frequency of 160Hz for a Q factor of 1. We recommend that you set the switch to -1, -2, -3dB if the loudspeakers are positioned on a table, console strip or any other support generating reflections (fig. I).
"LF" SHELVING
This control adjusts the level of low frequencies below 150Hz to ±3dB (fig. J). This setting will be very useful depending on the positioning of the loudspeakers on a console, near a wall or in a corner, where we tend to reduce these frequencies to varying degrees.
Light
There is an On/Off “LED” indicator on the front panel of the loudspeaker, above the Focus mode indicator, near to the “Focal” logo.
Focus mode
FOCUS mode is used to switch from 2-way (and 2.5-way for Twin6) to 1-way mode.
Solo6 and Twin6 (in FOCUS mode) offer a frequency response of 110Hz to 10kHz, making it possible to check the transfer quality of mixes on systems with a limited bass frequency response like televisions, computers, cars, iPod ^® docking stations or any other multimedia system.
Focus mode also makes it possible to check the midrange and mid-bass registers, which are always very critical to equalise and balance in terms of volume compared to the other information contained in the audio signal. It provides a listening experience that is as close as possible to the sound signature of 2-way mode (and 2.5-way for Twin6). This way of listening to a full-range speaker driver also permits another approach to the stereo image whilst retaining the same sweetspot.
INPUT
Input for connecting the footswitch-type control pedal to a switch, or for receiving the signal transmitted by the OUTPUT of the FOCUS mode of a Solo6, Twin6 or Sub12 loudspeaker.
OUTPUT
Output for connecting the Solo6 or Twin6 loudspeaker to a second Solo6, Twin6 or Sub12 loudspeaker.
Ensure that you use an instrument cable equipped with 2x 1/4" (6.35mm) jack connectors (or Stereo, depending on the pedal) to connect the control pedal to a Solo6 or Twin6, as well as to connect two loudspeakers together.
Controls specific to the Sub12 (fig. G)
Level
The Sub12 level adjustment is used to set the subwoofer's volume according to that of the monitors. This setting also offers the option to optimise the choice of the subwoofer's positioning, taking into account the acoustic consequences inherent in positioning the Sub12 (in a corner: +6dB, therefore necessity to attenuate the level to achieve perfect linearity of the frequency response curve for the whole system).
High pass
This zone is dedicated to controlling the “high-pass” crossover of the loudspeakers linked with the Sub12 when in 2.1 configuration. The 45Hz/60Hz/90Hz switch is used to select a cut-off frequency, so as to optimise the coupling of the latter with the Sub12 subwoofer.
Low pass
This rotary potentiometer is used to adjust the subwoofer's low-pass cut-off frequency in order to determine the highest frequency that the Sub12 will have to re-transcribe. The aim of this setting is to optimise the Sub12's cut-off frequency. The aim is of course to obtain the most linear frequency response curve possible from the whole system (subwoofer + loudspeakers). The low-pass crossover is no longer active as an LFE channel.
SOLO6 - TWIN6 - SUB12
Professional Analogue Monitoring System - User Manual
25
Polarité
This polarity switch inverts the Sub12 phase by 180^ .
Z
Phase
This “fine tuning” phase-adjustment potentiometer, combined with the polarity switch (seen above), will allow you to compensate for the positioning of the Sub12 in relation to that of the other loudspeakers. Depending on the distance of the subwoofer, on whether it is in a central position or not, this setting will allow you to simultaneously receive the sound information coming from the Sub12 and its linked loudspeakers.
2.1 Bypass/Mute
This input allows you to plug in a 2-position control pedal (not supplied), and to connect it using a 1/4" (6.35mm) jack. Activating the BYPASS will:
- enable the subwoofer's "Mute" function.
- disable the high-pass crossover for the linked satellite loudspeakers. The loudspeakers will then operate at their full bandwidth.
This action will authorise the instant comparison through rapid switchover, between a “2.1” system (Sub12, linked to 2 loudspeakers) and a traditional stereo system. This option will be particularly useful when optimising the crossover settings (phase, cut-off frequency, volume) between the Sub12 and its linked loudspeakers.
Power light
POWER LED: on (continuous green), stand-by (continuous red), protection (flashing red) 2.1 BYPASS/Mute LED: on (continuous green)
Focus
The Sub12 can be linked to the Focus mode of satellites using the dedicated Focus input and output.
Performance SOLO6 TWIN6
| • Frequency response (@ -3dB) 45Hz - 40kHz | |
| • Low cut-off frequency (@ -6dB) 40Hz | |
| • Focus mode 110Hz - 10kHz | |
| • Maximum SPL(Average CEA2034 50-10kHz free field @ 1m) | 110dB 112dB |
| • Focus mode(Average CEA2034 100-10kHz free field @ 1m) | 109.5dB 111.5dB |
Electronic section
| • Input Balanced XLR 10kΩ | ||
| • Bass amplifier stage 80W RMS 2 x 70W RMS | ||
| • Treble amplifier stage 50W RMS | ||
| • Nominal power supply ~100-120 VAC/220-240 VAC | 50/60Hz | |
| • Rated power consumption 100W | 150W | |
| • User controls | Sensitivity, stand-by HPF, LF Shelv, LMF EQ, HF Shelv | Sensitivity, stand-by, Left/Right, HPF, LF Shelv, LMF EQ, HF Shelv |
| • Fuses | ~100-120V, T2.5AL/250V~220-240V, T1.25AL/250V | ~100-120V, T3.15AL/250V~220-240V, T1.6AL/250V |
Transducers
| • Bass | 6.5" (16.5cm) “W” cone | 2 x 6.5" (16.5cm) “W” cone |
| • Treble | 1.5" (38mm) Beryllium | |
| • Shielding | no | |
Loudspeaker
| • Construction | 7/8" (22mm) MDF | |
| • Finish | Dark red natural veneering side panels, black body | |
| • Dimensions (HxWxD) | 13^1/8" × 9^3/4 × 11^5/8" (334x246x295mm) | 10^1/8 × 20^1/4 × 13^1/2" (258x514x344mm) |
| • Weight | 28.6lbs (13kg) | 48.5lbs (22kg) |
| • Temperature range | During use: 5-35°CIn storage: 0-50°C | |
SOLO6 - TWIN6 - SUB12
Professional Analogue Monitoring System - User Manual
Performance SUB12
| • Frequency response (@ -3dB) 30Hz - 400Hz | |
| • Low cut-off frequency (@ -6dB) 28Hz | |
| • Maximum SPL(Average CEA2010B 30-200 Hz free field @ 1m) | 124.5dB |
Electronic section
| • Input Balanced XLR LFE 10kΩ, Left & Right 10kΩ | |
| • Outputs Balanced XLR LFE (in parallel), Left & Right 50Ω | |
| • Bass amplifier stage 600W RMS | |
| • Nominal power supply ~100-120 VAC/220-240 VAC50/60Hz | |
| • Rated power consumption 180W | |
| • User controls Sensitivity, Stand-by, Polarity, Phase, LPF, Volume, HPF | |
| • Fuses ~100-120V, T10AL/250V~220-240V, T5AL/250V | |
| • Internal signal processing and functions- Subwoofer section | Left/right mono summationLFE + mono low-pass24dB/octavePhase adjustmentPolarity selectionSwitchable high-pass crossover,frequency cut-off selection24dB/octave |
| • Outputs (to satellites)- Type/Impedance- Connector | Right, leftElectronically balanced / 50Ω3-point male XLR |
Transducers
| • Bass 1 x 13" (33cm) x 'W' cone |
| • Shielding no |
Loudspeaker
| • Construction 1 | ^1/8 (30mm) MDF |
| • Finish | Dark red natural veneering side panels, black body |
| • Dimensions (HxWxD) | 23^5/8 × 19^1/8 × 22^3/8 (600x487x568mm) |
| • Weight | 127.8lbs (58kg) |
| • Temperature range | During use: 5-35°CIn storage: 0-50°C |
先閱讀!
重要安全提醒事項!
natural_image
Technical line drawing of a speaker with two concentric circles and a top panel (no text or symbols)擺位B
左/右
natural_image
Line drawing of a speaker with concentric rings and a base (no text or symbols)擺位C左
natural_image
Technical line drawing of a speaker or antenna assembly with circular components and mounting holes (no text or symbols)擺位C
右
natural_image
Technical line drawing of a speaker or speaker assembly with concentric rings and a side panel (no text or symbols)擺位A
左/右
natural_image
Line drawing of a speaker chamber with two speakers and a central speaker (no text or symbols)擺位B
左/右
natural_image
Technical line drawing of a speaker chamber with two circular speakers and a central speaker (no text or symbols)擺位C
natural_image
Top-down schematic of a speaker or audio device with two circular speakers and a speaker icon (no text or labels)左
natural_image
Technical line drawing of a speaker with two circular speakers and a speaker icon (no text or labels)右
LEFT

RIGHT
SPEAKER
natural_image
Technical line drawing of a speaker chamber with two main speakers and a central speaker (no text or symbols)中音喇叭
LEFT

RIGHT
SPEAKER
natural_image
Technical line drawing of a speaker chamber with two speakers and a central speaker (no text or symbols)中音喇叭
natural_image
Technical line drawing of a speaker chamber with two circular speakers and a central speaker (no text or symbols)LEFT
RIGHT
SPEAKER

natural_image
Diagram of a speaker chamber with two speakers and a central speaker (no text or labels)LEFT

RIGHT
SPEAKER
natural_image
Technical line drawing of a speaker with two circular speakers and a speaker icon, no text or symbols present.Gauche Droite
natural_image
Technical line drawing of a speaker tower with two main speakers and a speaker grille (no text or symbols)
text_image
2 1 8 3 9 10 11 12 13 4 5 6 7 FOCAL SUBT2 刷新 CCZ1.輸入靈敏度切換開關
Type designation (Type)
限物質及其化學符號
Restricted substances and its chemical symbols
Note 1: “Exceeding 0.1 wt %” and “exceeding 0.01 wt %” indicate that the percentage content of the restricted substance exceeds the reference percentage value of presence condition.
備考2. “○”係指該項喂“物質之百分比含量夫超出百分比含量基準值。
Note 2: “○” indicates that the percentage content of the restricted substance does not exceed the percentage of reference value of presence. 備考3. “—” 條指該項現物質益拝棄項目。
Note 3: The “-” indicates that the restricted substance corresponds to the exemption.
먼저 읽을 것!
중요 안전 지침!
natural_image
Line drawing of a speaker with two concentric circles and a speaker grille (no text or symbols)위치 B
좌 / 우
natural_image
Line drawing of a speaker with concentric rings and a base (no text or symbols)위치 C
좌측
natural_image
Technical line drawing of a speaker or audio component with concentric circles and a side panel (no text or symbols)위치 C
우측
natural_image
Technical line drawing of a speaker or speaker assembly with concentric rings and a side panel (no text or symbols)위치 A
좌/우
natural_image
Line drawing of a speaker chamber with two speakers and a central speaker (no text or symbols)위치 B
좌/우
natural_image
Top-down schematic of a speaker or audio device with two main speakers and a central speaker (no text or labels visible)위치 C
natural_image
Top-down schematic of a speaker with two circular speakers and a speaker icon (no text or labels)
natural_image
Technical line drawing of a speaker chamber with two circular speakers and a speaker (no text or symbols)좌측 우측
LEFT

RIGHT
SPEAKER
natural_image
Line drawing of a speaker chamber with two speakers and a central microphone (no text or symbols)Midrange
LEFT

RIGHT
SPEAKER
natural_image
Line drawing of a speaker chamber with two speakers and a central microphone (no text or symbols)Midrange

natural_image
Technical line drawing of a speaker chamber with two circular speakers and a central speaker (no text or symbols)LEFT

RIGHT
SPEAKER
natural_image
Diagram of a speaker chamber with two speakers and a central speaker (no text or labels)LEFT

RIGHT
SPEAKER

natural_image
Technical line drawing of a speaker with two circular speakers and a speaker icon, no text or symbols present좌측 우측
natural_image
Technical diagram of a speaker tower with two main speakers and an external speaker (no text or labels)