Trio6 Be - Monitor FOCAL - Free user manual and instructions
Find the device manual for free Trio6 Be FOCAL in PDF.

| Product Type | 3-way active studio monitor |
| Brand | Focal |
| Model | Trio6 Be |
| Dimensions (H x W x D) | Approx 320 x 580 x 400 mm |
| Weight | Approx 24 kg |
| Power Supply | 220-240 V AC, 50/60 Hz |
| Amplification | 3 class AB amplifiers (total 750 W) |
| Frequency Response | 35 Hz - 40 kHz (±3 dB) |
| Frequency Response (Focus mode) | 45 Hz - 20 kHz (±3 dB) |
| Tweeter | 1 x 25 mm (1 in) inverted Beryllium |
| Midrange driver | 1 x 165 mm (6.5 in) glass/fiber |
| Woofer | 2 x 210 mm (8 in) glass/fiber |
| Crossover Frequencies | 250 Hz (Focus mode), 300 Hz / 3 kHz (standard mode) |
| Audio Inputs | XLR balanced, RCA unbalanced |
| Key Features | Focus mode (2-way switch), EQ adjustments (Low Shelf, High Shelf), input attenuation, auto standby |
| Maintenance and Cleaning | Dust with a soft, dry cloth. Avoid any chemical products. |
| Safety | Do not expose to moisture, do not open the device. Plug into a grounded outlet. |
| Spare Parts and Repairability | Contact Focal support for any repairs. Use only original parts. |
| General Information | Professional studio monitor. Beryllium tweeter for precise high frequencies. Ideal for mixing and mastering. |
Frequently Asked Questions - Trio6 Be FOCAL
User questions about Trio6 Be FOCAL
0 question about this device. Answer the ones you know or ask your own.
Ask a new question about this device
Download the instructions for your Monitor in PDF format for free! Find your manual Trio6 Be - FOCAL and take your electronic device back in hand. On this page are published all the documents necessary for the use of your device. Trio6 Be by FOCAL.
USER MANUAL Trio6 Be FOCAL
natural_image
Line drawing of a box with two speakers and a circular panel, labeled 'POCAL' (no text or symbols on the diagram itself)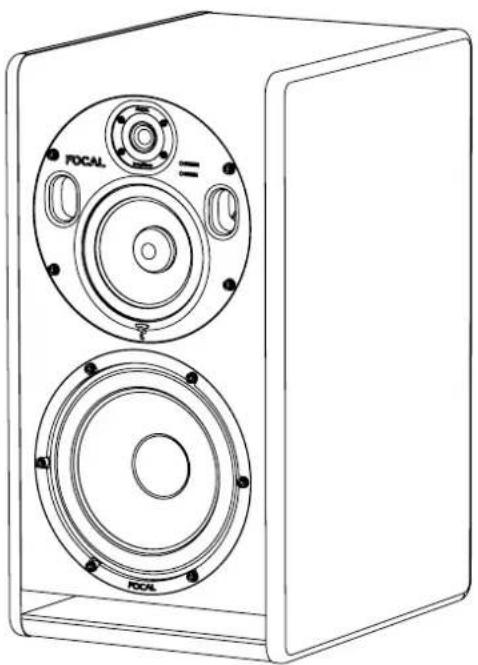
natural_image
Line drawing of a two-tiered speaker unit with circular components and mounting holes (no text or symbols)English page 12
Français page 22
Español página 32
中文42頁
日本の52ページ
한국어 62

 |  |  |
| The lightning flash with arrowhead symbol within an equilateral triangle, is intended to alert the user to the presence of uninsulated "dangerous voltage" within the product's enclosure that may be of sufficient magnitude to constitute a risk of electric shock to persons. | Caution: to prevent the risk of electric shock, do not remove cover (or back). No user-serviceable parts inside. Refer servicing to qualified service personnel. | The exclamation point within an equilateral triangle is intended to alert the user to the presence of important operating and maintenance (servicing) instructions in the literature accompanying the product. |
| 1. Read these instructions.2. Keep these instructions.3. Take these warnings into consideration.4. Follow all the instructions.5. Do not use this equipment around water.6. Only clean with a dry cloth.7. Do not cover ventilation outlets. Follow manufacturer's instructions when installing the equipment.8. Do not install the equipment near a source of heat, a cooker, a heating duct or other equipment (including amplifiers) which gives off heat.9. Respect safety instructions for power cable. The power cable has two prongs, one of which is larger than the other. A grounded cable has two prongs as well as a third which is the grounding prong. The largest or third prong is there for your safety. If the power cable doesn't fit your power socket, seek the advice of an electrician and replace the old power socket.10. Make sure the cable cannot be stepped on, crushed or pinched. Extreme care must be paid to the plug and the connection of the cable to the equipment.11. Only use accessories recommended by the manufacturer.12. Only use handling equipment, legs, tripods, supports or tables recommended by the manufacturer or those sold with the equipment. When using a cart, take extra care when moving the cart and equipment to avoid injury in case something falls.13. Disconnect the equipment in case of a thunderstorm or if left unused for extended periods of time. | 14. All maintenance must be carried out by a qualified professional. Maintenance is required following any damage caused to the equipment such as deterioration of the power cable or plug, spillage of liquid or insertion of objects inside the equipment, exposure to rain or humidity, poor functioning or physical damage.15. Do not use any accessories which aren't recommended by the manufacturer to avoid any risk.16. This product should only be connected to the type of power supply as indicated on the label on the equipment. In case of uncertainty as to the type of power supply of your electrical installation, consult the manufacturer of the product or your electricity provider. For equipment requiring a battery or another power source, consult the user manual. | 17. Do not overload power sockets, extension cables or power strips. This could lead to fire or electric shock.18. Never insert objects in the ventilation outlets of the equipment. The object may come in contact with components exposed to high voltages or cause short-circuiting and lead to fire or electric shock. Never spill liquid on the equipment.19. Never try to repair this equipment yourself; opening the equipment may expose you to high voltages or other risks. For all maintenance, consult a qualified professional.20. In case a replacement part is required, make sure the maintenance technician uses parts specified by the manufacturer or which have identical specifications to the original part. Non-compliant parts may lead to fire or have other risks.21. Following any intervention or repair to the equipment, ask the technician to carry out tests to verify the product works safely.22. The equipment must not be mounted to the wall or ceiling unless the manufacturer has intended it to, and only depending on antenna cables.23. The ON/OFF switch situated at the back of the product is the power supply cut-off device. The equipment must always be accessible to the user.24. Do not expose to dripping water or splashing.25. CAUTION: May cause an explosion if battery is incorrectly replaced. Replace only with the same or equivalent type. |

The Trio6 Be use a tweeter equipped with a Beryllium dome, allowing a frequency range extending beyond 40kHz. In its solid form, Beryllium is harmless. However, due to its nature, certain special precautions should be observed to avoid exposure to unnecessary risk:
- Under no circumstances should the Beryllium dome be subjected to any form of abrasive action. To ensure no accidental damage to the tweeter dome it is advised to carefully replace the protection covers while not in use.
- In the unlikely case of damage to the dome, of any form, a wide piece of adhesive tape should be immediately used to seal the whole front surface of the tweeter. The protective cover should then be replaced and also taped securely in place. You should then inform the dealer from whom you purchased the product so that the tweeter can be removed by a professional and returned to the product distributor for replacement.
- If the dome is broken in any way giving rise to loose particles of Beryllium, these should be carefully collected with the use of an adhesive tape and sealed in a zip-top bag to be returned with the tweeter.
For further information, please contact Focal-JMlab directly: beryllium@focal.com
F
Thank you for choosing Focal loudspeakers. We are pleased to share with you our philosophy: "the Spirit of Sound". These high-tech loudspeakers benefit from the last Focal improvements in terms of speaker drivers design for studios and audio professionals. In order to enjoy the maximum of their performance, we advise you to read this user's manual and to keep it carefully so that you can consult it later.
F
Please validate your Focal-JMlab guarantee by returning the guarantee form enclosed within 10 days or by registering directly on our website: http://www.focal.com/warranty
Conditions of guarantee
All Focal loudspeakers are covered by guarantee drawn up by the official Focal distributor in your country. Your distributor can provide all details concerning the conditions of guarantee. Guarantee cover extends at least to that granted by the legal guarantee in force in the country where the original purchase invoice was issued.
Package contents
Each monitor is provided with the following items (besides this manual):
- 1 power cable
- 4 rubber feet
• 1 N° 4 Allen key - 1 warranty card
- 2 protective grilles
Check none of these items are missing, and remove all the accessories from the box. To avoid damaging your product when removing it from the packaging, proceed as follows: open the flaps of the box fully, folding them over to the side. Then, remove the polystyrene protection. Carefully lift the monitor out of the box. Inspect the packaging for any possible damage. If there are signs of damage, contact the carrier and the supplier. It is important to conserve the packaging for possible future use.
Recommendations
We insist on emphasising that your equipment can generate high sound pressure levels, especially in a 5.1 configuration. As the distortion levels remain low and the auditory fatigue incurred on the user is minimal, it is not always easy to realise how high the sound pressure level actually is. Remember that exposure to high volumes over a sustained period of time may lead to permanent hearing loss.
Quick set-up guide:
- First of all, check that the monitors and all audio sources (mixing console...) are turned off and that all settings at the rear panel of the monitor are set to 0.
- Connect the audio signal from the source to the monitors using the XLR input.
- Check that the correct voltage is selected according to the mains power voltage chosen using the voltage selector, check the fuse and replace if necessary. The amperage of the fuse depends on the operating voltage (see fuse characteristics in specifications table). The monitor speakers absolutely must be grounded using the power cable provided. See page 19 for more information.
- Turn on the audio source and check that the output level of the audio source connected to the monitor is set to - or to a very low level.
- Turn on the power to your monitors. The monitors are now in "Standby" mode.
- Turn up the output level of the audio source until a signal is detected by the monitors in order for them to turn on automatically.

After turning on the power to the monitors, and once the automatic Standby mode has been activated (see page 19 for more information on this mode), the audio signal detection circuit within the monitor will automatically switch from "Standby" to "On" after a few seconds.
- Once you have finished recording, mixing or mastering, we recommend turning off your equipment in the following order:
a. Turn off the monitors
b. Turn off the audio sources
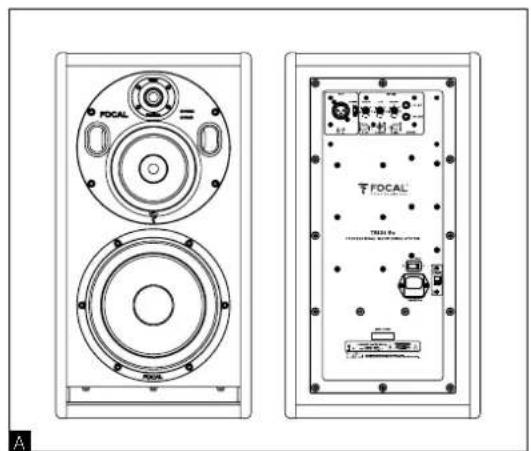
TRIO6 Be
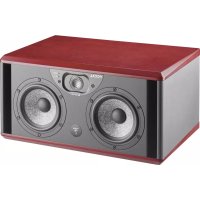
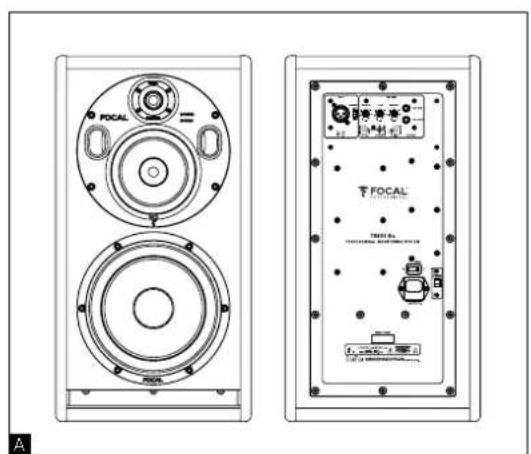
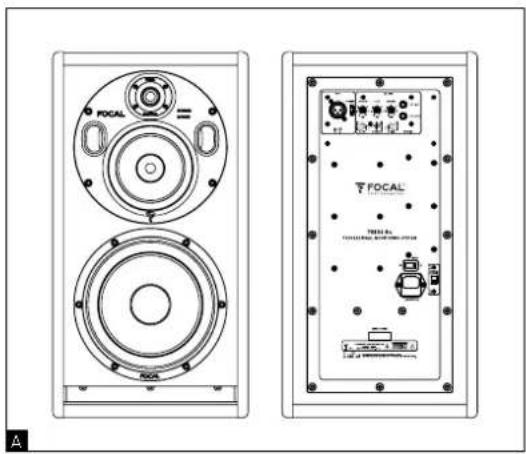
TRI06 Be is a professional near-field monitor with 2 monitor speakers within the same cabinet. TRI06 Be is composed of an 8-inch subwoofer with a "W" composite sandwich cone, a 5-inch woofer with "W" composite sandwich cone and a 1-inch pure Beryllium inverted dome tweeter.
In 3-way mode, the monitor has a frequency response of 35Hz to 40kHz (+/- 3dB) and 40Hz to 20kHz (+/- 1dB). In 2-way mode, only the 5-inch woofer and the tweeter are activated. The 2-way monitor speaker has a frequency response of 90Hz to 20kHz (+/- 3 dB) and is very efficient for checking the transfer quality of mixes carried out using systems with a limited bass range frequency response. These modes are controlled using a footswitch (see page 18).
The TRIO6 Be monitor speaker is equipped with 3 internal amplifiers:
1 x 200W powering the 8-inch subwoofer
1 x 150W powering the 5-inch woofer
1x 100W powering the 1-inch tweeter
natural_image
Technical line drawing of a two-tiered speaker with circular head and front speakers (no text or symbols)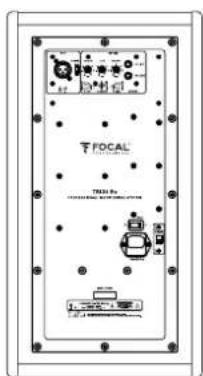
Installation

Mains power
Your products absolutely must be grounded using the power cable.
Positioning
TRIO 6 Be monitors are near-field professional monitoring loudspeakers which require positioning facing the listener at a distance between 1 to 3 meters (3 to 10 feet) They can perfectly be positioned on a mixing console or they can be mounted to appropriate stands. Whichever position you choose, it is highly recommended that the tweeter be at about the same height as the listener's ears.
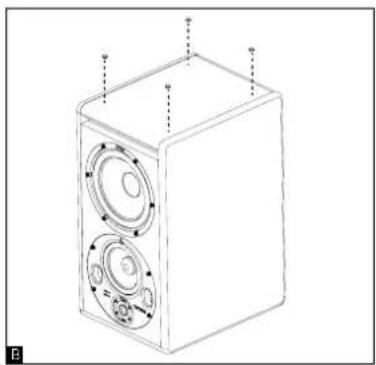
Positioning of the rubber feet
TRIO6 Be monitor speakers are supplied with 4 rubber feet so that the monitor can be detached from its support (mixing console, stand...). We recommend positioning the rubber feet as to keep as big a distance as possible between them according to the dimensions of the support (fig. B).
natural_image
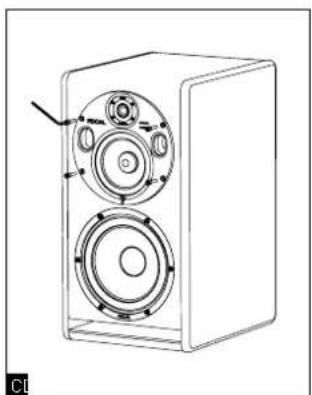
Line drawing of a speaker chamber with two circular speakers and a central hub, no text or symbols presentOrientation of the midrange/tweeter plate
The midrange/tweeter plate on the TRI06 Be monitor speaker can be rotated 360°, 90° at a time. This allows the user to optimise the set-up according to the room acoustics and installation constraints.
Procedure for rotating the midrange/tweeter plate
1) Keep the protective grille on the tweeter to keep it protected during this manoeuvre.
2] Remove the 4 screws using the n° 4 Allen key (fig. C).
3) Pull out the plate 10 cm whilst inclining it (fig. D).
4) Using the vents, rotate the plate to the desired position. Check that the retention pins are in line with the holes on the plate to ensure the screws are perfectly in line with the holes on the plate (fig. E).
5) Insert the screws and secure into place.
6) The monitor speaker is now ready to use
natural_image
Line drawing of a speaker with two speakers and a circular housing (no text or symbols)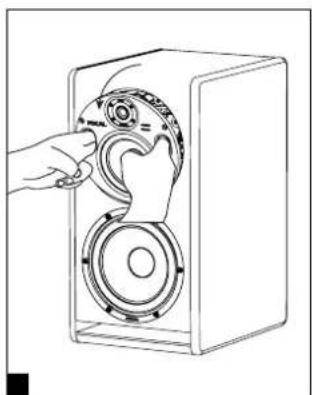
natural_image
Line drawing of a hand operating a speaker into a box with a circular dial (no text or symbols)
natural_image
Hand inserting a circular component into a speaker into a box (no text or symbols visible)
natural_image
Line drawing of a two-tiered speaker unit with visible sound waves and control knobs (no text or symbols)Stereo position
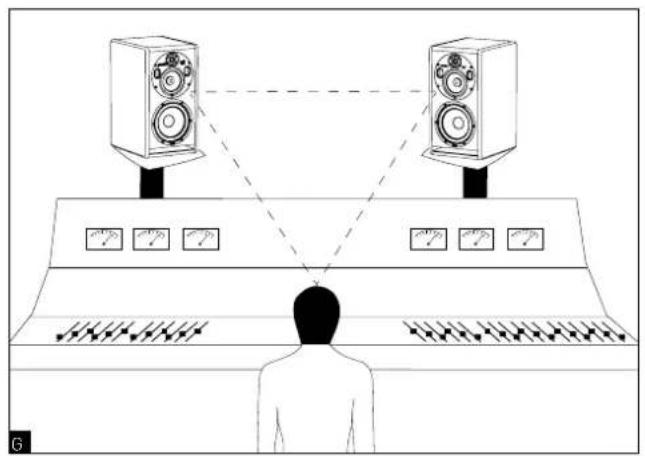
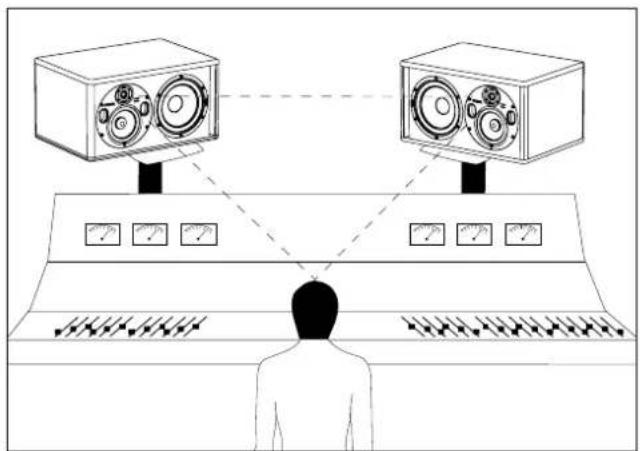
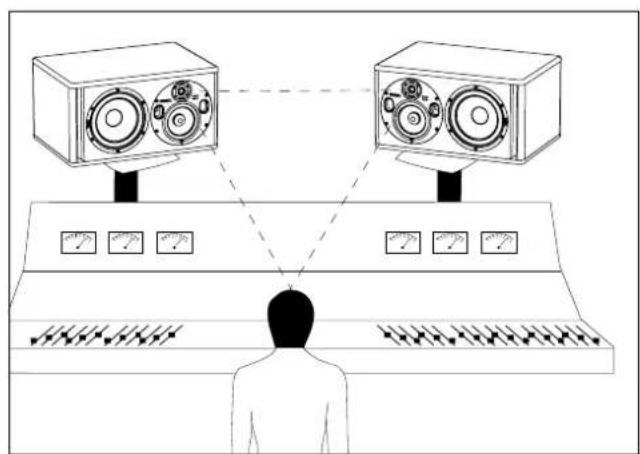
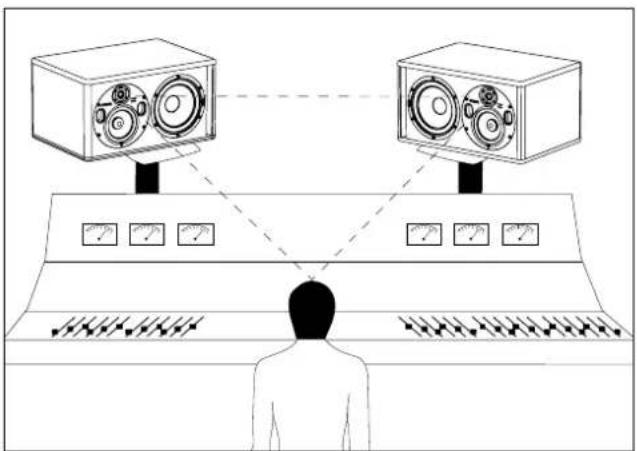
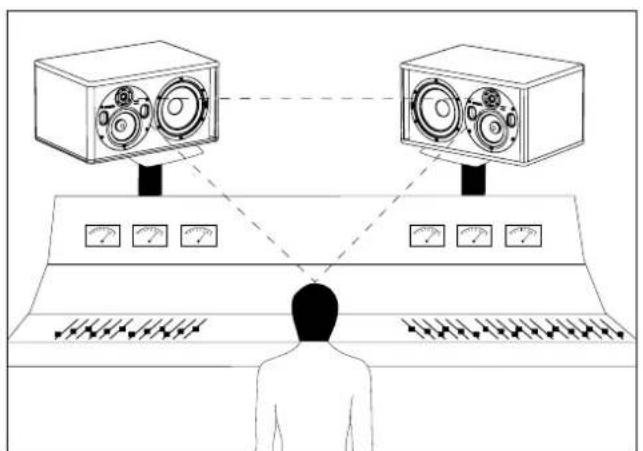
We recommend positioning the monitors to form an equilateral triangle with the listening area. The listener being at one corner and the left and right monitors at the other two corners (fig. G). The pure Beryllium inverted dome tweeter has one major advantage: its very low directivity. When using the monitors at less than 1.5 m (5 ft) away, it is highly recommended to widen the stereo image by increasing the distance between the two monitor speakers (the distance from tweeter to tweeter) to between 1.8 m and 2 m (6 ft and 6.5 ft) so as to balance integration constraints and working precision.
If needed, point the tweeters outwards to increase the width of the stereo image.


natural_image
Diagram of a person observing two large radio equipment units connected to a control panel, with no visible text or symbols.
Multichannel position
When using a 5.1 configuration, we recommend positioning the monitors around the listener so that the monitors are equal distance away from the listening position. Position the centre channel at 0°, the front right channel at 30°, the back right channel at 110°, the back left channel at 250° and the front left channel at 330° (fig. H).
Breaking-in
The transducers used in the TRI06 Be monitors are complex mechanical elements which require a breaking-in period to operate at their best and to become acclimatised to the temperature and humidity of the environment. The length of time this takes can vary depending on the conditions, and can sometimes last several weeks. Avoid listening at high volume during the first few hours of use. In order to shorten the breaking-in period, we advise you to let your equipment operate for about twenty hours at medium volume with programmes having significant low-frequency content. Once the transducers' characteristics have totally stabilised, you will be able to enjoy the full performance of your Focal products.
Settings and connections
1 -INPUT
The XLR connector enables you to connect a source with a balanced signal and has a standard wiring layout:
Pin 1 = ground (cable shield)
Pin 2 = in-phase signal (aka hot)
Pin 3 = reverse-phase signal (aka cold)
2 - INPUT SENSITIVITY
This selector allows you to adjust the input sensitivity of the monitor speaker according to the source (mixing console, sound card...). If the source transmits an audio signal via an unbalanced line, set the input sensitivity of the monitor speaker to -10 dBV. If the audio signal is transmitted via a balanced line, set the input sensitivity of the monitor speaker to +4dBu.
3 - LF SHELVING
The LF SHELVING potentiometer allows you to activate or deactivate the volume correction below 250Hz. We recommend setting the LF SHELVING potentiometer to +2dB when the acoustics of the listening room naturally soften that frequency range. We recommend setting the LF SHELVING potentiometer to 0 when the acoustics of the listening room are neutral. We recommend setting the LF SHELVING potentiometer to -2dB when the monitors are placed near a wall or a corner.
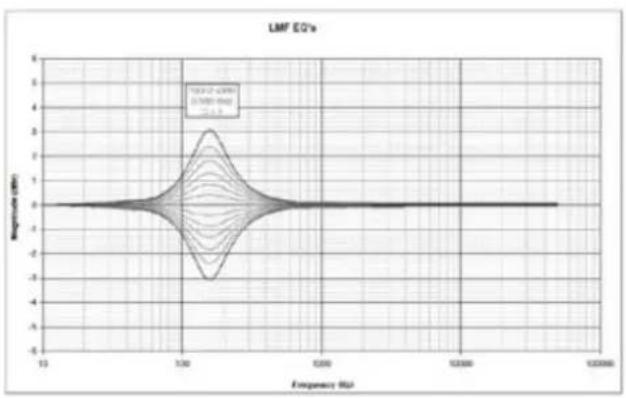
4 - LMF EQ
This potentiometer allows you to adjust the level of the low-mid frequencies. The centre frequency is 160Hz and the Q factor is 1. The corrections are made on a range of +/- 3dB. This correction is also useful if the monitor speaker is installed on top of a mixing console. Activating this function will diminish the reflections generated by the mixing console.
5 - HF SHELVING
The HF SHELVING potentiometer allows you to activate or deactivate the volume correction above 4.5kHz. We recommend setting the HF SHELVING potentiometer to +2dB when the acoustics of the listening room naturally soften this frequency range (mat environment). We recommended setting the LF SHELVING potentiometer to 0 when the acoustics of the listening room are neutral. We recommend setting the LF SHELVING potentiometer to -2dB or -3dB when the acoustics of the listening room naturally increase this frequency range (clear environment).
line
| Frequency (Hz) | Response (dBm) | | -------------- | -------------- | | 13 | 0 | | 1.00 | 2 | | 1.000 | 0 | | 1.0000 | 0 | | 1.00000 | 0 |
line
| Frequency (Hz) | Magnitude (dB) | | -------------- | -------------- | | 10 | 0 | | 500 | 0 | | 1000 | 0 | | 5000 | 0 | | 10000 | 0 | | 50000 | 0 | | 100000 | 0 |
FOCUS MODE
6 - INPUT
This input is for connecting the footswitch controller or for receiving the signal from the OUTPUT of the FOCUS mode of a TRI06 Be monitor.
7 - OUTPUT
This output is for connecting a TRI06 Be monitor to another TRI06 Be monitor.
Make sure you use an instrument-type cable with 2x 6.35 mm mono jacks to connect the footswitch to a TRI06 Be, and to connect two TRI06 Be monitors.
flowchart
graph TD
    A["PROFESSIONAL MONITORING SYSTEM"] --> B["TR106 Be PROFESSIONAL MONITORING SYSTEM"]
    B --> C["POWER"]
    B --> D["Ground"]
    C --> E["Control Unit"]
    D --> E
    E --> F["POWER"]
    E --> G["Ground"]
flowchart
graph TD
    A["INPUT"] --> B["EQ'S"]
    B --> C["FOCUS"]
    C --> D["Output"]
    subgraph Inputs
        E1["Speaker 1"]
        E2["Speaker 2"]
        E3["Speaker 3"]
        E4["Speaker 4"]
        E5["Speaker 5"]
    end
    E1 --> G1
    E2 --> G2
    E3 --> G3
    E4 --> G4
    E5 --> G5
    G1 --> H1
    G2 --> H2
    G3 --> H3
    G4 --> H4
    G5 --> H5
    style E1 fill:#f9f,stroke:#333
    style E2 fill:#f9f,stroke:#333
    style E3 fill:#f9f,stroke:#333
    style E4 fill:#f9f,stroke:#333
    style E5 fill:#f9f,stroke:#333
    style G1 fill:#ccf,stroke:#333
    style G2 fill:#ccf,stroke:#333
    style G3 fill:#ccf,stroke:#333
    style G4 fill:#ccf,stroke:#333
    style G5 fill:#ccf,stroke:#333
TRIO6 Be FOCUS mode diagram.
8 - ON/OFF
The ON/OFF switch turns the internal amplifiers on or off.
Automatic Standby mode
TRIO6 Be monitors feature a "Standby" mode. When you turn on the power to the monitors, they are already in "Standby" mode. To switch from "Standby" mode to "On", send an audio signal to the monitor by gradually increasing the volume of the audio source. After 15 minutes without an audio signal, the monitors automatically go into "Standby". When the "Standby" mode is activated, power consumption is inferior to 0.5W.
9 - VOLTAGE SELECTION
This slide switch allows you to select the voltage according to the mains power supply depending on the country you're in. There are two options: 115V or 230V. To change the voltage, proceed as follows:
1) Turn off the monitor and unplug the power cable
2) Using a flat-head screwdriver, remove the fuse situated below the power socket [11].
3) Replace the fuse with one having the appropriate values:
a. 115V: class T fuse, value 3.15A
b. 230V: class T fuse, value 1.6A
4) Using a Phillips screwdriver, slightly loosen the screws (12), and remove the protection cover from the voltage selector.
5) Switch the voltage selector (9) to the appropriate setting using a flat-head screwdriver.
6) Using a Phillips screwdriver, put the protection cover for the voltage selector back into place and slightly tighten the screws (12).
7) Reconnect the power cable [10].
8) Turn on the power to the monitor using the Power ON/OFF switch [8].
10 - POWER SOCKET
Connect the power supply cable supplied to this connector socket.
11 - FUSE HOUSING
This is where the fuse is located to protect the monitor. If necessary, replace the fuse as explained in section 9 - VOLTAGE SELECTION.
12 - SCREWS
Two screws protect access to the voltage selector (9).
13 - POWER LED (front panel)
There are three possible states for the POWER LED:
- Off: no power/monitor off
- Green: monitor on
- Red: the limiter is activated
14 - FOCUS LED (front panel)
There are three possible states for the FOCUS LED:
- Off: the monitor is in standby mode or in 3-way mode
- Green: the monitor is in FOCUS mode
- Red: the monitor's heat protection is activated
State of the TRI06 Be monitor
Colour State Solution
| POWER LED Illuminated green Monitor ON - | |||
| FOCUS LED OFF The monitor is in 3-way | limiter is activated Reduce volume | Send an audio signal to turn on ORPress the footswitch to activate FOCUS mode | |
| mode or standby mode ORit is in standby in FOCUS mode | |||
| Illuminated green FOCUS mode activated Press the footswitch to activate 3-way mode | |||
| Illuminated red Heat protection Reduce volume | |||
Performance
| • Frequency response 3-way mode 35Hz - 40kHz (+/- 3dB) | ||
| 2-way mode (Focus) | 90Hz - 20kHz (+/- 3dB) | |
| • Maximum SPL | 3-way mode 115dB SPL (peak at 1m) | |
| 2-way mode (Focus) | 105dB SPL (peak at 1m) | |
Electronics
| • Inputs Type /Impedance | Connectors Sensitivity | Electronically balanced / 10 KOhms XLR Adjustable, +4dBu ou -10dBv |
| • Bass Midrange Treble | 200W, class G 150W, class G 100W, class AB | |
| • Power supply Mains voltage | Wiring | 230V (class T fuse 1.6A fuse rating) - 115V (class T fuse 3.5 A fuse rating) Detachable IEC power cable |
| • Indicators and controls Rear panel Input sensitivity selector (+4dBu/-10dBV) Low frequency shelving (+/- 3dB from 35 to 250Hz) High frequency shelving (+/- 3dB from 4.5 to 40kHz) EQ low-mid frequencies (+/- 3dB at 160Hz, Q factor = 1) FOCUS input / FOCUS output | ||
| • LED Focus mode on, audio clipping and protection indicated by LED on front panel | ||
Transducers
| • Subwoofer 8W64701 | 8-inch Focal driver with W composite sandwich cone |
| • Woofer 5W04701 | 5-inch Focal driver with W composite sandwich cone |
| • Tweeter TB872, | 1-inch Focal pure Beryllium inverted dome tweeter |
Cabinet
| • Structure 22mm (0.86 in) reinforced panels | |
| • Finish Black Textured side panel, Red Textured body | |
| • Dimensions including 4 rubber feet (HxWxD) | 20^1/2 × 10^15/16 × 14^3/15 (520 x 278 x 360mm) |
| • Weight 44 lbs (20 kg) |
natural_image
Line drawing of a speaker chamber with two circular speakers and a central fan (no text or symbols)Orientation de la platine médium/tweeter
natural_image
Line drawing of a speaker with two speakers and a circular component, no text or symbols present
natural_image
Line drawing of a hand operating a speaker into a box with a circular dial (no text or symbols)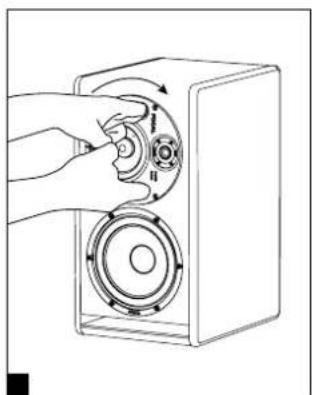
natural_image
Hand inserting a circular component into a speaker into a box (no text or symbols visible)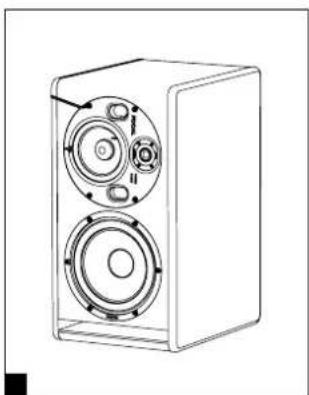
natural_image
Line drawing of a speaker chamber with two speakers and a central speaker (no text or symbols)
natural_image
Diagram of a person standing at a console with two speakers and multiple meters, connected by dashed lines (no text or symbols)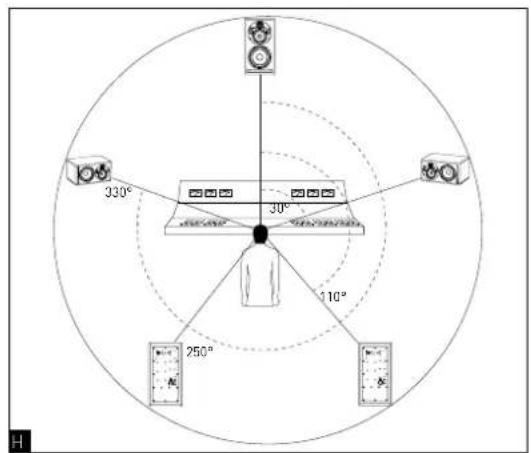
Pin 1 = masse (blindage)
Pin 2 = point chaud (signal en phase)
Pin 3 = point froid (signal hors phase)
2 - INPUT SENSITIVITY
line
| Frequency (Hz) | Magnitude (dB) for LF=0.500 | Magnitude (dB) for LF=1.000 | Magnitude (dB) for LF=2.000 | Magnitude (dB) for LF=3.000 | Magnitude (dB) for LF=4.000 | Magnitude (dB) for LF=5.000 | | -------------- | -------------------------- | -------------------------- | -------------------------- | -------------------------- | -------------------------- | -------------------------- | | 10 | ~3.5 | ~2.5 | ~1.5 | ~1.0 | ~0.5 | ~-0.5 | | 50 | ~2.0 | ~1.5 | ~1.0 | ~0.5 | ~0.0 | ~-0.5 | | 100 | ~1.0 | ~0.5 | ~0.5 | ~0.5 | ~0.5 | ~1.0 | | 200 | ~0.5 | ~0.5 | ~1.5 | ~2.5 | ~3.5 | ~4.5 | | 300 | ~0.5 | ~1.5 | ~2.5 | ~3.5 | ~4.5 | ~5.5 | | 400 | ~0.5 | ~2.5 | ~3.5 | ~4.5 | ~5.5 | ~6.5 | | 500 | ~0.5 | ~3.5 | ~4.5 | ~5.5 | ~6.5 | ~7.5 | | 600 | ~0.5 | ~4.5 | ~5.5 | ~6.5 | ~7.5 | ~8.5 | | 700 | ~0.5 | ~5.5 | ~6.5 | ~7.5 | ~8.5 | ~9.5 | | 800 | ~0.5 | ~6.5 | ~7.5 | ~8.5 | ~9.5 | ~10.5 | | 900 | ~0.5 | ~7.5 | ~8.5 | ~9.5 | ~10.5 | ~11.5 | | 1000 | ~0.5 | ~8.5 | ~9.5 | ~10.5 | ~11.5 | ~12.5 | | 1100 | ~0.5 | ~9.5 | ~10.5 | ~11.5 | ~12.5 | ~13.5 | | 1200 | ~0.5 | ~10.5 | ~11.5 | ~12.5 | ~13.5 | ~14.5 | | 1300 | ~0.5 | ~11.5 | ~12.5 | ~13.5 | ~14.5 | ~15.5 | | 1400 | ~0.5 | ~12.5 | ~13.5 | ~14.5 | ~15.5 | ~16.5 | | 1500 | ~0.5 | ~13.5 | ~14.5 | ~15.5 | ~16.5 | ~17.5 | | 1600 | ~0.5 | ~14.5 | ~15.5 | ~16.5 | ~17.5 | ~18.5 | | 1700 | ~0.5 | ~15.5 | ~16.5 | ~17.5 | ~18.5 | ~19.5 | | 1800 | ~0.5 | ~16.5 | ~17.5 | ~18.5 | ~19.5 | ~20.5 | | 1900 | ~0.5 | ~17.5 | ~18.5 | ~19.5 | ~20.5 | ~21.5 | | 2000 | ~0.5 | ~18.5 | ~19.5 | ~20.5 | ~21.5 | ~22.5 | | 2100 | ~0.5 | ~19.5 | ~20.5 | ~21.5 | ~22.5 | ~23.5 | | 2200 | ~0.5 | ~20.5 | ~21.5 | ~22.5 | ~23.5 | ~24.5 | | 2300 | ~0.5 | ~21.5 | ~22.5 | ~23.5 | ~24.5 | ~25.5 | | 2400 | ~0.5 | ~22.5 | ~23.5 | ~24.5 | ~25.5 | ~26.5 | | 2500 | ~0.5 | ~23.5 | ~24.5 | ~25.5 | ~26.5 | ~27.5 | | 2600 | ~0.5 | ~24.5 | ~25.5 | ~26.5 | ~27.5 | ~28.5 | | 2700 | ~0.5 | ~25.5 | ~26.5 | ~27.5 | ~28.5 | ~29.5 | | 2800 | ~0.5 | ~26.5 | ~27.5 | ~28.5 | ~29.5 | ~30.5 | | 2900 | ~0.5 | ~27.5 | ~28.5 | ~29.5 | ~30.5 | ~31.5 | | 3000 | ~0.5 | ~28.5 | ~29.5 | ~30.5 | ~31.5 | ~32.5 | | 3100 | ~0.5 | ~29.5 | ~30.5 | ~31.5 | ~32.5 | ~33.5 | | 3200 | ~0.5 | ~30.5 | ~31.5 | ~32.5 | ~33.5 | ~34.5 | | 3300 | ~0.5 | ~31.5 | ~32.5 | ~33.5 | ~34.5 | ~35.5 | | 3400 | ~0.5 | ~32.5 | ~33.5 | ~34.5 | ~35.5 | ~36.5 | | 3500 | ~0.5 | ~33.5 | ~34.5 | ~35.5 | ~36.5 | ~37.5 | | 3600 | ~0.5 | ~34.5 | ~35.5 | ~36.5 | ~37.5 | ~38.5 | | 3700 | ~0.5 | ~35.5 | ~36.5 | ~37.5 | ~38.5 | ~39.5 | | 3800 | ~0.5 | ~36.5 | ~37.5 | ~38.5 | ~39.5 | >4 | | 3900 | - | - | - | - | - | - | | 4000 | - | - | - | - | - | - | | 4100 | - | - | - | - | - | - | | 4200 | - | - | - | - | - | - | | 4300 | - | - | - | - | - | - | | 4400 | - | - | - | - | - | - | | 4500 | - | - | - | - | - | - | | 4600 | - | - | - | - | - | - | | 4700 | - | - | - | - | - | - | | 4800 | - | - | - | - | - | - | | 4900 | - | - | - | - | - | - | | 4999 (ref: Theoretical values are not explicitly provided in the code.) I have been calculated based on the number of samples in each bin from the data source to the number of samples in each bin of the data source (if a sample is not specified). If a sample is not specified, we can be calculated by applying the formula 'df' for the number of samples in each bin to calculate the number of samples in each bin of the data source (if a sample is not specified). If a sample is not specified, we can be calculated by applying the formula 'df' for the number of samples in each bin to calculate the number of samples in each bin of the data source (if a sample is not specified). If a sample is not specified, we can be calculated by applying the formula 'df' for the number of samples in each bin to calculate the number of points in each bin of the data source (if a sample is not specified). If a sample is not specified, we can be calculated by applying the formula 'df' for the number of samples in each bin to calculate the number of points in each bin of the data source (if a sample is not specified). If a sample is not specified, we can be calculated by applying the formula 'df' for the number of samples in each bin to calculate the number of points in each bin (if a sample is not specified). If a sample is not specified, we can be calculated by applying the formula 'df' for the number of samples in each bin to calculate the number of points in each bin (if a sample is not specified). If a sample is not specified, we can be calculated by applying the formula 'df' for the number of samples in each bin to calculate the number of points in each bin (if a sample is not specified). If a sampling point is estimated based on the number of samples in each bin, we can be calculated using the formula 'df'. The output values are estimated based on the number of samples in each bin from the data source to the number of samples in each bin of the data source (if a sample is not specified). For example, if a sample is not specified, we can be calculated using the formula 'df'. The output values are estimated based on the number of samples in each bin from the data source to the number of samples in each bin (if a sample is not specified). For example, if a sampling point is estimated based on the number of samples in each bin, we can be calculated using the formula 'df'. The output values are estimated based on the number of samples in each bin from the data source to the number of samples in each bin (if a sample is not specified). For example, if a sampling point is estimated based on the number of samples in each bin, we can be calculated using the formula 'df'. The output values are estimated based on the number of samples in each bin from the data source to the number of samples at that point.
MODE FOCUS
6 - INPUT
natural_image
Technical line drawing of a speaker chamber with two circular speakers and a central fan (no text or symbols)natural_image
Line drawing of a speaker with two speakers and a circular housing (no text or symbols)
natural_image
Line drawing of a hand operating a speaker into a box with a circular dial (no text or symbols)
natural_image
Illustration of a hand inserting a circular component into a speaker into a box (no text or symbols)
natural_image
Line drawing of a two-tiered speaker unit with visible sound waves and control knobs (no text or symbols)

natural_image
Line drawing of a person facing a control panel with two speakers and multiple meters (no text or symbols)
natural_image
Technical line drawing of a speaker with two circular speakers and a central speaker (no text or symbols)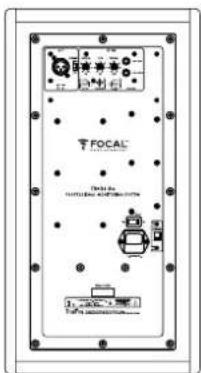

安装

主电源
产品使用的电源线必须接地。
位置
natural_image
Line drawing of a speaker chamber with two circular speakers and control knobs (no text or symbols)中音/高音板的定位
natural_image
Line drawing of a speaker chamber with two speakers and a circular head (no text or symbols)
natural_image
Line drawing of a hand inserting a speaker into a device housing (no text or symbols)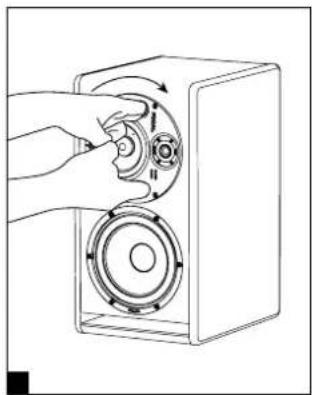
natural_image
Illustration of a hand pressing a button into a speaker into a box (no text or symbols)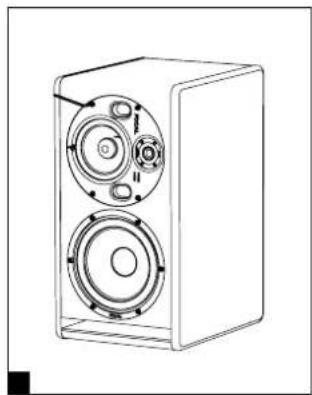
natural_image
Line drawing of a two-tiered speaker unit with visible sound waves and control knobs (no text or symbols)立体声位置
natural_image
Line drawing of a person facing a control panel with two speakers and multiple measurement gauges (no text or symbols)
多通道配置
Conditions of guarantee
1 x 200 W powering the 8-inch subwoofer
1 x 150 W powering the 5-inch woofer
1x 100 W powering the 1-inch tweeter
Installation

natural_image
Line drawing of a speaker chamber with two circular speakers and labeled ports (no text or symbols)natural_image
Line drawing of a speaker with two speakers and a central speaker, showing no text or symbols.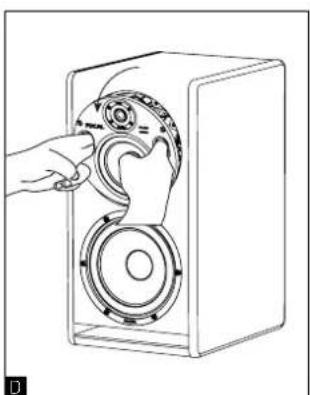
natural_image
Line drawing of hands operating a speaker into a speaker chamber (no text or symbols)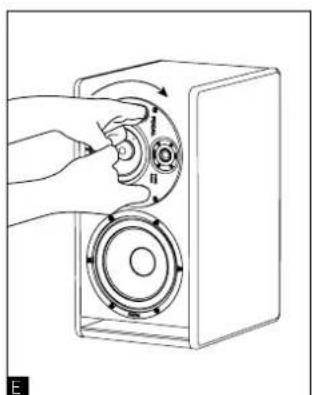
natural_image
Illustration of a hand inserting a circular component into a speaker into a box (no text or symbols)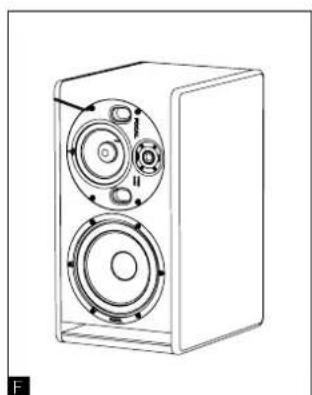
natural_image
Line drawing of a speaker chamber with two circular speakers and a central hub (no text or symbols)ステレオ・ポジション

natural_image
Diagram of a person observing two large radio equipment units connected to a control panel with multiple meters (no text or symbols present)
マルチチャンネル・ポジション
line
| Frequency (Hz) | Response (dBm) | | -------------- | -------------- | | 10 | 0 | | 1.25 | 3 | | 10.5 | 0 | | 10.75 | -3 | | 11 | 0 | | 12.5 | 0 | | 12.75 | 0 | | 13 | 0 | | 13.25 | 0 | | 13.5 | 0 | | 13.75 | 0 | | 14 | 0 | | 14.25 | 0 | | 14.5 | 0 | | 14.75 | 0 | | 15 | 0 | | 15.25 | 0 | | 15.5 | 0 | | 15.75 | 0 | | 16 | 0 | | 16.25 | 0 | | 16.5 | 0 | | 16.75 | 0 | | 17 | 0 | | 17.25 | 0 | | 17.5 | 0 | | 17.75 | 0 | | 18 | 0 | | 18.25 | 0 | | 18.5 | 0 | | 18.75 | 0 | | 19 | 0 | | 19.25 | 0 | | 19.5 | 0 | | 19.75 | 0 | | 20 | 0 | | 20.25 | 0 | | 20.5 | 0 | | 20.75 | 0 | | 21 | 0 | | 21.25 | 0 | | 21.5 | 0 | | 21.75 | 0 | | 22 | 0 | | 22.25 | 0 | | 22.5 | 0 | | 22.75 | 0 | | 23 | 0 | | 23.25 | 0 | | 23.5 | 0 | | 23.75 | 0 | | 24 | 0 | | 24.25 | 0 | | 24.5 | 0 | | 24.75 | 0 | | 25 | 0 | | 25.25 | 0 | | 25.5 | 0 | | 25.75 | 0 | | 26 | 0 | | 26.25 | 0 | | 26.5 | 0 | | 26.75 | 0 | | 27 | 0 | | 27.25 | 0 | | 27.5 | 0 | | 27.75 | 0 | | 28 | 0 | | 28.25 | 0 | | 28.5 | 0 | | 28.75 | 0 | | 29 | 0 | | 29.25 | 0 | | 29.5 | 0 | | 29.75 | 0 | | 30 | 0 | | Note: The frequency values are not explicitly labeled in the code provided in the code above the code provided in the chart.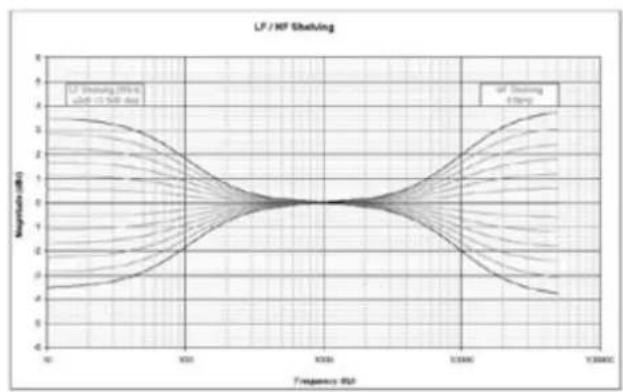
line
| Frequency (Hz) | Magnitude (dB) | | -------------- | -------------- | | 90 | ~2.5 | | 100 | ~1.5 | | 200 | ~0.5 | | 300 | ~0.2 | | 400 | ~0.1 | | 500 | ~0.05 | | 600 | ~0.1 | | 700 | ~0.2 | | 800 | ~0.5 | | 900 | ~1.5 | | 1000 | ~2.5 | | 2000 | ~1.5 | | 3000 | ~0.5 | | 4000 | ~0.2 | | 5000 | ~0.1 | | 6000 | ~0.05 | | 7000 | ~0.1 | | 8000 | ~0.2 | | 9000 | ~0.5 | | 10000 | ~1.5 | | 20000 | ~2.5 | | 30000 | ~1.5 | | 40000 | ~0.5 | | 50000 | ~0.2 | | 60000 | ~0.1 | | 70000 | ~0.05 | | 80000 | ~0.1 | | 90000 | ~0.2 | | 100000 | ~1.5 |
FOCUS MODE
| • Frequency response 3-way mode 35Hz - 40kHz (+/- 3dB) | ||
| 2-way mode (Focus) | 90Hz - 20kHz (+/- 3dB) | |
| • SPL maximum | 3-way mode 115dB SPL (peak at 1m) | |
| 2-way mode (Focus) | 105dB SPL (peak at 1m) | |
Electronics
| • Inputs Type /Impedance | Connectors Sensitivity | Electronically balanced / 10 KOhms XLR Adjustable, +4dBu ou -10dBv |
| • Bass Midrange Treble | 200W, class G 150W, class G 100W, class AB | |
| • Power supply Mains voltage | Wiring | 230V (class T fuse 1.6A fuse rating) - 115V (class T fuse 3.5 A fuse rating) Detachable IEC power cable |
| • Indicators and controls Rear panel Input sensitivity selector (+4dBu/-10dBV) Low frequency shelving (+/- 3dB from 35 to 250Hz) High frequency shelving (+/- 3dB from 4.5 to 40kHz) EQ low-mid frequencies (+/- 3dB at 160Hz, Q factor = 1) FOCUS input / FOCUS output | ||
| • LED Focus mode on, audio clipping and protection indicated by LED on front panel | ||
Transducers
| • Subwoofer 8W64701 | 8-inch Focal speaker driver with W composite sandwich cone |
| • Medium 5W04701 | 5-inch Focal driver with W composite sandwich cone |
| • Tweeter TB872, | 1-inch Focal pure Beryllium inverted dome tweeter |
Cabinet
| • Structure 19mm and 22mm (0.74 in and 0.86 in) reinforced panels | |
| • Finish Black Textured side panel, Red Textured body | |
| • Dimensions including 4 rubber feet (HxWxD) | 20^1/2 × 10^15/16 × 14^3/15 (520 x 278 x 360mm) |
| • Weight 44 lbs (20 kg) | |
1 x 200 W powering the 8-inch subwoofer
1 x 150 W powering the 5-inch woofer
1 x 100 W powering the 1-inch tweeter
1 x 200 W powering the 8-inch subwoofer 1 x 150 W powering the 5-inch woofer 1 x 100 W powering the 1-inch tweeter
natural_image
Technical line drawing of a speaker cabinet with dual speakers and control buttons (no text or symbols)Midrange/tweeter plate 지향
natural_image
Line drawing of a speaker chamber with two speakers and circular components (no text or symbols)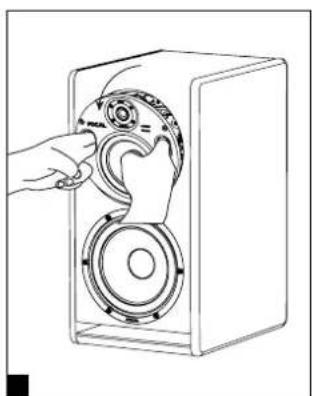
natural_image
Line drawing of a hand operating a speaker into a box with a circular dial (no text or symbols)
natural_image
Hand inserting a circular component into a speaker into a box (no text or symbols visible)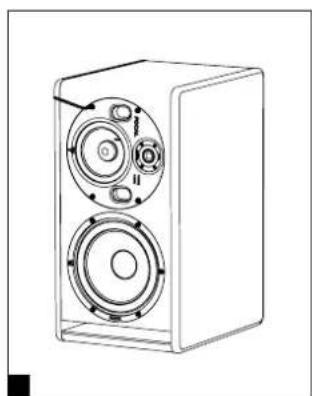
natural_image
Line drawing of a speaker chamber with two circular speakers and a central hub (no text or symbols)스테레오 포지션


natural_image
Diagram of a person observing two large radio equipment units connected to a control panel, with no visible text or symbols.
멀티채널 포지션
Pin 3 = reverse-phase signal (다른 말로 cold)
2-INPUT 감도
포커스 모드
6 - INPUT
b. 230V: class T fuse, 1.6 A
| • Frequency response 3-way mode 35Hz - 40kHz (+/- 3dB) | |
| 2-way mode (Focus) 90Hz - 20kHz (+/- 3dB) | |
| • SPL maximum | 3-way mode 115dB SPL (peak at 1m) |
| 2-way mode (Focus) 105dB SPL (peak at 1m) | |
Electronics
| • Inputs Type /Impedance | Connectors Sensitivity | Electronically balanced / 10 KOhms XLR Adjustable, +4dBu ou -10dBv |
| • Bass Midrange Treble | 200W, class G 150W, class G 100W, class AB | |
| • Power supply Mains voltage | Wiring | 230V (class T fuse 1.6A fuse rating) - 115V (class T fuse 3.5 A fuse rating) Detachable IEC power cable |
| • Indicators and controls Rear panel Input sensitivity selector (+4dBu/-10dBV) Low frequency shelving (+/- 3dB from 35 to 250Hz) High frequency shelving (+/- 3dB from 4.5 to 40kHz) EQ low-mid frequencies (+/- 3dB at 160Hz, Q factor = 1) FOCUS input / FOCUS output | ||
| • LED Focus mode on, audio clipping and protection indicated by LED on front panel | ||
Transducers
| • Subwoofer 8W64701 | 8-inch Focal speaker driver with W composite sandwich cone |
| • Medium 5W04701 | 5-inch Focal driver with W composite sandwich cone |
| • Tweeter TB872, | 1-inch Focal pure Beryllium inverted dome tweeter |
Cabinet
| • Structure 19mm and 22mm (0.74 in and 0.86 in) reinforced panels | |
| • Finish Black Textured side panel, Red Textured body | |
| • Dimensions including 4 rubber feet (HxWxD) | 20^1/2 × 10^15/16 × 14^3/15 (520 x 278 x 360mm) |
| • Weight 44 lbs (20 kg) | |
Garantie France
□ Post production Broadcast
□
□ nearfield midfield
□
Utilisé pour :
□ stereo multicanal
□
Now it's possible to register on line : www.focal.com/warranty
In order to validate the Focal guarantee, please return this page within 10 days to the following address or to register you on: http://www.focal.com/warranty
Retailer or distributor name: ____
Company or owner name: ____
Technical manager: ____
Your complete address:
Retail price: ____
Occupation:
□ Audio studio Mastering
□ Post production Broadcast □
☐ Other (please specify): ____
Installation details:
Exploitation details: □ Mac PC □
Used as: □ nearfield midfield □
Used for: □ stereo multichannel □
Mixing desk brand : ____
"Direct to disk" software:
In case of replacement, what were your previous acoustic speakers?
Explain in a few words why you chose Focal...
your comments: