9960 - Ice machine Cloer - Free user manual and instructions
Find the device manual for free 9960 Cloer in PDF.

User questions about 9960 Cloer
0 question about this device. Answer the ones you know or ask your own.
Ask a new question about this device
Download the instructions for your Ice machine in PDF format for free! Find your manual 9960 - Cloer and take your electronic device back in hand. On this page are published all the documents necessary for the use of your device. 9960 by Cloer.
USER MANUAL 9960 Cloer
natural_image
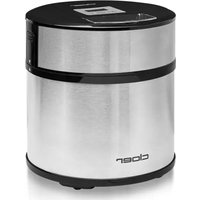
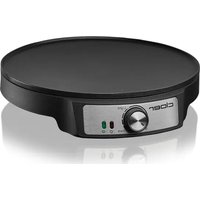
Black clover brand blender with digital display and control buttons (no visible text or symbols on device body)Slush Eis Maschine Cloer-9960
Slush Ice Machine Cloer-9960
natural_image
Black and white photo of a glass filled with chocolate liquid, no text or symbols visibleSPRACHEN - LANGUAGES
DE Bedienungsanleitung ....S. 4
EN Instruction Manual....S. 9
NL Gebruiksaanwijzing.... S. 13
FR Notice d'utilisation.... S. 19
IT Istruzioni sull'uso.... S. 24
ES Instrucciones de uso S. 29
LT Naudojimo instrukcija ....S. 34
LV Lietošanas instrukcija ....S. 39
DK Brugsanvisning S. 44
NO Bruksanvisning S. 49
SE Bruksanvisning S. 53
FI Használati utasitás S. 57
PL Instrukcja obsługi S. 61
text_image
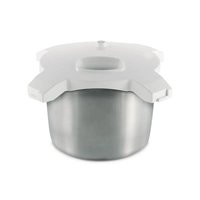
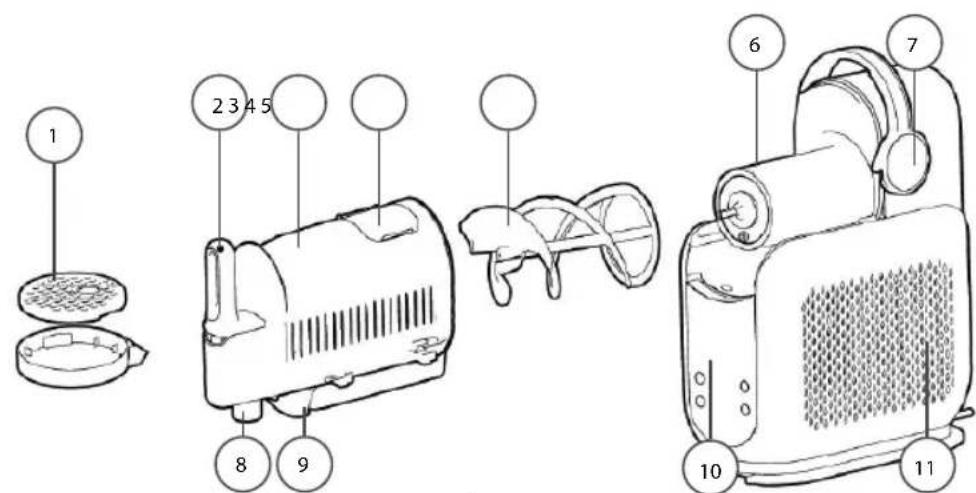
1 2 3 4 5 8 9 6 7 10 11| D1Tropfauffangschale2Zapfhebel3Behälter4Deckel5Schnecke6Kühlzylinder7Bügelgriff8Ausguss9Kondenzwasser Auffangschale10Bedienfeld11Gehäuse mit integrierten Kühlsystem | EN1Drip tray2Tap lever3Container4Lid5Screw6Cooling cylinder7Strap handle8Spout9Condensation water collection tray10Control panel11Housing with integrated cooling system |
| FR1Bac de récupération des gouttes2Levier de tirage3Réservoir4Couvercle5Vis sans fin6Cylindre de refroidissement7Poignée étrier8Bec verseur9Bac de récupération de l'eau de condensation10Panneau de commande11Boîtier avec système de refroidissement intégré | NL1Druppelopvangbakje2Tapkraan3Container4Deksel5Schroef6Koelcilinder7Beugelhandgreep8Uitloop9Condenswateropvangbakje10Bedieningspaneel11Behuizing met geïntegreerd koelsysteem |
| FI1Tippakaukalo2Hana3Säiliö4Kansi5Ruuvikierukka6Jäähdytyssylinteri7Kahva8Kaatonokka9Kondenssiveden tippakaukalo10Ohjauspaneeli11Kotelo integroidulla jäähdytysjärjestelmällä | DK1Drypbakke2Tappehändtag3Beholder4Låg5Snegl6Kølecylinder7Bøjlehändtag8Udløb9Kondensvandopsamlingsbakke10Betjeningspanel11Kabinet med integreret kølesystem |
| SE1Droppuppsamlingsskål2Tappkran3Behållare4Lock5Skruv6Kylcylinder7Handtag8Utloppsrör9Kondensvattenuppsamlingsskål10Manöverpanel11Hölje med integrerat kylsystem | ES1Bandeja recogegotas2Palanca de dispensación3Depósito4Tapa5Tornillo sinfin6Cilindro refrigerador7Asa de sujeción8Vertedor9Bandeja recogegotas10Panel de control11Carcasa con sistema de refrigeración integrado |
| IT1Vaschetta raccogli gocce2Leva di erogazione3Contenitore4Coperchio5Vite senza fine6Cilindro di raffreddamento7Maniglia ad arco8Beccuccio9Vaschetta raccogli condensa10Pannello di controllo11Alloggiamento con sistema di raffreddamento integrato | RU1Поддон для сбора капель2Рычаг крана3Контейнер4Крышка5Шнек6Охлаждающий цилиндр7Ручка-дужка8Излив9Поддон для сбора конденсата10Панель управления11Корпус со встроенной системой охлаждения |
text_image
clover STATION: PRESENTS, NOVO, MATHA
Cloer Online-Shop
https://cloer.com
Gewährleistung
Basic safety instructions
- The appliance is intended to be used in household only and using in:
– staff kitchen areas in shops, offices and other working environments,
– in farm houses,
– by clients in hotels, motels and other residential type environments,
— on bed and breakfast type environments.
- Have repairs of Cloer electronic appliances carried out only by authorized Cloer specialist dealers or by the Cloer customer service. Improper repairs can involve substantial dangers for the user. Furthermore, this will void your warranty claims.
- Only operate the appliance at household-usual power sockets. Check if the mains voltage stated on the type plate is up to that of your power supply network.
- The device must be connected to a power outlet with protective ground.
- If the supply cord is damaged, it must be replaced by Cloer, its service agent or similarly qualified persons in order to avoid a hazard.
- Pull power plug of the power socket
– in case of a defect,
- if the appliance is not used for a longer time,
– before any cleaning.
- Only pull at the plug, never at the feed cable.
- Do not stretch the feed cable over sharp edges and do not tighten it too tight.
- Do not use it for carrying and protect it from heat (hotplate, for example).
- Do not tighten the feed cable too tight as otherwise the appliance is likely to tip over.
- This appliance can be used by children aged from 8 years and above and persons with reduced physical, sensory or mental capabilities or lack of experience and knowledge if they have been given supervision or instruction concerning use of the appliance in a safe way and understand the hazards involved.
- Do not leave children unattended to ensure they do not play with the appliance.
- Keep the appliance and its cord out of reach of children less than 8 years.
- Cleaning and user maintenance shall not be made by children unless they are older than 8 and supervised.
- Do not immerse the appliance in water.
- Protect your appliance from humidity (splash water / rain).
- Let the appliance cool off before cleaning or stowing away. Do not use the appliance outdoors.
- This appliance should not be operated due to an external timer or separate remote control system.
- Do not fill with frozen fruit, vegetables, ice cream or hot ingredients
- Always keep the ventilation slots clear. Keep the back and sides clear - at least 10 cm away from other objects, walls or furniture.
- The mains connection line should be regularly inspected for signs of damage. The device must not be used if the connection line is damaged.
- WARNING: Extremely flammable refrigerant.
- Keep away from heat, sparks, open flames, hot surfaces and other ignition sources.
- The refrigerant R290 in the refrigeration circuit of the product is a natural gas with high environmental compatibility, but is flammable. When transporting and installing the product, ensure that none of the components of the cooling circuit are damaged.
-
Only transport and store the appliance in an upright position.
-
Ensure that the appliance is not tilted more than 45^ , otherwise the compressor may be damaged.
- After unpacking, please leave the appliance in its final location for at least two hours before operating it. The coolant in the appliance must be lowered first, otherwise the compressor may be damaged.
- Only operate appliances with flammable refrigerants in well-ventilated rooms.
- Observe all locally applicable regulations for handling gas.
- Persons who carry out maintenance or repair work on the refrigerant circuit should have a valid certificate for handling refrigerants.
- If the appliance is defective and can no longer be repaired, dispose of it properly in accordance with the locally applicable guidelines for appliances containing refrigerants.
Technical Data
| type volt hz watt | Off Status | |||
| 996 220 | -240 50 220 | ≤ 0,5 W | ||
Before the first use

Read these operating instructions carefully before using the appliance for the first time.
- Remove all packaging parts.
- Clean the slush ice machine with a damp cloth.
- Place the slush ice machine on a dry, non-slip and level surface.

ATTENTION
Leave the appliance on the work surface for at least 2 hours.
This enables the refrigerant to settle for safe and optimal operation.
EC Label / Safety information

The appliance meets the requirements of the applicable EC directives.

The appliance is designed for indoor domestic use only.
ATTENTION! Always unplug the appliance when not in use and before cleaning.
text_image
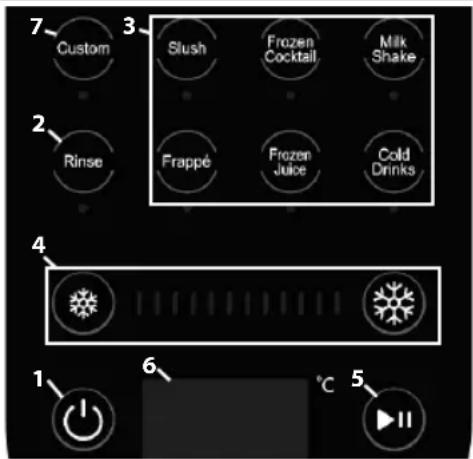
7 Custom 3 Slush Frozen Cocktail Milk Shake 2 Rinse Frappé Frozen Juice Cold Drinks 4 1 6 °C 5 II• 1. Power: Switch the device on and off.
- 2. Rinse (rinse cycle): Cleans the appliance without cooling.
• 3.Programmes: 6 preset programmes for different types of drinks.
• 4. Temperature control: Adjust the consistency of the drink.
• 5. Start/Pause: Start or pause the programme.
• 6. LED-Display: Displays the current temperature.
• 7. Custom: Customisable drink of your choice.
Programmes
- Slush: For drinks such as lemonade, iced tea, fruit juice.
- Frozen Cocktail: For alcoholic drinks such as wine and cocktails.
- Frappè: For frozen coffee specialities.
- Milkshake: For milk and creamy drinks..
- Frozen Juice: For natural fruit juices.
• Cold Drink: For water and other cold drinks.
Application
- Fit the screw by sliding it over the cooling cylinder and turning it until it fits onto the pin.
- Insert the condensation drip tray under the container until it clicks into place.
- Pull the handle upwards and slide the container over the inserted auger and the cooling cylinder up to the handle.
-
Press the handle down while pushing the container to the end.
-
Note: These two steps must be carried out simultaneously.
- Insert the drip tray into the front of the housing.
- Insert the mains plug.
- Open the lid of the container, add the liquid and close the lid again.
- Make sure that your drink contains enough sugar (see section on required sugar content).
- Press the power symbol (1) to switch on.
- Select the desired programme (3).
- The programme is displayed with the factory-set temperature via the bars. This can be set higher or lower as required (4).
- -Start the programme with the Start/Pause button (5).
- The current temperature of the beverage is shown on the LED display (6).
- The appliance beeps and the LED display (6) shows „End“ as soon as the selected temperature is reached.
- Place a cup under the spout on the drip tray.
- Pull the dispensing lever down slowly to dispense. Release the dispensing lever to stop.
• The appliance can run for up to 12 hours. - NOTE: Do NOT switch off the preset programme before the entire frozen beverage has been dispensed.
- If you want to change the programme during the process, press the Start/Pause button (5) and change the programme. Press the button again to start the programme.
- The appliance continues to run to keep the frozen beverage at the ideal temperature and ready for dispensing.
- Depending on the ingredients, quantity and starting temperature, it can take between 15 and 60 minutes to prepare drinks.
- The appliance runs for up to 12 hours, then switches off automatically and emits 10 beeps.
- To create your personalised drink, press the custom button (7). The temperature starts at 8 degrees and can be set as high or low as required.
Presets
| Program | Consistency Level | Made for Examples | |
| Custom | your own drink | any type of beverage | |
| Slush | Slush | Lemonade, smoothies, iced tea, fruit punch | |
| Frozen Cocktail | alcoholic beverages | wine, rum, sour beer, apple cider, lemonade | |
| Frappé | coffee | café mocha, sweetened iced coffee drinks | |
| Milk Shake | milk and cream-based beverages | sweet milk, chocolate milk, oat milk, mixed milkshakes | |
| Program | Consistency Level | Made for Examples | |
| Frozen Juice | sweetened drinks | orange juice, apple juice, freshly squeezed juices | |
| Cold Drink | cold drinks | water, all types of beverages and alcoholic drinks | |
Using the rinsing programme (2)
- This cycle stirs without cooling to rinse the appliance.
- Fill with water up to the maximum fill line of the container (1800ml) and add a little detergent if necessary.
- Press the „RINSE“ button to start the rinsing process. The process takes 10 minutes.
- The programme can be cancelled at any time using the power button (1).
- When finished, dispense the water from the appliance immediately.
- Press the power button to switch off the device.
- NOTE: When rinsing, the liquid flows quickly out of the spout. Use a large container or bowl to collect the water.
- After using the rinse cycle, wash all removable parts by hand or in the dishwasher to completely clean the appliance after each use.
Timer (start time delay)
- Start the appliance and select your desired programme and fill it accordingly.
- Press and hold the right snowflake and the start/pause button (5) simultaneously for 3 seconds to activate timer mode.
- In timer mode with time preset, the start can be delayed by up to 12 hours. The standard increments are 0.5 hours.
- Press the right snowflake to increase the time by 0.5 hours.
- Press the left snowflake to reduce the time by 0.5 hours.
- Press the Start/Pause button (5).
- The set time is now displayed and the timer counts down.
- As soon as the time has counted down, the selected programme starts.
Required sugar content
- Refer to the nutritional labelling of the drink/liquid to ensure that the sugar content complies with the minimum recommended values below. If there is too little sugar, the consistency of a slush drink cannot be achieved.
| Portion size Minimum sugar content | |
| 240 ml 8 g | |
| 355 ml 11 g | |
| 591 ml 18 g | |
- Refer to the nutritional labelling of the drink/liquid to ensure that the sugar content complies with the minimum recommended values below. If there is too little sugar, the consistency of a slush drink cannot be achieved.
- If the sugar content is too low, error message E4 appears on the display (6).
- Add 1-2 tablespoons of flavoured syrup, juice, sugar, date sweetener, coconut blossom sugar, maple syrup, agave syrup, sugar syrup or honey per portion.
- Mix the extra sugar with the base before pouring the mixture into the appliance.
- Reset the appliance by selecting the preset programme again (3).
- Then restart it by pressing the Start/Pause button (5) again.

NOTE: Sugar-free substitutes or artificial sweeteners do not count toward meeting the minimum total sugar content requirements.
- If there is too much sugar, the error message E5 appears. Follow the instructions in the following section.
Guidelines for alcohol
If the alcohol content is too high, a frozen cocktail cannot be made because the freezing point is too low.
| Portion size Maximum alcohol content | |
| 700 ml 110 ml | |
| 1000 ml 170 ml | |
| 1400 ml 230 ml | |
| 1800 ml 290 ml | |
The above table is intended solely as a guide for the use of high-proof alcohol/spirits (from 35 %).
- When using the „Frozen cocktail“ setting, all pre-mixed ingredients (wine, beer, etc.) must have an alcohol content of between 2.8 % and 16 %.
- Warning for high alcohol or sugar content: If the alcohol and sugar content of the mixture is too high, the display (6) shows error message „E5“.
- Add 1/4 cup of water, lemonade, tonic water, seltzer or chilled coffee/tea without additives per serving to dilute the mixture.
- Reset the appliance by selecting the preset programme again (3).
- Then restart it by pressing the Start/Pause button (5) again
Tips
- For optimum results, liquids or mixed ingredients should be cooled before being poured into the appliance.
- For particularly cool results, pre-chill the glasses before serving.
- Change the temperature setting (4) to achieve the ideal consistency of your frozen drink.
- When using the „Milkshake“ or „Frappé“ settings, you should dispense the contents within 30 minutes of the end of the programme to avoid a frothy result.
- For the best dispensing result, fill the appliance to the maximum mark.
Issue/Solution
| Error Issue Solution | ||
| E1 | Container not inserted | Use again:1. With the handle folded up, slide the container over the inserted auger and the cooling cylinder. 2. Press the power button to switch on the appliance - the appli-ance beeps and the preset lights up, indicating |
| E2 | Temperature sensor head / short-circuit error | Contact Cloer customer service |
| E3 | Overheating protection for the motor | 1. Unplug the power cord.2. Allow the device to cool down for approx. 15 minutes.3. Check whether the ambient temperature of the device is too high (the recommended operating temperature is 25 °C). |
| E4 | Too little sugar or engine stop warning | see section „Required sugar content“. |
| E5 | Warning for high alcohol or sugar content | see section „Guidelines for alcohol“. |
| E6 | Error on the control board or power board | Contact Cloer customer service. |
Motor reset
- This appliance has a unique safety system that prevents the motor or drive from being damaged if they are accidentally overloaded. In the event of an overload, the motor is temporarily deactivated. Proceed as follows:
- Disconnect the appliance from the power supply.
- Allow the appliance to cool for about 15 minutes.
- Drain liquids from the container via the tap.
- Remove all parts and accessories. Ensure that no ingredients are blocking the auger
-
Remove all parts and accessories. Ensure that no ingredients are blocking the auger.
-
IMPORTANT: Make sure that the maximum capacity is not exceeded. This is the most common cause of overloading.
- Do not use a solid block of ice or ice cubes.
Cleaning
- Clean the appliance immediately after each use.
- Caution! Do not use abrasive cleaning agents.
- First carry out the rinsing cycle, then dismantle and clean all removable parts.
- Unlock the handle by lifting it and carefully remove the container from the appliance.
- Tilt the container downwards to prevent residual liquid from leaking out the back.
- Remove the auger from the cooling cylinder.
- The cover of the drip tray can be removed for easy cleaning.
- Wipe the cooling cylinder, the area underneath it and the engine base with a damp cloth.
- Wash all parts by hand with hot soapy water or clean in the dishwasher. If necessary, repeat until everything is clean.
- Store the appliance upright and allow to dry completely.
Environmentally friendly disposal
We use environmentally friendly packaging for the transport of our appliances. Please recycle cardboard/paper and plastic packaging appropriately.
ATTENTION!
Electrical appliances should not be disposed of with the household trash.
Electrical appliances contain valuable raw materials. When an appliance is worn-out, please take it to a recognised recycling facility. Consult the local authorities for information on recycling appliances.
Warranty
Cloer electrical appliances are in conformity with the currently required EC-guidelines and safety regulations. If your Cloer electrical appliance has a defect or it does not work properly, contact your specialist dealer.
Registered clients have at their disposal our technical customer service.
Manufacturer warranty
Please register your appliances in the period of 6 months since the purchase in order to benefit from our manufacturer warranty. The published conditions of warranty in the moment of the registration are valid. You will find conditions of warranty and product registration here:

Manufacturer warranty
https://cloer.eu/guarantee
© 2025 by Cloer Germany GmbH&CoKG
https://cloer.com/contact
We reserve the right to make technical changes, we are not liable for any errors or printing errors.