6958 - Food Processor Cloer - Free user manual and instructions
Find the device manual for free 6958 Cloer in PDF.

User questions about 6958 Cloer
0 question about this device. Answer the ones you know or ask your own.
Ask a new question about this device
Download the instructions for your Food Processor in PDF format for free! Find your manual 6958 - Cloer and take your electronic device back in hand. On this page are published all the documents necessary for the use of your device. 6958 by Cloer.
USER MANUAL 6958 Cloer
natural_image
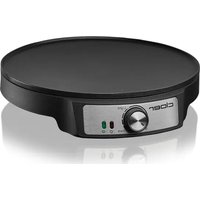
Black and white photo of a cloer blender with clear glass interior and control buttons (no visible text or symbols on body)Standmixer Cloer-6958
Stand mixer Cloer-6958

natural_image
Black and white photo of a glass filled with dark liquid, one stirring a straw, enclosed in a circle (no text or symbols)SPRACHEN - LANGUAGES
DE Bedienungsanleitung S. 5
EN Instruction Manual....S. 9
NL Gebruiksaanwijzing....S. 12
FR Notice d'utilisation.... S. 15
IT Istruzioni sull'uso.... S. 18
ES Instrucciones de uso S. 21
PT Instruções de uso....S. 24
LT Naudojimo instrukcija ....S. 27
LV Lietošanas instrukcija S. 30
DK Brugsanvisning S. 33
NO Bruksanvisning S. 36
SE Bruksanvisning S. 39
FI Használati utasitás S. 42
HU Használati utasitás S. 45
GR Οδηγίες Χρήσης...... S. 48
PL Instrukcja obsługi S. 51
text_image
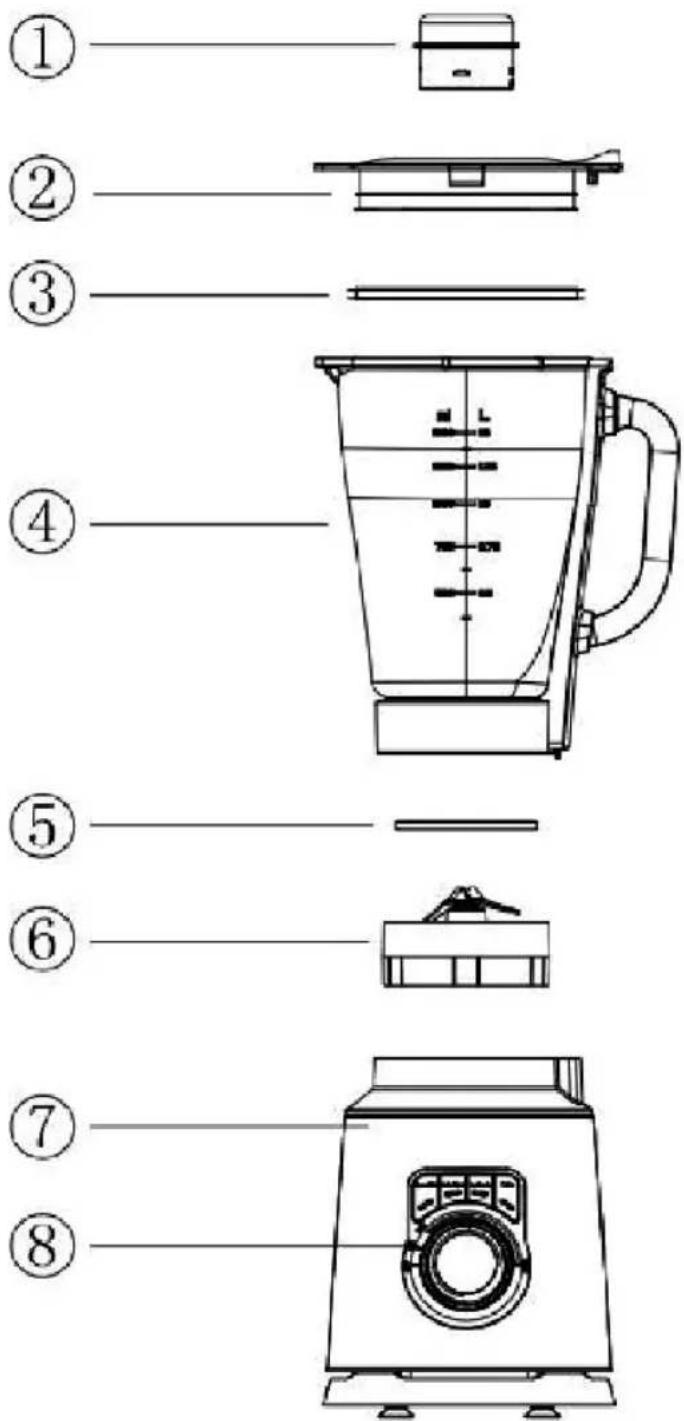
Exploded diagram of a blender with numbered parts for identification| D | 1 Deckelkappe2 Deckel3 Dichtungsring des Deckels4 Glasbehälter5 Dichtungsring der Klingeneinheit6 Klingeneinheit7 Motoreinheit8 Steuerknopf | EN | 1 Lid cap2 Lid3 Lid sealing ring4 Glass container5 Blade unit sealing ring6 Blade unit7 Motor unit8 Control button |
| NL | 1 Dekseldop2 Deksel3 Dekselafdichtring4 Glazen container5 Afdichtring mesunit6 Mesunit7 Motorunit8 Bedieningsknop | FR | 1 Bouchon du couvercle2 Couvercle3 Joint d'étanchéité du couvercle4 Récipient en verre5 Joint d'étanchéité du bloc-lames6 Bloc-lames7 Bloc-moteur8 Bouton de commande |
| IT | 1 Tappo del coperchio2 Coperchio3 Anello di tenuta del coperchio4 Contenitore in vetro5 Anello di tenuta del gruppo lame6 Gruppo lame7 Gruppo motore8 Pulsante di controllo | ES | 1 Tapa2 Tapa3 Anillo de sellado de la tapa4 Recipiente de vidrio5 Anillo de sellado de la unidad de cuchillas6 Unidad de cuchillas7 Unidad del motor8 Botón de control |
| PT | 1 Tampa2 Tampa3 Anel de vedação da tampa4 Recipiente de vidro5 Anel de vedação da unidade de lâminas6 Unidade de lâminas7 Unidade do motor8 Botão de controlo | LT | 1 Dangtelio dangtelis2 Dangtelis3 Dangtelio sandarinimo žiedas4 Stiklinis indas5 Peilio bloko sandarinimo žiedas6 Peilio blokas7 Variklio blokas8 Valdymo mygtukas |
| LV | 1 Väka uzgalis2 Väks3 Väka blivējuma gredzens4 Stikla trauks5 Asmeņu blivējuma gredzens6 Asmeņu bloks7 Motora bloks8 Vadības pogas | DK | 1 Lågkappe2 Låg3 Tætningsring til läget4 Glasbeholder5 Tætningsring til knivenheden6 Knivenhed7 Motorenhed8 Kontrollknap |
| NO | 1 Lokk2 Lokk3 Tetningsring på lokket4 Glassbeholder5 Tetningsring på knivenheten6 Knivenhet7 Motorenhet8 Kontrollknapp | SE | 1 Locket2 Locket3 Lockets tätningsring4 Glasbehållare5 Glasbehållare6 Blad7 Motorenhet8 Kontrollknapp |
| FI | 1 Kansi2 Kansi3 Kannen tiivisterenkaan4 Lasikannu5 Teräyksikön tiivisterenkaan6 Teräyksikkö7 Moottoriyksikkö8 Ohjauspainike | HU | 1 Fedél2 Fedél3 A fedél tömitőgyűrűje4 Üvegedény5 A késegység tömitőgyűrűje6 Késegység7 Motoregység8 Vezérlogomb |
| GR | 1 Kapáki2 Kapáki3 Đактúliος στεγανοποίησης καπακιού4 Γυάλινος περιέκτης5 Δακτύλιος στεγανοποίησης μονάδας λεπίδας6 Mováδα λεπίδας7 Mováδα κινητήρα8 Κουμπί ελέγχου | PL | 1 Pokrywka2 Pokrywka3 Pierścień uszczelniający pokrywki4 Szklany pojemnik5 Pierścień uszczelniający zespołu ostrzy6 Zespół ostrzy7 Zespół silnika8 Przycisk sterujący |
natural_image
Exterior view of a modern office building labeled 'cloer' with no visible text or symbols on the facade.
Cloer Online-Shop
https://cloer.de
Gewährleistung
Basic safety instructions
- The appliance is intended to be used in household only and using in:
– staff kitchen areas in shops, offices and other working environments,
– in farm houses,
– by clients in hotels, motels and other residential type environments,
— on bed and breakfast type environments.
- Have repairs of Cloer electronic appliances carried out only by authorized Cloer specialist dealers or by the Cloer customer service. Improper repairs can involve substantial dangers for the user. Furthermore, this will void your warranty claims.
- Only operate the appliance at household-usual power sockets. Check if the mains voltage stated on the type plate is up to that of your power supply network.
- The device must be connected to a power outlet with protective ground.
- If the supply cord is damaged, it must be replaced by Cloer, its service agent or similarly qualified persons in order to avoid a hazard.
- Pull power plug of the power socket
– in case of a defect,
- if the appliance is not used for a longer time,
– before any cleaning.
- Only pull at the plug, never at the feed cable.
- Do not stretch the feed cable over sharp edges and do not tighten it too tight.
- Do not use it for carrying and protect it from heat (hotplate, for example).
- Do not tighten the feed cable too tight as otherwise the appliance is likely to tip over.
- This appliance can be used by children aged from 8 years and above and persons with reduced physical, sensory or mental capabilities or lack of experience and knowledge if they have been given supervision or instruction concerning use of the appliance in a safe way and understand the hazards involved.
- Do not leave children unattended to ensure they do not play with the appliance.
- Keep the appliance and its cord out of reach of children less than 8 years.
- Cleaning and user maintenance shall not be made by children unless they are older than 8 and supervised.
- Do not immerse the appliance in water.
- Protect your appliance from humidity (splash water / rain).
- Let the appliance cool off before cleaning or stowing away.
- Do not use the appliance outdoors.
- This appliance should not be operated due to an external timer or separate remote control system.
- The mains connection line should be regularly inspected for signs of damage. The device must not be used if the connection line is damaged.
- The device should be operated via a residual current device (RCD) with a trigger current not exceeding 30 mA.
- Caution! The blades are very sharp! Take care when handling the sharp cutting blades, emptying the glass container, and cleaning.
Technical Data
| type volt hz watt | |||
| 695 220 | 240 50/60 12 | 00 | |
- Power consumption in standby mode: ≤0.3 W
Before the first use

Read these operating instructions carefully before using the appliance for the first time.
- Remove all packaging and any stickers, except for the type plate and serial number.
- Place the blender on a dry, non-slip, level surface. For hygiene reasons, clean all parts with warm water and washing-up liquid, except for the motor unit. You can run the blender once in the "Auto Clean" washing program: To do this, fill the glass container to the "1500 ml" mark with water and a drop of dish soap.
- Then rinse the glass container again with clear water.
• Finally, pour out the water.
EC Label / Safety information

The appliance meets the requirements of the applicable EC directives.

The appliance is designed for indoor domestic use only.

ATTENTION! Always unplug the appliance when not in use and before cleaning.

CAUTION! Operation is only possible with the glass container in place and the lid locked.
- Only use the blender for processing normal house - hold quantities. The appliance is not intended for commercial use.
- The power cord and plug should be protected from moisture. Only use the appliance when the plug and power cord are dry.
- Do not immerse the motor unit (lower part of the blender) in liquid.
- The motor unit only runs with the glass container in place and the lid closed.
- Do not put pieces that are too large into the appliance to avoid blocking the blades and causing the appliance to overheat.
- Do not use the appliance without any contents.
- Before removing the glass container, make sure that the blade unit has come to a complete standstill.
Operation
- Place the motor unit on a stable and level work surface.
- Ensure that the sealing ring is correctly positioned on the blade unit.
- Screw the blade unit onto the glass container counterclockwise.
- Then place the glass container on the motor unit.
- Plug the power cord into the power outlet.
- To process solid foods, cut them into smaller pieces beforehand.
- First place the solid or dry ingredients in the glass container, followed by the liquid ingredients.
- Now close the glass container with the lid along the locking tabs.
- Place the lid on the glass container. Make sure that the tabs on the lid are aligned with the spout and handle. If the lid is not correctly positioned and locked in place, the blender will not work.
- Insert the lid cap into the opening provided on the lid and lock it in place.
- Now select the desired program.
| Program Purpose | |
| Smoothie | Preparation of smoothies; the program automatically switches between slow and fast speedsRunning time: approx. 1 minute |
| Auto Clean | Automatic cleaning of the glass container; fill 1/4 of the glass container with warm water and a drop of dishwashing liquid, start the program, then rinse thoroughlyRunning time: approx. 35 seconds |
| Ice Crush | Making “snow ice” / crushed ice.Always add at least 1 capful of liquid to the glass container before adding ice. Without liquid, there is a risk that the glass will break. |
| Pulse | Short bursts of maximum power; the button must be held down throughout the entire process (manual activation required). |
NOTE
ATTENTION! The blender is not an ice crusher. When using the "Ice Crush" program, do not exceed a maximum of 10 ice cubes, otherwise the appliance will automatically stop and the function will be interrupted.

text_image
Bleonable Auto Class Ice Crush Pulse MIN OFF ON XVM- For manual operation, turn the control knob to select the desired speed. The speed increases between min. and max.
- The speed can be changed during operation.
- To add ingredients while blending, remove the lid cap and add the ingredients through the opening.
NOTE
The cap also serves as a measuring cup.
- Use the spatula through this opening to push any residue down the side of the glass container.
- Once the mixing process is complete, wait until the blade unit has come to a complete standstill.
- Then remove the glass container from the motor unit to remove the finished contents.
Cleaning
- It is recommended to clean the removable parts immediately after use.
- Caution! Do not use abrasive cleaning agents.
- The motor unit may only be wiped with a dry cloth—never immerse it in water!
- All other parts (lid, lid cap, glass container, and spa - tula) can be cleaned with warm water and dish soap.
- After cleaning, reattach the seal correctly to the blade unit. Make sure that the seal is not damaged by contact with the blades.
- Allow everything to dry completely before using again.

Caution! Risk of injury! The blades are very sharp! Do not touch the blades during cleaning to avoid injury!

Environmentally friendly disposal
We use environmentally friendly packaging for the transport of our appliances. Please recycle cardboard/ paper and plastic packaging appropriately.

ATTENTION!
Electrical appliances should not be disposed of with the household trash.
Electrical appliances contain valuable raw materials. When an appliance is worn-out, please take it to a recognised recycling facility. Consult the local authorities for information on recycling appliances.
Warranty
Cloer electrical appliances are in conformity with the currently required EC-guidelines and safety regulations. If your Cloer electrical appliance has a defect or it does not work properly, contact your specialist dealer.
Registered clients have at their disposal our technical customer service.
Manufacturer warranty
Please register your appliances in the period of 6 months since the purchase in order to benefit from our manufacturer warranty. The published conditions of warranty in the moment of the registration are valid. You will find conditions of warranty and product registration here:

Manufacturer warranty
https://cloer.eu/guarantee
text_image
Smooth Auto Class Ice Crush Pulse OFF ON 1 2 3 4 5 XVMNL
text_image
Smooth Auto Class Ink Crush Pulse OFF ON MAXtext_image
Bleonable Auto Class Ice Crush Pulse MIN OFF ON XVMtext_image
Bleeds Auto Class Ice Crush Pulse MIN OFF ON XVMtext_image
Bleachable Auto Class Ice Crush Pulse OFF ON 1 MXN XVMtext_image
Smoothable Auto Class Ice Crush Pulse OFF ON X/MNtext_image
Snowproof Auto Class Ice Crush Pulse MIN ON OFF X/Wtext_image
Snowcable Auto Class Ice Growth Pulse ON OFF 1 MXNtext_image
Bleachable Auto Class Ice Crush Pulse MIN ON OFF MAXtext_image
Bleeds Auto Class Ice Crush Pulse ON OFF MAXtext_image
Brocodile Auto Class Ice Crush Pulse MIN ON OFF MAXtext_image
Bleobable Auto Class Ice Crush Pulse MIN OFF ON XMM© 2025 by Cloer Germany GmbH&CoKG
https://cloer.com/contact
We reserve the right to make technical changes, we are not liable for any errors or printing errors.