HT-WB-650 - Agricultural tractor Hillvert - Free user manual and instructions
Find the device manual for free HT-WB-650 Hillvert in PDF.


User questions about HT-WB-650 Hillvert
0 question about this device. Answer the ones you know or ask your own.
Ask a new question about this device
Download the instructions for your Agricultural tractor in PDF format for free! Find your manual HT-WB-650 - Hillvert and take your electronic device back in hand. On this page are published all the documents necessary for the use of your device. HT-WB-650 by Hillvert.
USER MANUAL HT-WB-650 Hillvert
This User Manual has been translated for your convenience using machine translation. Reasonable efforts have been made to provide an accurate translation; however, no automated translation is perfect nor is it intended to replace human translators. The official User Manual is the English version. Any discrepancies or differences created in the translation are not binding and have no legal effect for compliance or enforcement purposes. If any questions arise related to the accuracy of the information contained in the User Manual, please refer to the English version of those contents which is the official version.
Technical data
| Parameter description | Parameter value |
| Product name | Walk-behind Tractor |
| Model | HT-WB-650 |
| Motor | 196 cc, 6.5 HP |
| Transmission | Gearbox 1F + 1R |
| Dimensions [width x depth x height; mm] | 1510 x 625 x 1180 |
| Weight [kg] | 46 |
1. General description
The user manual is designed to assist in the safe and trouble-free use of the device. The product is designed and manufactured in accordance with strict technical guidelines, using state-of-the-art technologies and components. Additionally, it is produced in compliance with the most stringent quality standards.
DO NOT USE THE DEVICE UNLESS YOU HAVE THOROUGHLY READ AND UNDERSTOOD THIS USER MANUAL.
To increase the product life of the device and to ensure trouble-free operation, use it in accordance with this user manual and regularly perform maintenance tasks. The technical data and specifications in this user manual are up to date. The manufacturer reserves the right to make changes associated with quality improvement. The device is designed to reduce noise emission risks to a minimum, taking into account technological progress and noise reduction opportunities.
Legend


The product satisfies the relevant safety standards.
Read instructions before use.
The product must be recycled.
WARNING! or CAUTION! or REMEMBER!
General warning sign.
Use ear protection. Exposure to loud noise may result in hearing loss.
Wear protective goggles.
Wear protective gloves.
Wear foot protection.

Use guard.

ATTENTION! Fire hazard - flammable materials!
ATTENTION! Hot surface, risk of burns!

Do not smoke near the device. The device contains flammable substances.

Do not operate the unit in enclosed spaces.

CAUTION! Harmful fumes.

CAUTION: There is the risk of ejection of objects from the machine!

CAUTION: Observe a safe distance from nearby bystanders.
ACCESSIONS:

Keep your hands and feet away from the rotating blades/ rotating augers/ brushes.

PLEASE NOTE! Drawings in this manual are for illustration purposes only and in some details may differ from the actual product.
2. Usage safety

ATTENTION! Read all safety warnings and all instructions. Failure to follow the warnings and instructions may result in serious injury or even death.
The terms "device" or "product" are used in the warnings and instructions to refer to: Walk-behind Tractor
2.1. Safety in the workplace
a) Make sure the workplace is clean and well lit. A messy or poorly lit workplace may lead to accidents. Try to think ahead, observe what is going on and use common sense when working with the device.
b) Do not use the device in a potentially explosive environment, for example in the presence of flammable liquids, gases or dust.
c) If you are unsure about whether the product is operating correctly or if you find damage, please contact the manufacturer's service centre.
d) Only the manufacturer's service point may repair the device. Do not attempt any repairs independently!
e) Children or unauthorised persons are forbidden to enter a work station. (A distraction may result in loss of control over the device).
f) Please keep this manual available for future reference. If this device is passed on to a third party, the manual must be passed on with it.
g) Keep packaging elements and small assembly parts in a place not available to children.
h) Keep the device away from children and animals.
i) If this device is used together with another equipment, the remaining instructions for use shall also be followed.

Remember! When using the device, protect children and other bystanders.
2.2. Personal safety
a) Do not use the device when tired, ill or under the influence of alcohol, narcotics or medication which can significantly impair the ability to operate the device.
b) The device is not designed to be handled by persons (including children) with limited mental and sensory functions or persons lacking relevant experience and/or knowledge unless they are supervised by a person responsible for their safety or they have received instruction on how to operate the device.
c) The device can be handled only by physically fit persons who are capable of handling it, properly trained, familiar with this manual and trained within the scope of occupational health and safety.
d) When working with the device, use common sense and stay alert. Temporary loss of concentration while using the device may lead to serious injuries.
e) Use personal protective equipment as required for working with the device, specified in section 1 (Legend).
The use of correct and approved personal protective equipment reduces the risk of injury.
f) Do not overestimate your abilities. When using the device, keep your balance and remain stable at all times. This will ensure better control over the device in unexpected situations.
g) Do not wear loose clothing or jewellery. Keep hair, clothes and gloves away from moving parts. Loose clothing, jewellery or long hair may get caught in moving parts.
h) The device is not a toy. Children must be supervised to ensure that they do not play with the device.
i) Do not put your hands or other items inside the device while it is in use!
2.3. Safe use of the device and accessories
a) Do not overload the device. Use the appropriate tools for the given task. A correctly-selected device will perform the task for which it was designed better and in a safer manner.
b) When not in use, store in a safe place, away from children and people not familiar with the device who have not read the user manual. The device may pose a hazard in the hands of inexperienced users.
c) Keep the device in perfect technical condition. Before each use check for general damage and especially check for cracked parts or elements and for any other conditions which may impact the safe operation of the device. If damage is discovered, hand over the device for repair before use.
d) Keep the device out of the reach of children.
e) Device repair or maintenance should be carried out by qualified persons, only using original spare parts. This will ensure safe use.
f) To ensure the operational integrity of the device, do not remove factory-fitted guards and do not loosen any screws.
g) When transporting and handling the device between the warehouse and the destination, observe the occupational health and safety principles for manual transport operations which apply in the country where the device will be used.
h) Avoid situations where the device stops working during use due to excessive loading. This may result in overheating of the drive elements and damage to the device.
i) Do not touch articulated parts or accessories unless the device has been disconnected turned off.
j) Do not leave this appliance unattended while it is in use.
k) Clean the device regularly to prevent stubborn grime from accumulating.
I) The device is not a toy. Cleaning and maintenance may not be carried out by children without supervision by an adult person.
m) It is forbidden to interfere with the structure of the device in order to change its parameters or construction.
n) Keep the device away from sources of fire and heat.
o) Do not cover the ventilation openings!
p) Oil leaking from the machine should be reported to the appropriate services or comply with legal requirements applicable in the area of use.
q) Danger! Danger to health and the risk of explosion of the internal combustion engine
r) Poisonous carbon monoxide is present in the engine exhaust. Remaining in a carbon monoxide environment may lead to losing consciousness or even death. Do not run the engine in a closed space.
s) Protect the engine from heat, sparks and flame. Do not smoke near the machine!
t) Petrol is flammable and explosive. Before refuelling the engine should be turned off and cooled down.
u) Warning! Risk of engine damage due to wrong fuel.
v) Remember to use the right proportions when mixing gasoline and engine oil.
w) After refuelling, tighten the fuel filler cap securely and move at least 3 meters away from the fuel filling area before starting the engine.
x) Make sure that the engine is turned off before transporting the device or subjecting it to maintenance.
y) Push the device slowly, do not accelerate, turn or brake sharply. Please note that the device may tilt or jump on uneven surfaces.
z) Before starting the work, check the soil in which the device will operate and remove hard and sharp objects so as not to damage the product.
aa) Use extreme caution when working near buildings. Special attention should be paid to armaments, cables and hoses.
bb) If the device starts to make unusual noises, vibrate or hit a large / hard object, stop the engine, disconnect the spark plug and carefully check the machine for damage! Never start the machine with visible damage.
cc) Always follow behind the machine, do not stand in front of the machine when it is in operation!
dd) Use tools to clean a blocked device. Never use your hands to do this!
ee) Do not use the machine in a confined space where there is a risk of crushing the operator between the machine and another object or wall.
ff) Do not use the device in bad weather or on wet grass.

ATTENTION! Despite the safe design of the device and its protective features, and despite the use of additional elements protecting the operator, there is still a slight risk of accident or injury when using the device. Stay alert and use common sense when using the device.
3. Use guidelines
The machine is an agricultural tool to help cultivate fields, allotments, gardens, forest nurseries, etc. When fitted with the appropriate accessories, the machine can be used for seedbed preparation, lawn mowing, etc. The product is intended for home use only.
The user is liable for any damage resulting from unintended use of the device.
3.1. Device description
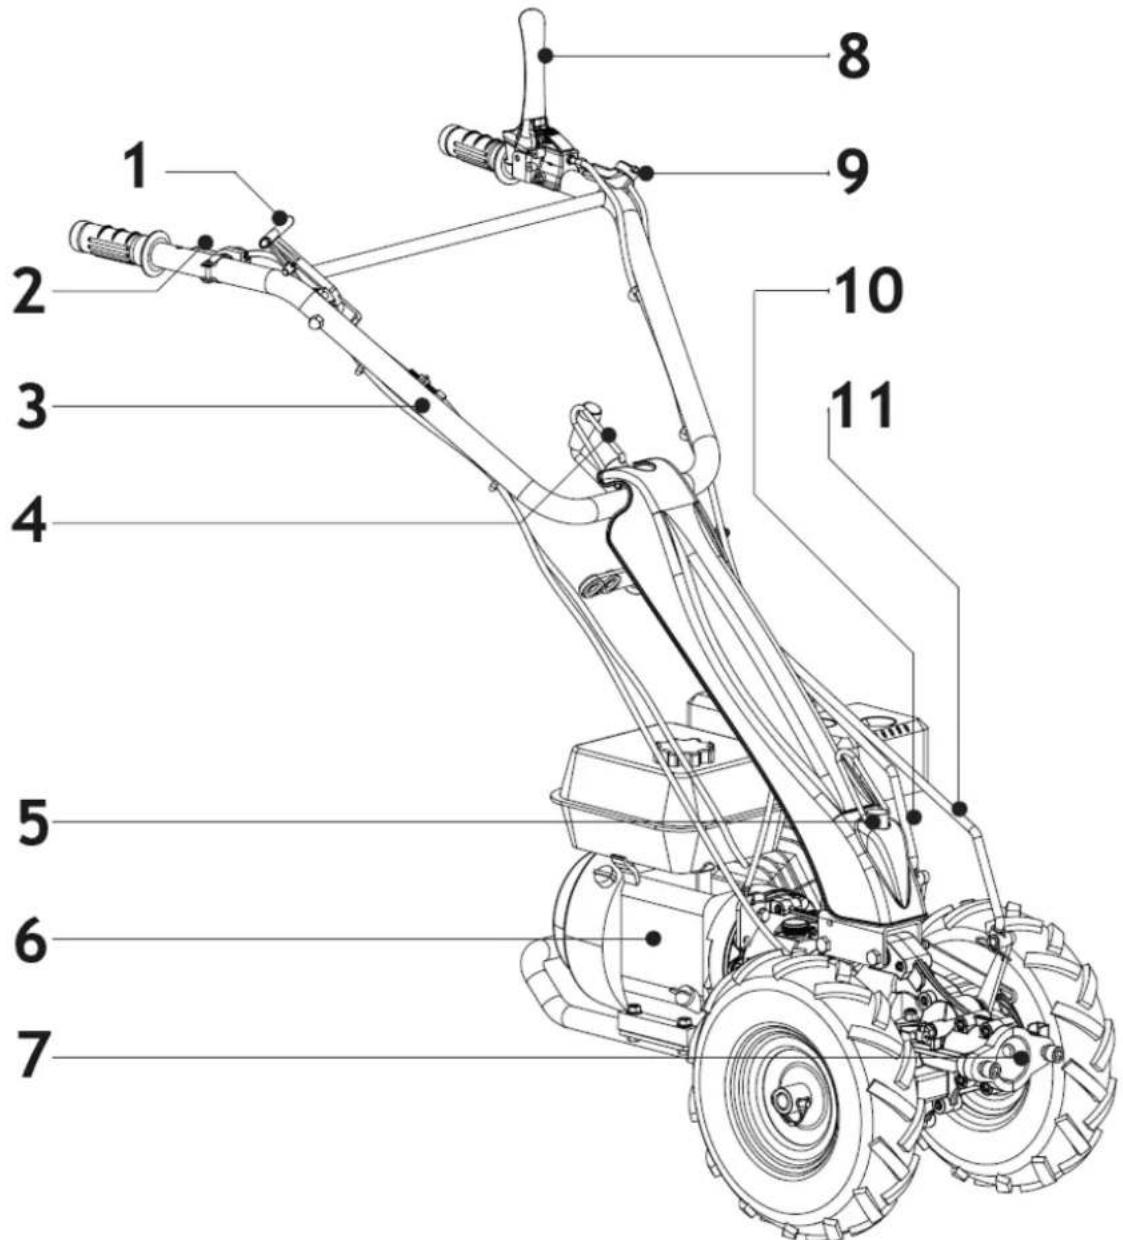
1-Wheel Clutch Control Lever
2-Throttle Lever
3- Handlebar
4 - Lock Nut for Height Adjustment
5 - Lock Bolt for Side Adjustment
6-Gearbox
7-Quick Coupler
8- Clutch Control Lever
9 - Engine Stop Switch
10-Gear Shift Rod
11-PTO Rod
Clutch Control Lever
It permits to engage and disengage clutch, PTO, reversing gear, and lock-unlock the differential.
Engine stop lever
It cuts out power to the machine at the end of working or when a problem occurs. If, for any reason, the handlebars are released from the operator's hands, it will automatically adopt its original position and thus stop the engine.
Gear Shift Lever
It is used to select forward and reverse direction as shown on the selector.
Operation Handle Lock Nut (Lock Nut for Height Adjustment)
To regulate the height of the handlebar, loosen lock nut, adjust handlebar to the desired position, and then fasten the lock nut.
Cover Lock Bolt (Lock Bolt for Side Adjustment)
Loosen lock pin, adjust handlebar to the desired position, and then secure the lock bolt.
PTO Rod
It is a front locking 3-teeth implement. It rotates clockwise, independently from the gear, and depending on the engine speed.
Quick Coupler
It is used to change the optional implements on the carrier rapidly.
Throttle lever
The throttle lever controls engine speed. Moving the throttle lever in the directions shown makes the engine run faster or slower.
Wheel Clutch Control Lever
It is used to STOP the wheel.
Handlebar
Driving position is comfortable with the controls positioned ergonomically. The handlebars are adjustable in height, sideways and are reversible by 180o. Special silent-blocks absorb the vibrations produced by the machine when in operation.
3.2. Assembling the device
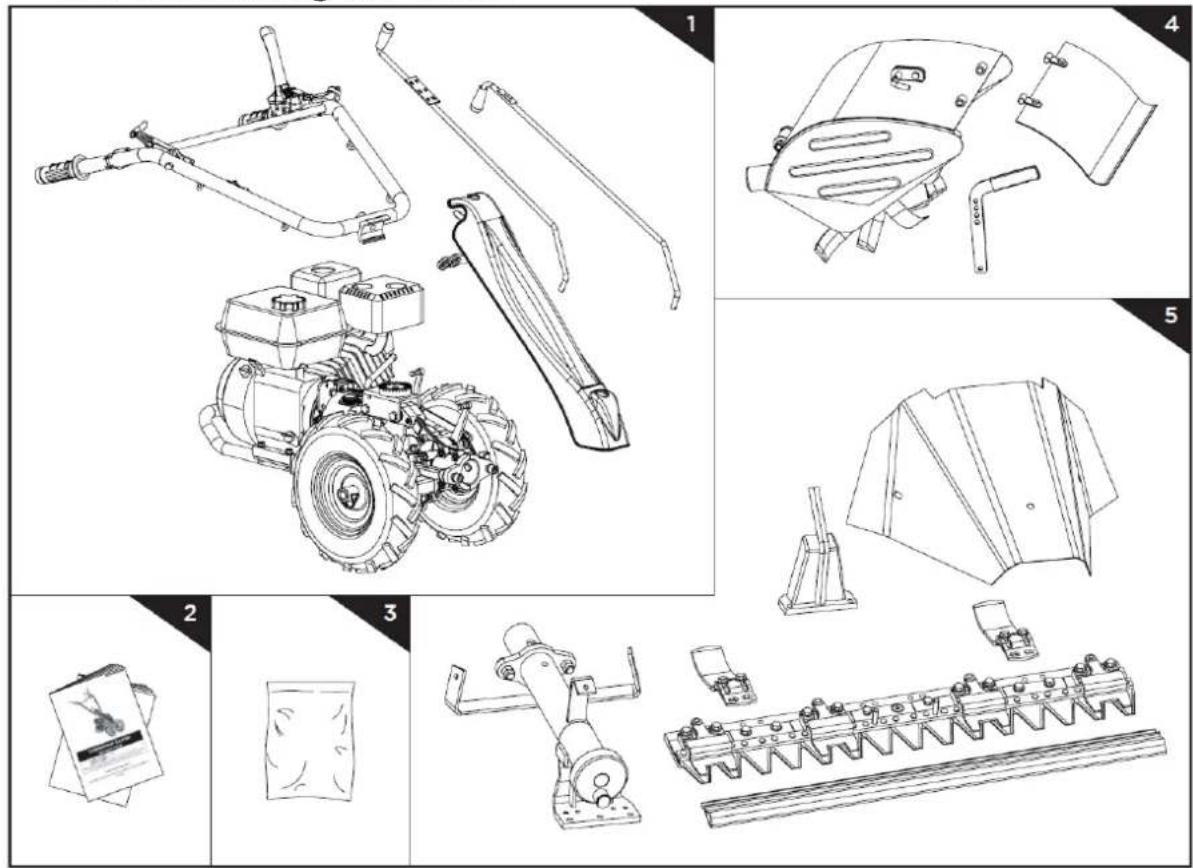
1 - Implement Carrier with Engine
2-Operator's Manual & Engine Manual
3-Hardware Bag, including:
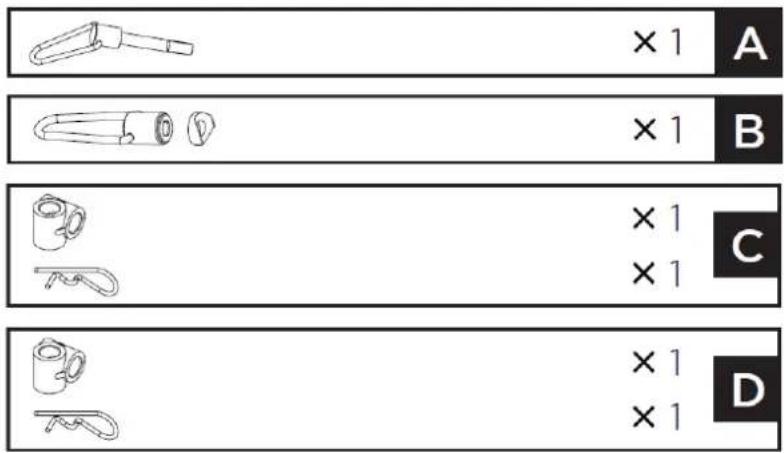
OPTIONAL:
| M8×30 | ×1 | E |
| ×2 | F | |
| M8×25 | ×2 | G |
| M8×25 | ×4 | H |
| M8×20 | ×2 | I |
| M8×16 | ×3 | J |
| M8×20 | ×4 | K |
4 - Tiller Implement (Optional)
5 - Sickle Bar Mower Implement (Optional)
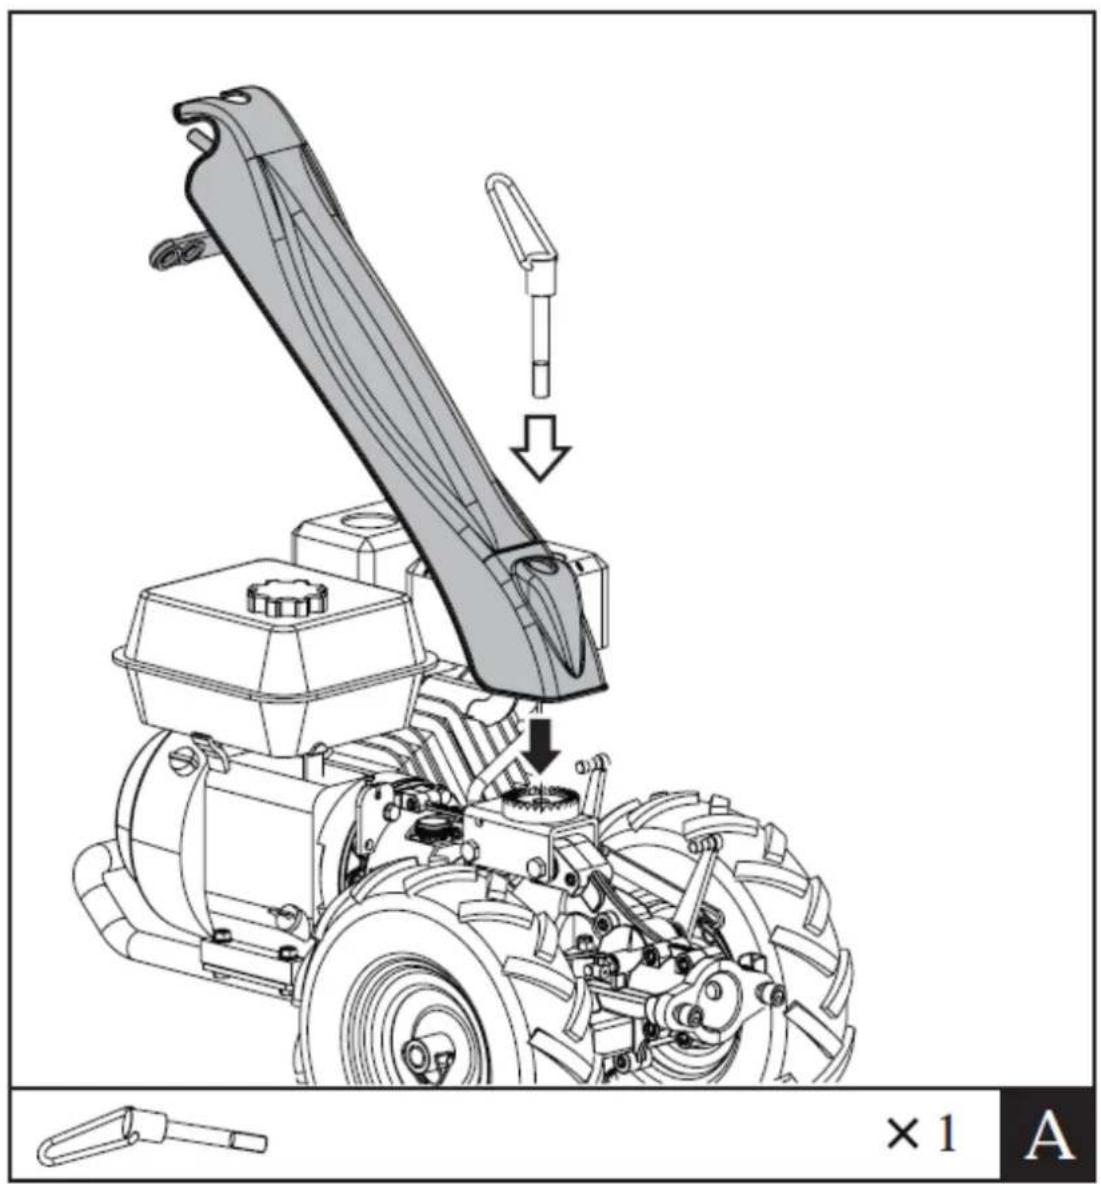
- Secure the cover on the main body with the lock bolt.
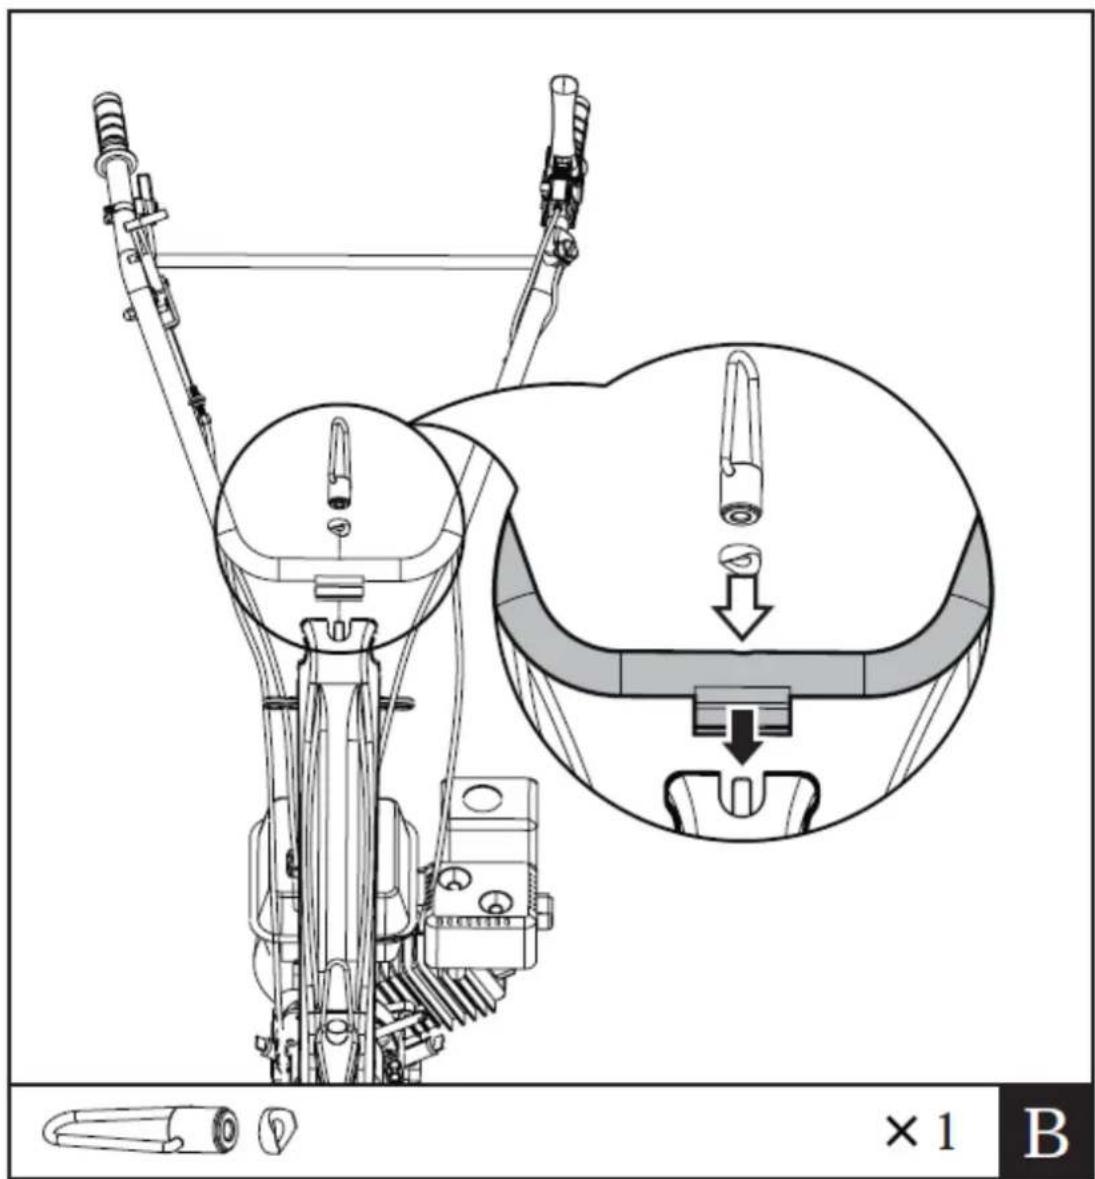
- Mount the operation handle on the screw provided by the main body, and then fasten it with the spacer and lock nut.
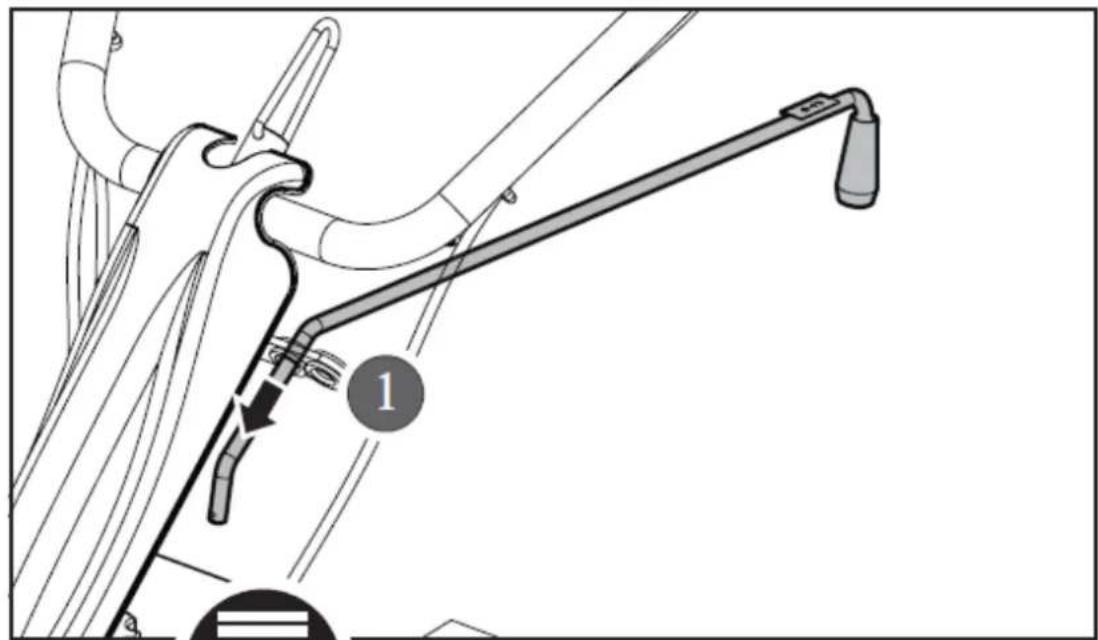
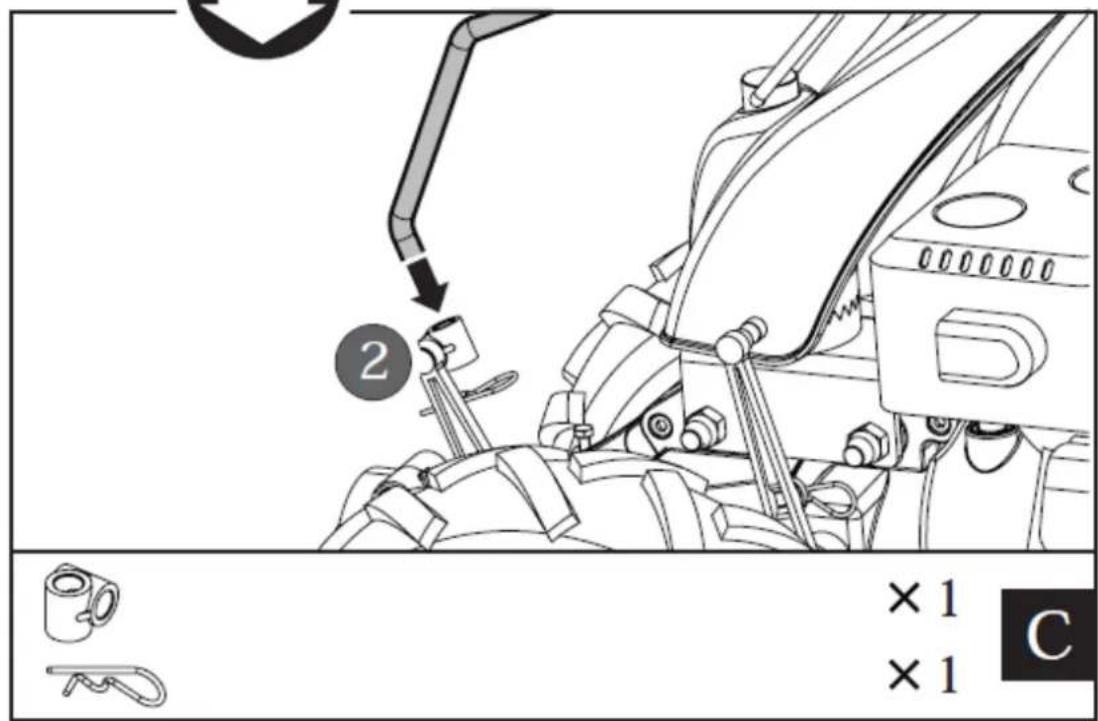
- Insert the gear shift rod and PTO rod into the support holes provided by the main body as shown.
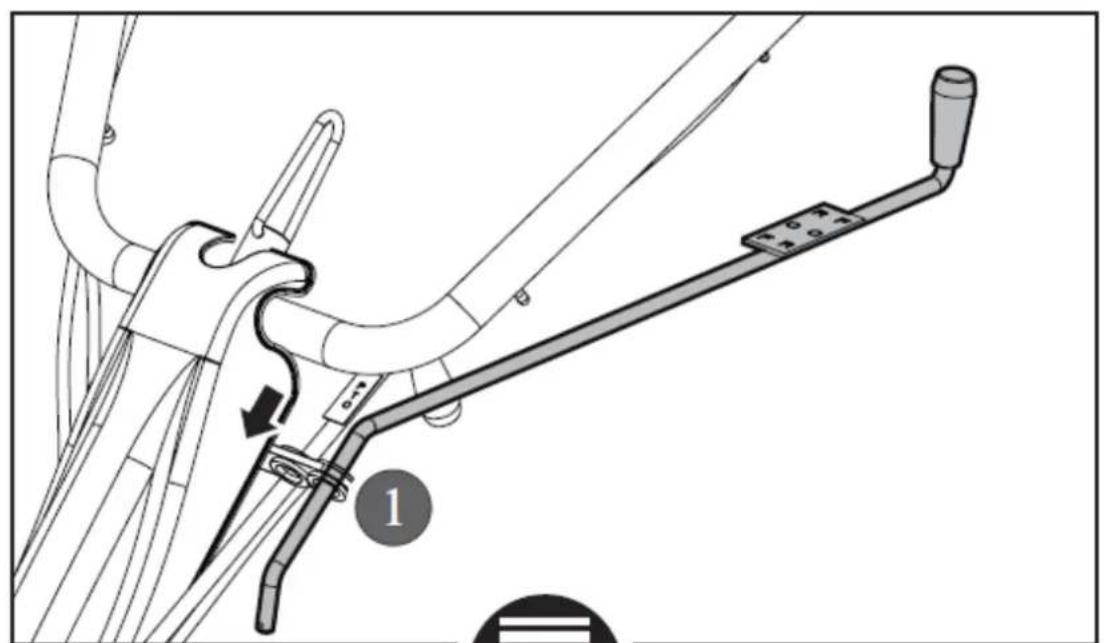
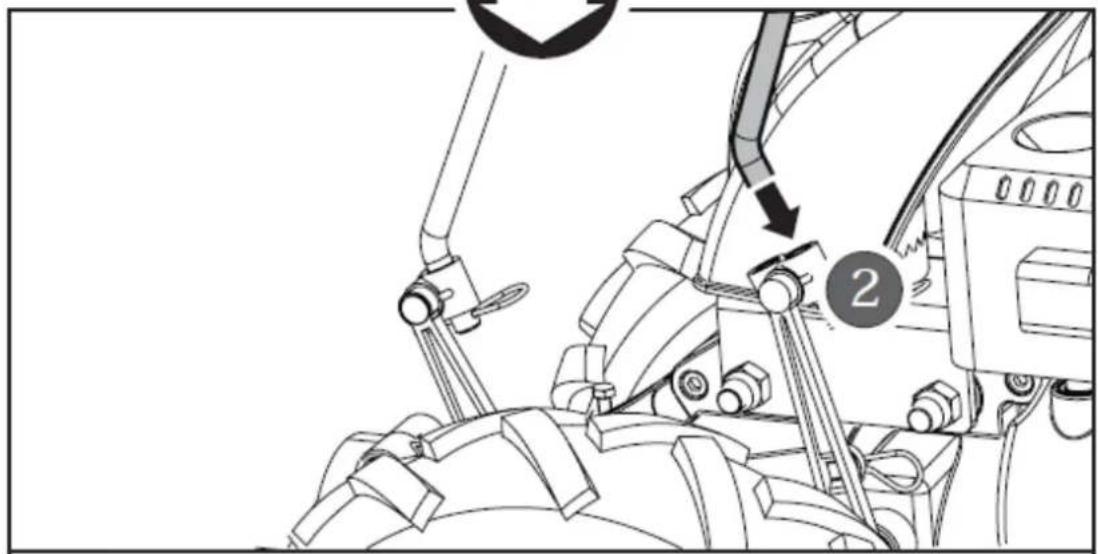

4. Mount the gear shift rod and PTO rod on their shift bracket separately with the plastic connectors and then fix them with the clips.
Sickle Bar HT-WBA-100 Assembly
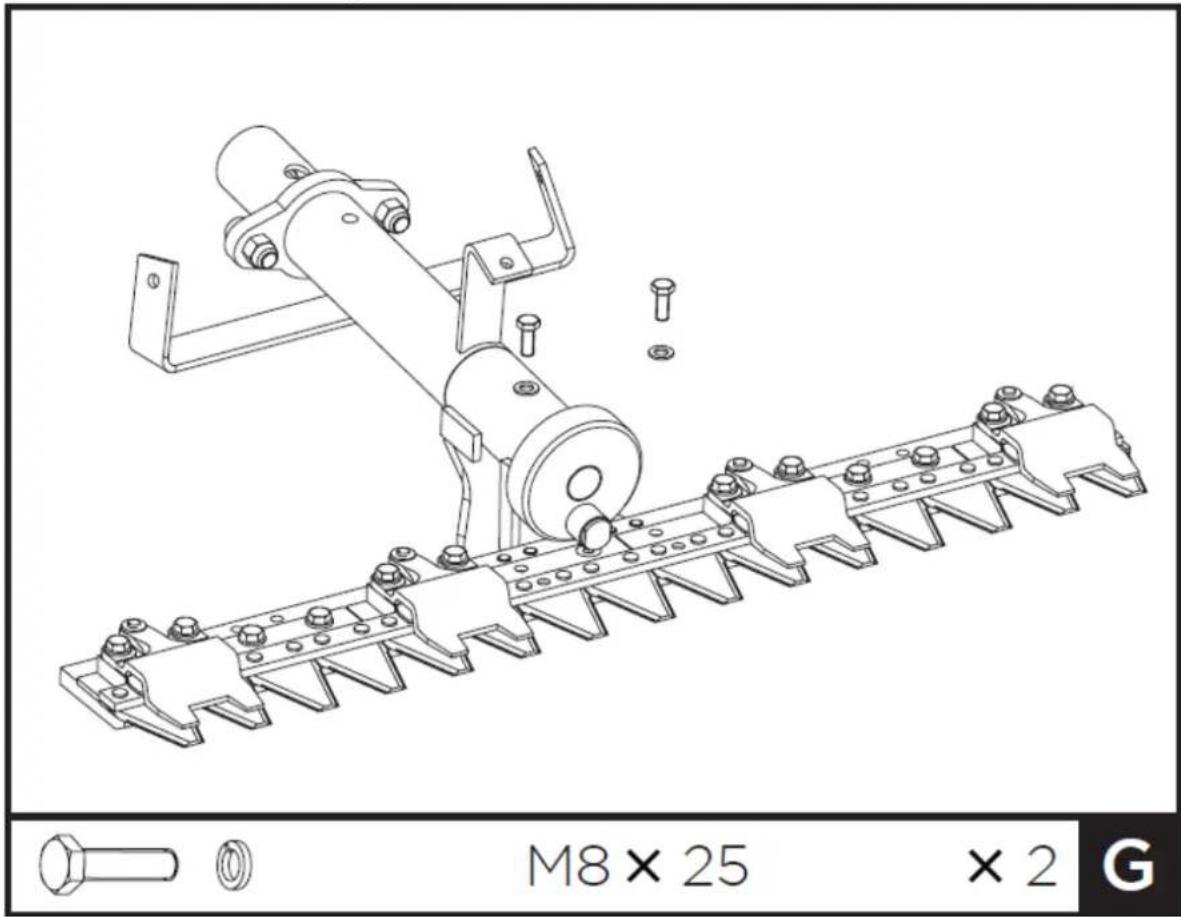
- Put the sickle bar on the transmission assay as shown. Align holes in the sickle bar and the transmission assay, place spring washers, followed by M8x25 screws, then tighten down.
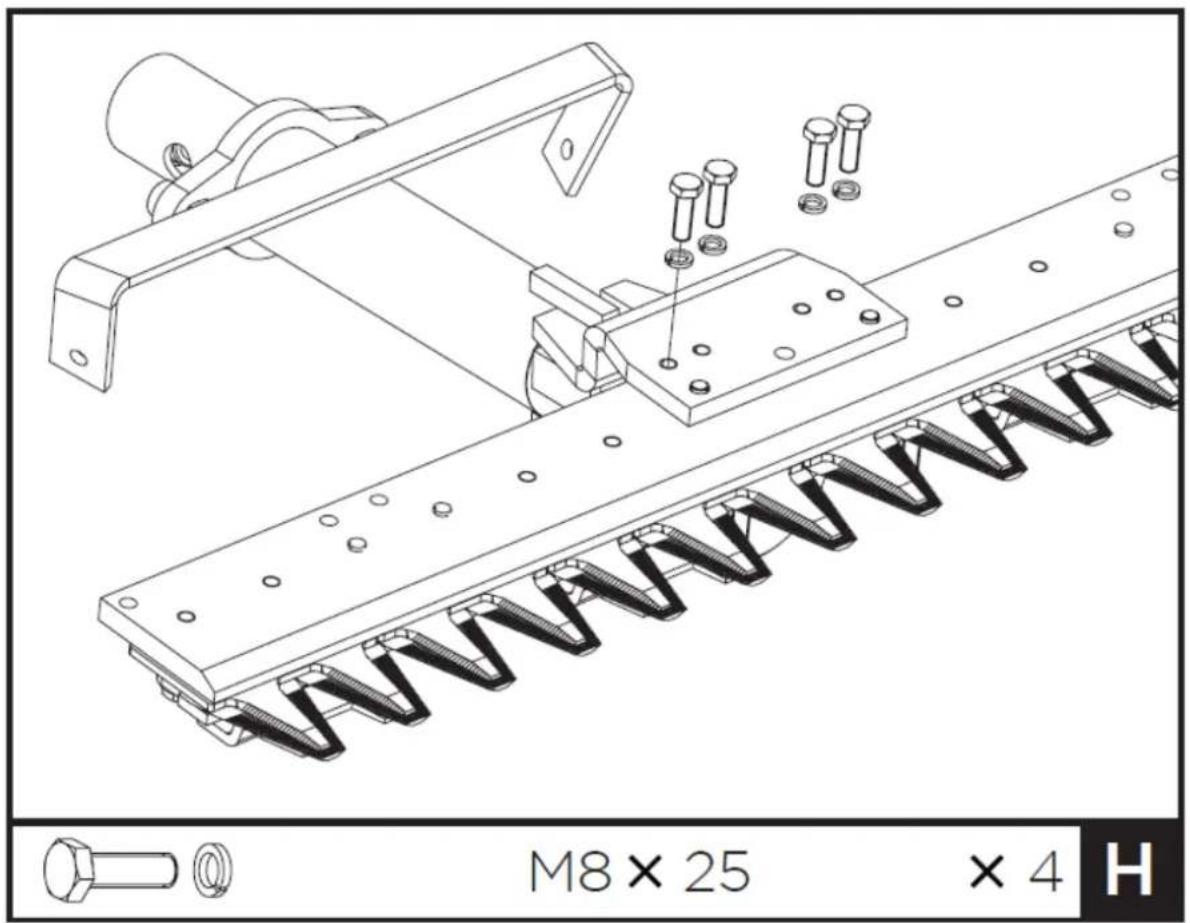
- Turn the assy to its back side as shown. Secure it with four M8x25 screws, each with a spring washer.
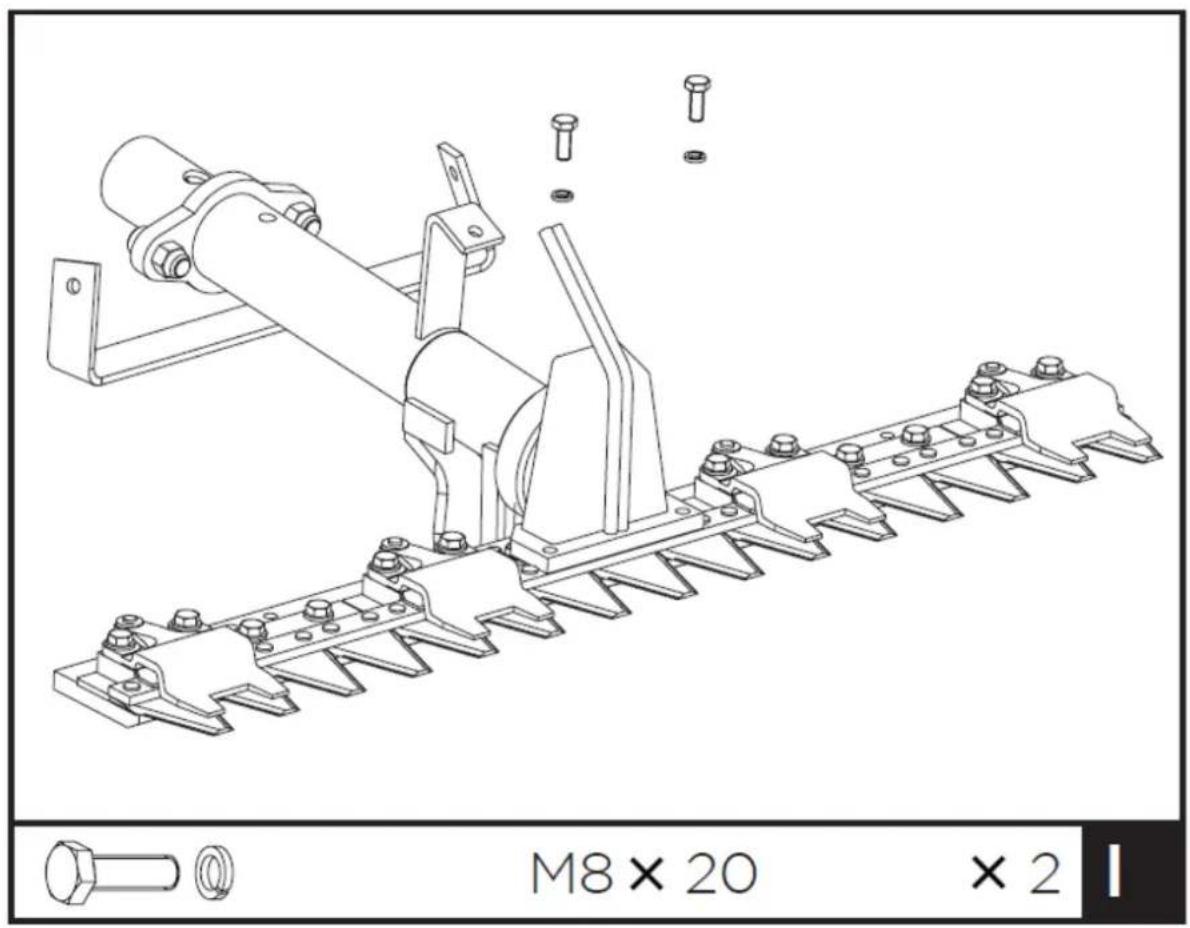
- Mount the fork on the sickle bar as shown.
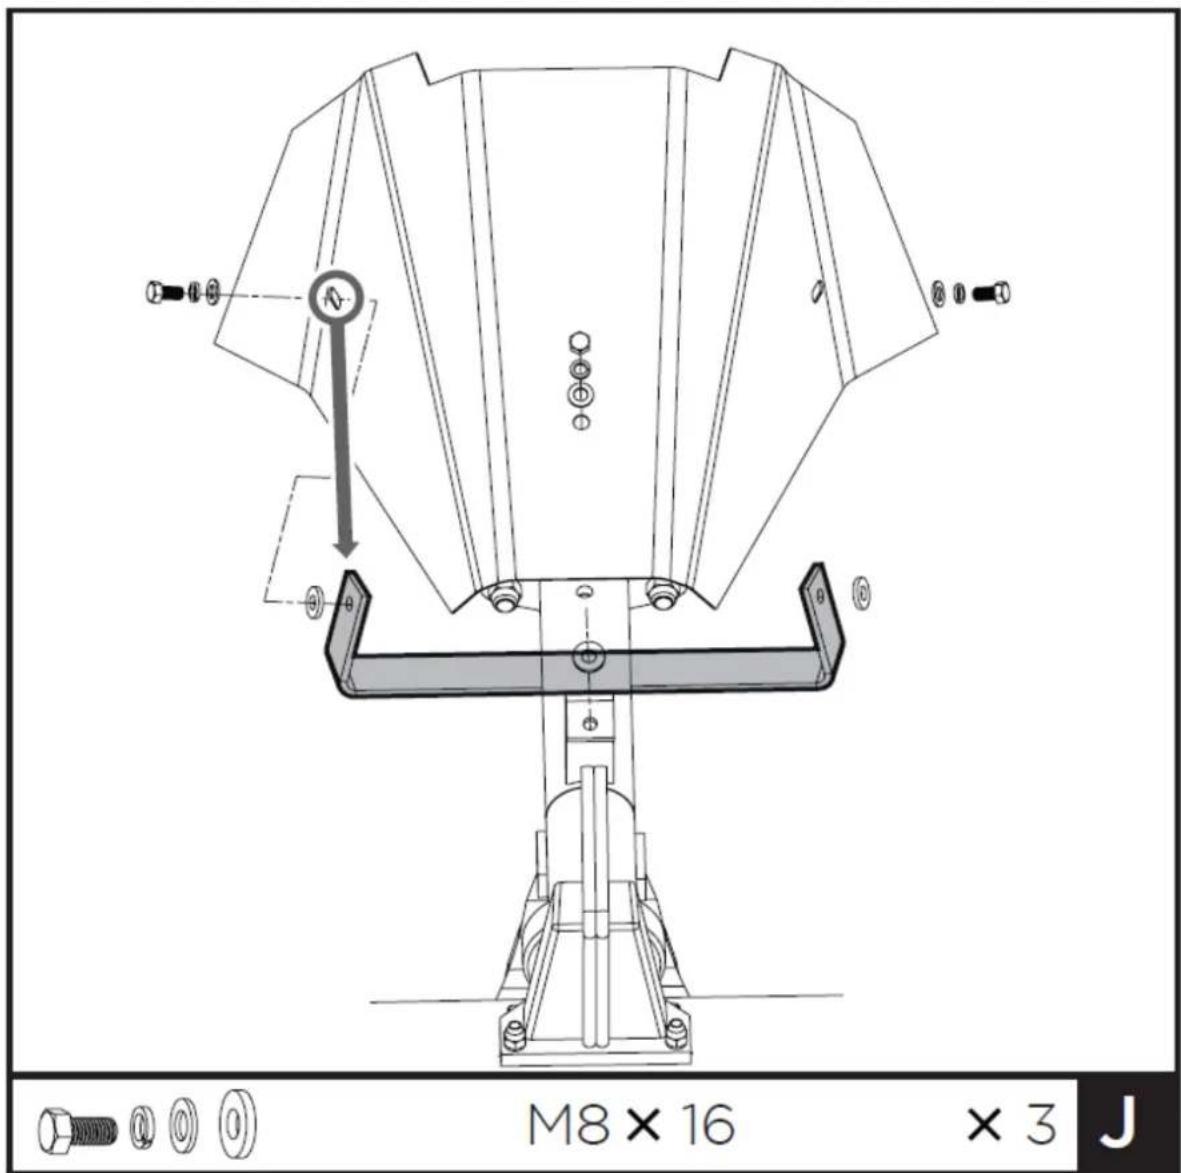
4. Attach the shield to the transmission assay as shown.
Slide three M8x16 screws into each mounting holes from out side, each with a spring and flat washers, then put the leather washers under the shield again the mounting plate on the transmission assy. Tighten down.
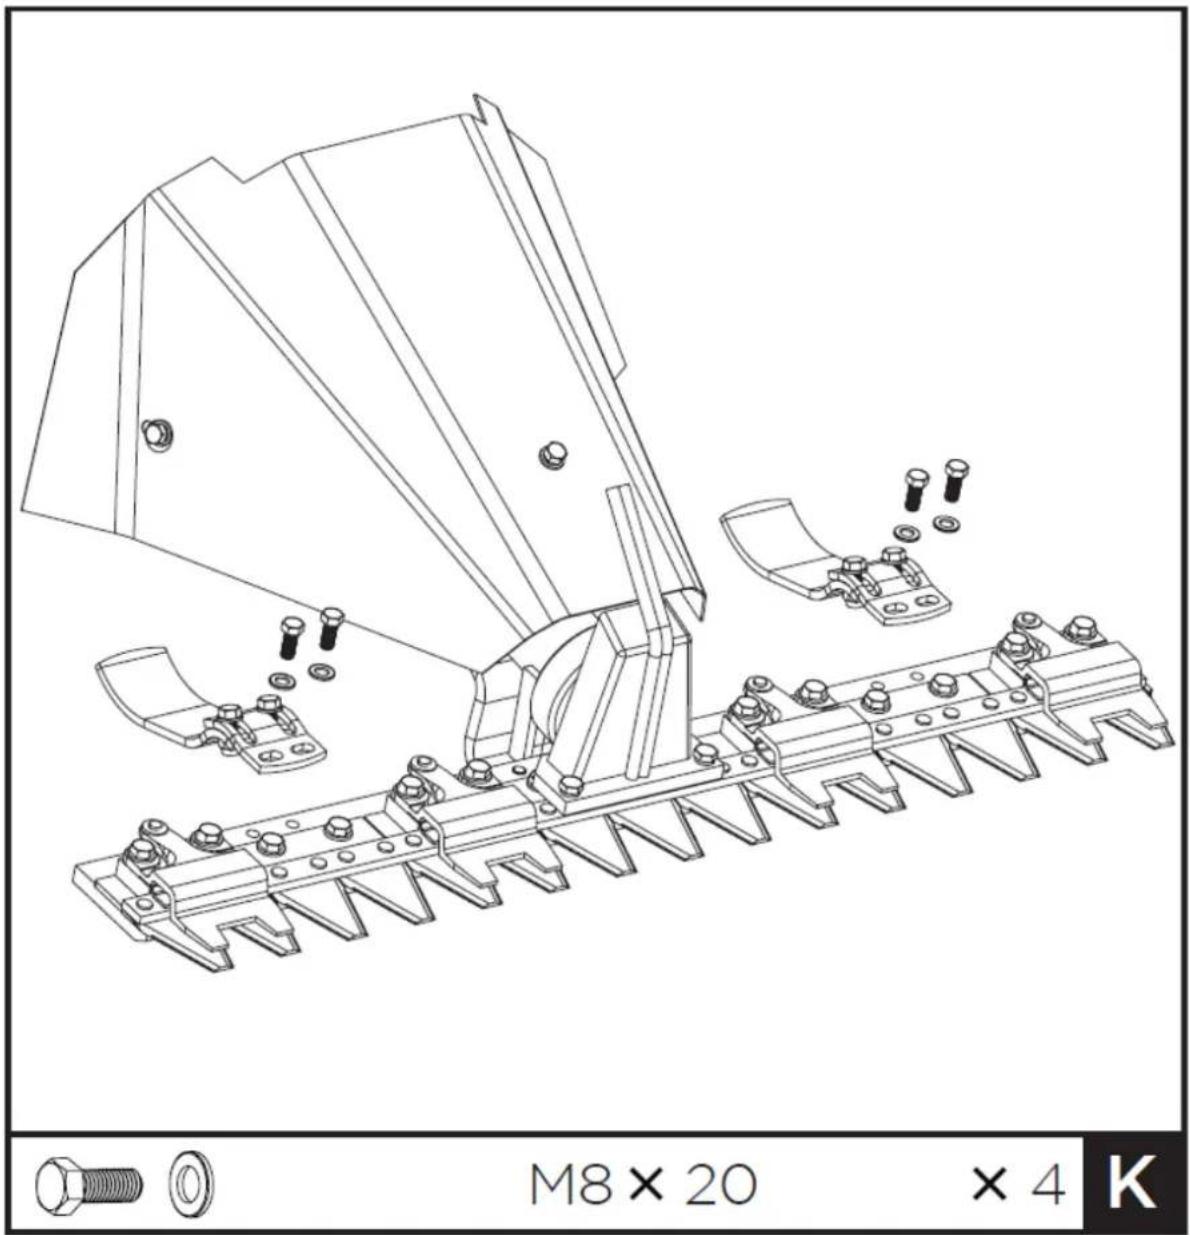
- Match the blade holder and sickle bar hole to hole, and fix with M8x20 bolts and washers.
Implement assembly.
The implement carrier has been designed to work with the sickle bar or rotary hoe.
Operator safety and comfort are of prime importance with inbuilt features such as variable tire digging widths, lightweight construction, adjustable handlebars, a wide choice of work and travel speed and safety devices designed to help prevent accidents while in operation.
Quick coupler
The implement carrier is equipped with a quick coupler to change the implements on the machine rapidly. Before mounting the implement, make sure the PTO lever is in idle position. When connecting the implement, with engine at standstill and machine placed horizontally, it is necessary to pull the pin upwards, engage the implement in the connection sleeve and bring the pin back to its original position. Make sure it has gone into the locking position and the nuts which fasten the implement to the machine are well tightened.
To avoid implements seizing, it is necessary to grease the quick coupler daily.
While to mount the sickle bar, it is necessary to turn the handlebar of 180^ . Before this, release the speed shift lever and PTO lever from their supports, pull the handlebar steering column and turn it 180o. Insert it again after choosing the ideal position of the handlebar. After turning the handlebar, levers must be inserted again into the supports. When the handlebar is turned, the machine will go forward in reverse speed and back in 1st speed.
Engine oil
OIL HAS BEEN DRAINED FOR SHIPPING. Failure to fill engine sump with oil before starting engine will result in permanent damage and void engine warranty.
3.3. Device use
Adding fuel
Fill the fuel tank as instructed in the separate Engine Manual packed with the machine.
Starting the machine
- Ensure that PTO lever is disengaged and speed shift lever is in idle position.
- Set the throttle lever on the handlebar at halfway position. If the engine is cold, engage the choke on the carburettor.
- Set engine for starting as described in the engine manual.
- Pull the starter grip lightly until you feel resistance, then pull briskly, return the starter grip gently. The starter grip must always be grasped with one hand only, to prevent the engine "kicking back". When the engine has started, allow it to run idle for some minutes to allow oil to lubricate all moving parts.
- Engage and locate the speed shift lever to the desired position.
- Connect PTO, Increase the speed as appropriate and squeeze the engine stop lever to start work.
Stopping the machine
Decelerate, disengage the PTO and speed shift levers to neutral position and fully release the engine stop lever.
Tilling depth adjustment
Lower the depth regulator rod will slow the tiller and make it till deeper. Raising the depth regulator rod will allow it to move faster and till shallower.
To adjust the tilling depth
- Remove the fixing screw.
- Raise or lower the depth regulator rod to the desired position.
- Replace the fixing screw.
Sickle bar height adjustment
When working on bad terrain, it is necessary to adjust the mower's cut height in the following way.
- Loosen nut.
- Bring the skid pad back to wanted position.
- Lock the nut again.
Mower blade holder adjustment
- Loosen fixing screw.
- Turn the adjustment screw.
- Tighten the fixing screw again.
- NOTE: excessive friction between the blade holder and the blade must be avoided in order to ensure good function.
Mower blade replacement
- Loosen screw.
-
Remove blade catch.
-
Slip off the blade.
To re-mount the blade, carry out the same operations but in reverse order, and ensure that blades are fitted in the same way.
3.4. Cleaning and maintenance
A proper maintenance and lubrication will help the machine in a perfect working condition.
- Turn off engine and disengage all command levers. Engine must be cool.
- Inspect the general condition of the unit Check for loose screws, misalignment or binding of moving parts, cracked or broken parts, and any other condition that may affect its safe operation.
- Remove all debris from the unit with a soft brush, vacuum, or compressed air. Then use a premium quality lightweight machine oil to lubricate all moving parts.
- Engine: you should check the oil every 4 hours of work and replace it every 50 hours of work. Always use good quality oil. For the intervals between maintenance follow the instructions give in the engine's manual.
- Gearbox: check oil level every 50 hours of working removing the plug and check that, with horizontal machine, oil reaches the two notches. If necessary, add the oil.
- Gearbox oil replacement: oil must be replaced when hot by unscrewing filler cap and plug equipped with an oil dipstick. When oil is completely drained, replace filler cap and fill up with new oil.
- Sickle bar: grease the blade movement block using the greaser every 4 working hours. Keep the blade correctly adjusted by regulating the blade holders. They must not be so tight that they lock the blade. Always keep blades sharp. After every working day, clean the sickle bar and remove any remaining piece of grass or mud. Check occasionally that all screws are tightened. Each time the bar is transferred or exposed to the public or left in a deposit, it is compulsory to apply the front protection.
- Tiller: clean the tiller underside of the tine shield after each use. The dirt washes off tines easier if rinsed off immediately instead of after it dries. Always towel dry the tiller afterwards and apply a light coat of oil to prevent rusting or water damage.
Never use a "pressure washer" to clean your unit. Water can penetrate tight areas of the unit and cause damage to spindles, gears, bearings, or the engine. The use of pressure washers will result in shortened life and reduce serviceability.
If the implement carrier will not be used for a period longer than 30 days, follow the steps below to prepare your unit for storage.
- Drain the fuel tank completely. Stored fuel containing ethanol or MTBE can start to go stale in 30 days. Stale fuel has high gum content and can clog the carburettor and restrict fuel flow.
- Start the engine and allow it to run until it stops. This ensures no fuel is left in the carburettor. Run the engine until it stops. This helps prevent deposits from forming inside the carburettor and possible engine damage.
- Lubricate the cylinder introducing few drops of the same kind of oil used for the engine through the spark plug hole and letting the engine tick over for a short time.
- Use clean cloths to clean off the outside of the machine and to keep the air vents free of obstructions.
Do not use strong detergents or petroleum based cleaners when cleaning plastic parts. Chemicals can damage plastics.
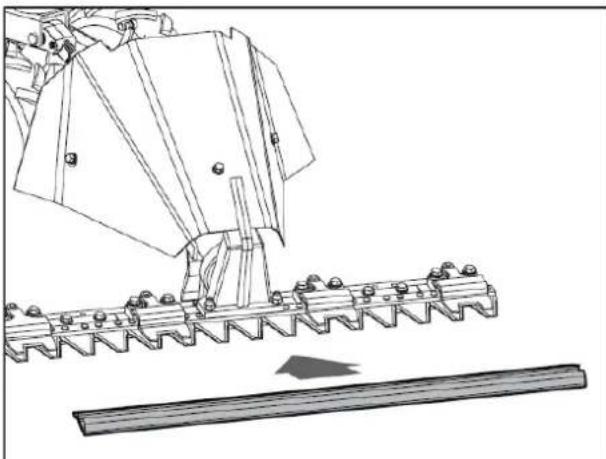
- Protect the teeth of the sickle bar with the front protection and ensure that the blade does not escape from the side of the bar.
- Store your unit in upright position in a clean, dry building that has good ventilation.
Do not store the unit with fuel in a non-ventilated area where fuel fumes may reach flame, sparks, pilot lights or any ignition sources.
DISPOSING OF USED DEVICES:
Do not dispose of this device in municipal waste systems. Hand it over to an electric and electrical device recycling and collection point. Check the symbol on the product, instruction manual and packaging. The plastics used to construct the device can be recycled in accordance with their markings. By choosing to recycle you are making a significant contribution to the protection of our environment.
Contact local authorities for information on your local recycling facility.
TROUBLESHOOTING:
The following is a list of small problems which can occur when using the implement carrier and which can be solved by the user.
- Engine does not start.
Make the following checks in the order given:
The fuel tank should be at least half-full.
The fuel tap should be open.
The choke should be set on OPEN (when engine is cold).
Fuel must reach the carburettor.
The mesh filter at the entrance to the carburettor input must be clean.
The carburettor jets must be clean. To check, screw them out and if they are dirty, clean with a blast of air.
- Machine with tiller. The machine jumps forward on hard ground.
Adjust the depth regulator rod by moving it to the last hole.
- Machine with sickle cutter bar, the blade coupling breaks frequently.
Make sure the blade holders are not too tight.
Check if the ground is stony. If so, use the cutting height adjustment to raise the cutter bar and prevent small stones wedging between teeth and blades.
- Cut grass should fall in front instead of being ejected at the sides.
If the grass is very thick and there are discharge problems, the cut grass must be separated from the uncut one by hand to prevent clogging.

Characteristicas techniques
WAARSCHUWING! of VOORZICTIGHEID! of HERINNEREN!
Aftelling maimeshouser
OBS! Varm overflate, fare for forbrenning!
For the disposal of the device please consider and act according to the national and local rules and regulations.
CONTACT
expondo Polska sp. z o.o. sp. k.