
YT-82490 - Welding machine Yato - Free user manual and instructions
Find the device manual for free YT-82490 Yato in PDF.

| Product type | Portable digital soldering iron |
| Brand | Yato |
| Model | YT-82490 |
| Power supply | USB-C (QC/PD), 9-24V battery, laptop charger |
| Max rated voltage | 24 V DC |
| Max rated current | 3 A |
| Rated power | 18 to 65 W |
| Heating time | 5 to 10 seconds |
| Temperature range | 90 °C to 480 °C (194 °F to 896 °F) |
| Tip type | T12 (heating resistance ~8 Ω) |
| Weight | 25 g |
| Display | Digital with set, actual temperature and power indicator |
| Functions | Temperature adjustment, programmable sleep, calibration, language selection (Polish/English) |
| Solderable materials | Metals with tin-lead wire (soft solder) |
| Safety | Automatic sleep lock, overheat protection, emergency stop (long press) |
| Maintenance | Clean tip with damp sponge, casing with soft cloth |
| Spare parts | Replacement tips Yato (YT-82491 to YT-82498) |
| Included accessories | USB cable, plug adapter, case, battery clips |
| Operating temperature | 0 °C to +40 °C, humidity <70% non-condensing |
| Storage | Dry, away from dust and moisture, out of reach of children |
Frequently Asked Questions - YT-82490 Yato
User questions about YT-82490 Yato
0 question about this device. Answer the ones you know or ask your own.
Ask a new question about this device
Download the instructions for your Welding machine in PDF format for free! Find your manual YT-82490 - Yato and take your electronic device back in hand. On this page are published all the documents necessary for the use of your device. YT-82490 by Yato.
USER MANUAL YT-82490 Yato
natural_image
Two black-and-white images showing hands holding a medical or dental tool, with no visible text or symbols.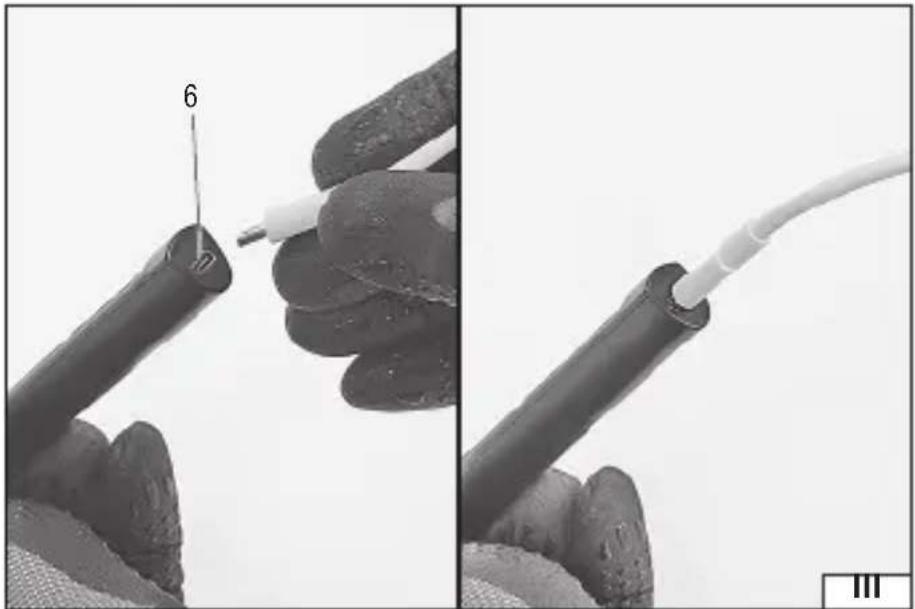
natural_image
Close-up of a hand holding a black cable with a white wire, showing a close-up view (no text or symbols)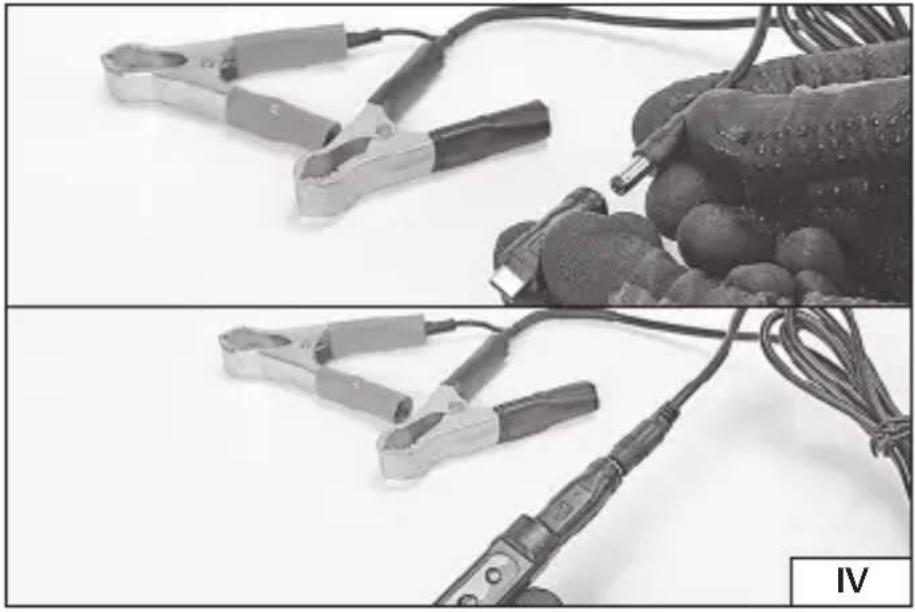
natural_image
Two black-and-white photos showing clamps and probes on a surface, one with a probe inserted into a glove (no text or symbols visible)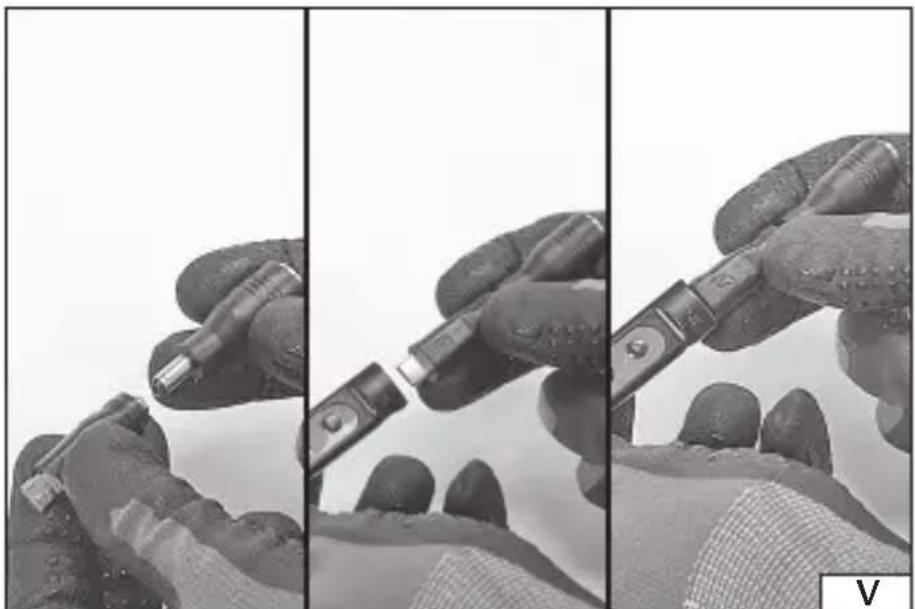
natural_image
Three-panel black-and-white photo showing hands holding a mechanical tool, no visible text or symbolsPL
Read the operating instruction
Wear protective goggles
This symbol indicates that waste electrical and electronic equipment (including batteries and storage cells) cannot be disposed of with other types of waste. Waste equipment should be collected and handed over separately to a collection point for recycling and recovery, in order to reduce the amount of waste and the use of natural resources. Uncontrolled release of hazardous components contained in electrical and electronic equipment may pose a risk to human health and have adverse effects for the environment. The household plays an important role in contributing to reuse and recovery, including recycling of waste equipment. For more information about the appropriate recycling methods, contact your local authority or retailer.
The digital soldering iron is designed for soldering metal materials using tin and lead binders for soft soldering. With its ability to be powered from a variety of sources, it demonstrates a high degree of mobility. Proper and safe operation of the tool requires appropriate use, that is why you should:
Read the entire manual before the first use of the device and keep it for future reference.
The supplier shall not be held liable for any damage or injury resulting from improper use of the tool, failure to observe the safety regulations and recommendations of this manual. Use of the tool for purposes other than those for which it was intended shall cause the loss of the user's rights under the warranty and non-compliance with the sale agreement.
EQUIPMENT
The soldering iron is supplied complete and does not require assembly. The equipment includes power cords, tip, socket adapter, case.
SPECIFICATIONS
| Parameter Unit Value | ||
| Part no. YT-82490 | ||
| Power supply standard QC*, PD** (voltage/current) | [V DC] / [A] 9 / 1.5; | 12 / 2; 15 / 2.5; 20 / 3.25 |
| Max. voltage rating [V DC] 24 | ||
| Max. rated current [A] 3 | ||
| Rated power [W] 18 – 65 | ||
| Heating time [s] 5 – 10 | ||
| Tip temperature | [°C] | 90 – 480 |
| Tip type | T12 | |
| Weight | [g] | 25 |
* QC – Quick Charge – is a fast charging standard for mobile devices.
** PD – Power Delivery – is the standard for fast charging of mobile devices and power via USB-C.
SAFE USE INSTRUCTIONS
Before starting work, make sure that the housing and the power cord and plug are not damaged. In case of damage, do not proceed with work.
If the power cord or the plug is damaged, immediately disconnect it from the mains and contact an authorised service centre of the manufacturer for replacement. Do not use the product with a damaged power cord or plug. The power cord or plug cannot be repaired and must be replaced with a new one that is free of defects if these components are damaged.
The appliance must not be used by children or persons with reduced physical,
EN
sensory or mental capabilities, or by persons without experience and knowledge, unless they are supervised or have been trained. Supervise children so that they do not use the appliance as a toy. Children should not be allowed to perform cleaning and maintenance of the equipment without supervision. This tool may be used by persons with reduced physical, mental abilities and persons with no experience or knowledge of the tool, if supervised or instructed on its safe use so that the risks associated with it are understood.
Careless use of the equipment can cause fire, therefore exercise caution when using the equipment in areas where combustible materials are present. Do not apply the soldering iron tip to the same place for an extended period of time; do not use the equipment in the presence of an explosive atmosphere; be aware that heat can be transferred to flammable materials that are out of sight. Once heated, hold the soldering iron only by the handle.
WARNING! The soldering iron tip can be hot during use and immediately after use. Do not touch the tip as this may cause severe burns. When work is complete, allow the device components to cool completely. Use gloves which protect against high temperatures if you need to move these components before they cool down. The unit must be fully cooled down and disconnected from the power source before replacing the soldering iron tip. When you have finished working, put the soldering iron down to cool on a level, stable and non-flammable surface away from other objects. It is forbidden to touch the insulation of electrical cables with a hot tip. Do not solder live components. Do not leave the device unattended. After use, allow the tool to cool down completely before storing. Do not accelerate the process of self-cooling of the tool components in any manner.
The tool is not designed to operate in high humidity conditions. The temperature at the place of the tool's use must be within the range of 0^ ÷ +40^ , and the relative humidity must be below 70% without condensation. Do not expose the tool to precipitation.
PREPARING FOR WORK
ATTENTION! Only install the accessories when the supply voltage is disconnected. Pull the tool power cord plug out of the mains socket!
Tip installation/replacement
ATTENTION! Take special care when replacing the tip. The soldering iron tip can be hot during use and immediately after use. Do not touch the tip as this may cause severe burns. It is recommended to wait until the soldering iron tip and components have cooled completely. Do not accelerate the process of self-cooling of the tool components in any manner. If it becomes necessary to replace the tip before it has cooled down, always wear gloves to protect against the effects of heat.
Insert the soldering iron tip into the hole of the soldering iron as shown in illustration (II). The tip end should be outside of the soldering iron.
If the tip has signs of wear in the form of dirt, burns, over-topping which cannot be removed during maintenance, or is mechanically damaged (burned out), it must be replaced with a new one which is free of defects. Slide out the worn tip and replace it with a new one. The soldering iron supports T12-type tips with a
EN
heater resistance of ca. 8 Ohms. It is recommended to use YATO tips with part no: YT-82491, YT-82492, YT-82493, YT-82494, YT-82495 YT-82496 YT-82497 YT-82498.
USING THE SOLDERING IRON
WARNING! Once the power is connected, the soldering iron will start automatically and begin the heating process to the last set temperature. Note that this process can happen very quickly. The soldering iron tip heats up to a high temperature. Do not touch the tip as this may cause severe burns.
Connection to USB power supply (III)
To do this, use the USB cable supplied with the product. Insert the USB cable plug into the product's USB Type C port, then connect the USB cable to the power supply and plug it into a mains socket.
CAUTION! Any USB port, such as on a mobile device charger, that the plug of the cable supplied with the device will fit into, can be used for power supply. However, make sure that the voltage and current capacity of the charging socket complies with the power supply standard listed in the technical data table.
Connection to battery power (IV)
A cable terminated with terminals should be used for this purpose. Insert the plug of the cable into the receptacle of the adapter ending in a USB type C plug and then connect it to the input socket of the USB type C product, connect the terminals of the cable to the terminals of the battery. Pay attention to the correct polarity. The terminal marked red should be connected to the battery terminal marked '+'. The terminal marked black should be connected to the battery terminal marked '-'.
CAUTION! The connected terminals of the power cable must not be short-circuited. A short circuit can cause burns, electric shock, fire and even explosion!
CAUTION! Any battery can be used to power the soldering iron. Battery power sources should provide a voltage range of 9 – 24 V and a recommended current output of 3 A.
Connecting to power from the laptop charger (V)
The product comes with an adapter that allows the soldering iron to be connected to power from a laptop power supply. Insert the plug of an adapter fitted with a laptop socket into the adapter socket ending in a USB type C plug. Then plug the connected adapters into the input socket of the USB Type C product. Insert the laptop charger plug into the adapter fitted with the laptop socket.
CAUTION! Any laptop charger can be used to supply power, the plug of which will fit into the adapter socket supplied with the product. However, make sure that the voltage and capacity of the charger are within the range shown in the technical data table.
Switching on/off
When the power is connected, the soldering iron starts automatically, the dis-
EN
play will show a welcome message: Uszanowanie/Welcome and then the power source will be checked, at which time a message will be displayed: Prosze czekac/Please wait. Once the correct power standard has been recognised, the display will show the main screen and the heating process will begin. In the event that the power supply standard does not provide adequate voltage and current capacity, a message will appear on the display: Niska moc/Low power. In this case, the soldering iron must be connected to a power source conforming to the standard shown in the technical data table.
To switch off the soldering iron, press and hold the switch for approximately 2 seconds. A message will appear on the display: OFF, this means that the soldering iron is switched off. To switch the soldering iron back on, press and hold the switch for approx. 2 seconds. Once started, the soldering iron will automatically start the heating process.
Display (home screen)
On the left-hand side of the display, the set temperature of the tip is shown as UST/SET.
The centre of the display shows the actual temperature and the temperature unit. The ^ C symbol displayed next to the set temperature indicates degrees Celsius, and the ^ F symbol indicates degrees Fahrenheit.
On the right-hand side of the display, a segmented indicator of the temporary heating power level is shown. The more power drawn from the power source, the greater the number of segments illuminated on the indicator.
Parameter setting
Parameter value settings are made using the function keys. To confirm the setting, wait approx. 3 seconds before returning to the main screen.
The parameter is selected by pressing the switch briefly.
Display language
The menu of messages displayed on the display of the soldering iron is available in Polish or English.
Briefly press the switch to the Jezyk/Language parameter. Use the function buttons to set the language: Polski/English. To confirm the setting, wait approx. 3 seconds before returning to the main screen.
Changing the temperature units
It is possible to set the displayed temperature units in degrees Celsius or degrees Fahrenheit.
Briefly press the switch to the parameter Temp/Temp unit. Use the function keys to set the unit: C – degrees Celsius or F – degrees Fahrenheit. To confirm the setting, wait approx. 3 seconds before returning to the main screen.
Temperature setting
The temperature of the tip is set on the main screen of the soldering iron. Use the function keys to set the desired blade temperature, marked as UST/SET. It is possible to set the temperature in the range 90^ C – 480^ C ( 194^ F – 896^ F).
EN
Timed switch-off function
The soldering supports a timed sleep function. Setting this function will cause the device to enter sleep mode when no action is taken. At this time, a countdown will start until the soldering iron enters sleep mode, and then it will stop heating when the countdown is complete. The soldering iron going to sleep mode is indicated by the message "Z z z". Returning the soldering iron to the operating position will start it to heat up.
Briefly press the switch to the Czas uspienia/Sleep time parameter. Use the function keys to set the sleep time between 1 and 999 seconds. To confirm the setting, wait approx. 3 seconds before returning to the main screen. Function setting marked as Wylacz/OFF means that the temporary sleep function is switched off.
Temperature calibration
The soldering iron tip is equipped with a heater, the parameters of which can be subject to change during use. Thanks to calibration, the temperature set for the soldering iron will correspond to the actual tip temperature. The temperature should be measured with an external thermometer, such as a thermocouple connected to a multimeter. The displayed value should then be adjusted to equal the measured value.
Briefly press the switch to the parameter Komp. Temp. /Offset. Calibration is possible in the range -80^ +80^ (-144°F ca. +144°F), relative to the set temperature. Use the function keys to set the arrowhead temperature so that it matches the measured value. To confirm the setting, wait approx. 3 seconds before returning to the main screen.
Supply voltage
Parameter marked as Napiecie zasil. /Input volt displays the current supply voltage.
Recommendations useful for soldering
Before soldering, thoroughly clean the metal parts to be soldered as well as the soldering iron tip. Replace the tip when excessively worn. Before soldering, clean the surfaces to be soldered of all impurities, especially grease. Make sure that the tip is clean and properly attached to the soldering iron slot. Wait for the tip to reach the required temperature. Begin soldering with flux and solder (soldering tin). Apply the tip only to the points to be connected. The solder should flow down from the tip to the weld when it has reached the correct temperature. After fi nishing work and when the tool is not in use, place it on the base. Carry out maintenance after work is completed.
MAINTENANCE AND STORAGE
When finished working, clean the tip with a damp sponge, switch off the soldering iron by pressing the switch for about 2 seconds and then disconnect the product from the power source. Leave the soldering iron on a level, stable and non-flammable surface away from other objects until all components have cooled completely. Check the tip condition; if any defects, damage, or changes in shape are found, replace the tip with a new one. Clean the soldering iron housing with a soft cloth slightly dampened with water, then dry.
Store the product disconnected from the power supply in places not accessible to unauthorised persons, especially children. The storage place should protect
EN
against dust, moisture, precipitation and excessive heat, and provide adequate ventilation to prevent condensation of water vapour. Do not store the device together with other tools, e.g., in a toolbox. The device stored in this way may be damaged by impacts with other objects.

