
Gelatec 1800 Touch - Fridge CECOTEC - Free user manual and instructions
Find the device manual for free Gelatec 1800 Touch CECOTEC in PDF.

| Product Type | Ice Cream Maker / Sorbet Maker |
| Brand | Cecotec |
| Model | Gelatec 1800 Touch |
| Rated Power | 700 W |
| Voltage | 220-240 V |
| Frequency | 50-60 Hz |
| Standby Power Consumption | 0.22 W |
| Programs | 13 programs: Ice Cream, Gelato, Italian Ice, Sorbet, Frozen Yogurt, Light Ice Cream, Granita, Milkshake, Frappé, Iced Drink, Mix-in, Re-spin, Shaft Clean |
| Processing Modes | Full, Top, Bottom |
| Screen | Touch screen with brightness adjustment |
| Sleep Function | Adjustable: 10 min, 30 min, 1 h, 2 h, or off |
| Languages | Multilingual (selectable) |
| Included Accessories | Outer bowl, small bowl, lids, spatula, installation tool |
| Materials | Plastic main body, plastic bowls |
| Cleaning | Small bowl and spatula dishwasher safe; other parts hand wash |
| Safety | Motor overload protection, automatic shut-off |
| After-sales Service | +34 9 63 21 07 28 |
| Repairability | Parts not repairable by user |
| Warranty | Compliance with applicable regulations |
Frequently Asked Questions - Gelatec 1800 Touch CECOTEC
User questions about Gelatec 1800 Touch CECOTEC
0 question about this device. Answer the ones you know or ask your own.
Ask a new question about this device
Download the instructions for your Fridge in PDF format for free! Find your manual Gelatec 1800 Touch - CECOTEC and take your electronic device back in hand. On this page are published all the documents necessary for the use of your device. Gelatec 1800 Touch by CECOTEC.
USER MANUAL Gelatec 1800 Touch CECOTEC
| 1. Parts and components | 58 |
| 2. Before use | 58 |
| 3. Operation | 50 |
| 4. Cleaning and maintenance | 64 |
| 5. Troubleshooting | 66 |
| 6. Technical specifications | 68 |
| 7. Recycling of electrical and electronic equipment | 69 |
| 8. Technical support and warranty | 64 |
| 9. Copyright | 69 |
| 10. Simplified EU Declaration of Conformity | 69 |
SOMMAIRE
EU01_123710 - Gelatec 1800 Touch
EN • The coding in this manual is generic and applies to all code variants of the appliance.
Please read these instructions carefully before using the appliance. Keep this instruction manual for future reference or new users.
- This appliance can be used by children aged 8 years and
above if they have been given supervision or instruction concerning use of the appliance in a safe way and understand the hazards involved. Cleaning and user maintenance should not be carried out by children, unless they are 8 years old or older and supervised. Keep this appliance and its power cord out of reach of children under the age of 8.
- Children should be supervised to ensure that they do not play with the appliance.
- This appliance is intended for domestic use only and is not suitable for use in commercial establishments such as bars, restaurants, farms, hotels, motels, and offices.
- For indoor and domestic use only.
- Ensure that children and babies do not play with plastic bags or any packaging materials.
- Take care when moving the appliance. Switch off and unplug the appliance before moving it.
- Do not attempt to modify this product in any way.
- Ensure that the exterior of the appliance does not get wet (water splashes, etc.). Do not operate the appliance with wet hands.
- Do not immerse the appliance in water or other liquids, nor use it near sinks, baths, or showers.
- Always use the appliance with a power supply of the same voltage, frequency, and rated power as indicated on the product identification plate.
- WARNING: Keep ventilation openings clear of obstructions.
- Avoid contact with moving parts. Keep hands, hair, clothing, as well as spatulas and other utensils away during operation to prevent injury and/or damage to the appliance.
- Switch off the appliance and disconnect it from the mains
before fitting accessories or approaching parts that move during use.
- Use only on a flat and level surface. Avoid use over sinks, draining boards, or uneven surfaces.
- Keep hands and utensils out of the container while the appliance is in operation.
- Always operate the appliance with the lid fitted.
- Do not defeat or bypass safety devices.
- Do not attempt to open the lid or remove the container. Injury could occur if the moving paddle (D) were accidentally exposed.
- Do not leave the appliance unattended while in operation.
- Do not use the appliance for mixing paints or other flammable liquids, nor in locations contaminated with flammable gases or vapours.
- Do not use the appliance if it has been dropped or if any part (including the cord or plug) is damaged.
- If the power cord is damaged, it must be replaced by the manufacturer, its service agent, or similarly qualified persons in order to avoid a hazard.
- The use of accessories not intended for this appliance may cause injury to the user or damage to the appliance.
- Do not install the unit on top of other appliances, on uneven surfaces, or where it may be exposed to heat sources (e.g., radiators or cookers), direct sunlight, excessive dust, or mechanical vibrations.
- Do not use the appliance outdoors, nor place it near a gas or electric burner, or inside a heated oven.
-
Do not install the appliance near any heat source, such as radiators, heat registers, cookers, or other equipment that produces heat.
-
Do not operate the appliance beneath or near flammable or combustible materials (e.g., curtains).
- Any servicing other than normal cleaning should be performed only by qualified electrical personnel. This appliance contains no user-serviceable parts.
- If the appliance is given or lent to a third party, hand it over together with the instruction manual.
- Do not use the appliance in very hot or humid locations, nor under direct sunlight.
INSTRUCTIONS DE SÉCURITÉ
H Paddle installation tool
Note:
The graphics in this manual are schematic representations and may not exactly match the product.
2. BEFORE USE
- This appliance comes in a packaging designed to protect it during transport. Remove the appliance from its box. You can keep the original box and other packaging materials in a safe place to prevent damage to the appliance if you need to transport it in the future. If you wish to dispose of the original packaging, make sure all items are recycled properly.
- Check that all parts and components are included and in good condition. If any of them are missing or damaged, please contact Cecotec's Official Technical Support Service immediately.
Box content:
- Product
- 3 tubs
- Instruction manual
- Do not remove the product's serial number in order to keep proper traceability if technical assistance is required.
Before first use
- Clean the small container (F), outer container (G), lids (B and E), and paddle (D) with warm soapy water.
- To clean the paddle (D), use a brush or long-handled washing-up utensil.
-
Rinse all parts thoroughly and allow to air dry.
-
Clean the control panel of the main body (A) with a soft cloth. Do not submerge or allow water to enter the main body (A).
3. OPERATION
Prerequisites
Place the appliance on a firm, flat, and level surface.
Position the appliance away from heat sources and direct sunlight. Avoid water splashes on the appliance, especially on the main body (A). These could cause a short circuit.
For proper ventilation, maintain clearance on both sides of the appliance.
Leave at least 100 mm clearance between the rear and sides of the appliance and any wall.
First use
Switching on and off
Connect the ice cream maker to a mains socket.
Note: If no operation is performed for 10 minutes, the appliance enters standby mode.
Processing mode
Select the processing mode after selecting a programme or recipe. To process the entire tub, press FULL. To process only the upper half, press TOP. To process the lower half, press BOTTOM.
Note: TOP and BOTTOM modes are not available with DRINKABLE programmes.
Programmes
Each programme is designed to prepare recipes simply. The duration and speed of each programme are automatically adjusted to obtain consistent and creamy results with each preparation.
ENGLISHENGLISH
| Category Programme Description | |
| Scoopable ICE CREAM Ideal for traditional recipes. Turns dairy and plant-based alternatives into dense and silky ice cream. | |
| GELATO Designed for preparing custard-based mixtures forclassic Italian ice cream, with velvety texture. | |
| ITALIAN ICE Turns water mixtures with fruit flavours into Italianice. | |
| SORBET Turns sweet and watery fruit mixtures into sorbetswith creamy texture. | |
| FROZEN YOGURT At the touch of a button, it turns regular yogurtinto creamy frozen yogurt. Tip: for best results, usesweetened full-fat varleties. Avoid fat-free or 'sugar-free" options. | |
| LIGHT ICE CREAM Designed to obtain ice cream with low sugar, reducedfat, or with sugar substitutes. | |
| Drinkable SLUSHIE Prepares smooth and consistent slush from water anddrink mixes. A reinterpretation of the classic children'sfavourite. | |
| MILKSHAKE | Prepares thick and creamy milkshakes in minutesusing your preferred ice cream (homemade orcommercial), milk, and your favourite add-ins. |
| FRAPPÉ | The perfect blend of intense coffee and smoothcappuccino. |
| FROZEN DRINK | Obtain ultra-refined quality frozen drinks, with greaterthickness, velvety texture, and prolonged resistanceto melting. |
Important: When processing DRINKABLE preparations such as SLUSHIE, FROZEN DRINK, or MILKSHAKE, add liquid over the top of the frozen base in the small container (F) before starting the programme.
MIX-IN
The MIX-IN programme is designed to integrate solid add-ins (pieces of sweets, biscuits, nuts, cereals, or frozen fruit) into a freshly processed base or commercial dessert. Note: for best results, place the mix-ins in the centre of the small container (F). After the main programme, scoop out a well approximately 4 cm in diameter down to the bottom of
the small container (F). Place the chopped ingredients in this well and execute the MIX-IN programme. If necessary, repeat MIX-IN to fully integrate the add-ins.
RE-SPIN
The RE-SPIN programme improves texture after running one of the preset programmes. It is especially useful when the base is very cold (below -7^ / -21^ ) and becomes brittle rather than creamy.
Note: do not use the RE-SPIN programme before running the MIX-IN programme.
Settings menu
| Setting | Description |
| Sleep | The default time is 10 minutes. You can also change it to 30 minutes. 1 hour, 2 hours, or disable it. The appliance enters sleep mode if no operation is performed during the set time. Touch the display to activate it. |
| Language On | this page you can select the language and add other languages. |
| Shaft Clean | This function is used to clean the shaft after each use to maintain better appliance performance. |
| Display | Use this touch icon to adjust screen brightness. |
| Sound (On) | The appliance voice can be switched on or off. |
| Version | Shows key appliance information, both hardware and software. |
Freezing tips
For optimal results, maintain the temperature between -12^ and -22^ . The appliance is designed to process frozen bases effectively within this range. When stored within these parameters, the small container (F) will achieve the ideal consistency for processing.
Do not freeze the small container (F) at an angle. Place it on a perfectly level surface within the freezer.
- Upright freezers are preferable. Avoid chest freezers, as they tend to over-freeze.
- Freeze the base for a full 24 hours. Although the mixture may appear solid earlier, it
needs additional freezing time to reach the optimal processing temperature.
- Optimise time by preparing several small containers (F) in advance and storing them in the freezer for processing when desired.
Operating instructions
Important: review all safety warnings before proceeding.
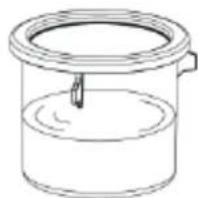
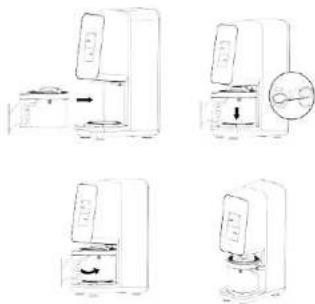
- Add the ingredients to the small container (F). DO NOT exceed the MAX FILL line marked on the small container (F). Fig. 2 - 3
ENGLISHENGLISH
- For recipes requiring frozen ingredients, close the small container (F) with the small container lid (E) and place it in the freezer for at least 24 hours. Fig. 4
- Connect the main body (A) to the mains socket and position the appliance on a flat, dry, and clean surface.
- When the base is ready or frozen, remove the small container lid (E) and place the small container (F) inside the outer container (G). Fig. 5.
Note:
- Do not process mixtures if the contents of the small container (F) were frozen at an angle or were partially removed and re-frozen unevenly.
- Before re-freezing, always smooth the surface of the processed dessert inside the small container (F).
- To partially soften, transfer the small container (F) to the refrigerator and mix vigorously until smooth.
- Re-freeze the small container (F) on a completely level surface in the freezer to ensure uniform consistency.
- Important: Important: Ensure that the outer container lid sealing ring (C) is correctly positioned on the outer container lid (B) before installing the paddle (D).
Installing the paddle (D) with the installation tool (H)
Fig. 6.
(1) Hold the base of the paddle installation tool (H) with one hand and, from the top of the outer container lid (B), insert it through the central hole in the lid.
(2) Turn the lid (B) upside down. Align the installation hole located at the base of the paddle (D) with the tool (H) and fit the paddle (D) into the tool.
(3) Slowly remove the installation tool (H) from the lid (B).
Notes:
- Handle the paddle (D) carefully.
- The paddle (D) must be installed correctly; otherwise, the appliance will not operate normally.
- If the outer container lid sealing ring (C) is not properly positioned, liquid may leak from the outer container (G) during drink preparation.
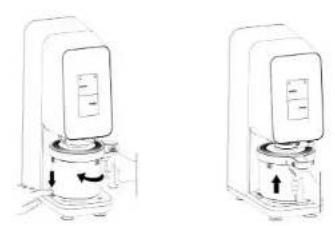
- Positioning and locking the outer container lid (B). Position the lid tab (B) slightly to the right of the outer container handle (G). Align the lid reference line (B) with the arrow located on the outer container handle (G). Turn the lid (B) clockwise to lock. Fig. 7
- Positioning the outer container (G) on the main body (A). With the appliance connected to the mains, position the outer container (G) on the main body (A) with the handle centred beneath the panel display. Turn the handle to the right to lock the outer container (G) in place; you will hear a confirmation 'click'. Fig. 8
B. Switching on, mode and programme selection. If the outer container (C) is correctly installed, the display will illuminate and the appliance will be ready for use. Select the programme that corresponds to your base. Press a processing mode: TOP, FULL, or BOTTOM and press the START touch icon to begin. The programme will stop automatically when finished.
Notes:
- If the outer bowl light is red and flashing, the appliance is not completely assembled for use. Ensure that the container is correctly installed. Make sure to plug in the appliance before installing the container.
- Removing the outer container (G) when the programme finishes. Press the outer container release button located on the left side of the main body (A). Turn the outer container handle (G) back to the central position. While turning, the platform will lower the outer container (G). When the outer container (G) is released and the platform is down, lift it to remove it from the main body (A). Fig. 9
- Removing the lid. Press the lid release button and turn the outer container lid (B) anticlockwise to remove it.
- If adding mix-ins, use a spoon to create a 4 cm diameter well that reaches to the bottom of the already processed portion of the small container (F). Place the chopped mix-ins in this well and repeat steps 7–11 to process again using the MIXIN programme and the desired processing mode (TOP/FULL/BOTTOM).
MIXIN tips
- Add 1/4 cup (approximately 60 ml) total of crushed sweets, frozen fruit, chopped nuts, chocolate pieces, etc. If using several mix-ins, keep the combined volume to 1/4 cup or less. Adjust to taste and ensure that the outer container lid (B) can close comfortably over the small container (F).
- Hard mix-ins such as chocolate, sweets, or nuts do not break during the MIXIN programme and will remain whole. For this reason, it is recommended to use chocolate chips, mini sweets, or pre-cut ingredients.
- Soft mix-ins will break. Ingredients such as cereals, biscuits, or frozen fruit will be left in smaller pieces after the MIXIN programme. For best results, start with larger pieces when the ingredient is soft.
- For best results with ICE CREAM and GELATO, fresh fruit, sauces, or spreads are not recommended as mix-ins. Adding fresh fruit, fudge, or caramel sauces dilutes the dessert.
- Chocolate hazelnut spreads and nut butters also do not integrate well.
- Frozen fruit or quick-hardening chocolate/caramel toppings are recommended.
ENGLISHENGLISH
- Improving texture with the RESPIN programme. If the preparation in the small container (F) becomes brittle or grainy, use the RESPIN programme. This programme is especially useful with very cold bases. If, after RESPIN, the texture is smooth, proceed to step 14. If it continues to be brittle or grainy, repeat steps 7–11 and execute RESPIN again to reprocess.
Note: Do not execute RESPIN before using the MIXIN programme. - Remove and serve. Lift the small container (F) out of the outer container (G) and serve the dessert.
- Cleaning the lid and removing the paddle. With the assembly away from the main body (A), rinse the outer container lid (B) thoroughly under the tap to remove sticky residue or particles trapped around the paddle (D). Hold the base of the paddle installation tool (H) with one hand. With the other, insert the tool (H) through the upper hole of the lid (B) and press to release the paddle (D). For easier cleaning, drop the paddle (D) directly into the sink. Wash the lid (B), paddle (D), and outer container lid sealing ring (C) separately. Dry completely before next use. Fig. 10
- Unplug the main body (A) when you have finished using it.
- Leftovers: smoothing, re-freezing, and reprocessing. If leftovers remain in the small container (F), smooth the surface with a spoon or spatula before returning it to the freezer, keeping it perfectly level. If, after re-freezing, the preparation is too hard, run it with the same programme you used to prepare it. If it is still soft, you can serve it directly with a spoon.
Note:
When reprocessing a dessert containing mix-ins, these may be crushed further and alter their texture and flavour.
4. CLEANING AND MAINTENANCE
Please note
- Disconnect the main body (A) from the power supply before cleaning.
- To start cleaning, release the Paddle (D) from the Outer Container Lid (B) using the Paddle Installation Tool (H).
- Rinse the Paddle (D) and Lid (B) with warm water to remove ice cream or toppings.
- Avoid abrasive scouring pads, metal brushes or aggressive cleaners (bleach, solvents, powder cleaners), as they may damage or scratch the parts.
- Cleaning the parts immediately after use makes the task easier, prolongs the service life of the device and accessories and reduces the appearance of stains on plastic parts.
- Dry completely before next use.
Cleaning by hand
- Wash the small container (F), the outer container (G), the lids (B and E) and the paddle (D) with warm water and soap.
- For the Paddle (D), use a cleaning utensil with a handle.
- Rinse well and allow all parts to air dry.
- The main body (A) must not be submerged; clean only with a slightly damp cloth.
Dishwashers
- Place the small container (F), and paddle (D) on the top rack. They are dishwasher safe.
- Separate the paddle (D), the small container (F), before inserting them.
- Avoid high temperature cycles or heat drying to prolong the life of the parts.
Outer Container Lid (B)
- Before cleaning the lid, remove the paddle (D) to remove any debris trapped underneath.
- Run warm water through the paddle release lever and through the drain holes on both sides.
- To empty it completely, place the lid with the lever side down.
Shaft cleaning program
This ice cream maker has a program to clean the shaft. To use this programme, follow the steps below:
- Plug in the device and press the configuration button in the upper right corner of the home page.
- Remove the outer container (G) from the main body (A).
- Press the "SHAFT CLEAN" button, press "Next Step" and then "Decline" to process the program.
- The shaft will slowly descend. When it is fully lowered, wipe it with a clean, slightly damp cloth.
- After cleaning, press "Withdraw" and the axis will return to its previous position.
Note: The shaft should be cleaned after each use.
Main body (A)
Before cleaning, unplug the main body (A).
Wipe the main body (A) with a cloth slightly moistened with neutral detergent and then dry.
Make sure that the electrical contact area is perfectly dry.
Do not use abrasive cloths/scouring pads or brushes.
Storage
To store the cable, avoid wrapping it around the bottom of the main body (A).
ENGLISHENGLISH
Store additional accessories next to the unit or in a cabinet to avoid damage or safety hazards.
Motor reset (overload protection)
- Unplug the main body (A) from the electrical outlet.
- Allow the motor to cool for at least 15 minutes.
- Remove the outer container lid (B) and the paddle (D). Check for trapped ingredients in the lid assembly (including the Seal Ring (C)) and around the shaft.
- If the small container (F) is too full or extremely hard, remove some of the mixture to reduce the load.
- Replace the small container (F) on the outer container (G), mount the lid (B) and lock the assembly on the main body (A).
- Reconnect and test the program. If it does not start, repeat the reset procedure.
- If the problem persists, contact the official Cecotec Technical Support Service.
Note - Avoid overloading
- DO NOT process solid blocks of ice or ice cubes.
- DO NOT attempt to prepare smoothies or process loose, hard ingredients.
The fruit should be crushed to release its juice or mixed with other ingredients and frozen before processing.
5. TROUBLESHOOTING
Caution: Always disconnect the power supply and unplug the device before troubleshooting to minimize the risk of electric shock and prevent accidental activation.
| Problem description Solution | |
| The device moves on theworktop during processing. | Make sure that the worktop and the feet of the main body (A) are clean and dry. |
| The dessert remains liquid, not solid, after processing. | If the mixture is too soft, return the small container (F) to the freezer for a few more hours or until the desired texture is reached. |
| Freeze the base for a full 24 hours and process it right after removing it from the freezer. | |
| If the texture is still soft, lower the freezer temperature. The device works best with frozen bases between -12 °C and -22 °C. |
| The device moves on theworktop during processing | Make sure that the worktop and the feet of the mainbody (A) are clean and dry. |
| The dessert becomes brittle or"mealy" after processing. | Use RE- SPIN after a Program to obtain a creamierconsistency. |
| If the mixture is extremely hard, temper the smallcontainer (F) 2 -5 minutes in the refrigerator beforeprocessing. | |
| Low fat or sugar content may affect texture, follow therecommended recipes. | |
| The Programs do not light up. Plug the main body (A) into a working outlet beforeinstalling the outer container (G). | |
| The Outer Container light is redand flashing. | The outer container (G) is not installed or not installedcorrectly. Reinstall the Outer Container (G) onto theMotor Base (A) until it "clicks" into place. |
| The display shows E03, E05,E08 or E28. | Motor overload detected. Unplug the unit, remove theOuter Container (G) and allow the Motor Base (A) tocool for 15 minutes before restarting. Remove the outercontainer Lid (B) and the Paddle (D), making sure that noingredients are stuck. |
| Excessively dense mixtures can cause clogging. Userecipes with adequate sugar and fat content. | |
| Bases should be between -12 °C and -22 °C. Adjust thefreezer temperature, place the small container (F) nearthe front of the freezer or allow it to warm briefly toroom temperature before processing. | |
| DO NOT process solid block ice, ice cubes or loose hardingredients. | |
ENGLISHENGLISH
| The small container (F) was frozen tilted in the freezer. | For best results, DO NOT process a small Container (F) that has been frozen at an angle or from which product has been removed and then refrozen unevenly. |
| Before refreezing, always smooth the surface; if it is already uneven, defrost in the refrigerator, mix to recombine the ingredients, and refreeze on a level surface. | |
| The outer container (G) is not released from the main body (A) after processing. | Wait 2 minutes; then press and hold the release button (left side of the main body (A)) while turning the handle of the outer container (G) clockwise to remove it. May require some force. |
| Make sure the paddle cavity (D) is completely dry before use. If you make several recipes, rinse and dry the Paddle between preparations. This prevents the residual water from freezing and sticking the components. | |
| A08 Make sure that the device is | fully assembled for use. If the appliance is on and the Outer Container (G) is not installed correctly, the Outer Container light will flash red. All Programs will be available when the instrument is fully assembled and a processing mode has been selected. |
| After each program, remove the Outer Container (G) to check the results before running another program. |
6. TECHNICAL SPECIFICATIONS
Product: Gelatec 1800 Touch
Product reference: EU01_123710
Rated power: 700 W
Voltage: 220 V-240 V
Frequency: 50–60 HZ
The power consumption in standby mode is 0.22 W using the guidelines of EN 50564:2011 and the European regulations 1275/2008/EC and 801/2013/EC. For this purpose, the device is connected to the mains without performing any function, waiting for the standby mode to be activated.
The period after which the device automatically switches to standby mode can be selected in your device.
Technical specifications may change without prior notice to improve product quality. Made in China | Designed in Spain
7. RECYCLING OF ELECTRICAL AND ELECTRONIC EQUIPMENT

This symbol indicates that, according to the applicable regulations, the product and/or battery must be disposed of separately from household waste. When this product reaches the end of its shelf life, you should dispose of the batteries/accumulators and take them to a collection point designated by the local
authorities.
For detailed information on how to properly dispose of electrical and electronic equipment and/or the corresponding batteries, consumers should contact their local authorities. Information regarding national packaging recycling systems and their marking can be found on our website.
Compliance with the above guidelines will help protect the environment.
8. TECHNICAL SUPPORT AND WARRANTY
Cecotec shall be liable to the end user or consumer for any lack of conformity that exists at the time of product delivery under the terms, conditions and deadlines established by applicable regulations.
Repairs should be carried out by qualified personnel.
If you detect any problem with the product or have any queries, please contact Cecotec's Official Technical Support Service at +34 96 321 07 28.
9. COPYRIGHT
The intellectual property rights over the texts in this manual belong to CECOTEC INNOVACIONES. S.L. All rights reserved. The content of this publication may not, either in part or in its entirety, be reproduced, stored in a retrieval system, transmitted or distributed by any means (electronic, mechanical, photocopying, recording or similar) without prior authorisation from CECOTEC INNOVACIONES, S.L.
10. SIMPLIFIED EU DECLARATION OF CONFORMITY

Cecotec Innovaciones hereby declares that this appliance complies with the essential requirements and other relevant provisions of the regulations applicable
in the European Union. This appliance has been designed, manufactured and tested in compliance with required safety and quality standards. The full text of the EU Declaration of Conformity can be found on the following website: https://cecotec.es/es/information/declaration-of-conformity
CFI ATFC 1800 TOUCHCFI ATFC 1800 TOUCH
FRANÇAISFRANÇAIS
1. PIÈCES ET COMPOSANTS
Image 1
A Corps principal
5. PROBLEEMOPLOSSING
6. TEKNIK ÖZELLIKLER
Ürün: Gelatec 1800 Touch
G Recipient exterior
Fig./Img./Abb./Afb./Rys.1
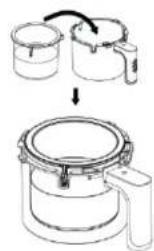
Fig./Img./Abb./Afb./Rys.4

natural_image
Line drawing of a hand pouring liquid into a jar with a lid (no text or symbols)Fig./Img./Abb./Afb./Rys.2
natural_image
Simple line drawing of a cylindrical container with a lid and a small rod inserted into the top (no text or symbols)Fig./Img./Abb./Afb./Rys.3
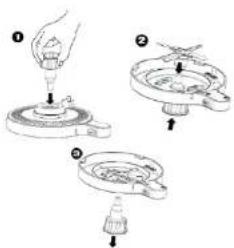
Fig./Img./Abb./Afb./Rys.5
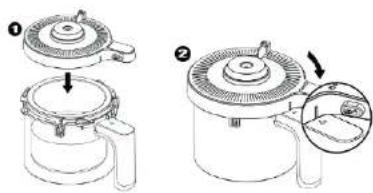
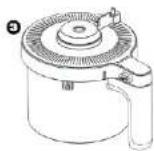
Fig./img./Abb./Afb./Rys. 6
natural_image
Four line drawings of a kitchen appliance with a magnified inset showing a circular detail (no text or symbols)Fig./Img./Abb./Afb./Rys.7
natural_image
Two identical line drawings of a device with internal components and directional arrows, no text or symbols present.
natural_image
Line drawing of a laboratory instrument with a magnified view showing internal components (no text or symbols)Fig./Img./Abb./Afb./Rys.8
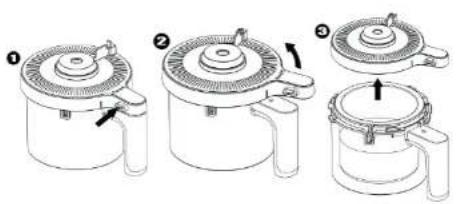
Fig./Img./Abb./Afb./Rys.9
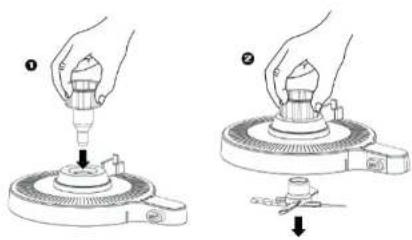
Fig./Img./Abb./Afb./Rys.10
www.cecotec.es

- SOMMAIRE
- INSTRUCTIONS DE SÉCURITÉ
- BEFORE USE
- Box content:
- Before first use
- OPERATION
- Prerequisites
- First use
- Switching on and off
- Processing mode
- Programmes
- MIX-IN
- RE-SPIN
- Freezing tips
- Operating instructions
- ENGLISHENGLISH
- Note:
- Fig. 6.
- Notes:
- MIXIN tips
- CLEANING AND MAINTENANCE
- Please note
- Cleaning by hand
- Dishwashers
- Outer Container Lid (B)
- Shaft cleaning program
- Main body (A)
- Storage
- Motor reset (overload protection)
- TROUBLESHOOTING
- TECHNICAL SPECIFICATIONS
- RECYCLING OF ELECTRICAL AND ELECTRONIC EQUIPMENT
- TECHNICAL SUPPORT AND WARRANTY
- COPYRIGHT
- SIMPLIFIED EU DECLARATION OF CONFORMITY
- FRANÇAISFRANÇAIS
- PIÈCES ET COMPOSANTS
- PROBLEEMOPLOSSING
- TEKNIK ÖZELLIKLER
Brand : CECOTEC
Model : Gelatec 1800 Touch
Category : Fridge