Bolero Wash&Dry 85900 Inverter - Washing machine CECOTEC - Free user manual and instructions
Find the device manual for free Bolero Wash&Dry 85900 Inverter CECOTEC in PDF.

| Product type | Washer dryer |
| Brand | Cecotec |
| Model | Bolero Wash&Dry 85900 Inverter |
| Washing capacity | 8 kg |
| Drying capacity | 5 kg |
| Motor type | Inverter (brushless) |
| Wash programs | Mixed, Quick, Wool, Cotton, Eco 40-60, 20°C, Sterilization, Drying, Spin, Drum Clean, Smart Wash (OnSmart) |
| Special functions | SteamMax, OnSmart, Delayed start, Child safety, Temperature and spin speed adjustment, Load balancing system |
| Power supply | 220-240 V ~ 50 Hz |
| Maximum current | 10 A |
| Water pressure | 0.03 - 1.0 MPa |
| Safety | Door lock, Child safety (KidLock), Unbalance detection |
| Maintenance | Drum Clean, drain filter, inlet hose mesh filter, detergent drawer |
| Detergent type | Powder and liquid, with separate compartments |
| Fabric softener capacity | MAX level in compartment |
| Drum material | Stainless steel |
Frequently Asked Questions - Bolero Wash&Dry 85900 Inverter CECOTEC
User questions about Bolero Wash&Dry 85900 Inverter CECOTEC
0 question about this device. Answer the ones you know or ask your own.
Ask a new question about this device
Download the instructions for your Washing machine in PDF format for free! Find your manual Bolero Wash&Dry 85900 Inverter - CECOTEC and take your electronic device back in hand. On this page are published all the documents necessary for the use of your device. Bolero Wash&Dry 85900 Inverter by CECOTEC.
USER MANUAL Bolero Wash&Dry 85900 Inverter CECOTEC
EN · The coding in this manual is generic and applies to all code variants of the appliance.
Read the following instructions carefully before using the appliance. Keep this instruction manual for future reference or new users.
- Make sure that the mains voltage matches the voltage specified on the product's rating label and that the plug is earthed.
- This appliance is intended for domestic use only and is not suitable for use in commercial establishments such as bars, restaurants, farms, hotels, motels, and offices.
- If the power cord is damaged, it must be replaced by the official Cecotec Technical Support Service or by a similarly qualified person to prevent hazards.
- This appliance is for indoor use only.
- Make sure the device is installed in places where the temperature is above 0 °C.
- The appliance is not designed for built-in installation.
- Use the hose set supplied with the appliance. Do not reuse old hoses.
- Check hose connections regularly to ensure that no water leaks out.
- Do not use the appliance if parts are missing or defective or if the power cord or plug is damaged.
- Do not use the appliance until you are sure that it is installed in accordance with the instructions provided in this manual and all water, drain, electrical and grounding connections comply with all applicable local regulations and/or other requirements.
- Before carrying out any maintenance or cleaning in the device, unplug the appliance from the mains.
- As a safety measure, we advise you to unplug the appliance and cut the water supply after every use. Maximum water
inlet pressure: 1 MPa. Minimum water-inlet pressure: 0.03 MPa.
- Never unplug the appliance with wet hands.
- For safety, be sure to connect the plug to a 3-pin socket. Check carefully and make sure that your socket is properly and reliably earthed.
- It must be possible to disconnect the appliance from the power supply by unplugging it if the plug is accessible, or by means of an all-pole switch upstream of the plug, in accordance with national electrical safety regulations.
- The maximum current of the device is 10 A, make sure that the power supply system (voltage, current and cable) is applicable to the load of the device.
- Make sure that the socket outlet is capable of supporting the Maximum Power rating of the appliance as indicated on the rating plate.
- Water and electrical devices must be connected by a qualified technician in accordance with the manufacturer's instructions and local safety regulations.
- The glass door may reach high temperatures during operation. Keep children and pets away from the glass door. Never open the door during the washing stage.
- Do not operate the appliance in very wet rooms or in rooms with explosive or caustic gas.
- Adequate ventilation must be provided to avoid the back flow of gases into the room from appliances burning other fuels, including open fires.
- Do not dry unwashed items in the appliance.
- Do not wash articles that have been cleaned in, washed in, soaked in, or stained with flammable or explosive substances, like wax, oil, paint, petrol, degreasers, dry-cleaning solvents, kerosene, etc., which may result in fire or
ENGLISHENGLISH
explosion.
- Fabric softeners or similar products should be used as specified by manufacturer.
- Do not wash or dry articles that have been cleaned in, washed in, soaked in, or dabbed with combustible or explosive substances (such as wax, oil, paint, petrol, degreasers, dry-cleaning solvents, kerosene, etc.). This may result in fire or explosion.
- When washing fabrics that contain vegetable or cooking oil or have been contaminated by hair care products, they should first be washed in hot water with extra detergent. This will reduce, but not eliminate, the hazard.
- The exhaust air must not be discharged into a flue which is for exhausting fumes from appliances burning gas or other fuels.
- The air openings must not be obstructed by a carpet.
- Appliances with a single inlet valve can only be connected to a cold water supply. Appliances with a double inlet valve must be correctly connected to a hot water and cold water supply (depending on the washing machine model).
- The plug must be accessible after installation.
- The appliance must not be installed behind a lockable door, a sliding door, or a door with a hinge on the opposite side to that of the device.
- The appliance shall not be installed in a humid place.
- Do not place other items or appliances (such as microwaves) or objects under pressure on the device.
- This product is intended for domestic use only and designed exclusively for machine-washable garments and tumble-drying suitable items.
- The product cannot be used for commercial or industrial purposes. Do not use the appliance outdoors, even if the
area is protected, as it may be exposed to moisture, rain or thunderstorms.
- Do not insert more laundry load than the allowed load (maximum allowed load indicated in the product data tables).
- This appliance is not designed to operate via external switching devices such as timers or remote control systems.
- Do not use an extension lead or multiple sockets.
- Do not wash or dry items containing fibreglass (such as certain curtains or blinds) as particles may remain in the washing machine and adhere to other garments, causing skin irritation.
- Do not stand, sit on, or lean against the appliance or its door.
- Flammable and explosive or toxic solvents are forbidden. Do not use detergents containing petrol, alcohol, etc. Use only detergents suitable for machine washing, especially for the drum.
- Garments containing oil may catch fire spontaneously, especially when exposed to heat sources such as a washing machine. The garments are heated, causing an oxidation reaction in the oil. Oxidation generates heat. If heat cannot escape, garments may become hot enough to catch fire. Piling, stacking or storing garments containing oil retains heat and therefore creates a fire hazard.
- Make sure that no objects such as lighters, matches, etc. are introduced.
- Close the door properly, if it is difficult to close, check that clothing does not prevent proper closing.
- Make sure that there is no water in the drum before opening the door.
- This appliance can be used by children aged 8 and above and people with reduced physical, sensory, or mental
ENGLISHENGLISH
capabilities or lack of experience and knowledge, as long as they have been given supervision or instruction concerning the use of the appliance in a safe way and understand the hazards involved. Do not allow children to play with the appliance. Cleaning and maintenance should not be carried out by children without supervision.
- Children of less than 3 years should be supervised to ensure that they do not play with the appliance.
- Supervise children to ensure they do not play with the appliance.
- Cleaning and maintenance should not be carried out by children without supervision.
- Always use the child lock function and switch off the appliance when not in use.
- Keep the cleaning products out of the reach of children.
Cautions during the handling of the appliance
- When relocating the washing machine, ensure transit bolts are refitted to prevent drum damage during transport.
- Water accumulated inside the appliance must be drained out.
- Handle the machine carefully. Never hold each protruded part on the machine while lifting. Do not use the appliance door as a handle during transport.
- The appliance is very heavy. Transport it with care.
- Secure the drain and water-supply hose correctly.
- Do not insert hands into the running water extracting tub.
- Do not close the door with excessive force. If it is found difficult to close the door, please check if the clothes are put in or distributed well.
- It is forbidden to wash carpets.
- Never refill the water by hand during washing.
Installation
- The appliance must be handled and installed by 2 or more people to avoid risk of injury. Wear protective gloves when unpacking and installing the product to avoid cutting hazards.
- Keep children away during installation process.
- During installation, make sure that the power cable is not damaged to avoid possible risk of fire or electric shock.
- Transit bolts must be removed before use.
- Keep the room dry and ventilated.
- Never place the appliance over the opening of an uncovered drain.
- Do not expose the device to temperatures below 5°C or above 35°C.
- Do not install in bathrooms or very damp rooms.
- Check that it is correctly levelled on the floor by means of the feet.
- WARNING! Cecotec accepts no liability for incidents caused by improper use outside the rules set out in this instruction manual.
FRANÇAISFRANÇAIS
INSTRUCTIONS DE SÉCURITÉ
| Secado --- 5 --- | ||||||
| Spin (Centrifugado) | --- 8 5 --- | |||||
| Drum Clean Plus 85 --- | ||||||
| OnSmart (Lava-do inteligente) | 40 5 --- L / P --- 0 |
- Water inlet hose
- Door
- Drain hose
- Body
- Power cord
- Detergent/softener dispenser drawer
- Control panel
- Drum
- Drain filter cover
- Adjustable feet
Note:
The graphics in this manual are schematic representations and may not exactly match the product.
2. BEFORE USE
- This appliance comes in a packaging designed to protect it during transport. Remove the appliance from its box. You can keep the original box and other packaging materials in a safe place to prevent damage to the appliance if you need to transport it in the future. If you wish to dispose of the original packaging, make sure all items are recycled properly.
- Check that all parts and components are included and in good condition. If any of them are missing or damaged, please contact Cecotec's Official Technical Support Service immediately.
Box content:
- Washer-dryer combo
- Water supply hose
- Transport feet
- Fixed spanner
- Trim cover x4
- Instruction manual
- Do not remove the product's serial number in order to keep proper traceability if technical assistance is required.
3. INSTALLATION
Removing the transport bolts
POSSIBLE DAMAGE TO THE DEVICE OR INJURY
- The device is secured for transport with transport bolts. Transport bolts that are not removed can damage the drum during washing machine operation, the appliance will vibrate and will be much noisier during spin cycles if the transport bolts are not removed before use. Be sure to completely remove the 4 transport bolts before the first use.
- Save the transport bolts.
- If a bracket was purchased with the unit, it should be installed first, before removing the transport bolts. Refer to the pedestal installation instructions.
- To avoid damage during subsequent transport, be sure to reinstall the bolts before transport.
Figure 2 shows the steps to remove the bolts. These are detailed below:
- Loosen the four transport bolts A with the wrench (supplied) and remove them.
- Remove the four spacer tubes B. During bolt removal, if the spacer tubes fall into the machine, they can be retrieved by tilting the machine forward and picking them up from the floor or from inside the machine base.
- Cover the open holes of the transport bolts with the four C-cover plugs found in the plastic bag containing the accessories.
- Store all parts in a safe place: you will need them again if the washer needs to be moved to another location.
Note:
To avoid breakage during transportation of the washing machine, follow the instructions below:
- The carriage bolts must be reinstalled.
- The power cord must be secured at the rear of the washer.
Location requirements
- The machine must be installed on a solid, level floor. Never place the machine on soft carpets or wooden floors. Do not install the machine on a makeshift base. Never place the appliance on separate racks. It is possible that the machine may move slightly due to factors such as overloading or moisture on the base. This could cause the machine to fall off the base after some time of use.
- Keep the environment dry and ventilated.
- The appliance must be installed and used in a room with a drain.
- Never place small appliances, such as microwave ovens and/or electric cookers, on the machine.
ENGLISHENGLISH
- Keep the machine away from equipment with flame, such as candles, gas stoves, liquefied gas containers, etc.
- Never place pressurized containers on the machine. - Never place the machine over an uncovered drain opening.
Free space requirements
- Install the appliance with easy access to the plug and socket. - Install the device where there is sufficient space around it.
Fig. 3
(a) 3 cm or more above
(b) 5 cm or more from behind
(c) 5 cm or more on the left side
(d) 5 cm or more on the right side
(e) 70 cm or more (This space is usually the space required in front of the appliance to open the door and gain access).
CAUTION: Do not allow metal parts of the appliance to come into contact with metal sinks or other appliances.
Appliance levelling
The appliance uses high spin speeds to remove water at the end of the washing cycle. It is important that it is level, and the adjustable feet press with equal pressure against the floor. This will help to ensure quieter operation and less vibration.
Follow these steps:
- Install the appliance on level, solid surfaces. Preferably in a corner of the room.
- If the floor is not level (or uneven), adjust the appliance's adjustable feet as needed to level it. Do not place anything under the appliance's adjustable feet to help level it.
- Do not extend the appliance's adjustable feet more than necessary. The more extended the legs are, the more vibration the device will experience. Start with the adjustable legs fully threaded and adjust each leg as needed.
- Use a spirit level (not supplied) to check the top of the appliance and ensure it is level from side to side and front to back.
- Press down on each corner of the appliance's top to ensure it does not wobble. There should be no "yielding" or movement. All adjustable feet must press equally against the floor. This is just as important as ensuring that the appliance is level to avoid vibrations.
- When the appliance is level and does not wobble, lock the adjustable feet in place by tightening the locknuts against the bottom of the washing machine. Ensure you do this without changing the foot height (hold the foot while tightening the locknut).
Procedure to adjust the adjustable feet
Fig. 4
- After determining which adjustable legs of the fixture need to be extended, have someone lift the fixture slightly to take pressure off the leg to be adjusted.
- Rotate the adjustable leg of the fixture to extend it downward as necessary to raise the corner of the fixture the correct amount and level it.
- When the foot height is correct, use the spanner (supplied) to tighten the locknut against the bottom of the appliance and secure the foot in place.
Water and electrical supply connection
Water supply hose connection
- Connect one end of the water inlet hose to a cold water tap and hand tighten. Before making the connection, allow the water to run freely until it runs completely clear. Fig. 5.
- Connect the other end of the water inlet hose to the water inlet valve at the rear of the appliance and hand tighten. Fig. 6.
-
Open the tap slowly and make sure there are no water leaks.
-
Do not kink, crush, modify or cut the hose.
- Tighten the end of the hose firmly by hand.
- The water supply pressure must be within a range between 0.03 and 1 MPa. If the pressure exceeds this value, a pressure reducing valve (not included) must be installed.
- If the hose is not long enough, please contact Cecotec's Official Technical Support Service or an authorised technician.
- Never use a second-hand water inlet hose.
- Use the new water inlet hose supplied with the appliance.
Drain hose connection
Drain point height
Height difference between floor and drain point: min. 60 cm (24 in.) and max. 100 cm (39 in.). Fig. 7
Drainage connection types
a) Vertical tube. Fig. 8
- Attach the drain hose to the elbow (not supplied).
- Place the elbow on the drain hose 4 inches (100 mm) from the end of the hose.
- Insert this section of the drain hose into the drain pipe. If the hose is inserted too far, this may cause the washing machine to continuously drain while filling.
- Secure the elbow and hose with a cable tie to prevent the hose from slipping out of the drain pipe during use.
ENGLISHENGLISH
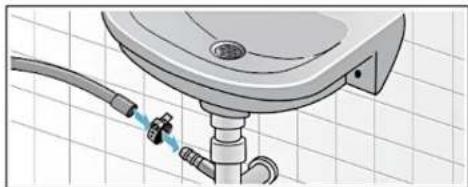
b) Sink trap
Attach the drain hose to the sink trap using a ∅ 0.9-1.6 inch (20-44 mm) hose clamp. Fig. 9
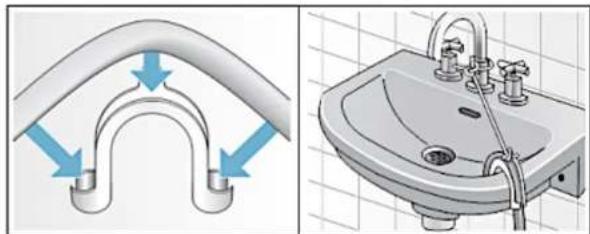
c) Sink
WARNING RISK OF BURNS: When washing at high temperatures, there is a risk of burns if you touch the hot foam, e.g. when pumping hot foam into a sink. Do not reach into the hot foam.
Note: Device damage/tissue damage.
If the end of the drain hose touches the discharged water (water drained from the washing machine), this discharged water may be siphoned back into the washing machine and damage the appliance or fabrics. Make sure that:
- There is no plug in the sink drain.
- The end of the drain hose does not touch the discharged water.
- The sink drain is free-flowing and not partially clogged.
- Attach the drain hose securely to the sink.
Figure 10 shows the correct way to place the hose in the sink.
- Do not twist, pull or bend the drain hose.
- Secure the drain hose with the cable tie to the drain pipe, sink, etc., so that the hose will not be pulled out by the force of the water.
- The use of drain hose extensions is not recommended; if absolutely necessary, the extension must have the same diameter as the original hose and must not exceed 250 cm in length. Fig. 11
Electric connection
Before plugging the washing machine into the mains socket, ensure that:
- The socket is earthed and complies with applicable legislation.
- The socket is capable of handling the maximum power load of the appliance as indicated on the technical data label affixed to the machine.
- The power supply voltage is within the values indicated on the rating plate affixed to the washing machine.
- During heating, the maximum current of the washing machine is 10A, so make sure that the power supply system (voltage, current and cable) is suitable for the load of the appliance.
- The socket is compatible with the washing machine plug. If this is not the case, have the outlet or plug replaced by a qualified electrician.
4. OPERATION
Control panel
Fig. 12
A-After pressing the power icon to start the machine, select the desired wash cycle in the highlighted icon area. The corresponding wash cycle light will turn on and the display will show the duration time of the selected wash cycle.
B- Icons for functions and options
-
Delay End touch icon. Press to set the end time of the wash cycle.
-
TEMP. touch icon: Press to change the water temperature for the current cycle.
-
Touch icon SPEED (Speed): Press to change the spin speed for the current cycle.
-
RINSE (Rinse) touch icon: Press to change the number of rinses for the current cycle.
-
Touch icon DRYING (Drying): Press to set the drying cycle.
-
Touch icon KidLock (Child Lock) function: Press to activate the child lock wash cycle.
-
SteamMax (Steam Wash) touch icon: Press to activate the STEAM wash cycle.
-
OnSmart (smart wash) touch icon: Press to activate the OnSmart wash cycle.
-
Touch icons "+" or "-" : Press these buttons to adjust the cycle time. The set cycle time is shown on the digital display.
Note: Some cycles do not have a selection function to adjust the cycle time.
- START/PAUSE touch icon: Press and hold the button to start or pause a washing cycle.
-
Add clothes during the current program Once the cycle has started, if you wish to pause the wash cycle, press and hold the Start/Pause touch icon again. If the door lock indicator light off, the door can be opened, and laundry can be added or removed. To resume the washing cycle from where it was interrupted, press the icon again.
-
POWER button: To turn the machine on and off, press and hold this icon.
C- Display
Fig. 13
The display is useful when programming the machine and provides a wealth of information.
- Child Lock (KidLock)
The illuminated icon indicates that the child lock function is activated, and the control panel is locked (except for the Power icon).
- Door lock
The illuminated icon indicates that the door is locked. To avoid any damage, wait until the icon turns off before opening the door.
ENGLISHENGLISH
Program progress bar.
During the washing process, the light bar shows the washing progress with the remaining programme time.
- Delayed end indicator (Delay End)
The illuminated indicator light indicates that the function is activated. The countdown to the end of the selected wash cycle will appear on the digital display.
- SteamMax Indicator (steam washing)
The illuminated indicator light indicates that the steam function is activated.
- OnSmart Indicator (smart washing)
The illuminated indicator light indicates that the OnSmart program is selected. There are three ways to configure the OnSmart washing programme.
- Digital display.
Fig.
a. Remaining washing cycle time
b. Delay End Time
c. Washing temp.
d. Drying time
e. Number of rinses
f. Spin speed
g. Error code
Preparing the laundry
Note: Damage to the device/tissue. Foreign objects (coins, paper clips, needles, nails, etc.) can damage clothes or washing machine components.
Keep the following tips in mind when preparing your clothes:
- Remove any loose or metal objects, such as safety pins, clips, etc., from the clothes.
- Remove sand, coins, etc., from pockets and cuffs.
- Close zips and fasten cushion covers, duvet covers, etc.
- Remove the curtain hooks or secure them in a net bag.
- Particularly delicate items, such as stockings or lace curtains, or smaller items, such as tiny socks or handkerchiefs, should only be washed in a net bag.
- Some garments are best washed inside out. This includes knitwear, trousers, t-shirts and sweatshirts.
- Make sure underwired bras are machine washable.
- Ensure that underwired bras are washed in a mesh bag that can be securely fastened with a zip or button! If the wire comes out of the cup, it can pass through the drum holes and cause significant damage.
Preparation of laundry for drying
- Only dryer-safe textiles that have been washed, rinsed and spun-dried.
- Remove as much water as possible from the laundry. Do not press the button to reduce
the spin speed.
- To ensure even drying, sort items according to fabric type and required dryness level.
- Items that require ironing do not have to be ironed immediately after drying in the dryer. It is a good idea to fold or roll them together for a while, so that the remaining moisture is evenly distributed.
- When washing clothes to be tumble-dried, use the correct amount of detergent and textile care products according to the manufacturer's instructions. Some detergents and textile care products, starch or fabric softeners may contain chemicals that can negatively deposit on the moisture sensors, affecting their function and the drying result.
The following textiles must not be tumble-dried:
- Clothing marked with the care symbol:

- Wool or articles containing wool. Risk of shrinkage!
- Delicate fabrics (silk, synthetic net curtains). Risk of wrinkles!
- Items containing foam rubber or similar materials.
- Items that have been treated with flammable solvents, such as stain removers, petrol, paint thinners. Danger of explosion!
- Items that still contain hair spray or similar substances. Dangerous vapors!
- Leaking clothes. Waste of energy!
Sorting laundry by colour and soil level
Sort garments according to colour, soil level and recommended washing temperature range
- Garments may lose their colour.
- Never wash new multicoloured items together with other clothes.
- Wash white garments separately from coloured garments. Otherwise, white items may tend to turn grey.
Degree of soiling
- Light soiling. No visible dirt or stains, but items may have absorbed some odour. This could include lightweight summer clothes such as t-shirts, shirts or blouses worn only once. Also for refreshing bed linen or guest towels.
- Normal soiling. Visible soiling and/or some light staining. This could include items such as t-shirts, shirts or blouses that have been sweated in or worn several times. Also kitchen towels, hand towels or bed linens used for up to a week or more. Unstained curtains that haven't been washed for up to six months.
- Heavy soiling. Visible dirt and stains. This could include tea towels, cloth napkins, baby bibs, children's outerwear or football shirts and tops stained with grass or soil. This may also include workwear such as overalls and jeans, and other garments used for outdoor work and activities.
ENGLISHENGLISH
5. PROGRAMMES AND FUNCTIONS
Washing cycle table
| Wash cycle | Max temp. (°C) | Maximum load (kg) | Type of detergent | |||
| Washing | Drying | Detergent | Fabric softener | |||
| Normal | Special | |||||
| Mix | 60 | 8 | 5 | L/P | --- | 0 |
| Quick | 40 | 1 | 1 | L/P | --- | 0 |
| Wool | 40 | 1 | --- | --- | L | 0 |
| Cotton | 60 | 8 | 5 | L/P | --- | 0 |
| Eco 40-60 | 40 | 8 | 5 | L/P | --- | 0 |
| 20 °C | 30 | 2 | --- | L/P | --- | 0 |
| Sanitise | 85 | 3 | 3 | L/P | --- | 0 |
| Drying | --- | --- | 5 | --- | --- | --- |
| Spin | --- | 8 | 5 | --- | --- | --- |
| Drum Clean Plus | 85 | --- | --- | --- | --- | --- |
| OnSmart (Smart wash) | 40 | 5 | --- | L/P | --- | 0 |
L = Gel/Liquid detergent; P = Powder detergent; O = Optional; ---- = No.
If you use liquid detergent, it is not recommended to activate the Delay end function.
It is recommended to use: powder detergent from 20 °C to 80 °C and wool detergent from 20 °C to 40 °C.
Follow the dosage recommendations of your detergent.
| Wash cycle | Description |
| Mix | For washing mixed loads of lightly to normally soiled cotton and synthetic fabrics, white and coloured items together. |
| Quick | For a small amount of garments or lightly soiled items that you want to finish washing quickly. |
| Wool | For machine-washable wool and wool blend garments. |
| Cotton | For everyday cotton, linen and cotton blend items. Energy efficiency test programme. |
| Eco 40-60 Energy efficiency test programme. | |
| 20 °C For a small amount of clothing that is easy to fade. | |
| Sanitise For clothes that need sterilization and decontamination. | |
| Drying For drying damp cotton fabrics. | |
| Spin This cycle uses a spin action to reduce drying time for heavy fabrics and hand-washed delicate items. | |
| Drum Clean Plus Clean the drum by removing dirt and bacteria from the drum. Make sure the drum is empty. | |
| OnSmart (Smart wash) | Intelligent wash cycle that automatically adjusts time and temperature according to the weight of the laundry (started by pressing the OnSmart touch icon - icon footprint 3") |
Programmes
OnSmart (smart washing)
The OnSmart washing programme can intelligently detect the laundry weight and adjust the washing time and temperature to perform a smart wash. When "Auto" is displayed in the detection stage after starting the program, the OnSmart wash program can be started in the following three ways:
- When the appliance is off, press and hold the OnSmart button (footprint icon) for at least 3 seconds, the washer will run the OnSmart wash program directly, with the OnSmart indicator light on.
- When the appliance is on, press and hold the OnSmart button for at least 3 seconds, the appliance will run the OnSmart wash program directly, with the OnSmart indicator light on.
- When the unit is on, briefly press the OnSmart button, the OnSmart indicator light will turn on, and then press the Start/Pause button.
Washing + Drying" program
Only certain washing programmes can add the drying function. First, load the laundry into the drum, close the door, press the drying touch icon (represented by a towel on the control panel) to select the two drying modes as follows:
Automatic drying: Press the drying touch icon (represented by a towel on the control panel) continuously to adjust the drying time displayed on the panel, and when "Auto" is displayed, the automatic drying mode will be activated, the drying time will be automatically adjusted according to the amount and humidity of the laundry.
- Timed drying: Press the drying touch icon (represented by a towel on the control panel), the digital display will show the drying time (30-60-90-120-150-180-210-240), select an appropriate drying time and enter the drying time. Then, press the Start/Pause button,
ENGLISHENGLISH
and the machine will begin to run the Wash + Dry programme, with the drying programme automatically activated at the end of the washing programme.
Drying program
The Drying program is suitable for drying cotton garments. Do not dry garments prone to warping or shrinkage. When the Drying program is set, before drying, it is recommended to run a single spin program to dry the laundry.
- First, load the laundry into the drum, close the door, press and select the Drying program, and press the Drying touch icon continuously, to select the Automatic Drying or Programmed Drying mode (as described above).
- Then press the Start/Pause button to start the programme.
Precautions for the drying programme
- The machine will automatically extend the drying time if clothes are too damp, and the display showing "0:20" for extended periods is normal.
- When the drying program is running, the faucet must be open, as water is required for cooling and dehumidification during the drying program.
- The longest drying time is set according to the different models.
- To prevent the clothes from wrinkling due to over-drying, the drying time can be adjusted a little less at first, and then the drying time can be added according to the drying effect.
- Before running the drying programme, it is recommended to run a spin cycle first.
- If necessary, untie any knots in the laundry that may have formed after spinning and then place them in the drum to dry.
- For larger or thicker laundry, drying may be uneven in some areas of the garments. Add drying time according to the drying effect after the end of the drying program.
- Woollen fabrics are not suitable for drying.
- Do not dry garments that may become misshapen or shrink.
- Some programmes do not have the drying function.
Steam function (SteamMax)
- This function adds a steam process at the end of the water drain of the selected wash program, just before the last spin.
- Press the SteamMax touch icon to add a steam washing process after the final water drainage stage of the selected (or running) washing programme and before the final spin.
- During the steam washing process, the machine generates a large amount of high temperature steam which penetrates deep into the fabrics, improving their softness and elasticity and, at the same time, eliminating unpleasant colours and refreshing the laundry.
- After the steam washing process, the machine enters the final stage of rinsing and spinning.
Benefits:
- Reduces wrinkles in clothes, leaving them smoother and more elastic.
- Helps eliminate unpleasant odors and refreshes garments.
- Facilitates ironing.
Note: This program is designed for cotton garments that do not fade easily.
WOOL programme
- Before washing, confirm that garments are labeled "machine washable".
- Once the cycle is complete, promptly remove garments, reshape and dry them to prevent deformation caused by extended time in the drum.
- To avoid damage to the garments, the water temperature should not exceed 40°C.
- For best results and to minimise garment damage, use specialist wool detergent and do not exceed 1.0 kg load.
Delay End
This function allows you to program the washer-dryer to end a wash program at a specific time, up to 24 hours later. The duration of the wash program is included in the total time of the Deferred End.
To configure it:
- Select the desired washing programme.
- Before pressing Start/Pause, press and hold the Delay End button for 3 seconds.
- Continue pressing the button until the display shows the desired end time. i+
- The indicator light will light up.
- Press Start/Pause to start the delayed end countdown.
- To cancel, press any other wash program button to restart the program. The indicator light will go out.
Notes
- The Delay End function is not available in all wash programs.
- Actual program end time may vary slightly due to factors such as water supply pressure, drainage, type of laundry and water temperature.
Child Lock (KidLock)
This function prevents misuse of the machine by children and avoids external interference during the washing process.
- During operation, press and hold the SPEED button for 3 seconds to activate or cancel the Child Lock function.
- The indicator light will light up.
- The door cannot be opened
- The control panel will be locked and the buttons will not respond (except for the power button).
ENGLISHENGLISH
Note:
- If the machine is turned off by pressing the Power icon while the Child Lock is activated, the function will be cancelled.
- When the machine is switched on again, it will directly run the selected programme before it was switched off.
Sound cancellation
- You can mute the machine sounds (buzzer) that occur during operation.
- To cancel, press and hold the Speed and OnSmart touch icons at the same time for at least 3 seconds.
- If you wish to reactivate it, perform the same operation (press and hold Speed and OnSmart for 3 seconds). The buzzer will be activated after one beep.
Adding laundry during running program
- When the program is running, press and hold the Start/Pause touch icon to pause the program, if the door lock indicator is on. It means that the door can be opened to add or remove laundry.
Once the operation is completed, close the door, press and hold the Start/Pause touch icon again, so that the machine will continue to run from the point where it was interrupted.
WARNING: If the water level or temperature in the drum is too high, the door lock indicator light will illuminate. In this case, the door cannot be opened and you will not be able to add or remove laundry during the program run.
Interior light
- The internal drum light is always on during programme or function setting.
- When the programme is paused, the interior light can be activated by opening the washing machine door.
- When the program is running, the interior light will turn on automatically with the change of washing phase.
- Pressing any touch icon other than the power touch icon will also illuminate the interior light.
Setting the programme time
- Press the "+" or "-" key to adjust the program time.
- The program time setting value is shown on the digital display.
- The washing machine will operate according to the set program time.
Note: Some programmes do not allow time adjustment.
Load balancing system (Smooth Wash)
The washer has an automatic detection system for unbalanced loads.
- The washing machine has an automatic eccentric load detection system. In the spinning process, if the laundry is unevenly distributed, the appliance will level and adjust the laundry until it is evenly distributed before spinning.
- If the laundry cannot be evenly distributed within the specified time, the appliance will not spin to avoid excessive vibrations. At this point, it is necessary to check if the laundry is knotted or tangled, and select the "Spin" programme after rearranging the laundry.
- When you wash less laundry, the machine may not complete the spin process due to balance protection.
WARNING: Due to different types and materials of clothes, the appliance's automatic adjustment and balance system may level and adjust the laundry several times, extending the spin time. This is normal and not a machine fault.
Before loading your first wash
- The washing machine has been tested before leaving the factory. This process involves running several wash cycles. As a result, a small amount of water may remain in the drum and drainage system. Run a drum cleaning cycle without laundry to clean the system before your first load of laundry.
- First, add 1 to 2 tablespoons of detergent to chamber I. Then run the Drum Clean cycle. Wait for the cycle to finish before running another program.
Using the washing machine
1. Loading the laundry
Open the door and load the laundry. Loosely insert the garments one by one into the drum without overloading it. Overload may result in unsatisfactory washing and wrinkled clothes.
2. Close the door
Make sure that clothes do not get caught between the door and the rubber seal. Close the door properly, you will hear a click.
3. Open the tap
Make sure that the washing machine is connected to the water supply. Open the tap.
4. Select the desired programme
Press and hold the power touch icon to switch on the washing machine. Then select the desired programme. The indicator light of the selected programme will turn on and the display will show the preset duration of the washing cycle as well as the temperature and spin speed settings available for the selected programme. Adjust the temperature and/or spin speed settings if necessary with the corresponding icons
ENGLISHENGLISH
- Set the temperature
Press the temperature selection icon to progressively decrease the value until cold wash is set ( ^ — ^* will be shown on the display). Pressing the icon again will set the highest setting available.
- Set the spin speed
Press the Spin speed selection icon to progressively decrease the spin speed until the spin cycle is switched off ("--" will be shown on the display). Pressing the icon again will set the highest setting available.
- Select options
Press the touch icon for your desired function, and the corresponding indicator light will illuminate. Press the icon again to cancel the selected option, the corresponding indicator light will switch off.
If the selected option is not compatible with the set programme, the incompatibility will be signalled by a beep, and the indicator light of the corresponding option will flash.
If the selected option is incompatible with a previously configured option, only the most recent selection shall remain active.
5. Add detergent
Slide open the detergent drawer and add detergent (and additives/fabric softener) into the appropriate compartments as shown below.
Fig. 15
- Powder detergent compartment
- Liquid detergent compartment (do not exceed "MAX" level)
- Fabric softener compartment (do not exceed "MAX" level)
Observe the dosage recommendations on the detergent container. Correct detergent/additive dosage is important because:
- Optimises the cleaning result
- Prevents irritating residues of leftover detergent in your laundry.
- Saves money by avoiding waste of leftover detergent.
- Protects the washing machine by preventing component calcification.
- Respects the environment by avoiding unnecessary environmental burden
Important!
Do not use hand-wash detergents, as they generate too much suds!
Use powder detergent for white cotton items, for pre-wash and for washing at temperatures above 60°C!
Follow the dosage instructions on the detergent package!
6. Initial program
- Press the Start/Pause button. The corresponding indicator light will illuminate, the door will lock and the door lock indicator light will turn on.
- To avoid overflows, do not reopen the detergent dispenser once the program has started.
- The remaining duration of the programme may vary. Factors such as Imbalance in the wash load or foam formation may affect the programme duration.
7. Changing the settings of an ongoing programme
- You can continue to change the settings while the programme is in operation. The changes shall be implemented as long as the respective programme phase has not been completed yet.
- To change the settings of an ongoing programme:
- Press the Start/Pause touch icon to pause the running washing programme.
- Change the settings.
- Press the Start/Pause touch icon again to resume the programme.
- If you have changed the programme, do not add detergent again.
- To prevent a running programme from being accidentally modified (e.g. by children), activate the Child Lock.
8. Pausing an ongoing programme and opening the door
- Press the Start/Pause touch icon to pause the running washing programme.
- If the water level or temperature in the drum is not too high, the Door Lock indicator light will switch off. You can open the door, for example, to add more laundry or to remove laundry that has been loaded by mistake. Press the Start/Pause touch icon again to resume the programme.
9. Cancelling an ongoing programme
- Press the power touch icon to switch off the washing machine.
- If the water level and/or temperature is not high, the door will unlock and can be opened.
- The door will remain locked if the water level in the drum is high. To unlock the door, switch on the washing machine by pressing and holding the power touch icon. Then, select the Spin programme and deactivate the Spin option by pressing the Spin speed selection icon repeatedly until “---” appears on the display.
- Press the Start/Pause touch icon to start the Spin programme. The door will unlock at the end of the programme.
10. Switching off the appliance when a programme ends
- At the end of the cycle, the word 'END' is shown on the digital display.
- The door can only be opened when the door lock indicator light switches off
- Check that the door lock indicator light is off. Then, open the door and take out the laundry.
- Press the power touch icon to switch off the washing machine.
ENGLISHENGLISH
- Close the tap.
- Leave the door ajar to allow the inside of the appliance to dry.
6. CLEANING AND MAINTENANCE
Read the following instructions to maintain and protect your washing machine and keep it in optimal working conditions.
Warning: Risk of electric shock
- To avoid the risk of electric shock, always disconnect the appliance from the mains before cleaning.
- Do not clean the appliance with a pressure washer.
Cutting off water and electricity supplies
- Close the water tap after each washing cycle. This will limit wear on the hydraulic system and help prevent leaks.
- Unplug the appliance when cleaning and during any maintenance work.
Cleaning the outside of the washing machine
Warning: Risk of explosion
To avoid the risk of explosion, never clean the washing machine with flammable solvents.
Clean the exterior surface when necessary as follows:
- Use warm soapy water or a mild (non-abrasive) cleaning product.
- Use a soft cloth to dry it.
- Dispose of waste immediately.
- Do not use high-pressure sprayers.
Drum cleaning
- Metal debris left in the drum can cause rust stains.
- Never use steel wool pads to try to remove them.
- Use a non-chlorine cleaning product and follow the manufacturer's instructions.
Descaling the washing machine
- If you use the correct amounts of detergent, you do not need to descale the washing machine.
- If it is necessary to descale the drum of the appliance, follow the instructions of the manufacturer of the descaling product.
- Small amounts of descaling agent can be used to remove white stains on the washing
machine drum caused by limescale or mineral deposits or small amounts of rust caused by metal objects left in the drum.
Caution: Descaling agents contain acids which can attack parts of the appliance and discolour the laundry.
Door and drum care
- Always leave the door ajar to prevent odours from forming.
Checking the water supply hose
- Check the water supply hose at least once a year. If there are any cracks, it must be replaced immediately. Water pressure is very strong, and a cracked water supply hose could easily burst open.
- Never use water supply hoses that are not new.
Cleaning the detergent compartment
Fig. 16
Clean the detergent drawer regularly to avoid clogging of the detergent powder and fabric softener compartments, which would affect the detergent output to the drum. To do so, follow the instructions below:
- Open the detergent dispenser drawer completely. Press down on the top of the box (1) and pull it out (2) to remove it from the housing.
- Remove the liquid detergent cap (3) by holding it and pulling it upwards from the detergent dispenser drawer.
- Clean the liquid detergent cap and the detergent dispenser box under running water. Gently wipe off any remaining detergent residue.
- Replace the liquid detergent cover and slide the detergent dispenser drawer until it clicks into place, and close it securely.
Note: During the cleaning process, do not open the liquid detergent compartment or tilt or turn the detergent drawer to prevent it from slipping out.
Tip: Do not use the appliance without the detergent drawer in place. Always keep the drawer completely closed.
Cleaning the water supply hose mesh filter.
Fig. 17
- Close the water inlet tap and unscrew the water supply hose.
- Carefully clean the mesh filter at the end of the hose with a fine brush.
- Next, unscrew the water supply hose at the back of the washing machine by hand. Remove
ENGLISHENGLISH
the mesh filter from the water inlet valve at the back of the washing machine with pliers and clean it carefully.
- Replace the mesh filter. Reconnect the water supply hose to the tap and washing machine. Do not use any tools to connect the inlet hose. Open the water tap and check that all connections are tight.
Cleaning the drain pump
Warning: Risk of burns
Risk of skin lesions from hot water.
You are responsible for ensuring that all safety precautions are followed when draining water from the machine and/or manually opening the door.
- It may be necessary to clean the drain pump if the washing machine does not drain (no sound of water pumping from the appliance when it should be draining, but other nearby drains, such as a sink, drain properly).
- The pump can become clogged with loose debris (a good reason to check the drum and remove any visible debris after each load). Fabrics that shed large amounts of lint can also cause blockages.
- To access the drain pump, the maintenance cover must first be opened (see following steps). Once you have opened the maintenance cover, proceed as follows:
-
If the appliance has not drained, try draining it. Choose the Spin cycle. Then press the spin speed selection touch icon repeatedly until all spin speed indicators turn off. Then press the Start/Pause touch icon. Wait a few moments for the cycle to empty the water from the drum. If the pump is totally blocked, the appliance will not be able to drain, and the cycle will end.
-
Turn off the tap so that no more water enters and needs to be drained. Switch off the appliance. Unplug the appliance from the mains.
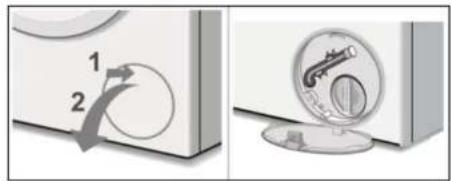
-
Open the drain filter cover. Fig. 18
-
Use the removable drain hose located on the pump access opening to drain the remaining water into a suitable container (up to 20 litres of water can be drained). Remove the plug from the hose and place it over the side of a suitable container and allow the water to drain out of the drum. When finished, replace the plug on the end of the hose and put it back in place. Fig. 19
-
Turn the pump cover counterclockwise to remove it. A small amount of residual water may flow out when the cover is removed. Clean the inside of the pump hose, removing any debris or foreign objects. Check that the impeller at the rear of the pump housing can rotate freely. Remove any lint, dirt or detergent residue from the pump cover. Reinstall the pump cover by screwing it firmly into position. The part that allows the cover to be opened must be vertical. Fig. 20
-
Close the drain filter cover. Clean up any spilled water.
7. TROUBLESHOOTING
The washing machine may occasionally stop working. Before contacting Cecotec's Official Technical Support Service, please make sure that the solution to the problem is not listed below.
| Problem Cause/Possible | solution |
| There are coloured stains and oil stains on the drum | Run a Drum Clean Plus washing cycle without detergent and laundry. |
| Bad smells Due to the use | of rubber parts, the machine will have a rubber smell at the beginning of use, but the rubber smell will gradually disappear during use. |
| The door cannot be opened | The safety protection function is in operation, and the water temperature and/or water level are too high. |
| The programme ended normally, but there was a power cut. | |
| If the Child lock function is activated, deactivate it. | |
| If the Delay End function is activated, deactivate it. | |
| Water spillage in the detergent drawer | The dispenser is blocked with detergent and requires cleaning. |
| The water pressure is too high and needs to be lowered; close the tap on the water supply pipe slightly and try again. | |
| The appliance is tilted forward (it must be level). | |
| Water leaks (other than from the detergent drawer). | Water supply hose is loose, check connections. |
| Water supply hose is tight but still leaks; if so, replace the rubber washers, or the water supply hose does not have the rubber washer. | |
| The drain hose is not positioned correctly. | |
| In case of water leakage inside the machine, turn off the power supply and contact Cecotec's Official Technical Support Service. |
ENGLISHENGLISH
| The washing machine does not switch on | Appliance is not fully plugged in or not plugged in enough to make contact. |
| There is no power at the socket or there is a problem with the fuses. | |
| Wash cycle does not start | The door is not properly closed. |
| You did not press the Power icon. | |
| You have not pressed the Start/Pause icon. | |
| The water tap has not been turned on to allow water to flow into the appliance. | |
| The Delay End function has been activated. | |
| No water or detergent enters the drum. Error “E02” appears on the display | Water supply hose is kinked or bent. |
| The water supply hose is not connected to the water supply. | |
| The water pressure is too low. | |
| The water tap has not been opened to allow water to flow into the machine. | |
| There is no water supply in the dwelling. | |
| The mesh filter in the water supply hose and/or the water inlet valve is/are blocked. | |
| Tap and/or water supply pipe is/are frozen. | |
| The Delay End function has been activated. | |
| You have not pressed the Start/Pause icon. | |
| There is already enough water in the drum. | |
| Water discharge when the programme starts | This is not an issue. Do not open the door to pour water directly into the drum before the programme is run, otherwise the machine may discharge the water that was poured into the drum when the programme was started. |
| The water level is too low when the machine is washing. | This is not an issue. The water consumption in the wash cycle of this appliance is relatively small, the water level in the wash cycle is lower than that of other types of washing machines. |
| Overfilling of water during operation of the wash cycle | If the water level drops, the machine will automatically recover the water. |
| When the amount of laundry to be washed is too large, the appliance can automatically fill the water several times during the operation of the washing cycle. | |
| Too much foam in the drum or foam overflows from the detergent dispenser. | The detergent is not suitable for machine washing (must show the text “for washing machines” or “hand and machine wash” or similar). |
| Too much detergent was used; less detergent is required in soft water. | |
| The spin phase is repeated several times. | Due to different types and materials of laundry, the load balancing system of the appliance may wobble and scatter the laundry many times to extend the spin time. This is a normal phenomenon, not an incidence of the machine. |
| Machine does not spin No spin speed has been selected. The display shows “—” | |
| The machine vibrates a lot during the spin cycle | The feet have not been adjusted, causing the machine to wobble. |
| If you have just installed the appliance: the transport bolts, including the plastic spacer, or the polystyrene packaging have not been removed when installing the machine. | |
| The appliance is trapped between furniture and/or walls. | |
| The load is slightly unbalanced, and the device is rotating, but at a slower speed. | |
| Spinning result is not optimal | When you wash less laundry, such as a pair of jeans, a jumper, a bath towel, etc., the machine may not complete the spin phase due to balance protection. |
| If the load is slightly unbalanced, the appliance will spin, but at a lower speed, not at the cycle’s default spin speed or the spin speed setting for the cycle. | |
| Machine does not drain, drains slowly or “E03” appears on the display. | The top of the drain hose is too high. It should be installed at a height of 65-100 cm from the ground. |
| The draining pump filter is blocked. | |
| Drain hose is kinked or bent. | |
| Drain hose is blocked or frozen. | |
ENGLISHENGLISH
| The wash programme time stops counting before entering the high-speed spin process. | This is not an issue. The load balancing system of the appliance wobbles and disperses the laundry in the drum for a long time to achieve balance and complete the spin at high speed. In the tumbling and spreading process, the programme time stops counting before the appliance reaches the high-speed spin process. |
| Washing programme lasts too long | Programme times will vary due to water pressure, incoming water temperature, and if the load is unbalanced. As a result, the programme times will increase (see “Spin cycle repeats several times”). |
| Excessive noise There will always be some noise from the motor. pump and drum during spinning. | |
| The machine is continuously filled with water and continuously emptied. | The top of the drain hose is too low. It should be installed at a height of 65-100 cm from the floor. |
| The end of the drain hose has been pushed too far down into the standpipe; the hose elbow must be installed 100 mm from the end of the drain hose. | |
| The end of the drain hose is submerged in the discharged water. | |
| The drained water returns to the apparatus | If the end of the drain hose touches the discharged water (water drained from the washing machine). It (the discharged water) may be sucked back into the appliance and damage the appliance or garments. |
| Control panel gets hot This is a slight heating effect of the electronic components on the PCB board installed on the back of the control panel. | |
| After drying, there are drops of water on the door and drum | During drying, water droplets may accumulate on the door. Clean them. |
| Do not put too many clothes or heavy items. | |
| General issues Your appliance contains sensors that monitor progress during the washing cycle (e.g. water level, temperature, unbalanced loads, washing time/progress). Normally, if your appliance completes the cycle successfully, it is unlikely that there will be a problem. |
In the event of any of the following faults occurring, they shall be detected by the microcomputer system. The washing machine will beep, and the following fault codes will be displayed:
| Error codes | Error type | Possible cause and solution |
| E02 No water inlet | Is the tap open? Has the water supply been cut off? Are the water supply hose mesh filter and water inlet valve blocked? Is the water supply hose frozen? If the answer is yes, try to solve the problems yourself. If the error code is still displayed, please contact Cecotec's Official Technical Support Service. | |
| E03 Abnormal drainage | Clean the pump filter.Check if the drain hose is bent, kinked or clogged. If the problem persists, contact Cecotec's Official Technical Support Service. | |
| U4 Door fault | The door may not be properly closed. Close the door again and then press the Power icon to switch off the washing machine. Then switch it back on and press the Start/Pause touch icon to restart the programme. If the problem persists, contact the official Cecotec Technical Support Service. | |
| H | Drum temperature is high | Press the Start/Pause icon to suspend operation of the appliance and wait a few minutes. When the drum temperature drops to a safe range and the fault code disappears from the display, press the Start/Pause icon to restart the programme. If the problem persists, contact the official Cecotec Technical Support Service. |
ENGLISHENGLISH
| FXXX The concentration of negative ions in the drum is too high. | Press the Start/Pause touch icon to suspend washing machine operation and wait a few minutes. When the negative lon charge in the drum drops to a safe range and the fault code disappears from the display, press the Start/Pause icon to restart the programme. If the problem persists, contact the official Cecotec Technical Support Service. |
| EXX Other faults | Switch off the appliance by pressing the Power icon. Then disconnect it from the mains and contact Cecotec's Official Technical Support Service. |
Note: Make sure to check the cause of the fault and solve it before pressing the Start/Pause icon again. If the fault code disappears, the washing machine will continue to operate. If the error code still appears, unplug the power cord and contact Cecotec's Official Technical Support Service.
8. RECYCLING OF ELECTRICAL AND ELECTRONIC EQUIPMENT

This symbol indicates that, according to the applicable regulations, the product and/or battery must be disposed of separately from household waste. When this product reaches the end of its shelf life, you should dispose of the batteries/accumulators and take them to a collection point designated by the local authorities.
For detailed information on how to properly dispose of electrical and electronic equipment and/or the corresponding batteries, consumers should contact their local authorities. Compliance with the above guidelines will help protecting the environment.
Information regarding national packaging recycling systems and their marking can be found on our website.
9. COPYRIGHT
The intellectual property rights over the texts in this manual belong to CECOTEC INNOVACIONES, S.L. All rights reserved. The content of this publication may not, either in part or in its entirety, be reproduced, stored in a retrieval system, transmitted or distributed by any means (electronic, mechanical, photocopying, recording or similar) without prior authorisation from CECOTEC INNOVACIONES, S.L.
10. SIMPLIFIED EU DECLARATION OF CONFORMITY
CE Cecotec Innovaciones hereby declares that this appliance complies with the essential requirements and other relevant provisions of applicable European Union regulations. This appliance has been designed, manufactured and tested in compliance with required safety and quality standards. The full text of the EU Declaration of Conformity can be found on the following website: https://cecotec.es/es/information/declaration-of-conformity
FRANÇAISFRANÇAIS
1. PIÈCES ET COMPOSANTS
Image 1
| Lavage rapide(Quick) | 40 1 1 L / P --- | 0 | ||||
| Laline (Wool) | 40 | 1 | --- | --- | L | 0 |
| Coton (Cotton) | 60 B 5 L / P --- | 0 | ||||
| Eco 40-60 40 8 5 L | / P --- 0 | |||||
| 20 °C | 30 | 2 | --- | L / P | --- | 0 |
| Stérilisation(Sanitize) | 85 3 3 L | / P --- 0 | ||||
| Séchage | --- | --- | 5 | --- | --- | --- |
| Essorage (Spin) | --- | 8 | 5 | --- | --- | --- |
| Nettoyage cu tambour | 85 --- | --- | --- | --- | ||
| Lavage intelligent(OrSmart) | 40 5 --- | L | / P --- 0 |
L= Lessive liquide; P= Lessive en poudre; O= En option; ----= Non.
Lavage intelligent (OnSmart)
| Cotton (colone) | 60 8 5 L / P --- D | |||||
| Eco 40-60 40 8 5 L | /P --- O | |||||
| 20 °C 30 2 --- L / P --- O | ||||||
| Sanitize (Sterilizzazione) | 85 3 3 L | /P --- O | ||||
| Asciugatura | --- | --- | 5 | --- | --- | --- |
| Spin (centrifuga) | 8 | 5 | --- | --- | ||
| Drum Clean Plus | 85 --- | --- | --- | --- | ||
| OnSmart (lavaggio intelligente) | 40 5 --- | L / P --- O |
| Algodão | 50 | 8 | 5 | L/P | --- | EIT |
| Echo 40-60 | 40 | 8 | 5 | L/P | --- | EIT |
| 20 °C | 30 | 2 | --- | L/P | --- | EIT |
| Desinfecção (esterilização) | 85 | 3 | 3 | L/P | --- | EIT |
| Socagem | --- | --- | 5 | --- | --- | --- |
| Cnétho | --- | 8 | 5 | --- | --- | --- |
| Limpeza do cesto Plus | 85 | --- | --- | --- | --- | --- |
| OnSmart (Lavagem Inteligente) | 40 | 5 | --- | L/P | --- | L/P |
| 20 °C 30 2 --- L/P --- OF | |||||
| Steriluseren (desinfecteren) | 85 3 3 L/P --- OF | ||||
| Drogen ---- 5 --- | |||||
| Draalen --- 8 | 5 --- --- --- | ||||
| Trommeleriniging Plus | 85 ---- | ||||
| OnSmart (Slim Wassen) | 40 | 5 --- L/P --- OF |
7. PROBLEEMOPLOSSING
5. PROGRAMY I FUNKCJE
Tabela programów
| Yikama döngüsü | Maksimum Sicaklık (°C) | Maksimum yük (kg) | Deterjan türü | |||
| Yikama | Kurutma | Deterjanlar | Yumuşatici | |||
| Normal | Özel | |||||
| Karışim 60 8 5 L/P | --- | HERHANGİ BIRİ | ||||
| Hızlı (Hızlı yıkama) | 40 | 1 | 1 | L/P | --- | HERHANGİ BIRİ |
| Yün | 40 | 1 | --- | --- | L | HERHANGİ BIRİ |
| Pomuk | 60 8 5 L/P | --- | HERHANGİ BIRİ | |||
| Yankı 40-60 | 40 | 8 | 5 | L/P | --- | HERHANGİ BIRİ |
| 20 °C | 30 | 2 | --- | L/P | --- | HERHANGİ BIRİ |
| Dezenfekte Etmek (Sterilizasyon) | 85 3 | 3 L/P | --- | HERHANGİ BIRİ | ||
| Kurutma | --- | --- | 5 | --- | --- | --- |
| Döndürmek | --- | 8 | 5 | --- | --- | --- |
| Drum Clean Plus | 85 | --- | --- | --- | --- | --- |
| OnSmart (Akılu Yikama) | 40 | 5 | --- | L/P | --- | HERHANGİ BIRİ |
POSSIBLES DANYS A L'APARELL O LESIONS
| Drum Clean Plus | 85 | --- | --- | --- | --- | --- |
| OnSmart (Rentat Intel Ilgent) | 40 | 5 | --- | L/P | --- | 0 |
Programa Drying (assecat)
Fig./Img./Abb./Afb./Rys./Obr./Şekil/Eik./abra/الکشلا1
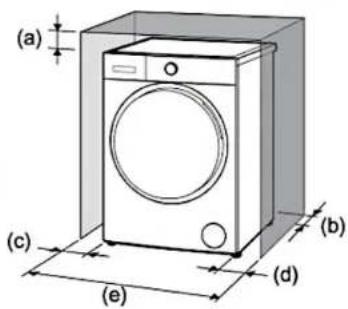
Fig./Img./Abb./Afb./Rys./Obr./Şekl/Eik./ábra/2
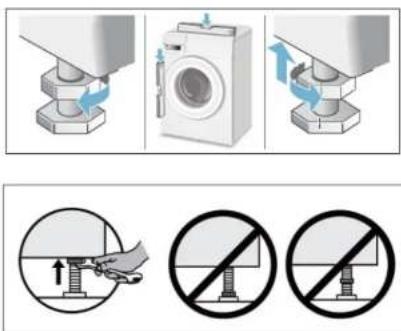
Fig./Img./Abb./Afb./Rys./Obr./Şekil/Eik./ábra/4

Fig./Img./Abb./Afo./Rys./Obr./Şekil/Eik./ábra/5
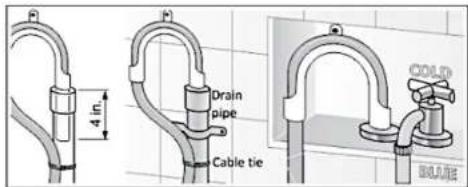
Fig./Img./Abb./Afb./Rys./Obr/Şekil/Eik./ábra/۱۰۶۲۱۸
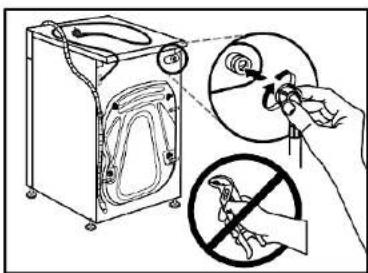
Fig./Img./Abb./Afb./Rys./Obr./Şekil/Eik./ábra/1236
natural_image
Diagram of a kitchen sink with pipe and valve, no text or symbols presentFig./Img./Abb./Afb./Rys./Obr./Şekil/Eik./ábra/9
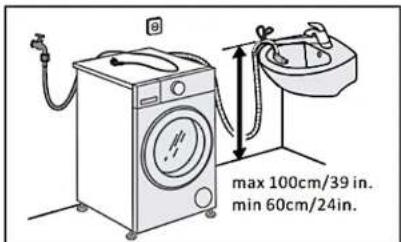
Fig./Img./Abb./Afb./Rys./Obr./Şekil/Eik./ábra/17
natural_image
Diagram showing a pipe fitting with blue arrows indicating direction, alongside a close-up of a water basin sink (no text or symbols)Fig./Img./Abb./Afb./Rys./Obr./Şekil/Eik./ábra/10
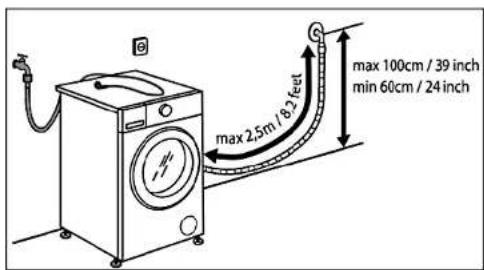
Fig./Img./Abb./Afb./Rys./Obr./Şekil/Eik./ábra/Ukən11
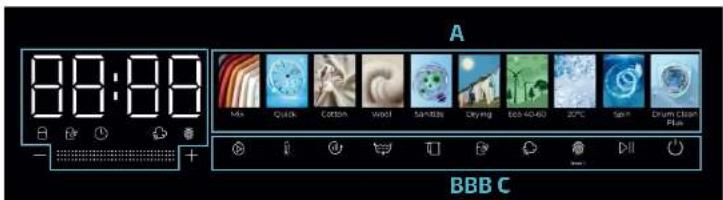
Fig./Img./Abb./Afb./Rys./Obr./Şekil/Eik./ábra/12
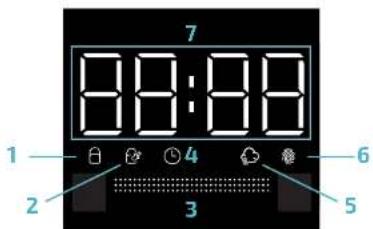
Fig./Img./Abb./Afb./Rys./Obr./Şekil/Eik./ábra/UJ4J13
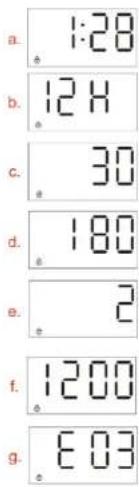
Fig./Img./Abb./Afb./Rys./Obr./Şekil/Eik./âbra/Ükül 14
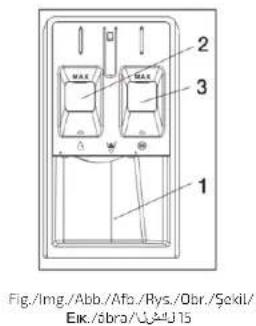
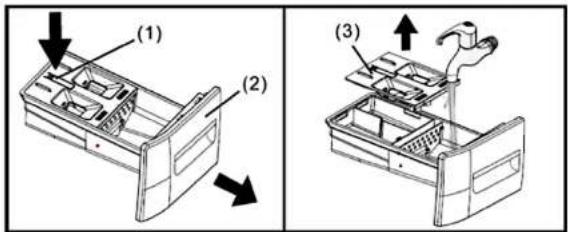
Fig./Img./Abb./Afb./Rys./Obr./Şekil/Eik./ébra/16
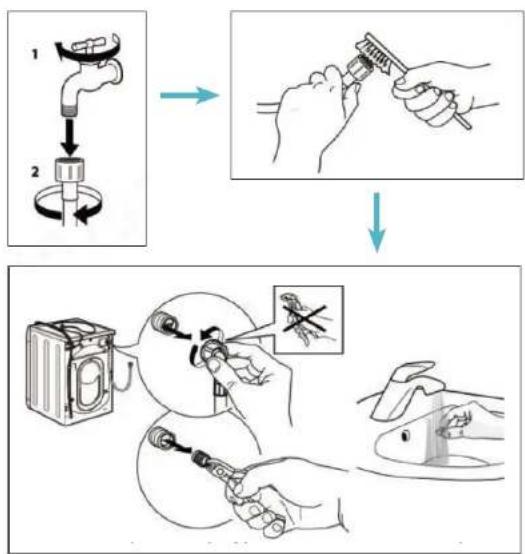
Fig./Img./Abb./Afb./Rys./Obr./Şekil/Eik./ábra/UJ4U17
natural_image
Diagram showing two views of a washing machine: one with a circular component labeled 1 and 2, the other showing a partially open circular device (no text or symbols present)Fig./Img./Abb./Afb./Rys./Obr./Şekil/Eik./ábra/UJ18

natural_image
Illustration of a sewing machine with a sewing machine needle inserted into the base (no text or symbols visible)Fig./Img./Abb./Afb./Rys./Obr./Şekl/Eik./âbra/UJ19
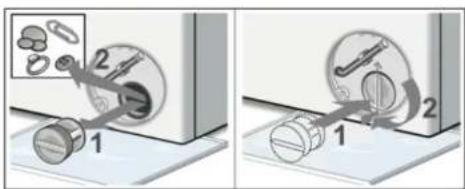
Fig./Img./Abb./Afb./Rys./Obr./Şekl/Eik./ábra/UÜU20
www.cecotec.es