
Bolero DressCode 12450 Inverter - Washing machine CECOTEC - Free user manual and instructions
Find the device manual for free Bolero DressCode 12450 Inverter CECOTEC in PDF.

User questions about Bolero DressCode 12450 Inverter CECOTEC
0 question about this device. Answer the ones you know or ask your own.
Ask a new question about this device
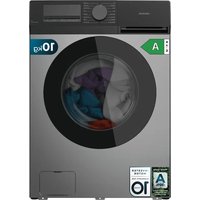
Download the instructions for your Washing machine in PDF format for free! Find your manual Bolero DressCode 12450 Inverter - CECOTEC and take your electronic device back in hand. On this page are published all the documents necessary for the use of your device. Bolero DressCode 12450 Inverter by CECOTEC.
USER MANUAL Bolero DressCode 12450 Inverter CECOTEC
natural_image
Front view of a white CECOLDC washing machine with a circular black lid and digital display (no visible text or symbols on the device itself)bolero
Safety instructions 11
-
Parts and components 109
-
Before use 109
-
Installation 110
-
Operation 113
-
Cleaning and maintenance 119
-
Troubleshooting 121
-
Recycling of electrical and
electronic equipment 123
-
Copyright 123
-
Simplified EU Declaration of Conformity 124
SOMMAIRE
Read the following instructions carefully before using the appliance. Keep this instruction manual for future reference or new users.
- Make sure that the mains voltage matches the voltage specified on the product's rating label and that the plug is earthed.
- If the power cord is damaged, it must be replaced by the official Cecotec Technical Support Service or by a similarly qualified person to prevent hazards.
- This appliance is for indoor use only.
- Make sure the device is installed in places where the temperature is above 0 °C.
- The appliance is not designed for built-in installation.
- Use the hose set supplied with the appliance. Do not reuse old hoses.
- Check hose connections regularly to ensure that no water leaks out.
- Do not use the appliance if parts are missing or defective or if the power cord or plug is damaged.
- Do not use the appliance until you are sure that it is installed in accordance with the instructions provided in this manual and all water, drain, electrical and grounding connections comply with all applicable local regulations and/or other requirements.
- Before carrying out any maintenance or cleaning in the device, unplug the appliance from the mains.
- As a safety measure, we advise you to unplug the appliance and cut the water supply after every use. Maximum water inlet pressure: 1 MPa. Minimum water-inlet pressure: 0.03 MPa.
- Never unplug the appliance with wet hands.
- For safety, be sure to connect the plug to a 3-pin socket. Check carefully and make sure that your socket is properly and reliably earthed.
- It must be possible to disconnect the appliance from the power supply by unplugging it if the plug is accessible, or by means of an all-pole switch upstream of the plug, in accordance with national electrical safety regulations.
- The maximum current of the device is 10 A, make sure that the power supply system (voltage, current and cable) is applicable to the load of the device.
-
Make sure that the socket outlet is capable of supporting the Maximum Power rating of the appliance as indicated on the rating plate.
-
Water and electrical devices must be connected by a qualified technician in accordance with the manufacturer's instructions and local safety regulations.
- The glass door may reach high temperatures during operation. Keep children and pets away from the glass door. Never open the door during the washing stage.
- Do not operate the appliance in very wet rooms or in rooms with explosive or caustic gas.
- Adequate ventilation must be provided to avoid the back flow of gases into the room from appliances burning other fuels, including open fires.
- Do not dry unwashed items in the appliance.
- Do not wash items that have been soiled with substances such as cooking oil, acetone, alcohol, petrol, kerosene, spot removers, turpentine, waxes, and wax removers.
- Do not wash articles that have been cleaned in, washed in, soaked in, or stained with flammable or explosive substances, like wax, oil, paint, petrol, degreasers, dry-cleaning solvents, kerosene, etc., which may result in fire or explosion.
- Fabric softeners or similar products should be used as specified by manufacturer.
- Do not wash or dry articles that have been cleaned in, washed in, soaked in, or dabbed with combustible or explosive substances (such as wax, oil, paint, petrol, degreasers, dry-cleaning solvents, kerosene, etc.). This may result in fire or explosion.
- When washing fabrics that contain vegetable or cooking oil or have been contaminated by hair care products, they should first be washed in hot water with extra detergent. This will reduce, but not eliminate, the hazard.
-
The exhaust air must not be discharged into a flue which is for exhausting fumes from appliances burning gas or other fuels.
-
The air openings must not be obstructed by a carpet.
- Appliances with a single inlet valve can only be connected to a cold water supply. Appliances with a double inlet valve must be correctly connected to a hot water and cold water supply (depending on the washing machine model).
- The plug must be accessible after installation.
- The appliance must not be installed behind a lockable door, a sliding door, or a door with a hinge on the opposite side to that of the device.
- The appliance shall not be installed in a humid place.
- Do not place other items or appliances (such as microwaves) or objects under pressure on the device.
- The product is exclusive for household use and is only designed for the textiles suitable for machine washing.
- The product cannot be used for commercial or industrial purposes. Do not use the appliance outdoors, even if the area is protected, as it may be exposed to moisture, rain or thunderstorms.
- Do not insert more laundry load than the allowed load (maximum allowed load indicated in the product data tables).
- The device is not designed to be operated by external switching devices such as timers or remote control systems.
- Do not use an extension lead or multiple sockets.
- Do not wash garments containing glass fibre, such as certain curtains or blinds, as particles may remain in the washing machine and adhere to other types of garments, causing skin irritation.
- Do not stand or sit on the appliance.
- Do not lean against appliance door.
- Flammable and explosive or toxic solvents are forbidden. Do not use detergents containing petrol, alcohol, etc. Use only
detergents suitable for machine washing, especially for the drum.
- Garments containing oil may catch fire spontaneously, especially when exposed to heat sources such as a washing machine. The garments are heated, causing an oxidation reaction in the oil. Oxidation generates heat. If heat cannot escape, garments may become hot enough to catch fire. Piling, stacking or storing garments containing oil retains heat and therefore creates a fire hazard.
- Garments containing vegetable cooking oil or hair care products should first be washed in hot water with extra detergent, this will reduce the hazard, but will not completely eliminate it.
- Make sure that no objects such as lighters, matches, etc. are introduced.
- Close the door properly, if it is difficult to close, check that clothing does not prevent proper closing.
- Make sure that there is no water in the drum before opening the door.
- Once the washing cycle has finished, we recommend removing the laundry as soon as possible to prevent creases.
- This appliance can be used by children aged 8 and above and people with reduced physical, sensory, or mental capabilities or lack of experience and knowledge, as long as they have been given supervision or instruction concerning the use of the appliance in a safe way and understand the hazards involved. Do not allow children to play with the appliance. Cleaning and maintenance should not be carried out by children without supervision.
- Children of less than 3 years should be supervised to ensure that they do not play with the appliance.
- Children should be supervised to make sure that they do not play with the appliance.
- Cleaning and maintenance should not be carried out by children without supervision.
- Be sure to use the child lock functions and to switch off the appliance when not in use.
- Keep the cleaning products out of the reach of children.
Cautions during the handling of the appliance
- If you wish to change the location of the washing machine, make sure you install the transport bolts again in the appliance, as they will ensure the interior of the product is not damaged during transport.
- Water accumulated inside the appliance must be drained out.
- Handle the machine carefully. Never hold each protruded part on the machine while lifting. Do not use the door of the appliance as a handle during transport.
- The device is heavy. Transport it with care.
- Secure the drain and water-supply hose correctly.
- Do not insert hands into the running water extracting tub.
- Do not close the door with excessive force. If it is found difficult to close the door, please check if the clothes are put in or distributed well.
- It is forbidden to wash carpets.
- Never refill the water by hand during washing.
Installation
- The appliance must be handled and installed by 2 or more people to avoid risk of injury. Wear protective gloves when unpacking and installing the product to avoid cutting hazards.
- Keep children away during installation process.
-
During installation, make sure that the power cable is not damaged to avoid possible risk of fire or electric shock.
-
Before using the device, it is imperative to remove the transport screws.
- Keep the room dry and ventilated.
- Never place the appliance over the opening of an uncovered drain.
- Do not expose the device to temperatures below 5^ C or above 35^ C.
- Do not install in bathrooms or very damp rooms.
- Check that it is correctly levelled on the floor by means of the feet.
- WARNING! Cecotec accepts no liability for incidents caused by improper use outside the rules set out in this instruction manual.
INSTRUCTIONS DE SÉCURITÉ
Sportswear (Ropa deportiva)
- Detergent drawer
- Control panel
- Door
- Drum
- Drain pump filter cover
- Top cover
- Adjustable foot
- Drain hose attachment clips
- Cold water inlet valve
- Hot water inlet valve (Only models with double water inlet have a hot water valve).
- Power cord
- Drain hose
- Transit bolts
- Back cover
- Power plug
Note:
The graphics in this manual are schematic representations and may not exactly match the product.
2. BEFORE USE
- This appliance comes in a packaging designed to protect it during transport. Remove the appliance from its box. You can keep the original box and other packaging materials in a safe place to prevent damage to the appliance if you need to transport it in the future. If you wish to dispose of the original packaging, make sure all items are recycled properly.
- Check that all parts and components are included and in good condition. If any of them are missing or damaged, please contact Cecotec's Official Technical Support Service immediately.
Box content
- Washing machine
- Cold water supply hose
- Hot water inlet hose
- Decorative plugs for bolts
- Support for drain hose
- Spanner
ENGLISH
- Do not remove the product's serial number in order to keep proper traceability if technical assistance is required.
- Washing machine unpacking. Unpack the washing machine and check for any transport damage. Also make sure that all items have been received. If the washing machine is damaged in transit, or if any parts are missing or damaged, please contact Cecotec's Official Cecotec Service Center immediately.
3. INSTALLATION
Needed tools
You may need the following tools for the installation of your washing machine: scissors, gloves, pliers, wrench and flat screwdriver.
Choosing the location for installation
Before installing the washing machine, select a location with the following characteristics:
- Rigid, dry and level surface.
- Avoid direct sunlight.
- Properly ventilated.
- The ambient temperature must be between 0 and 40°C.
- The ambient humidity must be below 95% (at 25°C).
- Keep it away from heat sources such as coal or gas. Ensure the washing machine does not rest on the power cord. Do not install the washing machine on carpets or rugs.
Removing the transport bolts
Before using this washing machine, the transit bolts must be removed from the rear of the machine. Follow these steps to remove the bolts:

Keep transit bolts in a safe place for future use.
Fig. 2
A. Loosen the four transit bolts with a spanner.
B. Grasp the head of each bolt and pull it through the wide part of the hole. Repeat the process for each bolt.
C. Plug the holes with the plastic caps provided.
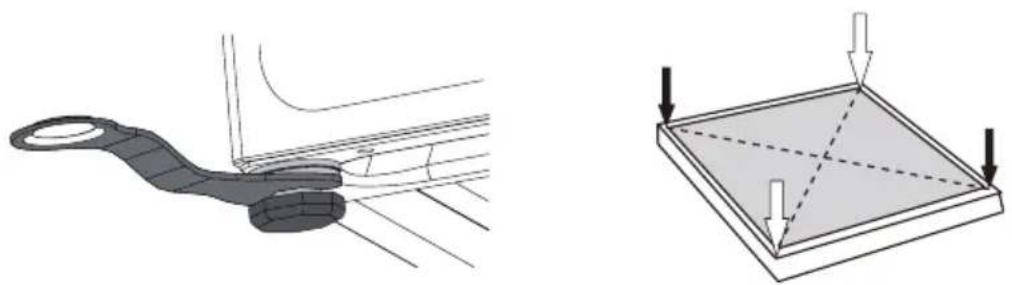
Levelling the washing machine
Install or place the washer at an ambient temperature of not less than 0 °C and not outdoors, as this may damage the programmer.
Structure of the levelling feet:
Fig. 3
-
Locknut
-
Support leg with rubber cover
Note: For ease of installation, the factory state of the legs may not be completely locked. Be sure to lock all four legs before adjusting the level.
- When placing the washing machine, check if the lower leg is in the factory condition. If not, restore the lower leg to factory condition: the locknut should be firmly tightened to the bottom of the housing, and the support leg should be firmly tightened to the locknut. Fig. 3
- Once the washer is in place, press alternately with both hands on the opposite corners of the top cover of the washer and move it vertically downward to check if the support leg is in contact with the floor and if the machine wobbles. Fig. 4
- To ensure that the washer is properly seated, loosen the locknut in the direction shown in Figure 5 with the wrench provided to the proper height so that the support leg is in contact with the floor and the machine does not wobble.
- Text in the figure: Support base in contact with the ground
- Finally, use the wrench to turn the locknut towards the bottom of the box to lock it (you can also lightly clamp the support leg by hand to prevent it from moving again).
Note: Ensure the support feet do not move. Fig. 6.
! CAUTION
- The washing machine must be perfectly level and stable when all four support feet are close to the floor. Lower the legs as far as possible once the machine is level.
- Incorrect leveling adjustment may cause loud noise, machine vibration, machine displacement and other abnormal phenomena.
- The ventilation grille is designed at the bottom of the machine (to avoid blockages). Install the washing machine on a solid, flat, non-slip surface. Do not place the washer on soft blankets, wooden floors, or on tables and other supports to avoid unnecessary injury.
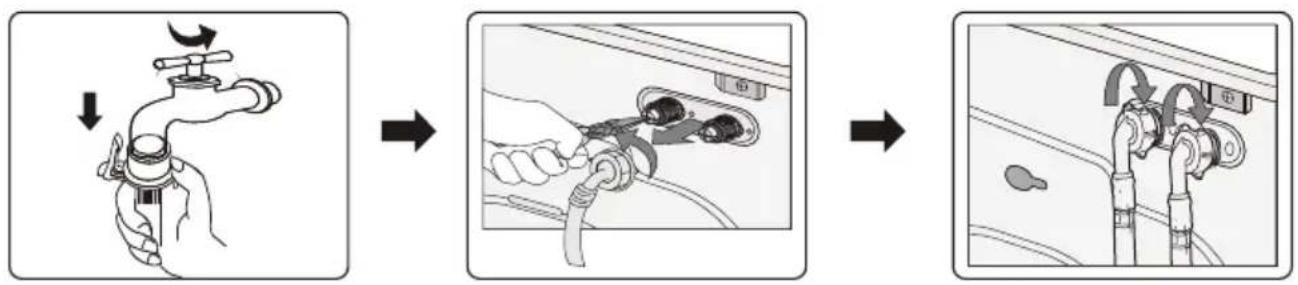
Water inlet hose connection
Connection to a threaded water faucet
Fig. 7
- Connect the water hose to the faucet, then turn the connector clockwise as shown.
- Connect the other end of the water hose to the inlet valve at the rear of the washing machine. Turn the hose clockwise to tighten it.
- Turn on the water faucet and check for leaks around the connection areas. If water leaks, repeat the above steps.
ENGLISH
Connection to an unthreaded water tap
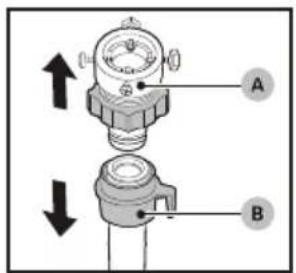
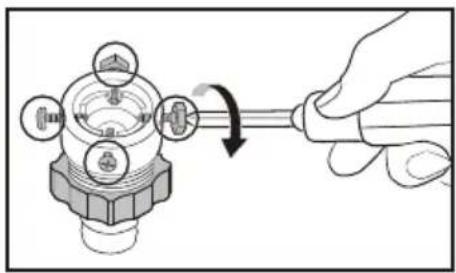
Fig. 8
- Remove the adapter (A) from the water hose (B).
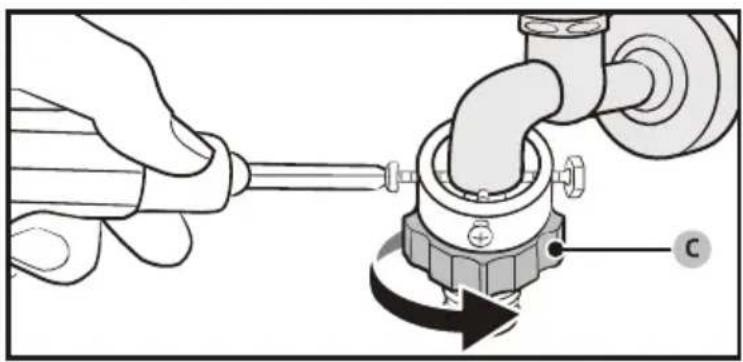
- Use a Phillips screwdriver to loosen the four adapter screws.
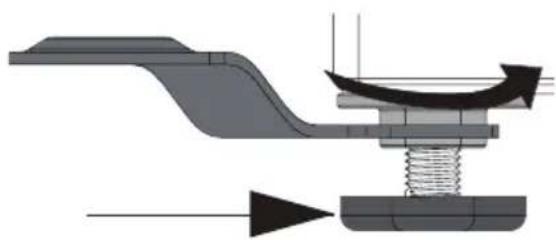
- Hold the adapter and turn the part (C) in the direction of the arrow to loosen it by 5 mm (*).
- Insert the adapter into the water tap, then tighten the screws while lifting the adapter.
- Turn the part (C) in the direction of the arrow to tighten it.
- While pulling down on part (D) of the water hose, connect the water hose to the adapter. Then, release part (D). The hose will click into the adapter.
- For complete water hose connection, refer to steps 2 and 3 in the "Connection to threaded water tap" section.

NOTA
- If there is any leakage in the hose after connection, repeat the steps to connect the inlet hose.
- Do not bend the hose.
- Carefully check the inlet hose connection before each use.
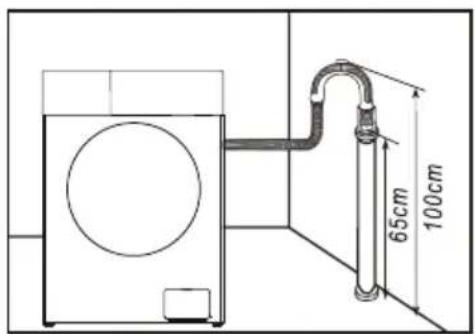
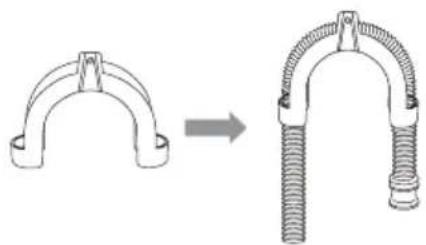
Connecting the drain hose
- The drain hose must be positioned 65-100 cm above floor level; otherwise, it may cause poor drainage. Fig. 9
- You can use the drain hose bracket supplied to attach the drain hose to the wall, standpipe or sink. Fig. 10
- Make sure that all hose connections are tight.

NOTA
The drain hose end must not be submerged in water for the washing machine to function properly.
Connection to power supply
- Since the maximum current through the unit is 10 A when using its heating function, make sure that the electrical supply system (current, voltage and wiring) in your home meets the normal load requirements for electrical appliances.
- Connect the power supply to an outlet that is properly installed and properly grounded.
- Make sure that the mains voltage in your home matches the rated voltage of the machine.
- The plug must match the power socket.
- Do not use multiple adapters or power strips as extension cords.
- Do not connect or disconnect the plug with wet hands.
- When unplugging, grasp the plug firmly and pull it out. Do not pull the power cord forcefully.
- If the power cord is damaged or shows any signs of breakage, it must be replaced with a special power cord purchased from the manufacturer or a service center.
! WARNING
- This machine must be properly grounded. In the event of a short circuit, grounding can reduce the risk of electric shock.
- The washing machine must be operated on a circuit separate from other electrical appliances. Otherwise, the current protector may trip or the fuse may blow.
4. OPERATION
Using the washing machine
NOTE: Ensure your machine is properly installed before use.
Before washing clothes for the first time, run a complete cycle without clothes: To do so:
- Connect power and water supply.
- Add some detergent (approximately 10 g) to the drawer and close it.
- Press the power button.
- Turn the selector to the "Cotton" program.
- Press the Start/Pause button. This will remove any remaining water from the manufacturer's test cycle in the machine.
Sorting clothes
- Read this recommendation carefully to avoid washing machine problems and clothing damage.
- Do not insert clothing that exceeds the rated capacity.
- Sort clothes by color and care label. Most garments have a textile care label in the collar or side seam.
- Make sure that all pockets are empty. Foreign objects (e.g., nails, coins, clips, etc.) can damage clothes and machine components.
- Close all zips, fasten hooks, etc., before washing.
- To wash clothes, they should be sorted by color. Dark clothes should not be washed with light clothes, especially.
- Heavily soiled areas, stains, etc., should be pre-treated with liquid detergent, stain remover, etc.
- Turn easily pilling garments and those with a wool surface inside out before putting them in the machine.
NOTE: Ensure no clothing is trapped between the door and seal.
Put detergent
- Remove the detergent drawer. Fig. 11
- Add detergent for pre-wash in compartment I. Used for prewash programs only. (Option 1: solid detergent; Option 2: liquid detergent).
ENGLISH
- Add main wash detergent to compartment II. (Option 1: solid detergent; Option 2: liquid detergent).
- Add softener in the compartment.
- Choose the right type of detergent for different wash temperatures to obtain the best washing effect with less water and energy consumption.
- Detergent/softener amount should only be added once. Refer to the manufacturer's instructions for detergent/softener dosage.
- Excess detergent will produce excessive foam, leading to overflow and affecting dissolution, making rinsing difficult.
! NOTA
- The first time you use liquid detergent, run the "Super Fast" program to clean the tub and drum.
- It is normal for a small amount of liquid detergent to flow into the drain compartment when the liquid detergent drawer is removed. Avoid frequent drawer removal to reduce liquid detergent consumption.
- Refer to the manual for the amount of softener. Excessive softener may damage synthetic fibers.
- The liquid level must not exceed the MAX level of the dispenser drawer.
- Dilute the thick fabric softener or bleach first and then pour it into the dispenser drawer.
Steps for washing
- Connect the inlet hose and open the faucet.
- Insert the plug.
- Attach the drain hose.
- Open the door, insert the laundry and close it; put the detergent in the detergent compartment and close the compartment.
- Select the program according to your needs.
- Customize settings such as delay time, temperature, spin speed and other settings.
- Press the Start button.
- Press the power button.
Operating instructions
- Press the power button to switch on the washing machine.
- Turn the cycle selector to select a cycle.
- Change cycle settings (temperature and speed, etc.) as needed.
- Set the delayed start if you want the wash cycle to end at the desired time.
- Press Start/Pause.
To change the cycle during operation
- Press Start/Pause to stop operation.
- Select a different cycle.
- Press Start/Pause again to start the new cycle.
Control panel
Fig. 12
| 01 Cycle selection knob Turn the dial to select the cycle. | ||
| 02 Display The display shows th current cycle information and estimated time remaining, or information code when a problem occurs. | ||
| 03 Temperature Press to change the water temperature of the current cycle.The temperature time available depends on the cycle.The selected temperature will be shown on the display. | ||
| 04 RPM Presses to change the spin speed of the current cycle.The available spin speed depends on the cycle.The selected spin speed will be shown on the display. | ||
| 05 Delay Start Repeatedly press the Delay Start button to select the desired delay time, from 3 to 24 hours, in one-hour increments. | ||
| 06 Start/Pause Press to start, pause operation.Press the button once to start a cycle.To pause the operation, press the button again.You can change the settings and cycle options.To resume the paused operation, press again. | ||
| 07 Power icon Press to switch on/off the washing machine.If you turn on the washer and do not use it for 10 minutes, it will automatically turn off. |
Delay Start

You can set the washing machine to automatically complete your wash at a later time, choosing a delay between 3 and 24 hours (in 1-hour increments). The time displayed indicates the time at which the wash will be completed.
- Select a cycle. Then change the cycle settings if necessary.
- Press the Delay Start button repeatedly until the desired end time is set.
- Press Start/Pause. The corresponding indicator will light up and the clock will start running.
- To cancel this function, restart the washer by pressing On/Off.
ENGLISH
Indicator lights
1. Steam wash

If this icon remains lit, it means that the steam wash function is activated. Due to different model configurations, some models do not have this feature; refer to the actual model.
2. KidLock - Child Lock

To prevent accidents with children, Child Lock locks all buttons except the power on/off.
- To activate or deactivate the Child Lock function, press and hold the temperature and speed buttons simultaneously for 3 seconds.
- When the Child Lock is activated, the indicator lights up.
You can activate or deactivate the sound for the cycle selection knob and all buttons.
- To enable or disable the sound, press and hold the Speed and Delay Start buttons simultaneously for 3 seconds. When the sound is disabled, the indicator light illuminates.
4. Door lock

When the door is not closed or locked properly, the icon does not illuminate; lock the door properly so that the icon remains lit.
5. Reload

Press and hold the Start/Pause button for 3 seconds. Once the door is unlocked, you can start the add laundry function in the middle of the cycle.
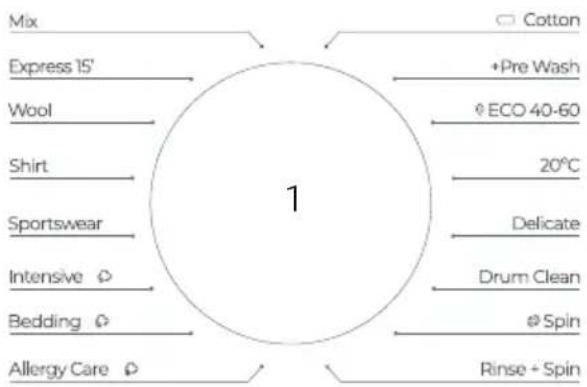
Programmes
Mix
For mixed loads composed of cotton and synthetics.
Super Quick
For lightly soiled items under 2.0 kg that need quick washing.
Wool
The wool cycle features gentle rolling and soaking to protect wool fibers from shrinkage/distortion. It is recommended to use a neutral detergent.
Shirt
Suitable for washing cotton shirts, linen, synthetic fibres or mixed fabrics.
Sportswear
This procedure is applicable to the cleaning of sportswear.
Intensive
For heavily soiled garments. The operating time is longer than in other cycles.
Bedding
This programme is suitable for washing heavier items such as jeans, bedding, etc.
Allergy Care (Anti-allergies)
Includes a high-temperature wash and additional rinses to help remove detergent residues effectively.
Cotton
For cottons, bedding, table linen, underwear, towels or shirts. Washing time and number of rinses are automatically adjusted according to the load.
+ Prewash
Adds a preliminary wash process before starting the Cotton cycle.
ECO 40-60
For cleaning normally soiled cotton garments declared to be washable at 40^ C or 60^ C, together in the same cycle. This cycle is set by default.
20°C
Used to wash some delicate garments, the temperature can only be 20 °C, protective clothing.
Delicate
For transparent fabrics, bras, lingerie (silk), and other fabrics that can only be washed by hand. For best performance, use liquid detergent.
Drum Clean
Cleans the drum by removing dirt and bacteria. Make sure the drum is empty. Do not use any cleaning agents to clean the drum.
Spin
Includes additional spin cycle to effectively remove moisture from clothes.
Rinse + Spin
Includes an additional rinsing process after applying fabric softener to the laundry.
Table of washing procedures
- Washing efficiency and performance are determined by the quality of detergent used. Use only detergent approved for washing machines.
ENGLISH
- If necessary, use specific detergents, e.g., for synthetic fabrics and wool. Always follow detergent manufacturer's recommendations.
- Do not use dry cleaning agents such as trichloroethylene and similar products. Choose the best detergent.
| PROGRAMME M | MAXIMUM LOAD (kg) TYPE OF | WASHING MACHINEDETERGENT FABRIC | SOFTENER | ||||
| 8 kg 9 | kg 10 kg | 12 kg | ANY FA | BRIC SPECIFIC | FABRIC | ||
| Mix 4 4.5 5 6 L/P - | 0 | ||||||
| Super Quick | 2 | 2 | 2 | 2 | L/P | - | 0 |
| Wool | 2 | 2 | 2 | 2 | - | L/P | - |
| Shirt | 3 | 3.5 | 4 | 5 | L/P | L | 0 |
| Sportswear | 3 | 3.5 | 4 | 5 | L/P | - | 0 |
| Intensive 📋 | 8 | 9 | 10 | 12 | L/P | - | 0 |
| Bedding 📋 | 6 | 7 | 8 | 10 | L/P | L/P | 0 |
| Allergy Care(Allergy Care) 📋 | 4 4.5 5 | 6 L/P | L/P | 0 | |||
| Cotton 📋 | 8 | 9 | 10 | 12 | L/P | - | 0 |
| + Prewash | 6 | 7 | 8 | 10 | L/P | - | 0 |
| ECO 40-60 | 8 | 9 | 10 | 12 | L/P | - | 0 |
| 20 °C | 4 4.5 5 | 6 L/P | - | 0 | |||
| Delicate | 4 4.5 5 | 6 L/P | - | - | |||
| Drum Clean | 0 | 0 | 0 | 0 | - | - | - |
| Spin | 8 | 9 | 10 | 12 | - | - | - |
| Rinse + Spin | 8 | 9 | 10 | 12 | - | - | 0 |
L: liquid detergent (if you use liquid detergent, it is not recommended to enable Delay Start).
P: powder detergent.
O: optional.
-: no detergent or softener.
If you use liquid detergent, it is not recommended to activate the time delay (Delay Start). We recommend using: Powder detergent: 20°C to 95°C; Wool detergent: 20°C to 40°C; Choose the 95°C wash temperature only for special hygienic requirements.
Additional functions
Emergency unlocking of the door
- If you want to remove the laundry when there is a prolonged power failure, make sure that the water level in the drum is below the safety level, the temperature is below 40 °C and the inner drum does not rotate. Then disconnect the drain hose and lower it, and replace the hose after the water has drained.
- Open the drain pump cover on the lower right side of the front, gently pull the rod, and when you hear a slight sound, open the door and take out or put in the laundry.
- Replace the drain pump cover.
- This method should only be used in emergencies.
Resume function
- This machine has a restart function in case of shutdown. If there is a power failure or the plug is released during machine operation, the machine can remember the operating status and resume work when power is restored.
Memory function
- This machine can automatically remember the last working process. When you turn the machine back on, it will remember the wash process and settings you made last time (i.e., the complete work process of the last wash will be selected by default when the machine starts).
Unbalance protection
- When the machine is ready to spin, the washing machine may take time to balance the laundry due to significant unbalance.
- If clothes remain unbalanced in the drum afterwards, spin speed may be reduced to prevent excessive vibration.
- If the amount of laundry in the drum is too small, the machine may not spin due to the imbalance protection; in that case, you must add more laundry to the machine so that it can spin.
5. CLEANING AND MAINTENANCE
Proper maintenance can extend the washing machine's service life.
WARNING Before starting any maintenance work, unplug the power cord or disconnect the power and turn off the faucet.
Clean internal drum
Rust residues left inside the drum by metallic objects must be removed immediately with non-chlorine detergents. Never use steel wool.
ENGLISH
Cleaning the surface
If there is any water overflow, use a dry cloth to wipe it up immediately. Sharp objects are not allowed to hit the washer.
The surface can be cleaned with diluted non-abrasive neutral detergents when needed.
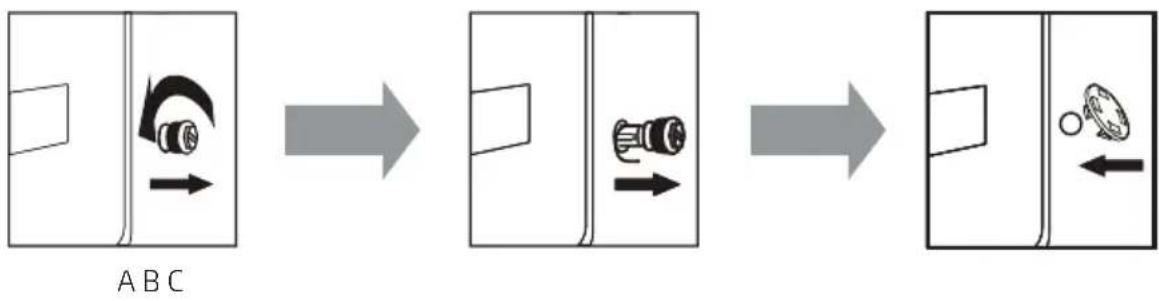
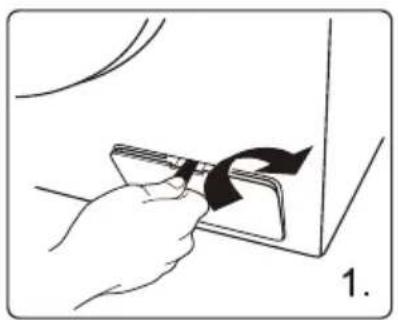
Cleaning the drain pump
Fig. 13
- Open the filter cover with tools such as coins, following the direction of the graph.
- Unscrew the filter and pay attention to the remaining water, removing any foreign material from the drain pump filter.
- Reinstall the filter.
Cleaning the air valve filter
Fig. 14
The inlet filter should be cleaned if there is no or insufficient water when the faucet is turned on.
- Reduce water pressure:
a. Close the tap.
b. Select any programme except "Spin".
d. Unplug the power cable.
c. Press the Start/Pause button and let the programme run for about 40 seconds.
- Remove the inlet hose from the tap.
- Use water to wash the filter.
- Reconnect the inlet hose.
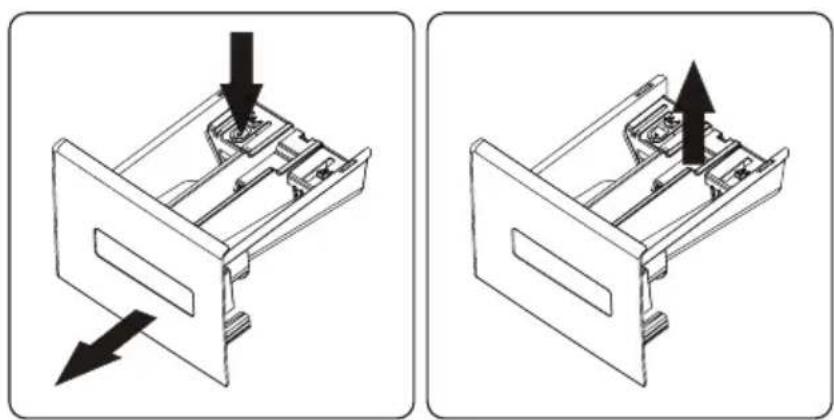
Cleaning the detergent compartment
Follow the steps and methods shown in Figure 15 below to clean the detergent compartment.
If there is detergent or fabric softener residue in the compartment
- As shown in figure 15, pull out the compartment and press the limit rod; pull out the entire drawer.
- Use tap water or a brush to wash the detergent compartment and the siphon tube.
- Replace the compartment lid and siphon tube, and push the drawer back in.
- A small amount of detergent will flow into the water tank when the compartment is removed; this is normal.
- Try not to open and close the compartment repeatedly to avoid loss of detergent.
- Pay attention to detergent spillage which may cause inconvenience when adjusting (such as tilting and moving, etc.) the machine (remove the compartment before adjusting).
Recovery from freezing
The washer may freeze when the temperature drops below 0 °C .
- Turn off the washing machine and unplug the power cord.
- Pour warm water over the tap to loosen the water hose.
- Disconnect the water hose and immerse it in warm water.
- Pour warm water into the drum and leave it for approximately 10 minutes.
- Reconnect the water hose to the tap.

NOTA
- When the washing machine is used again, ensure the ambient temperature is above 0^ C.
- If the washing machine is located in a room where it can easily freeze, thoroughly drain the remaining water inside the drain hose and water inlet hose.
- Refer to a technician if the washing machine freezes.
6. TROUBLESHOOTING
There is water inside the machine
- This is normal and is the result of factory water testing.
The washing machine does not work
- Check if the power plug is properly inserted.
- Check if the tap is open.
- Check if the "On" button is pressed.
- Check if the Start/Pause button is pressed.
- Check if the Delay Start function is enabled.
Water leakage
- Check and fasten the inlet hose.
- Clean the drain hose and have it repaired by a qualified person when necessary.
Abnormal noise and large vibration
- Check if the transit bolts have been removed.
- Check if the adjustable feet are level.
- Check if the washer is installed on a solid and level floor.
- Check for pins or metal items inside.
Washing efficiency is not satisfied
- Select an appropriate procedure.
- Add the appropriate amount of detergent according to the instructions on the detergent package.
ENGLISH
The machine does not respond after pressing the buttons
- Check whether the "Child Lock" function has been activated.
- Press the "Start/Pause" button first and then press other buttons.
The execution time of the procedures does not correspond to the display time
- Check if the laundry in the drum is sufficiently dispersed.
- Check if the water is draining or entering well.
Washing machine fills up while draining
- Check if the drain hose maximum height is below 65 cm.
- Check if the drain hose is submerged.
Error codes
| Code Meaning Solution | ||
| E1 The washing machine takes too long to fill. | Check if the faucet is open.Check if the water pressure is too low. Check if the inlet hose is blocked. | |
| E2 Water draining is slow. | Check if the drain pump is blocked.Contact Cecotec's Official Technical Support Service if necessary. | |
| E3 The door lock is faulty. | Close the door tightly again.Check if clothes are trapped between the door and the gasket.Contact Cecotec's Official Technical Support Service if necessary. | |
| E4 Water overflow. The water will automatically fill until the level is adequate for the washing process.Contact Cecotec's Official Technical Support Service if necessary. | ||
| E5 The electric motor is faulty. | Contact Cecotec's Official Technical Support Service if necessary. | |
| E6 The resistor does not work. | Contact Cecotec's Official Technical Support Service if necessary. | |
| E7 Fault in the temperature sensor. | Contact Cecotec's Official Technical Support Service if necessary. | |
| E8 The software/ hardware on the motherboard and the frequency inverter board is faulty. | Contact Cecotec's Official Technical Support Service if necessary. | |
| E9 Communication failure. | Contact Cecotec's Official Technical Support Service if necessary. | |
| E10 Inverter failures. | Contact Cecotec's Official Technical Support Service if necessary. | |
| EP The running program does not correspond to the cycle indicated by the control. | Turn the cycle selector to the cycle that corresponds to the program in operation. | |
7. RECYCLING OF ELECTRICAL AND ELECTRONIC EQUIPMENT
This symbol indicates that, according to the applicable regulations, the product and/or battery must be disposed of separately from household waste. When this product reaches the end of its shelf life, you should dispose of the batteries/accumulators and take them to a collection point designated by the local authorities.
For detailed information on how to properly dispose of electrical and electronic equipment and/or the corresponding batteries, consumers should contact their local authorities.
Compliance with the above guidelines will help protecting the environment.
Information regarding national packaging recycling systems and their marking can be found on our website.
8. COPYRIGHT
The intellectual property rights over the texts in this manual belong to CECOTEC INNOVACIONES, S.L. All rights reserved. The content of this publication may not, either in part or in its entirety, be reproduced, stored in a retrieval system, transmitted or distributed by any means (electronic, mechanical, photocopying, recording or similar) without prior authorisation from CECOTEC INNOVACIONES, S.L.
ENGLISH
9. SIMPLIFIED EU DECLARATION OF CONFORMITY
CE Cecotec Innovaciones hereby declares that this appliance complies with the essential requirements and other relevant provisions of applicable European Union regulations. This appliance has been designed, manufactured and tested in compliance with required safety and quality standards. The full text of the EU Declaration of Conformity can be found on the following website: https://cecotec.es/es/information/declaration-of-conformity
1. PIÈCES ET COMPOSANTS
Image 1
Intensif (Intensive)
Anti-allergique (Allergy Care)
Sports (Capi sportivi)
Allergy Care (Antiallergico)
Sportswear (Roupa desportiva)
Supersnel (Super Quick)
Sportkleding (Sportswear)
6. PROBLEEMOPLOSSING
De wasmachine is kapot
Sportswear (Ubrania sportowe)
Spor giyim (Sportswear)
Szupergyors (Super Quick)
Sportswear (Roba esportiva)
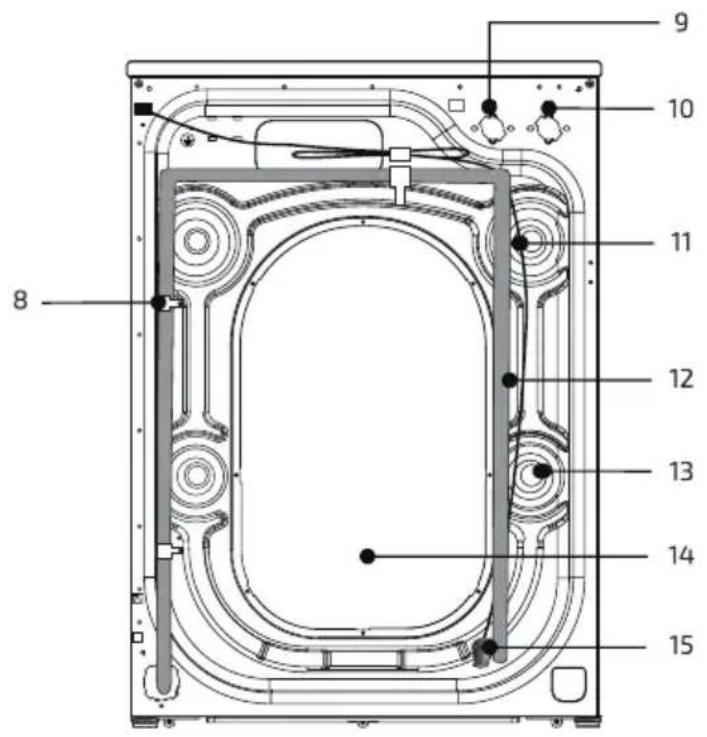
Fig./Img./Abb./Afb./Rys.1
flowchart
graph LR
    A["Initial State"] --> B{Transformation}
    B --> C["Intermediate State"]
    C --> D["Final State"]
Fig./Img./Abb./Afb./Rys.2
natural_image
Technical diagram showing a mechanical component and its 3D cross-section with arrows indicating force or movement (no text or symbols present)Fig./Img./Abb./Afb./Rys. 3 Fig./Img./Abb./Afb./Rys. 4

natural_image
Mechanical assembly diagram showing a component before and after assembly, with no visible text or symbolsFig./Img./Abb./Afb./Rys. 5
natural_image
Mechanical assembly diagram showing a lever and spring mechanism with directional arrows (no text or labels)Fig./Img./Abb./Afb./Rys. 6
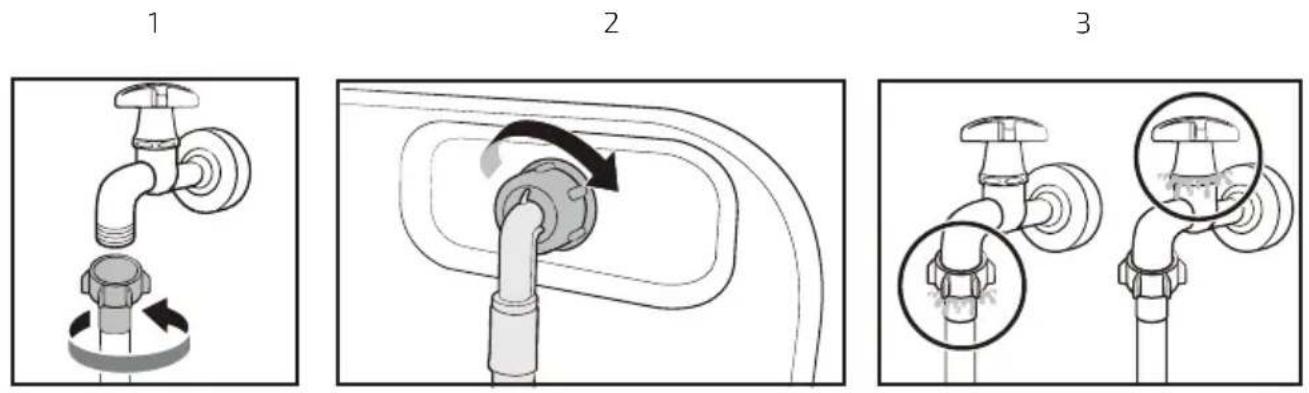
Fig./Img./Abb./Afb./Rys. 7
2
3
1
natural_image
Hand turning a valve into a mechanical component (no text or symbols visible)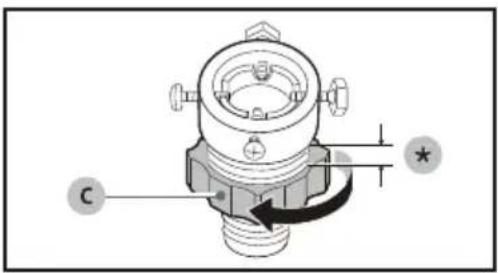
4-5 6-7
natural_image
Illustration of a hand using a tool to adjust a mechanical component, showing a rotating arrow (no text or symbols)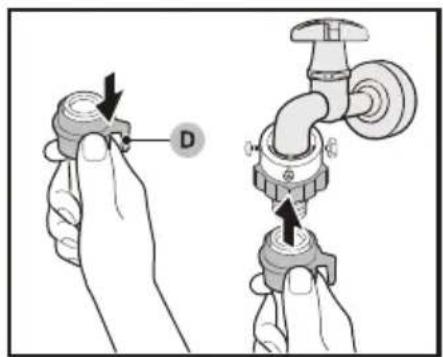
Fig./Img./Abb./Afb./Rys. 8
natural_image
Diagram showing a mechanical component before and after transformation, with no visible text or symbols.Fig./Img./Abb./Afb./Rys. 9 Fig./Img./Abb./Afb./Rys. 10
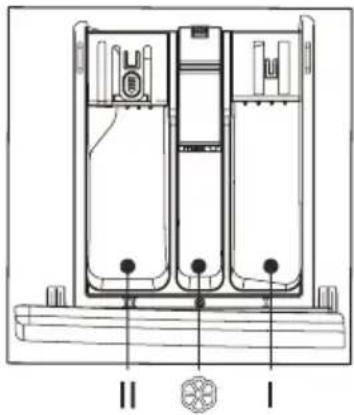
Fig./Img./Abb./Afb./Rys.11
flowchart
graph TD
    A["1"] --> B["Mix"]
    A --> C["Cotton"]
    A --> D["Express 15'"]
    A --> E["Wool"]
    A --> F["Shirt"]
    A --> G["Sportswear"]
    A --> H["Intensive"]
    A --> I["Bedding"]
    A --> J["Allergy Care"]
    A --> K["+Pre Wash"]
    A --> L["€ ECO 40-60"]
    A --> M["20°C"]
    A --> N["Delicate"]
    A --> O["Drum Clean"]
    A --> P["€ Spin"]
    A --> Q["Rinse + Spin"]
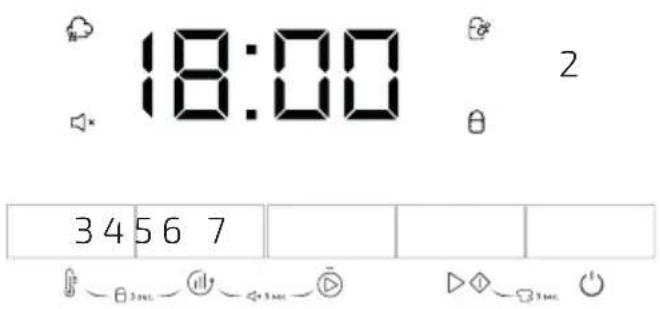
Fig./Img./Abb./Afb./Rys. 12
natural_image
Hand holding a card with a black arrow indicating direction (no text or symbols)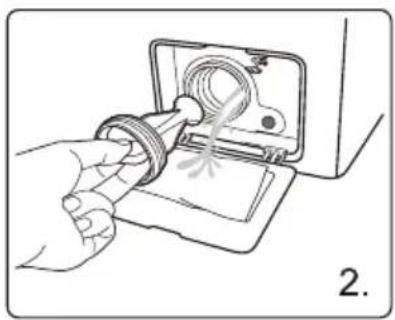
natural_image
Illustration of a hand inserting a cable into a device (no text or symbols visible)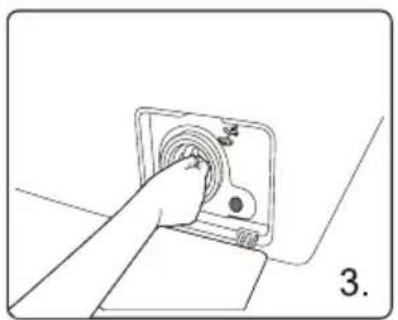
natural_image
Hand inserting a circular sensor into a device (no text or symbols visible)Fig./Img./Abb./Afb./Rys. 13
flowchart
graph LR
    A["Water Tap with Switch"] --> B["Switch to Level 1"]
    B --> C["Switch to Level 2"]
    C --> D["Switch to Level 3"]
Fig./Img./Abb./Afb./Rys. 14
natural_image
Two technical diagrams showing a mechanical component with arrows indicating direction, no text or symbols present.Fig./Img./Abb./Afb./Rys. 15
www.cecotec.es
- SOMMAIRE
- Cautions during the handling of the appliance
- Installation
- INSTRUCTIONS DE SÉCURITÉ
- Sportswear (Ropa deportiva)
- Note:
- BEFORE USE
- Box content
- ENGLISH
- INSTALLATION
- Choosing the location for installation
- Removing the transport bolts
- Fig. 2
- Levelling the washing machine
- Water inlet hose connection
- Connection to an unthreaded water tap
- Fig. 8
- NOTA
- Connecting the drain hose
- Connection to power supply
- ! WARNING
- OPERATION
- Using the washing machine
- Sorting clothes
- Put detergent
- ! NOTA
- Steps for washing
- Operating instructions
- To change the cycle during operation
- Delay Start
- Indicator lights
- Steam wash
- KidLock - Child Lock
- Door lock
- Reload
- Programmes
- Mix
- Super Quick
- Wool
- Shirt
- Sportswear
- Intensive
- Bedding
- Allergy Care (Anti-allergies)
- Cotton
- + Prewash
- ECO 40-60
- 20°C
- Delicate
- Drum Clean
- Spin
- Rinse + Spin
- Table of washing procedures
- Additional functions
- Emergency unlocking of the door
- Resume function
- Memory function
- Unbalance protection
- CLEANING AND MAINTENANCE
- Clean internal drum
- Cleaning the surface
- Cleaning the drain pump
- Fig. 13
- Cleaning the air valve filter
- Fig. 14
- Cleaning the detergent compartment
- Recovery from freezing
- TROUBLESHOOTING
- There is water inside the machine
- The washing machine does not work
- Water leakage
- Abnormal noise and large vibration
- Washing efficiency is not satisfied
- The machine does not respond after pressing the buttons
- The execution time of the procedures does not correspond to the display time
- Washing machine fills up while draining
- RECYCLING OF ELECTRICAL AND ELECTRONIC EQUIPMENT
- COPYRIGHT
- SIMPLIFIED EU DECLARATION OF CONFORMITY
- PIÈCES ET COMPOSANTS
- Image 1
- Intensif (Intensive)
- Anti-allergique (Allergy Care)
- Sports (Capi sportivi)
- Allergy Care (Antiallergico)
- Sportswear (Roupa desportiva)
- Supersnel (Super Quick)
- Sportkleding (Sportswear)
- PROBLEEMOPLOSSING
- De wasmachine is kapot
- Sportswear (Ubrania sportowe)
- Spor giyim (Sportswear)
- Szupergyors (Super Quick)
- Sportswear (Roba esportiva)
Brand : CECOTEC
Model : Bolero DressCode 12450 Inverter
Category : Washing machine