Coffee 66 Grind & Brew - Coffee machine CECOTEC - Free user manual and instructions
Find the device manual for free Coffee 66 Grind & Brew CECOTEC in PDF.

| Product type | Drip coffee maker with integrated burr grinder |
| Brand | Cecotec |
| Model | Coffee 66 Grind & Brew |
| Power supply | Mains (230 V ~ 50 Hz) |
| Bean hopper capacity | 200 g |
| Maximum number of cups | 12 |
| Brewing functions | Whole bean, ground coffee, timer, keep warm |
| Strength setting | Mild, medium, strong |
| Grind setting | Adjustment wheel |
| Filter type | Reusable filter (compatible with paper filter) |
| Anti-drip valve | Yes |
| Hot plate | Yes |
| Keep warm time | 40 minutes by default |
| Display | LED screen with indicators |
| Auto descaling | Yes, recommended after 50 cycles |
| Grinder cleaning | Removable parts, wash with warm water (max 50 °C) |
| Safety | Automatic shut-off, water absence detection |
| Included accessories | Reusable filter, instruction manual |
Frequently Asked Questions - Coffee 66 Grind & Brew CECOTEC
User questions about Coffee 66 Grind & Brew CECOTEC
0 question about this device. Answer the ones you know or ask your own.
Ask a new question about this device
Download the instructions for your Coffee machine in PDF format for free! Find your manual Coffee 66 Grind & Brew - CECOTEC and take your electronic device back in hand. On this page are published all the documents necessary for the use of your device. Coffee 66 Grind & Brew by CECOTEC.
USER MANUAL Coffee 66 Grind & Brew CECOTEC
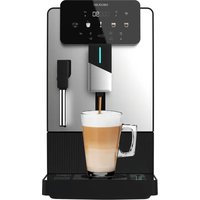
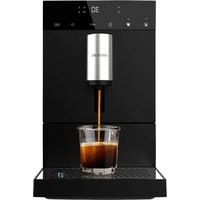
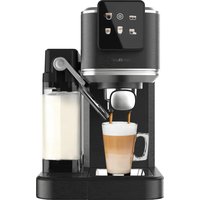
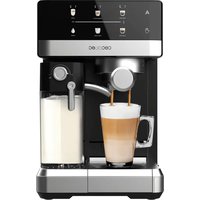
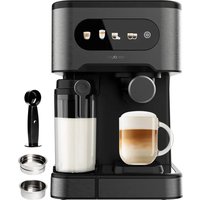
natural_image
Modern coffee maker with digital display and open lid, no visible text or symbols on device body- Parts and components 15
- Before use 16
- Operation 16
- Cleaning and maintenance 20
- Troubleshooting 22
- Copyright 23
- Simplified EU Declaration of Conformity 23
SOMMAIRE
EN • The coding in this manual is generic and applies to all code variants of the appliance.
- Reusable filter
- Funnel handle
- Funnel
- Non-drip valve
- Funnel support handle
- Funnel bracket
- Jug
- Coffee bean tank lid
- Grain storage
- Water tank cover
- Water level indicator
- Control panel
- Heating plate
- Grinding setting knob
Control panel
Fig. 2
- Descaling button
- Coffee intensity and ground coffee button
- Cup adjustment button
- Coffee brewing start/stop button
- Hours setting button
- Minutes setting button
- Timer button
- Timer indicator light
- Open/closed funnel holder indicator light
- Ground coffee indicator light
- Power indicator light
- Coffee intensity indicator light
- Keep Warm indicator light
- Coffee brewing indicator light
NOTE:
The graphics in this manual are schematic representations and may not exactly match the product.
ENGLISH
2. BEFORE USE
- This appliance is packaged in a way as to protect it during transport. Take the appliance out of its box and remove all packaging materials. You can keep the original box and other packaging materials in a safe place to prevent damage to the appliance if you need to transport it in the future. If you wish to dispose of the original packaging, make sure all items are recycled properly.
- Check that all parts and components are included and in good condition. If there is any piece missing or in bad conditions, contact the official Cecotec Technical Support Service immediately.
Box content
- Coffee machine
- Reusable filter
- Instruction manual
- Do not remove the product serial number in order to keep proper traceability of the appliance in case assistance is required.
Before first use
- Make sure the power cord has been disconnected from the from the mains socket.
- Turn the funnel holder to the left, remove the funnel and other detachable parts, clean them with warm water. If necessary, you can use some detergents, then rinse.
- Pour cold potable water into the water tank up to the maximum water level, do not place filter paper or reusable filter.
- Connect the power cable to a power socket.
- Press the ▷ button. You can repeat 2 to 3 times to ensure that the coffee machine is clean.
3. OPERATION
3.1 Coffee brewing with coffee beans
-
Filling up the water tank:
-
Open the water tank lid and pour in cold water up to the desired level, without exceeding the maximum.
- Important note: the resulting amount of coffee will be less than the amount of water used, since part of the water is absorbed by the ground coffee. Do not use hot water (above 40°C), milk, coffee powder or tea.
- Add the coffee beans:
- Place up to 200 g of coffee in the bean hopper and close the lid.
- Warning: Do not use roasted, caramelized or wet coffee beans, as they may block the grinder. To prevent the grains from getting wet, do not add more than necessary.
-
Setting the time:
-
Connect the power cord to the mains socket. The display will show "12:00" flashing. Set the time with the 📋 and buttons.
-
Note: it is normal for the machine to emit a slight rotational sound when it is turned on.
-
Prepare the filter:
-
Open the funnel holder by pulling the funnel holder knob.
- Place the funnel and filter (reusable or paper) correctly.
- Close the funnel holder until it locks into place.
-
Note: otherwise, "OPEN" and the icon will be displayed on the control panel. The icon will flash, and an error tone will be played.
-
Select the number of cups:
-
Press the 📋 button to select the number of cups (2, 4, 6, 8, 10 or 12). If not selected, the default value is 4 cups.
-
Note: The coffee machine automatically adjusts the amount of water needed. You can fill the tank to the maximum and select a smaller number of cups.
-
Select the coffee intensity:
- Press the button to select the coffee strength. The following icons show the selected intensity on the display:
o : ground coffee.
o : soft intensity.
o : medium intensity.
○ : strong intensity.
-
Start preparation:
-
Press the button. The green indicator will light up and the machine will start grinding the coffee beans after about 6 seconds.
- The machine will start grinding the beans, the and icon will appear on the control panel at the same time, and the "icon will appear at the time position during preheating.
-
After preheating is completed, the control panel will display the countdown interval for coffee preparation. During coffee brewing, the funnel support cannot be opened. If you open the funnel holder, "CLOSED" will be shown on the display and coffee brewing will stop. Coffee brewing will not resume until the funnel support is closed again.
-
After preparation:
-
The icon will turn off and the machine will beep 3 times.
- The machine enters the Keep Warm function, and the icon 📁 will be changed to the icon 📁 to be displayed on the control panel, and the Keep Warm time will be displayed on the screen. The default Keep Warm time is 40 minutes.
- When the heat holding time is over, the 🎨 icon will change to the 🔊 icon, and the machine will beep 3 times. The ▶ button indicator light will turn off.
ENGLISH
NOTE:
- If there is no water, the 🔊 icon will be displayed on the control panel.
- Check the water temperature in the water tank. If the water temperature exceeds 40 °C (104 °F), “HOT WATER” will be shown on the display to remind the user that the water in the water tank must be replaced with cold water of a lower temperature.
3.2 Brewing with ground coffee
-
Filling up the water tank:
-
Open the water tank lid and pour in cold water up to the desired level, without exceeding the maximum.
-
Important note: the resulting amount of coffee will be less than the amount of water used, since part of the water is absorbed by the ground coffee. Do not use hot water (above 40°C), milk, coffee powder or tea.
-
Setting the time:
-
Connect the power cord to the mains socket. The display will show "12:00" flashing. Set the time with the C and buttons.
-
Note: It is normal for the machine to emit a slight rotating sound when it is turned on.
-
Press the button until the icon is displayed on the display panel.
-
Prepare the filter:
-
Open the funnel holder by pulling the funnel holder handle.
- Place the funnel and filter (reusable or paper) correctly.
- Add coffee powder in the filter (reusable or paper).
- Close the funnel holder until it locks into place.
-
Note: otherwise, "OPEN" will be displayed on the screen and the icon will be displayed on the control panel. The icon will flash, and an error tone will be played.
-
Select the number of cups:
-
Press the 🎨 button to select the number of cups (2, 4, 6, 8, 10 or 12). If not selected, the default value is 4 cups.
-
Note: The coffee machine automatically adjusts the amount of water needed. You can fill the tank to the maximum and select a smaller number of cups.
-
Start preparation:
-
Press the button. The green indicator light will illuminate, and the machine will start brewing coffee.
- The machine will start grinding the beans, the "and" icons will appear on the control panel at the same time, and the " " icon will appear at the time position during preheating.
- After preheating is completed, the control panel will display the countdown interval for coffee brewing. During coffee brewing, the funnel support cannot be opened. If you open the funnel holder, "CLOSED" will be shown on the display and coffee brewing will stop. Coffee brewing will not resume until the funnel support is closed again.
7. After preparation:
- The icon will turn off and the machine will beep 3 times.
- The machine enters the Keep Warm function, and the icon 📋 will be changed to the icon 📋 to be displayed on the control panel, and the Keep Warm time will be displayed on the screen. The default Keep Warm time is 40 minutes.
- When the heat holding time is over, the 🎨 icon will change to the 🎨 icon, and the machine will beep 3 times. The button indicator light will turn off.
NOTE:
- If there is no water, the icon will be displayed on the control panel.
- Check the water temperature in the water tank. If the water temperature exceeds 40 °C (104 °F), “Hot Water” will be shown on the display to remind the user that the water in the water tank must be replaced with cold water of a lower temperature.
Automatic start function
- Follow the instructions in the section titled "Brewing filter coffee with coffee beans" or "Brewing filter coffee with ground coffee" to prepare the coffee machine for use.
- Set the current time. Press and hold the C_H button to set the time. Press and hold the C_M button to set the minutes. Do not press any button to confirm the hour.
- Push the funnel holder handle and turn the funnel holder to the left, making sure that the funnel and filter (reusable or paper) are correctly positioned. Add the amount of ground coffee in the filter, according to your preference.
- Press the ⏻ button once to enter the timer mode (the numbers will flash again). The ≡ indicator light will flash. While the numbers are flashing, set the desired automatic start time by pressing the Ⓗ and buttons.
- While the numbers are still flashing, press the ⏻ button again. The display will show the current time and the ≡ indicator will change from flashing to steady light, indicating that the unit is in automatic mode. Alternatively, if no button is pressed for 5 seconds, the control panel will briefly display the programmed automatic start time for 2 seconds.
Note: The timer operates on a 24-hour cycle. The default automatic start time is 12:00 noon.
- The coffee machine will start brewing coffee at the preset time, the indicator light will turn off and the indicator light will illuminate. The device will then start the automatic preparation process.
Cancel the presetting programme
If the coffee preparation is in pre-selection status (indicator ≡ and icon 📋 are on), but you want to brew coffee immediately, you only need to press button ▷ or button 📋 once, then indicator ≡ and icon 📋 will turn off, the automatic mode will be cancelled.
Tips for excellent coffee
- A clean coffee machine is essential to prepare good-tasting coffee. Regularly clean the
ENGLISH
coffee machine as specified in section "4. Cleaning and maintenance". Always use fresh, cold water.
- Store unused ground coffee in a cool, dry place. Once opened, seal the package of ground coffee tightly and store it in the refrigerator to preserve its freshness.
- For optimal coffee flavour, use whole coffee beans and grind them just before brewing.
- Do not reuse ground coffee, as this will greatly reduce the flavour of the coffee. It is not recommended to reheat coffee, since coffee has its best flavour immediately after brewing.
- Clean the coffee machine when overextraction causes oiliness. Small oil droplets on the surface of the coffee are due to the extraction of oil from ground coffee.
- Oiliness can occur more frequently if coffee beans of intense roasting are used.
4. CLEANING AND MAINTENANCE
WARNING: Before cleaning the appliance, switch it off and disconnect it from the mains. To avoid electric shock, do not immerse the cord, plug or appliance in water or any other liquid.
- Clean the funnel, reusable filter and coffee carafe after each use with hot soapy water.
- Clean the outer surface of the product with a soft, damp cloth to remove stains.
- Use a damp cloth to gently wipe the heating plate. Never use an abrasive cleaner to clean the machine.
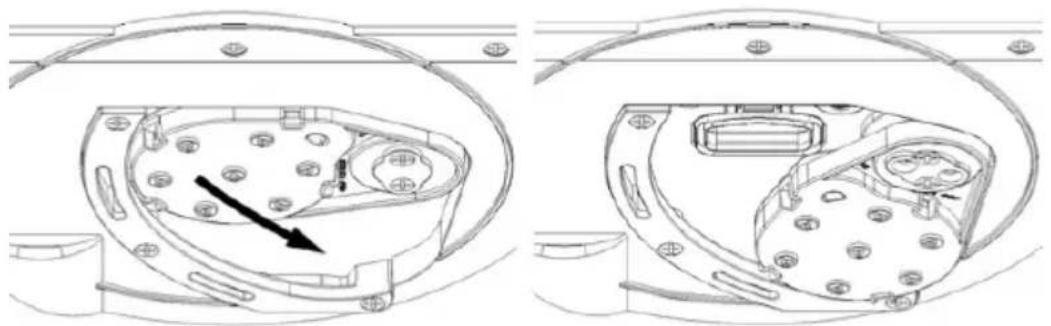
- If you use coffee beans, clean the coffee outlet port at least once a week:
a) Open the funnel holder.
b) Slide the shower head inward as shown in Figure 3.
c) Remove coffee residue from the outlet port opening.
d) There is no need to return the shower head to its original position, the machine will automatically return to its original position when turned on.
CAUTION: Also follow the steps in point 4 when ground coffee blocks the outlet.
- Clean the grain tank:
a) Remove the coffee bean tank lid.
b) Rotate the grain tank and then lift it up to remove it, as shown in Figure 4. The grain tank is not dishwasher safe and can only be washed with hot water not exceeding 50^ C.
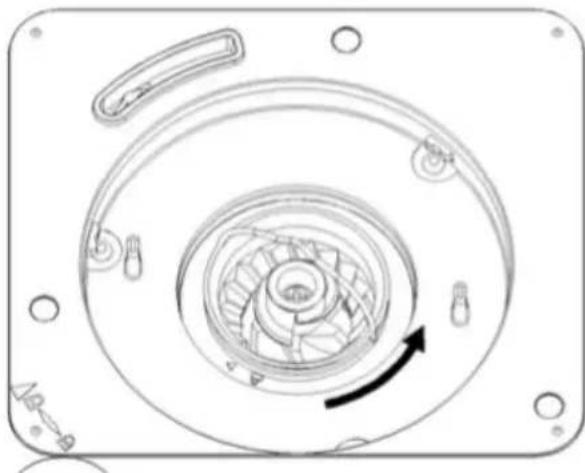
c) Rotate the cutting head handle and then lift it up, as shown in Figure 5. Remove the cutting head and clean the cutting head and cutting head seat.
d) After cleaning, in the parts assembly process, when inserting the grain tank, it is necessary to align the insertion symbol on the front of the grain tank with the insertion symbol on the top cover to ensure the correct insertion position, as shown in Figure 6.
Descaling
Minerals present in the water will leave deposits in your coffee machine and affect its performance. The icon will flash on the display when it is recommended to descale your coffee machine (this icon will appear after approximately 50 uses). To descale the coffee machine, follow the steps below:
- Fill the water tank with water and descaler (use a mild, easy-to-dissolve descaler) to the maximum level (the ratio of water to descaler is 4:1; refer to the descaler instructions for details).
- Push the funnel holder handle and turn the funnel holder to the left, make sure that the funnel and filter (reusable or paper) are inside the funnel holder.
- Turn the funnel holder clockwise until it is locked.
- Place the empty carafe in the brewer.
-
Press the button, during the descaling process, the LED display will show "CLEAN" on the left side and a process symbol on the right side.
-
The entire cycle will take approximately 10 minutes to complete. At the end of the cycle, the LED display will stop showing "CLEAN", the process is complete.
-
Discard the cleaning solution and rinse the carafe thoroughly with clean water.
-
Fill the water tank with 12 cups of clean, fresh water.
-
Place the empty carafe back into the brewer.
-
Remove the filter used during the descaling cycle. If a reusable filter was used during the descaling cycle, remove it and rinse it thoroughly before replacing it.
-
Press the ▷ button, allow the entire preparation cycle to complete.
-
Discard the water from the pitcher and rinse the pitcher thoroughly with clean water.
-
Repeat steps 8 to 12 more times to ensure that the brewer is completely rinsed. If you wish to stop the descaling function once it has started, press the button. If the descaling process has lasted more than 5 minutes, the coffee machine will understand that the descaling cycle has been completed. Otherwise, the display will show "CLEAN" on the screen and remind the user to run the descaling program. The user can ignore this message and directly press the coffee brewing button.
Please note that when a complete descaling cycle is completed, CLEAN will no longer be shown on the display and the brewer will start counting the number of coffees brewed to give the next required descaling warning.
- TROUBLESHOOTING
| No. | Error code | Cause of error code | Analysis of the causes | Solution |
| 1 EC14 | After switching on the machine, no closing signal of the funnel holder is detected.The signal sent by the funnel holder opening switch is not detected by the PCB. | There is coffee residue in the coffee outlet port, which interferes with the closing switch of the funnel holder.Poor connection between the funnel bracket latch switch and the PCB assembly. | Clean the coffee residue around the shower head according to the instructions. In case of daily use, it is recommended to clean the coffee residues once a week.Please contact the official Cecotec Technical Support Service. | |
| 2 EC15 | After switching on the machine, no sign of opening of the funnel holder is detected.The signal sent by the funnel holder closure switch is not detected by the PCB. | There is coffee residue in the coffee outlet port, which interferes with the funnel holder opening switch.Poor connection between the funnel bracket latch switch and the PCB assembly. | Clean the coffee residue around the shower head according to the instructions. In case of daily use, it is recommended to clean the coffee residues once a week.Please contact the official Cecotec Technical Support Service. | |
| 3 EC16 | The water NTC is faulty. | Faulty NTC. | Please contact the official Cecotec Technical Support Service. | |
| 4 EC17 | Water NTC is out of range. | Faulty NTC. | Please contact the official Cecotec Technical Support Service. | |
| 5 EC19 | Water pump does not start. | Failed water pump. | Please contact the official Cecotec Technical Support Service. |
6. COPYRIGHT
The intellectual property rights over the texts in this manual belong to CECOTEC INNOVACIONES, S.L. All rights reserved. The contents of this publication may not, in whole or in part, be reproduced, stored in a retrieval system, transmitted, or distributed by any means (electronic, mechanical, photocopying, recording or similar) without the prior authorization of CECOTEC INNOVACIONES, S.L.
7. SIMPLIFIED EU DECLARATION OF CONFORMITY
CE Cecotec Innovaciones hereby declares that this appliance complies with the essential requirements and other relevant provisions of the regulations applicable in the European Union. This appliance has been designed, manufactured and tested in compliance with required safety and quality standards. The full text of the EU Declaration of Conformity can be found on the following website: https://cecotec.es/es/information/declaration-of-conformity
FRANÇAIS
1. PIÈCES ET COMPOSANTS
Img. 1
5. PROBLEEMOPLOSSING
Fig./Img./Abb./Afb./Rys.1
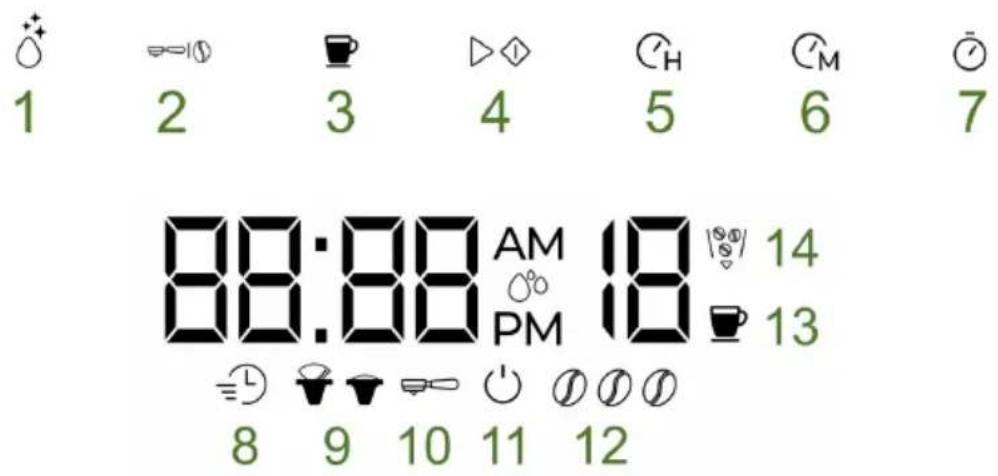
Fig./Img./Abb./Afb./Rys.2
natural_image
Technical line drawing of a mechanical component with internal components and mounting holes (no text or symbols)Fig./Img./Abb./Afb./Rys. 3

natural_image
Diagram showing two mechanical components with rotating arrows, one with a circular center and the other with a square base (no text or symbols)Fig./Img./Abb./Afb./Rys. 4
natural_image
Technical line drawing of a mechanical component with concentric circular features and a curved arrow indicating rotation (no text or symbols)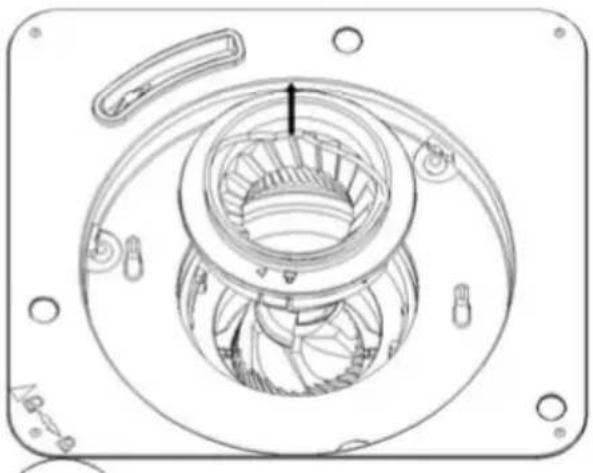
natural_image
Technical line drawing of a mechanical component with no visible text or symbolsFig./Img./Abb./Afb./Rys. 5

natural_image
Technical line drawing of a mechanical component with no visible text or symbolsFig./Img./Abb./Afb./Rys. 6
www.cecotec.es