
Cremmaet Commpact - Coffee machine CECOTEC - Free user manual and instructions
Find the device manual for free Cremmaet Commpact CECOTEC in PDF.

| Product type | Automatic coffee machine with built-in grinder |
| Brand | Cecotec |
| Model | Cremmaet Compact |
| Reference | 01636 |
| Power supply | 220-240 V, 50/60 Hz |
| Power | 1100-1350 W |
| Functions | Espresso, American, Hot water, Double coffee, Rinse/Cleaning |
| Settings | Ground coffee quantity, liquid coffee quantity, temperature, flow, automatic shut-off |
| Grind level | Adjustable by selector (from fine to coarse) |
| Rinse capacity | 60 ml |
| Automatic shut-off | Programmable from 0.5 h to 24 h |
| Descaling | Manual with descaling product |
| Water tank | Removable |
| Bean hopper | Removable |
| Brewing unit | Removable for cleaning |
| Drip tray | Removable with residue container |
| Maintenance | Regular cleaning of components, periodic descaling |
| Safety | Programmable automatic disconnection |
| Warranty | According to current regulations, Cecotec after-sales service |
| Country of manufacture | China (designed in Spain) |
Frequently Asked Questions - Cremmaet Commpact CECOTEC
User questions about Cremmaet Commpact CECOTEC
0 question about this device. Answer the ones you know or ask your own.
Ask a new question about this device
Download the instructions for your Coffee machine in PDF format for free! Find your manual Cremmaet Commpact - CECOTEC and take your electronic device back in hand. On this page are published all the documents necessary for the use of your device. Cremmaet Commpact by CECOTEC.
USER MANUAL Cremmaet Commpact CECOTEC
Safety instructions 6
-
Parts and components
-
Before use
-
Installation and initial use
-
Operation
-
Cleaning and maintenance
-
Troubleshooting 45
-
Technical specifications 48
-
Disposal of old electrical
and electronic appliances 48
-
Technical support and warranty
-
Copyright 49
SOMMAIRE
- Read these instructions thoroughly before using the appliance. Keep this instruction manual for future reference or new users.
- The appliance can be used by persons with reduced physical, sensory, or mental capabilities or lack of experience and knowledge if they have been given supervision or instruction concerning use of the appliance in a safe way and understand the hazards involved.
- The device is not intended to be used by children. Keep the appliance and its power cable out of the reach of children.
-
Cleaning and maintenance tasks should not be carried out by children.
-
Children must not play with the appliance.
- Check the power cable regularly for visible damage. If the power cable is damaged, it must be replaced by the Technical Support Service of Cecotec or similar qualified personnel to avoid risks.
- This appliance is designed for domestic use only and is not intended for bars, restaurants, farmhouses, hotels, motels, and offices.
- Do not immerse the cable, plug, or any other part of the appliance in water or any other liquid or expose electrical connections to water. Make sure your hands are dry before handling the plug or switching on the appliance.
- WARNING: the filling opening must not be opened during operation.
- WARNING: take precautions to avoid spillage of liquids on the cable.
- WARNING: incorrect or improper use can be dangerous for the user and damage the appliance. Use the appliance only for the purposes described in this manual. The surface of the heating element is subject to residual heat after use.
- Always disconnect the appliance from the power supply if it is left unattended and before assembly, disassembly, or cleaning.
- It is your responsibility to make sure every user is informed about the warnings and precautions stated in this instruction manual. Do not use the appliance for any use other than the one specified in this manual.
- Make sure that the mains voltage matches the voltage stated on the rating label of the appliance and that the wall outlet is earthed.
- Disconnect the appliance from the mains in any of the following circumstances:
A. Before filling up the water tank.
B. Before removing or installing any of the appliance's parts.
C. Before cleaning or maintenance.
D. When the appliance is not working properly.
E. After using the appliance.
- Empty the water tank when the appliance is not going to be used for some time.
- Make sure the appliance has cooled down completely before removing or installing parts and before cleaning it.
- Always use cold water. The use of hot water or other liquids may damage the appliance.
- Use the grinder to grind only coffee beans.
- Do not use caramelised or frozen coffee beans. This appliance can only be used with natural coffee beans.
- Never leave the appliance unattended when it is connected to a mains power supply.
- Do not let the cable protrude over the edge of the table or worktop, or come into contact with hot surfaces or sharp edges.
- Place the appliance on a flat, stable surface. Do not use or place the appliance on a hot or damp surface.
- Do not use the appliance if the drip tray is not properly positioned.
- Do not use the appliance if any of its parts are damaged or if the appliance is not working properly.
- WARNING: this product has undergone a quality control previous to its commercialisation with the aim of ensuring its correct functioning. After the quality control testing, the appliance is cleaned thoroughly, therefore, although it is unlikely to occur, there could be rests of water or coffee drops inside it.
INSTRUCTIONS DE SÉCURITÉ
- Water tank
- Coffee bean container
- Grinding level knob
- Control panel
- Coffee spout
- Power button
- Drip tray
- Coffee residues tank
- Brewing unit
- Side panel
Control panel. Fig. 2
- Espresso
- American
- Hot water
- Double coffee/Cleaning
- Confirm
- Settings/Exit
NOTE
The graphics in this manual are schematic representations and may not exactly match the appliance.
2. BEFORE USE
- This appliance has a packaging designed to protect it during transport. Take the appliance out of its box and remove all packaging materials. You can keep the original box and other packaging elements in a safe place. This will help you prevent damage to the appliance when transporting it in the future. In case the original packaging is disposed of, make sure all packaging materials are recycled accordingly.
- Make sure all parts and components are included and in good conditions. If there is any piece missing or in bad conditions, contact the official Cecotec Technical Support Service immediately.
ENGLISHENGLISH
3. INSTALLATION AND INITIAL USE
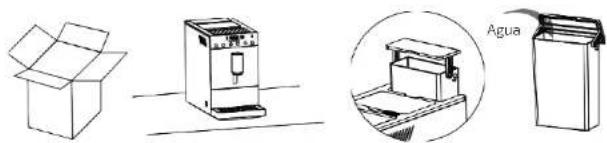
- Remove the coffee machine from the box and save the packaging material for future use. Place the machine on a flat and stable surface. Fig. 3
- Remove and clean the water tank Fill it with water and insert it into the coffee machine. Fig. 4
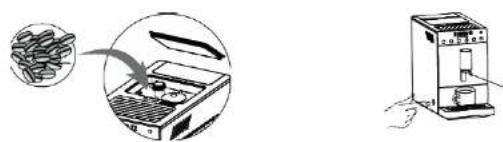
- Fill the container with coffee beans. Fig. 5
- Plug in the coffee machine.
- Place a container under the coffee spout to collect the hot water dispensed by the coffee machine.
- Press the power button to switch on the machine and clean the coffee spout. Fig. 6
- Press and hold down the "x2|8" button for 3 seconds to start cleaning/flushing of the coffee machine. Discard the water dispensed by the coffee machine and clean the container.
- Press the buttons according to the function you want to activate.
- Press and hold the power button for 3 seconds to switch off the coffee machine.
4. OPERATION
Filling up the water tank. Fig. 4
- Remove and clean the water tank
- Fill it with water and insert it into the coffee machine.
NOTE
Never exceed the maximum capacity of the water tank.
Making an espresso
- Ajuste la altura de la salida de café y coloque una taza debajo. Fig. 7
- Press the espresso button * once to brew one small espresso.
- Select the desired amount of coffee.
- During grinding (the control panel display shows "g"), press the "△' or "▽" buttons to adjust the amount of coffee powder. During coffee preparation ("ml" is displayed on the right-hand side of the control panel display), press "△' or "▽" to adjust the amount of liquid coffee.
- Press the "button to prepare two cups of coffee.
- Press "to stop coffee preparation.
Preparing an Americano
- Adjust the height of the coffee spout and place a cup underneath. Fig. 7
-
Press the Americano button "t" prepare an Americano coffee.
-
Select the desired amount of coffee
- During grinding (the control panel display shows "g"), press the "△" or "▽" buttons to adjust the amount of coffee powder. During coffee preparation ("mt" is displayed on the right-hand side of the control panel display), press "△" or "▽" to adjust the amount of liquid coffee.
- Press the "button" to prepare two cups of coffee.
- Press "to stop coffee preparation.
Preparing hot water
- Adjust the height of the coffee spout and place a cup underneath. Fig. 7
- Press the hot water button " to dispense hot water
- Once the desired amount of hot water is obtained, press the "button" on the panel to stop dispensing water.
Cleaning/RinsIng
- Adjust the height of the coffee spout and place a container underneath. Fig. 7
- Press and hold down the button " * for 2 seconds to start cleaning/flushing of the coffee machine. This function uses 60 ml of water and is automatically deactivated.
Settings and configuration
In standby mode, press and hold the settings button ** for 3 seconds to access the configuration interface.
- Settings for Espresso and Americano coffee. Fig. 8
a. Once inside the setting interface, the Espresso and Americano buttons will flash.
b. Press the Espresso button " [icon] for the American button " [icon] depending on the type of coffee you want to change."
c. Once you have pressed the desired button, you have accessed the interface for setting the amount of coffee powder. Press "2or" to increase or decrease the amount of coffee powder.
d. Then, press the Settings/Exit button * to enter the coffee flow setting interface. press "2or" to increase or decrease the Espresso flow rate.
e. When the configuration is finished, press the 'Settings/Exit' button to advance to the next step, and press the button 7 times to return to the standby interface.
2. Temperature settings.Fig. 9
After configuring the quantity and flow rate settings, press the Settings/Exit button * ' to enter the temperature settings interface. Press the button "△" or "▽" to adjust the temperature.
ENGLISHENGLISH
3. Automatic shutdown settings.Fig. 10
After configuring the quantity and flow rate settings, press the Settings/Exit button to enter the automatic shutdown settings interface. Press '△' or "▽" to programme the coffee machine to shutdown (0.5 h, 1 h, 2 h... 24 h).
4. Start-up settings.Fig.11
After configuring the quantity and flow rate settings, press the Settings/Exit button to enter the automatic start-up settings interface. This function is for authorised professionals or after-sales personnel only.
5. Manufacturing Information.Fig.12
After setting the temperature adjustment, press the Settings/Exit button "4 times to check both the manufacturing information and the date and batch number.
6. Decalcification. Fig. 13
A. Pour the descaler into a container with clean water and follow the manufacturer's instructions.
B. Take out the water tank, pour the descaling product into the tank and add clean water until the tank is completely full, never exceed the maximum.
C. Place a container under the coffee spout.
D. In the standby interface, press and hold the Settings/Exit button * 📋* and wait for 2 seconds. Then press the Settings/Exit button " 📋" in four times and the descaling indicator " 📋" will light up on the display.
E. Press the Confirm button * to start descaling
F. Once emptied, remove the water tank and add fresh water until the coffee machine completes the cycle. This process may take a few minutes. When the container is full, empty it.
G. When descaling is complete, be sure to carry out several Cleaning/Rinse cycles as indicated in the "Cleaning/Rinse" section.
H. When the coffee machine is free of descaling agent after the necessary "Clean/Rinse" cycles, it is ready for normal operation.
7. Adjusting the grinding level. Fig. 14
- When you need to adjust the grind level of the coffee beans, turn the grind level knob when the grinder is in operation, otherwise the grinder may be damaged.
- Adjust the grind level according to the degree of roast of the coffee beans you use (medium roast beans are recommended).
- If the coffee comes out too slowly during preparation (the coffee powder is too fine), turn the grind level selector clockwise until a coarser grind is obtained.
- If during preparation the coffee comes out too fast and too clear (the coffee powder is too coarse), turn the grind level knob anticlockwise until a finer grind is obtained.
Tips
- Do not overfill the bean container or use beans that are too long, otherwise the quality of the coffee and the performance of the grinder will be affected, and the beans will become wet (especially in humid environments).
- Do not overfill the bean container or leave the coffee beans inside for a long time so that they do not get too wet and lose freshness (especially on humid days). Moisture will affect the grind, brew and taste of the coffee.
- If the coffee beans are wet, empty the container and fill it with fresh coffee beans for better taste. Turn the grind level knob to maximum and try grinding the coffee beans. If the coffee machine is working properly, return the knob switch to its original position.
- If the coffee beans do not grind properly, it is possible that the coffee beans are too wet or that there is too much coffee bean oil accumulated inside. In the latter case, add grinder cleaner to the bean container and try grinding. If the grinder is working properly, return the grind level knob to its original position. If not, repeat the process until it works properly. Perform several "Clean/Rinse" cycles after using grinder cleaner.
Warnings and cautions
1. Empty coffee bean container
When " lights up, it means the bean container is empty. Fill up the container.
2. Double coffee
When the double coffee button "lights up, the double coffee function is activated. The machine will prepare 2 coffees.
The machine will not prepare the second coffee if the bean container is emptied during the preparation of the first coffee.
3. Open panel
When "lights up, it means that the right panel is open: close it.
4. Water tank empty
When the "icon lights up, it means that the water tank is empty or low on water: fill it up.
5. Processing unit not installed
When "ights up, it means that the processing unit is not installed: you must install it properly.
6. Coffee residues tank
When lights up, it means that the waste-holding tank is not properly positioned or installed or that it is full and needs to be emptied.
Empty the waste container every 8 cups of coffee or if you are not going to use it for a long period of time.
ENGLISHENGLISH
7. Decalcification
When "Lights up, it means that the coffee machine needs to be descaled.
8. Warning of water shortage in the internal pipeline
When "Lights up" on the control panel, it means that there is a shortage of water in the internal piping of the coffee machine. Make sure that there is water in the tank and that it is properly installed. Press the "Button" to restart the pump and expel the accumulated air, causing the water to flow through the internal piping.
5. CLEANING AND MAINTENANCE
Daily maintenance
Daily maintenance is important to extend the life of the coffee machine and to obtain better results.
| Components Maintenance Other models | ||
| Brewing unit | Remove the brewing unit and wash it under running water, then remove the coffee residues. Clean the processing unit by hand every 3 days.Do not wipe lubricating oil from the bottom and centre of the processing unit. Do not wash it in the dishwasher. | To clean the brewing unit, you can use a coffee machine cleaning tablet; remove the brewing unit, place a cleaning tablet inside, place it back into the coffee machine and brew an Espresso with the maximum amount of coffee.Then remove the processing unit again and clean the product residues by hand. |
| Drip tray and waste container | Remove the drip tray and the waste container, rinse them under running water and wipe them with a cloth.Clean them at least every two days. | |
| Water tank | Rinse the tank under running water every 3 days.Empty it if you are not going to use it for a long time. | |
| Coffee bean container/ grinder | Clean the coffee bean container weekly. Use a soft dry cloth to wipe oil/coffee grounds from the inside. If there is too much oil inside the bean container, it is possible that there is too much oil in the grinder. Clean the grinder thoroughly in case of grinding problems. | To clean the bean container and the grinder, you can use a grinder cleaner for coffee machines; place the cleaner inside the container and prepare an espresso with the maximum amount of coffee. Then, clean the container by hand. |
| Ground coffee groove | Open the right panel, remove the brewing unit and clean the ground coffee channel with a soft cloth on a weekly basis. |
Dismantling parts for cleaning
Fig. 15
- Pull the water tank upwards and remove it.
- Pull the right panel outwards.
- Press where the blue arrow in figure 15 indicates and remove the processing unit.
- Lift the drip tray slightly and remove it.
Fig. 16
- Replace the water tank in the coffee machine.
- Push the processing unit along the groove until a snapping noise is heard, as shown in figure 16.
- Push the drip tray inwards into place.
Warning:
- When reinstalling the processor unit, a snapping noise will be heard: if you do not hear it, disassemble the processor unit again and reinsert it.
Make sure that the water tank is fully inserted. If this is not the case, push the water tank down until it clicks into place.
6. TROUBLESHOOTING
In the event of a fall or malfunction, unplug the appliance immediately from the mains socket. If a mechanical failure occurs in the appliance, please contact your supplier, authorised dealer for repair or the official Cecotec Service Centre.
ENGLISHENGLISH
| Num Problem Num Possible cause Solution | ||||
| 1 | The control panel display shows the water tank icon. | 1.1 | Water tank is out of water. | Fill the water tank and install it in the appliance. |
| 2 | The display shows "continuous square line", press the Settings/Exit button but the coffee machine does not dispense water. | 2.1 | The water tank is not correctly installed. | Install the tank securely inside the coffee machine. |
| 2.2 | No pasa agua por la bomba. | Contact the official Cecotec Technical Support Service. | ||
| 2.3 | The internal piping is blocked. | Contact the official Cecotec Technical Support Service. | ||
| 3 | The control panel shows "continuous square line" press the Settings/Exit button but the icon does not disappear when dispensing water. | 3.1 | The water flow meter cables are loose or the water flow meter is broken. | Contact the official Cecotec Technical Support Service. |
| 4. Watery/light coffee. | 4.1 Grinding too fine. Turn the grind level knob to obtain a coarser ground coffee. | ||
| 4.2 After filling the container with dark roasted or oily coffee beans, the grinder blades are sticky and the coffee is not ground. | Increase the grinding level or contact Technical Support. | ||
| 4.3 Res dues and wet coffee beans block the grinder. | Remove damp coffee beans, clean the container and insert dry coffee beans/ grinder cleaner. | ||
| 5 No coffee comes out. | 5.1 The water tank is not correctly installed. | Install the tank securely inside the coffee machine. | |
| 5.2 Filter blocked. Clean or replace the filter. | |||
| 5.3 The internal piping of the coffee machine is blocked. | Descal the coffee machine If this does not solve the problem, contact the official Technical Support Service of Cecotec. | ||
| 5.4 The processing unit does not react, does not go down/up and does not react to commands. | Open the right-hand panel door and press and hold the espresso button for 3 seconds, the press unit will return to its initial position. | ||
ENGLISHENGLISH
| 6 The grinder does not work. | 6.1 Grinder blocked by foreign objects. | Remove foreign objects from the grinder. If this does not solve the problem, contact the official Technical Support Service of Cecotec. |
| 6.2 The grinder cables are loose. | Contact the official Cecotec Technical Support Service. | |
| 6.3 The grinder motor is broken. | Contact the official Cecotec Technical Support Service. | |
| 7 The processing unit does not work. | 7.1 TRANSFORMER (BLACK) Contact the official Cecotec Technical Support Service. | |
| 7.2 The microswitch is broken. | Contact the official Cecotec Technical Support Service. | |
7. TECHNICAL SPECIFICATIONS
Product: Cremmaet Compact
Product reference: 01636
Power: 1100 - 1350 W
Voltage and frequency: 220 - 240 V. 50/60 Hz
Technical specifications may change without prior notification to improve product quality.
Made in China | Designed in Spain
8. DISPOSAL OF OLD ELECTRICAL AND ELECTRONIC APPLIANCES

This symbol indicates that, according to the applicable regulations, the product and/or batteries must be disposed of separately from household waste. When this product reaches the end of its shelf life, you should dispose of the cells/batteries/accumulators and take them to a collection point designated by the local authorities.
Consumers must contact their local authorities or retailer for information concerning the correct disposal of old machines and/or their batteries.
Compliance with the above guidelines will help protecting the environment.
9. TECHNICAL SUPPORT AND WARRANTY
Cecotec shall be liable to the end user or consumer for any lack of conformity that exists at the time of delivery of the product under the terms, conditions, and deadlines established by the applicable regulations.
It is recommended that repairs be carried out by qualified personnel.
If at any moment you detect any problem with your product or have any doubt, do not hesitate to contact the official Cecotec Technical Support Service at -34 963 210 728.
10. COPYRIGHT
The intellectual property rights over the texts in this manual belong to CECOTEC INNOVACIONES, S.L. All rights reserved. The contents of this publication may not, in whole or in part, be reproduced, stored in a retrieval system, transmitted, or distributed by any means (electronic, mechanical, photocopying, recording or similar) without the prior authorization of CECOTEC INNOVACIONES, S.L.
FRANÇAISFRANÇAIS
1. PIÈCES ET COMPOSANTS
Img. 1
Fig./Img./Abb./Afb./Rys./Obr.1
natural_image
Line drawings of open and closed boxes, a washing machine, and an open shelf with a labeled 'Agua' (no text or symbols on the devices themselves)Fig./Img./Abb./Afb./Rys./Obr.3 Fig./Img./Abb./Afb./Rys./Obr.4
natural_image
Illustration of a coffee machine with a hand inserting into it, showing its internal components and a magnified view (no text or symbols present)Fig./Img./Abb./Afb/Rys./Obr.5 Fig./Img./Abb./Afb/Rys./Obr.6

Fig./Img./Abb./Afb./Rys./Obr.2
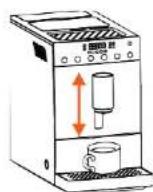
Fig./Img./Abb./Afb./Rys./Obr.7
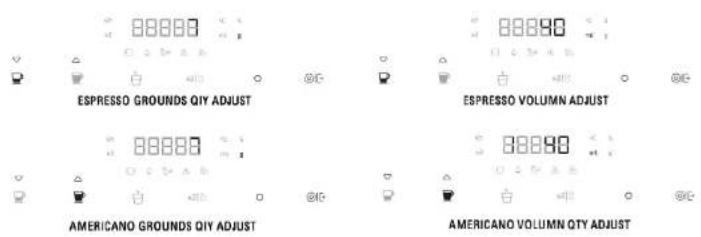
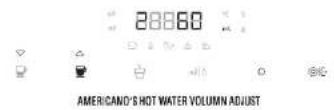
Fig./Img./Abb./Afb./Rys./Obr.8

Fig./Img./Abb./Afb./Rys./Obr.9

Fig./Img./Abb./Afb./Rys./Obr.10

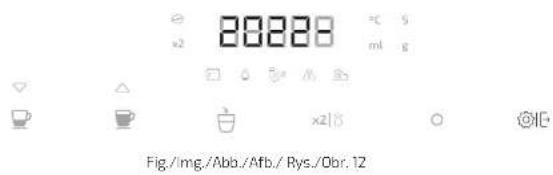
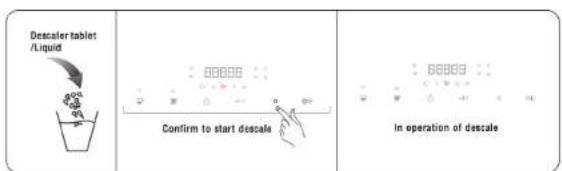
Fig./Img./Abb./Afb./Rys./Obr.13
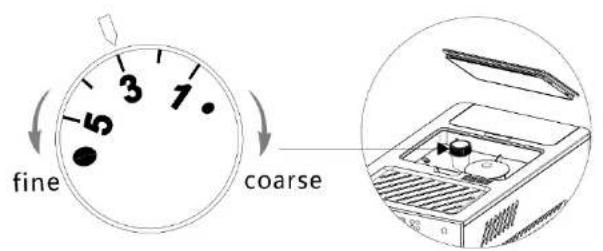
Fig./Img./Abb./Afo./Rys./Obr.14
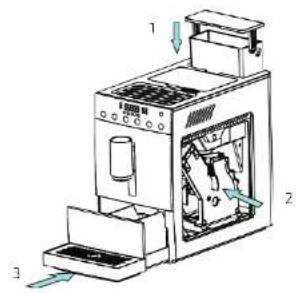
Fig./img./Abb./Afb./Rys./Obr.16

Fig./Img./Abb./Afo./Rys./Obr.15
www.cecotec.es


- SOMMAIRE
- INSTRUCTIONS DE SÉCURITÉ
- BEFORE USE
- ENGLISHENGLISH
- INSTALLATION AND INITIAL USE
- OPERATION
- Making an espresso
- Preparing an Americano
- Preparing hot water
- Cleaning/RinsIng
- Settings and configuration
- Temperature settings.Fig. 9
- Automatic shutdown settings.Fig. 10
- Start-up settings.Fig.11
- Manufacturing Information.Fig.12
- Decalcification. Fig. 13
- Adjusting the grinding level. Fig. 14
- Tips
- Warnings and cautions
- Empty coffee bean container
- Double coffee
- Open panel
- Water tank empty
- Processing unit not installed
- Coffee residues tank
- Decalcification
- Warning of water shortage in the internal pipeline
- CLEANING AND MAINTENANCE
- Daily maintenance
- Dismantling parts for cleaning
- TROUBLESHOOTING
- TECHNICAL SPECIFICATIONS
- DISPOSAL OF OLD ELECTRICAL AND ELECTRONIC APPLIANCES
- TECHNICAL SUPPORT AND WARRANTY
- COPYRIGHT
- FRANÇAISFRANÇAIS
- PIÈCES ET COMPOSANTS
- Img. 1
Brand : CECOTEC
Model : Cremmaet Commpact
Category : Coffee machine