
67590 - Oven Lund - Free user manual and instructions
Find the device manual for free 67590 Lund in PDF.

| Product type | Oven / air fryer (hot air) |
| Brand | Lund |
| Model | 67590 |
| Capacity | 12 L |
| Rated power | 1800 W |
| Rated voltage | 220 – 240 V~ |
| Rated frequency | 50 / 60 Hz |
| Temperature range | 30 °C to 200 °C |
| Time setting | 1 min to 9 min (1 min increments); drying: 2 h to 24 h (0.5 h increments) |
| Insulation class | I (with ground) |
| Net weight | 8 kg |
| Dimensions (approx.) | 30 x 30 x 35 cm |
| Bowl material | Steel with non-stick coating |
| Display | Illuminated touch screen |
| Preset programs | 10 modes: fries, steaks, fish, shrimp, pizza, chicken, baking, rotisserie, drying, heating |
| Special functions | Rotisserie rotation, interior light, auto shut-off when door is opened |
| Included accessories | Bowl with removable handle, drip tray, rotating basket, shashlik accessory (spit + forks), grid |
| Care and cleaning | Hand wash with mild detergent; do not immerse the housing; accessories are dishwasher safe |
| Safety | Auto shut-off when door opens, hot surfaces indicated, fan cooling, overcurrent protection (16 A) |
| Repairability | Repair by authorized service only; do not disassemble yourself |
| Warranty | Manufacturer's warranty (refer to manual) |
Frequently Asked Questions - 67590 Lund
User questions about 67590 Lund
0 question about this device. Answer the ones you know or ask your own.
Ask a new question about this device
Download the instructions for your Oven in PDF format for free! Find your manual 67590 - Lund and take your electronic device back in hand. On this page are published all the documents necessary for the use of your device. 67590 by Lund.
USER MANUAL 67590 Lund
natural_image
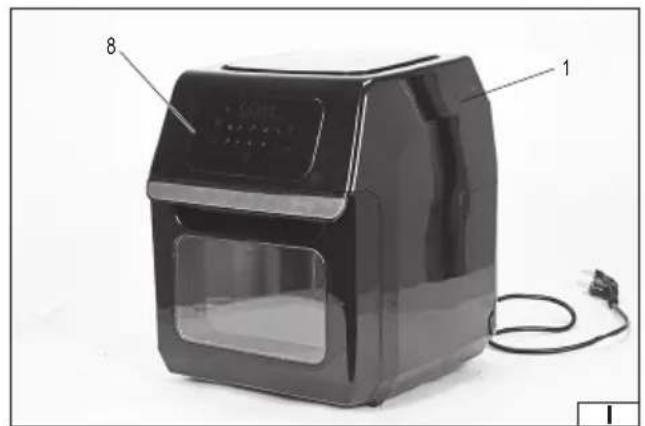
Black electric air fryer with digital display and control buttons (no visible text or symbols)CE
PL EN DE RU UA LT LV CZ SK HU RO ES FR IT NL GR
natural_image
Black air fryer device with labeled parts (1 and 8), no visible text or symbols on body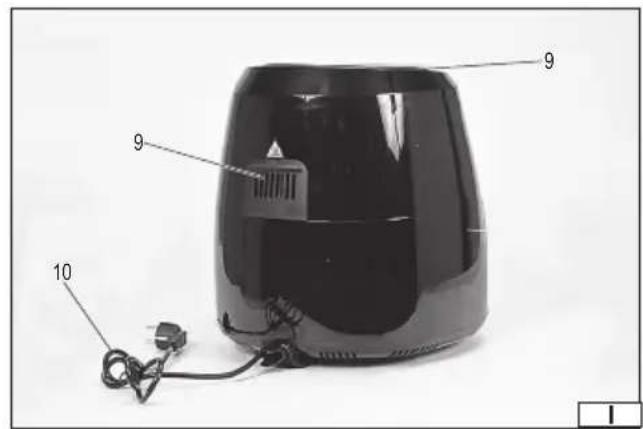

natural_image
Two views of a kitchen appliance showing internal components: one with a grater and labeled parts 2 and 7, the other with a handle and part number 5 (no text or symbols visible)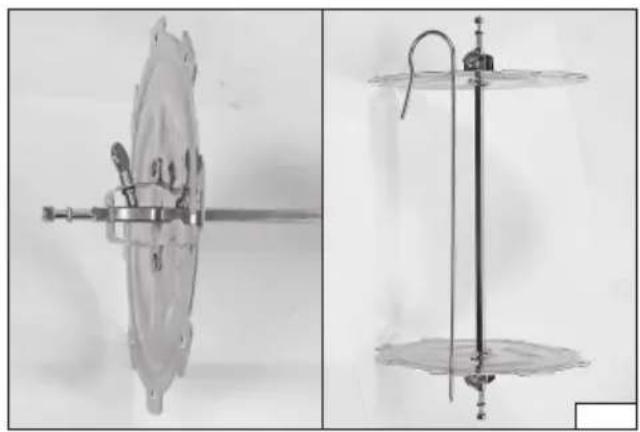
natural_image
Two technical diagrams showing mechanical components with no visible text or symbols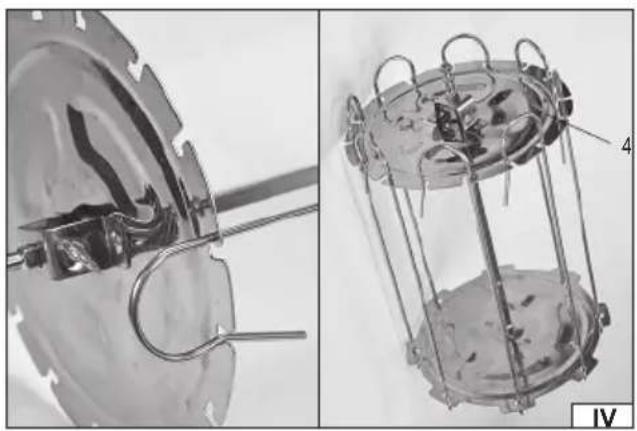
natural_image
Technical illustration of a mechanical device with two views: front view and side view, showing internal components and wiring (no text or symbols)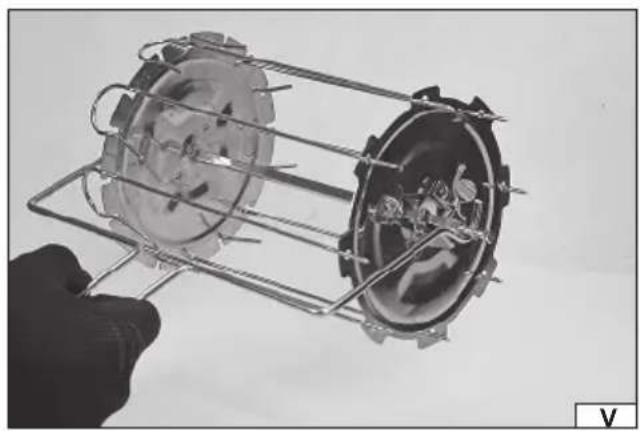
natural_image
Close-up of a hand holding a wire cage containing a mechanical component, no visible text or symbols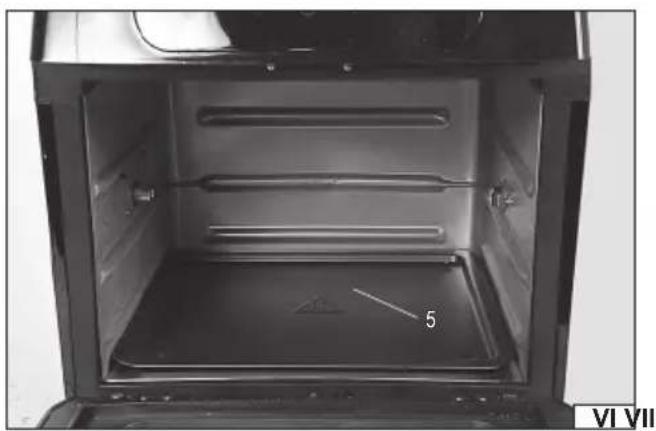
natural_image
Interior view of a kitchen appliance with a numbered floor panel (no text or symbols visible)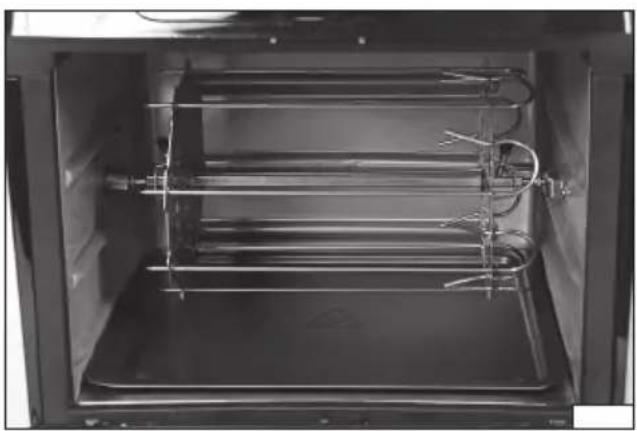
natural_image
Interior view of a laboratory oven with three parallel metal heating elements (no text or symbols visible)natural_image
Interior view of a laboratory apparatus with a mesh chamber and labeled component (6), no readable text or symbols beyond labels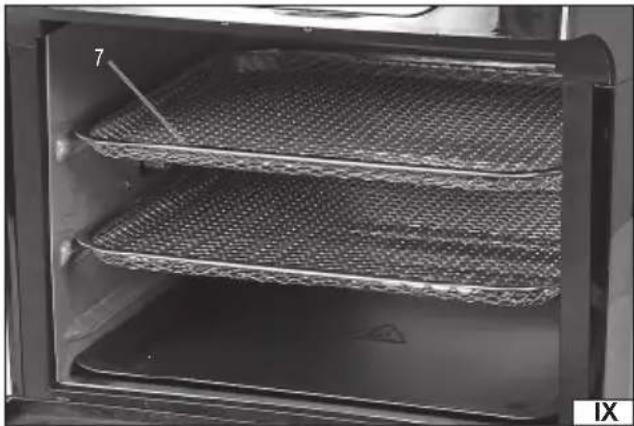
natural_image
Interior view of a stainless steel oven with mesh grating and labeled component '7' (no text or symbols beyond label)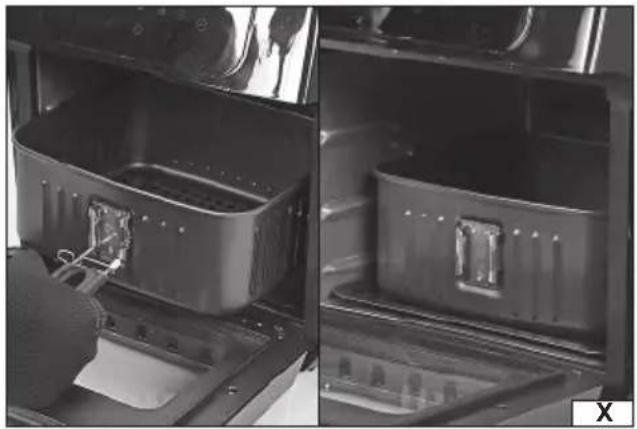
natural_image
Interior view of a microwave oven with two open outlets, one containing a baking tray and the other showing a closed lid (no text or symbols visible)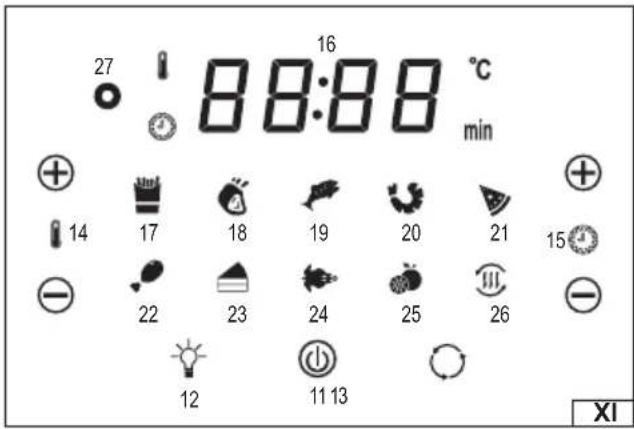
PL
- obudowa
2.misa
-
housing
-
bowl
-
bowl holder
-
shish-kebab attachment
-
drip tray
-
rotary cage
/. tray
-
control panel
-
vents
-
power cord with plug
-
power switch
-
interior light switch
-
barbecue rotation button
-
temperature control
-
time control
-
display
17.chips
18.steak
-
fi sh
-
shrimp
-
pizza
-
chicken
-
oven
-
spit
-
dry
-
reheat
-
fan light indicator
DE
Read the operating instruction
Note! Hot surface. Do not touch.
Safe contact with food
This symbol indicates that waste electrical and electronic equipment (including batteries and storage cells) cannot be disposed of with other types of waste. Waste equipment should be collected and handed over separately to a collection point for recycling and recovery, in order to reduce the amount of waste and the use of natural resources. Uncontrolled release of hazardous components contained in electrical and electronic equipment may pose a risk to human health and have adverse effects for the environment. The household plays an important role in contributing to reuse and recovery, including recycling of waste equipment. For more information about the appropriate recycling methods, contact your local authority or retailer.
PRODUCT CHARACTERISTICS
The no-fat fryer is a product designed for reheating, cooking, drying, grilling and preparing dishes that require heat treatment. The heat fryer uses a forced flow of heated air to reheat the food evenly. Unlike traditional deep-fat fryers, it does not require deep frying, which facilitates much healthier food preparation. Thanks to the wide range and adjustment of the temperature control, you can adjust the operating parameters of the product to your needs. Proper, reliable and safe operation of the product depends on appropriate use, that is why you should:
Read the entire manual before the first use of the product and keep it for future reference.
The supplier shall not be held liable for any damage or injury resulting from improper use of the product, failure to observe the safety regulations and recommendations of this manual. Use of the product for purposes other than those for which it was intended shall cause the loss of the user's rights to the warranty and under statutory warranty.
EQUIPMENT
The product is supplied complete and does not require assembly. However, before using the product, remove all packaging and transport protection elements. Preparatory activities described later in this manual are also required.
GENERAL INSTRUCTIONS FOR USE
The product has been designed for domestic use and is not allowed to be used in commercial applications, e.g. in catering facilities. The product can be used only for heat processing of food placed directly inside the bowl. It is forbidden to use the product in any other way. The product cannot be used to heat or boil water or other liquids. The product cannot be used for preparing dishes by deep-frying. Do not place food in plastic packaging in a bowl. It is forbidden to repair, disassemble or modify the product on one's own. All repairs to the product must be carried out by an authorised service centre. The product must be kept under supervision at all times during operation. WARNING! The product heats up to high temperature during operation, do not touch the bowl, the lid or other components placed inside the bowl during operation and immediately after operation as this may cause severe burns. The product is not intended for use by children under at least 8 years of age and by persons with reduced physical and mental abilities and by persons without experience in or understanding of the operation of the product, unless they will be supervised or instructed to use the product safely, in a manner ensuring that the risks involved are understood. Children should not play with the product. Children left unattended should not be allowed to perform the cleaning and maintenance of the tool.
Recommendations concerning transport and installation of the product
The product may only be placed on a hard, flat, level, non-flammable and resistant to high temperatures surface. The surface should withstand the weight of the device itself and the food placed on it. Ensure that there is a minimum distance of 10 cm around the side walls of the product, and do not place non-high temperature resistant materials above the product. This will allow for the proper ventilation of the product. Do not place near edges of, e.g., a table. Do not place anything on the product. This disrupts the air circulation and can cause damage to the product as well as fire. Do not place the product near flammable materials, e.g. curtains or drapes. Do not place any electrical equipment above the product. During operation, water vapour is released, which can cause a short circuit in the electrical system
EN
and lead to electric shock. It is forbidden to drill any holes in the product, as well as making any other modifications of the product not described in the manual. Move the product only when cooled down, grasping the bottom of the housing. Do not move the product by grasping the bowl holder. Do not move the product by pulling the power cord. The temperature at the place of installation and use of the product must be within the range of +10^ ÷ +38^ , and the relative humidity must be below 90% without water vapour condensation.
Recommendations for connecting the product to the power supply
Before connecting the product to the power supply, make sure that the voltage, frequency and performance of the power supply correspond to the values shown on the product's rating plate. The plug must fit into the socket. It is forbidden to modify the plug or socket in any manner to make them fit. The product must be connected directly to a single socket of the power supply. NEVER use extension cords, adapters or double outlets. The mains circuit must be equipped with a protective cable and at least 16 A protection. Avoid contact between the power cord and sharp edges and hot objects and surfaces. During operation, the power cord must always be fully extended and the position of the power cord must be set so that it does not become an obstacle during product operation. The power cord should not be placed in a manner which would pose a risk of tripping. The power supply socket should be located in a place where it is always possible to quickly remove the product power cord plug. Always pull the power cord by the plug housing when unplugging it, never by the cord. If the power cord or the plug is damaged, immediately disconnect it from the power supply and contact an authorised service centre of the manufacturer for replacement. Do not use the product with a damaged power cord or plug. The power cord or plug cannot be repaired and must be replaced with a new one that is free of defects if these components are damaged.
Instructions for use
WARNING! All accessories placed inside the appliance and the housing of the appliance can be hot after use. Do not touch them, as it may cause severe burns. Allow the tool components to cool down. If you need to move these components before they cool down, hold them by the handles provided for this purpose. Use heat protection gloves. Make sure that the floor near the place of use of the product is not slippery. This will prevent slipping, which can cause serious injuries. Due to the holes in the accessories, special care should be taken when handling hot accessories. Liquids produced during the heat treatment of food may leak through the holes. Contact with hot liquids can lead to severe burns. The product may only be connected to the power supply during operation. When finished, pull out the power plug to disconnect the appliance from the power supply. Do not leave the product connected to the power supply unattended. Always place the drip tray at the bottom of the fryer chamber. This will reduce the risk of liquid entering the enclosure and also facilitate cleaning the interior of the appliance. Foodstuffs placed in the bowl must not protrude over the edge of the bowl. Do not use accessories other than those supplied with the product or authorised by the manufacturer. All accessories included are designed in such a way that they do not interfere with the air circulation inside the appliance. Observe the product at all times during food preparation. Food left unattended can burn, which can cause fire and serious burns. The bowl and
EN
other accessories must only be carried using the handle. Place the bowl and other accessories with hot food only on a heat-resistant surface or use protective stands. When preparing food, touch the inside of the compartment and the food itself only with utensils made of such materials that are resistant the temperature generated by the product. It is forbidden to use bare hands for this purpose. Do not use sharp, metal objects that may damage the non-stick coating. If any food is left inside the bowl or chamber during or after preparation, remove the food remains before preparing another dish. Food remains can be burned, causing smoke, unpleasant smell, and affect the taste of the prepared food. They may also be the cause of fire. Use utensils made of wood or plastic able to withstand the temperature generated by the product. Do not use sharp or metal utensils. Such utensils can damage the bowl and other accessories' surface.
PRODUCT OPERATION
Installation, start-up and operation of the product
The product must be unpacked and all parts of the packaging and transport protections completely removed. It is recommended to keep the packaging, as it can be helpful for further transport and storage of the product.
Clean the product according to the instructions specified in the "Product Maintenance" section.
Set the product according to the instructions.
Assemble the selected accessory.
The bowl has a removable handle. The handle allows you to carry the hot bowl. Turn the handle lock, and then lightly squeeze the handle so that the handle can be attached to the bowl guide. Secure the bowl handle with the lock that prevents the bowl from detaching from the handle by accidentally squeezing the handle (II).
Warning! Always remove the handle from the bowl before closing the fryer door.
Assemble the shish-kebab attachment using the spit bar and two flanges fixing the pins to the shish-kebabs. Place the flanges on the spit bar and secure their position with the screw (iii). Place both flanges so that the pins are parallel to the spit bar. The flanges have notches on the edges enabling the pins to be locked so that they do not extend during the rotation of the attachment (IV). Move the hot attachment with the attached handle (V).
The spit bar can also be used as a spit-roaster – for this purpose, attach the supplied forks to it, which, when embedded in food, will cause it to rotate along with the spit. Locking screws are used to lock the forks.
The handle (V) is also used to carry the spit and the rotary cage.
Open the fryer door and place the drip tray at the bottom of the chamber.
Attach the spit, the shish kebab attachment (VII) or the rotary cage (VIII) to the handles in the side walls. Insert the trays into the guides embossed in the side walls (IX).
Place the bowl directly on the drip tray (X).
Then close the appliance door and go to the settings using the control panel.
From time to time, check the condition of the prepared food through the glass door. If necessary, change the time and/or temperature settings.
After you have finished, pull out the power plug. Leave the product to cool down completely and, then, proceed with maintenance.
WARNING! During and immediately after operation: the accessories heat up to a high temperature. Caution must be maintained.
Contact with hot product parts can lead to severe burns.
Control panel
The product is equipped with a touch control panel with an LED display.
When the product is connected to the power supply, only the switch will be highlighted.
Touch the switch to highlight all display items, press the switch again to set the default temperature: 185 °C and the default time: 15 min.
If you touch the switch at any time of operation, the appliance will be switched off, the entire display turned off, except for the fan indicator light, which will be switched off after approx. 20 seconds after the fan stops working.
Touch the internal light button to turn on the light inside the fryer chamber.
Caution! If you open the door during food preparation the cooking process will be stopped and the lighting inside the chamber will turn on.
Touch the rotary button of the spit if you want the spit or other accessory installed in the spit holders to start rotating. The button light will flash.
EN
The temperature control buttons allow temperature control in the range 80 - 200 °C at 5°C intervals.
The time control buttons allow you to set the operating time in the range from 1 minute to 9 minutes at 1 minute intervals in all modes except for drying where you can select from 2 to 24 hours at 0.5 hour intervals.
The „+” button increases the time and temperature setting and the „-” button decreases the time and temperature setting. The time and temperature is displayed on the display together with the unit corresponding to the given value.
The appliance has 10 factory-default settings. If you touch one of the setting buttons, the time and temperature will be set automatically according to the table below.
The appliance will start automatically 5 seconds after touching the selected mode button or immediately if the switch is touched after touching the mode button.
The time and temperature settings can be changed by using the buttons, but the modes cannot be reprogrammed permanently.
| Program button Temperature Time | ||
| Chips 200 | °C 15 min. | |
| Steak 175 | °C 25 min. | |
| Fish 165 | °C 15 min. | |
| Shrimp 160 | °C 12 min. | |
| Pizza 180 | °C 15 min. | |
| Chicken 185 | °C 40 min. | |
| Oven 160 | °C 30 min. | |
| Spit 190 | °C 30 min. | |
| Drying 30 | °C | 2 h |
| Reheat 115 | °C 12 min. |
Changing the temperature unit is possible by simultaneously pressing both temperature control buttons and the time control button marked “-”.
Advice on using the no-fat fryer
The use of a non-fat fryer for preparing food provides an advantage over the process of preparing food in a traditional oven or deep-frying.
Decreases the cholesterol level. Due to the use of forced air circulation, the fat content of food is reduced and the cholesterol level is reduced.
Saves time and money. Thanks to the high efficiency of the forced air circulation method for food preparation, it is possible to reduce time and energy consumption.
Preserves the flavour. Too long time and too high temperature of cooking make the food taste worse. Thanks to easy time and temperature control, this is no longer the problem.
Adding a small amount of fat to the dishes to be prepared will make them crispy after preparation.
Mixing the ingredients in mid-time will make them evenly heated.
Product maintenance
CAUTION! All maintenance works must be carried out with the product switched off. To do this, unplug the power cord plug from the socket.
CAUTION! Never immerse the product in water or any other liquid. The product cannot be cleaned under running water, high-pressure water jet or in a dishwasher. The accessories, after disassembly from the product and cooling down, can be washed under running water, by immersion and in mechanical dishwashers.
CAUTION! Allow all parts of the product to cool down completely before cleaning. Do not accelerate the cooling process by immersing hot parts in water.
The product is used to prepare food placed directly in the accessories, therefore care must be taken to maintain proper hygiene so that the preparation of food is safe.
Use a mild dishwashing agent for cleaning. Remove solution residues with a cloth soaked in water (lid) or rinse with a stream of running water (other components). Wipe the product dry or leave to dry after cleaning it.
The product should be cleaned before the first use and after each use, after waiting for it to cool down completely. Clean any food residue remaining on the product to prevent it from burning when used again, and to prevent the product's performance from being impaired.
Do not use solvents, corrosive agents, alcohol, petrol or abrasives for cleaning.
Clean the lid's ventilation openings with a vacuum cleaner.
Product storage and transport
During storage, keep the product indoors in closed rooms, and make sure it is not exposed to dust, dirt, or moisture. It is recommended to store the product in its original packaging.
Store the product in operating position. Do not stack products in layers. Do not place anything on the product during storage.
EN
Transport the product in its original packaging. Protect against excessive shocks during transportation. Do not place anything on the product during transport.
TECHNICAL DATA
| Parameter Unit Value | ||
| Catalogue No. 67590 | ||
| Rated voltage [V~] 220 - 240 | ||
| Rated frequency [Hz] 50 / 60 | ||
| Rated power [W] 1800 | ||
| Insulation class I | ||
| Chamber capacity [I] 12 | ||
| Operating temperature [°C] 30 ~ 200 | ||
| Net weight | [kg] | 8 |
PRODUKTBESCHREIBUNG
CARACTÉRISTIQUES DU PRODUIT


- PL
- DE
- PRODUCT CHARACTERISTICS
- EQUIPMENT
- GENERAL INSTRUCTIONS FOR USE
- EN
- Recommendations for connecting the product to the power supply
- Instructions for use
- PRODUCT OPERATION
- Advice on using the no-fat fryer
- Product maintenance
- Product storage and transport
- PRODUKTBESCHREIBUNG
- CARACTÉRISTIQUES DU PRODUIT
Brand : Lund
Model : 67590
Category : Oven