YT-85234 - Grass trimmer Yato - Free user manual and instructions
Find the device manual for free YT-85234 Yato in PDF.

User questions about YT-85234 Yato
0 question about this device. Answer the ones you know or ask your own.
Ask a new question about this device
Download the instructions for your Grass trimmer in PDF format for free! Find your manual YT-85234 - Yato and take your electronic device back in hand. On this page are published all the documents necessary for the use of your device. YT-85234 by Yato.
USER MANUAL YT-85234 Yato
natural_image
Exterior view of a metal detector tool (no text or symbols visible)CE
natural_image
Close-up of a mechanical component being inserted into a housing, showing internal structure and tool (no text or symbols visible)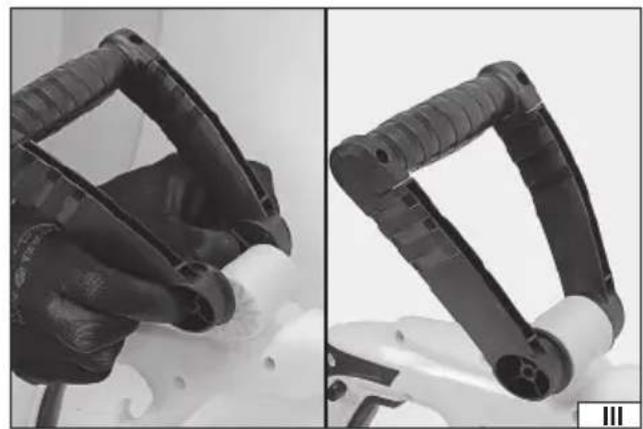
natural_image
Close-up of a hand using a power tool to clean or brush the material (no text or symbols visible)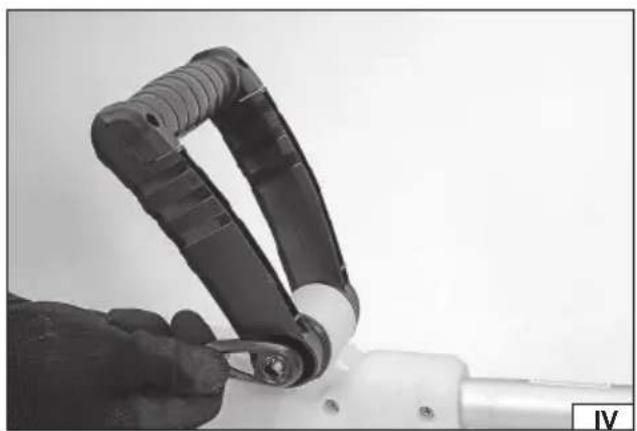
natural_image
Close-up of a hand using a tool to adjust or install a white plastic component, no visible text or symbols.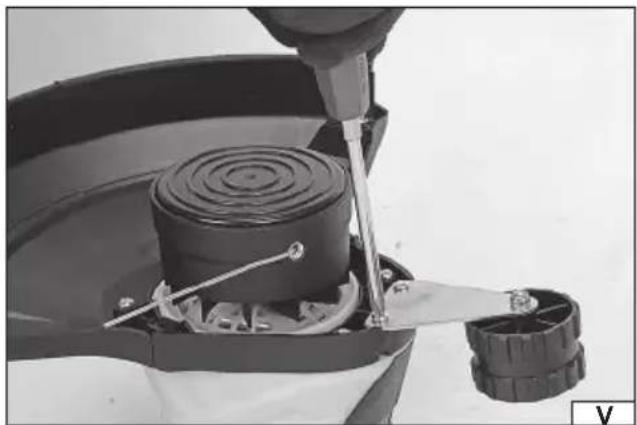
natural_image
Close-up of a mechanical device with a cylindrical component inserted, showing a tool and a separate gear mechanism (no visible text or symbols)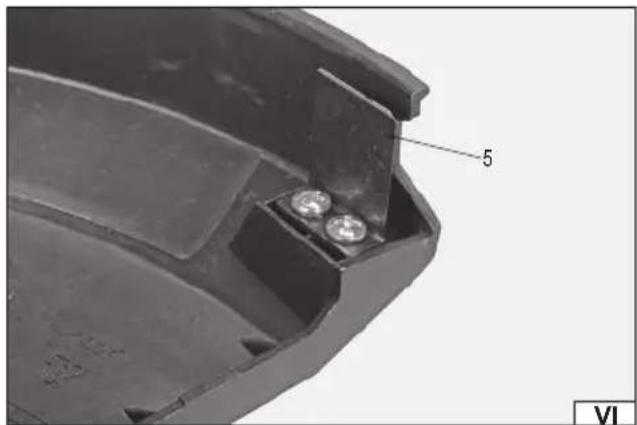
natural_image
Close-up of a mechanical component with two small circular features and a labeled part '5' (no text or symbols beyond label)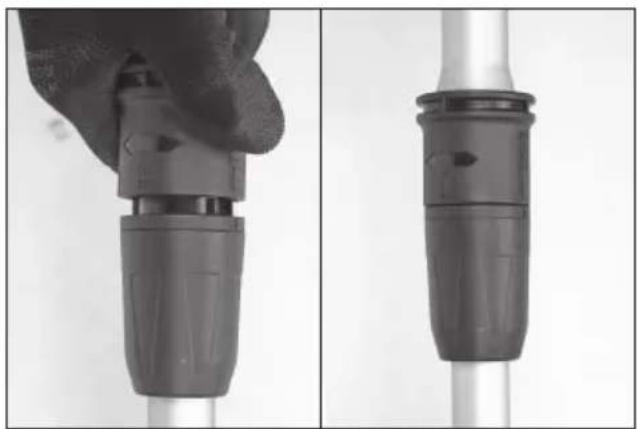
natural_image
Close-up of a hand holding a black plastic connector, shown from two angles (no text or symbols visible)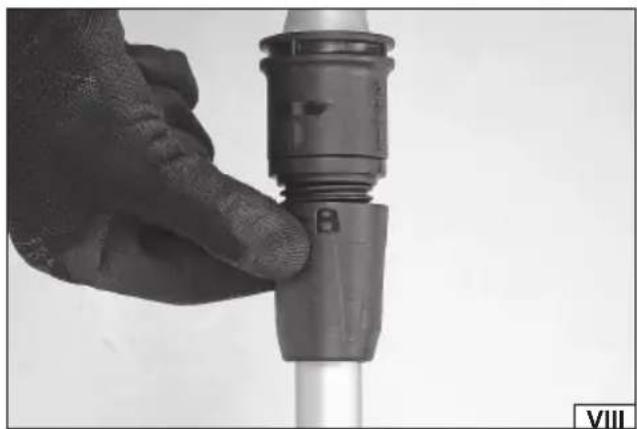
natural_image
Close-up of a hand adjusting a mechanical component with a black plastic cap (no visible text or symbols)natural_image
Person using a power tool on a mechanical device (no visible text or symbols)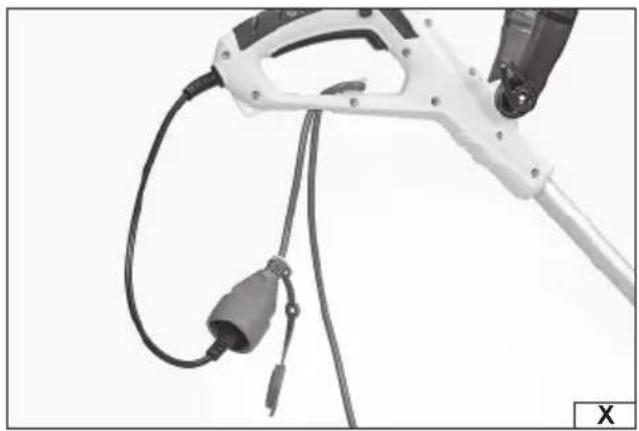
natural_image
Close-up of a white electric vehicle charging plug with attached cable and connector (no visible text or symbols)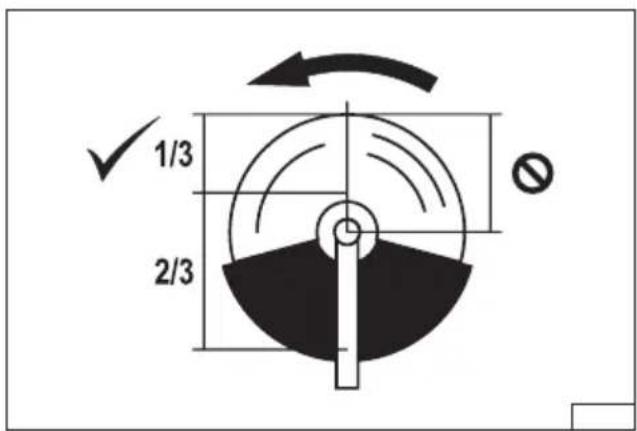
natural_image
Line drawing of a mechanical device with no visible text or symbols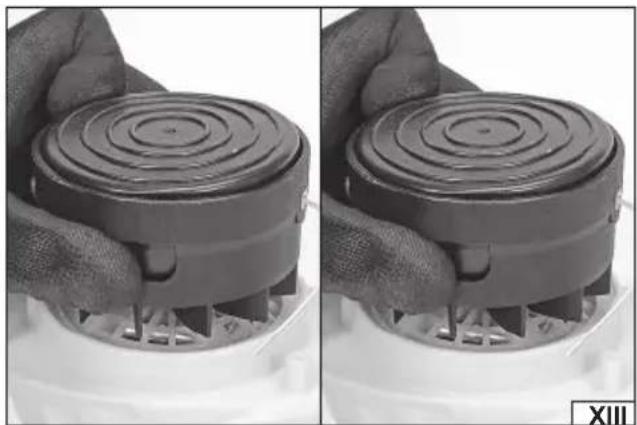
natural_image
Close-up of hands holding a black circular device with a spiral top, showing internal components and mounting brackets (no text or symbols visible)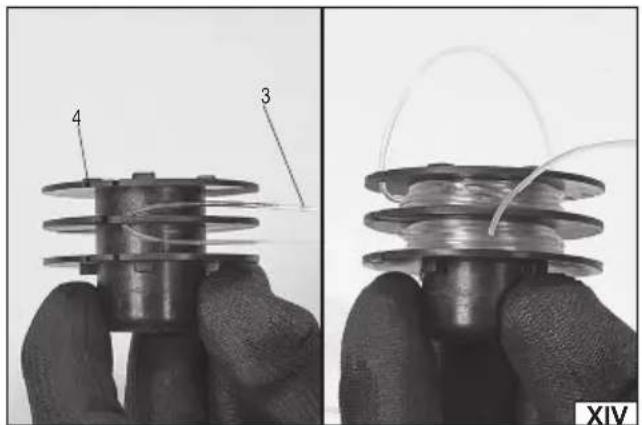
natural_image
Close-up of hands holding a coiled wire with numbered components (no text or symbols visible)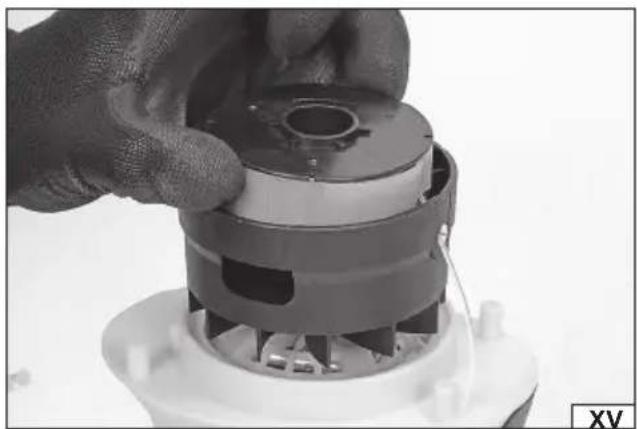
natural_image
Close-up of hands assembling a mechanical component with a cylindrical housing and internal components (no visible text or symbols)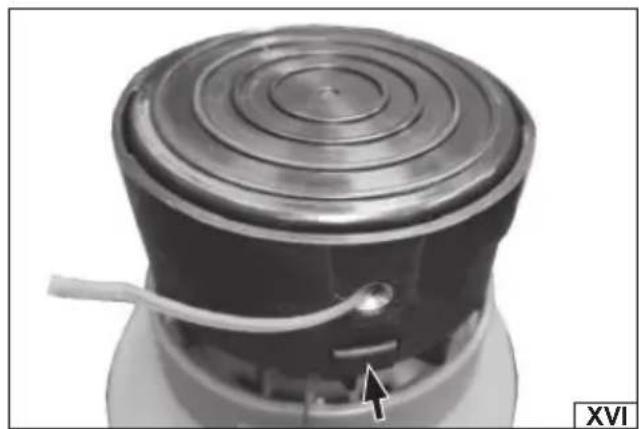
natural_image
Close-up of a mechanical component with concentric rings and a small arrow pointing to a feature, labeled 'XVI' in the corner (no readable text or symbols on the object itself)PL EN DE RU UA LT LV CZ SK HU RO ES FR IT NL GR BG
PL
- cutting head
- cutting element guard
- line
- spool
- blade
- additional handle
- main handle
- power switch
- power switch lock
- adjusting ring
- guide wheel
DE
Keep at least 15 m distance between the workplace and bystanders
Beware of the discarded items
Do not expose to precipitation
It is forbidden to use metal cutting blades, use only the cutting line
Read the operating instruction
Wear hearing protectors
Gehörschutz tragen
Wear protective goggles
Schutzbrille tragen
This symbol indicates that waste electrical and electronic equipment (including batteries and storage cells) cannot be disposed of with other types of waste. Waste equipment should be collected and handed over separately to a collection point for recycling and recovery, in order to reduce the amount of waste and the use of natural resources. Uncontrolled release of hazardous components contained in electrical and electronic equipment may pose a risk to human health and have adverse effects for the environment. The household plays an important role in contributing to reuse and recovery, including recycling of waste equipment. For more information about the appropriate recycling methods, contact your local authority or retailer.
WYPOSAŻENIE PRODUKTU
The electric string trimmer is used for decorative lawn formation with a plastic string rotating at high speed. Thanks to the electric drive, the trimmer is much quieter than a petrol one, and can also be used near buildings. Proper, reliable and safe operation of the tool depends on appropriate use, that is why you should:
Read the entire instructions manual before the first use of the tool and keep it for future reference.
The supplier shall not be held liable for any damage or injury resulting from improper use of the tool, failure to observe the safety regulations and recommendations of this manual. Use of the tool for purposes other than those for which it was intended shall cause the loss of the user's rights to a warranty and statutory warranty.
PRODUCT EQUIPMENT
The product is supplied complete but requires assembly before first use. The following are supplied with the product: a cutter guard and a front handle
TECHNICAL DATA
| Parameter Unit Value | ||
| Catalogue No. YT-85234 | ||
| Rated voltage [V~] 230 - 240 | ||
| Rated frequency [Hz] 50 | ||
| Power [W] 550 | ||
| Cutting speed [min] | 10 000 | |
| Cutting width | [mm] | 300 |
| String diameter | [mm] | 1,6 |
| String length on the spool | [m] | 6 |
| IEC protection class | II | |
| Weight | [kg] | 2,3 |
| Noise level | ||
| - L_pA (pressure) | [dB] (A) | 73,45 ± 1,52 |
| - L_wA (power) | [dB] (A) | 93,17 ± 1,52 |
| Vibration (main handle/additional) handle | [m/s2] | 4,556 ± 1,5 / 4,306 ± 1,5 |
| Protection rating | IPX0 |
SAFETY INSTRUCTIONS
IMPORTANT READ CAREFULLY BEFORE USE SAVE FOR FUTURE REFERENCE
Safe operating practices
Training
Read the instructions manual carefully. Familiarise yourself with the controls and the correct use of the machine. Never allow children or persons not familiar with the instructions to use the product. National regulations may restrict the operator's age.
Remember that it is the operator or the user who is responsible for accidents of or hazards to other people or the properties.
The machine can cause serious injuries. Please read the instruction manual carefully. Read and understand the correct holding method, operation, maintenance, starting, and stopping of the device. Familiarise yourself with the proper use of all the controls.
EN
The machine is not intended for use by children and persons with reduced physical, sensory or mental capabilities or lack of experience and knowledge or who have not read the instructions for use of the machine.
Preparation
Inspect the power cord and extension cord for damage or wear before use.
If the cord is damaged during use, immediately disconnect it from the power supply.
DO NOT TOUCH THE CORD BEFORE DISCONNECTING THE POWER SUPPLY. Do not use the machine if the cord is defective or damaged.
Always visually inspect the machine for damaged, missing or improperly placed guards or protections before use.
Never operate the machine when persons, in particular, children or pets are in the vicinity.
Use only the accessories provided by the manufacturer: a spool with a plastic string. Do not use any equipment other than that provided by the manufacturer, such as blades, cutting discs or discs equipped with a cutting chain. Do not replace the string with metal wire or rope.
The use of other equipment than that described may pose a serious threat to the operator and bystanders' safety. Never replace non-metallic cutting accessories with metal ones. Before installing the cutting element and guard, make sure they are not damaged, deformed, and do not have cracks. Make sure that there is at least 1 meter of string on the spool.
Before plugging the machine in, make sure that the power supply parameters are the same as the ones listed on the machine's nameplate.
When working, there is a risk of ejecting objects in the direction of the operator and bystanders. The operator is responsible for accidents or hazards to other people or the environment. Do not operate the device if there are bystanders, especially children and animals in the vicinity. Before commencing work, designate a safety zone with a radius of at least 15 meters from the workplace.
Despite the safety measures taken during the design and construction of the machine, there is always a residual risk. Therefore, technical and complementary protective measures should be applied.
Always use eye and face protection – these will protect eyes, face, and respiratory tract against dust and objects ejected during work. Always wear suitable protective clothing adhering to the body. Wear trousers only with long legs. Do not wear loose clothing or jewellery, which may be caught by the device's moving parts. Use protective gloves and hearing protectors. Wear protective footwear with a slip-resistant sole. Do not work barefoot or wearing sandals.
Use hearing protectors during work. Exposure to excessive noise may lead to permanent hearing damage.
Wear safety glasses. The waste generated during work can create a risk of eye damage.
Before use, check whether the cutting element, screws, guard, and other components are not worn or damaged. Replace worn parts before starting work. Check also whether the screw connections are not loose. Tighten the loose screws.
Operation
Keep the power and extension cord away from the cutting unit.
EN
Wear safety goggles and sturdy footwear at all times when operating the machine.
Avoid using the machine in bad weather, especially when there is a risk of lightning.
Operate the machine only in daylight or in good artificial lighting.
Never operate the machine with damaged guards or enclosures or without the guards or enclosures in place.
Only switch on the motor when hands and feet are away from the cutting unit.
Always disconnect the machine from the power supply (i.e. pull the plug out of the mains, remove the lockout device or the removable battery)
- whenever the machine is left unattended;
- before the obstruction is removed;
- before checking, cleaning or working with the machine:
- after hitting a foreign object;
- if the machine starts to vibrate excessively.
Take care not to injure the feet and hands with the cutting unit.
Always make sure that the vents are free of dirt.
When working, the power cord must be hidden in the grass; therefore, its accidental damage or cutting is possible. If the power cord is damaged or tangled, turn off the machine with the switch and unplug it from the mains.
When working with the machine, do not tilt and keep balance at all times. Always place your feet firmly on the slope and walk, never run. When trimming a slope, always move across it, never along.
Never touch the dangerous moving parts before disconnecting the machine from the power supply and until all dangerous moving parts stop.
The cutting element rotates for some time after the motor is stopped.
Disconnecting the machine from the power supply requires turning it off with the power switch and disconnecting the power source. In the case of mains-powered devices, it is done by disconnecting the power cord plug from the mains socket. However, in the case of battery-powered devices, it is done by disconnecting the battery.
Do not expose the machine to precipitation. The machine is not protected against ingress of water. Water which enters the machine can cause a short-circuit which can cause electric shock and serious injury.
Read the instructions on stopping the device in case of emergency.
Maintenance and storage
Disconnect the machine from mains (i.e. pull the plug out of the mains, remove the lockout device or the removable battery) before carrying out any maintenance or cleaning.
Use spare parts and equipment recommended by the manufacturer only.
Regularly inspect and maintain the machine. Repair should only be carried out at an authorised workshop.
When the machine is not in use, keep it out of the reach of children.
Regularly inspect the device according to the information contained in the further part of the instructions manual. This will allow for more efficient and safe work.
EN
Recommendations (for machines powered from the mains and with an integral charger). It is recommended that the machine be supplied by a residual current device (RCD) with a trip current of 30 mA or less.
PRODUCT OPERATION
Preparing the grass trimmer for operation
Caution! Unplug the trimmer from the power supply before performing any assembly and adjustment work. Make sure that the power cord plug is unplugged from the mains outlet.
Visually inspect the product. If any damages are observed, do not operate the device before removing them.
Grass trimmer assembly
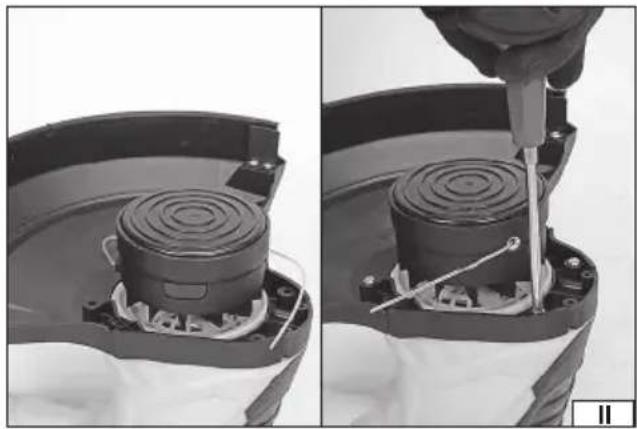
Attach the cutting element guard to the bottom of the housing. Put the clamp flange onto the housing, then fix the clamp to the housing with screws (II).
Gently expand the additional handle and slide it onto the mounting point (III). Secure the additional handle with a clamping element (IV). Before screwing the clamping element, the position of the additional handle can be adjusted. The adjustment is made in steps. The handle properly secured with the clamping element should not change its position.
Screw the edge trimming wheel (V) on the front of the cutting element guard. A properly mounted wheel does not interfere with normal mowing and does not have to be dismantled for mowing the grass.
There is a metal blade in the cutting element guard to cut off the excess of the line as it unwinds itself. Make sure that the guard (VI) has been removed from the blade.
Adjusting the grass trimmer settings
An adjusting ring is mounted on the grass trimmer housing.
Pulling and holding the back of the ring (VII) in this position allows for setting the position of the main handle with respect to the cutting head. Setting the trimmer in the position described as "TRIM" allows for setting the device in the grass trimming mode. Setting to the "EDGE" position allows for edge trimming. After setting the selected position, release the pulled ring so that it adheres to the front part of the ring along its entire circumference (VII).
Unscrewing the front part of the ring (VIII) allows for changing the length of the housing. Once the selected length has been set, screw the ring. A correctly screwed ring will not allow for automatic change of the housing length.
You can also adjust the angle of the head with the cutting element relative to the housing. To do so, press and hold the lock button in this position, and then change the head angle (IX). After setting the selected angle, release the lock button to allow it for returning to its rest position. A correctly set head should not automatically change the set angle.
Preparing the workplace
Before commencing work, prepare the workplace. Designate a safety zone with a radius of at least 15 m from the workplace, which will be inaccessible to unauthorised persons. Ensure that there are no obstacles around the workplace that could cause the operator or grass trimmer collision during work.
Connecting the grass trimmer to the power supply
The grass trimmer is supplied only with a short power cord. Use an extension cord for the proper power supply of the grass trimmer. The extension cord should have rubber insulation of at least the H05RNF type or polyvinyl (PVC) insulation of at least the H05VVF type.
Always use cords intended for outdoor use due to the nature of the machine work. The power cord should have a single socket matching the machine's plug. It is forbidden to modify the plug or socket to make them fit. The electrical parameters of the power cord should correspond to the electrical parameters of the device, listed on the rating plate. It should be noted that the power cord's cross-section depends on the length of the cord. Follow the instructions below regarding the power cord cross-section:
- 1.0 mm ^2 – cable length of not more than 40 m;
- 1.5 mm ^2 – cable length of not more than 60 m;
- 2.5 mm ^2 – cable length of not more than 100 m.
When preparing for the operation and during operation, pay attention to the power cord. Protect the power cord from water, moisture, oils, heat sources and sharp objects. Lay the cord so that it does not come within the reach of the cutting element. Cutting the cord may result in electric shock and serious injury or death. Make sure that you do not become entangled in the cord. This can lead to a fall and serious injury.
Do not overload the power cord, and do not cause any of the cord's section to become tensioned. Do not pull the cord when moving the device. Always disconnect the power cord plug from the socket by pulling by the plug and socket housing, never pull by the cord.
There is an opening in the handle cover to route the extension cord loop through, and then attach the loop to the hook inside the
EN
handle. Only then, connect the plug to the socket of the extension cord (X). This will minimise the risk of pulling the power cord from the grass trimmer housing, e.g. in the event of a sudden jerk.
Starting and stopping the grass trimmer
Make sure that the grass trimmer has been connected to the power supply, a guard has been removed from the cutting element guard blade, and the cutting element does not come into contact with any body part or other objects.
Adopt a posture which guarantees balance. Grasp the front handle with one hand. Grasp the rear handle with the other hand.
Press and hold the power switch lock in this position, then press the power switch; the grass trimmer will turn on. The power switch cannot be locked in the on position. After turning on the grass trimmer, release the pressure on the power switch lock.
The grass trimmer stops when the pressure on the power switch is released. The cutting element can rotate for some time after the motor is stopped. It is forbidden to stop the cutting element by pressing the spool against the ground or against another object.
After the cutting element has come to a complete stop, unplug the grass trimmer from the power supply by unplugging the power cord plug from the mains socket. Next, proceed with maintenance.
Operating the grass trimmer
Do not allow the device to operate at low speed or during start-up.
It is recommended to move the grass trimmer from right to left during work. Avoid trimming by moving the grass trimmer from left to right. This will allow the operator to avoid ejected mowed grass residues during mowing.
Avoid mowing shrubs and bushes. Operating the grass trimmer near trees may damage the bark. Hitting the stones, bricks, brickworks, or other similar surfaces with the line may lead to the line's very fast wear.
Avoid trimming with the upper right quarter of the blade (XI). This will prevent the grass trimmer from kickback towards the operator if the cutting element is blocked during operation.
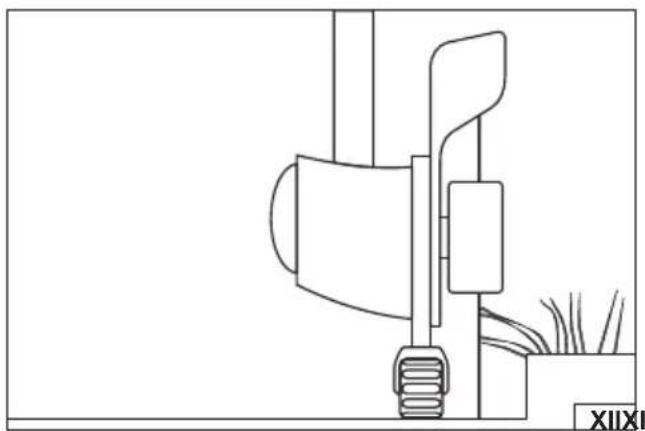
The guide wheel can be used in two ways. If the grass trimmer is used for edge trimming, the wheel allows for guiding the device on the ground (XII). In the case of standard grass mowing, the wheel determines the range of the line at the front of the grass trimmer. This reduces damage to, for example, the walls of the building when mowing the lawn.
Working tips
Maintain balance and proper posture during work. Exercise particular caution when working on a slippery, inclined, or uneven surface.
Continuously monitor the cutting element during work. Do not mow in places which are out of sight.
Before starting work, inspect the workplace thoroughly, remove all loose branches and residues from the previous mowing.
Take regular breaks when working. During operation, the tool emits noise and vibration, which impact the tool's operator. Taking regular breaks and wearing personal protective equipment such as gloves, hearing protectors and eye protection allows to reduce the impact of the tool on the operator's well-being.
Start work when healthy and in good shape. In case of nausea, headache, sight problems (e.g., reduced visual range), hearing problems, or dizziness, immediately stop operating the tool.
Mow high grass gradually from above; this will reduce the risk of the grass mowed being wound on the spool with the line.
Try to mow the grass only with the line end; this will reduce the risk of the grass mowed being wound on the spool with the line. If, during operation, any part of the trimmer or guard is damaged or deformed, replace or repair it before resuming work.
To extend the line, release the trigger, wait for the cutting element to come to a complete stop, and then unplug the trimmer from the mains socket. Pull the line protruding from the spool, then press the spool lock button (XVI). Each press releases a few millimeters of line. Do not extend the line beyond the length sufficient to reach the guard blade. After starting the trimmer, any line extending beyond the guard blade will be cut off. If the line cannot be extended any further, it means the spool is empty and the line needs to be replaced.
Replacing the line
Warning! Make sure that the power cord plug of the grass trimmer has been disconnected from mains socket before replacing the line.
Prepare a section of the line with the length and diameter as provided in the table. Then remove the spool guard cover by simultaneously pressing both cover lock buttons (XIII). Remove the spool and then clean it and the inside of the cutting head. There is a spring under the spool; make sure not to lose it.
If the spool has a safety band, it must be removed before winding the line. Pass the line in the middle of the length through the notch in the spool's middle flange (XIV). Then tightly wind the ends of the line on the spool in the direction indicated by the arrow on the spool. Leave a few centimetres of the line for each end, which should then be passed through the gaps in the safety band, and then through the holes in the cutting head (XV).
Install the spring and spool into the cutting head and secure with the cover.
EN
PRODUCT MAINTENANCE AND STORAGE
Warning! Before starting any of the operations described below, make sure that the power cord of the trimmer is disconnected from mains.
After each use, inspect the condition of the tool with particular attention to the flow capacity of ventilation openings.
Check the placement of all of the tool's components. Tighten all loose screw connections, if any. Check the condition of the cutting element. Clean the cutting element guard and the spool from grass residues. If the cutting element guard and/or the spool is damaged, replace it before performing further work. It is forbidden to use the trimmer with a damaged cutting element guard and/or the spool.
Clean the tool's housing with a soft, dry cloth. Clean the housing from grass residues, oil, grease, and other contaminants. Store the disconnected tool in a dry and closed room.
Store the tool in shaded and dry places with appropriate ventilation preventing steam condensation. Such place should not be accessible to unauthorised persons, especially children. During storage, the blades should always be protected with a guard.
GERÄTEBESCHREIBUNG
CARACTÉRISTIQUES DU PRODUIT
DECLARATION OF CONFORMITY
0525/YT-85234/EC/2025
We declare and guarantee with full responsibility that the following products:
Electric grass trimmer 230-240 V\~ 50 Hz; 550 W; 300 mm; 10 000 min ^1 ; item no. YT-85234
meet requirements of the following European Standards / Technical Specifications:
EN 60335-1:2012 + A11:2014 + A13:2017 + A1:2019 + A14:2019 + A2:2019 + A15:2021
EN 60335-2-91:2014
EN 62233:2008
EN IEC 55014-1:2021
EN IEC 55014-2:2021
EN 61000-3-2:2019 + A1:2021
EN 61000-3-3:2013 + A1:2019
and fulfill requirements of the following European Directives:
2006/42/EC Machinery and safety elements
2014/30/EU Electromagnetic compatibility (EMC) Directive
2011/65/EU Restriction of the Use of Certain Hazardous Substances
Serial number: concern all serials numbers of item(s) mentioned in this declaration
The person authorized to compile the technical file:
Agnieszka Rędziak
(Place and date of issue)
V-CE PREZES ZARZADU
JAN SZMIDT
(Name and signature of authorized person)
TOYA S.A.
DECLARATION OF CONFORMITY
0525/YT-85234/EC/2025
We declare and guarantee with full responsibility that the following products:
Electric grass trimmer 230-240 V\~ 50 Hz; 550 W; 300 mm; 10 000 min ^-1 ; item no. YT-85234
fulfil requirements of the following European Directive: 2000/14/WE
Conformity assessment procedure:
Manufacturer quality-control system, examination of the manufacturer's technical file and periodical inspection by notified body
Notified body:
TÜV Rheinland LGA Products GmbH; notification no. 0197
Tillystraße 2, 90431 Nürnberg, Germany
Measured sound power level on an equipment representative for this type: 93,17 dB(A)
Guaranteed sound power level for this equipment: 96 dB(A)
conformity and references of the other Community Directives applied:
2006/42/WE Machinery and safety devices
2014/30/UE Electromagnetic compatibility
2011/65/UE Restriction of the Use of Certain Hazardous Substances
Wrocław, 2025.05.27
(Place and date of issue)
V-CE PREZES ZARZADU
JAN SZMIDT
(Name and signature of authorized person)
TOYA S.A.