THS 500 PRO - Hedge trimmers FLEXOTRIM - Free user manual and instructions
Find the device manual for free THS 500 PRO FLEXOTRIM in PDF.


User questions about THS 500 PRO FLEXOTRIM
0 question about this device. Answer the ones you know or ask your own.
Ask a new question about this device
Download the instructions for your Hedge trimmers in PDF format for free! Find your manual THS 500 PRO - FLEXOTRIM and take your electronic device back in hand. On this page are published all the documents necessary for the use of your device. THS 500 PRO by FLEXOTRIM.
USER MANUAL THS 500 PRO FLEXOTRIM
Operating Instructions - Translation of the original Operating Instructions
FR
GB Read operating instructions before use!
text_image
Labeled diagram of a hairpin tool with numbered parts for identificationEinzelteile
natural_image
Close-up of two connected electrical connectors, labeled 1 and 2, showing wiring and components (no text or symbols beyond labels)natural_image
Close-up of hands holding a white PVC pipe fitting with a black handle, no visible text or symbolsnatural_image
Two hands operating a pipe fitting with labeled parts (1 and 2), no text or symbols present.natural_image
Close-up of hands holding a mechanical component with a cylindrical shaft (no visible text or symbols)natural_image
Close-up of hands holding a cylindrical object with a black handle, labeled '2' (no text or symbols on the object itself)natural_image
Close-up of a hand gripping a cylindrical object with directional arrows indicating motion (no text or symbols)natural_image
Close-up of a mechanical component with a black arrow pointing to a circular opening (no text or symbols visible)natural_image
Mechanical device with angular rotation indicator (no text or symbols)natural_image
Close-up of an electric vehicle charging plug with labeled parts A and B (no text or symbols beyond labels)natural_image
Line drawing of a person wearing a short-sleeve shirt and belt, carrying a black bandage (no text or symbols)natural_image
Mechanical assembly diagram showing a lever with weights and a close-up of a mechanical component (no text or symbols)natural_image
Illustration of a person spraying a hose to a leafy wall (no text or symbols)natural_image
Illustration of a person spraying a hose with a close-up of foliage (no text or symbols)natural_image
Illustration of a person using a manual power tool to clean or brush a large sheet of material (no text or symbols)natural_image
Line drawing of a person using a tool to clean or brush a surface (no text or symbols)- Read and understand this manual before assembling or operating this Pole Trimmer.
- Improper use of Pole Trimmer can cause severe injury or death.
- Keep this operator's manual for future reference.
Content
Page
Intended use GB-2
General safety information for power tools GB-2
- Safety at the workplace
- Electrical safety
- Personal safety
- Use and handling of the power tool
- Service
- Safety instructions for hedge trimmers
General safety GB-4
- Before use the pole trimmer
- When using the telescoping hedge trimmer
Parts
GB-7
Technical data GB-8
Symbols GB-9
Before commissioning
GB-10
- Unpacking
- Packing List
- Assembly
Operation pole hedge trimmer GB-11
- Pivoting the Power Head
- Adjusting telescoping pole
- Power connection
- Power circuit breaker
- Connecting Extension Cord
- Switching on/off
- Attachment of the shoulder belt
- Instructions for use of the equipment
Using the pole hedge trimmer GB-12
Cleaning, maintenance and storage of the pole trimmer GB-13
Environmental protection GB-14
Repair service GB-14
Spare parts GB-14
Warranty GB-14
Troubleshooting GB-15
Declaration of conformity
Service
Intended use
This hedge trimmer is only intended to be used to trim shrubs, bushes, ornamental plants and hedges. It is designed to cut branches with a diameter of no more than 22 mm. The hedge trimmer is not intended for commercial use. The user of the hedge trimmer must make sure that the protective equipment specified in the operating instructions and by the warning label on the trimmer is attached whenever the trimmer is in use. The hedge trimmer must be checked for electrical or mechanical damage before it is used or while it is being used.
Stop working and contact a specialist workshop if you find any damage.
Improper use
Any use not identified in the chapter „Intended use“ is an improper use.
The user of the hedge trimmer is solely liable for any property damage or personal injury arising from improper use of the hedge trimmer.
The manufacturer's obligation to honour the warranty is voided if the hedge trimmer is used with non-original parts
Residual dangers
Residual risks always remain even if the hedge trimmer is used properly. The hedge trimmer's design can entail the following hazards:
- Contact can be made with the unprotected blade (resulting in cutting injuries)
- Reaching into or grabbing the hedge trimmer while it is in operation (resulting in cutting injuries)
- Unanticipated, sudden movement of the plant material being cut (resulting in cutting injuries)
- Ejection or catapulting of damaged cutting teeth
- Ejection or catapulting of the plant material being cut
- Hearing damage if the specified hearing protection is not worn
• Inhalation of cut materials
Read operating instructions!
General safety information for power tools
Warning! Read all safety-related information and safety instructions! Failure to observe the safety information and instructions may result in electric shock, burns and/or severe injury.
Keep the safety information and instructions for future reference.
The term ‘power tool’ as used in the safety information and instructions includes both mains-operated tools (with power cord) and battery-operated tools (without power cord).
1) Safety at the workplace
a) Keep your working area clean, tidy and
well-lit. Disorder and poorly lit working areas may result in accidents.
b) Do not operate the power tool in potentially explosive environments containing combustible fluids, gases or dusts. Power tools generate sparks that may ignite dusts or fumes.
c) Keep children and other persons away while you are operating the power tool. Distractions may result in the operator loosing control over the tool.
2) Electrical safety
a) The mains plug of the power tool must fit into the mains socket. The plug must not be modified in any way. Do not use adapter plugs/connectors in combination with tools with protective earthing. Unmodified plugs and fitting sockets reduce the risk of electric shock.
b) Avoid physical contact with earthed surfaces as pipes, heaters, ovens and refrigerators. There is an increased risk of electric shock if your body is earthed.
c) Keep the tool out of the rain or moisture in general. The penetration of water into a power tool increases the risk of electric shock.
d) Do not use the cord to carry or hang up the tool or to pull the plug out of the socket. Keep the cord away from heat, oil and sharp edges or moving parts of the tool. Damaged or tangled cords increase the risk of electric shock.
e) When operating a power tool outdoors, use exclusively extension cords that are approved for outdoor-use. The use of an extension cord that is suitable for outdoor use reduces the risk of electric shock.
f) If the operation of a power tool in a moist environment cannot be avoided it is highly recommended to use a residual current device (RCD). The use of an RCD reduces the risk of electric shock.
3) Personal safety
a) Always pay attention to what you do and apply reasonable care when working with a power tool. Do not use the power tool when you are tired or under the influence of medication, drugs or alcohol.
When working with power tools, even a short moment of inattentiveness may result in severe injury.
b) Wear personal protection equipment and always wear eye protection (safety goggles). Wearing personal protection equipment as a dust mask, nonslip safety shoes, safety helmet or ear protectors (depending on the type and application of the tool) reduces the risk of injury.
c) Avoid unintentional operation. Make sure that the power tool is switched off before you connect it to the mains supply and/or the battery and whenever you pick up or carry the tool. When carrying the tool with your finger on the on/off switch or connecting the tool to the mains supply with the switch in 'ON' position, this may result in accidents.
d) Remove adjustment tools or wrenches and the like before you switch the power tool on. A wrench or other tool that is inside or on a rotating part of the tool may cause injury.
e) Avoid unusual postures. Make sure to have a safe footing and keep your balance at all times. This will allow you to better control the power tool in unexpected situations.
f) Wear suitable clothes. Do not wear wide clothing or jewellery. Keep your hair, clothes and gloves clear of all moving parts. Loose clothing, jewellery or long hair may get caught in moving parts.
g) If dust extraction/collection devices are provided make sure that they are connected and used properly. The use of a dust extraction device may reduce risks caused by dust.
4) Use and handling of the power tool
a) Do not overtax the power tool. Use the power tool intended for your type of work in each case. The use of the suitable power tool within the stated range of performance makes working more effective and safer.
b) Do not use a power tool with a damaged switch. A power tool that cannot be switched on or off any more is dangerous and must be repaired.
c) Pull the mains plug and/or remove the battery before adjusting a tool, changing accessories or putting the tool aside. This precaution avoids the unintentional start of the tool.
d) Store power tools that are currently not used out of the reach of children. Do not
allow persons to use the tool if they are not familiar with the tool or these instructions. Power tools are dangerous if used by inexperienced persons.
e) Thoroughly maintain your power tool. Check whether moving parts are working properly and are not jamming/sticking, and whether parts are broken or otherwise damaged in a way that may affect the function of the power tool. Have damaged parts repaired before using the tool. Many accidents are the result of poorly maintained power tools.
f) Keep cutting tools sharp and clean. Thoroughly maintained cutting tools with sharp cutting edges are jamming less often and are easier to guide.
g) Use power tools, accessories, add-on tools, etc. in accordance with these instructions and in the way prescribed for the respective type of tool. You should also consider the working conditions and the work to be carried out. The use of power tools for purposes other than those intended for the respective tool may result in dangerous situations.
5) Service
a) Have the power tool serviced by qualified technical personnel only; repairs should be carried out using exclusively original spare parts. This will ensure the continued safe operation of the power tool.
Safety instructions for hedge trimmers:
- Keep all parts of your body away from the cutting blades. Do not try to remove cut-off matter with the tool running. Do not try to hold material to be cut off with your hand. Remove cut-off matter that is stuck between the blades only with the tool being switched off! When working with hedge trimmers even a short moment of inattentiveness may result in severe injury.
- Hold the power tool by its insulated handling surfaces as the cutting blades might get in touch with the tool's own power cable. If the cutting blades should accidentally cut into a live power cable this might turn metal parts of the tool 'hot' thereby causing an electric shock.
- Carry the hedge trimmer at the handle with the cutting blades standing still. Always put on the protection cover when trans-
porting or storing the hedge trimmer. Careful handling reduces the risk of injury through the cutting blades.
- Keep the cable away from the cutting area. When working with the trimmer the cable might be hidden in bushes and accidentally cut through.
- Check the hedge for hidden objects such as wire fencing before beginning to cut.
- The hedge trimmer may not be used by persons who are younger than 16 years of age or by persons who have not been trained to use it.
- This machine is not intended for use by persons (including children) with an impaired physical, sensory or mental capacity or insufficient experience and/or insufficient knowledge unless they are supervised by a person responsible for their safety or receive instructions from that person in the use of the machine. Children should be supervised in order to ensure that they do not play with the machine.
- Remain alert, pay attention to what you are doing and proceed sensibly when working with an electric tool. Do not use the machine if you are tired or under the influence of drugs, alcohol or medication.
- Keep the hedge trimmer away from children, other persons and pets.
- Wear suitable clothing. Do not wear loose clothing or jewellery. This could become caught in moving parts. Wearing rubber gloves and sturdy footwear is recommended. Wear a hair net if you have long hair.
- Wear a dust mask if it is dusty where you are working.
- Do not use the hedge trimmer if the cutter is not properly secured or if it is damaged.
- Make sure before switching on the hedge trimmer that the blades do not come into contact with stones or rubble.
- When working, keep the cutter away from your body and extremities.
- Do not cut hard objects. This can cause injuries and damage the hedge trimmer.
- Use only in daylight or if there is sufficient artificial lighting.
- Never carry the hedge trimmer by the cable or pull on the cable to pull the plug out of the socket. Keep the cable away from heat, oil and sharp edges.
- When the hedge trimmer is not being used, store it in a dry location in such a way that the blade is not exposed and the hedge trimmer is out of the reach of children.
- The mains voltage must match the voltage specified on the type plate.
- Never use the hedge trimmer in the rain. Keep away from the wet and the damp. Do not leave outdoors overnight. Do not cut damp or wet grass.
- Regularly check the mains cable. Make sure before every use that the cable is not damaged or worn. The hedge trimmer may not be used if the cable is not in good condition. Have the cable repaired by a specialist workshop.
- Only use extension cables which are suitable for the outdoors. Keep the cable out of the cutting zone and away from damp, wet or oily surfaces and sharp edges. Keep the cable away from heat and fuels.
- Make sure the hedge trimmer does not start accidentally. Do not carry the hedge trimmer with fingers on both switches if the hedge trimmer is plugged in. Make sure the switch is set to off before plugging the plug into the socket.
- Do not attempt to remove cut materials or attempt to hold on to materials being cut while the blades are in motion. Make sure that the hedge trimmer has been switched off and has come to a complete stop before attempting to remove jammed material. Do not lift or hold the hedge trimmer by the blades.
CAUTION: The blades continue to run after the trimmer has been switched off.
- Do not overload the hedge trimmer. The trimmer works better and poses less risk of injury if it is operated as intended.
- Be careful, pay attention to what you are doing. Use common sense. Do not use the hedge trimmer if you are tired.
- Take care of the hedge trimmer, keep the blades sharp and clean; the blades then provide the best performance and pose less risk of injury. Check the extension cable regularly and replace it if it is damaged. Keep the grips dry, clean and free of oil and grease.
- A circuit breaker with a fault current of 30 mA or less is necessary when working outdoors.
- A tingling feeling or numbness in the hands is sign of excessive vibration. Limit the operating time, take sufficiently long work breaks, distribute the work between several people or wear anti-vibration gloves when using the tool for extended periods.
- A certain degree of noise from this device is unavoidable. Perform noise-intensive work at times when this is permitted and at times in-
tended for this type of work. Where applicable, observe quiet times and limit working time to the absolute minimum. You and other persons in the area where the trimmer is being used should wear suitable hearing protection.
General safety

WARNING: When using electric gardening appliances, basic safety precautions should always be followed to reduce risk of fire, electric shock, and personal injury, including the following:
Before use the pole trimmer

READ ALL INSTRUCTIONS
- Stay Alert – Watch what you are doing. Use common sense when operating Pole Trimmer.
-
Avoid Dangerous Environments:
-
Do not operate Pole Trimmer in rain or in damp or wet locations..
- Do not operate Pole Trimmer while under the influence of alcohol, medications, or drugs.
- Do not operate Pole Trimmer where highly-flammable liquids or gases are present.
- Do not operate Pole Trimmer while standing on a ladder or in a tree.
-
Do not operate Pole Trimmer if it is damaged or not securely and fully assembled.
-
Keep Children Away – Keep all visitors, children and pets a safe distance from work area, at least 50 ft (15 m) away.
- Use Right Appliance – Do not use Pole Trimmer for any job except that for which it is intended.
- Only well instructed adults should operate Pole Trimmer. Never allow children to operate Pole Trimmer.
-
Dress Properly when operating Pole Trimmer
-
Do not wear loose clothing or jewelry that can get caught in the moving blades or parts of the Pole Trimmer.
- Always wear rubber gloves and substantial foot wear when working outside.
- Always wear protective hair covering to contain long hair.
-
Always wear a face or dust mask if operation is dusty.
-
Always wear eye protection.
- Use only electrical voltage noted on model name-plate on Pole Trimmer.
Extension Cord: Make sure your extension
cord is in good condition. When using an extension cord, be sure to use one heavy enough to carry the current your Pole Trimmer will draw. An under sized extension cord will cause a drop in line voltage resulting in loss of power and overheating.
- Your power tool is not insulated against electric shock. To reduce the risk of electrocution, never operate this power tool in the vicinity of any wires or cables (power, etc.) which may be carrying electric current. Electricity can jump from one point to another by means of arcing. Higher voltage increases the distance electricity can arc. Electricity can also move through branches, especially if they are wet. Maintain a clearance of at least 50 feet (15 m) between the pole trimmer (including any branches it is contacting) and any electrical line carrying live current. Before working with less clearance, contact your electric utility and make sure the current is turned off.
- This power tool has a large range. In order to reduce the risk of personal or even fatal injury to bystanders from falling objects or inadvertent contact with the moving blades of your power tool always keep bystanders at least 50 feet (15 m) away when the power tool is running.
When using the telescopic hedge trimmer
- WARNING: Pay attention to what you are doing. Be careful when using the telescopic hedge trimmer.
- Pay attention to the extension cable when using the telescopic hedge trimmer. Be careful not to trip on the extension cable. Keep the blade away from the extension cable.
- Make sure the hedge trimmer does not start accidentally: do not connect the telescopic hedge trimmer to the mains if your fingers are on the switch. Make sure the telescopic hedge trimmer is switched off when connecting it to the mains.
- Avoid leaning out when working with the hedge trimmer: make sure that your footing and balance is always secure.
DANGER: Keep hands away from blades at all times. Keep both hands on handle areas when Pole Trimmer is on. Do not attempt to remove cut material nor hold material to be cut when blades are moving. Do not grasp the exposed cutting blades or cutting edges when picking up or holding the Pole Trimmer.

CAUTION: The blades are hot after the trim-mer has been switched off.
-
Disconnect Pole Trimmer – Disconnect the Pole Trimmer from the power supply:
-
when not in use
- before servicing
- when changing accessories such as blades
- when clearing jammed material from blades
-
when moving from one worksite to another.
-
Do Not Force Pole Trimmer – It will do the job better and with less likelihood of a risk of injury at the rate for which it was designed.
- Do Not Abuse Power Cord – Never carry Pole Trimmer by power cord or yank it to disconnect from receptacle. Keep power cord from heat, oil, and sharp edges.
- Make sure the blades are not touching anything before starting the telescoping hedge trimmer.
text_image
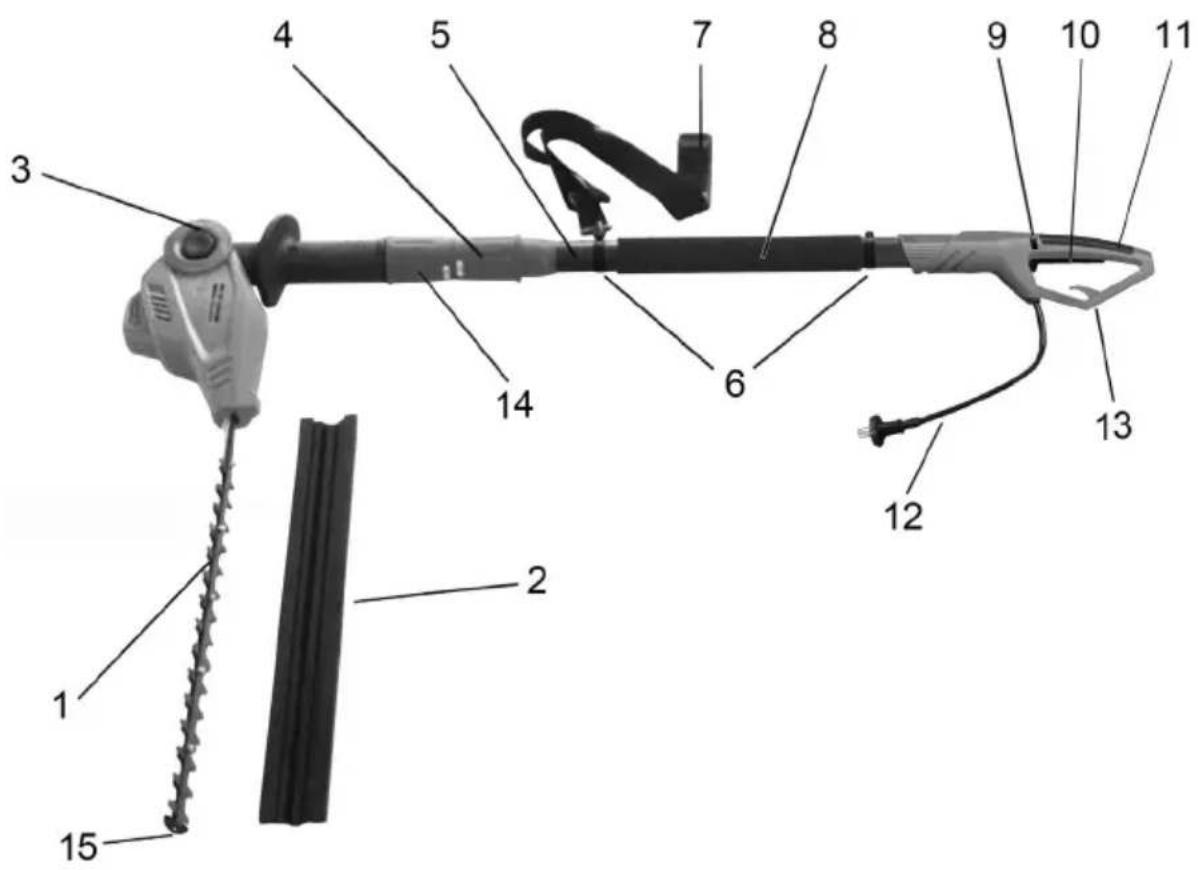
Labeled diagram of a handheld tool with numbered parts for identificationParts
- Blade
- Transport guard
- The adjusting knob (angle) for the cutter head
- Threaded sleeve 1 (used to adjust the length of the shaft)
- Telescoping shaft
- Shoulder belt clasps
- Shoulder belt
- Wrapped handgrip
- Lock for the ON/OFF switch
- ON/OFF switch
- Grip
- Mains cable with plug
- Cable strain relief
- Threaded sleeve 2 (used to secure the hedge trimmer to the shaft)
- Impact protector
Electric telescoping hedge trimmer
Technical data
| Model | THS 500 Pro | |
| Operating voltage | V~ | 230 |
| Nominal frequency | Hz | 50 |
| Nominal consumption | W | 500 |
| No-load Speed n_0 | rpm | 3300 |
| Maximum cutting length | mm | 515 |
| Maximum cutting diameter | mm | 22 |
| Angle at which the motor can be set | 0^ to 135^ | |
| Tool length | mm | 2015 - 2432 |
| Weight without the cable | kg | 4,4 |
| Noise level (EN 60745-2-15) | dB (A) | 83 K 3,0 dB(A) |
| Vibration (EN 60745-2-15) | m/s ^2 | ≤2,5 K 1,5 m/s ^2 |
Protection class II/DIN EN 60745/VDE 0740
The specified vibration emissions value is measured in accordance with EN 60745. This can be used for any other hedge trimmer with the same design and type of power supply.
The specified vibration emissions value limits the working time. Stop working if you notice a tingling sensation or a discolouration (white) of the fingers.
WARNING: When in operation, the tool's actual vibration emissions value can deviate from the specified value depending on how the tool is used, as in the following examples or because it is used in another way:
- How the tool is being used and which materials are being cut.
- The tool is well maintained and in good working order. The correct accessories are being used and care has been taken to make sure they are sharp and in good working order.
- How secure the hand grip is and whether anti-vibration accessories are being used.
- Whether the tool is being used in accordance with its design and as specified in these instructions.
- The tool can cause hand-arm vibration syndrome symptoms if it is not used properly.
WARNING: To make sure, an assessment should be made of the strain exerted when the tool is in use, for example when the tool is switched off or is idling. This will make it possible to significantly reduce the strain exerted during the entire time the tool is in use.
Minimise your risks if the tool vibrates.
Take care of the tool as specified in these instructions and make sure the tool is properly lubricated (if necessary).
If the temperature is 10^ C or less, do not use the tools. Prepare a work schedule so that work is distributed over several days when using tools that exert high vibrations.
Noise emission information in accordance with the German Product Safety Act (ProdSG) and the EC Machine Directive: the noise pressure level at the place of work can exceed 80 dB(A). In such cases the operator will require noise protection (e.g. wearing of ear protectors).

Attention: Noise protection! Please observe the local regulations when operating your device.
Symbols
The following symbols are used on this electric tool.

text_image
Safety warning symbols and safety instructions for workers, including pictograms, hand gesture, hazard warning, and LWA 98 dB sign.Attention! If you do not adhere to the instructions and safety measures described in the Operating Instructions severe injuries may occur. Read the Operating Instructions before you start and operate this device.
Wear eye and ear protection devices when operating this device.
Always wear safety gloves when operating the device.
Always wear safety boots when operating the device.
Clothing must be sturdy and snug-fitting, but allow complete freedom of movement.
Unplug immediately if the power cord or plug becomes damaged!
Do not use the tool under wet weather conditions!
Attention, danger!
Protection class II
Environmental protection/ disposal! This device may not be disposed of with general/household waste. Dispose of only at a designated collection point.
Maintain a minimum clearance of 10 m from current-carrying lines. Life-threatening danger from electric shock!
Guaranteed acoustic capacity level LWA dB(A)
Complies with the relevant safety standards
Before commissioning
Unpacking
- Remove the telescoping hedge trimmer and everything else from the packaging.
- If any parts are damaged or missing, do not operate this product until the parts are replaced. Failure to heed this warning could result in serious personal injury.
Packing List:
- Cutter Blade
- Cutter Blade Cover
- Pivoting Power Head
- Telescopic pole
- Operator's manual
Assembly
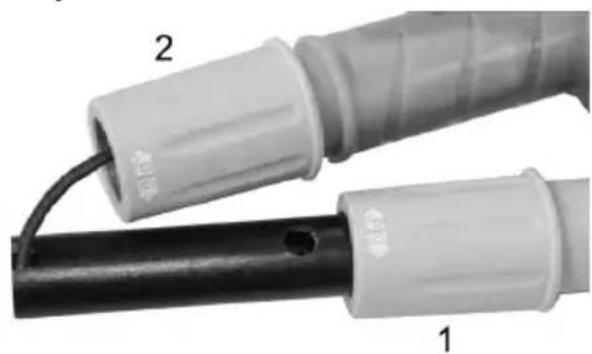
natural_image
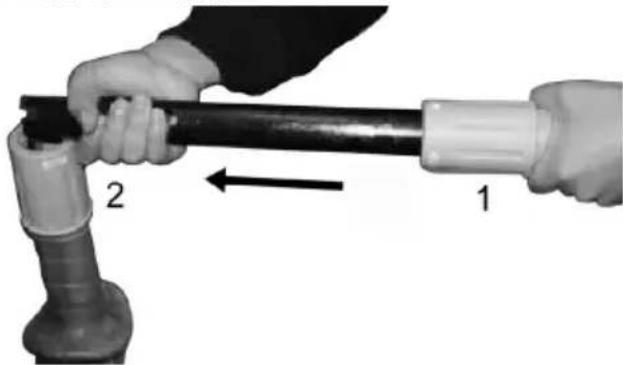
Close-up of two connected electrical connectors labeled 1 and 2, showing black and gray parts with no visible text or symbols.- Rotate the knob (1) of the telescopic tube anticlockwise (to loosen the tube.
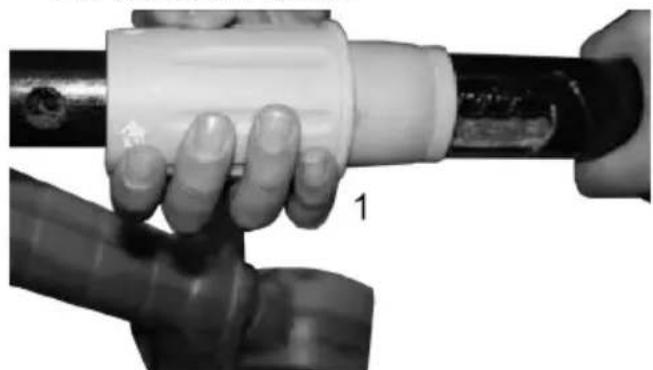
natural_image
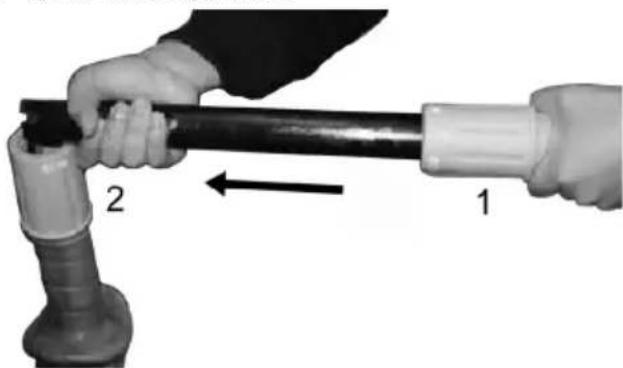
Close-up of hands holding a white PVC pipe fitting with a black handle, no visible text or symbols- Pull up the tube for a short distance.
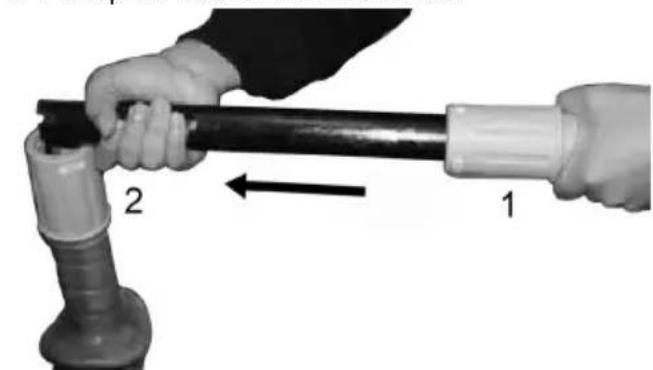
natural_image
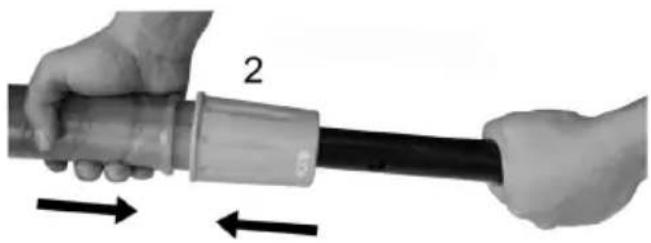
Two hands operating a pipe fitting with labeled parts (1 and 2), no text or symbols present.- Fix the tube with machine on the black tube
natural_image
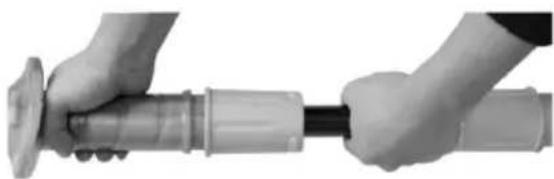
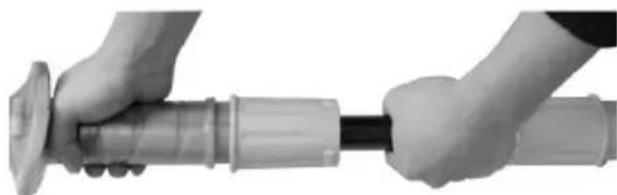
Two hands holding a cable with a labeled component '2' and directional arrows indicating movement (no text or symbols beyond labels)- Hold the black tube to make sure the head tube is fixed well on the top of the black tube.
natural_image
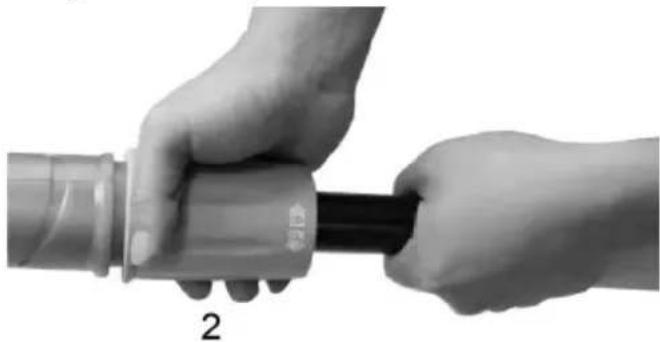
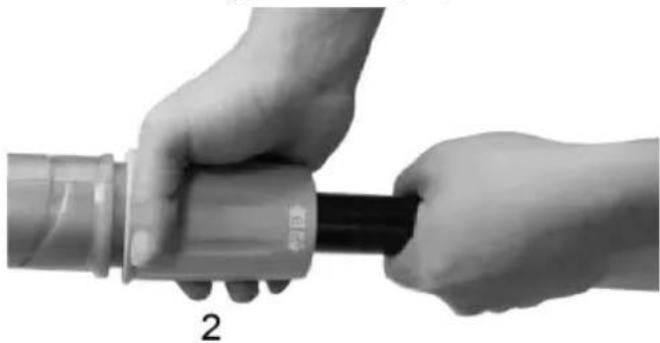
Close-up of hands holding a cylindrical mechanical device with a flanged handle (no visible text or symbols)- Rotate the knob (2) of the head tube clockwise (☐ to tighten the head part.
natural_image
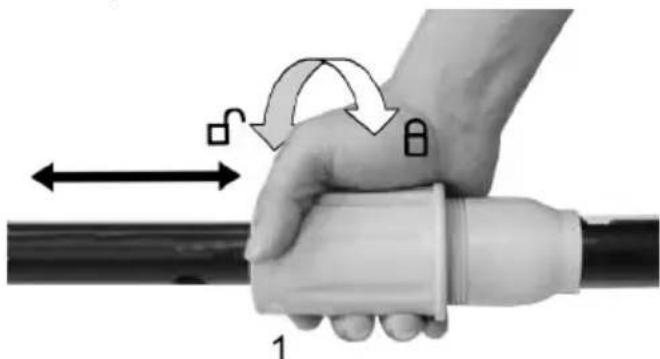
Close-up of two hands holding a cylindrical object with a black handle, labeled '2' (no text or symbols on the object itself)-
Draw back the tube
-
Rotate the knob (1) clockwise (to tighten the telescopic tube.
text_image
S θ 1Operation pole hedge trimmer
WARNING: Read and understand this owner's manual before operating Pole Trimmer. Make certain you read and understand all Safety Warnings of this manual. Improper use of this Pole Trimmer can result in severe injury or death from fire, electric shock, or body contact with moving parts.
Pivoting the Power Head
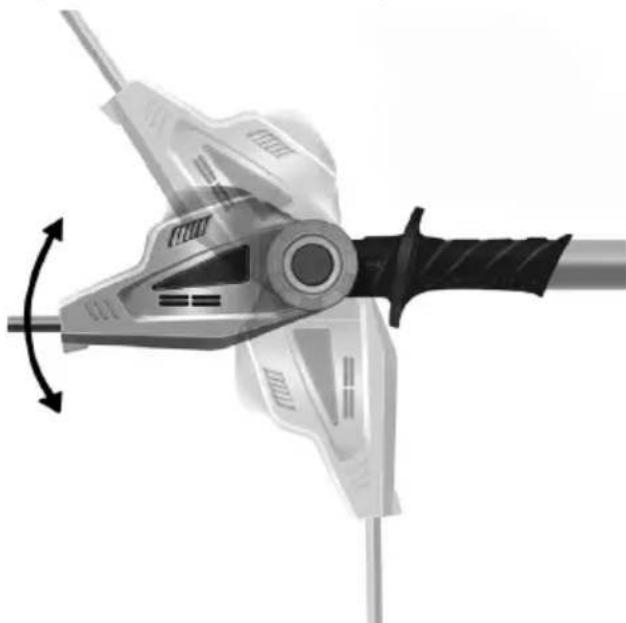
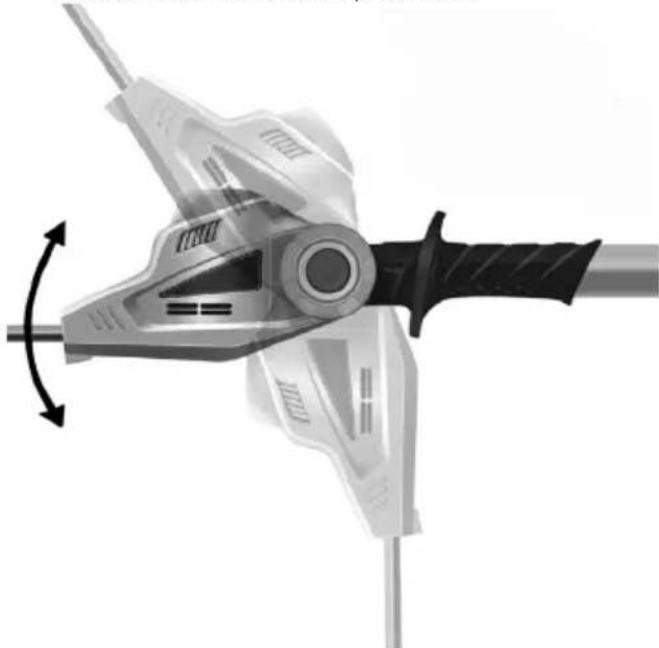
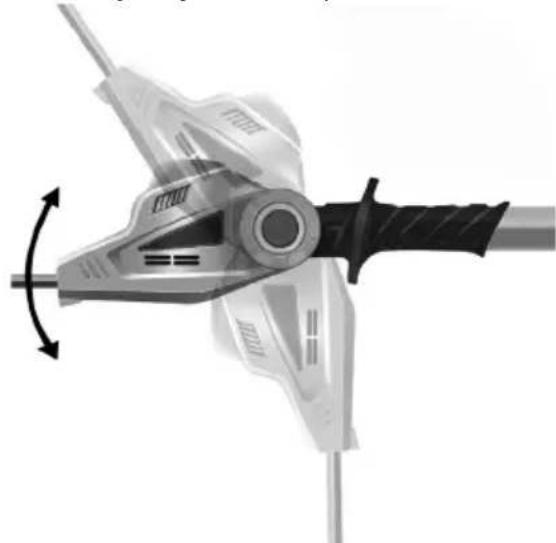
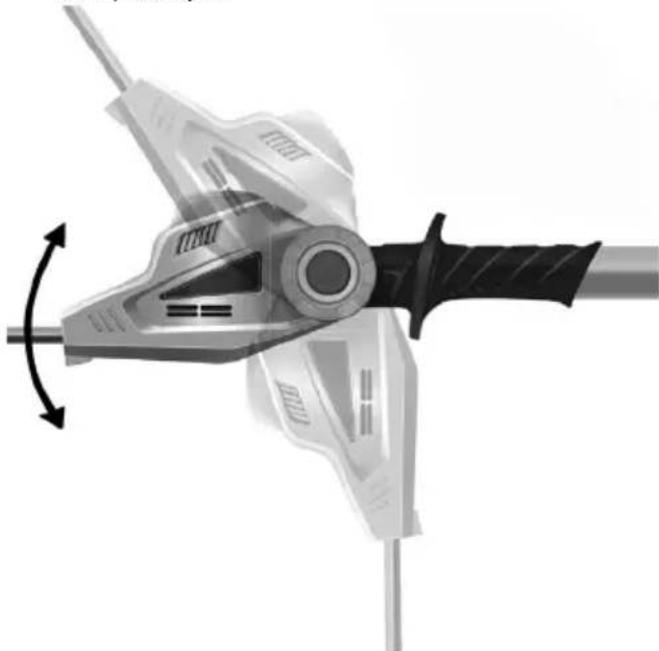
The Pole Trimmer is equipped with a power head that pivots. The power head has a spring-loaded button that allows it to be locked into several different positions within its 135-degree rotation. Before connecting the Pole Trimmer to the electrical supply, make sure the power head is locked into position. Do this by trying to rotate the power head in either direction. The power head should be locked in position and should not rotate. To pivot the power head, follow the instructions below.
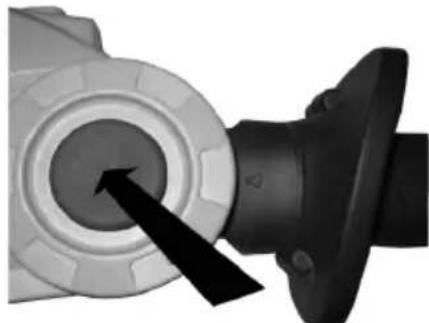
- Push the round button located on the side of the pivot bracket. The button is spring-loaded, so you will feel some resistance when pulling it out.
natural_image
Close-up of a mechanical component with a black arrow pointing to a circular opening (no text or symbols visible)- Grasp the power head motor housing and rotate the power head to either of the 6 positions.
natural_image
Mechanical device with angular rotation indicator (no text or symbols)- Release the round button.
It should snap back into its seated position. If it does not, rotate the power head back and forth slightly until the button snaps back into its seated position. The power head is now locked into position and ready for use.

WARNING: To guard against injury observe the following:
- Read instruction manual before using, save instruction manual.
- Keep hands away from blade.
- Keep hands on handles. Don't overreach.
- A good, firm grip on the Pole Trimmer with both hands will help you maintain control. Don't let go. Grip the rear handle with your right hand whether you are right or left handed. Wrap the fingers of your left hand over and around the front handle.
Adjusting telescoping pole

Disconnect the pole trimmer from the power supply.
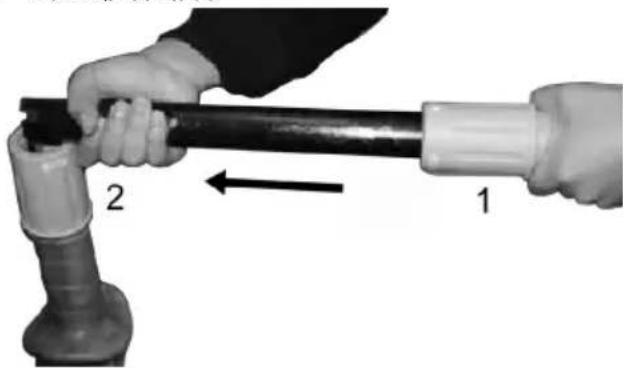
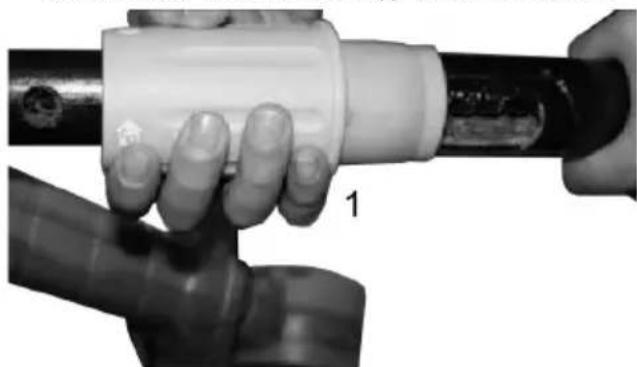
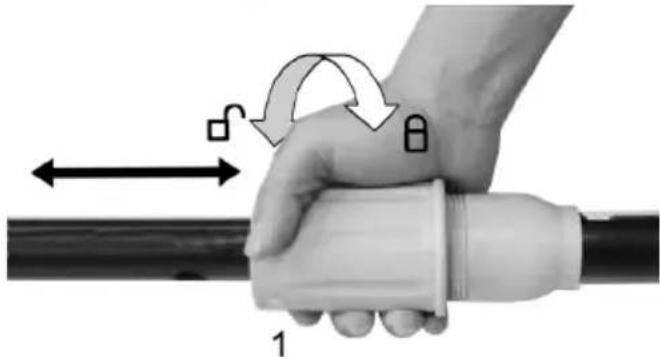
Rotate the collar (1) counter clockwise (to loosen.

natural_image
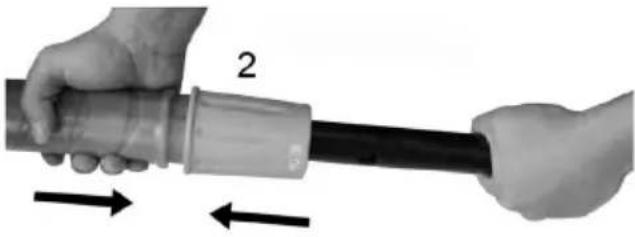
Close-up of a hand gripping a cylindrical object with directional arrows indicating motion (no text or symbols)Push poles towards each other to shorten the pole or pull away from each to lengthen the pole.
Note: Extend the pole only to the length required to reach the cut hedges or shrubs.
When the desired length is achieved, rotate the collar (1) clockwise to secure.
Power connection
The machine can only be connected to a single-phase a.c. current connection. The machine is protectively insulated in accordance with classification II of VDE 0740. Before using the machine ensure that the mains current agrees with the operating voltage data on the machine's identification plate.
Power circuit breaker
We recommend to operate the pole trimmer in connection with a residual current operated device with a maximum breaking current of 30mA.
Connecting Extension Cord
The Pole Trimmer has a built-in extension cord retainer to prevent the accidental disconnection of the unit from the extension cord during use. It is molded into the lower hand guard area of the trigger housing.
- Make sure the trigger lever is in the OFF position
- Plug the power cord into the extension cord.
- Create a loop in the extension cord and insert the loop through the bottom of the handle. Pull the loop tight around the molded cord hook.

natural_image
Close-up of a white electric vehicle head with labeled points A and B, showing wiring and cable (no text or symbols beyond labels)Switching on/out
- Press with your thumbs the stopping button (A) on the left side of the rear handle and then the operating switch (B).
- The stopping button (A) is used for unlocking the switch-on mechanism and does not need to be pressed again after the device is switched on.
• To switch off the device, release switch (B).
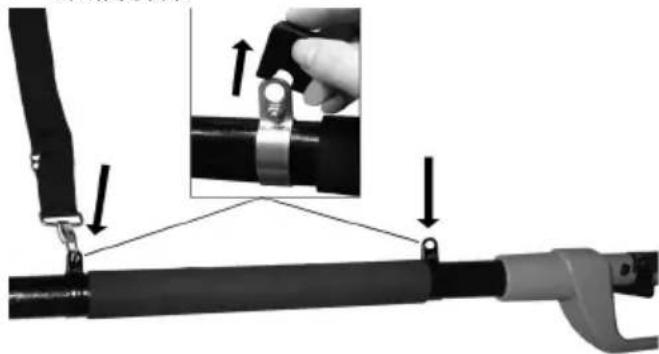
Attachment of the shoulder belt
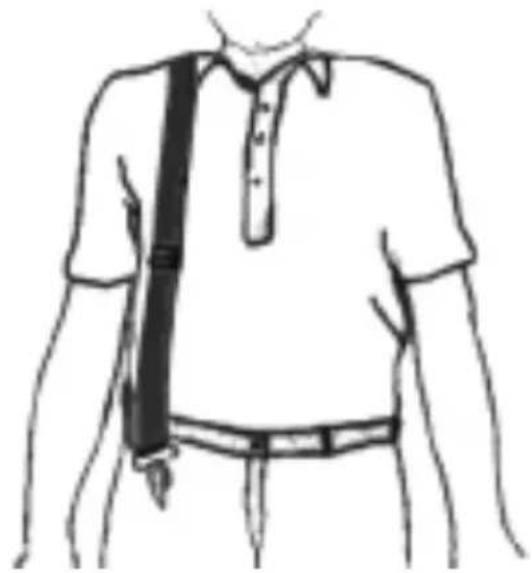
- Wear the shoulder belt so that it lies over the right-shoulder.
natural_image
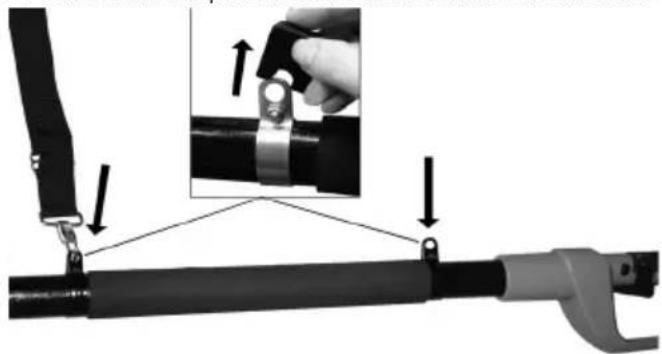
Line drawing of a person wearing a short-sleeve shirt and belt, no text or symbols present- Fasten the snap hook on the shaft bracket on the shaft.
natural_image
Mechanical assembly diagram showing a tool being inserted into a cylindrical component, with no visible text or symbols.Instructions for use of the equipment
- Do not use the trimmer in rain or for cutting wet hedges!
- Check the hedge trimmer flex and its connections before each and every use for visible signs of damage (disconnect the power plug)! Do not use a faulty flex.
- Gloves:
Protective gloves must be worn when using the hedge trimmer.
Using the pole hedge trimmer
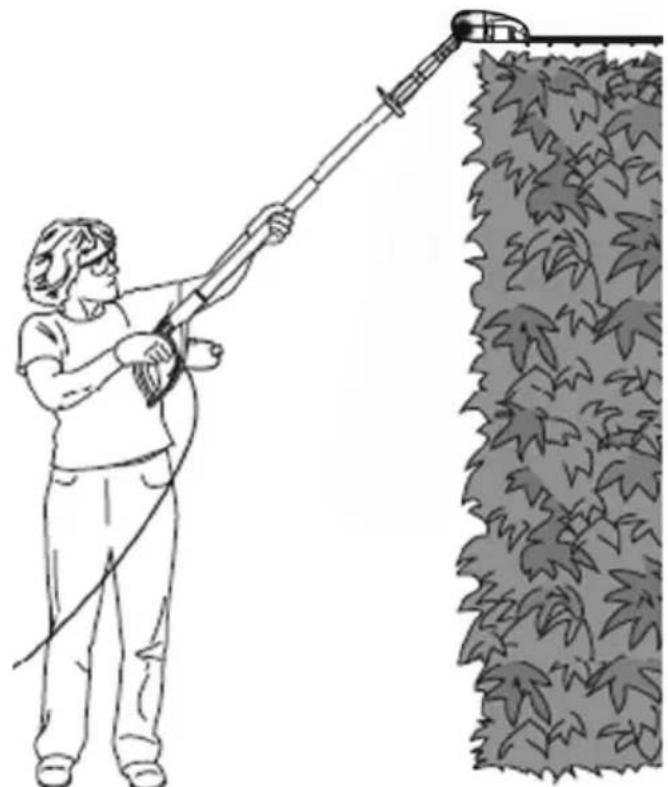
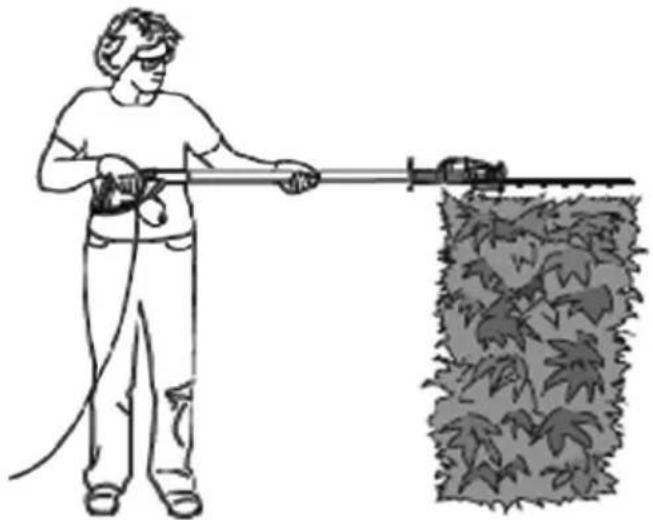
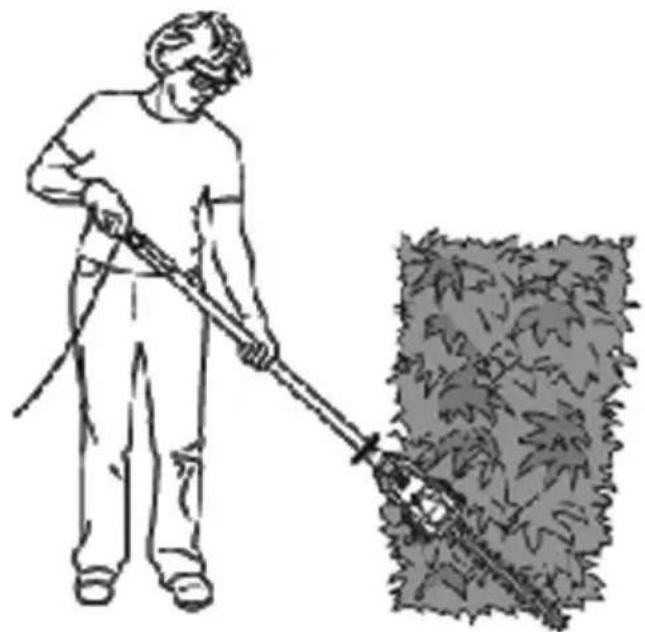
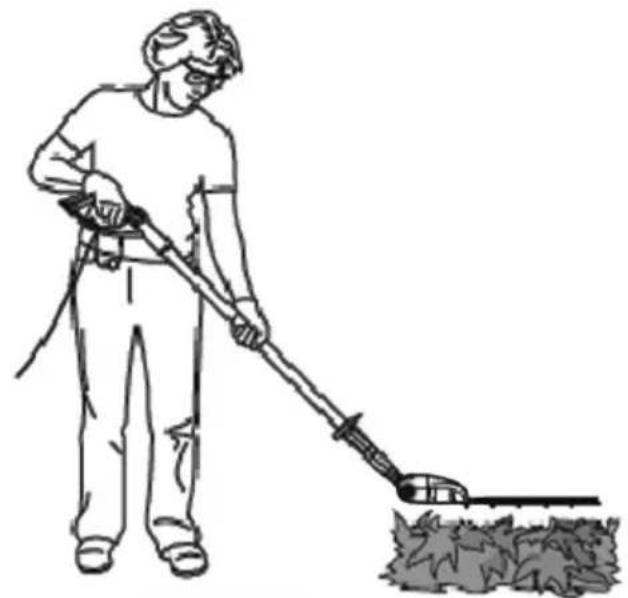
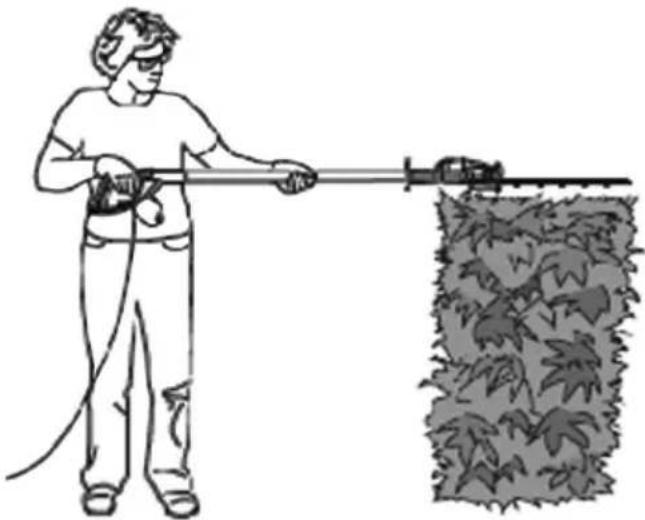
The Pole Trimmer is a dual-purpose tool. It is designed to trim and shape tall, hard-to-reach hedges and bushes with its extended reach and pivoting power head. You can also adjust the Pole Trimmer to trim and shape smaller hedges and shrubs near the ground without having to bend or stoop.
To use the Pole Trimmer for trimming tall, hard-to-reach hedges or shrubs, hold the Pole Trimmer at the positions shown. Pivot the power head to several different positions to shape or sculpt shrubs or hedges.
natural_image
Illustration of a person using a long-handled tool to clean leafy plants (no text or symbols)To use the Pole Trimmer for trimming smaller hedges or shrubs, hold the Pole Trimmer at the positions as shown.
natural_image
Illustration of a person spraying a hair gun with a leafy ground (no text or symbols)To use the Pole Trimmer for trimming the bottoms and sides of hedges and shrubs, hold the Pole Trimmer at the positions as shown.
natural_image
Illustration of a person using a manual power shaver to clean vegetation (no text or symbols)To use the Pole Trimmer for trimming low-lying foliage or ground cover, hold the Pole Trimmer at the position as shown.
natural_image
Line drawing of a person using a tool to clean or brush a surface (no text or symbols)Use the Pole Trimmer properly. Always wear eye protection, rubber gloves, and substantial foot wear while using the Pole Trimmer. Always maintain proper footing and balance and never overreach when using Pole Trimmer. Before starting the Pole Trimmer, hold the unit with both hands on the grip areas. Make sure that the cutter blade is not touching anything.
Always keep the extension cord behind the Pole Trimmer when in use. Do not drape the cord over the hedge where it may be cut by the blades. Use smooth steady sweeping motions to trim new growth. Do not try to cut too much at one time. This can cause the Pole Trimmer to slow down or get jammed, reducing the cutting efficiency.
Do not force the Pole Trimmer through dense growth. A slight back and forth sawing action may ease the cutting of larger, more dense growth. If the Pole Trimmer begins to slow down, reduce the rate of speed at which you are trying to cut. If the Pole Trimmer becomes jammed, immediately turn Pole Trimmer off. Disconnect Pole Trimmer from the power supply and remove the jammed debris from the cutter blades.
Do not try to cut branches larger than 18mm in diameter. For best results, trim the sides of hedges with an upward sweeping motion. Trim the hedges so that the top is slightly narrower than the bottom.
Cleaning, maintenance and storage of the pole trimmer

WARNING: Disconnect Pole Trimmer from power supply before cleaning or servicing. Severe injury or death could occur from fire, electrical shock, or body contact with moving cutter blades.

WARNING: When cleaning Pole Trimmer:
- Do not submerse Pole Trimmer in any liquids.
- Do not use products that contain Ammonia, Chlorine, or abrasives.
- Do not use chlorinated cleaning solvents, Carbon Tetrachloride, Kerosene, or Gasoline.
Use a soft cloth dampened with a mild soap and water mixture to wipe Pole Trimmer pole, housing, and cutter blades clean. Do not spray or pour water directly onto Pole Trimmer.
- Keep cutting edge sharp and clean for best performance and to reduce the risk of injury
- Follow instruction for lubricating and changing accessories.
- Inspect Pole Trimmer cord periodically, and if damaged, have it repaired by an authorized service facility.
- Inspect extension cords periodically and replace if damaged.
- Keep handles dry, clean, and free from oil and grease.
1. Check Damaged Parts
- If a part is damaged, carefully check the damaged part before using the Pole Trimmer. Make sure the part will operate properly and perform its intended function.
-
Check for alignment of moving parts, binding of moving parts, breakage of parts, mounting, and any other condition that may affect its operation.
-
When servicing Pole Trimmer, use only identical replacement parts.
- Store Idle Pole Trimmer Indoors.
When not in use, the Pole Trimmer should be stored indoors in a dry location. Store Pole Trimmer above the reach of children or in a locked area out of the reach of children.
Information for environmental protection/disposal
Dispose of the machine properly after it is worn out. Disconnect the mains cable in order to prevent misuse. Do not dispose of the machine with the household waste. In the interest of environmental protection, take it to a collection point for electric machines. Your responsible local authority can provide you with addresses and operating times. Also take the packaging materials and worn out accessories to the appropriate collection points.
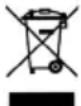
Only for EU countries
Do not discard electric tools in the household waste!
In accordance with European Directive 2012/19/EC on waste electrical and electronic equipment and its implementation in national law, waste electric tools must be collected separately for environmentally-compatible re-use.
Recycling alternative to the return invitation:
Instead of returning the electric equipment, the owner is alternatively obligated to take part in the proper recycling in the case of relinquishment of ownership. The waste equipment can also be taken to a collection facility which disposes of it in the sense of the national recycling management and waste acts. This does not pertain to the accessory parts and auxiliary equipment without electrical components accompanying the waste equipment.
Repair Service
Repairs to electric power tools should only be carried out by specialist electrical personnel.
Always keep the original packaging for a possibly required shipping of the tool.
Spare parts
Please contact our service department if you need accessories or spare parts.
When working with this machine, do not use spare parts other than those recommended by us. Using spare parts not recommend by us can result in serious injuries to persons or damage to the machine.
Warranty
For this electric tool, the company provides the end user - independently from the retailer's obligations resulting from the purchasing contract - with the following warranties:
The warranty period is 36 months beginning from the hand-over of the device which has to be proved by the original purchasing document. For commercial use and use for rent, the warranty period is reduced to 12 months. Wearing parts and defects caused by the use of no fitting accessories, repair with parts that are not original parts of the manufacturer, use of force, strokes and breaking as well as mischievous overloading of the motor are excluded from this warranty. Warranty replacement does only include defective parts, not complete devices. Warranty repair shall exclusively be carried out by authorized service partners or by the company's customer service. In the case of any intervention of not authorized personnel, the warranty will be held void.
All postage or delivery costs as well as any other subsequent expenses will be borne by the customer.
Troubleshooting
| Problem Possible Cause Possible Solution | ||
| Unit does not run Power cord not connected Check power supply connection | ||
| Lock off not fully operated Check that lock off is fully forward prior to moving trigger | ||
| Blade cutter is running hot Blade cutter dull Have blade sharpened | ||
| Blade cutter has dent Have blade inspected/overhauled | ||
| Too much friction, due to lack of lubricant | Apply lubricant spray | |
| Blade cutter will not move Machine defective Contact Service Agent | ||
| Excessive vibrations/noise Machine defective Contact Service Agent | ||
| Pole trimmer operates intermittently Internal wiring of machine damaged Contact Service Agent | ||
| On/Off switch defective Contact Service Agent | ||
IMPORTANT:
Indications techniques FR-9
Symboles FR-10
text_image
Labeled diagram of a handheld device with numbered parts for identificationPièces détachées
Indications techniques
text_image
Safety warning symbols and safety instructions for workers, including pictograms, hand gesture, hazard warning, and 10-meter distance limit sign.natural_image
Close-up of two connected electrical connectors, labeled 1 and 2, with no visible text or symbols beyond labels.natural_image
Close-up of hands holding a white PVC pipe fitting with a black plastic cap, no visible text or symbolsnatural_image
Two hands holding a pipe fitting with labeled parts (1 and 2), no text or symbols present.natural_image
Close-up of hands holding a cable with a labeled component '2' and directional arrows indicating movement (no text or symbols beyond labels)natural_image
Close-up of hands holding a cylindrical mechanical component (no visible text or symbols)natural_image
Close-up of hands holding a cylindrical object with a black handle, labeled '2' (no text or symbols on the object itself)natural_image
Close-up of a hand gripping a cylindrical object with a lock mechanism indicated by arrows (no text or symbols)natural_image
Close-up of a mechanical component with a black arrow pointing to a circular opening (no text or symbols visible)natural_image
Mechanical component with angular rotation indicator (no text or symbols)text_image
Diagram showing hand press technique with labeled arrows and a lock mechanism, likely illustrating mechanical or electrical motion.natural_image
Close-up of a white electric vehicle charging plug with labeled points A and B, showing cable and connector (no text or symbols beyond labels)Activation/désactivation
natural_image
Line drawing of a person wearing a short-sleeve shirt and belt, carrying a black bandage (no text or symbols)natural_image
Mechanical assembly diagram showing a tool being adjusted to a metal component with two downward arrows indicating motion (no text or symbols present)natural_image
Illustration of a person spraying a hose to a hedgehog on a hill (no text or symbols)natural_image
Illustration of a person spraying a hose with a bucket cover, no text or symbols presentnatural_image
Illustration of a person using a manual power shaver to clean leafy soil (no text or symbols)natural_image
Line drawing of a person using a power tool to clean or brush the ground (no text or symbols)text_image
Labeled diagram of a hairpin tool with numbered parts for identificationComponenti
natural_image
Close-up of two connected electrical connectors, labeled 1 and 2, showing wiring and components (no text or symbols beyond labels)natural_image
Close-up of hands holding a white PVC pipe fitting with a black handle, no visible text or symbolsnatural_image
Two hands operating a pipe fitting with labeled parts (1 and 2), showing mechanical assembly (no text or symbols beyond labels)natural_image
Close-up of hands connecting a cable with a plug, showing two directional arrows (no text or symbols)natural_image
Close-up of hands holding a cylindrical mechanical component with a flange (no text or symbols visible)natural_image
Close-up of hands holding a cylindrical object with a black handle, labeled '2' (no text or symbols on the object itself)natural_image
Close-up of a hand gripping a cylindrical object with directional arrows indicating motion (no text or symbols)natural_image
Close-up of a mechanical component with a black arrow pointing to a circular opening (no text or symbols visible)natural_image
Mechanical component with angular displacement indicator (no text or symbols)natural_image
Close-up of a hand gripping a mechanical component with directional arrows indicating motion (no text or symbols)natural_image
Close-up of a white electric vehicle charging plug with labeled parts A and B, showing wiring and cable (no text or symbols beyond labels)natural_image
Line drawing of a person wearing a short-sleeve shirt and belt, no text or symbols presentnatural_image
Mechanical assembly diagram showing a tool being inserted into a cylindrical component with arrows indicating motion (no text or symbols present)natural_image
Illustration of a person spraying a hose to a leafy wall (no text or symbols)natural_image
Illustration of a person spraying a hose with a hatched ground area (no text or symbols)natural_image
Illustration of a person using a manual power shaver to clean vegetation (no text or symbols)natural_image
Line drawing of a person using a long-handled tool to clean or brush the ground (no text or symbols)text_image
Labeled diagram of a handheld device with numbered parts for identificationCOMPONENTES
natural_image
Close-up of two connected electrical connectors labeled 1 and 2, showing internal components (no text or symbols beyond labels)natural_image
Close-up of hands holding a white PVC pipe fitting with a black plastic cap, no visible text or symbolsnatural_image
Two hands operating a pipe fitting with labeled parts (1 and 2), no text or symbols present.natural_image
Two hands holding a cable with a labeled component '2' and directional arrows indicating movement (no text or symbols beyond labels)natural_image
Close-up of hands operating a mechanical device with a flange and shaft (no visible text or symbols)natural_image
Close-up of hands holding a cylindrical mechanical component, labeled '2' (no text or symbols on the object itself)natural_image
Close-up of a hand gripping a cylindrical object with a lock icon and directional arrows indicating motion (no text or symbols)natural_image
Close-up of a mechanical component with a black arrow pointing to a circular opening (no text or symbols visible)natural_image
Mechanical device with angular displacement indicator (no text or symbols)natural_image
Close-up of a hand gripping a cylindrical object with a lock icon, showing motion arrows (no text or symbols)natural_image
Line drawing of a person wearing a short-sleeve shirt and belt (no text or symbols)natural_image
Mechanical assembly diagram showing a lever and clamp mechanism with no visible text or symbolsnatural_image
Illustration of a person using a long-handled tool to brush a leafy plant (no text or symbols)natural_image
Illustration of a person spraying a hose with a small pile of green foliage (no text or symbols)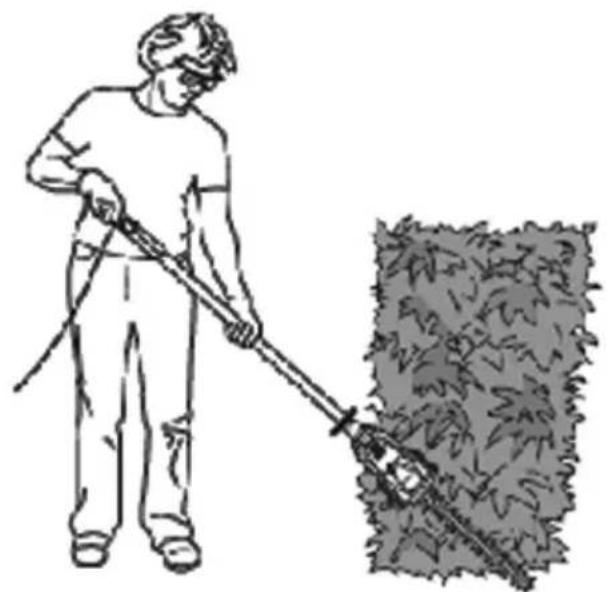
natural_image
Illustration of a person using a manual power tool to brush a large piece of grass (no text or symbols present)natural_image
Line drawing of a person using a long-handled tool to clean or brush the ground (no text or symbols)text_image
Labeled diagram of a handheld device with numbered parts for identificationMaskinens dele
natural_image
Close-up of two connected electrical connectors labeled 1 and 2, showing wiring and components (no text or symbols beyond labels)natural_image
Close-up of hands holding a white PVC pipe fitting with a black handle, no visible text or symbolsnatural_image
Two hands operating a cylindrical tool with labeled parts (1 and 2), showing mechanical assembly (no text or symbols beyond labels)text_image
at ander 2natural_image
Close-up of hands holding a cylindrical mechanical device with a flange (no visible text or symbols)natural_image
Close-up of hands holding a cylindrical object with a black handle, labeled '2' (no text or symbols on the object itself)natural_image
Close-up of a mechanical component with a black arrow pointing to a circular opening (no text or symbols visible)-
- Grib fast om motordelens motorhus, og drej motordelen over i en af de 6 positioner.
natural_image
Mechanical component with angular rotation indicator (no text or symbols)natural_image
Close-up of a hand gripping a pipe with a lock mechanism indicated by arrows (no text or symbols)natural_image
Close-up of a white electric vehicle charging plug with labeled parts A and B (no text or symbols beyond labels)Tænd/sluk
natural_image
Line drawing of a person wearing a short-sleeve shirt and belt, no text or symbols presentnatural_image
Mechanical assembly diagram showing a lever with mounting points and a close-up of a mechanical component (no text or symbols visible)Brugsvejledning
natural_image
Illustration of a person using a long-handled tool to clean leafy plants (no text or symbols)natural_image
Illustration of a person using a long tool to brush a plant, with dense foliage nearby (no text or symbols)natural_image
Illustration of a person using a manual power shaver to clean or brush the ground (no text or symbols)natural_image
Line drawing of a person using a tool to clean or brush a piece of material (no text or symbols)INNEHÅLLSFÖRTECKNING
Sida
text_image
Labeled diagram of a handheld device with numbered parts for identificationHäcksaxens delar
natural_image
Close-up of two connected electrical connectors, labeled 1 and 2, with no visible text or symbols beyond labels.natural_image
Close-up of hands holding a white PVC pipe fitting with a black plastic cap, no visible text or symbolsnatural_image
Two hands operating a pipe fitting with labeled parts (1 and 2), no text or symbols present.natural_image
Two hands holding a cable with a labeled connector (2), showing directional arrows indicating movement or force (no text or symbols present)natural_image
Close-up of hands holding a cylindrical mechanical component with a flanged top (no visible text or symbols)natural_image
Close-up of hands holding a cylindrical object with a black handle, labeled '2' (no text or symbols on the object itself)natural_image
Close-up of a hand gripping a pipe with directional arrows indicating motion (no text or symbols)natural_image
Close-up of a mechanical component with a black arrow pointing to a circular opening (no text or symbols visible)natural_image
Mechanical component with angular rotation indicator (no text or symbols)text_image
Diagram illustrating hand press mechanism with labeled components and directional arrowsnatural_image
Line drawing of a person wearing a short-sleeve shirt and belt, no text or symbols presentnatural_image
Mechanical assembly diagram showing a clamp securing a metal ring with two downward arrows indicating force application (no text or symbols present)natural_image
Illustration of a person using a long-handled tool to brush a leafy plant (no text or symbols)natural_image
Illustration of a person using a power tool to clean vegetation, with no text or symbols present.natural_image
Illustration of a person using a long-handled tool to brush a leafy material (no text or symbols)natural_image
Line drawing of a person using a long-handled tool to clean or brush the ground (no text or symbols)text_image
Labeled diagram of a handheld device with numbered parts for identificationOsat
natural_image
Close-up of two white plastic electrical connectors with visible wiring and a black terminal block (no text or symbols)natural_image
Close-up of hands holding a white PVC pipe fitting with a black handle, no visible text or symbolsnatural_image
Two hands operating a pipe fitting with labeled parts (1 and 2), showing mechanical advantage (no text or symbols beyond labels)natural_image
Close-up of hands connecting a cable with a plug, showing two directional arrows (no text or symbols)natural_image
Close-up of hands holding a cylindrical mechanical component (no visible text or symbols)natural_image
Close-up of hands holding a cylindrical object with a black handle, labeled '2' (no text or symbols on the object itself)natural_image
Close-up of a hand gripping a cylindrical object with a lock icon and directional arrows indicating motion (no text or symbols)Trimmerin käyttö
natural_image
Close-up of a mechanical component with a black arrow pointing to a circular opening (no text or symbols visible)natural_image
Mechanical component with angular rotation indicator (no text or symbols)natural_image
Close-up of a hand gripping a pipe with a lock icon and directional arrows indicating motion (no text or symbols)natural_image
Line drawing of a person wearing a short-sleeve shirt and belt, no text or symbols presentnatural_image
Mechanical assembly diagram showing a lever and clamp mechanism with no visible text or symbolsKäyttöohjeet
natural_image
Illustration of a person using a long-handled tool to clean vegetation, with no text or symbols present.natural_image
Illustration of a person spraying a shade filter over a fence (no text or symbols)natural_image
Line drawing of a person using a manual power tool to brush a large block of grass (no text or symbols)natural_image
Line drawing of a person using a power tool to clean or brush the ground (no text or symbols)text_image
Labeled diagram of a handheld device with numbered parts for identificationEnkeltdeler
natural_image
Close-up of two connected electrical connectors, labeled 1 and 2, showing wiring and components (no text or symbols beyond labels)natural_image
Close-up of hands holding a white plastic pipe fitting with a black handle, no visible text or symbols- Trekk røret litt ut.
natural_image
Close-up of two hands operating a pipe fitting with labeled parts (1 and 2), no text or symbols present.- Skyv hekklipperen på det svarte røret (skruhylse 2 må tas løs ved å dreie den med klokken).
natural_image
Close-up of hands holding a cable with two arrows indicating direction (no text or symbols)natural_image
Close-up of hands holding a cylindrical mechanical component (no visible text or symbols)natural_image
Close-up of hands holding a cylindrical object with a black handle, labeled '2' (no text or symbols on the object itself)natural_image
Close-up of a mechanical component with a black arrow pointing to a circular opening (no text or symbols visible)natural_image
Mechanical device with angular displacement indicator (no text or symbols)- Løsne på den runde tasten.
natural_image
Close-up of a hand gripping a wrist brace with a lock icon and directional arrows indicating motion (no text or symbols)natural_image
Line drawing of a person wearing a short-sleeve shirt and belt, no text or symbols presentnatural_image
Mechanical assembly diagram showing a clamp securing a metal ring with arrows indicating force application (no text or symbols present)Bruksveiledning
- Ikke klipp i regn og ikke klipp en våt hekk!
- Før du bruker hekklipperens kabel og dens koblinger, skal du alltid kontrollere om den har synlige mangler (støpsel trukket ut). Ikke bruk en kabel med feil eller mangler.
- Hansker: Du skal alltid ha på arbeidshansker ved bruk av hekklipperen.
natural_image
Illustration of a person using a long-handled tool to clean vegetation, with no text or symbols present.Hold teleskophekklipperen som vist på bildet när du skal bruke den til å klippe mindre hekker eller busker.
natural_image
Illustration of a person spraying a hose with a bucket cover, no text or symbols presentnatural_image
Illustration of a person using a manual power shaver to clean grass or straw (no text or symbols)natural_image
Line drawing of a person using a long-handled tool to clean or brush the ground (no text or symbols)text_image
Labeled diagram of a handheld device with numbered parts for identificationMakinenin Parçaları
natural_image
Close-up of two connected electrical connectors labeled 1 and 2, showing wiring and components (no text or symbols beyond labels)natural_image
Close-up of hands holding a white PVC pipe fitting with a small house symbol, no visible text or symbolsnatural_image
Two hands operating a pipe fitting with labeled parts (1 and 2), showing mechanical advantage (no text or symbols beyond labels)natural_image
Close-up of hands connecting a cable with a plug, showing two directional arrows (no text or symbols)natural_image
Close-up of hands holding a cylindrical mechanical component with a flanged top (no visible text or symbols)natural_image
Close-up of two hands holding a cylindrical object with a black handle, labeled '2' (no text or symbols on the object itself)text_image
Diagram showing hand grip mechanism with padlock and angle annotations, labeled with number 1Makinenin Kullanımı
natural_image
Close-up of a mechanical component with a black arrow pointing to a circular opening (no text or symbols visible)natural_image
Mechanical device with angular displacement indicator (no text or symbols)natural_image
Close-up of a hand gripping a pipe with a lock mechanism indicated by arrows (no text or symbols)natural_image
Line drawing of a person wearing a short-sleeve shirt and belt, no text or symbols presentnatural_image
Mechanical assembly diagram showing a lever with mounting points and a close-up of a mechanical component (no text or symbols visible)natural_image
Illustration of a person spraying a hose to a leafy wall (no text or symbols)natural_image
Illustration of a person spraying a shade with a tool, next to a pile of green foliage (no text or symbols)natural_image
Illustration of a person using a manual power tool to spread soil or vegetation, with no text or symbols present.natural_image
Line drawing of a person using a mop to clean or brush the net (no text or symbols)natural_image
Circular emblem with stylized letter Z and swirling floral pattern (no text or symbols)zimas
natural_image
Product photo of a hairless chain-linking tool with a headband and cord (no text or symbols visible)İTHALATÇI FİRMANIN
Ünvani : ZİMAŞ ZİRAAT MAKİNALARI SAN. VE TİC. A.Ş. Adresi : 1202/1 SOKAK NO:101/G YENİŞEHİR 35110 İZMİR Tel : 0232 4580586 – 4591581 Faks : 0232 4572697 E-posta : info@zimasziraat.com
TYTO POKYNY SI DOBŘE USCHOVEJTE.
1) Pracovní prostor
text_image
Labeled diagram of a hairpin tool with numbered parts for identificationSoučásti
natural_image
Close-up of two connected electrical connectors labeled 1 and 2, showing wiring and components (no text or symbols beyond labels)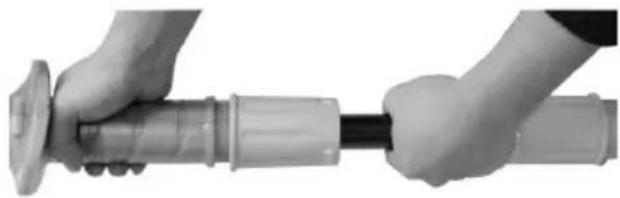
natural_image
Close-up of hands holding a cylindrical mechanical component with a flanged top (no text or symbols visible)natural_image
Close-up of hands holding a white PVC pipe fitting with black plastic bands, no visible text or symbols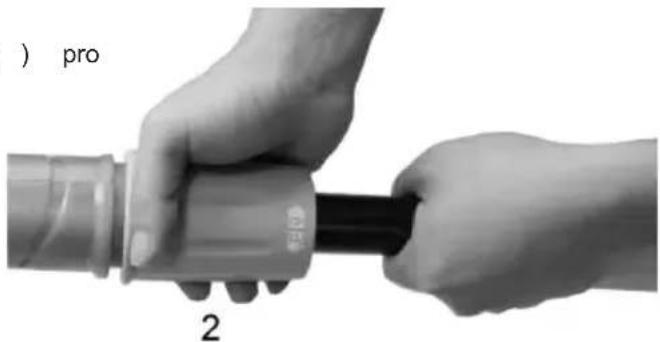
natural_image
Close-up of hands holding a cylindrical object with a black handle, labeled '2' and '(pro)', no readable text or symbols beyond labelsnatural_image
Two hands operating a pipe fitting with labeled parts (1 and 2), no text or symbols present.natural_image
Close-up of a hand gripping a cylindrical object with directional arrows indicating motion (no text or symbols)natural_image
Close-up of a mechanical component with a black arrow pointing to a circular opening (no text or symbols visible)natural_image
Mechanical device with angular displacement indicator (no text or symbols)text_image
Diagram illustrating hand grip technique with labeled arrows and lock mechanismnatural_image
Close-up of an electric vehicle charging plug with labeled parts A and B (no text or symbols beyond labels)Zapínání/vypínání
natural_image
Line drawing of a person wearing a short-sleeve shirt and belt, no text or symbols presentnatural_image
Mechanical assembly diagram showing a clamp securing a metal ring with arrows indicating force application (no text or symbols)Návod k použití
natural_image
Illustration of a person spraying a hair gun near dense vegetation (no text or symbols)natural_image
Illustration of a person spraying a hose next to a pile of green foliage (no text or symbols)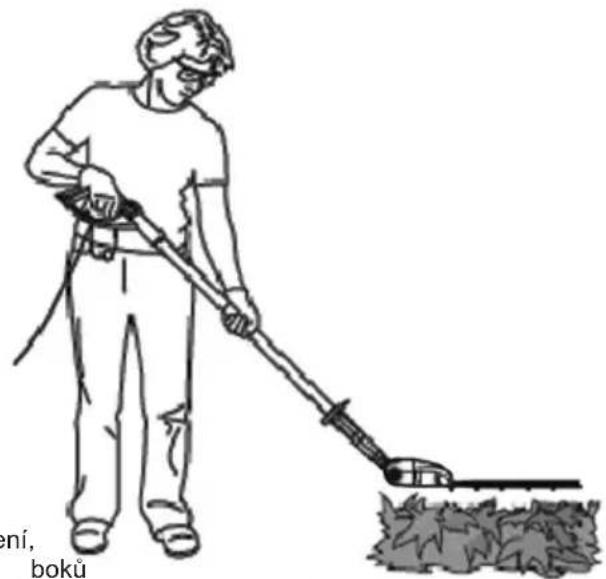
natural_image
Illustration of a person using a long-handled tool to clean or brush the ground (no text or symbols)natural_image
Illustration of a person using a manual power shaver to clean leafy material (no text or symbols)TIETO POKYNY SI DOBRE USCHOVAJTE.
text_image
Labeled diagram of a handheld device with numbered parts for identificationJednotlivé diely
natural_image
Close-up of two electrical connectors with labeled parts (1 and 2), no visible text or symbols beyond labelsnatural_image
Close-up of hands holding a white PVC pipe fitting with a black handle, no visible text or symbols- Tyč trochu povytiahnite.
natural_image
Two hands operating a pipe fitting with labeled parts (1 and 2), no text or symbols present.natural_image
Close-up of hands holding a cable with two arrows indicating direction (no text or symbols)natural_image
Close-up of hands holding a cylindrical mechanical component with a black handle (no text or symbols visible)natural_image
Close-up of hands holding a cylindrical object with a black handle, labeled '2' (no text or symbols on the object itself)natural_image
Close-up of a mechanical component with a black arrow pointing to a circular opening (no text or symbols visible)- Chyt'te teleso motora hnacej hlavice a hnaciu hlavicu otočte do jednej zo šiestich polôh.
natural_image
Mechanical component with angular rotation indicator (no text or symbols)- Uvol'nite okrúhle tlačidlo.
natural_image
Close-up of a hand gripping a wristband with a lock mechanism indicated by arrows (no text or symbols)natural_image
Close-up of a white electric vehicle head with labeled points A and B, showing wiring and cable (no text or symbols beyond labels)Zapnutie/vypnutie
natural_image
Line drawing of a person wearing a short-sleeve shirt and belt (no text or symbols)natural_image
Mechanical assembly diagram showing a lever mechanism with adjustment arrows (no text or symbols)natural_image
Illustration of a person using a long-handled tool to spray over dense vegetation (no text or symbols)natural_image
Illustration of a person spraying a shade filter over a green leafy area (no text or symbols)natural_image
Illustration of a person using a manual power tool to spread soil or vegetation, with no text or symbols present.natural_image
Line drawing of a person using a long-handled tool to clean or brush the ground (no text or symbols)text_image
Labeled diagram of a handheld device with numbered parts for identificationCzęści składowe
natural_image
Close-up of two connected electrical connectors labeled 1 and 2, showing wiring and components (no text or symbols beyond labels)natural_image
Close-up of hands holding a white PVC pipe fitting with a black handle, no visible text or symbolsnatural_image
Two hands operating a pipe fitting with labeled parts (1 and 2), showing mechanical advantage (no text or symbols beyond labels)natural_image
Close-up of hands connecting a cable with a plug, showing two directional arrows (no text or symbols)natural_image
Close-up of hands holding a cylindrical mechanical component with a flange (no visible text or symbols)natural_image
Close-up of hands holding a cylindrical object with a black handle, labeled '2' (no text or symbols on the object itself)natural_image
Close-up of a hand gripping a wrist with a lock icon and directional arrows indicating motion (no text or symbols)natural_image
Close-up of a mechanical component with a black arrow pointing to a circular opening (no text or symbols visible)natural_image
Mechanical device with angular displacement indicator (no text or symbols)natural_image
Close-up of a hand gripping a cylindrical object with directional arrows indicating motion (no text or symbols)natural_image
Close-up of a white electric vehicle head with labeled components A and B, showing wiring and cable (no text or symbols beyond labels)natural_image
Line drawing of a person wearing a short-sleeve shirt and belt, no text or symbols presentnatural_image
Mechanical assembly diagram showing a tool being inserted into a cylindrical component, with arrows indicating direction of movement (no text or symbols present)natural_image
Illustration of a person using a long-handled tool to clean vegetation, with no text or symbols present.natural_image
Illustration of a person using a long tool to spread a large pile of green foliage (no text or symbols)natural_image
Illustration of a person using a manual power shaver to clean leafy material (no text or symbols)natural_image
Line drawing of a person using a tool to clean or brush a piece of material (no text or symbols)text_image
Labeled diagram of a handheld device with numbered parts for identificationSestavni deli
natural_image
Close-up of two connected electrical connectors with visible wiring (no text or symbols)1
- Zavrtite navojno zaponko (1) teleskopske cevi v nasprotno smer urnih kazalcev (d) da se sprosti cev.
natural_image
Close-up of hands holding a white PVC pipe fitting with a black handle, no visible text or symbols- Malo cevi izvlecite
natural_image
Two hands operating a pipe fitting with labeled parts (1 and 2), no text or symbols present.natural_image
Close-up of hands holding a cable with a labeled component (no text or symbols visible)- Zadržite cev tako, da zagotovite dobro pričvrstitev sprednje cevi na vrh zadnje cevi.
natural_image
Close-up of hands holding a cylindrical mechanical component with a flange (no text or symbols visible)- Zavrtite navojno zaponko (2) sprednje cevi v smer urnih kazalcev (θ), da se tako privije.
natural_image
Close-up of hands holding a cylindrical object with a black handle, labeled '2' (no text or symbols on the object itself)- Izvlecite cev.
- Zavrtite navojno zaponko (1) sprednje cevi v smer urnih kazalcev (θ), da se tako privije sprednja cev.
natural_image
Close-up of a hand gripping a cylindrical object with directional arrows indicating motion (no text or symbols)Uporaba teleskopskih škarij za grmičevje
natural_image
Close-up of a mechanical component with a black arrow pointing to a circular opening (no text or symbols visible)- Primate rezalno glavo orodja in jo zavrtite v enega od 6 položajev.
natural_image
Mechanical device with angular displacement indicator (no text or symbols)- Sprostite tipko
natural_image
Close-up of a hand gripping a pipe with a lock mechanism indicated by arrows (no text or symbols)natural_image
Line drawing of a person wearing a short-sleeve shirt and belt, carrying a dark-colored bandage (no text or symbols)natural_image
Mechanical assembly diagram showing a tool being adjusted for a ring component, with no visible text or symbols.natural_image
Illustration of a person using a long-handled tool to spray over dense vegetation (no text or symbols)natural_image
Illustration of a person spraying a hose next to a pile of green foliage (no text or symbols)natural_image
Illustration of a person using a manual power shaver to clean vegetation (no text or symbols)natural_image
Line drawing of a person using a long-handled tool to clean or brush the ground (no text or symbols)text_image
Labeled diagram of a handheld device with numbered parts for identificationDijelovi
- Nož
- Štitnik noža pri transportu
- Podesni gumb (za nagib) rezne glave
- Čahura s navojem 1 (za podešavanje duljine osovine)
- Teleskopski štap
- Kopče za remen
- Remen za nošenje preko ramena
- Remen za ruke
- Blokada prekidača UKLJUČIVANJE/ISKLJUČIVANJE
- Prekidač za UKLJUČIVANJE/ISKLJUČIVANJE
- Drška
- Električni kabl s utikačem
- Gumb za otpuštanje kabla
- Čahura s navojem 2 (za podešavanje duljine osovine)
- Zaštita protiv protuudara
natural_image
Close-up of two connected electrical connectors labeled 1 and 2, showing wiring and components (no text or symbols beyond labels)natural_image
Close-up of hands holding a white PVC pipe fitting with a black handle, no visible text or symbolsnatural_image
Two hands operating a pipe fitting with labeled parts (1 and 2), no text or symbols present.natural_image
Two hands holding a cable with a labeled component '2' and directional arrows indicating movement (no text or symbols beyond labels)natural_image
Close-up of hands holding a cylindrical mechanical component with a flange (no text or symbols visible)natural_image
Close-up of hands holding a cylindrical object with a black handle, labeled '2' (no text or symbols on the object itself)natural_image
Close-up of a hand gripping a cylindrical object with directional arrows indicating motion (no text or symbols)Rukovanje teleskopskim škarama za živicu
natural_image
Close-up of a mechanical component with a black arrow pointing to a circular opening (no text or symbols visible)- Pridržite kućište motora rotirajuće glave i zavrtite rotirajuću glavu na bilo koji od 6 mogućih položaja.
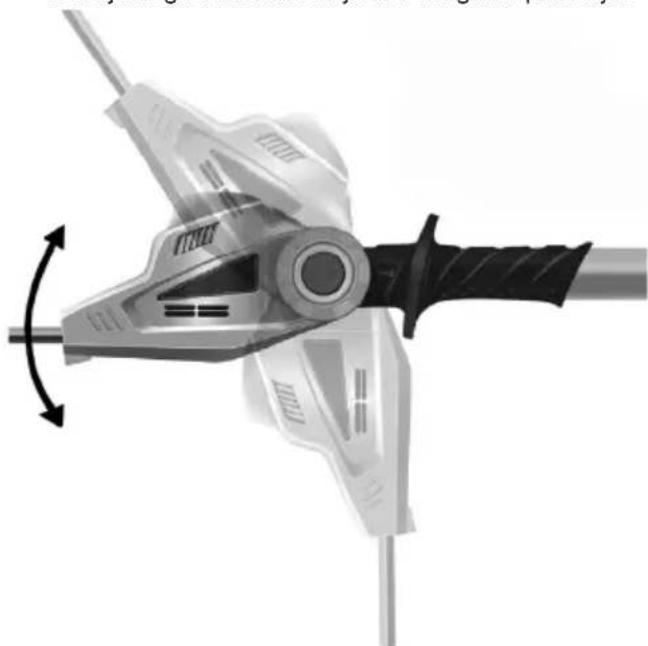
natural_image
Mechanical device with angular rotation indicator (no text or symbols)text_image
Diagram illustrating hand press technique with labeled components and directional arrowsnatural_image
Close-up of a white electric vehicle charging plug with labeled points A and B, showing wiring and cable (no text or symbols beyond labels)natural_image
Line drawing of a person wearing a short-sleeve shirt and belt, no text or symbols presentnatural_image
Mechanical assembly diagram showing a lever and clamp mechanism with no visible text or symbolsnatural_image
Illustration of a person using a long-handled tool to brush a leafy plant (no text or symbols present)Za šišanje nižih živica i grmlja držite škare za živicu kao što je prikazano na slikama.
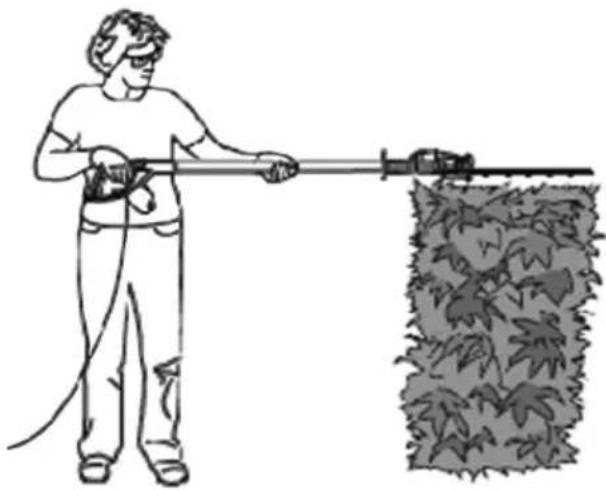
natural_image
Illustration of a person spraying water with a tool, next to a pile of green foliage (no text or symbols)natural_image
Illustration of a person using a long-handled tool to clean or brush a large piece of grass (no text or symbols)Za šišanje niskog raslinja držite škare za živicu kao što je prikazano na slikama.
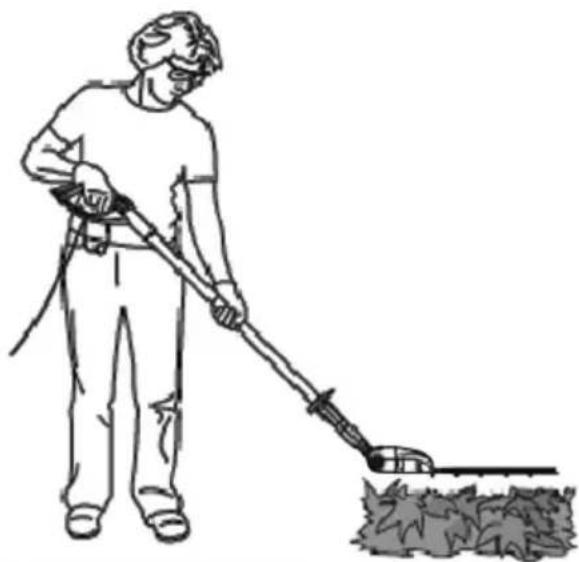
natural_image
Line drawing of a person using a power tool to clean or brush a plant (no text or symbols)Pravilno uporabljajte škare za živicu. Uvijek stavite zaštitu za oči, gumene rukavice i čvrstu obuću za uporabu
škara za živicu. Uvijek stojte čvrsto i održavajte dobru ravnotežu, nikad ne posežite rukama predaleko kad rukovodite škarama za živicu. Prije uključivanja škara za živicu držite uređaj objema rukama tamo gdje su ručke. Pazite da nož nije u kontaktu s bilokakvim predmetima.
Pri uporabi pazite da je produžni kabl uvijek iza škara za živicu. Ne stavljajte kabl preko živice, jer bi ga tako mogli odrezati. Za šišanje novo izraslog raslinja upotrijebite lagane, odmjerene zamahe. Ne pokušavajte odrezati previše odjednom. Time biste mogli usporiti rad ili bi se škare za živicu mogle zaglaviti, što smanjuje učinkovitost rezanja.
Ne preopterećujte škare za živicu kad režete kroz gusto raslinje. Laganim pokretima naprijed i natrag mogli biste olakšati rezanje većeg, gušćeg raslinja. Ako škare za živicu počnu raditi sporije, smanjite brzinu koju ste podesili za rezanje. Ako se škare za živicu zaglave, smjesta ih isključite. Izvadite utikač iz utičnice i odstranite odrezani materijal koji se nakupio na noževima.
text_image
Labeled diagram of a handheld device with numbered parts for identificationEgyes alkatrészek
natural_image
Close-up of two connected electrical connectors, labeled 1 and 2, with no visible text or symbols beyond labels.natural_image
Close-up of hands holding a white PVC pipe fitting with a small inset image, no visible text or symbolsnatural_image
Two hands operating a mechanical device with labeled parts (1 and 2), no text or symbols present.natural_image
Close-up of hands holding a cable with two arrows indicating direction (no text or symbols)natural_image
Close-up of hands holding a cylindrical mechanical component with a flanged top (no visible text or symbols)natural_image
Close-up of two hands holding a cylindrical object with a black handle, labeled '2' (no text or symbols on the object itself)text_image
Diagram illustrating hand press technique with labeled components and directional arrowsnatural_image
Close-up of a mechanical component with a black arrow pointing to a circular opening (no text or symbols visible)natural_image
Mechanical component with angular rotation indicator (no text or symbols)text_image
Diagram illustrating hand movement with labeled arrows and angles, showing a finger pressing a wristbell.natural_image
Line drawing of a person wearing a short-sleeve shirt and belt, carrying a black bandage (no text or symbols)natural_image
Mechanical assembly diagram showing a tool with pins and a magnified inset of a mechanical component (no text or symbols)Használati útmutató
natural_image
Illustration of a person using a long-handled tool to spray over dense vegetation (no text or symbols)natural_image
Illustration of a person using a power tool to clean vegetation, with no text or symbols present.natural_image
Illustration of a person using a manual power shaver to brush a leafy material (no text or symbols)natural_image
Line drawing of a person using a long-handled tool to clean or brush the ground (no text or symbols)text_image
Labeled diagram of a handheld device with numbered parts for identificationOsad
natural_image
Close-up of two connected electrical connectors, labeled 1 and 2, showing wiring and components (no text or symbols beyond labels)natural_image
Close-up of hands holding a pipe fitting with a white plastic sleeve, no visible text or symbolsnatural_image
Two hands holding a cable with a labeled connector (2), showing directional arrows indicating movement or force (no text or symbols present)natural_image
Close-up of hands operating a cylindrical mechanical device with a black handle (no visible text or symbols)natural_image
Close-up of two hands holding a cylindrical object with a black handle, labeled '2' (no text or symbols on the object itself)natural_image
Close-up of a hand gripping a cylindrical object with directional arrows indicating motion (no text or symbols)Teleskoop-hekilōikuri kasutamine
natural_image
Close-up of a mechanical component with a black arrow pointing to a circular opening (no text or symbols visible)natural_image
Mechanical component with angular displacement indicator (no text or symbols)- Vabastage ümmargune nupp.
natural_image
Close-up of a hand gripping a pipe with a lock mechanism indicated by arrows (no text or symbols)natural_image
Close-up of an electric vehicle charging plug with labeled points A and B, showing wiring and cable (no text or symbols beyond labels)natural_image
Line drawing of a person wearing a short-sleeve shirt and belt, carrying a dark-colored bandage (no text or symbols)- Kinnitage ölarihm teleskooptorul olevatesse kinnituskohtadesse.
natural_image
Mechanical assembly diagram showing a tool being inserted into a cable with arrows indicating force direction (no text or symbols present)natural_image
Illustration of a person spraying a leafy plant with a long tool (no text or symbols)natural_image
Illustration of a person spraying a hose to a hedgehog on a hill (no text or symbols)natural_image
Illustration of a person using a manual power shaver to clean or brush a large block of material (no text or symbols)natural_image
Line drawing of a person using a power tool to clean or brush the ground (no text or symbols)text_image
Labeled diagram of a handheld device with numbered parts for identificationЧасти
natural_image
Close-up of two connected electrical connectors, labeled 1 and 2, showing wiring and components (no text or symbols beyond labels)natural_image
Close-up of hands holding a white PVC pipe fitting with a black plastic tube, no visible text or symbolsnatural_image
Two hands operating a pipe fitting with labeled parts (1 and 2), no text or symbols present.natural_image
Close-up of hands holding a cable with a labeled connector (no text or symbols visible)natural_image
Close-up of hands holding a cylindrical mechanical component with a flanged top (no visible text or symbols)natural_image
Close-up of two hands holding a cylindrical object with a black handle, labeled '2' (no text or symbols on the object itself)natural_image
Close-up of a mechanical component with a black arrow pointing to a circular opening (no text or symbols visible)natural_image
Mechanical device with angular displacement indicator (no text or symbols)natural_image
Close-up of a hand gripping a cylindrical object with a lock icon and directional arrows indicating motion (no text or symbols)natural_image
Line drawing of a person wearing a short-sleeve shirt and belt, carrying a dark-colored bandage (no text or symbols)natural_image
Mechanical assembly diagram showing a lever and clamp mechanism with no visible text or symbolsnatural_image
Illustration of a person using a long-handled tool to brush a leafy plant (no text or symbols)natural_image
Illustration of a person spraying a hose with a leafy ground (no text or symbols)natural_image
Illustration of a person using a long-handled tool to brush a leafy plant (no text or symbols present)natural_image
Line drawing of a person using a power tool to clean or brush a plant (no text or symbols)Remonto paslaugos LT-14
Atsarginès dalys LT-14
GARANTIJA LT-14
!SPÈJIMAS: The blades continue to run after the trimmer has been switched off.
text_image
Labeled diagram of a hairpin tool with numbered parts for identificationDalys
natural_image
Close-up of two connected electrical cables, one with a black cable and labeled component 2 (no text or symbols on the cables themselves)natural_image
Close-up of hands holding a white PVC pipe fitting with a black handle, no visible text or symbolsnatural_image
Two hands operating a pipe fitting with labeled parts 1 and 2, showing mechanical assembly (no text or symbols beyond labels)natural_image
Close-up of hands holding a cable with a labeled component (no text or symbols visible)natural_image
Close-up of hands holding a cylindrical mechanical component with a flanged top (no visible text or symbols)natural_image
Close-up of two hands holding a cylindrical object with a black handle, labeled '2' (no text or symbols on the object itself)natural_image
Close-up of a hand gripping a cylindrical object with directional arrows indicating motion (no text or symbols)natural_image
Close-up of a mechanical component with a black arrow pointing to a circular opening (no text or symbols visible)natural_image
Mechanical component with angular displacement indicator (no text or symbols)natural_image
Close-up of a hand gripping a cylindrical object with directional arrows indicating motion (no text or symbols)natural_image
Line drawing of a person wearing a short-sleeve shirt and belt, with no text or symbols present.natural_image
Mechanical assembly diagram showing a lever and clamp mechanism with an inset close-up of a metal ring component (no text or symbols)Irangos naudojimo instrukcija
natural_image
Illustration of a person using a manual trellis to clean vegetation (no text or symbols)natural_image
Illustration of a person spraying a hose with a bag of green foliage (no text or symbols)natural_image
Illustration of a person using a long-handled tool to brush a large pile of grass (no text or symbols)natural_image
Line drawing of a person using a long-handled tool to clean or brush a leafy material (no text or symbols)text_image
Labeled diagram of a handheld device with numbered parts for identificationСоставные части
natural_image
Close-up of two connected electrical connectors labeled 1 and 2, showing wiring and components (no text or symbols beyond labels)natural_image
Close-up of hands holding a white PVC pipe fitting with a black handle, no visible text or symbolsnatural_image
Two hands operating a pipe fitting with labeled parts (1 and 2), no text or symbols present.natural_image
Close-up of hands holding a cable with two arrows indicating direction (no text or symbols)natural_image
Close-up of hands holding a cylindrical mechanical component (no visible text or symbols)natural_image
Close-up of hands holding a cylindrical object with a black handle, labeled '2' (no text or symbols on the object itself)natural_image
Close-up of a hand gripping a cylindrical object with directional arrows indicating motion (no text or symbols)natural_image
Close-up of a mechanical component with a black arrow pointing to a circular opening (no text or symbols visible)natural_image
Mechanical component with angular rotation indicator (no text or symbols)natural_image
Close-up of a hand gripping a wrist with a lock mechanism indicated by arrows (no text or symbols)natural_image
Line drawing of a person wearing a short-sleeve shirt and belt, with no text or symbols present.natural_image
Mechanical assembly diagram showing a clamp securing a metal ring with arrows indicating force application (no text or symbols)natural_image
Illustration of a person using a long-handled tool to brush a leafy plant (no text or symbols)natural_image
Illustration of a person spraying a hose next to a pile of green foliage (no text or symbols)natural_image
Illustration of a person using a manual power shaver to brush a large pile of hay or straw (no text or symbols)natural_image
Line drawing of a person using a manual power tool to clean or brush the ground (no text or symbols)DE Ikra Mogatec - Service
11 Othellos Street, Dali Industrial Zone
2540 Nicosia
Tel.: +357 22667908
+357 22667157
CZ Mountfield, a.s.
Všechromy 56 (D1 EXIT 15)
251 63 Strančice
+420 255 704 333
+420 255 704 220
DK Bahn-Larsen
Skov- Have- og Parkmaskiner
Vinkelvej 28
7840 Hoejslev
① +45 48 28 70 20
EE Hooldusbuss OÜ
Kabelikopli tee, 5
79221 Kohila vald, Raplamaa
📞 +372 56 678 672
ES Yaros Dau
C/ Puigpalter n° 48, Polígono Industrial UP4
17820 Banyoles (Girona)
+34 902 555 677
+34 972 57 36 00
GB-Northampton, NN3 8RH
UK/N.Ireland: 0344 824 3524
@ customerservice@b-gr8.co.uk
GR Panos Vrontanis & Co
3 Molas Street
13671 Aharnes
+30 210 2402020
+30 210 2463300
HR VAR - ERCO d.o.o.
Stipana Vilova 14A
10090 ZAGREB
+385 91 571 3164
+385 1 3454 906
HU Tooltechnic Kft.
Bárd u. 2.
1097 Budapest
+36 1 330 4465
+36 1 283 6550
IN Agritech Floritech Inc.
206-B Rajindera Arihant Tower
B-1 Community Centre Janak Puri
New Delhi - 110058 / India
+91 11 45662679
+91 11 25597432
IR BGR8 Ltd. c/o Seabourne Group
South Portway Close, Round Spinney
Northampton, NN3 8RH
+353 1890 8823 7
+44 113 385 1115
@ enquiries@gardenhomepower.com
IT kra Service Italia, by BRUMAR
Loc. Valgera 110/B
14100 ASTI (AT)
+39 0141 477309
+39 0141 440385
JO Taha & Qashou Agri Co. (LLC)
205 Mekka Street
Amman 11821, Jordan
+962 6 585 0251
+962 6 582 5728
LTUAB „Baltic Continent“
P. Lukšio g. 23
09132 Vilr
+370 8 700 555 95
@ remontas@bcsc.lt
LU Bobinage Georges Back
53, Rue Nic. Meyers
4918 Bascharage
+352 507622
+352 504889
MD OLSOM S.R.L.
Mateevici Str., 38/1
2009 Chisinau
+373 22 214075
+373 22 225009
MK FEROELEKTRO D.O.O.
Str.Nikola Parapunov br.35A/3
1000 Skopje
+389 2 3063190
+389 2 3063190
NL Muldertechniek
Noorderkijl 1
9571 AR 2 e Exloermond
+31 599 671570
+31 599 672650
Timetable: 09:00 to 12:30 and
14:00 to 18:30 (except Friday that is 18:00)
RO BRONTO COMPROD S.R.L.
Str. Corneliu Coposu nr. 35-37
400235 Cluj-Napoca
+40 264 435 337
+40 264 406 703
SE ikra Service
Verkstadsgatan 8
57341Tranås
+46 763 268982
@ ikrawinbladh@gmail.com
SI BIBIRO d.o.o.
Trzaska cesta 233
1000 Ljubljana
+386 1 256 4868
+386 1 256 4867
SK Mountfield, a.s.
Všechromy 56 (D1 EXIT 15)
251 63 Strančice
+420 255 704 333
+420 255 704 220