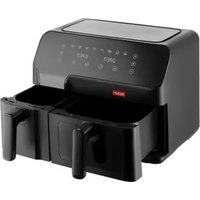
Melior L - Electric fryer BODUM - Free user manual and instructions
Find the device manual for free Melior L BODUM in PDF.


User questions about Melior L BODUM
0 question about this device. Answer the ones you know or ask your own.
Ask a new question about this device
Download the instructions for your Electric fryer in PDF format for free! Find your manual Melior L - BODUM and take your electronic device back in hand. On this page are published all the documents necessary for the use of your device. Melior L by BODUM.
USER MANUAL Melior L BODUM
natural_image
Line drawing of a rectangular device with two side ports and a lid (no text or symbols)Air Fryer L Instructions for use ENGLISH
| Heißluftfritteuse L | Gebrauchsanweisung | DEUTSCH |
| Friteuse à Air Chaud L | Mode d'emploi | FRANÇAIS |
| Airfryer L Brugsanvisning DANSK | ||
| Freidora de Aire L | Instrucciones de uso | ESPAÑOL |
| Friggitrice ad Aria L | Istruzioni per l'uso | ITALIANO |
| Air Fryer L | Gebruiksaanwijzing | NEDERLANDS |
| Varmluftsfritösen L | Bruksanvisning | SVENSKA |
| Air Fryer L | Manual de instruções | PORTUGUÊS |
| Airfryer L Käyttöohje SUOMI | ||
| Аэрогриль L | Руководство по эксплуатации | РУССКИЙ |
text_image
Technical diagram of a mechanical component with numbered parts for identification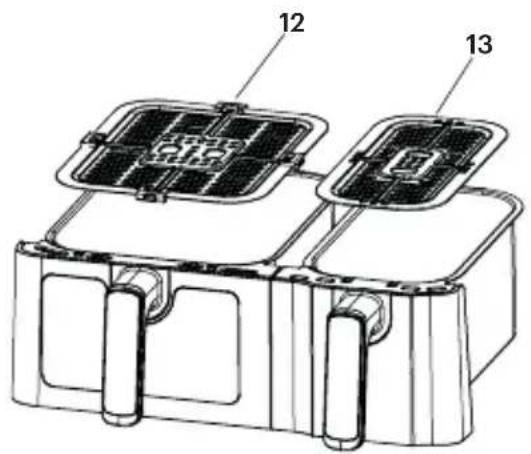
text_image
Technical diagram of a device with labeled components 12 and 13, showing internal grid structures.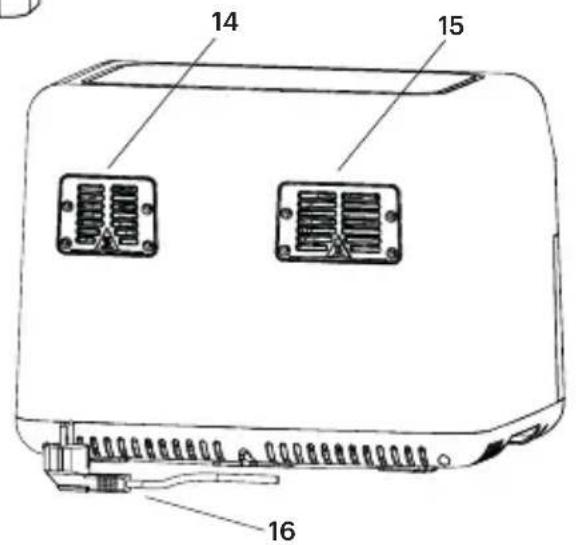
text_image
14 15 16Fig.1
EN AIR FRYER L
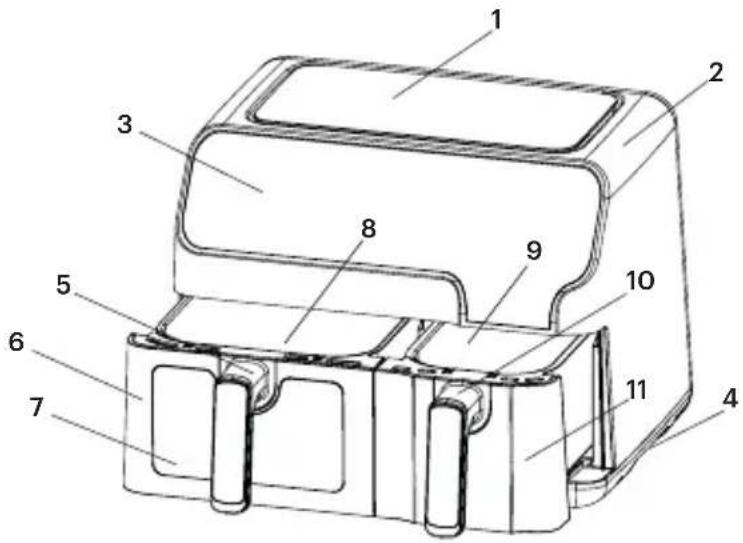
Description of appliance
1 Top Cover
2 Shell
3 Control panel
4 Base
5 Left drawer handle
6 Left drawer panel
7 Visual window
8 Left drawer
9 Right drawer
10 Right drawer handle
11 Right drawer panel
12 Right tray
13 Left tray
14 Right air outlet
15 Left air outlet
16 Main cord (Electrical cord)
text_image
Technical diagram of a mechanical component with numbered parts for identification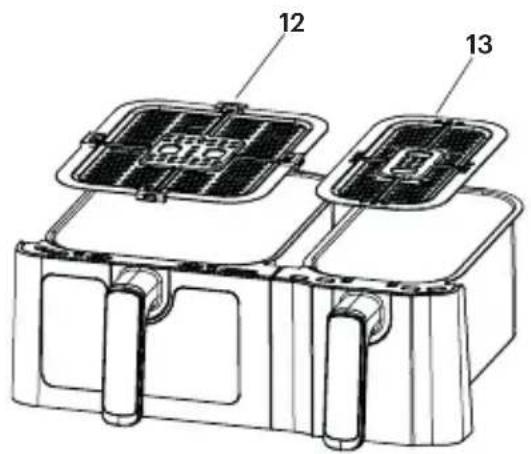
text_image
Technical diagram of a device with labeled components 12 and 13, showing internal grid structures.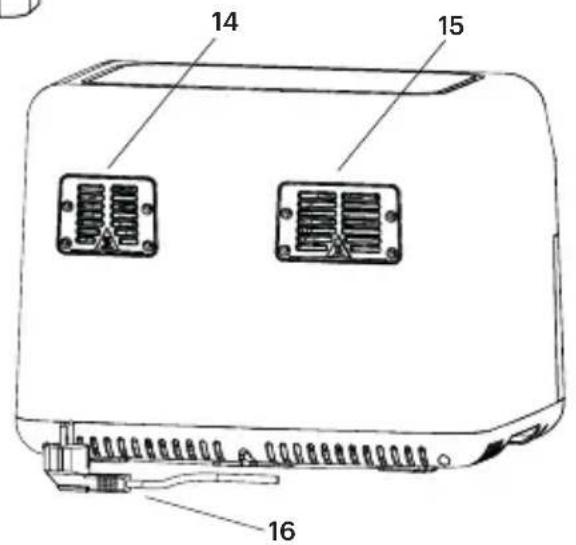
text_image
14 15 16Fig.1
natural_image
Technical line drawing of a mechanical component with two side slots and a top housing (no text or symbols)Please read these instructions carefully before using. ENGLISH
Congratulations! You are now the proud owner of a MELIOR Air Fryer L, an electric fryer by BODUM®. Please read these instructions carefully before using the appliance.
EN
IMPORTANT SAFEGUARDS
When using electrical appliances, basic safety precautions should always be followed, including the following:
Read all instructions carefully.
Do not touch hot surfaces.
To protect against electric shock, do not immerse the cord, plugs, or base in water or other liquid.
WARNING! This electrical appliance contains a heating function. Surfaces other than the functional surfaces can develop high temperatures. Since temperatures are differently perceived by different persons, this equipment shall be used with CAUTION. The equipment shall be touched only at intended handles and gripping surfaces, and use heat protection like gloves or similar. Surfaces other than intended gripping surfaces should be allowed sufficient time to cool down before being touched.
Unplug from the outlet when not in use and before cleaning. Allow to cool before putting on or taking off parts.
If the supply cord is damaged, it must be replaced by the manufacturer, its service agent, or similarly qualified persons to avoid a hazard.
Avoid using accessory attachments not recommended by the appliance manufacturer as they may cause injuries.
Do not use outdoors.
Do not let the cord hang over the edge of the table or counter or touch hot surfaces.
Do not place on or near a hot gas or electric burner, or in a heated oven.
Extreme caution must be used when moving an appliance containing hot oil or other hot liquids.
Always attach the plug cord in the wall outlet. To disconnect, turn any control to "off," then remove the plug from the wall outlet.
Do not use the appliance for other than intended use.
This appliance can be used by children aged from 8 years and above and persons with reduced physical, sensory or mental capabilities or lack of experience and knowledge if they have been given supervision or instruction concerning use of the appliance in a safe way and understand the hazards involved. Children shall not play with the appliance. Cleaning and user maintenance shall not be made by children unless they are older than 8 and supervised.
Keep the appliance and its cord out of reach of children less than 8 years.
The appliances are not intended to be operated by means of an external timer or separate remote-control system.
SAVE THESE INSTRUCTIONS.
IMPORTANT! Please read this manual carefully before you use the appliance and save it for future reference.
This appliance is not intended to be used in household and similar applications such as staff kitchen areas in shops, offices and other working environments; farm houses; by clients in hotels, motels and other residential type environments; bed and breakfast type environments.
Keep the appliance and its cord out of reach of children less than 8 years.
Never immerse the housing, which contains electrical components and the heating elements, in water nor rinse it under the tap.
Do not let any water or other liquid enter the appliance to prevent electric shock.
Always put the ingredients to be fried in the tray, to prevent it from coming into contact with the heating elements.
Do not cover the air inlet and the air outer openings while the appliance is operating.
Do not fill the drawer with oil as this may cause a fire hazard.
Never touch the inside of the appliance while it is operating.
The temperature of accessible surfaces may be high when the appliance is operating.
WARNING! Check if the voltage indicated on the appliance fits the local mains voltage.
Do not use the appliance if there is any damage to the plug, mains cord, or other parts.
Do not go to any unauthorized person to replace or fix the damaged main cord.
Keep the mains cord away from hot surfaces.
Do not plug in the appliance or operate the control panel with wet hands.
Do not place the appliance against a wall or against other appliances.
Leave at least 10 cm of free space on the back and sides and 10 cm of free space above the appliance.
Do not place anything on top of the appliance.
Do not use the appliance for any other purpose than described in this manual.
Do not let the appliance operate unattended.
During hot air frying, hot steam is released through the air outlet openings. Keep your hands and face at a safe distance from the steam and from the air outlet openings. Also be careful of hot steam and air when you remove the drawer from the appliance.
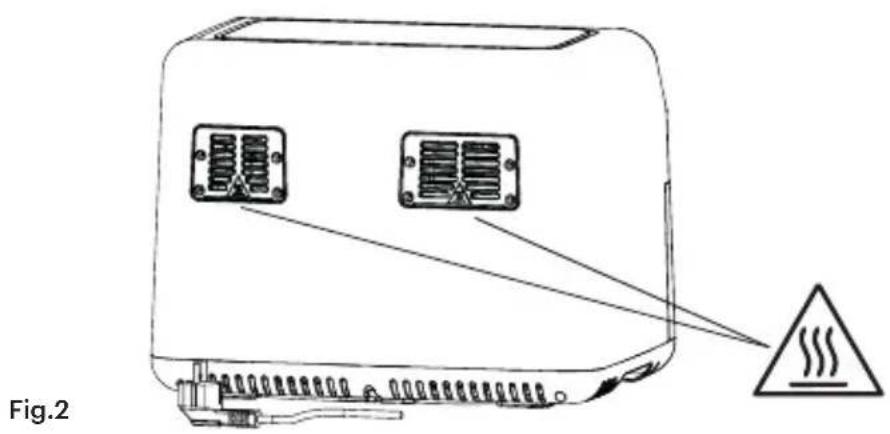
Any accessible surfaces may become hot during use (Fig. 2).
Immediately unplug the appliance if you see dark smoke coming out of the appliance. Wait for the smoke emission to stop before you remove the drawer from the appliance.
CAUTION! Ensure the appliance is placed on a horizontal, even, and stable surface.
This appliance is designed for household use only. It may not be suitable to be safely used in environments such as staff kitchens, farms, motels, and other non-residential environments. Nor is it intended to be used by clients in hotels, motels, bed and breakfasts, and other residential environments.
If the appliance is used improperly or for professional or semi-professional purposes or it is not used according to the instructions in the user manual, the guarantee becomes invalid and we could refuse any liability for damage caused.
The appliance needs approximately 30 minutes to cool down for safe handling or cleaning. Always unplug the appliance while not in use.
natural_image
Diagram of a device with two heat exchangers and a warning symbol (no text or labels)Retain these user instructions for future reference.
FOR INDOOR HOUSEHOLD USE ONLY
INTRODUCTION
This new air fryer provides an easy and healthy way of preparing your favourite ingredients. By using hot rapid air circulation and a top grill, it is able to make numerous dishes. The best part is that the Hot-air fryer heats food from all directions.
BEFORE FIRST USE
- Remove all packaging materials.
- Remove any stickers or labels from the appliance.
- Thoroughly clean the trays and drawers with hot water, washing-up liquid and a non-abrasive sponge.
- Wipe the inside and outside of the appliance with a moist cloth.
CAUTION! This is an oil-free fryer that works using hot air. Do not fill the drawer with oil or frying fat directly.
NOTE: When your air fryer is heated for the first time, it may emit some smoke or odour. This is normal with many heated appliances. This does not affect the safety of your appliance.
PREPARING FOR USE
- Place the appliance on a stable, horizontal and even surface.
CAUTION! Do not place the appliance on a non-heat-resistant surface.
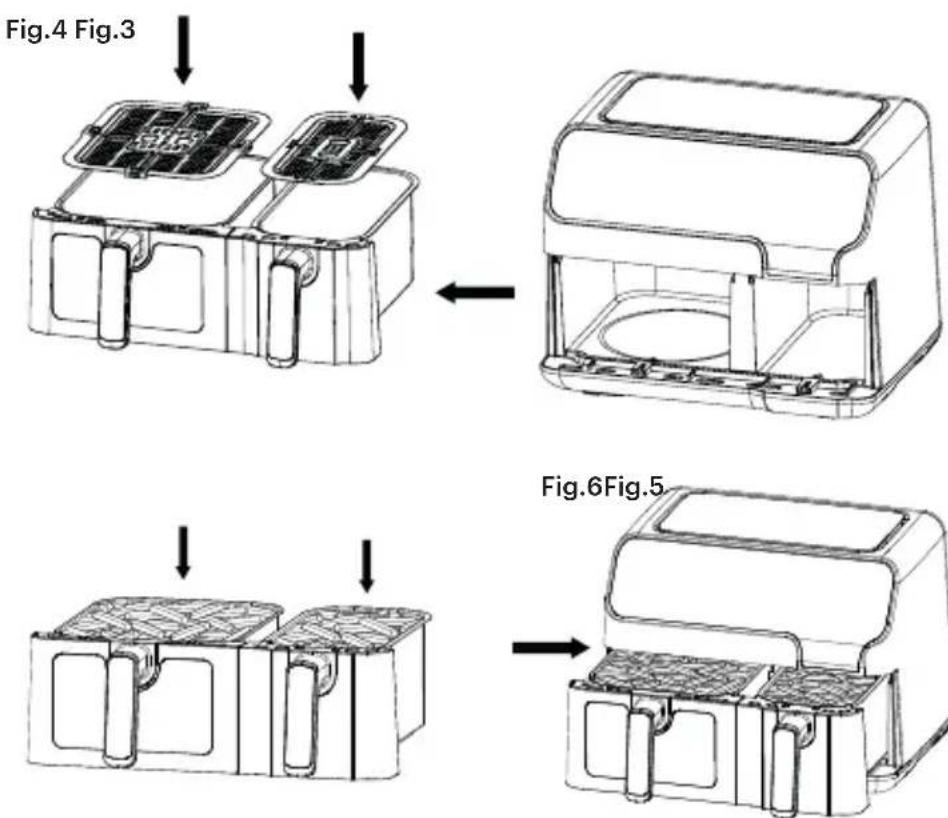
- Place the trays in the drawers (Fig. 4).
NOTE: The tray is properly secured only once it snaps into place.
WARNING! Do not fill the drawer with oil or any other liquid.
WARNING! Do not put anything on top of the appliance, the airflow will be disrupted, which and affects the hot air frying result.
USING THE APPLIANCE
The oil-free appliance can prepare a wide range of ingredients.
- Connect the mains plug to an earthed wall socket.
- Carefully pull the drawer out of the air fryer (Fig.3)
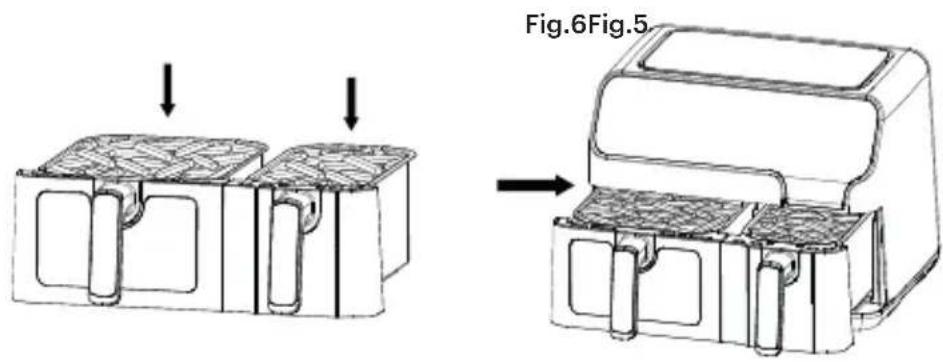
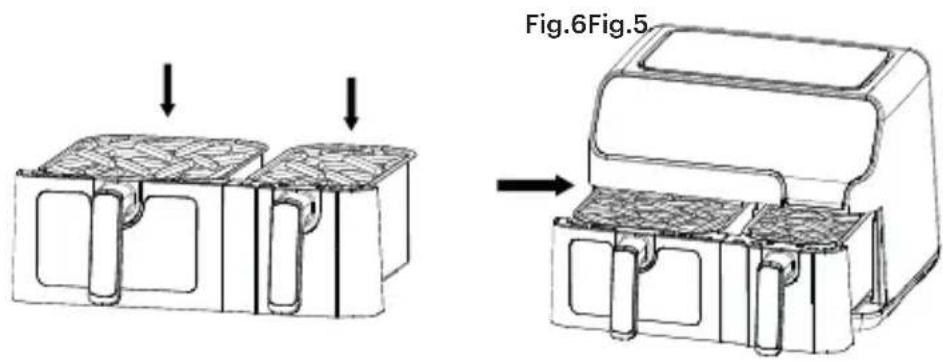
- Put the ingredients into the tray (Fig. 5).
- Slide the drawer back into the air fryer (Fig 6)
NOTE: Carefully align the drawers with the guides in the body of the fryer.
CAUTION! Never use the outer drawer without the inner tray inside.
CAUTION! Do not touch the outer drawer during and after use, as it gets very hot. Only touch the handle.
- Determine the required preparation time for the ingredient (see section 'Settings' in this chapter).
- Some ingredients require a shake halfway through the preparation time (see section "Settings" in this chapter).
To shake the ingredients, pull the drawer out of the appliance by the handle and shake well. Then slide the drawer back into the air fryer.
TIP: If you set the timer to half the preparation time, the timer buzzer will "beep" when you have to shake the ingredients. However, this means that you have to reset the timer for the remaining preparation time.
- When you hear the timer buzzer, pull the drawer out of the appliance.
NOTE: Holding down the power button for 2 seconds switches off the appliance manually.
EN
TIP: You can adjust temperature or time as preferred. Your settings are retained for about 60 mins after the removal of the drawer.
- Check if the ingredients are ready.
If the ingredients are not ready yet, simply slide the drawer back into the appliance and reset the timer to a few extra minutes.
- To remove ingredients (e.g. chips), pull the drawer out of the air fryer and place it on heat resistance framework.
CAUTION! Do not turn the tray upside down, as any excess oil that has collected on the bottom of the drawer will drip onto the ingredients.
CAUTION! The drawer and the ingredients are hot. Depending on the type of the ingredients in the air fryer, steam may escape from the drawer.
-
Use tongs or other kitchen utensil to transfer food to a plate.
-
When one batch of ingredients is ready, the air fryer can be used immediately for the next batch.
text_image
Fig.4 Fig.3 Fig.6Fig.5Instructions for Use
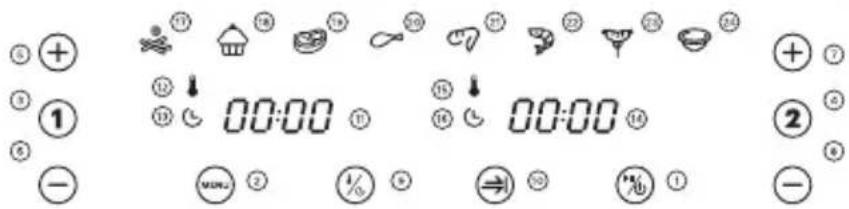
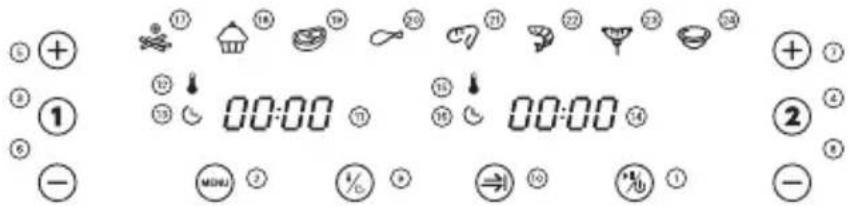
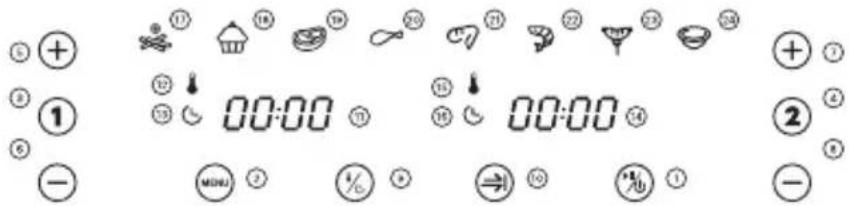
CONTROL PANEL INSTRUCTIONS
text_image
Cropped image showing a calendar with icons for food, meals, drinks, and time, some marked with numbers and symbols.OPERATION INSTRUCTIONS
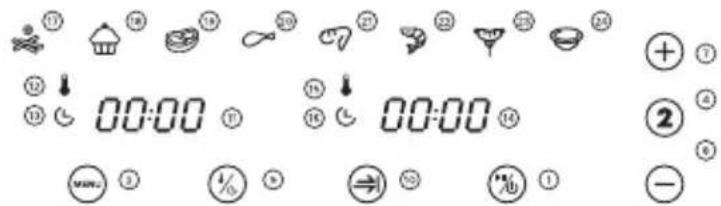
1. Power Button
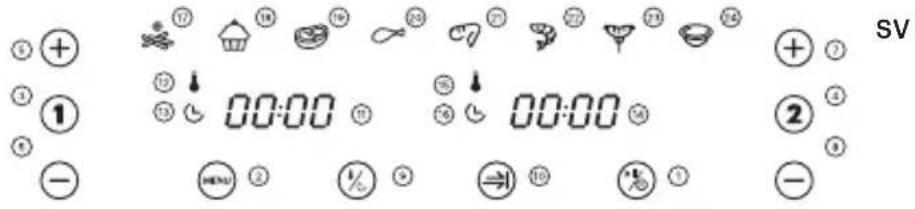
Once the tray and drawer are properly positioned, the Power button will be illuminated. Tap the power button to put the machine into standby mode After selecting the drawer type, tap the Power button a second time to start the cooking process. Hold the power button for 2 seconds to shut down the entire device during cooking,
NOTE: During cooking, you can touch any button to control the pause and restart of cooking.
2. Preset Button
Selecting the Preset button ☉ enables you to scroll through the 8 popular food choices 17-24. Once selected, the preset time and cooking temperature function are activated.
3. The Left drawer Button
Tapping this button ① illuminates various functions. The indicator flashes on the first default menu item (chips). For chips, the programme display shows the temperature in the upper left and the time in the lower left. The light will always be on for the time. If you hold down the button for 2 seconds, you cancel the selection and switch to standby mode.
4. The Right Drawer Button
Tapping this button ② illuminates various functions. The indicator flashes on the first default menu item (chips) For chips, the programme display shows the temperature in the upper left and the time in the lower left. The light will always be on for the time. If you hold down the button for 2 seconds, you cancel the selection and switch to standby mode.
5 & 6. Temperature and Timer Control Buttons
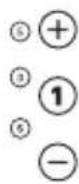
Button 5 ⊕ and Button 6 ⊖ symbols enable you to increase or decrease cooking temperature 5°C at a time for the left drawer. Keeping the button held down will rapidly change the temperature. Temperature Control range: 80°C—200°C. Similarly, for the Timer button, holding it down will rapidly change the time. Time Control range: 1 min-60min.
7 & 8. Temperature and Timer Control Button
Button 7 ⊕ and Button 8 ⊖ symbols enable you to increase or decrease cooking temperature 5°C at a time for the left drawer. Keeping the button held down will rapidly change the temperature. Temperature Control range: 80°C–200°C. Similarly, for the Timer button, holding it down will rapidly change the time. Time Control range: 1 min-60min.
9. Temperature /Time Button Icons
To adjust the temperature and time you need, just tap the ⏻ button and scroll through to select the required amounts
10. Synchronization Button
Use this button ➕ to set the times for two different recipes simultaneously.
Indicator light "11" Left drawer display
Indicator light "12" Left drawer temperature
Indicator light "13" Left drawer timer.
Indicator light "14" Right drawer display
Indicator light "15" Right drawer temperature
Indicator light "16" Right drawer timer
Indicator light "17-24" Recipe indicator
DETAILED
OPERATING
INSTRUCTIONS
1. Boot Mode
Before powering up, check that the drawers is correctly fitted and the machine plugged in. The machine will "beep" once when turned on and the lights will flash for one second only. The "Power Button" will stay illuminated.
2. Standby Mode
Tapping the "Power Button" illuminates the drawer selection icons which stay illuminated in standby mode. The machine automatically returns to Boot mode after 5 mins when no selection is made.
3. The Left/Right Drawer Buttons
3.1. When you touch the drawer (1) and (2) buttons, the function and menu indicators will light up and remain on. The indicator for the default menu (fries) will flash, while the other indicators will stay on. Meanwhile, the temperature and time indicators will flash. To cancel the selection for the left drawer, press and hold the corresponding button for 2 seconds. Similarly, press and hold the other button the right drawer. If both drawers are canceled by pressing the buttons, the product will enter Standby mode.
3.2. To select a recipe, touch the "Preset Button". Adjust the temperature and time based on the specific food requirements. Pressing
the temperature adjustment button will change the temperature by 5°C with each press. For continuous adjustment, long press the "+" or "-" key. The temperature can be adjusted within the range of 80°C to 200°C for each menu. To adjust the time, pressing the time adjustment button will change the time by 1 minute with each press. The time can be adjusted within the range of 1 minute to 60 minutes.
3.3. Once the recipe, temperature, and time have been set, touch the "Power Button" Icon to start the cooking process. Drawer(1) or (2) will begin working, and the display will show the current cooking time in a countdown format. The flashing will stop. The indicator for the selected recipe will remain steady, while the indicators for other recipes will turn off.
3.4. If you need to adjust the temperature or time during the cooking process, press the Temp or Time buttons once, and then use the "+" or "-" buttons to make the desired adjustments. The machine will continue working during the adjustment process.
3.5. If you need to reset the recipe during the cooking process, lightly press the "Preset Button" once to pause it. The heater and motor will stop working, and both the indicator for the recipe and the display screen will flash. Adjust the recipe as required during this time, and you can also adjust the temperature and time if needed.
3.6. Press the "Power Button" during cooking, and the device will stop. If inactive, the machine will automatically return to standby mode after 5 minutes.
3.7. If you need to turn off the machine during cooking, press the "Power Button" for 2 seconds. The buzzer "beeps" and the display shows "OFF" to confirm this.
3.8. After the cooking process is complete, the display screen will show the word "OFF," and the buzzer will emit a series of 5 prompt sounds, "beep." The display screen will turn off, and the machine will return to the standby mode.
3.9. During the cooking cycle, if you remove the drawers, the display screen will show the word "OPEN", and the machine stops working. To reset the machine, re-insert the drawers.
- Dual drawer working mode
4.1 Operating the 2 drawers
4.1.1. Firstly, select one drawer. Select the recipe, temperature and time according to needs. Secondly, select the other drawer, the recipe, temperature and time just like the first drawer.
4.1.2. By pressing the "Power Button", both drawers (1)/(2) will start working simultaneously. The button and indicator light for drawer (1) recipe will flash once every 6 seconds, while the button and
indicator light for drawer (2) recipe will also flash once every 6 seconds. The display will alternate between drawer (1) and drawer (2), with approximately a 3-second interval.
4.1.3. Alternatively, you can start drawer (1) first by pressing the "Power Button" after setting the parameters for drawer (1). Then, press the button to set the parameters for drawer (2). Once drawer (2) is ready, press the "Power Button" again to start drawer (2).
4.1.4. In the dual drawer operating mode, the time is the default display. Press the Temp and Time buttons once for each drawer to make the corresponding selections for the desired recipe. The machine will switch back to the time display after 3 seconds of inactivity.
4.2 Debug during the double drawers working process
4.2.1. While both drawers are cooking simultaneously, if you need to adjust the temperature or time for drawer (1), press the corresponding button and make the necessary adjustments. Please note that you cannot adjust the recipe in this state. If there is no further operation within 10 seconds after making adjustments, the display screen will automatically return to the normal mode.
4.2.2. If you need to amend the temp or time settings for drawer (2), refer to "4.2.1.".
4.2.3. During the cooking process, recipe and temp/time can be adjusted by choosing the desired drawer and pressing the "Power Button". Cancel the pause mode by press "Power Button" again.
4.2.4. When the machine enters the pause mode, and there is no activity for 5 minutes, cooking is suspended and the machine enters standby mode.
4.3 Shutdown both Drawers
4.3.1. Hold down the "Power Button" for 2 seconds, and the selected drawer will stop working and return to standby mode.
4.4. Pull out the Drawer
4.4.1. During cooking, if one drawer is pulled out, the display will show "OPEN". It will resume working when the tray is put back. One drawer can be removed and reloaded without affecting the other drawer.
4.4.2. When the drawer is pulled out and the machine is in standby mode, the display will show "OPEN" and cooking is suspended.
4.5 Pausing Both Drawers
4.5.1. For dual drawer cooking, press "Power Button" once, and both drawers will enter pause mode simultaneously. Press the "Power Button" again to resume cooking.
4.5.2. When 2 drawers are paused at the same time for 5 minutes, both drawers will stop working and return to standby mode.
4.5.3. While both drawers are cooking, lightly press the "Power Button" once to activate the pause mode for both drawers simultaneously. If you need to make adjustments, first press the buttons to select the desired drawer, and then adjust the recipe, temperature, and time according to your requirements. After completing the adjustments, press the "Power Button" once again to resume the cooking process for both drawers simultaneously.
4.5.4. During 2 drawer cooking, gently press "Power Button" once, both drawers will enter the pause mode at the same time. Hold the "Power Button" again for 2 seconds, both will stop working at the same time, the left and right screens will display "OFF", and the product will return to the standby mode after a prompt sound of "beep".
4.6 Stop both drawers
4.6.1. During double drawer cooking, hold down the "Power Button" for 2 seconds, both will stop working at the same time, and the left and right screens will display "OFF". The machine will enter the standby mode after the "beep" sounds.
4.6.2. If there is no operation during the simultaneous cooking of two drawers, once the display time expires, both the heating and motor functions will stop. The display screen will show "OFF". After the buzzer emits 5 prompt sounds "beep", the display screen will turn off, and the machine will return to the standby mode.
4.6.3. If you want to turn off one of the two drawers while cooking, press the desired drawer button first, and then press and hold the "Power Button" for 2 seconds. The selected drawer will stop working, and its corresponding display screen will show "OFF". After a prompt sound of "beep", the machine will return to the standby mode. At this point, the machine will switch to the single drawer working mode.
4.7 Simultaneous function
4.7.1. This function is be activated only when two recipes with different times are selected in 2 drawers mode.
4.7.2. After selecting the menu, press the "Synchronization Button" first, which will remain on. Press the "Power Button" again to start the machine. In this state, the drawer with the longer cooking time will start working, while the display of the drawer with the shorter cooking time will show "HOLD". Once the additional time has elapsed, the drawer with the shorter cooking time will begin working. The "Synchronization Button" will remain continuously on throughout this process.
4.7.3. During operation, if the displayed time on one drawer in the "HOLD" state is set to be longer than the other drawer, the synchronization mode will be exited, and the indicator for the "Synchronization Button" will turn off.
4.7.4. While the machine is working, if one drawer is removed, the timer for that drawer will be paused, and the timer for the other drawer will also be paused. The display screen will show "HOLD". If the removed drawer is reinserted, the synchronization will continue.
4.7.5. During the synchronous operation, if one drawer is paused while the other drawer continues working, the synchronization function will be exited, and the indicator for the "Synchronization Button" will turn off.
Remarks
- Boot mode: When in this mode, only the "Power Button" Icon is illuminated;
- Standby mode: the "Power Button" and drawer (1) / drawer (2) buttons are illuminated;
- Debug the unit when the unit is not working: the corresponding function button is always on, the selected recipe indicator is flashing, the rest of the menu indicator is always on, the corresponding display is flashing alternately to show the temperature/time of the selected recipe. When adjusting the menu, the selected recipe is flashing, when debugging the temperature, press the temperature button, the display is flashing to show the current temperature, press the time key to adjust the time, the display switches the current time and flashes to show. When the 2 pot is in the selected state at the same time, the side that is not selected, the corresponding menu does not flash, the corresponding display alternately shows the temperature and time without flashing, in this this process heaters and motors are not work;
- Debugging mode during the cooking process: the recipe indicator does not flash. The screen flashes to display the temp and time. You can adjust the temp and time, but the recipe cannot be adjusted;
- Single pot pause mode: the corresponding function key is on, and the menu indicator blinks when selected. The other menu indicators are on, and the corresponding display screen blinks, indicating temperature/time. The corresponding or key blinks, and the menu, temperature and time can be adjusted;
- 2 pot pause mode: the corresponding function key is on, the selected menu indicator blinks, the other menu indicator is on, the display screen blinks, showing the corresponding temperature/time;
- Working mode: the corresponding function button is on, the selected menu indicator is on, other menu indicators are off, and the corresponding time is displayed;
- When both drawers are working simultaneously, the button indicator and the corresponding menu indicator of the drawer (1) will
blink simultaneously every 6 seconds, with an extinguishing time of less than 0.5 seconds. After 3 seconds, the button indicator and the corresponding menu indicator of the drawer (2) will also blink simultaneously every 6 seconds, with an extinguishing time of less than 0.5 seconds. The blinking will alternate between the left and right sides, with a 3-second interval between them;
-
The machine has a memory function. After a cooking cycle is completed, the machine will not power off, and when the same drawer is selected for the next use, it will directly display the previously used menu. The memory function will be deactivated if the machine is powered off for 1 hour. After more than 1 hour, the machine will display its initial state when powered on again;
-
The machine has a power-off memory feature. If the machine is in use and accidentally loses power, as long as it is re-energized within 30 minutes, the machine will return to the working state it was in before the power interruption.
SETTINGS
The next table will help you to select the basic settings for the ingredients.
NOTE: Keep in mind that these settings are suggestions. As ingredients differ in origin, size, shape as well as brand, we cannot guarantee the best settings for your ingredients.
Because the Rapid Air technology instantly reheats the air inside the appliance, pulling the drawer out of the appliance during the frying process hardly disturbs the process.
TIPS:
- Small-sized ingredients usually require a shorter preparation time than large-sized ingredients.
- A larger quantity of ingredients only requires a slightly longer preparation time, a smaller quantity of ingredients only requires a slightly shorter preparation time.
- Shaking smaller ingredients halfway through the preparation time optimises the result and can help prevent unevenly fried ingredients.
- Add some oil to fresh potatoes for a crispy result. Fry your ingredients in the air fryer a few minutes after you have added the oil.
- Do not fry extremely greasy ingredients, such as sausages, in the Air Fryer.
- Snacks that can be prepared in an oven can also be prepared in the Air Fryer.
-
The optimal amount for preparing crispy fries is 500 grams.
-
Use ready-made dough to prepare filled snacks quickly and easily. Ready-made dough also requires a shorter preparation time than home-made dough.
- Place a baking tin or oven dish in the Air Fryer tray if you want to bake a cake or quiche or if you want to fry fragile ingredients or filled ingredients.
- You can also use the Air Fryer to reheat ingredients. To reheat ingredients, set the temperature to 150°C (300°F) for up to 10 minutes.
EN
| Menu | Reference weight | Default temperature | Default drawer time | Temperature range | Time Frame | Shake | |
| Frozen French Fries | Big 50 g | 200°C 20 min | 80-200°C | C | 1-60 min | 1-2 | |
| Small 300 g | |||||||
| Cake | Big 300 g | 150°C 25 min | 80-200°C | C | 1-60 min | ||
| Small 150 g | |||||||
| Steak | Big 175 g | 200°C 15 min | 80-200°C | C | 1-60 min | 1-2 | |
| Small 85 g | |||||||
| Drum-sticks | Big 800 g | 200°C 30 min | 80-200°C | C | 1-60 min | 1-2 | |
| Small 300 g | |||||||
| Chicken Wings | Big 500 g | 180°C 22 min | 80-200°C | C | 1-60 min | 1-2 | |
| Small 300 g | |||||||
| Shrimp | Big 350 g | 190°C 10 min | 80-200°C | C | 1-60 min | 1-2 | |
| Small 175 g | |||||||
| Roast Sausage | Big 240 g | 160°C 10 min | 80-200°C | C | 1-60 min | 1-2 | |
| Small 130 g | |||||||
| Egg Tart | Big 290 g | 170°C 20 min | 80-200°C | C | 1-60 min | ||
| Small 150 g | |||||||
Instructions for Use
NOTE: Add 3 minutes to the preparation time if you start frying when the Air Fryer is still cold.
NOTE: You can adjust the temperature or time according to the actual cooking effect when using two cooking drawers at the same time.
| CLEANING | Clean the appliance after every use.Do not use metal kitchen utensils or abrasive cleaning materials, as this may damage the non-stick coating.1. Remove the mains plug from the wall socket and let the appliance cool down.TIP: Remove the drawer to let the air fryer cool down faster.2. Wipe the outside of the appliance with a moist cloth.3. Clean the drawer and tray with hot water, washing-up liquid and a non-abrasive sponge.NOTE: You can use degreasing liquid to remove any remaining dirt.TIP: If dirt is stuck to the trays or the bottom of the drawer, fill the drawer with hot water mixed with washing-up liquid. Put the trays in the drawer and let the drawer and the trays soak for about 10 minutes.4. Clean the inside of the appliance with hot water and a non-abrasive sponge.5. Clean the heating element with a cleaning brush to remove any food residues. |
| STORAGE | 1. Unplug the appliance and let it cool down.2. Make sure all parts are clean and dry. |
| ENVIRONMENT | Do not dispose of the appliance in normal household waste, but hand it in at an official collection point for recycling. Doing this will help to protect the environment. |
TROUBLESHOOTING
| PROBLEM POSSIBLE CAUSE SOLUTION | ||
| The Hot-air fryer does not work | The appliance is not plugged in | Put the mains plug in an earthed wall socket. |
| You have not set the timer. | Set the timer key to the required preparation time to switch on the appliance. | |
| The ingredients fried with the airfryer are not done | The quantity ofingredients in the trayis too big | Put smaller batches of ingredientsin the tray. Smaller batches are friedmore evenly. |
| The temperaturesetting is too low | Set the temperature key to therequired temperature setting (seesection ‘settings’ in chapter ‘Usingthe appliance’). | |
| The preparation timeis too short | Set the timer to the requiredpreparation time (see section ‘Settings’in chapter’ Using the appliance’). | |
| The ingredients arefried unevenly in theair fryer | Certain types ofingredients needto be shakenhalfway through thepreparation time | Layers of Ingredients (e.g. chips)need to be shaken halfway throughthe preparation time. See section‘Settings’. |
| Fried snacks are notcrispy when theycome out of theair fryer | You used a type offood better preparedin a traditionaldeep fryer | Use oven snacks or lightly brushsome oil onto the snacks fora crispier result. |
| I cannot slidethe pan into theappliance properly | There are too manyingredients in the tray. | Do not fill the tray abovethe MAX indication. |
| The tray is notplaced in the drawercorrectly. | Push the tray down into the draweruntil you hear a click. | |
| White smoke comesout of the appliance | You are preparinggreasy ingredients | When you fry greasy ingredients in theair fryer, a large amount of oil will dripinto the drawer. The oil produces whitesmoke causing the drawer to heat upmore than usual. This does not affectthe appliance or the end result. |
| The pan still containsgrease residues fromprevious use | White smoke is caused by greaseheating up in the pan. Make sureyou clean the pan properly aftereach use. | |
EN
Instructions for Use
| PROBLEM POSSIBLE CAUSE SOLUTION | ||
| My chips are fried unevenly in the Air Fryer | You did not use the right potato type | Use fresh potatoes and make sure they stay firm during frying. |
| You did not rinse the potato sticks properly before you fried them | Rinse the potato sticks properly to remove starch from the outside of the sticks. | |
| My chips are not crispy when they come out of the Air Fryer | The crispiness of the chipsfries depends on the amount of oil and water in themthe fries | Make sure you dry the potato sticks properly before you add the oil |
| Cut the potato sticks smaller for a crispier result. | ||
| Add slightly more oil for a crispier result. | ||
TECHNICAL SPECIFICATIONS
TECHNICAL DATA
Voltage 220-240V\~50HZ-60Hz
Wattage 2700 Watts
Capacity of drawer 5.1 L +3.2 L
Ajustable temperature 80°C - 200°C
Timer (0-60 min)
MANUFACTURER GUARANTEE FOR THE USA & CAN, THE EU AND CH.
Guarantee: BODUM® AG, Switzerland, guarantees the MELIOR Air Fryer for a period of two years from the date of original purchase against faulty materials and malfunctions that can be traced back to defects in design or manufacturing. Repairs are carried out free of charge if all guarantee conditions are met. Refunds are not available.
Guarantor: BODUM® (Schweiz) AG, Altgasse 82, 6340 Baar, Switzerland
Guarantee conditions: The guarantee certificate must be completed by the seller at the time of purchase. You must present the guarantee certificate to obtain guarantee services. Should your BODUM® product require guarantee service, please contact your BODUM® retailer, a BODUM® store, your country's BODUM® distributor, or visit www.bodum.com.
BODUM® will not provide warranty for damage resulting from inappropriate use, improper handling, normal wear and tear, inadequate or incorrect maintenance or care, incorrect operation or use of the appliance by unauthorized persons.
This Manufacturer Guarantee does not affect your statutory rights under applicable national laws in force, nor your right against the dealer arising from their sales/purchase contract.
ENVIRONMENTALLY ACCEPTABLE DISPOSAL
This marking indicates that this product should not be disposed with other household wastes throughout the EU. To prevent possible harm to the environment or human health from uncontrolled waste disposal, recycle it responsibly to promote the sustainable reuse of material resources. To return your used device, please use the return and collection systems or contact the retailer where the product was purchased. They can take this product for environmentally safe recycling.
DEUTSCH
natural_image
Diagram of a device with two rectangular components and a warning symbol (no text or labels)text_image
Fig.4 Fig.3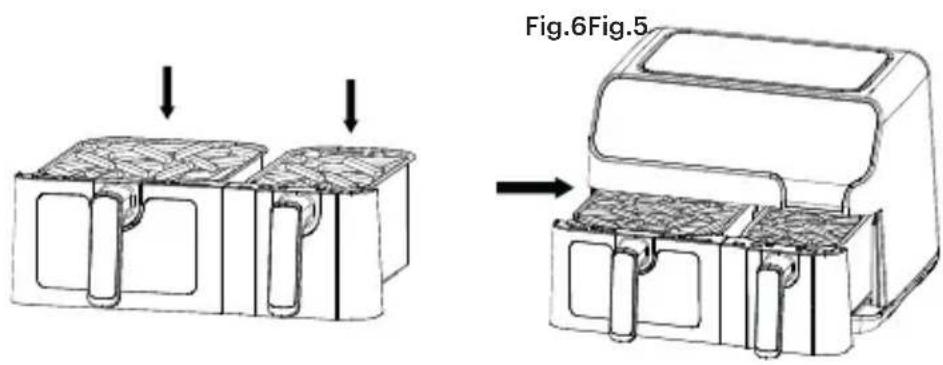
text_image
Fig.6Fig.5DE
Gebrauchsanweisung
text_image
Cropped image showing a calendar with icons for meal, lunch, dinner, and food, some marked with numbers and symbols.natural_image
Diagram of a device with two heat exchangers and a warning triangle (no text or symbols)Fig.2
text_image
Fig.4 Fig.3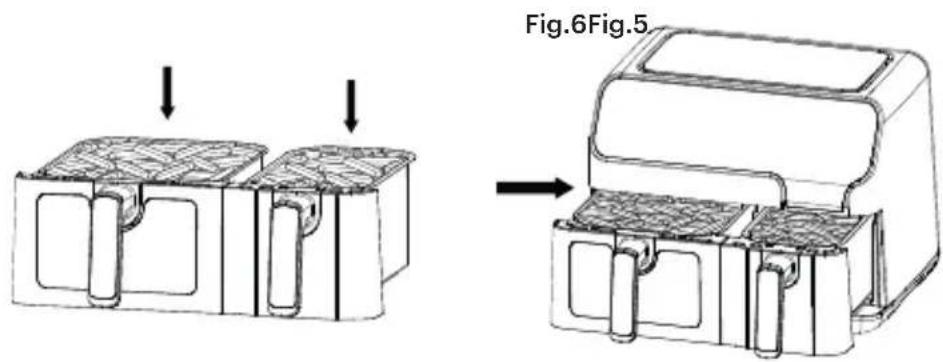
text_image
Fig.6Fig.5INSTRUCTIONS POUR LE PANNEAU DE CONTRÔLE
text_image
Collection of food and meal icons with numerical values and symbols, including time, percentage, and directional indicators.INSTRUCTIONS D'OPÉRATION
MISE AU REBUT CORRECT DE CE PRODUIT
natural_image
Line drawing of a device with two labeled buttons and a warning symbol (no text or labels present)text_image
Fig.4 Fig.3 Fig.6Fig.5
text_image
INSTRUKTIONER TIL BETJENINGS- PANELET ③ + ③ ① ⑥ - ⑦ ⑩ 00:00 ⑪ ⑫ 00:00 ⑬ ⑭ ⑮ ⑯ ⑰ DA MENU ② % ③ ⇒ ④ ⑤ ⑥ -BETJENINGSVEJ-LEDNING
- Tænd/Sluk-knap
Airfryer
FEJLFINDING
natural_image
Line drawing of a device with two vented outlets and a warning triangle symbol (no text or labels)text_image
Fig.4 Fig.3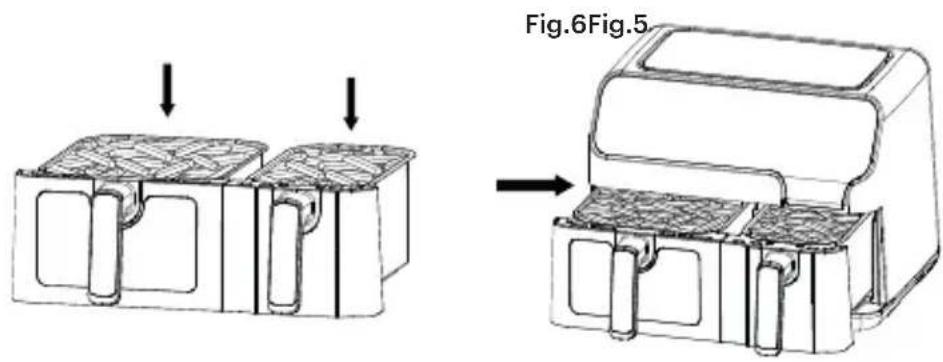
text_image
Fig.6Fig.5INSTRUCCIONES DEL PANEL DE CONTROL.
text_image
Cropped image showing a calendar with icons for meal, lunch, dinner, and food, some displaying time and percentage values.natural_image
Diagram of an electronic device with two labeled components and a warning symbol (no text or labels present)IT
text_image
Fig.4 Fig.3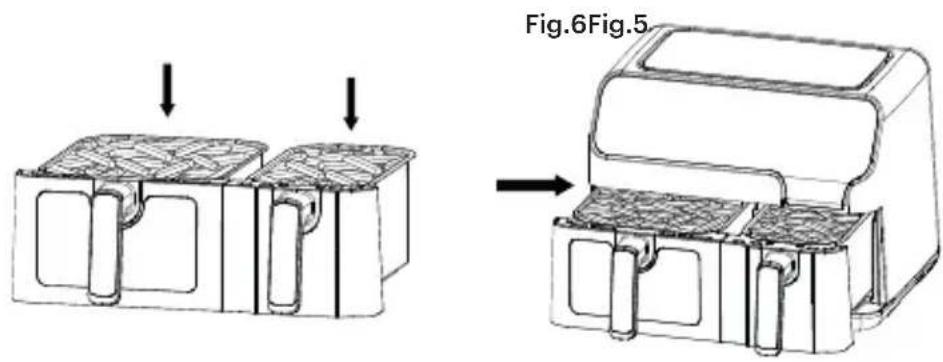
text_image
Fig.6Fig.5ISTRUZIONI PER IL PANNELLO DI CONTROLLO
text_image
Cropped image showing a calendar with icons for meal, lunch, dinner, and food, some displaying time and percentage values.ISTRUZIONI PER L'USO
natural_image
Diagram of a device with two internal components and a warning symbol (no text or labels)text_image
Fig.4 Fig.3NL
text_image
Fig.6Fig.5text_image
Cropped image showing a digital timer display with icons and time settings, including symbols like '00:00' and percentage signs.BEDIENINGSIN- STRUCTIES
1. Aan/uit-knop
natural_image
Line drawing of an electronic device with two labeled components and a warning symbol (no text or labels present)Fig.2
text_image
Fig.4 Fig.3 Fig.6Fig.5KONTROLLPANE- LENS INSTRUK- TIONER
text_image
⑤ + ① ① ② ④ - ③ 00:00 ⑪ ⑤ ↓ 00:00 ⑭ ⑥ ⑦ ⑧ ⑨ ⑩ ⑪ ⑫ ⑬ SVDRIFTSINSTRUK- TIONER
1. Strömbrytaren
natural_image
Line drawing of a device with two labeled buttons and a warning symbol (no text or labels present)Fig.2
text_image
Fig.4 Fig.3PT
text_image
Fig.6Fig.54.3 Desligar as duas gavetas
natural_image
Line drawing of a device with two labeled buttons and a warning symbol (no text or labels present)Fig.2
text_image
Fig.4 Fig.3 Fig.6Fig.5text_image
Cropped image showing a digital timer display with icons and numbers, including plus signs, down arrows, and time controls.FI
KÄYTTÖOHJEET
1. Virtapainike
YMPÄRISTÖYSTÄVÄLLINEN HÄVITYS
natural_image
Line drawing of a device with two heat exchangers and a warning symbol (no text or labels)Fig.2
text_image
Fig.4 Fig.3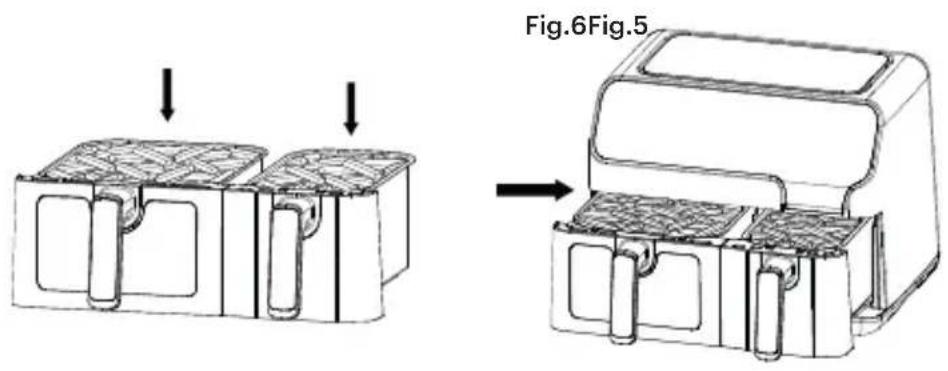
text_image
Fig.6Fig.5text_image
Cropped image showing a calendar with icons for food, meals, drinks, and lunch, plus signs for positive and negative indicators.BODUM AUSTRALIA WARRANTY
We are pleased to say that the return rate on BODUM ^® product is very low; however, should you need to process a returned BODUM ^® product under warranty, please follow the simple procedure below. We have tried to make it as simple as possible for both yourself and the end consumer.
BODUM AUSTRALIA WARRANTY PROCEDURE
Our goods come with guarantees that cannot be excluded under the Australian Consumer Law. Consumers are entitled to a replacement or refund for a major failure and for compensation for any other reasonably foreseeable loss or damage. Consumers are also entitled to have the goods repaired or replaced if the goods fail to be of acceptable quality and the failure does not amount to a major failure.
The benefits to BODUM ^® customers given by the warranty set out below are in addition to other rights and remedies under a law in relation to the BODUM ^® product to which the warranty relates.
To process a faulty BODUM ^® product you will require a Return Authorisation (RA) number. Returned items without a RA number are not able to be processed for credit or replacement. Contact BODUM ^® on (02) 9692 0582 for a RA number.
Faulty product does not include items which have incurred wear and tear through general home use, misuse or commercial use. Warranty does not include accidental glass breakages.
Warranty period:
e-BODUM®: 2 year replacement warranty from the date of purchase for electrical appliances where a defect appears and BODUM® is notified within 2 years from date of purchase.
Proof of purchase: any claim from the end consumer must be validated with a copy of proof of purchase; without providing a proof of purchase BODUM® Australia will not be able to process the claim. Proof of purchase includes original purchase receipt/docket or credit card statement showing the purchase amount.
Replacement or credit: once claim is validated, if possible please replace the faulty item from stock on hand. If a customer requires a replacement for an item which you don't have on hand, please have the item added to your next order.
Return or work order: to ensure that the return process is as easy as possible for both you and the end consumer, we don't do work orders or product repairs.
Once you have received a RA number and sighted the product please safely dispose of the faulty item. We don't require the faulty product to be sent back to us. However, if you come across an unusual fault which you think we need to be aware of please send it back to BODUM® Australia Head Office.
BODUM ^® (Australia) PTY LTD
Suite 39, 26-32 Pirrama Rd, Pyrmont NSW 2009
T. +61 2 9692 0582 F. +61 2 9692 0586
office.australia@bodum.com
GUARANTEE SERVICE FOR USA – CANADA (SEE OVERLEAF FOR AUS)
For more information or questions, guarantee claim and return authorization FREE CALL - SUPPORT@BODUM.COM
GUARANTEE CLAIM CAN NOT BE DONE WITHOUT PROOF OF PURCHASE.
The guarantee certificate must be completed by the seller at the time of purchase. You must present the guarantee certificate to obtain guarantee services. Should your BODUM® product require guarantee service, please contact your BODUM® retailer, a BODUM® store, your country's BODUM® distributor, or visit www.bodum.com.
2 YEARS LIMITED GUARANTEE CERTIFICATE. CERTIFICAT DE GARANTIE LIMITÉE DE 2 ANS. CERTIFICADO DE GARÁNTÍA LIMITADA DE 2 AÑOS.
Proof of purchase • Firmenstempel • Cachet du revendeur • Firmastempel Sello de la empresa • Timbro del rivenditore • Stempel van de zaak • Firmastämpel Carimbo da empresa • Ostotodistus • Доказательство покупки
GARANTIBEVIS - GARANTI: 2 ÅR. Airfryer
CERTIFICADO DE GARANTIA - GARANTÍA: 2 AÑOS. Freidora de Aire
CERTIFICATO DI GARANZIA - GARANZIA: 2 ANNI. Friggitrice ad Aria
GARANTIECERTIFIKAAT - GARANTIE: 2 JAAR. Air Fryer
GARANTIBEVIS - GARANTI: 2 ÅRS. Varmluftsfritösen
CERTIFICADO DE GARANTIA - GARANTIA: 2 ANOS. Air Fryer
TAKUU TODISTUS - TAKUU: 2 VUOTTA. Airfryer