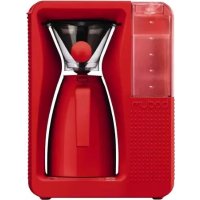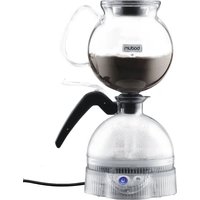
ePEBO 1.0 L - Coffee machine BODUM - Free user manual and instructions
Find the device manual for free ePEBO 1.0 L BODUM in PDF.


| Product Type | Vacuum Coffee Maker |
| Brand | Bodum |
| Model | ePEBO 1.0 L |
| Capacity | 1 liter (6 to 8 cups) |
| Rated Power | 1000 W |
| Mains Voltage (Europe) | 220-240 V ~ 50-60 Hz |
| Mains Voltage (USA) | 120 V ~ 60 Hz |
| Cable Length | Approximately 70 cm |
| Main Materials | Glass, plastic, silicone, stainless steel |
| Filter | Permanent stainless steel filter (part included, no paper filters) |
| Vacuum Function | Yes, vacuum infusion with water rise |
| Keep Warm Function | Yes, up to 30 minutes (dedicated button) |
| Automatic Shut-off | Yes, at end of brewing cycle |
| Water Level Indicator | MIN and MAX markings on lower chamber |
| Removable Parts | Funnel, funnel lid, filter, gasket, scoop, spoon |
| Dishwasher-safe Parts | Funnel lid, filter, funnel, gasket, scoop, mixing spoon |
| Maintenance | Descaling recommended every 100 uses with descaling solution or vinegar (20%) |
| Safety | Automatic shut-off, dry-run protection, hot surface warning |
| Warranty | 2 years (materials and workmanship) |
| Usage | Household only (indoor use) |
Frequently Asked Questions - ePEBO 1.0 L BODUM
User questions about ePEBO 1.0 L BODUM
0 question about this device. Answer the ones you know or ask your own.
Ask a new question about this device
Download the instructions for your Coffee machine in PDF format for free! Find your manual ePEBO 1.0 L - BODUM and take your electronic device back in hand. On this page are published all the documents necessary for the use of your device. ePEBO 1.0 L by BODUM.
USER MANUAL ePEBO 1.0 L BODUM
GUARANTEE SERVICE FOR USA-CANADA
For more information or questions, guarantee claim and return authorization FREE CALL - 1.800.23.BODUM/WARRANTY@BODUM.COM
GUARANTEE CLAIM CAN NOT BE DONE WITHOUT PROOF OF PURCHASE.
The guarantee certificate must be completed by the seller at the time of purchase.
You must present the guarantee certificate to obtain guarantee services. Should your BODUM® product require guarantee service, please contact your BODUM® retailer, a BODUM® store, your country's BODUM® distributor, or visit www.bodum.com.
2 YEARS LIMITED GUARANTEE CERTIFICATE.
CERTIFICAT DE GARANTIE LIMITÉE DE 2 ANS.
natural_image
Line drawing of a coffee maker with handle and side arm (no text or symbols)Vacuum Coffee Maker Instruction for use ENGLISH
natural_image
Line drawing of a coffee maker with handle and spout (no text or symbols)Welcome to BODUM®
Congratulations! You are now the proud owner of the BODUM® ePEBO Vacuum Coffee Maker
Please read these instructions carefully before using. ENGLISH
14 MIN Water Level Indicator
15 Stirring spoon
9 Bouton MAINTIEN AU CHAUD
10 Base
BODUM AUSTRALIA WARRANTY
We are pleased to say that the return rate on BODUM ^® product is very low; however, should you need to process a returned BODUM ^® product under warranty, please follow the simple procedure below. We have tried to make it as simple as possible for both yourself and the end consumer.
BODUM AUSTRALIA WARRANTY PROCEDURE
Our goods come with guarantees that cannot be excluded under the Australian Consumer Law. Consumers are entitled to a replacement or refund for a major failure and for compensation for any other reasonably foreseeable loss or damage. Consumers are also entitled to have the goods repaired or replaced if the goods fail to be of acceptable quality and the failure does not amount to a major failure.
The benefits to BODUM ^® customers given by the warranty set out below are in addition to other rights and remedies under a law in relation to the BODUM ^® product to which the warranty relates.
To process a faulty BODUM ^® product you will require a Return Authorisation (RA) number. Returned items without a RA number are not able to be processed for credit or replacement. Contact BODUM ^® on (02) 9692 0582 for a RA number.
Faulty product does not include items which have incurred wear and tear through general home use, misuse or commercial use. Warranty does not include accidental glass breakages.
Warranty period:
e-BODUM®: 2 year replacement warranty from the date of purchase for electrical appliances where a defect appears and BODUM® is notified within 2 years from date of purchase.
Proof of purchase: any claim from the end consumer must be validated with a copy of proof of purchase; without providing a proof of purchase BODUM® Australia will not be able to process the claim. Proof of purchase includes original purchase receipt/docket or credit card statement showing the purchase amount.
Replacement or credit: once claim is validated, if possible please replace the faulty item from stock on hand. If a customer requires a replacement for an item which you don't have on hand, please have the item added to your next order.
Return or work order: to ensure that the return process is as easy as possible for both you and the end consumer, we don't do work orders or product repairs.
Once you have received a RA number and sighted the product please safely dispose of the faulty item. We don't require the faulty product to be sent back to us. However, if you come across an unusual fault which you think we need to be aware of please send it back to BODUM® Australia Head Office.
BODUM® (Australia) PTY LTD
Suite 39, 26-32 Pirrama Rd, Pyrmont NSW 2009
T. +61 2 9692 0582 F. +61 2 9692 0586
office.australia@bodum.com
ENGLISH
Congratulations! You are now the proud owner of a BODUM® ePEBO Vacuum Coffee Maker. Please read these instructions carefully before you use your device for the first time.
EN
IMPORTANT SAFEGUARDS
When using electrical appliances, basic safety precautions should always be followed, including the following:
Read all of the information before you use the appliance for the first time. Failure to follow the instructions and safety information may lead to hazardous situations.
After unpacking the appliance check it for damage. If you are unsure whether the appliance is damaged, do not use it and contact your dealer instead.
Keep the packaging material (cardboard, plastic bag, etc.) out of the reach of children (risk of suffocation or injury).
Do not use the appliance other than for its intended use.
This Vacuum Coffee Maker is designed for indoor domestic use only. Do not use it outdoors.
The coffee maker is only to be used with the stand provided.
Do not place the appliance on or in close proximity to a hot gas or electric hob that is switched on, or in a preheated oven.
WARNING! Misuse will cause potential injury!
The manufacturer shall not be responsible for damage or injuries that arise as a result of misuse or unintended use.
Use the appliance exclusively for the purpose intended.
Do not allow children to play with the appliance.
When using the appliance in close proximity to children or persons who are unfamiliar with it ensure close supervision at all times.
This appliance must not be used by persons (including children) who are restricted in terms of their physical, sensory or mental faculties or who lack the requisite experience or knowledge, unless such persons receive instructions in its use from a person who is responsible for their safety and who supervises them while using the appliance. Children must be supervised, in order to ensure they do not play with the appliance.
This appliance can be used by children aged 8 years and above if they are supervised or have been instructed in the use of the appliance in a safe way and if they understand the hazards involved. Cleaning and user maintenance should not be undertaken by children unless they are older than 8 and are supervised. Keep the appliance and its cord out of the reach of children under the age of 8.
Do not allow the appliance to come into contact with damp or wet hands. Do not touch the mains cable or the plug with wet hands.
Do not touch any hot surfaces. Hold the glass jug and the filter holder by the handle only.
Do not use any accessories that have not been recommended by the appliance manufacturer. This can lead to fires, electric shocks or injuries.
For USA-Canada: This appliances has a polarized plug (one blade is wider than the other). To reduce the risk of electric shock, this plug will fit in a polarized socket one way only. If the plug does not correctly fit the socket, reverse the plug. If it still
does not fit, contact a qualified electrician. Do not modify the plug in any way.
The appliance must not be switched on without water.
Do not fill the jug (11) above the MAX line (13).
Avoid contact with the steam that is generated during the brewing process. Therefore do not open the funnel lid (1) during this process. Otherwise there is a risk of scalding.
Scalding may occur if the funnel lid is removed during the brewing cycles.
Boiling water can cause burns.
Ensure that the On/Off button (8) remains easily accessible at all times.
CAUTION: To prevent damage to the appliance do not use alkaline cleaning agents. When cleaning, use a soft cloth and a mild detergent.
Never immerse the appliance in water. Remember that this is an electrical appliance.
Only clean the jug (11) with a damp cloth.
Push the On/Off button (8) and pull the plug out of the socket in order to switch the appliance off.
Always apply pressure to the plug rather than the cable when unplugging the appliance from the mains.
Do not allow the power cable to hang over the edges of tables or worktops or permit it to come into contact with hot surfaces.
Remove the plug from the socket if the coffee machine is not in use or prior to cleaning it. Allow the appliance to cool prior to cleaning it or before putting on or taking off parts.
Never put an electrical appliance into operation if the power cable or plug is damaged, after malfunctions have occurred or
if the appliance itself has been damaged in any way. In such instances take the appliance to the nearest authorized service center for inspection, repairs or adjustment.
Never attempt to replace the power cable on the appliance. Special tools are required for this purpose. Only have the appliance repaired or the power cable exchanged by a service center approved by the manufacturer, in order to ensure that the appliance remains safe.
WARNING! Avoid any spillage onto the connector.
Do not immerse the cable, plug or appliance in water or other liquids because this may cause a fire, electric shock or injuries.
Ensure that the surface upon which the appliance is placed is dry prior to use.
Always put the funnel lid (1), funnel (3) with its gasket (4) and coffee filter (2) on the appliance during operation.
Do not leave the empty jug (11) on the base (10) when the appliance is turned ON. This can result in damage to the jug.
The container is designed for use with this appliance. It must never be used on a range top.
Do not set a hot container on a wet or cold surface.
Do not use a cracked container or a container with a loose or weakened handle.
Do not clean container with cleansers, steel wool pads, or other abrasive materials.
The heating element surface is subject to residual heat after use.
INSTALLATION
- Place the appliance on a stable, level surface that is neither hot nor in close proximity to a source of heat. The surface must be dry. Keep the appliance and the power cable out of the reach of children.
- When using the Vacuum Coffee Maker never place the jug (11) on a metal tray or any other metal surface.
- Check that the type plate on the appliance indicates a voltage corresponding to the mains voltage in your region. Whilst using the appliance it is necessary that the socket remain easily accessible in case of emergencies. The manufacturer shall not be liable for any accidents that arise due to deficient or defective earthing of the appliance.
- If the socket is not suitable for the plug on your appliance, you will need to have the socket replaced by an approved electrician.
Retain these user instructions for future reference.
HOUSEHOLD USE ONLY
DESCRIPTION OF APPLIANCE
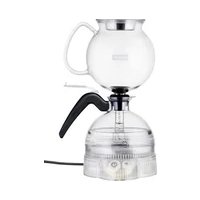
1 Funnel Lid 9 KEEP WARM Button
2 Filter 10 Base
3 Funnel 11 Jug
4 Funnel Gasket 12 Measuring Spoon
5 Jug Lid 13 MAX Water Level Indicator
6 Lid Knob 14 MIN Water Level Indicator
7 Jug Handle 15 Stirring spoon
8 ON/OFF Button
IMPORTANT INFORMATION
Power Cable
The appliance is supplied with a short power cable in order to reduce the risk of persons becoming entangled or tripping over a long cable.
Whilst exercising the requisite caution it is possible to use an extension cable.
In the event that an extension cable is used the nominal values quoted for the extension cable must comply with those of the appliance as a minimum. If the appliance is earthed, then the extension cable must be a three-conductor, earthed cable. The longer cable must be laid so that it does not hang over the edges of tables or the corners of worktops, so that children cannot pull on it and so that it is not possible for persons to trip over it.
Switching Off The Vacuum Coffee Maker
Using the ON/OFF button (8) it is possible to switch the Vacuum Coffee Maker off at any time.
Prior To Using The Vacuum Coffee Maker
Clean the appliance prior to first use. In order to do so fill the jug (11) with water to the MAX line (13) and allow the appliance to run with the funnel lid (1), funnel (3) and its gasket (4) and filter (2) in place but without ground coffee. Afterwards simply pour the water away. Wait at least 10 minutes before starting to use the appliance regularly.
HOW TO USE THE VACUUM COFFEE MAKER
Open the jug lid (5) and fill the jug (11) with the desired volume of cold water. However, do not fill above the MAX (13) and below the MIN (14) line on the jug (11).
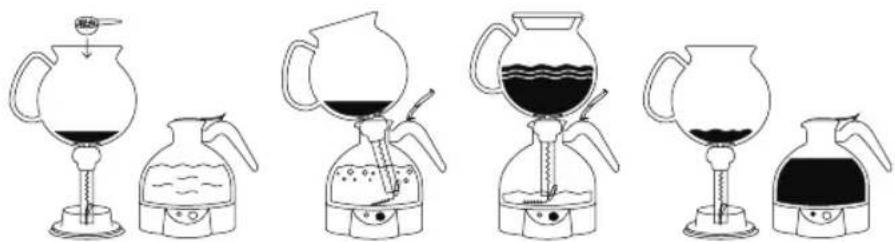
1st Brewing suggestion
STEP 1 Fill the jug with the required amount of water (6 to 8 cups) and place on its base.
STEP 2 Secure the filter to the funnel by the pulling filter chain through the glass tube and fasten the metal hook onto the tube end. Place the funnel in the jug. Make sure it has a complete seal. Add the required amount of ground coffee to the funnel. Place the lid on top of the funnel.
STEP 3 Press the ON/OFF button. The water will rise through the funnel, where it will brew for 4 minutes. Ensure all the grounds are completely saturated by giving it a gentle stir with the included stirring spoon. The ePEBO will automatically turn off, and the brewed coffee will flow back into the jug.
STEP 4 Remove funnel and pull on the filter chain to release the hook from the glass tube. Place the funnel on the up-side down funnel lid. Now enjoy your coffee.
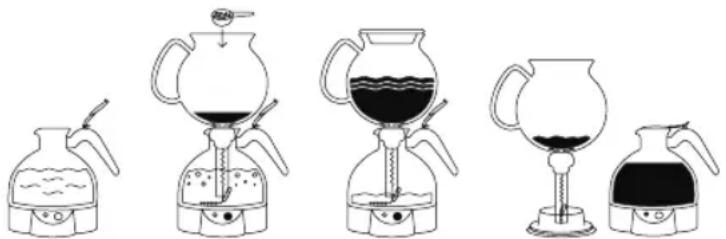
natural_image
Five different laboratory glassware setups with different drying and heating stages (no text or labels visible)STEP 1 STEP 2 STEP 3 STEP 4
2nd Brewing suggestion
STEP 1 Prepare the funnel by pulling on the filter chain to release the hook from the glass tube end and place the funnel on the upside down funnel lid. Add the required ground coffee amount to the funnel. Fill the jug with the required amount of water (6 to 8 cups) and place the jug on its base.
STEP 2 Secure the filter to the funnel by pulling the filter chain through the glass tube and fasten the metal hook onto the tube end. Then place the funnel on the jug, make sure it is tilted and press the ON/OFF button.
STEP 3 Wait until the water boils and then place the funnel in the jug. Make sure it has a complete seal. Place the funnel lid on the funnel. The water will rise through the funnel, where it will brew for 4 minutes. Ensure all the grounds are completely saturated by giving it a gentle stir with the included stirring spoon. The ePEBO will turn off automatically, and the brewed coffee will flow back into the jug.
STEP 4 Remove the funnel and pull on the filter chain to release the hook from the glass tube end. Place the funnel on the upside down funnel lid. Now enjoy your coffee.
text_image
Diagram showing five different experimental setups for heating a coffee maker, including condenser, filter, and evaporator.STEP 1 STEP 2 STEP 3 STEP 4
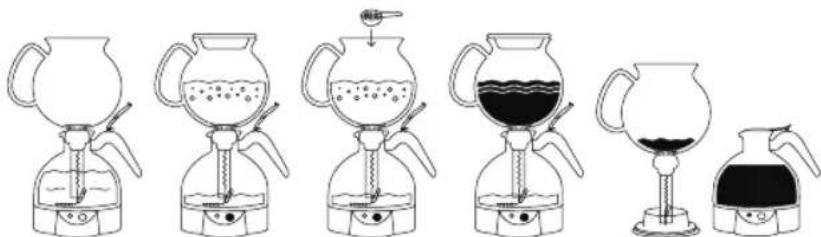
3rd Brewing suggestion
STEP 1 Fill the jug with the required amount of water (6 to 8 cups) and place it on its base. Secure the filter to the funnel by pulling the filter chain through the glass tube and fasten the metal hook onto the tube end. Place the funnel in the jug. Make sure it has a complete seal.
STEP 2 Press the ON/OFF button and place the lid on top of the funnel.
STEP 3 The water will rise through the funnel, and once all the water has risen into the funnel, simply remove the lid and add the required amount of ground coffee. Ensure all the grounds are completely saturated by giving them a gentle stir with the included plastic spoon. Place the lid back on the funnel. Ensure all the grounds are completely saturated by giving it a gentle stir with the included stirring spoon.
STEP 4 The ePEBO will turn off automatically after 4 minutes, and the brewed coffee will flow back into the jug.
STEP 5 Remove the funnel and pull on the filter chain to release the hook from the glass tube. Place the funnel on the upside down funnel lid. Now enjoy your coffee.
text_image
Diagram showing six different experimental setups for heating a liquid, with labeled apparatus and color gradient.STEP 1 STEP 2 STEP 3 STEP 4 STEP 5
Note: If the jug (11) is empty, the appliance will not switch on for safety reasons, in order to prevent the heating element from running whilst dry.
WARNING: Only top up the jug (11) with cold, clear water. Do not add any milk or other liquids to the jug.
To make a pot of coffee, fill the funnel (3) with a maximum of 8 level BODUM ^® measuring spoons of filter ground coffee. When making a smaller quantity of coffee you will require proportionally less ground coffee.
CAUTION: Only use the coffee filter (2) supplied with the appliance. Never use paper filters.
Press the On/Off button (8) once to start the brewing process. The On/Off button will turn blue.
After a few minutes the water starts to flow through the tube into the funnel (3) and then remains there for four minutes. This process requires approx. 10 minutes for a jug of coffee.
Note: Do not open the funnel lid (1) during the brewing process. Scalding may occur if the lid is removed during brewing cycles.
Once the brewing process is complete, the ePEBO will switch off automatically.
It is possible to switch the KEEP WARM function on and off during or after the whole brewing process (to keep the coffee warm for an additional 30 minutes. After 30 minutes, the KEEP WARM function will turn off automatically).
If the KEEP WARM switch is on, the button will turn red.
The KEEP WARM function process takes 30 minutes and will turn off automatically.
After the cycle the funnel (3) can be taken off and placed on the funnel lid (1), as shown in figure 2; upside down position.
Before placing the funnel (3) on the lid funnel (1), please release the filter (2) by pulling its chain.
Note: Clean the coffee filter (2) and funnel (3) thoroughly after every use.
CLEANING THE MACHINE
When cleaning the Vacuum Coffee Maker never use any chemicals, steel wool or abrasive cleaners. Clean the jug (11) with a damp cloth only.
Never immerse the jug in water. Remember that this is an electrical appliance.
Note: Always disconnect the Vacuum Coffee Maker from the mains prior to cleaning the appliance.
Clean the Vacuum Coffee Maker after every use. The following parts are dishwasher safe:
1 Funnel Lid 4 Funnel Gasket
2 Filter 12 Measuring Spoon
3 Funnel 15 Stirring spoon
Ensure that no ground coffee remains in the filter (2) before putting it in the dishwasher.
Wash the jug under warm, clear running water. Then scrub the inside of the jug with a soaped kitchen brush. Rinse it well.
MAINTENANCE AND CARE
De-Scaling The Vacuum Coffee Maker
To guarantee that the Vacuum Coffee Maker works correctly, you have to ensure that the machine is kept free of lime-scale. The optimum cycle is dependent on the hardness of the water which differs from country to country. We would advise de-scaling the machine after every 100 uses.
Important: If you do not de-scale the Vacuum Coffee Maker then this can cause damage!
Regular de-scaling can increase the service life of the product and guarantees its faultless operation. Furthermore, regular de-scaling will result in less steam forming, faster brewing times and energy savings.
Deposits should be removed with a commercially available de-scaling solution for coffee machines or with a solution of vinegar and water (20% vinegar and 80% water). When using commercially available de-scaling solutions ensure that these are suitable for use with heating elements made of copper as well as silicone materials. (Carefully check the specifications and dosage instructions of the manufacturer).
Fill the jug (11) with descaling solution or a vinegar and water solution (do not fill above the MAX line (13)) and leave it for a while.
Then rinse the jug thoroughly with cold, clear water, at least twice.
Any other servicing should be performed by an authorized service facility.
STORAGE
Always disconnect the Vacuum Coffee Maker from the mains when it is not in use.
TECHNICAL SPECIFICATIONS
| TECHNICAL DATA |
| EU mains voltage 220-240 V~ 50-60 Hz |
| USA mains voltage 120 V~ 60 Hz |
| EU nominal power 1000 W |
| USA nominal power 1000 W |
| Cable length approx. 70 cm / 27.5 in |
| Volumetric capacity 1.0 liter/34 fl. oz |
| Test marks GS, CE, ETL, CETL |
MANUFACTURER GUARANTEE FOR THE USA & CAN, THE EU AND CH.
Guarantee: BODUM® AG, Switzerland, guarantees the ePEBO Vacuum Coffee Maker for a period of two years from the date of original purchase against faulty materials and malfunctions that can be traced back to defects in design or manufacturing. Repairs are carried out free of charge if all guarantee conditions are met. Refunds are not available.
Guarantee conditions: The guarantee certificate must be completed by the seller at the time of purchase. You must present the guarantee certificate to obtain guarantee services. Should your BODUM® product require guarantee service, please contact your BODUM® retailer, a BODUM® store, your country's BODUM® distributor, or visit www.bodum.com.
BODUM ^® will not provide warranty for damage resulting from inappropriate use, improper handling, normal wear and tear, inadequate or incorrect maintenance or care, incorrect operation or use of the appliance by unauthorized persons.
This Manufacturer Guarantee does not affect your statutory rights under applicable national laws in force, nor your right against the dealer arising from their sales/purchase contract.
ENVIRONMENTALLY ACCEPTABLE DISPOSAL
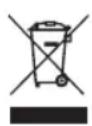
This marking indicates that this product should not be disposed with other household wastes throughout the EU. To prevent possible harm to the environment or human health from uncontrolled waste disposal, recycle it responsibly to promote the sustainable reuse of material resources. To return your used device, please use the return and collection systems or contact the retailer where the product was purchased. They can take this product for environmentally safe recycling.
DEUTSCH
natural_image
Five laboratory glassware setups with different drying and heating stages (no text or labels)SCHRITT 1 SCHRITT 2 SCHRITT 3 SCHRITT 4
2. Brühvorschlag
text_image
SCHRITT 1 SCHRITT 2 SCHRITT 3 SCHRITT 43. Brühvorschlag
text_image
SCHRITT 1 SCHRITT 2 SCHRITT 3 SCHRITT 4 SCHRITT 5Hz = Hertz \~ = Wechselstrom
natural_image
Five laboratory glassware setups with different apparatuses, including a round-bottom flask, squeegee, and beaker (no text or labels visible)ÉTAPE 1 ÉTAPE 2 ÉTAPE 3 ÉTAPE 4
text_image
Diagram showing a series of laboratory glassware for gas generation and purification, including a round-bottom flask, beaker with liquid, and a Bunsen burner.ÉTAPE 1 ÉTAPE 2 ÉTAPE 3 ÉTAPE 4 ÉTAPE 5
Certifications GS, CE, ETL, CETL
GARANTIE FABRICANT POUR LES ÉTATS-UNIS & CANADA, L'UNION EUROPÉENNE ET LA SUISSE.
MISE AU REBUT CORRECT DE CE PRODUIT
natural_image
Five different laboratory glassware setups with different drying and heating stages (no text or labels visible)TRIN 1 TRIN 2 TRIN 3 TRIN 4
2. Brygningsforslag
DA
text_image
Diagram showing six different experimental setups for heating a conical flask, including gas generation and drying.TRIN 1 TRIN 2 TRIN 3 TRIN 4 TRIN 5
natural_image
Five different laboratory glassware setups with varying liquid levels and drying stages (no text or labels)PASO 1 PASO 2 PASO 3 PASO 4
text_image
Diagram showing six different experimental setups for heating a liquid in a conical flask, with labeled components and apparatus.PASO 1 PASO 2 PASO 3 PASO 4 PASO 5
natural_image
Five different laboratory glassware setups with different drying and heating stages (no text or labels visible)PASSAGGIO 1 PASSAGGIO 2 PASSAGGIO 3 PASSAGGIO 4
text_image
Diagram showing six different experimental setups for heating a liquid in a round-bottom flask, with labeled components and apparatus.PASSAGGIO 1 PASSAGGIO 2 PASSAGGIO 3 PASSAGGIO 4 PASSAGGIO 5
BESCHRIJVING VAN HET APPA- RAAT
| 1 | Deksel trechter 9 | Warmhoudknop |
| 2 | Filter 10 | Voet |
| 3 | Trebter 11 | Kan |
| 4 | Klep trechter 12 | Maatschepje |
| 5 | Deksel kan 13 | MAX waterniveau-indicator |
| 6 | Knop deksel | 14 MIN waterniveau-indicator |
| 7 | Handvat kan | 15 Roerlepel |
| 8 | AAN/UIT-knop |
natural_image
Five different laboratory glassware setups with different apparatuses and colors, including a round-bottom flask, top filter, and beaker (no text or labels visible)STAP 1 STAP 2 STAP 3 STAP 4
2e Zetmethode
text_image
Diagram showing six different experimental setups for heating a liquid, with labeled apparatus and color gradient.STAP 1 STAP 2 STAP 3 STAP 4 STAP 5
natural_image
Five laboratory glassware setups with different apparatuses and colors, no text or labels presentSTEG 1 STEG 2 STEG 3 STEG 4
Bryggningsförslag 2
text_image
Diagram showing six different experimental setups for heating a liquid, with labeled apparatus and color gradient.STEG 1 STEG 2 STEG 3 STEG 4 STEG 5
natural_image
Five laboratory glassware setups with different apparatuses and colors, including a round-bottom flask, top filter, and beaker (no text or labels visible)PASSO 1 PASSO 2 PASSO 3 PASSO 4
text_image
Diagram showing six different experimental setups for heating a liquid, with labeled apparatus and color gradient.PASSO 1 PASSO 2 PASSO 3 PASSO 4 PASSO 5
text_image
Diagram showing five different laboratory apparatus setups with labeled components and liquid levelsVAIHE 1 VAIHE 2 VAIHE 3 VAIHE 4
text_image
Diagram showing six different experimental setups for heating a liquid in a round-bottom flask, with labeled components and apparatus.VAIHE 1 VAIHE 2 VAIHE 3 VAIHE 4 VAIHE 5
YMPÄRISTÖYSTÄVÄLLINEN HÄVITYS