PDNB 6.3 C3 - Pneumatic tool PARKSIDE - Free user manual and instructions
Find the device manual for free PDNB 6.3 C3 PARKSIDE in PDF.

| Product type | Pneumatic needle scaler |
| Brand | Parkside |
| Model | PDNB 6.3 C3 |
| Maximum working pressure | 6.3 bar |
| Compressed air connection | 1/4" (0.63 cm) |
| Striking speed | Approximately 4000 min⁻¹ |
| Weight (without accessories) | 2060 g |
| Dimensions (L × W × H) | 341.5 × 193.1 × 50.0 mm |
| Sound pressure level (LpA) | 92.5 dB(A) (uncertainty 3 dB) |
| Sound power level (LWA) | 103.5 dB(A) (uncertainty 3 dB) |
| Vibrations (total value) | 8.53 m/s² (uncertainty 0.81 m/s²) |
| Main functions | Removal of rust, paints and coatings on metal; shaping |
| Delivery contents | Device, connection nozzle, hex key, oil bottle, user manual |
| Maintenance and cleaning | Oil lubrication before each use; clean with a dry cloth; store frost-free and dust-free |
| Safety | Wear eye, hearing, respiratory protection and gloves; read manual before use |
| Spare parts and repairability | Use only original manufacturer parts; repairs by qualified personnel |
| Warranty | 3 years (Belgium); 2 years statutory (France) |
| General information | Private use only, not commercial; use in accordance with instructions |
Frequently Asked Questions - PDNB 6.3 C3 PARKSIDE
User questions about PDNB 6.3 C3 PARKSIDE
0 question about this device. Answer the ones you know or ask your own.
Ask a new question about this device
Download the instructions for your Pneumatic tool in PDF format for free! Find your manual PDNB 6.3 C3 - PARKSIDE and take your electronic device back in hand. On this page are published all the documents necessary for the use of your device. PDNB 6.3 C3 by PARKSIDE.
USER MANUAL PDNB 6.3 C3 PARKSIDE
AIR NEEDLE SCALER PDNE 4000 C3
DRUCKLUFT-NADELENTROSTER PDNE 4000 C3
DÉROUILLEUR À AIGUILLES PNEUMATIQUE PDNE 4000 C3
IEGB NI CY MT
AIR NEEDLE SCALER
Translation of the original instructions
BEFR CH
Before reading, fold out the page with the images and familiarise yourself with all the features of the device.
DE AT CH
GB/IE/NI/CY/MT Translation of the original instructions Page 5
1.1 Intended use 6
1.2 Scope of delivery...6.....
1.3 Equipment 6
1.4 Technical data 6
2. Safety instructions .8
2.1 General safety rules ...8.
2.2 Hazards from ejected parts...9.....
2.3 Hazards during operation...9.....
2.4 Hazards due to repetitive movements ...9....
2.5 Hazards due to accessory parts ...10....
2.6 Workplace hazards...1.0
2.7 Hazards from dust and fumes 10
2.8 Noise hazards 11
2.9 Hazards due to vibrations...1.1
2.10 Additional safety instructions for pneumatic machines 11
3. Before commissioning 12
3.1 Oil lubrication 12
3.2 Mounting the unit head 12
3.3 Connection to a compressed air source 12
4. Starting-up 12
4.1 Operation 12
5. Maintenance, cleaning and storage 13
6. Disposal 13
6.1 Environmental compatibility and Material disposal 13
7. ROWI Germany GmbH Warranty 14
8. Service 15
9. Translation of the original declaration of conformity C€ 15
AIR NEEDLE SCALER PDNE 4000 C3
1. Introduction
Congratulations on the purchase of your new appliance. You have chosen a high-quality product. The operating instructions are an integral part of this product. It contains important instructions for safety, use and disposal. Familiarise yourself with all operating and safety instructions before using the product. Only use the product as described and for the specified areas of application. Hand over all documents when passing the product on to third parties.
1.1 Intended use
This tool is used exclusively for removing rust and coatings (paint, varnish, etc.) from solid metal parts, but also for modelling work. Only use the product as described and for the specified areas of application. Keep these instructions in a safe place. If the product is passed on to a third party, hand over all documents as well. Any other use or modification of the product is considered improper, involves considerable risk of accident and is also not permitted. We accept no liability for damage resulting from improper use. The device is intended for private use only and may not be used commercially or industrially.
1.2 Scope of delivery
1 Air Needle Scaler
1 Connection nipple (pre-assembled)
1 Hexagon socket spanner
1 Oil-bottle
1 Instruction manual
1.3 Equipment
1 Needles
2 Unit head
3 Screw
4 Threaded
5 Air regulation screw
6 Plug nipple 1/4" (pre-assembled)
7 Trigger
8 Oil container
9 Hexagon socket spanner
1.4 Technical data
Operating pressure: max. 6,3 bar
Compressed air
connection: 14 (0,63 cm)
Beat Rate:: ca. 4000 min -1
Weight
(without accessories): 2060 g
Dimensions: 341,5 × 193,1 × 50,0 mm
Noise emission values
Measured value for noise determined according to ISO 15744:
Sound pressure level L_pA = 92.5 dB(A)
Uncertainty K_WA = 3 dB
Sound power levels L_WA = 103.5 dB(A)
Uncertainty K_WA = 3 dB
WARNING!
The noise emission values given in these instructions have been measured according to a measurement method standardised in ISO 15744 and can be used for tool comparison. The noise emission values will vary according to the use of the air tool and may in some cases be higher than the values given in these instructions. Noise emission levels may be underestimated if the air tool is used regularly in such a manner.
NOTE
For an accurate estimation of the noise emission load during a specific working period, the times when the unit is switched off or running but not actually in use should also be taken into account. This can significantly reduce the noise emission load over the entire working period.
Vibration emission value (declaration according to EN 12096)
Total vibration value determined according to ISO 28927-10
Vibrations*: a_h = 8,53 m/s^2
Uncertainty: K = 0,81 m/s ^4
* Vibrations transmitted to the operator's hands
WARNING
The vibration level specified in these instructions has been measured according to a measurement method standardised in ISO 28927-10 and can be used for unit comparison. The specified vibration emission value can also be used for an introductory assessment of exposure.
Vibration emissions during actual use of the air tool may differ from the stated values depending on the way the air tool is used, in particular what type of workpiece is being machined and what accessory is being used.
The vibration load could be underestimated if the air tool is regularly used in such a way.
NOTE
Try to keep the load as low as possible. Exemplary measures to reduce the vibration load are:
The maintenance of the appliance according to this Instructions,
■ wearing gloves when using the tool,
■ limiting working time or planning your work steps so that you do not have to use highly vibrating equipment for days on end.
All parts of the operating cycle must be taken into account (for example, times when the air tool is switched off and those when it is switched on but running without load).
Explanations of all symbols on the machine symbols found on the machine
  | WARNINGRead the operating instructions before commissioning. |
   | Oil daily |
 | Wear eye protection |
 | Wear respiratory protection |
 | Wear ear protection |
 | Wear protective gloves |
2. Safety instructions

Please Read all safety information and instructions

Failure to comply with the safety notes and instructions can cause serious injury and/or damage to property.
Keep all safety notes and instructions for future reference!
NOTE
When using air tools, basic safety precautions must be followed to eliminate the risks of fire, electric shock and personal injury.
The information provided in this instruction manual is an important, but not the sole, basis for the safe use of the machine. The hazards indicated are foreseeable for the general use of hand-held air needle scalers. However, in addition, the user must evaluate specific risks that may arise as a result of each use.
Residual risks
Even if you operate the machine as instructed, there will always be residual risks. The following hazards may occur in connection with the design and construction of this appliance:
■ Hose kickback due to improper handling.
■ Risk of falling due to compressed air hoses lying around.
■ Danger from compressed air hoses flapping around.
Reduce the residual risk by using the tool carefully and according to instructions and by following all instructions. Keep your work area clean and well lit. Disorder and unlit work areas can lead to accidents!
2.1 General safety rules
- When you want to connect the tool to the air supply hose, never point the front end (needle head) of the tool towards yourself or towards other people
■ Never point the unit at yourself or at other people.
For multiple hazards, the safety instructions must be read and understood before installation, operation, repair, maintenance and replacement of accessories, and before working near the non-rotating, impacting machine. Failure to do so may result in serious physical injury.
The non-rotating, impact machine should only be set up, adjusted or used by qualified and trained operators.
The non-rotating, impacting machine must not be modified. Modifications can reduce the effectiveness of the safety measures and increase the risks for the operator.
■ The safety instructions must not be lost - give them to the operator.
■ Never use a damaged non-rotating, impacting machine.
The machines shall be serviced regularly to check that the ratings and markings required by this part of ISO 11148 are legibly marked on the machine. The employee / user shall contact the manufacturer to obtain replacement labels for marking when necessary.
2.2 Hazards from ejected parts
- Disconnect the non-rotating, impacting machine from the power supply before replacing the machine tool or accessories.
If the workpiece or one of the accessories breaks, or even the machine itself, parts can be ejected at high speed. - Impact-resistant eye protection must always be worn when operating the non-rotating, impacting machine. The degree of protection required should be assessed separately for each individual operation.
■ A safety helmet must be worn when working overhead.
In this case, the risks to others should also be assessed.
■ Ensure that the workpiece is securely fastened. - Only operate the machine when the machine tool is held in the machine by means of a suitable locking device.
■ To avoid injury, replace any broken or bent parts of the lock that show signs of wear.
■ Before switching on the machine, place the machine tool firmly on the surface to be machined.
2.3 Hazards during operation
- When using the machine, operators' hands may be exposed to hazards such as blows, cuts, abrasions and heat. Wear suitable gloves to protect the handsWear suitable gloves to protect the hands.
- Operators and maintenance personnel must be physically able to handle the size, weight and power of the machine.
- Hold the machine properly: Be ready to counteract the usual or sudden movements - have both hands ready.
■ Make sure your body is balanced and that you have a secure stance.
■ Enable command device to start and stop in case of power supply interruption.
■ Use only the lubricants recommended by the manufacturer.
- Avoid direct contact with the machine tool during and after use because it can be hot.
Note that safety glasses must be worn and that the wearing of protective gloves and clothing is recommended.
2.4 Hazards due to repetitive movements
- When using a non-rotating, percussive machine, the operator may experience uncomfortable sensations in the hands, arms, shoulders, neck or other parts of the body when performing work-related activities.
- When working with the non-rotating, percussive machine, adopt a comfortable position, ensure a secure hold and avoid awkward positions or those where it is difficult to maintain balance. The operator should change posture during long periods of work, which can help prevent discomfort and fatigue.
If the operator experiences symptoms such as persistent discomfort, aching, throbbing, pain, tingling, numbness, burning or stiffness, these warning signs should not be ignored. The operator should report them to their employer and consult a qualified medical professional.
2.5 Hazards due to accessory parts
- Disconnect the non-rotating, impacting machine from the power supply before attaching or changing the machine tool or accessory.
- Use only accessories and consumables of the sizes and types recommended by the manufacturer of the impacting, non-turning machines; do not use other types or sizes of accessories and consumables.
- Avoid direct contact with the machine tool during and after use because it may be hot or sharp.
- Do not use accessories or machine tools that are cracked or deformed.
2.6 Workplace hazards
Slips, trips and falls are major causes of injury in the workplace. Be aware of surfaces that may have become slippery due to use of the machine and tripping hazards caused by the air hose.
■ Proceed with caution in unknown environments. There may be hidden hazards from power or other supply lines.
The non-rotating, percussive machine is not intended for use in explosive atmospheres and is not insulated against contact with electrical power sources.
■ Make sure that there are no electrical lines, gas pipelines, etc. that could cause a hazard if damaged by the use of the machine.
2.7 Hazards from dust and fumes
Slips, trips and falls are major causes of injury in the workplace. Watch out for surfaces that may have become slippery through use of the machine and for tripping hazards caused by the air hoseBe aware of surfaces that may have become slippery due to the use of the machine and tripping hazards caused by the air hose.
The risk assessment should include the dusts generated by the use of the machine and any existing dusts that may be stirred up in the process.
The non-rotating, percussive machine shall be operated and maintained in accordance with the recommendations contained in this manual to minimise the release of dust and fumes.
The exhaust air must be discharged in such a way that the whirling up of dust in dusty environments is reduced to a minimum.
If dusts or vapours are generated, the main task must be to control them at the point of release.
- Any installation or accessory parts of the machine intended to collect, extract or suppress flying dust or fumes should be used and maintained in accordance with the manufacturer's instructions.
The consumables and the machine tool shall be selected, maintained and replaced according to the recommendations in this manual to avoid unnecessary intensification of dust or vapour generation.
- Use respiratory protective equipment according to your employer's instructions or as required by occupational health and safety regulations.
2.8 Noise hazards
- Exposure to high noise levels can lead to permanent hearing damage and other problems such as tinnitus (ringing, buzzing, whistling or buzzing in the ear) if hearing protection is inadequate. It is essential to carry out a risk assessment in relation to these hazards and implement appropriate control mechanisms.
- Control mechanisms suitable for risk reduction include measures such as the use of insulating materials to avoid "ringing" noises occurring on the workpieces.
■ Use hearing protection equipment as required by local occupational health and safety regulations.
The non-rotating, percussive machine shall be operated and maintained in accordance with the recommendations contained in this manual to avoid unnecessary increase in noise levels. - Select, maintain and replace consumables and machine tools according to the recommendations in this manual to avoid unnecessary increase in noise level.
If the non-rotating percussive machine has a silencer, always ensure that it is in place and in good working order when operating the non-rotating percussive machine.
2.9 Hazards due to vibrations
- Exposure to vibrations can cause damage to the nerves and disturbances in blood circulation in the hands and arms.
■ Wear warm clothing when working in cold environments and keep your hands warm and dry.
If you notice that the skin on your fingers or hands becomes numb, tingles, hurts or turns white, stop working with the non-rotating percussive machine, notify your employer and consult a doctor.
The non-rotating, percussive machine shall be operated and maintained in accordance with the recommendations contained in this manual to avoid unnecessary amplification of vibrations. - Do not hold the machine tool with your free hand, as this will increase the effect of vibration.
- Hold the machine with a not too firm but secure grip while maintaining the required hand reaction forces, as the risk of vibration usually increases with increasing grip force.
- Keep suspended handles centred and avoid pushing the handles up to the stops.
2.10 Additional safety instructions for pneumatic machines
■ Compressed air can cause serious injuries:
- When the machine is not in use, before replacing accessories or when carrying out repair work, always shut off the air supply, depressurise the air hose and disconnect the machine from the compressed air supply.
- Never direct the airflow towards yourself or towards other people.
- Hoses flapping around can cause serious injuries. Therefore, always check that the hoses and their fasteners are undamaged and have not come loose.
- Cold air must be drawn away from the hands.
Do not use quick-release couplings on the tool inlet. For threaded hose connections, use only those made of hardened steel (or a material of comparable impact resistance).
If universal swivel couplings (claw couplings) are used, lock pins must be inserted and use Whipcheck hose locks to provide protection in the event of failure of the connection of the hose to the machine or of hoses to each other.
■ Ensure that the maximum pressure indicated on the machine is not exceeded.
■ Never carry with air-powered machines by the hose.
3. Before commissioning
3.1 Oil lubrication
■ Lubricate the air tool before each start-up.
- Put 3-5 drops of special compressed air oil into the plug nipple 6. This is enough for 15 minutes of continuous use.
NOTE: Regular lubrication prevents friction and corrosion damage. We recommend special compressed air oil, e.g. from GÜDE, Metabo, E-COLL or Einhell.
NOTE: You can also use a so-called mist or compressed air lubricator or a compressed air maintenance unit for lubrication. These guarantee regular lubrication.
3.2 Mounting the unit head
- Turn the unit head 2 hand-tight onto the thread 4.
- Tighten the three screws 3 it new device head 2 with the hexagon socket spanner provided 9.
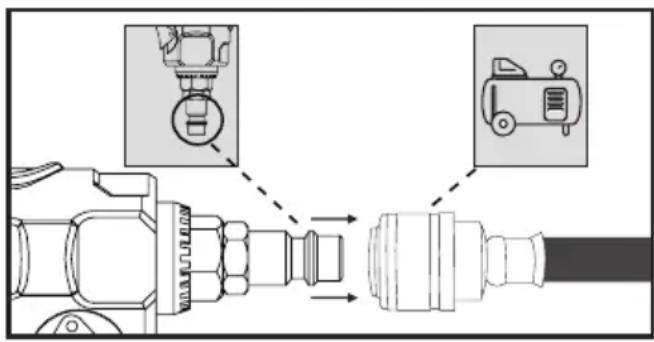
3.3 Connection to a compressed air source
- The machine may only be operated with cleaned, oil-misted compressed air.
The compressed air line must not contain any condensation. - The maximum working pressure of 6.3 bar must not be exceeded.
■ Make sure that the working pressure is not lower than 6.3 bar. The machine is only designed for this working pressure.
■ The compressor must be equipped with a pressure reducer to regulate the working pressure.
- Connect the plug nipple 3 with the supply hose of a compressor.
4. Starting-up
4.1 Operation
- Press the trigger 7, to switch on the unit. Press and hold the shutter release button 7.
■ Make sure that you guide the tool at a slight angle to the surface you are working on for best results.
NOTE
Do not use high force when working with the appliance, as this could damage the workpiece.
■ Release the trigger 7 when the compressed air supply has been interrupted or you want to finish the work.
- Disconnect the unit from the compressed air source after finishing work.
5. Maintenance, cleaning and storage
WARNING! RISK OF INJURY! Disconnect the unit from the compressed air source before maintenance work.
The following points can be considered as a list of operating steps that the user should perform for maintenance, cleaning and storage of the appliance.
- Regular preventive maintenance ensures the safety of the machine.
- Regardless of the number of operations or actuations, maintain and clean the unit after each use.
- Pay attention to the disposal instructions given in these operating instructions. Improper disposal may harm the environment or your health.
■ Never use liquids such as petrol, solvents or water for cleaning.
- Do not allow any liquids to enter the interior of the unit.
■ Clean the tool only with a dry cloth.
- Sufficient and constantly intact oil lubrication is of decisive importance for optimum function (see chapter Oil lubrication).
- Check the RPM after each use. The speed must be checked regularly.
- Perform a simple check of the vibration level after each service and maintenance.
- Only use original spare or replacement parts from the manufacturer, otherwise the health and safety of operators will be affected. If in doubt, contact our service team.
Before servicing, clean the unit from hazardous substances that have been deposited on it (due to work processes). Avoid any skin contact with these substances. If the skin comes into contact with hazardous dusts, it may cause severe dermatitis. If dust is generated or stirred up during maintenance work, it can be inhaled.
■ Always wear protective gloves and a protective mask!
The unit may only be operated and maintained by instructed persons. Repairs may only be carried out by qualified persons.
If possible, inspections, adjustments and maintenance work should be carried out by the same
person or their deputy and documented in a maintenance book.
- Store the unit and its accessories in a dark, dry, dust-free and frost-free place.
6. Disposal
The pneumatic power tool, accessories and packaging* should be recycled in an environmentally friendly manner.
For information on how to dispose of the discarded machine and accessories, please contact your local council or town/city administration.

The packaging is made of environmentally friendly materials that you can dispose of at your local recycling centres.

The Triman logo is valid in France only.
Observe the labelling of the packaging materials when separating waste; these are marked with abbreviations (a) and numbers (b) with the following meaning: 1-7: Plastics/20-22: Paper and cardboard/80-98: Composites.
6.1 Environmental compatibility and Material disposal
Lubricating oil must not get into the soil, water or waste water. Lubricating oil is special waste that must be disposed of accordingly. Observe the local regulations. Dispose of the lubricating oil as well as packaging containing residues at your local collection point, petrol station or oil dealer.
* Non-contaminated or cleaned packaging can be recycled.
7. ROWI Germany GmbH Warranty
Dear Customer,
This appliance has a 3-year warranty valid from the date of purchase. If this product has any faults, you, the buyer, have certain statutory rights. Your statutory rights are not restricted in any way by the warranty described below.
Warranty conditions
The validity period of the warranty starts from the date of purchase. Please keep your original receipt in a safe place. This document will be required as proof of purchase.
If any material or production fault occurs within three years of the date of purchase of the product, we will either repair or replace the product for you or refund the purchase price at our discretion. This warranty service is dependent on you presenting the defective appliance and the proof of purchase (receipt) and a short written description of the fault and its time of occurrence.
If the defect is covered by the warranty, your product will either be repaired or replaced by us. The repair or replacement of a product does not signify the beginning of a new warranty period.
Warranty period and statutory claims for defects
The warranty period is not prolonged by repairs effected under the warranty. This also applies to replaced and repaired components. Any damage and defects present at the time of purchase must be reported immediately after unpacking. Repairs carried out after expiry of the warranty period shall be subject to a fee.
Scope of the warranty
This appliance has been manufactured in accordance with strict quality guidelines and inspected meticulously prior to delivery.
The warranty covers material faults or production faults. The warranty does not extend to product parts subject to normal wear and tear or fragile parts such as switches, batteries or those made of glass.
The warranty does not apply if the product has been damaged, improperly used or improperly maintained. The directions in the operating instructions for the product regarding proper use of the product are to be strictly followed. Uses and actions that are discouraged in the operating instructions or which are warned against must be avoided.
This product is intended solely for private use and not for commercial purposes. The warranty shall be deemed void in cases of misuse or improper handling, use of force and modifications/repairs which have not been carried out by one of our authorised Service centres.
Warranty claim procedure
To ensure quick processing of your case, please observe the following instructions:
- Please have the till receipt and the item number (IAN 435173_2304) available as proof of purchase.
- You will find the item number on the type plate on the product, on the front page of the instructions (bottom left), or as a sticker on the rear or bottom of the appliance.
If functional or other defects occur, please contact the service department listed either by telephone or by e-mail. - You can return a defective product to us free of charge to the service address that will be provided to you. Ensure that you enclose the proof of purchase (till receipt) and information about what the defect is and when it occurred.

At www.lidl-service.com you can download this manual as well as many other manuals, product videos and installation software. This QR code will take you directly to the Lidl service page (www.lidl-service.com) and allow you to open your operating instructions simply by entering the article number (IAN 435173_2304).
8. Service
If any problems occur during use of your ROWI Germany product, please proceed as follows:
Contact us
You can contact the service team of ROWI Germany at:
ROWI Germany GmbH
(free call from a German landline)
IAN 435173_2304
Most problems can be resolved with the skilled technical support of our Service Team.
9. Translation of the original declaration of conformity C€
We, ROWI Germany GmbH, Werner-von-Siemens-Str. 27, 76694 Forst, Germany, hereby declare that this product conforms to the following standards, normative documents and EU directives:
Machinery directive: 2006/42/EC
Applied harmonized standards:
EN ISO 11148-4:2012
Device name:
Air Needle Scaler
Model number: PDNE 4000 C3
Year of manufacture: 10/2023
Lot number: IAN 435173_2304
Documentation officer:
Marc Stockenberger
Place: Forst
Date/manufacturer's signature: 06.07.2023

Marc Stockenberger
Managing Director
Technical changes due to further development are reserved.
4. Inbetriebnahme
4.1 Bedienung
Marc Stockenberger
Geschäftsführer