PKLL 3 A1 - Measuring equipment PARKSIDE - Free user manual and instructions
Find the device manual for free PKLL 3 A1 PARKSIDE in PDF.

| Product type | Cross-line laser level |
| Brand | Parkside |
| Model | PKLL 3 A1 |
| Rated voltage | 3 V (2 × 1,5 V AA) |
| Working range | Up to 40 m |
| Weight (without tripod) | 260 g |
| Self-leveling range | ± 3° |
| Leveling accuracy | ± 0,5 mm/m |
| Leveling time | ≈ 4 s |
| Laser – wavelength | 515 nm |
| Laser – class | 2 |
| Laser – power | < 1 mW |
| Storage temperature | -30 to 60 °C |
| Operating temperature | -10 to 50 °C |
| Power supply | 2 AA batteries (1,5 V) |
| Main functions | Projection of vertical and horizontal lines, self-leveling |
| Care and cleaning | Clean with a soft cloth; do not use solvents |
| Safety | Class 2 laser – do not stare into the beam |
| Spare parts available | Tripod (ref. 91120039) |
| Warranty | 3 years (private use) |
Frequently Asked Questions - PKLL 3 A1 PARKSIDE
User questions about PKLL 3 A1 PARKSIDE
0 question about this device. Answer the ones you know or ask your own.
Ask a new question about this device
Download the instructions for your Measuring equipment in PDF format for free! Find your manual PKLL 3 A1 - PARKSIDE and take your electronic device back in hand. On this page are published all the documents necessary for the use of your device. PKLL 3 A1 by PARKSIDE.
USER MANUAL PKLL 3 A1 PARKSIDE
natural_image
Black-and-white photo of a tripod-mounted surveying instrument with a central screen (no visible text or symbols)
PDF ONLINE
parkside-diy.com

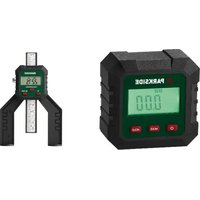
Cross line laser / Kreuzlinienlaser / Niveau laser en croix PKLL 3 A1
DE AT CH
Kreuzlinienlaser
Translation of the original instructions
NL BE
Kruislijnenlaser
Before reading, unfold the page containing the illustrations and familiarise yourself with all functions of the device.
FR BE
Christian Frank
Scope of delivery/accessories.... 16
Overview......16
Description of functions...... 16
Technical data.... 16
Safety information......16
Meaning of the safety information.... 16
Pictograms and symbols......17
General safety instructions......17
Preparation......18
Control elements...... 18
Inserting the batteries....18
Working with the tripod...... 18
Adjusting the tripod....19
Operation....19
Working with the automatic leveller.... 19
Working without the automatic leveller.... 19
Transport....19
Cleaning, maintenance and storage....19
Cleaning.... 20
Maintenance....20
Storage.... 20
Disposal/environmental protection.... 20
Troubleshooting...... 21
Service.... 21
Guarantee....21
Repair service....23
Service Centre......23
Importer....23
Spare parts and accessories..... 24
Translation of the original EU declaration of conformity....24
Exploded view.... 126
Introduction
Congratulations on purchasing your new cross line laser (hereafter referred to as device or power tool). You have chosen a high-quality device. This device was quality-tested and subjected to a final inspection during production, therefore ensuring proper functioning of your device.

The instruction manual forms part of this device. It contains important information on safety, use and disposal. Read the instruction manual carefully. Familiarise yourself with the controls and how to use the device correctly. Use the device only as described and for the stated fields of application. Store the instruction manual carefully and ensure that all documents are handed over in the event that the device is passed on to another user.
Proper use
This device is only intended for the following use:
- Projection of vertical and horizontal lines
Any other use that is not expressly permitted in this instruction manual may pose a serious hazard to the user and result in damage to the device. The operator or user of the machine is responsible for any accidents or personal injury and/or ma-
terial damage to third parties or their property. The machine is intended to be used by do-it-yourselfers. It was not designed for heavy commercial use. The warranty is void in the case of commercial use. The manufacturer is not liable for damage caused by improper use or incorrect operation.
Scope of delivery/accessories
Unpack the device and check that everything is present.
Dispose of the packaging material properly.
- Cross line laser
- Tripod
- 2× TRONIC Alkaline battery (1.5 V; AA/LR06)
• Translation of the original instructions
Overview
The illustrations for the device can be found on the front fold-out page.
1 On/Off button
2 Battery compartment
3 Levelling stop
4 Internal thread
5 Laser
6 Screw
7 Crank handle
8 Flap fastener
9 Leg
10 Locking screw
Description of functions
Please refer to the descriptions below for information on how the operating elements work.
Technical data
Cross line laser ......PKLL 3 A1
Rated voltage U ...3 V = (2×1.5 V AA)
Work area 40 m
Weight (without tripod) 260 g
Self-levelling range ....± 3°
Levelling accuracy ....± 0.5 mm/m
Levelling time ....≈ 4s
Laser
- Wavelength 515 nm
- Laser class 2
- Laser power ....<1 mW
Temperature
- Storage ......-30 - 60 °C
- Operation ......-10 - 50 °C
NOTICE! The working range may be restricted by environmental conditions (e.g. bright light).
Safety information
This section deals with the basic safety instructions for using the device.
Meaning of the safety information
⚠️ DANGER! If you do not observe this safety instruction, an accident will occur. The result of which is severe bodily injury or death.
WARNING! If you do not observe this safety instruction, an accident may occur. The result of which is likely severe bodily injury or death.
⚠️ CAUTION! If you do not observe this safety instruction, an accident will occur. The result of which is likely minor or moderate bodily injury.
NOTICE! If you do not observe this safety instruction, an accident will occur. The result of which is possible damage to property.
Pictograms and symbols
Symbols on the device

Read the instruction manual
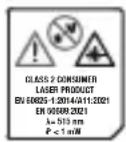
Attention! Laser beam. Do not look into the beam! Laser class 2
Waste electrical and electronic equipment (WEEE) must not be disposed of with domestic waste.
Symbols used in the instruction manual

Attention!
General safety instructions
- Observe the information on operation, cleaning, storage and disposal in the operating instructions.
- Keep children away from the device.
- Check the device each time before using. If damaged, have the device repaired. Do not use the device if damaged.
- Turn off the device when not in use. Do not leave the device unsupervised.
- Keep the device away from medical devices, magnetic data storage media and magnetically sensitive devices.
- This device can be used by individuals with reduced physic-
al, sensory or mental abilities or a lack of experience and knowledge if they are supervised or have been instructed in the safe use of the device and understand the resulting hazards.
Children must never play with the device.
Cleaning and user maintenance must not be carried out by children.
- Do not leave the device unattended during operation.
- Do not allow children to play with the packaging. Children can become trapped in it while playing and suffocate.
Safety instructions for handling the laser
- Caution: Laser radiation - Do not look into the beam - Laser class 2
- Do not aim the laser at reflective surfaces.
- Caution! When operating devices or adjusting devices or procedures are used that do not conform to the ones stated below, you may be exposed dangerous radiation.
Safety information for batteries
Under normal operating conditions, a hermetically sealed battery does not present any hazards. A battery can present a hazard in the following cases:
⚠️ DANGER! Danger to life due if swallowed! Keep children away from batteries.
CAUTION! Risk of explosion and burns! When handling batteries, observe the following:
- Never open or damage batteries.
- Never try to charge disposable batteries.
- Never expose batteries to a source of heat, fire or direct sunlight.
- Never short-circuit batteries.
- Never mix used and new batteries in a device.
- Pay attention to the correct polarity when inserting the batteries.
• Take leaking batteries out of the battery compartment immediately.
WARNING! Risk of chemical burns and poisoning from battery acid! If toxic and caustic battery acid leaks:
• After eye contact: Flush the eyes with a large amount of running water for 30 minutes. Call a doctor right away.
• After skin contact: Take off soiled clothing and rinse the skin with a large amount of running water for at least 15 minutes. Call a doctor if irritation, injury or pain persists.
• After breathing it in: Get some fresh air if you notice your respiratory tract is irritated. Call a doctor if irritation persists.
• After swallowing: Do not force vomiting. If the affected person is conscious, make sure that they rinse their mouth and the surrounding areas of skin with water for at least 15 minutes. Consult a
doctor right away. Call a doctor right away.
Preparation
Control elements
Familiarise yourself with the operating elements before using the device for the first time.
On/Off button (1)
- Switching on: Press
- Switching off: Press
Levelling stop (3)
| Symbol Function | |
| Automatic level-ling switched on | |
| Automatic level-ling switched off | |
Inserting the batteries
Notes
- Ensure you place the batteries into the compartment in accordance with the illustration.
- The On/Off switch (1) will flash red when the battery charge is low.
Procedure
- Open the battery compartment (2).
- Insert two batteries (size: AA).
- Close the battery compartment (2).
Working with the tripod
You can place the device in a stable position and adjust the height using the tripod.
Screwing the device onto the tri- pod
- Place the device with the internal thread (4) on the screw (6) and screw it on hand-tight.
⚠️ CAUTION! Do not use excessive force as this may damage the device.
Adjusting the tripod
Setting up the tripod
- Pull the legs (9) apart.
Adjusting the height, tripod legs
- Open the snap fasteners (8).
- Adjust the legs (9) to the desired length.
- Close the snap fasteners (8).
Adjusting the height, crank handle
- Fold up the crank handle (7).
- Loosen the locking screw (10).
- Crank the tripod to the desired height.
- Fasten the locking screw again.
Operation
Working with the automatic leveller
Notes
- NOTICE! Levelling is complete once the laser lines no longer move.
- CAUTION! In the event of vibrations, the laser will level itself automatically; wait until the laser lines no longer move.
Switching on
- Place the device on a horizontal, solid surface or fasten the device
to a tripod (Working with the tripod, p. 18)
- Push the levelling lock (3) to position: 🔒.
The On/Off button (1) lights up:
- green: If automatic levelling is possible.
- red: If automatic levelling is not possible.
The laser lines flash.
Switching off
- Push the levelling lock (3) to position: 🔒
Working without the automatic leveller
Switching on
⚠️ CAUTION! The On/Off button (1) lights up continuously when working without the automatic leveller. The laser lines shown are not levelled.
- Push the levelling lock (3) to position: 🔒.
- Press the On/Off button (1). The laser lines shown flash at intervals.
Switching off
- Press the On/Off button (1).
Transport
Information on transporting the tool:
- Turn off the device.
- Push the levelling lock (3) to position: 🔒
Cleaning, maintenance and storage
You should have any repair and maintenance work that is not de-
scribed in these instructions carried out by our Service Centre. Only use original replacement parts.
Cleaning
WARNING! Electric shock! Never spray down the device with water. NOTICE! Risk of damage. Chemical substances may attack the plastic parts of the machine. Do not use any cleaning agents or solvents.
- Thoroughly clean the tool after every use.
- Clean the disc protecting the laser (5) with a soft jet of air, or soft cloth. Do not use heavy pressure as this may damage the surface!
- Clean the surface of the device with a soft brush or cloth.
Maintenance
The device is maintenance free.
Storage
Always store the device and accessories:
- clean
- dry
• protected against dust
• out of the reach of children
Notes
- Remove the batteries if you will not be using the product for a longer period of time.
Disposal/environmental protection
Waste electrical and electronic equipment (WEEE) must not be disposed of with domestic waste.
The symbol of the crossed-out wheeled bin means that this product must not be disposed of as unsorted municipal waste at the end of its useful life.
Directive 2012/19/EU on waste electrical and electronic equipment:
Consumers are legally obliged to recycle electrical and electronic equipment in an environmentally sound manner at the end of its life. In this way, environmentally friendly and resource-saving recycling is ensured. Depending on the implementation in national law, you may have the following options:
- Return to a shop,
- Hand over to an official collection point,
- Return to the manufacturer/distributor.
This does not affect accessories enclosed with the old devices or tools without any electrical components.
Dispose of the batteries according to local regulations. Hand in the batteries at a used battery collection point where they are recycled in an environmentally friendly manner. For more information, please contact your local waste management provider or the service centre.
Troubleshooting
The following table will assist you in fixing faults:
| Problem Possible Cause Remedy | ||
| Automatic lev-eller does not work | The automatic leveller can-not oscillate freely, the device is not aligned suf-ficiently parallel to the ground | Align the device so it is paral-lel to the ground |
| Device does not start | Discharged battery Inserting | the batteries, p.18 |
Service
Guarantee
Dear Customer,
This product is provided with a 3 year guarantee from the date of purchase. In case of defects, you have statutory rights against the seller of the product. These statutory rights are not restricted by our guarantee presented below.
Terms of Guarantee
The guarantee period begins on the date of purchase. Please retain the original receipt. This document is re-
quired as proof of purchase. If a material or manufacturing defect occurs within three years of the date of purchase of this product, we will repair or replace – at our choice – the product for you free of charge. This guarantee requires the defective product and proof of purchase to be presented within the three-year period with a brief written description of what constitutes the defect and when it occurred.
If the defect is covered by our guarantee, you will receive either the repaired product or a new product. No
new guarantee period begins on re-pair or replacement of the product.
Guarantee Period and Statutory Claims for Defects
The guarantee period is not extended by the guarantee service. This also applies for replaced or repaired parts. Any damages and defects already present at the time of purchase must be reported immediately after unpacking. Repairs arising after expiry of the guarantee period are chargeable.
Guarantee Cover
The product has been carefully produced in accordance with strict quality guidelines and conscientiously checked prior to delivery.
The guarantee applies for all material and manufacturing defects. This guarantee does not extend to cover product parts that are subject to normal wear and may therefore be considered as wearing parts (e.g. Battery capacity) or to cover damage to breakable parts.
This guarantee shall be invalid if the product has been damaged, used incorrectly or not maintained. Precise adherence to all of the instructions specified in the operating manual is required for proper use of the product. Intended uses and actions against which the operating manual advises or warns must be categorically avoided.
The product is designed only for private and not commercial use. The guarantee will be invalidated in case of misuse or improper handling, use of force, or interventions not undertaken by our authorised service branch.
Processing in Case of Guarantee
To ensure efficient handling of your query, please follow the directions below:
- Please have the receipt and product number (IAN 479091_2410) ready as proof of purchase for all enquiries.
- Please refer for the product number to the type plate on the product, an engraving on the product, the title page of the operating instructions (bottom left) or the sticker on the back or underside of the product.
- Should functional errors or other defects occur, please initially contact the service centre specified below by telephone or use the contact form available on park-side-diy.com in the category Service.
- After consultation with our customer service, a product recorded as defective can be sent postage paid to the service address communicated to you, with the proof of purchase (receipt) and specification of what constitutes the defect and when it occurred. In order to avoid acceptance problems and additional costs, please be sure to use only the address communicated to you. Ensure that the consignment is not sent carriage forward or by bulky goods, express or other special freight. Please send the appliance inc. all accessories supplied at the time
of purchase and ensure adequate, safe transport packaging.

You can view and download these and many other manuals on park-side-diy.com. This QR code will take you directly to parkside-diy.com. Select your country and search for the operating instructions via the search mask. You can open your operating instructions by entering the article number (IAN) 479091_2410.
Repair service
For repairs that are not covered by warranty, contact the service centre. They will gladly create a cost estimate for you.
• We can only work on devices which are sent in properly packed and with postage paid.
Note: Please send your device cleaned and with an indication of the defect to the address named for the service centre.
- The following are not accepted: devices sent in without prepaid postage, sent as bulky goods, sent as an Express shipment, or devices sent as any other form of special freight.
• We will dispose of defective devices you ship to us free of charge.
Service Centre

Service Great Britain
Tel.: 0800 051 8970
Contact form on parkside-diy.com
IAN 479091_2410

Service Malta
Tel.: 800 65168
Contact form on
parkside-diy.com
IAN 479091_2410
Importer
Please note that the address below is not a service address. Contact the service centre named above first.
Spare parts and accessories
You can get spare parts and accessories from www.grizzlytools.shop. If you have any problems with your order, contact us via our online shop. If you have any other questions, contact: Service Centre, p. 23
Pos. nr. Name Order No.
Tripod 91120039
Translation of the original EU declaration of conformity
Product: Cross line laser
Model: PKLL 3 A1
Serial number: 000001-218600
The object of the declaration described above is in conformity with the relevant Union harmonisation legislation:
2014/30/EU • 2011/65/EU & (EU) 2015/863
The object of the declaration described above is in conformity with Directive 2011/65/EU of the European Parliament and of the Council of 8 June 2011 on the restriction of the use of certain hazardous substances in electrical and electronic equipment.
To ensure conformity, the following harmonised standards and national standards and regulations have been applied:
EN 61010-1:2010/A1:2019 • EN 60825-1:2014/A11:2021 EN IEC 61326-1:2021 • EN 50689:2021 • EN IEC 63000:2018
This declaration of conformity is issued under the sole responsibility of the manufacturer:

Authorised representative of documentation
Sommaire
Introduction...... 25
PDF ONLINE parkside-diy.com
Christian Frank
Christian Frank
PDF ONLINE
parkside-diy.com
Christian Frank
Reparationsservice......120
Service-Center...... 121
Importør......121
Christian Frank
informativ • informative • informatif • informatief • informativo • informatív • informacyjny • informační • informatívny

IAN 479091_2410