ARA2000 - Antenna EGO - Free user manual and instructions
Find the device manual for free ARA2000 EGO in PDF.

| Product Type | RTK Antenna |
| Brand | EGO |
| Model | ARA2000 |
| Power Supply | 18–28 V DC, separate extra-low voltage source (SELV) |
| RTK antenna weight | 0.7 kg |
| Supplied low-voltage cable length | 10 m |
| IP protection rating | IP66 (total protection against dust and water jets) |
| Recommended operating temperature | 0°C to 40°C |
| Recommended storage temperature | -40°C to 70°C |
| Radio frequency bands (LoRa) | 863–870 MHz (Europe, Middle East, Africa); 917–920 MHz (Israel) |
| Maximum RF power | 22 dBm (nominal) |
| Main function | Receiving satellite signals and sending correction data to the robot lawnmower for precise positioning |
| Mounting | Wall-mounted (with supplied mounting bar or plate) |
| Compatibility | EGO AURA-R2 robot lawnmower (ARA2000 kit) |
| Maximum antenna-robot distance | 260 m in open field (reduced with obstacles) |
| LED status indicator | Colors and flashes indicating status (power, pairing, signal quality, standby, update) |
| Maintenance and cleaning | Clean with a damp cloth; do not use solvents |
| Safety | Follow electrical regulations; disconnect before cleaning; have repairs done by a qualified professional |
| Repairability | Repairs by a qualified repairer only; do not modify the product |
| Warranty | Check terms at egopowerplus.eu |
| Package contents | RTK antenna, 10 m low-voltage cable, wall mounting bar, mounting plate, 3 bolts, 10 cable fixing stakes, 4 screws |
Frequently Asked Questions - ARA2000 EGO
User questions about ARA2000 EGO
0 question about this device. Answer the ones you know or ask your own.
Ask a new question about this device
Download the instructions for your Antenna in PDF format for free! Find your manual ARA2000 - EGO and take your electronic device back in hand. On this page are published all the documents necessary for the use of your device. ARA2000 by EGO.
USER MANUAL ARA2000 EGO
natural_image
Line drawing of a handheld device with a circular top and handle, showing internal components (no text or symbols)ARA2000
RTK ANTENNA
EN RTK antenna 7 RO Antena RTK 71
DE RTK antenne 11 SL RTK Antenna 75
FR Antenne RTK 15 LT RTK Antena 79
ES Antena RTK 19 LV RTK antenna 83
PT Antena RTK 23 GR Kεραια RTK 87
IT Antenna RTK 27 TR RTK Anteni 91
D1
natural_image
Technical line drawing of a mechanical or electronic component with no visible text or symbols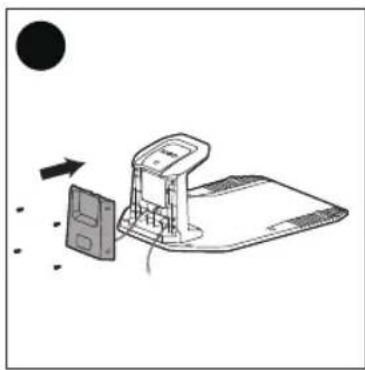
natural_image
Diagram of a device with an open lid and a screen, showing directional arrows (no text or symbols)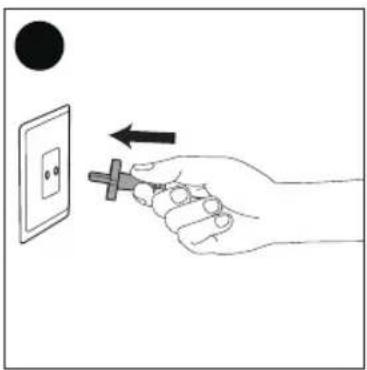
D2
natural_image
Technical line drawing of a mechanical device with internal components and directional arrows (no text or symbols)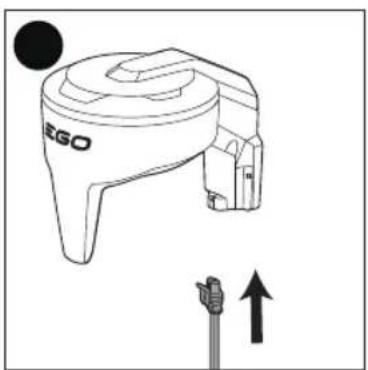
natural_image
Line drawing of a device labeled 'EGO' with an upward arrow indicator below (no text or symbols on the device itself)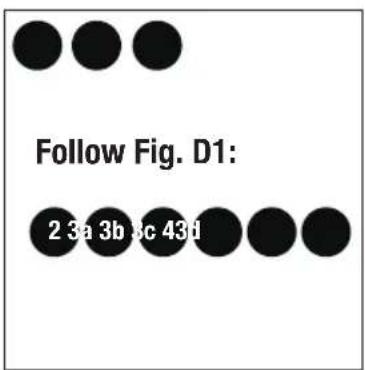
E

natural_image
Line drawing of a robotic lawn mower with a circular head and gear (no text or symbols)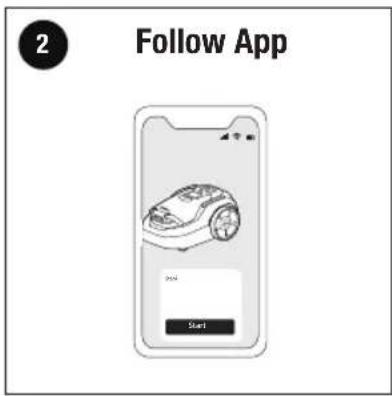
natural_image
Line drawing of a GE0 electric shaver with screwdriver and mounting bracket (no text or symbols)EGO Europe GmbH
The Anchorage, 34 Bridge Street Reading, RG1 2LU, United Kingdom
NOTE: The following format is used in the Operator's manual to make it easier to use:
■ Text written in italicsis a text that is in the EGO Connect™ app.
READ ALL INSTRUCTIONS!
WARNING: Be sure to read and understand all safety instructions in this Operator's Manual, including all safety alert symbols such as "DANGER", "WARNING" and "CAUTION" before using this product. Failure to follow all instructions listed below may result in electric shock, fire, and/or serious personal injury.
WARNING: To ensure safety and reliability, all repairs should be performed by a qualified service technician.
SAFETY INSTRUCTIONS
READ CAREFULLY BEFORE USE.
KEEP FOR FUTURE REFERENCE.
■ Obey national regulations about electrical safety.
■ The product is only to be used with the power supply supplied by the manufacturer.
■ The product must only be used with the equipment recommended by the manufacturer. All other types of use are incorrect.
- Please read the Operator's Manual of EGO RMR1500E/RMR3000E/RMR6000E carefully and make sure you understand the instructions before using the product.
■ Do not attempt to modify the product or create accessories not recommended for use with the product.
■ Inspect the product carefully to make sure that no breakage or damage occurred during shipping.
■ Make sure that the plugs of the low-voltage cable and the power supply are clean and dry before you connect them.
■ There is a risk of falling objects during the installation of the RTK antenna which can result in injury.
■ There is a risk of falling when you install the RTK antenna in a high position. Make sure that you have a stable position during installation.
■ Do not put power supply cable and low-voltage cable in the work area, which can cause damage to the cables.
■ Disconnect the product from the power supply before cleaning or performing any maintenance.
■ To decrease the risk of damage to electrical components in the RTK antenna, we recommend that the power supply to the RTK antenna is disconnected if there is a risk of a thunderstorm. Connect the power supply again when there is no risk of thunderstorm.
SAFETY SYMBOLS
| Safety Alert | |
| Read & Understand operator's manual | |
| Designed to be supplied from a separated extra-low voltage (SELV) power source | |
| CE | This product is in accordance with applicable EC directives. |
| UKCA | This product is in accordance with applicable UK legislation. |
| Waste electrical products should not be disposed of with household waste. Take to an authorized recycler. | |
| IP66 | Protected from total dust ingress and from high-pressure water jets from any direction |
| m Meter | |
| cm Centimeter | |
| mm Millimeter | |
| °C Celsius |
INTRODUCTION
Product description
The RTK antenna receives satellite signals and sends correction data to the robotic lawn mower.
EN
EGO
EGO AURA-R2 description (Fig. A)
The EGO AURA-R2 contains a robotic lawn mower, a charging station and a RTK antenna. The robotic lawn mower and the RTK antenna receives satellite signals for positioning. The RTK antenna is stationary and sends correction data to the robotic lawn mower to get an accurate position for the mower. The mowing zone is made virtually in EGO Connect™ app by operating the mower.
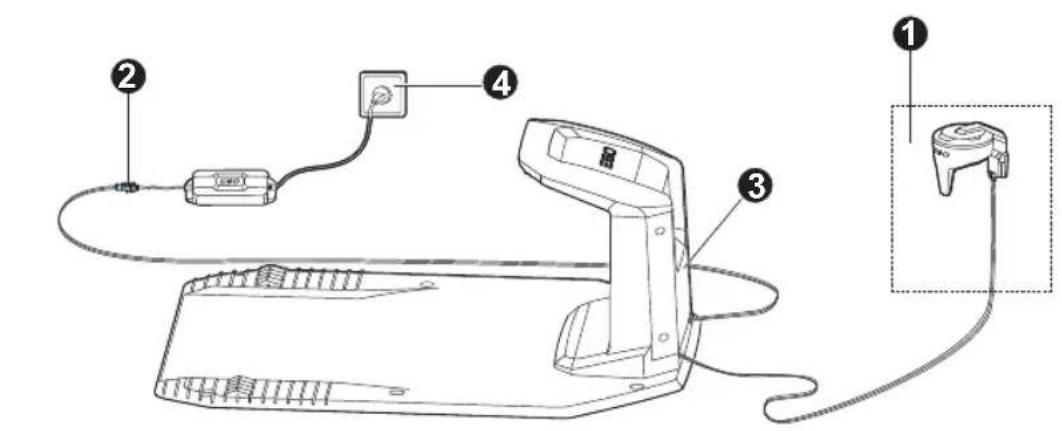
PACKING LIST (FIG. B)
DESCRIPTION
Know Your RTK Antenna (Fig. B)
- RTK Antenna
- LED Status Indicator
- Wall-mount Pole
- Wall-mount Plate
- Bolt (3)
- Stake to Fix the Low-voltage Cable (10)
- Low-voltage Cable
- Screw (4)
SPECIFICATIONS
| Input 18-28 V d.c. | ||
| RTK antenna IP-classification IP66 | ||
| Low-voltage cable length 10 m | ||
| RTK antenna weight 0.7 kg | ||
| Lora | Frequency Band(s) | 863-870 MHz(Europe, Middle East,Africa) |
| Frequency Band(s) 917 | -920 MHz (Israel) | |
| Max. RF Power | 22 dBm (ConductedRated) | |
| Recommended operating temperature | 0°C - 40°C | |
| Recommended storage temperature | -40°C - 70°C | |
INSTALLATION
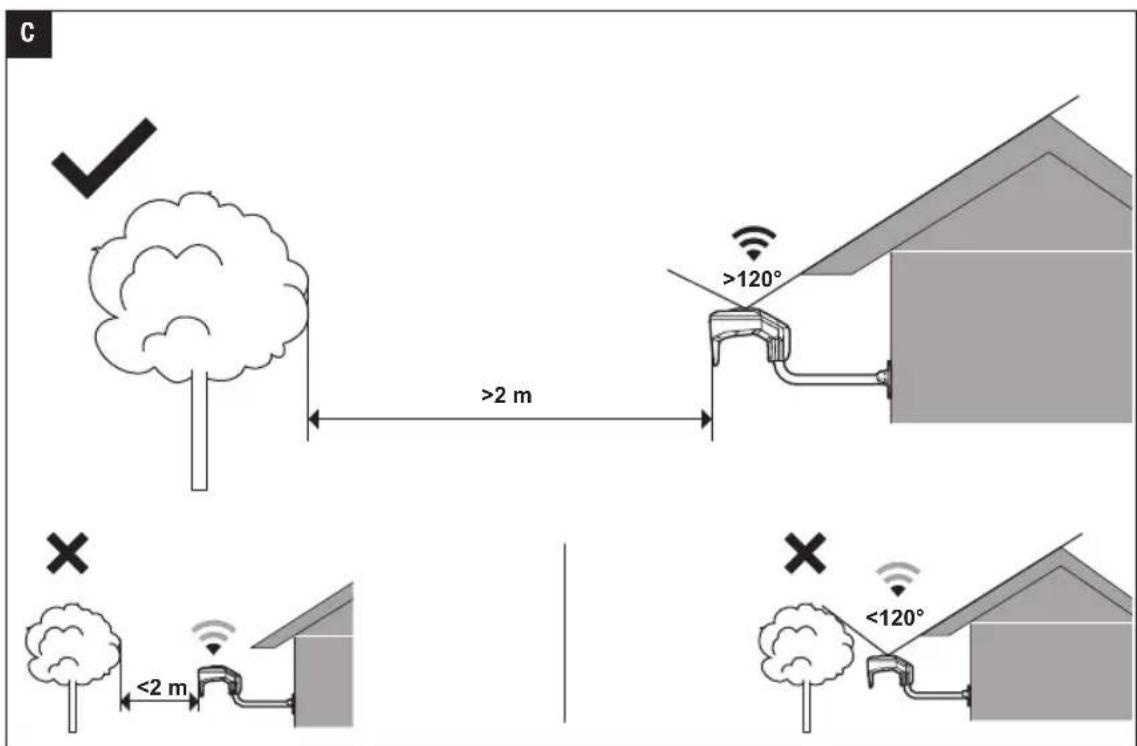
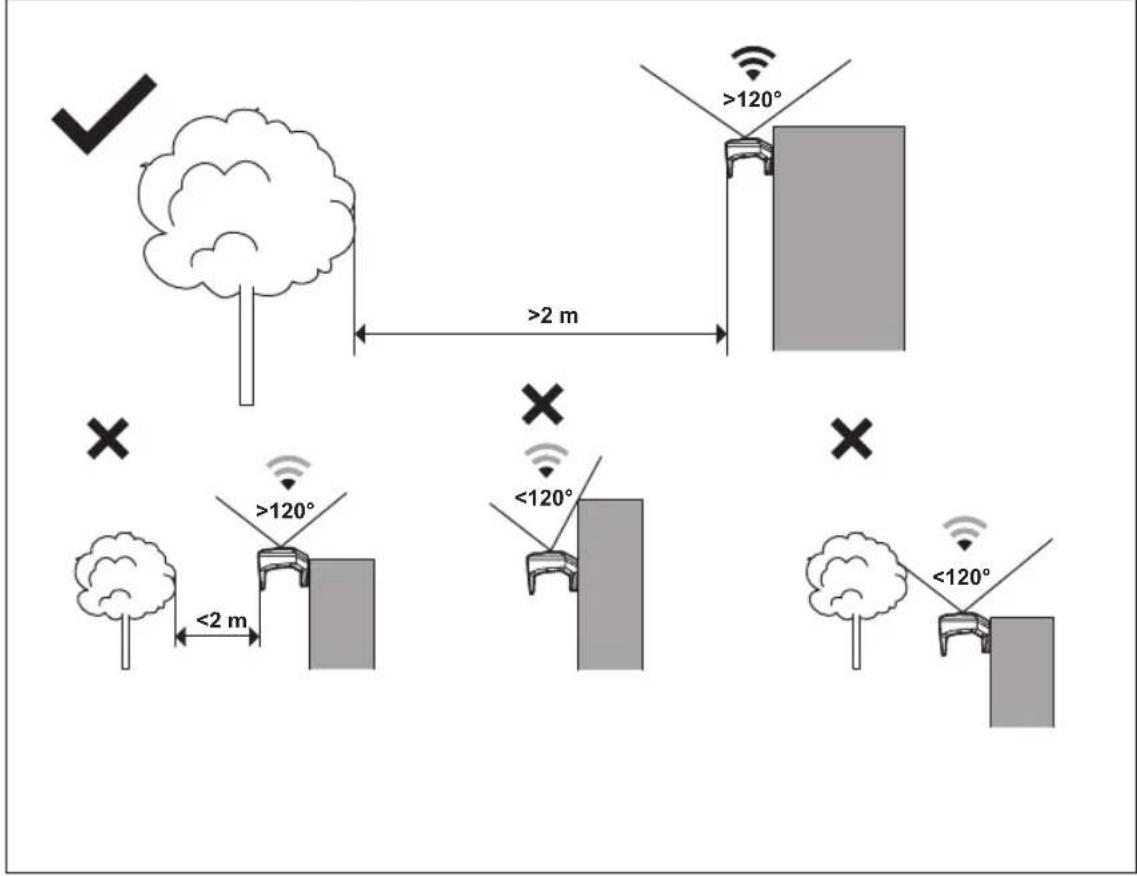
Examine Where to Put the RTK Antenna (Fig. C)
You can install the RTK antenna on a wall, follow the basic principles (Fig. C).
Installation process on app will help guide you in selecting appropriate location. Where possible choose an open area with no obstacles blocking views in any direction if possible (within at least the radius of 2 m).
■ Try to keep the sky directly above the antenna unobstructed by trees or roofs.
If full openness on all sides cannot be achieved, at least keep the southern sky clear when in the Northern Hemisphere, or the northern sky when in the Southern Hemisphere (If possible, try to keep the east and west sides clear of obstacles).
■ Install the RTK antenna on a fixed object that cannot move or rotate.
CAUTION: If there is a lightning rod nearby, do not install the RTK Antenna higher than the lightning rod.
CAUTION: Do not install the RTK Antenna on a flagpole. Movements of the antenna will affect the correction data sent to the product with the accurate position.
NOTE: If the RTK antenna is installed on a wall, the top of the antenna must be above the wall. Metal objects can cause interference with the antenna signal.
NOTE: Do not fix the RTK antenna in place until signals have been verified and location deemed suitable by app process.
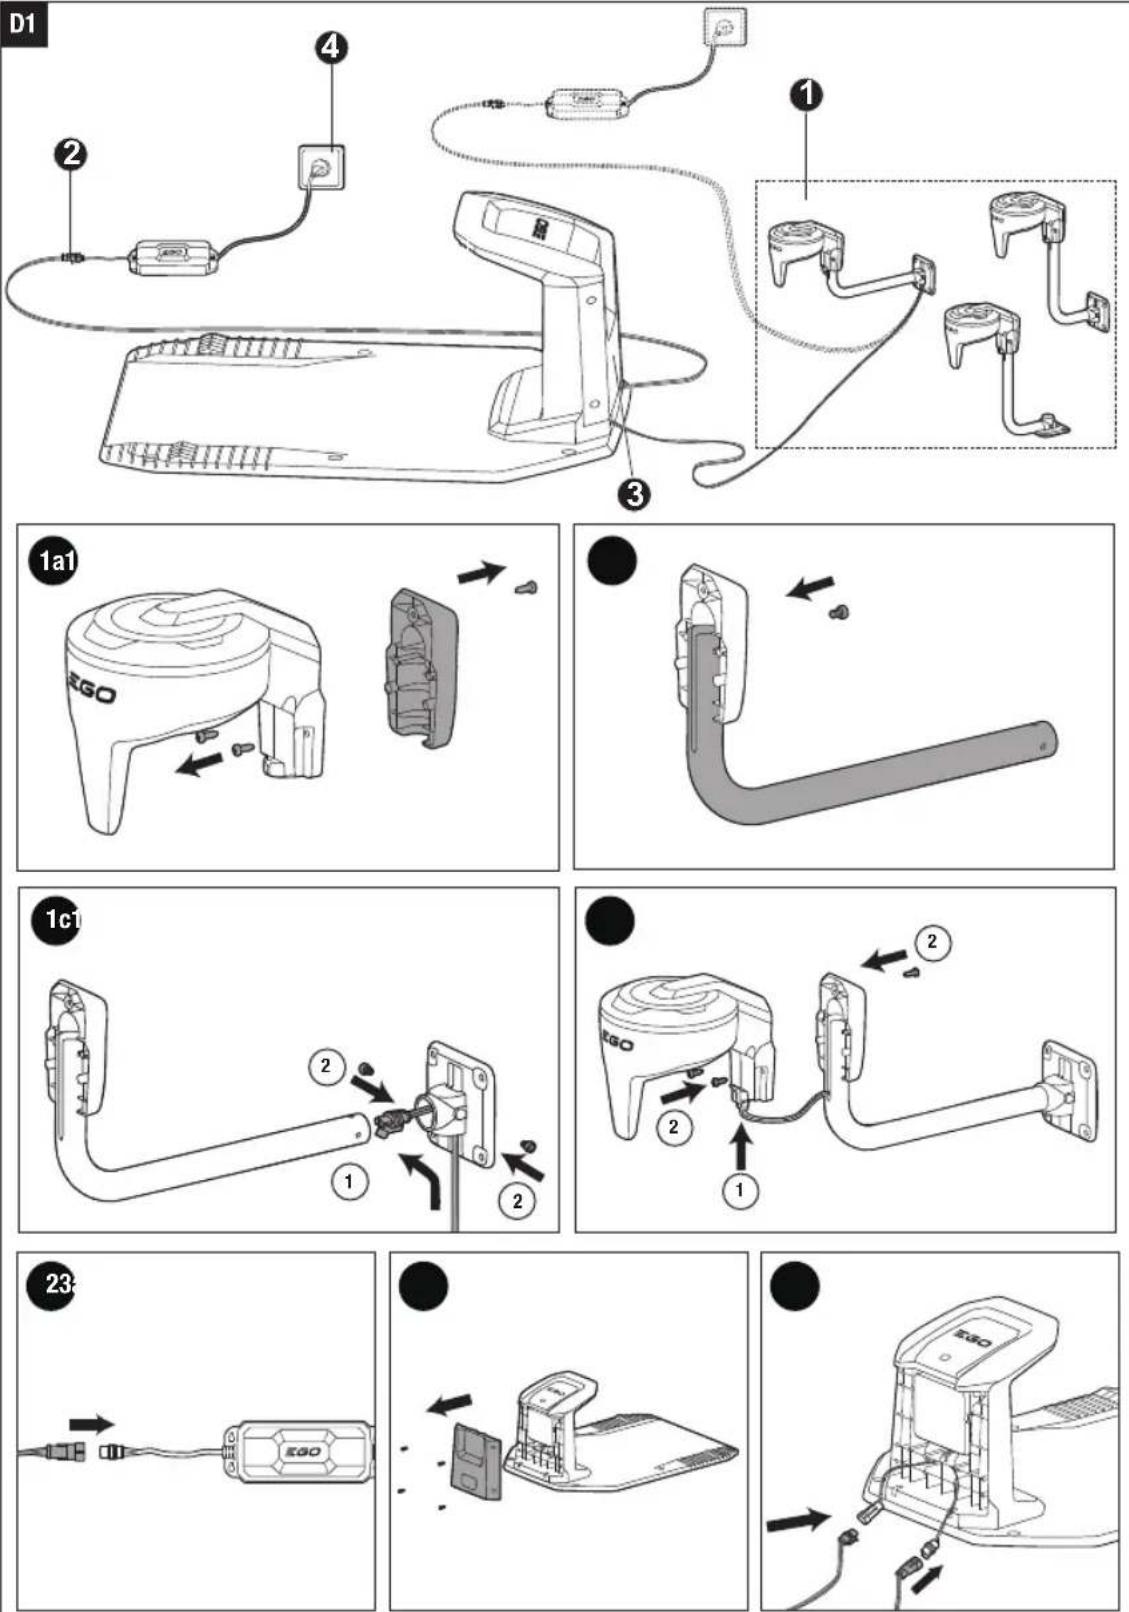
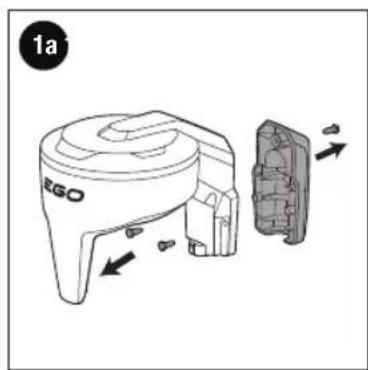
Assemble the Charging Station and the Antenna (Fig. D1, D2)
You can select appropriate assembly way according to the RTK antenna installation location:
■ Install the RTK antenna by wall-mount pole on a wall, refer to D1.
■ Install the RTK antenna directly on a wall, refer to D2.
NOTE: The RTK antenna can be connected to either the charging station or the power supply via low-voltage cable.
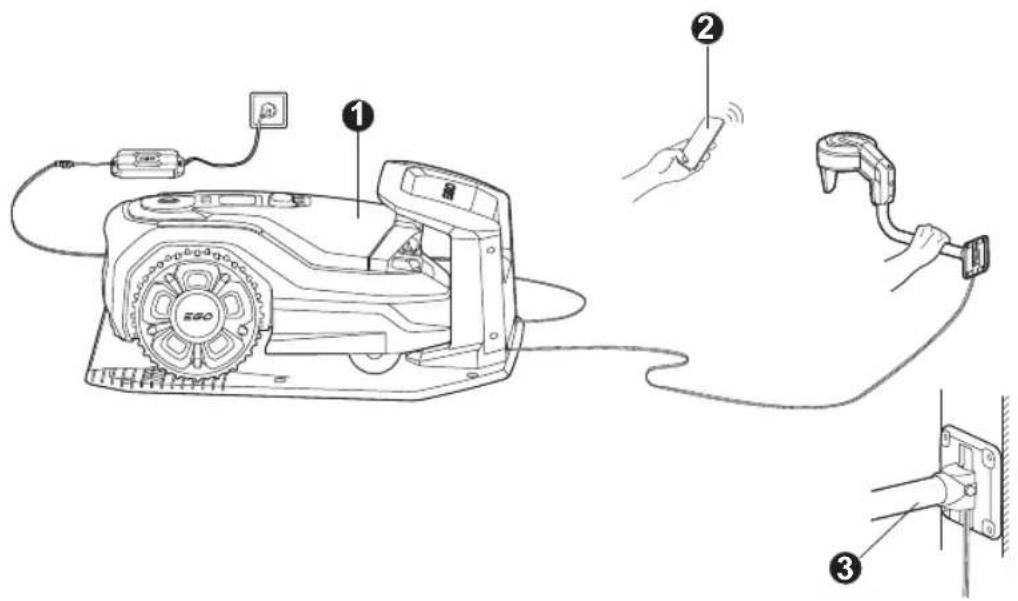
Select the RTK Antenna Place for Installation via App and Secure the Antenna (Fig. E)
Fig. E illustrates the RTK antenna mounted on the wall by wall-mount pole.
To pair RTK antenna with mower
To pair the antenna with the mower, follow the instructions below:
To relocate RTK antenna
If you want to adjust the antenna or the wall-mount pole:
Tap : (Device Details) > Others > Relocate Antenna in app
Follow the guidance to relocate the RTK antenna and make sure the antenna always points straight up to the sky.
NOTE: You will need to remap all work areas when the RTK antenna has been relocated.
■ Make sure the mower is switched ON and the antenna is plugged in.
■ Push the mower into the charging station, make sure proper contacts between the mower and the charging station. Please wait until the charging status indicator flashes GREEN or solid GREEN.
NOTE: Make sure only one mower and antenna powered on at the same time so you know which RTK antenna paired to which mower.
The antenna will pair with the mower automatically, and the antenna status indicator flashes GREEN, meaning the antenna has been paired with the mower.
NOTE: Make sure that the maximum distance between the RTK antenna and the robot is 260 m.
NOTE: The maximum distance decreases if there are objects between the RTK antenna and robot.
To locate RTK antenna
- Follow the instructions in app and tap Start, move the antenna to the specified position, keep it upright for 1 minute and observe the signal strength. If the scores is more than 60 in the app, the antenna can be fixed here. If the scores is less than 60, please follow the instructions to find a better location. We recommend following the guidance in app to check for an even better location with a score greater than 80.
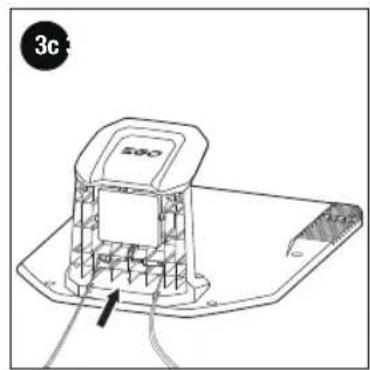
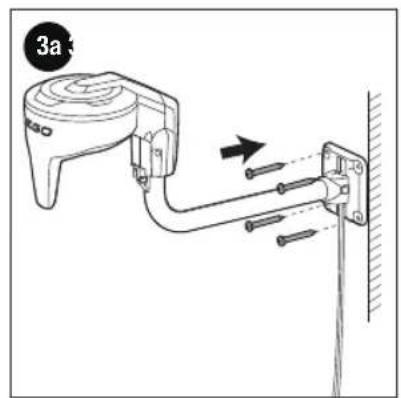
- Secure the antenna
- For the antenna mounted by the wall-mount pole, refer to ③a.
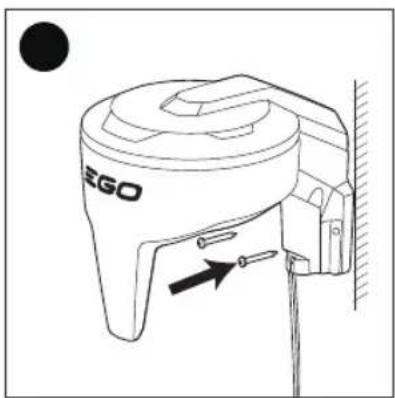
- For the antenna mounted directly on the wall, refer to ③b.
- When clear signal achieved as detailed in app, Tap Locate antenna in app, the antenna status indicator will glow solid GREEN, meaning the antenna location is fixed and the antenna function is normal. Once you have located the antenna, follow the instructions to proceed with the mapping.
MAINTENANCE
Cleaning the Product
⚠ WARNING: Never use solvents for cleaning. If necessary, use a moist cloth to clean the product.
Protecting the Environment
Do not dispose of electrical appliances as unsorted municipal waste, use separate collection facilities.
Contact your local government for information regarding the collection systems available.
If electrical appliances are disposed of in landfills or dumps, hazardous substances can leak into the groundwater and get into the food chain, damaging your health and well-being.
TROUBLESHOOTING
LED Status Indicator on the RTK Antenna
The LED status indicator on the RTK antenna shows the current antenna status:
| LED Status Indicator Antenna status | |
| Solid RED Antenna has electronics error. | |
| Solid GREEN | Antenna is powered by power supply or battery (battery is not in charged), and antenna function is normal. |
| Solid GREEN for 10 seconds, and flashing once every 2 seconds | Antenna is powered battery (battery is in charged), and antenna function is OK. |
| Flashing RED/GREEN alternately, flashing once every 2 seconds | Antenna is powered on normally, and no pairing with robot. |
| Flashing RED, flashing once every 2 seconds | Antenna has no communication with robot. |
| Flashing GREEN, flashing twice every second | Antenna site is in selection, and the score in app ≥ 60 |
| Flashing RED, flashing twice every second A | Antenna site is in selection, and the score in app < 60 |
| Flashing GREEN for 1 second every 10 seconds | Antenna is in sleep mode. |
| Flashing RED/GREEN alternately, flashing twice every second | Antenna update is in progress. |
WARRANTY
EGO WARRANTY POLICY
Please visit the website egopowerplus.eu for full terms and conditions of the EGO Warranty policy.
LISTA DE PEÇAS (IMAGEM B)
DESCRIÇÃO
Ottovirta 18–28 V DC
POLITYKA GWARANCYJNA EGO
A CSOMAG TARTALMA (B ÁBRA)
LEÍRÁS
RTK s68960s 3505856s
_y _y ^ _s ^ s:
s z g o g g o : ( d m o m o g g o) > b z > s g g o z g g s
natural_image
Line drawing of a handheld electronic device with a circular top and handle (no text or symbols)ARA2000
RTK בַרְבָא HE
RTK هوائي تقنية AR