FC 59 - Face cleansing BEURER - Free user manual and instructions
Find the device manual for free FC 59 BEURER in PDF.

| Product type | Facial cosmetic brush |
| Brand | Beurer |
| Model | FC 59 |
| Dimensions (device) | Diameter 60 mm, height with silicone attachment 60 mm, with exfoliation/sensitive 67 mm |
| Weight (device) | 89 g |
| Included brush attachments | 3 (Exfoliation, Sensitive, Silicone) |
| Attachment dimensions | Silicone: diameter 48 mm, height 13 mm; Exfoliation/Sensitive: diameter 47 mm, height 20 mm |
| Attachment weight | Silicone: 11 g; Exfoliation/Sensitive: 14 g |
| Power supply | Li-Ion battery 350 mAh, 3.7 V |
| Charging input | USB-C, 5.0 V, 1.0 A |
| Charging time | 90 minutes |
| Runtime | Approximately 50 minutes |
| Speeds | 2 speeds |
| Key lock | Yes (3-second activation) |
| Water resistance | IPX7 (temporary immersion up to 1 meter for 30 minutes) |
| Usage | Face, except eye and mouth area |
| Cleaning | Brush attachments washable with water, do not immerse device |
| Attachment replacement | Exfoliation/Sensitive: every 4 months; Silicone: every 6 months |
| Warranty | See included warranty card |
| Manufacturer | Beurer |
| Protection class | II |
Frequently Asked Questions - FC 59 BEURER
User questions about FC 59 BEURER
0 question about this device. Answer the ones you know or ask your own.
Ask a new question about this device
Download the instructions for your Face cleansing in PDF format for free! Find your manual FC 59 - BEURER and take your electronic device back in hand. On this page are published all the documents necessary for the use of your device. FC 59 by BEURER.
USER MANUAL FC 59 BEURER
natural_image
Close-up of a metallic mechanical component with textured surface and circular base (no text or symbols visible)DE Gesichtsbürste
Gebrauchsanweisung
EN Facial brush
Instructions for use 12
natural_image
Illustration of an open book with a geometric arrow pointing to its cover, showing text lines and page layout (no readable text or symbols)EN Unfold page 3 before reading the instructions for use.
natural_image
Line drawing of a hand gripping a circular object with a base, labeled 'A' in the corner (no text or symbols on the diagram itself)
natural_image
Line drawing of a hand holding a circular mechanical component (no text or symbols)DEUTSCH

natural_image
Close-up of a mechanical component with a tool, no visible text or symbols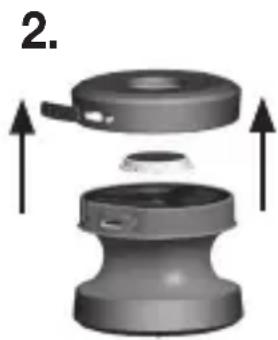
natural_image
3D mechanical component diagram showing a cylindrical housing with internal components and upward arrows indicating motion (no text or symbols)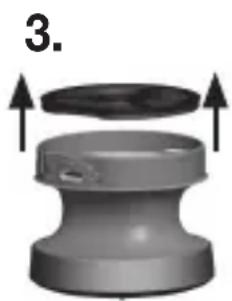
natural_image
3D diagram of a mechanical component with arrows indicating upward motion (no text or symbols)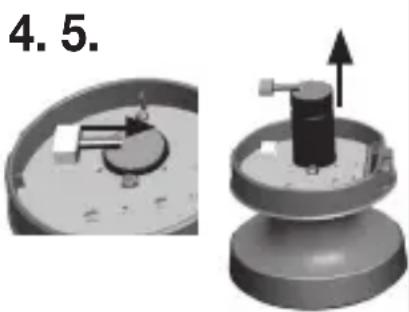
natural_image
3D mechanical assembly diagram showing a dial and a cylindrical component with an upward arrow (no text or symbols)- TECHNISCHE ANGABEN
Read these instructions for use carefully and keep them for later use, be sure to make them accessible to other users and observe the information they contain
Table of conents
- Included in delivery ...... 12
- Signs and symbols....12
- Intended use....13
- Warnings and safety notes....13
- Device description....15
- Usage 15
6.1 Initial use....15
6.2 Starting use....15
6.3 Button lock....16 - Cleaning and maintenance....16
- Accessories and replacement parts....16
- Troubleshooting....17
- Disposal....17
- Technical specifications ....18
- Warranty ....18
1. INCLUDED IN DELIVERY
Check that the exterior of the cardboard delivery packaging is intact and make sure that all contents are present. Before use, ensure that there is no visible damage to the device or accessories and that all packaging material has been removed. If you have any doubts, do not use the device and contact your retailer or the specified Customer Services address.
- 1 hand-held device
• 1 brush attachment Exfoliation
• 1 brush attachment Sensitive
• 1 brush attachment Silicon
• 1 USB-C charging cable
2. SIGNS AND SYMBOLS
The following symbols are used on the device, in these instructions for use, on the packaging and on the type plate for the device:

WARNING
Indicates a potentially impending danger. If it is not avoided, there is a risk of death or serious injury.

CAUTION
Indicates a potentially impending danger. If it is not avoided, slight or minor injuries may result.
NOTICE
Indicates a potentially harmful situation. If it is not avoided, the system or something in its vicinity may be damaged.
| Product informationNote on important information | |
| Read the instructions | |
| The electronic device must not be disposed of with household waste | |
| Do not dispose of batteries containing hazardous substances with household waste | |
| Manufacturer | |
| CE labellingThis product satisfies the requirements of the applicable European and national directives. | |
| Separate the product and packaging elements and dispose of them in accordance with local regulations. | |
| Marking to identify the packaging material.A = material abbreviation,B = material number:1-7 = plastics,20-22 = paper and cardboard | |
| Protection class II device | |
| The products demonstrably meet the requirements of the Technical Regulations of the EAEU | |
| Protection against temporary sub-mersion. Device can be immersed to a depth of 1 metre for up to 30 minutes. |
| Suitable for use in a bath or shower | |
| Direct current | |
| USB-C | |
| United Kingdom Conformity Assessed Mark | |
| Importer |
3. INTENDED USE
The device is only to be used on the human face (apart from the eye and mouth area). The device is only intended for the purpose described in these instructions for use. The manufacturer is not liable for damage resulting from improper or careless use.
4. WARNINGS AND SAFETY NOTES
WARNING
- Danger of su ocation by packaging material. Keep packaging material away from children.
- Before use, inspect the device and accessories for visible damage. If you have any doubts, do not use the device and contact your retailer or the specified Customer Service address.
- The hand-held part must be disconnected from the connection cable before it is cleaned in water.
- When using the device in the bathroom, unplug the plug after charging as water in the vicinity constitutes a danger, even when the device is switched o.
-
Keep the device away from extended exposure to direct sunlight, extreme heat or boiling water.
-
Avoid using corrosive cleaning products or care products which are clay or silicone based.
- The device is only intended for domestic/private use, not for commercial use.
- This device may be used by children over the age of 8 and by people with reduced physical, sensory or mental skills or a lack of experience or knowledge, provided that they are supervised or have been instructed on how to use the device safely, and are fully aware of the consequent risks of use.
- Children must not play with the device.
- Cleaning and user maintenance must not be performed by children unless supervised.
- If the mains connection cable of this device is damaged, it must be disposed of.
- Under no circumstances should you open or repair the device yourself, as faultless functionality can no longer be guaranteed thereafter. Failure to adhere to this instruction will void the warranty.
WARNING
Do NOT use the device
- on broken skin.
- on open wounds.
- if you su er from a skin disease or irritated skin.
- immediately after sunbathing.
- if you are taking medication that contains steroids.
CAUTION
Only specialist personnel may perform repairs on electrical devices. Improper repairs may subject users to considerable danger. In the event of a fault or damage, have the device repaired by a certified specialist workshop.
Notes on handling batteries
WARNING
- Risk of explosion! Risk of fire! Failure to comply with the points mentioned can result in personal injury, overheating, leakage, venting, breakage, explosion, or fire.
- Always use the correct or supplied charging cable for charging.
- Avoid continuous charging or overcharging. Unplug the charger when charging is complete.
- Only use with the corresponding mains adapter.
- Charge the device under supervision, paying attention to any heat generated, deformation, or release of gases. If in doubt, stop charging.
- If batteries/charging cables/chargers are defective, immediately dispose them properly (see chapter 10 on disposal).
- Do not throw the device or batteries into a fire.
- Never forcibly discharge, heat, disassemble, open, crush, deform, encapsulate, modify, or knock the device or batteries.
- Never short-circuit batteries or the connections of the battery-powered device.
- Protect the device or batteries from direct sunlight, rain, heat, and water.
- Exposure of batteries to an environment with extremely high temperatures or an extremely low air pressure may result in explosion or leakage of flammable liquids and gases.
- If fluid from a battery comes into contact with your skin or eyes, wash the affected areas with water and seek medical assistance.
- Do not use modified or damaged batteries/charging cables/chargers.
- Always select the correct battery type. Contact Customer Services for information on whether a battery replacement part can be replaced.
-
Always insert the batteries correctly, taking into account the polarity (+/-).
-
If a battery has leaked, put on protective gloves and clean the battery compartment with a dry cloth.
- Choking hazard! Keep batteries out of the reach of children. Seek medical attention immediately if swallowed. Swallowing them may cause severe internal burns and death.
- Never allow children to replace batteries without adult supervision.
NOTICE
- Information on how to remove and/or replace the battery can be found in chapter 10 or on the website.
- Store battery replacement parts away from metal objects in a well-ventilated, dry, and cool place.
- Keep batteries clean and dry.
- Keep batteries away from water.
5. DEVICE DESCRIPTION
The associated drawings are shown on page 3.
1 ON/OFF button
2 LED rlng
3 Brush attachment
4 Recessed grip
5 USB-C-port
6 Brush attachment Silicon
7 Brush attachment Exfoliation
8 Brush attachment Sensitive
6. USAGE
6.1 Initial use
You must fully charge the device for 90 minutes before the first use. The device will run for approx. 50 minutes when fully charged.
To do this, proceed as follows:
- Connect the supplied USB-C cable to the USB-C-port and a mains adapter (not included in delivery).
- Insert the mains adapter into a suitable socket. The LED ring 2 lights up white during the charging process.
- Attach the desired brush attachment to the appliance. If necessary, turn it carefully to the right and left until you can hear and feel it click into place.
NOTICE
The device cannot be used while charging.
- As soon as the LED ring 2 lights up white continuously, the battery is fully charged. Once the charging process is complete, the LED ring 2 lights up for another 10 minutes and then goes out. If you unplug the USB-C cable from the device, the LED ring 2 also goes out. The device is now ready for operation.

If the battery life is less than 10 %, the LED ring 2 starts to flash red.
6.2 Starting use
CAUTION
Stop use immediately if use of the facial brush leads to reactions, and consult your doctor.
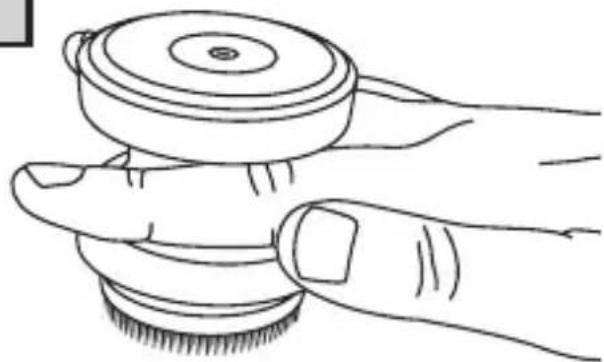
To use the device, you can either grip it with your hand or place the recessed grip 4 between your index finger and middle finger (see illustrations A und B on fold-out page 3).
-
Moisten the attached brush attachment with water. Never use the device with a dry brush attachment as this can irritate the skin.
-
Apply the cleansing gel to your facial skin.
-
To switch on the device, briefly press and hold the ON/OFF button 1. The LED ring 2 lights up white and the brush attachment will begin to rotate.
-
The device features two speed settings. To switch between the individual speed settings, briefly press the ON/OFF button 1. The LED ring 2 lights up brighter at the higher speed level.
-
Now apply the device gently to your face and cleanse your facial skin using even movements to remove residue, dirt and dead skin cells.

To ensure comfortable treatment, do not apply the rotating brush attachment too firmly to the skin. Treat each section of skin for a maximum of 20 seconds only. The recommended application period per use is 1 minute. The appliance switches off automatically after 5 minutes.
-
Switch off the device after use. To switch off the device, press the ON/OFF button 1 repeatedly until the appliance switches off (press twice at level 1, press once at level 2). The LED ring 2 goes out.
-
Cleanse your face thoroughly with water to remove any residue from your skin.
-
Pat your skin dry with a towel and then apply a moisturising cream using even, circular movements.
6.3 Button lock
The device has a button lock to prevent the device from being accidentally switched on (e.g. when traveling in a suitcase or bag).
-
To activate the button lock, press and hold the ON/OFF button 1 for 3 seconds. The LED ring 2 flashes three times to confirm.
-
To deactivate the button lock, press and hold the ON/OFF button 1 again for 3 seconds.
7. CLEANING AND MAINTENANCE
NOTICE
Before beginning cleaning, pull the brush attachment up and off.
- Never clean the device with cleaning products containing alcohol, petrol or acetone.
- Clean the device using only the methods specified.
- Pat dry the device with a lint-free cloth.
- Ensure that no water enters the device. If this should happen, the device should only be used again once it has fully dried out.
8. ACCESSORIES AND REPLACEMENT PARTS
To purchase accessories and replacement parts, please visit www.beurer.com or contact the corresponding service address (according to the service address list) in your country. Accessories and replacement parts are also available from retailers.
| Brush type |  Brush attachment Exfoliation Brush attachment Exfoliation | 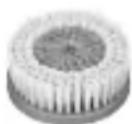 Brush attachment Sensitive Brush attachment Sensitive | 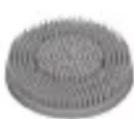 Brush attachment Silicone Brush attachment Silicone |
| In-tended purpose | Weekly exfoliation to gently remove excess skin cells | Gentle daily cleansing | Daily cleansing |
| Skin type | Normal skin, combination skin, oily skin | Sensitive skin | All skin types |
| Re-placements | After 4 months | After 4 months | After 6 months |
| Item number | 110.187 110.186 110.185 | ||
9. TROUBLESHOOTING
| Problem Solution | |
| The device will not switch on. | When switching on, ensure that you press the ON/OFF button with sufficient force and hold the button down for a sufficient amount of time. Charge the device as described in these instructions for use. If it is still not possible to switch on the device, contact Customer Services. |
| The device does not cleanse as well as it did to be -gin with. | The brush is worn. Replace the brush. If you do not have any replacement brushes, they can be reordered (see “11. ACCES- SORIES AND REPLACEMENT PARTS”). |
10. DISPOSAL
For environmental reasons, do not dispose of the device in household waste at the end of its
service life. Dispose of the device at a suitable local collection or recycling point in your country. Dispose of the device in accordance with EC Directive – WEEE (Waste Electrical and Electronic Equip-
ment). If you have any questions, please contact the local authorities responsible for waste disposal.
Empty, completely flat batteries must be disposed of through specially designated collection boxes, recycling points or electronics retailers. You are legally required to dispose of the batteries:
The codes below are printed on batteries containing harmful substances:
Pb = Battery contains lead, Cd = Battery contains cadmium, Hg = Battery contains mercury.
Environmentally friendly disposal
For the sake of the environment, we recommend you to dispose of the individual components separately, especially the batteries.
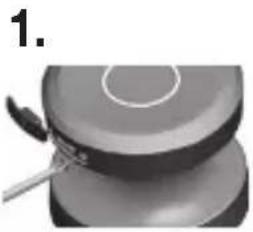
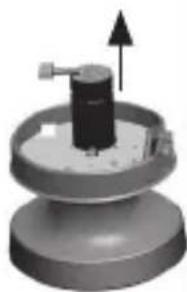
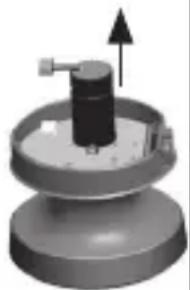
- Unscrew the screw on the USB-C port using a suitable screwdriver.
- Unscrew the top cover clockwise and pull upwards with the button.
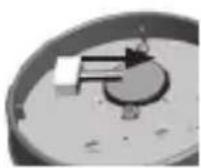
- Pull the water cover upwards.
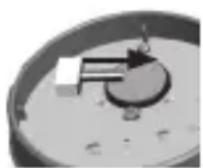
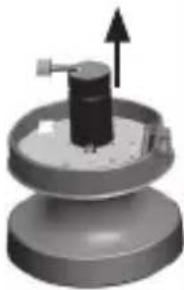
- Pull off the battery connection.
- Pull battery upwards and dispose of separately.
natural_image
Close-up of a kitchen utensil applying paint to a round cake (no text or symbols visible)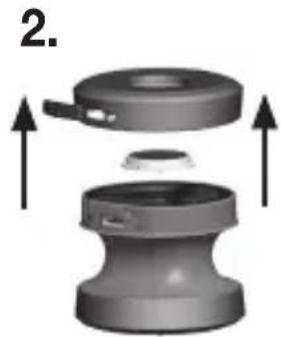
natural_image
3D mechanical assembly diagram showing a cylindrical component with internal components and upward arrows indicating motion (no text or symbols)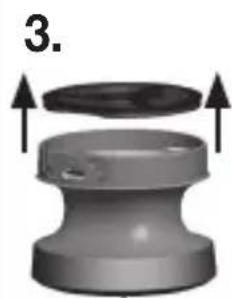
natural_image
3D rendered mechanical component with arrows indicating assembly or transformation (no text or symbols)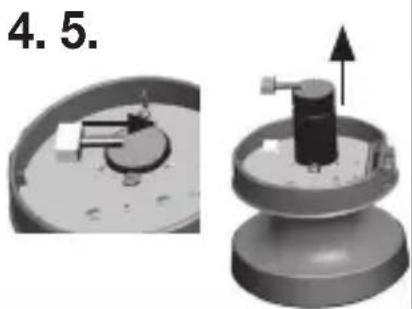
natural_image
3D mechanical assembly diagram showing a dial indicator and a cylindrical component with an upward arrow (no text or symbols)11. TECHNICAL SPECIFICATIONS
| Input | 5.0 V --- 1.0 A; 5.0 W |
| Dimensions | Device:diameter 60 mmHeight with brush attachmentSilicone: 60 mmHeight with attachment Exfoliation und Sensitive: 67 mmBrush attachmentsSilicone: diameter 48 mm and height 13 mmExfoliation und Sensitive:diameter 47 mm and height 20 mm |
| Weight | Device: 89 gbrush attachment Silicone: 11 gbrush attachmentExfoliation/Sensitive: 14 g |
| Battery:CapacityNominal voltageType designation | 350 mAh3.7 VRechargeable Li-ion battery |
12. WARRANTY
Further information on the warranty and warranty conditions can be found in the warranty leaflet supplied.
FRANÇAIS

Marque UKCA (UK Conformity Assessed)
Instructions relatives aux piles
AVERTISSEMENT
natural_image
Close-up of a mechanical component with a tool, no visible text or symbols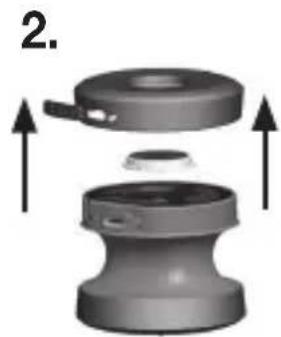
natural_image
3D diagram of a mechanical component with arrows indicating assembly or transformation (no text or symbols)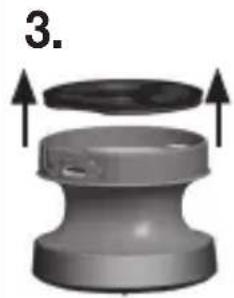
natural_image
3D diagram of a mechanical component with arrows indicating upward motion (no text or symbols)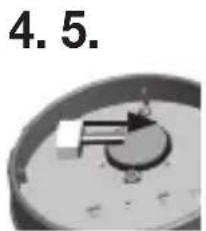
natural_image
Close-up of a mechanical component with a circular base and internal mechanism (no visible text or symbols)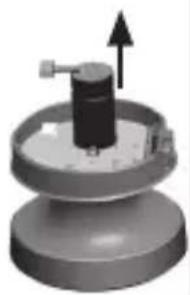
natural_image
3D rendered mechanical component with upward arrow indicator (no text or symbols)11. CARACTÉRISTIQUES TECHNIQUES
natural_image
Close-up of a kitchen utensil applying paint to a cylindrical food item (no text or symbols visible)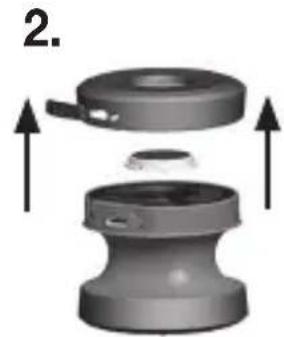
natural_image
Mechanical assembly diagram showing two components with upward arrows indicating motion (no text or symbols)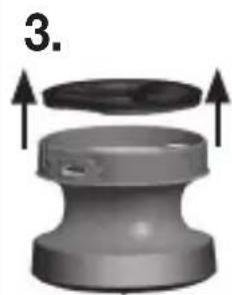
natural_image
3D rendered mechanical component with arrows indicating upward motion (no text or symbols)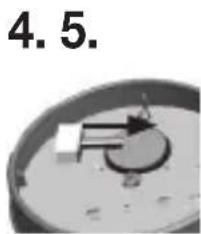

natural_image
3D mechanical component diagram showing a cylindrical shaft with an upward arrow, mounted on a circular base (no text or symbols)- DATOS TÉCNICOS
8. ACCESSORI E/O RICAMBI
natural_image
Close-up of a mechanical component with a tool, no visible text or symbols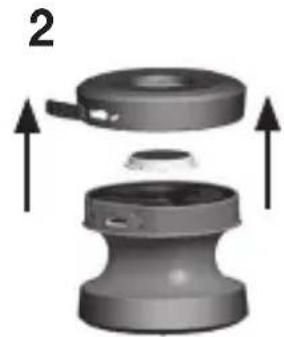
natural_image
3D diagram of a mechanical component with arrows indicating assembly or movement (no text or symbols)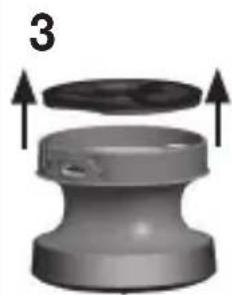
natural_image
3D diagram of a mechanical component with arrows indicating upward motion (no text or symbols)
natural_image
3D mechanical component diagram showing a cylindrical shaft mounted on a circular base with an upward arrow indicating motion (no text or symbols)- DATI TECNICI
natural_image
Close-up of a kitchen utensil applying paint to a lid (no text or symbols visible)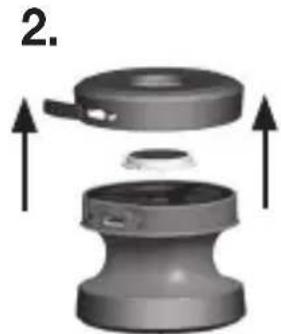
natural_image
3D mechanical component diagram showing a cylindrical housing with internal components and upward arrows indicating assembly (no text or symbols)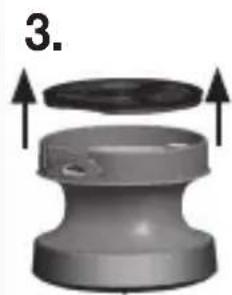
natural_image
3D rendered mechanical component with arrows indicating upward motion (no text or symbols)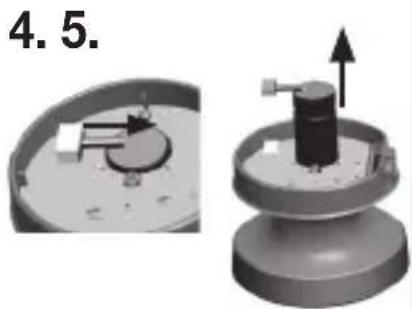
natural_image
3D mechanical assembly diagram showing a cylindrical component mounted on a base plate, with an arrow indicating upward motion (no text or symbols)- TEKNİK VERİLER
natural_image
Close-up of a mechanical component with a tool, no visible text or symbols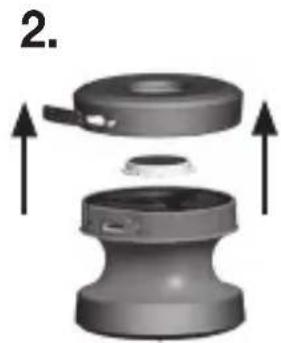
natural_image
Mechanical assembly diagram showing a cylindrical component with internal components and upward arrows indicating motion (no text or symbols)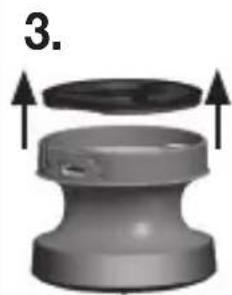
natural_image
3D diagram of a mechanical component with arrows indicating upward motion (no text or symbols)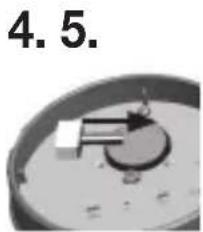
natural_image
Close-up of a mechanical component with a circular base and central lever, labeled '4.5' (no other text or symbols)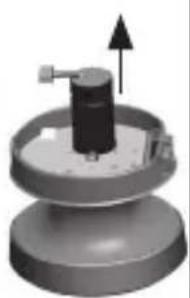
natural_image
3D rendered mechanical component with upward arrow indicator (no text or symbols)- ТЕХНИЧЕСКИЕ ДАННЫЕ
natural_image
Close-up of a brush applying paint to a circular object (no text or symbols visible)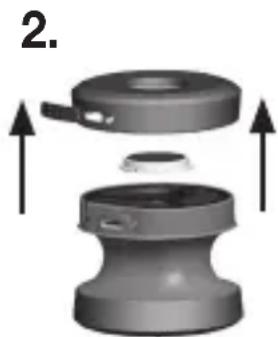
natural_image
3D mechanical component diagram showing a cylindrical housing with internal components and upward arrows indicating motion (no text or symbols)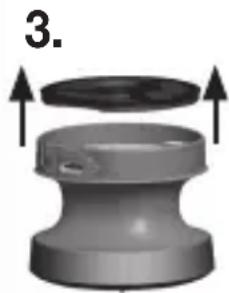
natural_image
3D rendering of a mechanical component with arrows indicating upward motion (no text or symbols)
natural_image
Close-up of a circular mechanical component with a central knob and a small protrusion, labeled '4.5.' (no other text or symbols visible)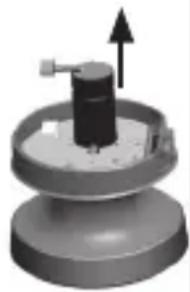
natural_image
3D rendered mechanical component with a cylindrical shaft and upward arrow indicator (no text or symbols)- DANE TECHNICZNE
4. WAARSCHUWINGENEN VEILIGHEIDSRICHTLIJNEN
WAARSCHUWING
5. BESCHRIJVING VAN HET APPARAAT
natural_image
Close-up of a kitchen utensil applying paint to a cylindrical food item (no text or symbols visible)
natural_image
3D diagram of a mechanical component with arrows indicating assembly or movement (no text or symbols)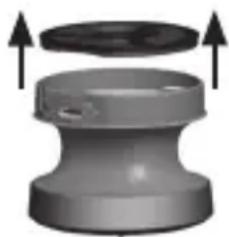
natural_image
3D rendering of a mechanical component with two upward arrows indicating motion or assembly (no text or symbols)4.5.
natural_image
3D mechanical component diagram showing a cylindrical shaft with an upward arrow, mounted on a circular base (no text or symbols)- TECHNISCHE GEGEVENS
| Ingang apparaat | 5,0 V 1,0 A; 5,0 W |
| Afmetingen | Apparaat:Diameter 60 mmHoogte met opzetborstelSilicon: 60 mmHoogte met opzetborstelExfoliation en Sensitive:67 mmOpzetborstelSilicon: diameter 48 mmen hoogte 13 mmExfoliation en Sensitive:diameter 47 mm enhoogte 20 mm |
| Gewicht | Apparaat: 89 gOpzetborstel Silicon: 11 gOpzetborstel Exfoliation/Sensitive: 14 g |
| Accu:CapaciteitNominalespanningTypeaanduiding | 350 mAh3,7 VLi-ionbatterij |
12. GARANTIE
5. BESKRIVELSEAF APPARATET
natural_image
Close-up of a kitchen utensil and a plate with a spoon, no visible text or symbols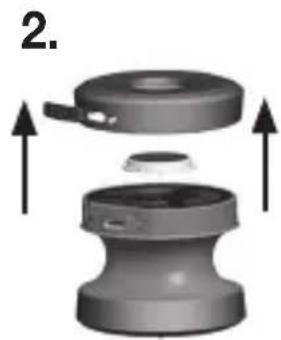
natural_image
Mechanical assembly diagram showing a cylindrical component with two upward arrows indicating motion or assembly (no text or symbols present)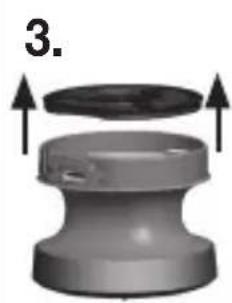
natural_image
3D rendered mechanical component with arrows indicating assembly or transformation (no text or symbols)
natural_image
Close-up of a mechanical component with a circular base and internal components (no visible text or symbols)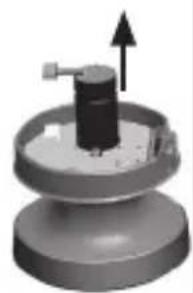
natural_image
3D rendered mechanical component with a cylindrical shaft and upward arrow indicator (no text or symbols)- TEKNISKE DATA
natural_image
Close-up of a mechanical component with a tool applying material to a circular base (no visible text or symbols)
natural_image
3D mechanical component diagram showing a cylindrical housing with internal components and upward arrows indicating motion (no text or symbols)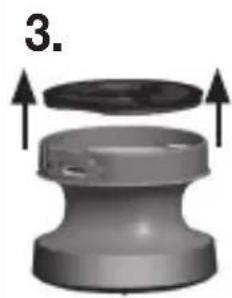
natural_image
3D rendered mechanical component with arrows indicating assembly or transformation (no text or symbols)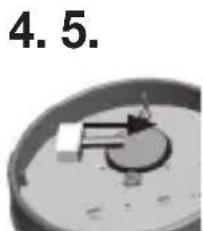
natural_image
Close-up of a mechanical component with a circular base and internal components (no visible text or symbols)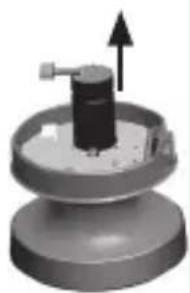
natural_image
3D rendered mechanical component with a cylindrical shaft and upward arrow indicator (no text or symbols)- TEKNISKA SPECIFIKATIONER
natural_image
Close-up of a kitchen pot with a spoon and lid, no visible text or symbols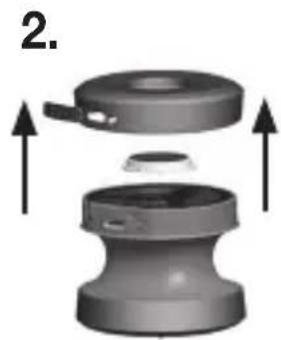
natural_image
3D mechanical component diagram showing a cylindrical housing with internal components and upward arrows indicating motion (no text or symbols)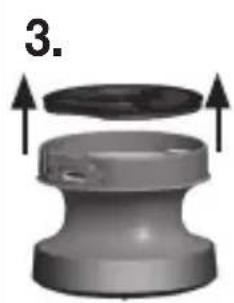
natural_image
3D rendered mechanical component with arrows indicating assembly or transformation (no text or symbols)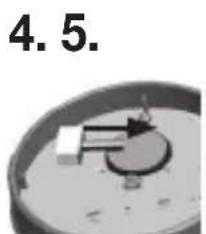
natural_image
Close-up of a mechanical component with a circular base and internal components (no visible text or symbols)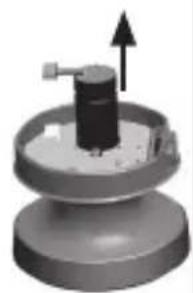
natural_image
3D rendered mechanical component with a cylindrical shaft and upward arrow indicator (no text or symbols)11. KAN GJENBRUKES PÅ EN ENKELT PASIENT
natural_image
Close-up of a cylindrical object with a metallic tool inserted, possibly a pot or container (no visible text or symbols)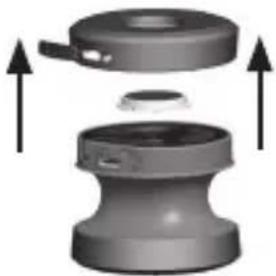
natural_image
3D diagram of a mechanical component with arrows indicating upward motion (no text or symbols)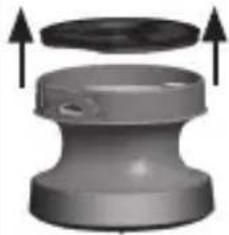
natural_image
3D rendering of a mechanical component with upward arrows indicating assembly or transformation (no text or symbols)4.5.
natural_image
3D rendered mechanical component with cylindrical shaft and upward arrow indicator (no text or symbols)- TEKNISET TIEDOT
BEURER UK Ltd. Suite 16, Stonecross Place, Stonecross Lane North WA3 2SH Lowton United Kingdom