
LunAqua Connect - Outdoor Lighting OASE - Free user manual and instructions
Find the device manual for free LunAqua Connect OASE in PDF.

| Product type | Modular lighting system for indoor/outdoor |
| Brand | Oase |
| Model | LunAqua Connect |
| Luminaire variants | White (S, M, L) and RGB (M RGB) |
| Luminaire S dimensions | 87 × 53 mm (L × ∅) |
| Luminaire M / M RGB / L dimensions | 98 × 61 mm (L × ∅) |
| Height with spike (S) | 283 mm |
| Height with spike (M / M RGB / L) | 293 mm |
| Height with stand foot (S) | 160 mm |
| Height with stand foot (M / M RGB / L) | 170 mm |
| Luminaire S weight | 700 g |
| Luminaire M / M RGB / L weight | 900 g |
| Power supply | Power supply unit 36 W, input 220-240 V AC, output 24 V DC |
| Luminaire S power consumption | 2.5 W |
| Luminaire M power consumption | 4.0 W |
| Luminaire L power consumption | 6.5 W |
| Luminaire M RGB power consumption | 7.5 W |
| Wireless control | Via OASE Switch app (Bluetooth, max. range 40 m) |
| Luminaire protection rating | IP68 (permanent immersion up to 1 m) |
| Power supply protection rating | IP67 |
| Controller protection rating | IP44 |
| Operating temperature | -10 °C to +40 °C (dry); +4 °C to +35 °C (immersed) |
| Cleaning and maintenance | Clean with clear water using a sponge or soft cloth; do not use aggressive products |
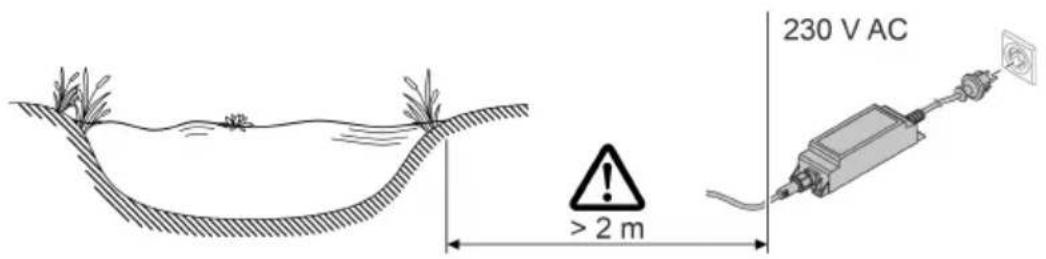
| Safety instructions | Do not look directly at the light source; keep a safety distance of 2 m from the body of water for the power supply; installation by a qualified electrician |
| Spare parts available | Extension cables, splitters, controller, power supply units |
| Repairability | Bulbs not replaceable; contact OASE customer service in case of defect |
| Warranty | Consult OASE general terms and conditions |
Frequently Asked Questions - LunAqua Connect OASE
User questions about LunAqua Connect OASE
0 question about this device. Answer the ones you know or ask your own.
Ask a new question about this device
Download the instructions for your Outdoor Lighting in PDF format for free! Find your manual LunAqua Connect - OASE and take your electronic device back in hand. On this page are published all the documents necessary for the use of your device. LunAqua Connect by OASE.
USER MANUAL LunAqua Connect OASE
natural_image
Two black electronic devices: a spotlights and a connected device with three leads (no visible text or symbols)LunAqua Connect
System
EN Operating instructions
FR Notice d'emploi
 |  | |
| LunAqua Connect WHITE | 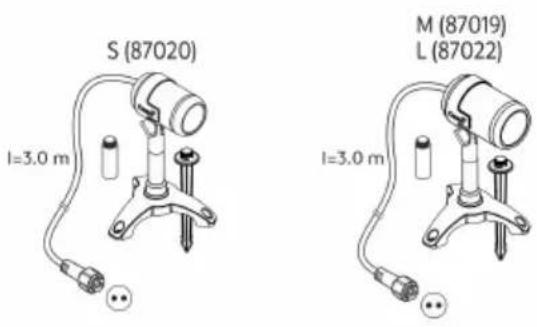 |  |
| LunAqua Connect RGB | 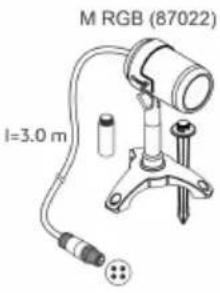 | 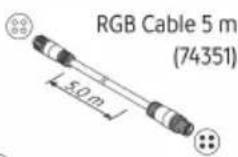 RGB Outlet Cable 10 m RGB Outlet Cable 10 m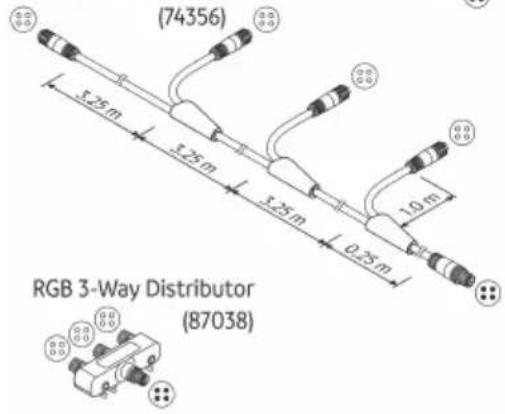 |
| LunAqua Connect | [72KW] | [73W] |
 |  |
LunAqua Connect WHITE
LAA0071
LAA0070
HINWEIS
This unit can be used by children aged 8 and above and by persons with reduced physical, sensory or mental capabilities or lack of experience and knowledge if they are supervised or have been instructed on how to use the unit in a safe way and they understand the hazards involved. Do not allow children to play with the unit. Only allow children to carry out cleaning and user maintenance under supervision.
Safety information
Electrical connection
- Special regulations apply for electrical installation in outdoor spaces. Only a qualified electrician may perform the electrical installation.
- The qualified electrician has the necessary professional training, knowledge and experience to perform electrical installation in outdoor spaces. The electrician can detect potential dangers and knows how to adhere to regional and national standards, regulations and directives.
- For your own safety, please consult a qualified electrician.
• Install the transformer or the power pack at a safety distance of at least 2 m from the water. - Only connect the unit if the electrical data of the unit and the power supply match.
- Only connect the transformer or power supply unit to a correctly installed outlet.
- Ensure that the outlet is fused for a rated fault current of max. 30 mA by means of a fault current protection device (RCD).
Safe operation
- Do not look directly into the light source.
- Protect open plugs and sockets from moisture.
- Do not use any system components whose electrical cables or housings are damaged.
- Dispose of the power supply unit if its power connection cable is damaged. The power connection cable cannot be replaced.
- Route lines in such a way that they are protected from damage and do not present a tripping hazard.
- Never pull-on electric cables. In particular, never carry units on their cables.
- Never carry out technical modifications to the system components.
- Only use original spare parts and accessories.
- Should problems occur, please contact the authorised customer service or OASE.
Intended use
Only use the product described in this manual as follows:
- As a lighting system.
- Only use in conjunction with units intended by OASE for this purpose.
- While adhering to the technical specifications. (→ Technical data)
The following restrictions apply to the units:
- Do not use for industrial purposes.
Product Description
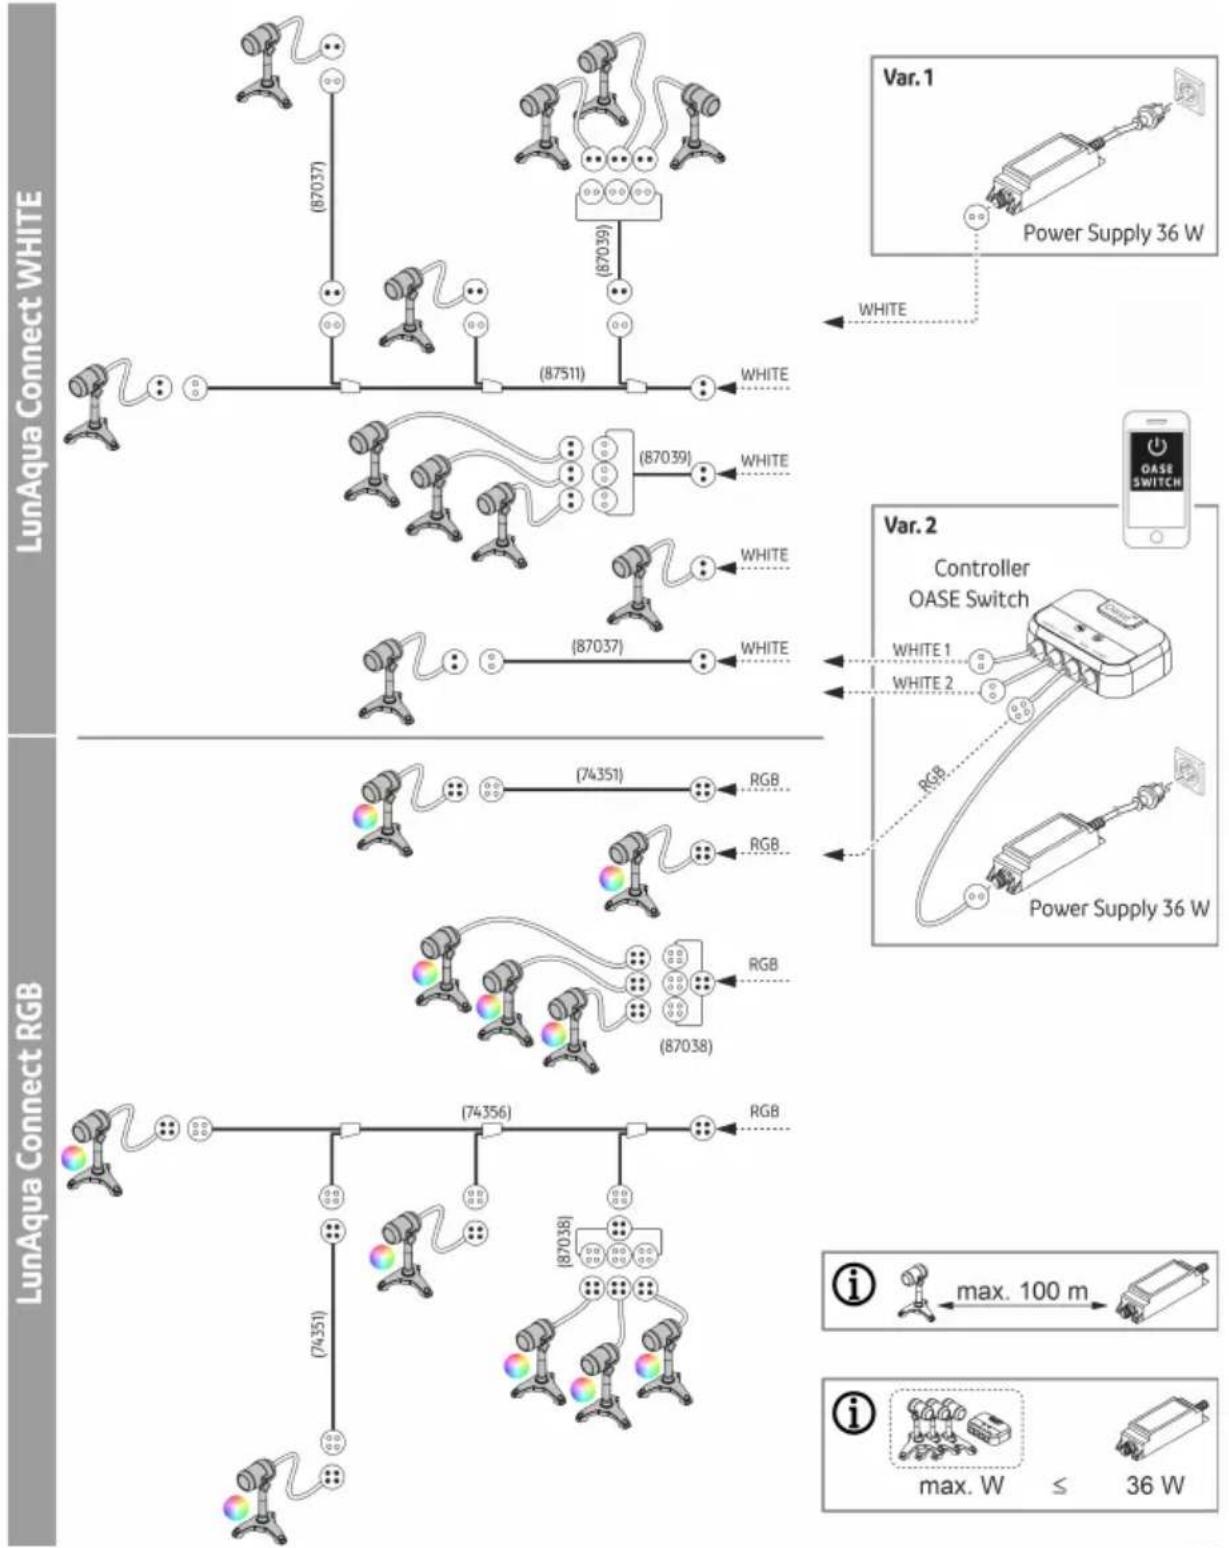
LunAqua Connect is a modular and scalable lighting system for indoor and outdoor areas. It is divided into lights with white light (WHITE) and lights with coloured light (RGB).
Both variants can be controlled wirelessly in conjunction with the "LunAqua Connect Controller OASE Switch". To do this, you need the free "OASE Switch" app on your smartphone or tablet.
The lights with white light (WHITE) can also be operated without the Controller OASE Switch.
They can then only be switched via external switches. In this case, they cannot be dimmed.
System components
| LunAqua Connect WHITE |  |  | |
 |  |  | |
| LunAqua Connect RGB |  | 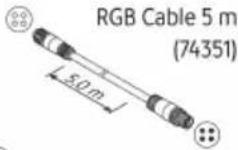 RGB Outlet Cable 10 m RGB Outlet Cable 10 m | |
| LunAqua Connect | [HYZS] | [HYZS] | |
 |  | ||
LunAqua Connect WHITE
LunAqua Connect
LAA0071
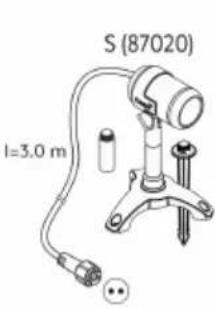
| Lights | LunAqua Connect S, M, LWith white light in various light intensities.Dimmable in conjunction with the optional Controller OASE Switch.Installation optionally with foot or ground stroke.Includes 2 extension pieces for raising the position of the light.LunAqua Connect M RGBWith coloured light.Can only be used in conjunction with Controller OASE Switch.Dimmable, selectable light colour.Installation optionally with foot or ground stroke.Includes 2 extension pieces for raising the position of the light.Information in accordance with the German Ecodesign Directive / the Energy Related Products Act (EVPK):The bulbs cannot be replaced due to the design. |
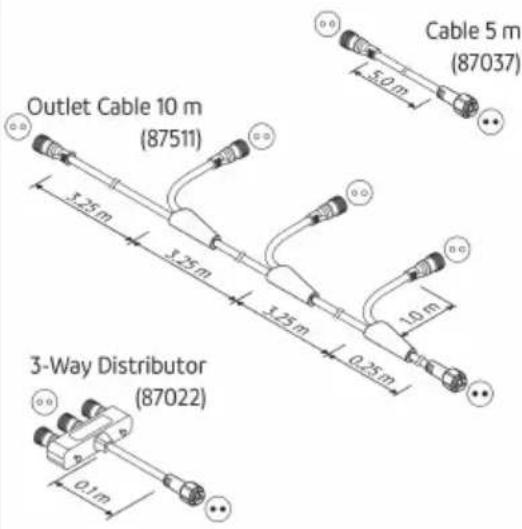
| Cables | These products contain light sources of energy efficiency class "G".Cables and distributors for creating light strands (optional accessory).For WHITE (2-pin):-LunAqua Connect WHITE Extension Cable 5 m (Article number 87037)-LunAqua Connect WHITE Outlet Ext. Cable 10 m (Article number 87511)-LunAqua Connect WHITE 3way Distributor (Article number 87039)For RGB (4-pin):-LunAqua Connect RGB Extension Cable 5 m (Article number 74351)-LunAqua Connect RGB Outlet Cable 10 m (Article number 74356)-LunAqua Connect RGB 3way Distributor (Article number 87038) |
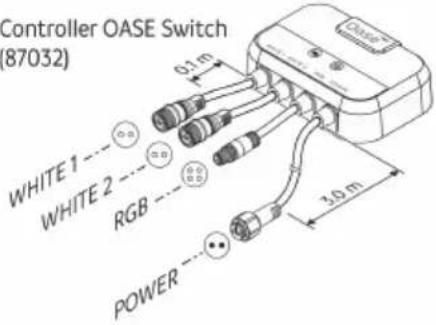
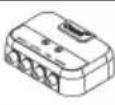
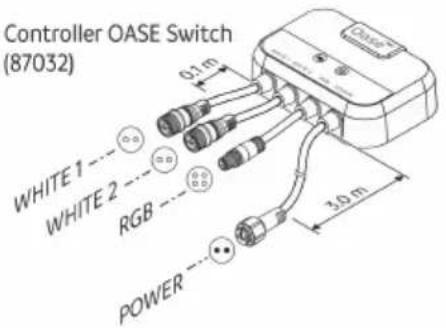
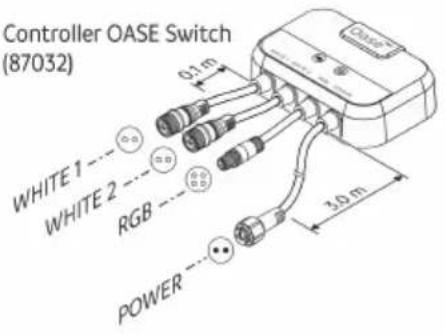
| Control system | LunAqua Connect Controller OASE SwitchFor operating the system components via a wireless connection.Messages from the green status LED:Off: The Controller is switched off (no supply voltage).Lights up: The Controller is switched on总价:Messages from the blue status LED:Off: The Controller is not connected to any unit.Lights up: The Controller is connected to a smartphone/tablet and can be operated.Flashes slowly (1 × per sec.): Coupling mode active.Flashes quickly: Firmware update active. |
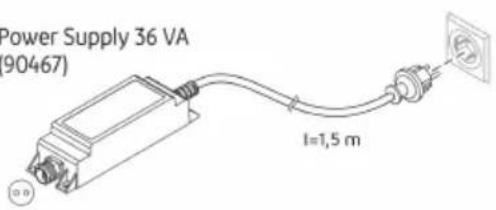
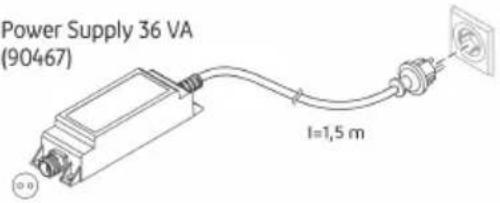
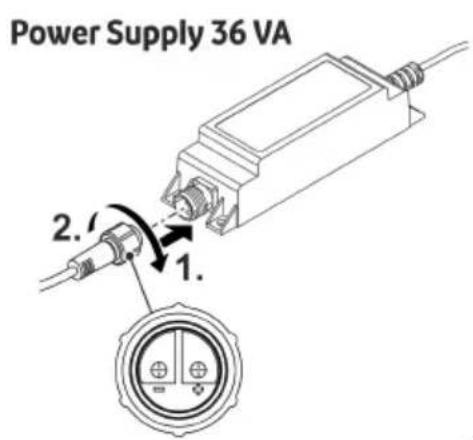
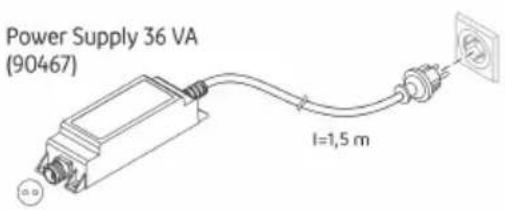
| Power supply | LunAqua Connect Power Supply 36 WINT cable power supply with type F earthed plug. |
EN
System structure
flowchart
graph TD
    subgraph "LunAqua Connect WHITE"
        A1["Camera"] -->|87037| B1["Link"]
        A2["Camera"] -->|87039| C1["Link"]
        A3["Camera"] -->|87037| D1["Link"]
        A4["Camera"] -->|87511| E1["White"]
    end

    subgraph "LunAqua Connect RGB"
        A5["Camera"] -->|74351| B2["Link"]
        A6["Camera"] -->|74356| C2["Link"]
        A7["Camera"] -->|74351| D2["Link"]
        A8["Camera"] -->|87038| E2["White"]
    end

    subgraph "LunAqua Connect RGB"
        A9["Camera"] -->|74356| B3["Link"]
        A10["Camera"] -->|87038| C3["Link"]
        A11["Camera"] -->|87511| D3["White"]
    end

    subgraph "Var. 1" (Power Supply 36 W)
        E1["Controller OASE Switch"] --> F1["White 1"]
        E2["Controller OASE Switch"] --> F2["White 2"]
        F1 --> G1["Power Supply 36 W"]
        F2 --> G2["Power Supply 36 W"]
    end

    subgraph "Var. 2" (Power Supply 36 W)
        G1 --> H1["Power Supply 36 W"]
        G2 --> H2["Power Supply 36 W"]
    end

    style A1 fill:#f9f,stroke:#333
    style A2 fill:#f9f,stroke:#333
    style A3 fill:#f9f,stroke:#333
    style A4 fill:#f9f,stroke:#333
    style A5 fill:#f9f,stroke:#333
    style A6 fill:#f9f,stroke:#333
    style A7 fill:#f9f,stroke:#333
    style A8 fill:#f9f,stroke:#333
    style A9 fill:#f9f,stroke:#333
    style B1 fill:#ccf,stroke:#333
    style B2 fill:#ccf,stroke:#333
    style B3 fill:#ccf,stroke:#333
    style B4 fill:#ccf,stroke:#333
    style B5 fill:#ccf,stroke:#333
    style B6 fill:#ccf,stroke:#333
    style B7 fill:#ccf,stroke:#333
    style B8 fill:#ccf,stroke:#333
    style B9 fill:#ccf,stroke:#333
    style C1 fill:#ccf,stroke:#333
    style C2 fill:#ccf,stroke:#333
    style C3 fill:#ccf,stroke:#333
    style C4 fill:#ccf,stroke:#333
    style C5 fill:#ccf,stroke:#333
    style C6 fill:#ccf,stroke:#333
    style C7 fill:#ccf,stroke:#333
    style C8 fill:#ccf,stroke:#333
    style C9 fill:#ccf,stroke:#333
    style C10 fill:#ccf,stroke:#333
LAA0068
System configuration
- The distance from the furthest light to the power supply unit must not exceed 100 m.
- The number of light strands (branches) is unlimited.
- The number of consumers in a LunAqua Connect system is limited by the maximum output power of the power supply unit.
Any number of consumers with a total power consumption of max. 36 W can be connected to the LunAqua Connect Power Supply 36 W.
| LunAqua Connect | S | M | M RGB | L | Controller OASE Switch |
 |  |  |  |  | |
| Power consumption: | 2.5 W | 4.0 W | 7.5 W | 6.5 W | 0.5 W |
Symbols on the units
 | [WTGS] | The unit is dust-tight and protected against the results of permanent immersion in water to a depth of 1 m. |
 | The unit is dust-tight and protected for short-term immersion. | |
 | The unit is protected against foreign objects ( ≥ 1 mm) and splash water. | |
 | The unit has protection rating II and is protected by double or reinforced insulation. | |
 | The unit has protection rating III. Only operate the unit with safety-low voltage. | |
 | The unit contains a short-circuit-proof safety transformer. | |
 | The unit is protected against overheating. | |
 | Do not dispose of the unit with normal household waste. | |
 | Read the operating instructions. |
Installation and connection
Lights
- A light may be permanently immersed to a depth of 1 m (IP68/1 m).
• Installation variants:
— With ground stake (only for soft ground conditions)
Ensure that no pond liners or underground pipes are damaged.
- With foot
The holes on the foot allow you to screw it to a paving slab or a wall.
Two extension pieces are included in the scope of delivery for raising the position of the lights, which can be screwed between the light and the ground stake/foot.
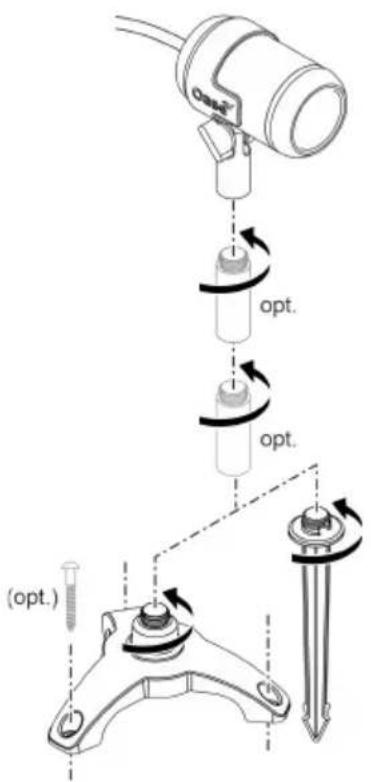
LAA0069
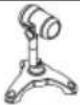
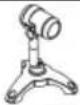
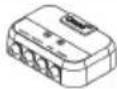
Controller
• Install the Controller OASE Switch so that it is protected from flooding.
- Position the Controller OASE Switch as close as possible to where you want to control the system using your smartphone or tablet.
- You can optimise the radio range by installing the Controller OASE Switch around 20 ... 30 cm above the floor.
Power supply

WARNING
The power supply carries dangerous electrical voltage and must not be placed directly near water. Otherwise, there is a risk of serious injury or death from electric shock.
▶ Install the power supply in a flood-protected position at least 2 m from the water.
LAA0065
Connect system
- Only use cables, distributors and power supply units from the LunAqua Connect range.
- The cable length between the power supply unit and the furthest light must not exceed 100 m.
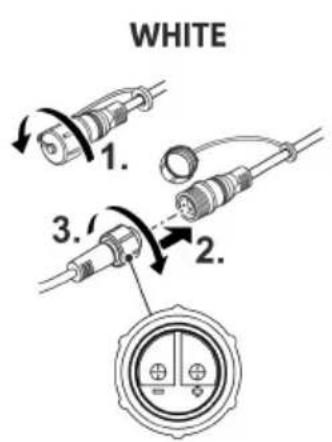
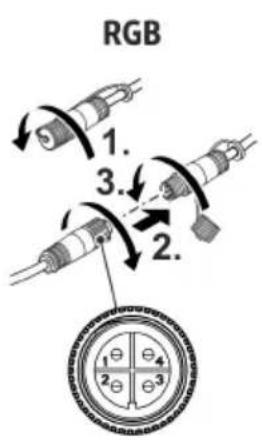
- When plugging connectors together, pay attention to the reverse polarity protection.
- Always screw connectors together with the union nut to ensure a secure connection and prevent the ingress of moisture.
- Screwed plug connections may only be immersed for a short time, not permanently.
- Close unused outlets on the Controller OASE Switch using the protective cap.
- Route lines in such a way that they are protected from damage and do not present a tripping hazard.
LAA0070
Commissioning/start-up
Switching ON/OFF
NOTE
Electrical units must be disconnected from the power supply immediately in an emergency.
▶ For units with a power plug, the plug must be accessible so that it can be pulled out.
▶ For units with a power cable for permanent connection, suitable measures must be taken to ensure that the unit can be disconnected from the power supply immediately.
Switching on: Plug the power plug into the outlet. If the outlet is switchable, switch on the outlet if necessary.
- System without Controller OASE Switch: The lights are switched on.
- System with Controller OASE Switch: The green status LED on the controller lights up. Lights connected to the controller can be controlled via the "OASE Switch" app.
Switching off: Pull the power plug out of the outlet or switch off the outlet.
- System with Controller OASE Switch: The Controller OASE Switch can be switched on permanently. The lights connected to the controller are controlled via the "OASE Switch" app.
System with Controller OASE Switch
The "OASE Switch" app must be installed on your smartphone/tablet for commissioning and operating the unit.
The operating systems iOS 12.5 (Apple) or Android 7.0 or newer are required to operate the App on mobile devices.
Starting up the Controller OASE Switch
How to proceed:
- If you have not already done so, install the "OASE Switch" app via the app store of your operating system (iOS or Android).
- Check whether the Bluetooth function is switched on on your smartphone/tablet. If not, switch it on.
- Open the "OASE Switch" app and follow the instructions.
NOTE
Pairing between the Controller OASE Switch and an as yet unknown smartphone/tablet is only possible within 5 minutes of switching on the controller.
If necessary, switch the controller off and on again to pair a new unit.
▶ The blue status LED on the controller flashes when pairing mode is active.
▶ The blue status LED on the controller lights up if the pairing was successful.
Operating the Controller OASE Switch
To operate the Controller OASE Switch with the "OASE Switch" app ...
- the Bluetooth function of the smartphone/tablet must be switched on.
- the smartphone/tablet must be paired with and connected to the Controller OASE Switch.
- the "OASE Switch" app must be open on the smartphone/tablet.
- the distance between the smartphone/tablet and Controller OASE Switch must not be too large. (Max. 40 m with a clear view; correspondingly less if the radio connection is impaired by walls, plants or other obstacles)
Updating the firmware
When the "OASE Switch"-App connects with the Controller OASE Switch it is automatically checked whether its firmware is up to date. If the firmware is new, you will be notified via the App. Follow the instructions.
The blue LED flashes quickly during the firmware update.
Maintenance and cleaning
If necessary, clean the system components with clear water using a soft sponge or cloth.
- Never use aggressive cleaning agents or chemical solutions. These could attack the housing surface or impair the function.
Malfunction remedy
- You can also find troubleshooting tips in the FAQs at www.oase.com.
- You can contact our customer service via support.app@oase.com.
| Malfunction | Possible cause | Remedy |
| The "OASE Switch" app cannot find a Controller OASE Switch. | No mains voltage at Controller OASE Switch (green status LED does not light up). | Check the power supply, use a different outlet if necessary. |
| Insufficient radio signal. | Reduce the distance between the smartphone/tablet and Controller OASE Switch.Position the Controller OASE Switch raised around 20 ... 30 cm from the floor.Eliminate interfering influences:- Obstacles such as walls, windows, shutters, dense plants, etc.- Other radio devices, such as mobile phones.- Switched-on electrical units that are poorly shielded. | |
| Bluetooth function on the smartphone/tablet is not switched on. | Switch on the Bluetooth function on the smartphone/tablet. | |
| Smartphone/tablet is not connected to the Controller OASE Switch, but it used to be. | Check on the smartphone/tablet, ...whether the Controller OASE Switch is available in the Bluetooth list. If not, see "Smartphone/tablet is not paired with the Controller OASE Switch".whether the Controller OASE Switch is declared as "Connected" in the Bluetooth list. If not, switch the Bluetooth function on the smartphone/tablet off and on again. | |
| Smartphone/tablet is not paired with the Controller OASE Switch (is not in the Bluetooth list). | Switch on the Bluetooth function on the smartphone/tablet.To pair a unit, switch the Controller OASE Switch off and on again. Pairing mode is now active for 5 minutes. | |
| The Bluetooth standard of the smartphone/tablet is not compatible. | Try to establish the connection with a newer smartphone/tablet. | |
| The "OASE Switch" app is outdated. | Download the latest app to your smartphone/tablet. | |
| The Controller OASE Switch is defective. | Please contact the OASE service. | |
| Individual lights cannot be switched on. | Line interruption or short circuit. | Check the cabling for breaks.Check the connections for secure fit and possible short circuits due to moisture. |
| Bulb defective | Replace the light with a new light. | |
| All lights or thelights in a light strand do not light up. | Line interruption or short circuit. | Check the cabling for breaks.Check the connections for secure fit and possible short circuits due to moisture. |
EN
Spare parts
(→ Spare parts)
Technical data
Power supply
| LunAqua Connect | |||
| Power Supply 36 W | |||
| Type | Cable power supply with earthed plug F | ||
| Primary | voltage | AC V | 220 ... 240 |
| Mains frequency | HZ | 50 ... 60 | |
| Max. current consumption A | 0.6 | ||
| Cable length | m | 1.5 | |
| Secondary | voltage | V DC | 24 |
| Max. power output | W | 36 | |
| Protection type | Unit | IP67 | |
| Connection | IP67 | ||
| Protection class | II | ||
| Ambient temperature range | °C | -10 ... +40 | |
| Dimensions (L × W × H) | mm | 165 × 50 × 40 | |
| Weight | g | 500 | |
Control system
| LunAqua Connect | |||
| Controller OASE Switch | |||
| voltage | V DC | 24 | |
| Power consumption | W | < 0.5 | |
| Max. power output | W | 100 | |
| Max. radio range with visual contact | m | 40 | |
| Protection type | Controller | IP44 | |
| Connections | IP67 | ||
| Ambient temperature range | °C | -10 ... +40 | |
| Dimensions (L × W × H) | mm | 135 × 105 × 40 | |
| Cable lengths | WHITE, RGB | m | 0.1 |
| Power supply | m | 3.0 | |
| Weight | g | 1000 | |
Lights
| LunAqua Connect | ||||||
| S | M | L | M RGB | |||
| Supply voltage | V DC 24 | |||||
| Wattage of the bulb | W | 2.5 | 4.0 | 6.5 | 7.5 | |
| Light colour | K | 3000 | 3000 | 3000 | - | |
| Light current, total | lm | 150 | 250 | 500 | 217 | |
| CRI | 95 | 95 | 95 | - | ||
| Beam angle | 30^ | |||||
| Energy efficiency class | G | |||||
| Replaceability | Bulb | No | ||||
| Ballast | No | |||||
| Protection type | Spotlight | IP68 | ||||
| Connection | IP67 | |||||
| Ambient temperature range | Dry installation | °C | -10 ... +40 | |||
| Immersed | °C +4 ... +35 | |||||
| Dimensions | Light (L × ∅) | mm | 87 × 53 | 98 × 61 | 98 × 61 | 98 × 61 |
| Height with ground stake | mm | 283 | 293 | 293 | 293 | |
| Height with foot | mm | 160 | 170 | 170 | 170 | |
| Height of connecting piece | mm | 50 | ||||
| Ground stake (H) | mm 173 | |||||
| Foot (∅) | mm 149 | |||||
| Cable length | m | 3 | ||||
| Weight | g | 700 | 900 | 900 | 900 | |
Disposal
NOTE
▶ Dispose of the unit by using the return system provided for this purpose.
▶ Should you have questions, please contact your local disposal company. They will give you information on how to correctly dispose of the unit.

AVERTISSEMENT
LAA0070
Mise en service
| | |
| LunAqua Connect WHITE |  | 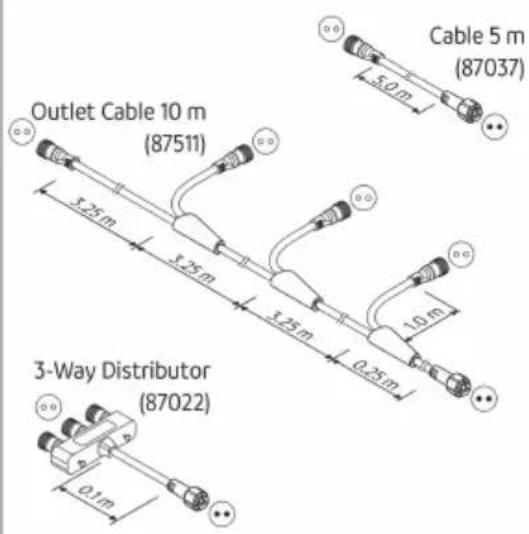 |
| LunAqua Connect RGB | 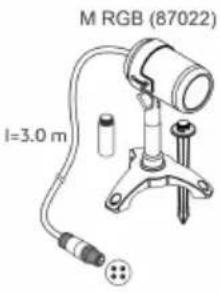 | 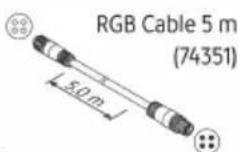 RGB Outlet Cable 10 m RGB Outlet Cable 10 m |
| LunAqua Connect | 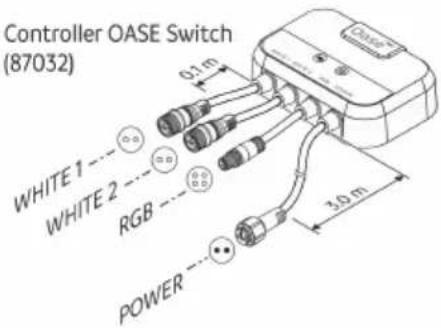 | 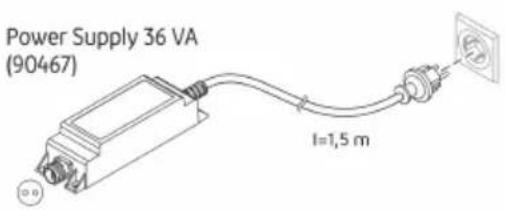 |
LAA0071
LAA0069
Controller
LAA0070
Ingebruikname
LAA0069
Controlador
LAA0070
Puesta en marcha
LAA0069
Controlador
LAA0070
LAA0070
Messa in funzione
| | |
| LunAqua Connect WHITE | | |
| LunAqua Connect RGB | | RGB Outlet Cable 10 m |
| LunAqua Connect | [S071] | [CK2] |
 | |
LAA0071
LAA0069
Controller
LAA0070
Ibrugtagning
Tænd / sluk
BEMÆRK
NO
LAA0069
Styreenhet
LAA0070
Igangsetting
Slå av/på
MERK
LunAqua Connect WHITE
LunAqua Connect
LAA0071
LAA0069
Styrenhet
Driftstart
FI
LAA0069
Säädin
LAA0070
Käyttöönotto
| | |
| LunAqua Connect WHITE | | |
| LunAqua Connect RGB | 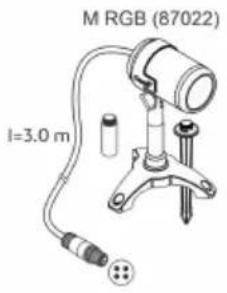 | 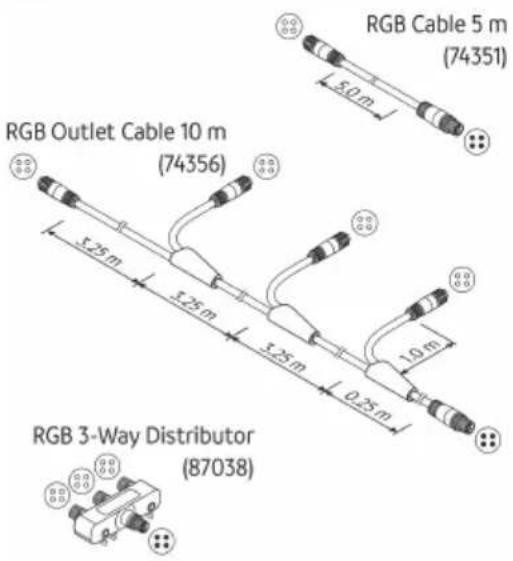 |
| LunAqua Connect | [48WC] | [163] |
 | |
LunAqua Connect WHITE
LunAqua Connect
LAA0071
LAA0070
Üzembe helyezés
| LunAqua Connect WHITE |  |  | |
 |  | | |
| LunAqua Connect RGB | | 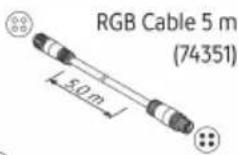 RGB Outlet Cable 10 m RGB Outlet Cable 10 m | |
| [SZYK] |  | ||
| [Y076] |  | 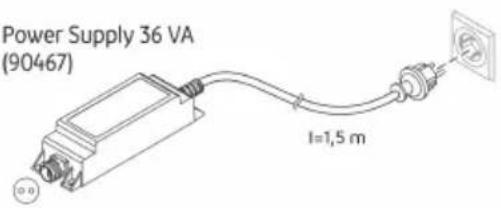 | |
LAA0071
flowchart
graph TD
    subgraph "LunAqua Connect WHITE"
        A1["White"] --> B1["Power Supply 36 W"]
        A2["White"] --> B2["Power Supply 36 W"]
        A3["White"] --> B3["Power Supply 36 W"]
        A4["White"] --> B4["Power Supply 36 W"]
        A5["White"] --> B5["Power Supply 36 W"]
        A6["White"] --> B6["Power Supply 36 W"]
        A7["White"] --> B7["Power Supply 36 W"]
        A8["White"] --> B8["Power Supply 36 W"]
        A9["White"] --> B9["Power Supply 36 W"]
        A10["White"] --> B10["Power Supply 36 W"]
        A11["White"] --> B11["Power Supply 36 W"]
        A12["White"] --> B12["Power Supply 36 W"]
        A13["White"] --> B13["Power Supply 36 W"]
        A14["White"] --> B14["Power Supply 36 W"]
        A15["White"] --> B15["Power Supply 36 W"]
        A16["White"] --> B16["Power Supply 36 W"]
        A17["White"] --> B17["Power Supply 36 W"]
        A18["White"] --> B18["Power Supply 36 W"]
        A19["White"] --> B19["Power Supply 36 W"]
        A20["White"] --> B20["Power Supply 36 W"]
        A21["White"] --> B21["Power Supply 36 W"]
        A22["White"] --> B22["Power Supply 36 W"]
        A23["White"] --> B23["Power Supply 36 W"]
        A24["White"] --> B24["Power Supply 36 W"]
        A25["White"] --> B25["Power Supply 36 W"]
        A26["White"] --> B26["Power Supply 36 W"]
        A27["White"] --> B27["Power Supply 36 W"]
        A28["White"] --> B28["Power Supply 36 W"]
        A29["White"] --> B29["Power Supply 36 W"]
        A30["White"] --> B30["Power Supply 36 W"]
        A31["White"] --> B31["Power Supply 36 W"]
        A32["White"] --> B32["Power Supply 36 W"]
        A33["White"] --> B33["Power Supply 36 W"]
        A34["White"] --> B34["Power Supply 36 W"]
        A35["White"] --> B35["Power Supply 36 W"]
        A36["White"] --> B36["Power Supply 36 W"]
        A37["White"] --> B37["Power Supply 36 W"]
        A38["White"] --> B38["Power Supply 36 W"]
        A39["White"] --> B39["Power Supply 36 W"]
        A40["White"] --> B40["Power Supply 36 W"]
        A41["White"] --> B41["Power Supply 36 W"]
        A42["White"] --> B42["Power Supply 36 W"]
        A43["White"] --> B43["Power Supply 36 W"]
        A44["White"] --> B44["Power Supply 36 W"]
        A45["White"] --> B45["Power Supply 36 W"]
        A46["White"] --> B46["Power Supply 36 W"]
        A47["White"] --> B47["Power Supply 36 W"]
        A48["White"] --> B48["Power Supply 36 W"]
        A49["White"] --> B49["Power Supply 36 W"]
        A50["White"] --> B50["Power Supply 36 W"]
        A51["White"] --> B51["Power Supply 36 W"]
        A52["White"] --> B52["Power Supply 36 W"]
        A53["White"] --> B53["Power Supply 36 W"]
        A54["White"] --> B54["Power Supply 36 W"]
        A55["White"] --> B55["Power Supply 36 W"]
        A56["White"] --> B56["Power Supply 36 W"]
        A57["White"] --> B57["Power Supply 36 W"]
        A58["White"] --> B58["Power Supply 36 W"]
        A59["White"] --> B59["Power Supply 36 W"]
        A60["White"] --> B60["Power Supply 36 W"]
        A61["White"] --> B61["Power Supply 36 W"]
        A62["White"] --> B62["Power Supply 36 W"]
        A63["White"] --> B63["Power Supply 36 W"]
        A64["White"] --> B64["Power Supply 36 W"]
        A65["White"] --> B65["Power Supply 36 W"]
        A66["White"] --> B66["Power Supply 36 W"]
        A67["White"] --> B67["Power Supply 36 W"]
        A68["White"] --> B68["Power Supply 36 W"]
        A69["White"] --> B69["Power Supply 36 W"]
        A70["White"] --> B70["Power Supply 36 W"]
        A71["White"] --> B71a["RGB."]
        A72["White"] --> B72["RGB."]
        A73["White"] --> B73["RGB."]
        A74["White"] --> B74["RGB."]
        A75["White"] --> B75["RGB."]
        A76["White"] --> B76["RGB."]
        A77["White"] --> B77["RGB."]
        A78["White"] --> B78["RGB."]
        A79["White"] --> B79["RGB."]
        A80[Black Circle with Red Arrow at (74) color scale: max. 100 m, ≤ 36 w; max. W ≤ max. W > max. W < max. W < max. W < max. W < max. W < max. W < max. W < max. W < max. W < max. W < max. W < max. W < max. W < max. W < max. W < max. W < max. W < max. W < max. W < max. W < max. W < max. W < max. W < max. W < max. W < max. W = max. W < max. W < max. W < max. W < max. W < max. W < max. W < max. W < max. W < max. W < max. W < max. W < max. W < max. W < max. W < max. W < max. W < max. W < max. W < max. W < max. W < max. W < max. W < max. W < max. W
    end
    subgraph "LunAqua Connect RGB"
        C1[LungAqua Connect RGB: Max=100m, ≤-max=≤-max=≤-max=≤-max=≤-max=≤-max=≤-max=≤-max=≤-max=≤-max=≤-max=≤-max=≤-max=≤-max=≤-max=≤-max=≤-max=≤-max=≤-max=≤-max=≤-max=≤-max=≤-max=≤-max=≤-max=≤-max=≥min, min, min, min, min, min, min, min, min, min, min, min, min, min, min, min, min, min, min, min, min, min, min, min, min, min, min, min, min, min, min, min, min, min, min, min, min, min, min, min, min, min, min, min, min, min, min, min, min, min, min, Min, Min, Min, Min, Min, Min, Min, Min, Min, Min, Min, Min, Min, Min, Min, Min, Min, Min, Min, Min, Min, Min, Min, Min, Min, Min, Min, Min, Min, Min, Min, Min, Min, Min, Min, Min, Min, Min, Min, Min, Min, Min, Min, Min, Min, Min, Min, Min, Min, Min, Mink & Light Blue Lamp
    end
    subgraph "LunAqua Connect RGB"
        C2[LungAqua Connect RGB: Max=100m, ≤-max=≤-max=≤-max=≤-max=≤-max=≤-max=≤-max=≤-max=≤-max=≤-max=≤-max=≤-max=≤-max=≤-max=≤-max=≤-max=≤-max=≤-max=≤-max=≤-max=≤-max=≤ -min,
    end
    subgraph "LunAqua Connect RGB"
        C3[LungAqua Connect RGB: Max=100m, ≤-max=≤-max=≤-max=≤-max=≤-max=≤-max=≤-max=≤-max=≤-max=≤-max=≤-max=≤-max=≤-max=≤-max=≤-max=≤-max=≤ -min,
    end
LAA0068
PL
LAA0069
Sterownik
LAA0070
Rozruch
LAA0069
Ovladač
LAA0070
Uvedení do provozu
Zapnutí / vypnutí
UPOZORNĚNÍ
LAA0069
Ovládač
LAA0070
| | |
| LunAqua Connect WHITE | | |
| LunAqua Connect RGB | | |
| LunAqua Connect | [ADYC] | [ITACY] |
 | |
LunAqua Connect WHITE
LunAqua Connect
LAA0071
LAA0069
Regulator
- Controller OASE Switch postavite varno pred poplavami.
- Controller OASE Switch postavita kar se da blizu mestu, kjer lahko sistem upravljate s pametnim telefonom ali tabličnim računalnikom.
- Doseg radijskega signala optimirate tako, da Controller OASE Switch postavite pribl. 20 ... 30 cm nad tlemi.
Napajanje

OPOZORILO
LAA0070
Zagon
Vklop / izklop
NASVET
Zagon Controller OASE Switch
flowchart
LunAqua network architecture diagram showing connections between RGB and white nodes with power supply and OASE switch componentsLAA0068
LAA0069
Upravljač
- Postavite Controller OASE Switch tako da bude siguran od poplavljivanja.
- Postavite Controller OASE Switch što bliže mjestu na kojem želite upravljati sustavom pomoću pametnog telefona ili tableta.
- Domet radiosignala možete optimizirati postavljanjem Controller OASE Switch približno 20 ... 30 cm od tla.
HR
Opskrba strujom

UPOZORENJE
LAA0070
Stavljanje u pogon
LAA0070
LunAqua Connect S, M, L
LunAqua Connect M RGB
LunAqua Connect Power Supply 36 W
- Кабелен мрежов елемент INT с щепсел шуко тип F.
flowchart
```mermaid
graph TD
    subgraph "LunAqua Connect WHITE"
        A1["White"] --> B1["Var. 1"]
        A2["White"] --> B2["Var. 2"]
        A3["White"] --> B3["Var. 2"]
        A4["White"] --> B4["Var. 2"]
        A5["White"] --> B5["Var. 2"]
        A6["White"] --> B6["Var. 2"]
        A7["White"] --> B7["Var. 2"]
        A8["White"] --> B8["Var. 2"]
        A9["White"] --> B9["Var. 2"]
        A10["White"] --> B10["Var. 2"]
        A11["White"] --> B11["Var. 2"]
        A12["White"] --> B12["Var. 2"]
        A13["White"] --> B13["Var. 2"]
        A14["White"] --> B14["Var. 2"]
        A15["White"] --> B15["Var. 2"]
        A16["White"] --> B16["Var. 2"]
        A17["White"] --> B17["Var. 2"]
        A18["White"] --> B18["Var. 2"]
        A19["White"] --> B19["Var. 2"]
        A20["White"] --> B20["Var. 2"]
        A21["White"] --> B21["Var. 2"]
        A22["White"] --> B22["Var. 2"]
        A23["White"] --> B23["Var. 2"]
        A24["White"] --> B24["Var. 2"]
        A25["White"] --> B25["Var. 2"]
        A26["White"] --> B26["Var. 2"]
        A27["White"] --> B27["Var. 2"]
        A28["White"] --> B28["Var. 2"]
        A29["White"] --> B29["Var. 2"]
        A30["White"] --> B30["Var. 2"]
        A31["White"] --> B31["Var. 2"]
        A32["White"] --> B32["Var. 2"]
        A33["White"] --> B33["Var. 2"]
        A34["White"] --> B34["Var. 2"]
        A35["White"] --> B35["Var. 2"]
        A36["White"] --> B36["Var. 2"]
    end

    subgraph "LunAqua Connect RGB"
        B1 --> C1["(74351)"]
        B2 --> C2["(74356)"]
        B3 --> C3["(74351)"]
        B4 --> C4["(87038)"]
        B5 --> C5["(87038)"]
        B6 --> C6["(87038)"]
        B7 --> C7["(87038)"]
        B8 --> C8["(87038)"]
        B9 --> C9["(87038)"]
        B10 --> C10["(87038)"]
    end

    subgraph "LunAqua Connect White"
        C1 --> D1["(87037)"]
        C2 --> D2["(87039)"]
        C3 --> D3["(87037)"]
    end

    subgraph "LunAqua Connect Black"
        C4 --> D4["(87038)"]
        C5 --> D5["(87038)"]
    end

    subgraph "LunAqua Connect White" (varies)
        D1 --> E1["(varies)"]
        D2 --> E2["(varies)"]
        D3 --> E3["(varies)"]
        D4 --> E4["(varies)"]
    end

    subgraph "LunAqua Connect Black"
        E1 --> F1["(varies)"]
        E2 --> F2["(varies)"]
        E3 --> F3["(varies)"]
    end

    subgraph "LunAqua Connect Black" (varies)
        F1 --> G1["(varies)"]
        F2 --> G2["(varies)"]
        F3 --> G3["(varies)"]
    end

    subgraph "LunAqua Connect Black" (varies)
        G1 --> H1["(varies)"]
        G2 --> H2["(varies)"]
    end

    subgraph "LunAqua Connect White"
        H1 --> I1["(varies)"]
        H2 --> I2["(varies)"]
    end

    subgraph "LunAqua Connect Black"
        I1 --> J1["(varies)"]
        I2 --> J2["(varies)"]
    end

    subgraph "LunAqua Connect Black" (varies)
        J1 --> K1["(varies)"]
        J2 --> K2["(varies)"]
    end

    subgraph "LunAqua Connect White"
        K1 --> L1["(varies)"]
        K2 --> L2["(varies)"]
    end

    subgraph "LunAqua Connect Black"
        L1 --> M1["(varies)"]
        L2 --> M2["(varies)"]
    end

    subgraph "LunAqua Connect Black" (varies)
        M1 --> N1["(varies)"]
        M2 --> N2["(varies)"]
    end

    subgraph "LunAqua Connect White"
        N1 --> O1["(varies)"]
        N2 --> O2["(varies)"]
    end

    subgraph "LunAqua Connect Black"
        O1 --> P1["(varies)"]
        O2 --> P2["(varies)"]
    end

    subgraph "LunAqua Connect Black" (varies)
        P1 --> Q1["(varies)"]
        P2 --> Q2["(varies)"]
    end

    subgraph "LunAqua Connect White"
        Q1 --> R1["(varies)"]
        Q2 --> R2["(varies)"]
    end

    subgraph "LunAqua Connect Black"
        R1 --> S1["(varies)"]
        R2 --> S2["(varies)"]
    end

    subgraph "LunAqua Connect Black" (varies)
        S1 --> T1["(varies)"]
        S2 --> T2["(varies)"]
    end

    subgraph "LunAqua Connect White"
        T1 --> U1["(varies)"]
        T2 --> U2["(varies)"]
    end

    subgraph "LunAqua Connect Black"
        U1 --> V1["(varies)"]
        U2 --> V2["(varies)"]
    end

    subgraph "LunAqua Connect Black" (varies)
        V1 --> W1["(varies)"]
        V2 --> W2["(varies)"]
    end

    subgraph "LunAqua Connect White"
        W1 --> X1["(varies)"]
        W2 --> X2["(varies)"]
    end

    subgraph "LunAqua Connect Black"
        X1 --> Y1["(varies)"]
        X2 --> Y2["(varies)"]
    end

    subgraph "LunAqua Connect Black" (varies)
        Y1 --> Z1["(varies)"]
        Y2 --> Z2["(varies)"]
    end

    subgraph "LunAqua Connect White"
        Z1 --> AA1["(varies)"]
        Z2 --> AA2["(varies)"]
    end

    subgraph "LunAqua Connect Black"
        AA1 --> AB1["(varies)"]
        AA2 --> AB2["(varies)"]
    end

    subgraph "LunAqua Connect Black" (varies)
        AB1 --> AC1["(varies)"]
        AB2 --> AC2["(varies)"]
    end

    subgraph "LunAqua Connect White"
        AC1 --> AD1["(varies)"]
        AC2 --> AD2["(varies)"]
    end

    subgraph "LunAqua Connect Black"
        AD1 --> AE1["(varies)"]
        AD2 --> AE2["(varies)"]
    end

    subgraph "LunAqua Connect Black" (varies)
        AE1 --> AF1["(varies)"]
        AE2 --> AF2["(varies)"]
    end

    subgraph "LunAqua Connect White"
        AF1 --> AG1["(varies)"]
        AF2 --> AG2["(varies)"]
    end

    subgraph "LunAqua Connect Black"
        AG1 --> AH1["(varies)"]
        AG2 --> AH2["(varies)"]
    end

    subgraph "LunAqua Connect Black" (varies)
        AH1 --> AI1["(varies)"]
        AH2 --> AI2["(varies)"]
    end

    subgraph "LunAqua Connect White"
        AI1 --> AJ1["(varies)"]
        AI2 --> AJ2["(varies)"]
    end

    subgraph "LunAqua Connect Black"
        AJ1 --> AK1["(varies)"]
        AJ2 --> AK2["(varies)"]
    end

    subgraph "LunAqua Connect Black" (varies)
        AK1 --> AL1["(varies)"]
        AK2 --> AL2["(varies)"]
    end

    subgraph "LunAqua Connect White"
        AL1 --> AM1["(varies)"]
        AL2 --> AM2["(varies)"]
    end

    subgraph "LunAqua Connect Black"
        AM1 --> AN1["(varies)"]
        AN1a((varies))
        AN2a((varies))
        AN3a((varies))
    end

    subgraph "LunAqua Connect Black" (varies)
        AN1a((varies))
        AN2a((varies))
        AN3a((varies))
    end

    subgraph "LunAqua Connect White"
        ANB["a"] --> AO["a"]
            ANC["a"] < max: 36W
            AO["a"] max: 36W
            AP["a"] max: 36W
            AQ["a"] max: 36W
            AR["a"] max: 36W
            AS["a"] max: 36W
            AT["a"] max: 36W
            AU["a"] max: 36W
            AV["a"] max: 36W
            AW["a"] max: 36W
            AX["a"] max: 36W
            AZ["a"] max: 36W
            BA["a"] max: 36W
            BB["a"] max: 36W
            BC["a"] max: 36W
            BD["a"] max: 36W
            BE["a"] max: 36W
            BF["a"] max: 36W
            BG["a"] max: 36W
            BH["a"] max: 36W
            BI["a"] max: 36W
            BJ["a"] max: 36W
            BK["a"] max: 36W
            BL["a"] max: 36W
            BM["a"] max: 36W
            BN["a"] max: 36W
            BO["a"] max: 36W
            BP["a"] max: 36W
            BQ["a"] max: 36W
            BW["a"] max: 36W
            BX["a"] max: 36W
            BY["a"] max: 36W
            BZ["a"] max: 36W
            CA["b"] max: 36W
            CB["b"] max: 36W
            CC["b"] max: 36W
            CD["b"] max: 36W
            DD["b"] max: 36W
            DE["b"] max: 36W
            EF["b"] max: 36W
            GF["b"] max: 36W
            GH["b"] max: 36W
            ID["b"] max: 36W
            Iq["f"] max: 36W
            Jq["f"] max: 36W
            Kq["f"] max: 36W
            Lq["f"] max: 36W
            Mq["f"] max: 36W
            Nq["f"] max: 36W
            Oq["f"] max: 36W
            PQ["f"] max: 36W
            QD["f"] max: 36W
            RQ["f"] max: 36W
            SQ["f"] max: 36W
            TQ["f"] max: 36W
            UQ["f"] max: 36W
            VQ["f"] max: 36W
            WQ["f"] max: 36W
            XQ["f"] max: 36W
            YQ["f"] max: 36W
            ZQ["f"] max: 36W
            AA["f"] max: 36W
            AB["f"] max: 36W
            AC["f"] max: 36W
            AD["f"] max: 36W
            AE["f"] max: 36W
            AF["f"] max: 36W
            AG["f"] max: 36W
            AH["f"] max: 36W
            AI["f"] max: 36W
            AJ["f"] max: 36W
            AK["f"] max: 36W
            AL["f"] max: 36W
            AM["f"] max: 36W
            AN["f"] max: 36W
            AO["f"] max: 36W
            AP["f"] max: 36W
            AQ["f"] max: 36W
            AR["f"] max: 36W
            AS["f"] max: 36W
            AT["f"] max: 36W
            AU["f"] max: 36W
            AV["f"] max: 36W
            AW["f"] max: 36W
            AX["f"] max: 36W
            AZ["f"] max: 36W
            BA["f"] max: 36W
            BB["f"] max: 36W
            BC["f"] max: 36W
            BD["f"] max: 36W
            BE["f"] max: 36W
            BF["f"] max: 36W
            BG["f"] max: 36W
            BH["f"] max: 36W
            BI["f"] max: 36W
            BJ["f"] max: 36W
            BK["f"] max: 36W
            BL["f"] max: 36W
            BM["f"] max: 36W
            BN["f"] max: 36W
            BO["f"] max: 36W
            BP["f"] max: 36W
            BOF["f"] max: 36W
            BPF["f"] max: 36W
            BPG["f"] max: 36W
            BPH["f"] max: 36W
            BPI["f"] max: 36W
            BPJ["f"] max: 36W
            BPK["f"] max: 36W
            BPL["f"] max: 36W
            BPM["f"] max: 36W
            BPN["f"] max: 36W
            BPO["f"] max: 36W
            BPP["f"] max: 36W
            BPQ["f"] max: 36W
            BP_R["f"] max: 36W
                    end

All values are estimated based on the chart with the original text in the image.

The chart is labeled with the color and position of the lines in the table.
LAA0068
LAA0069
Контролер
LAA0070
 |  | |
| LunAqua Connect WHITE | 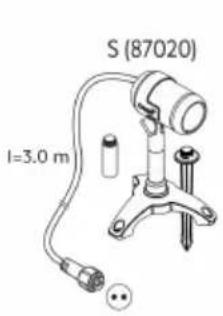 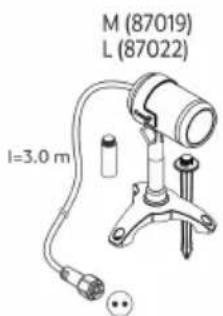 | 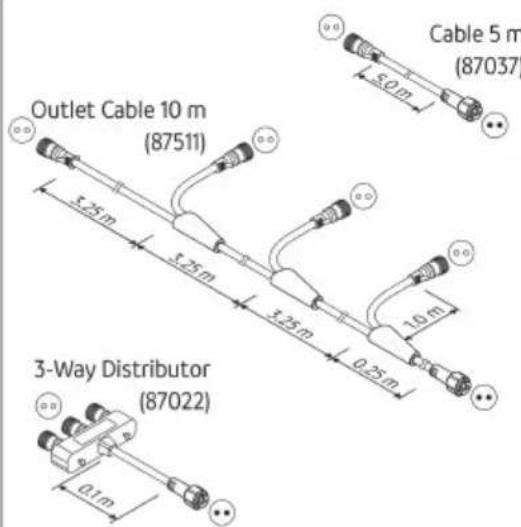 |
| LunAqua Connect RGB | 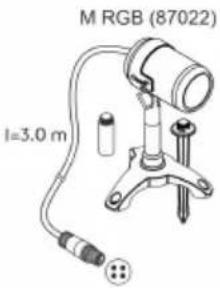 | 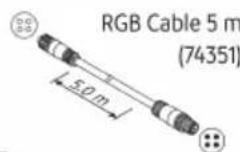 RGB Outlet Cable 10 m RGB Outlet Cable 10 m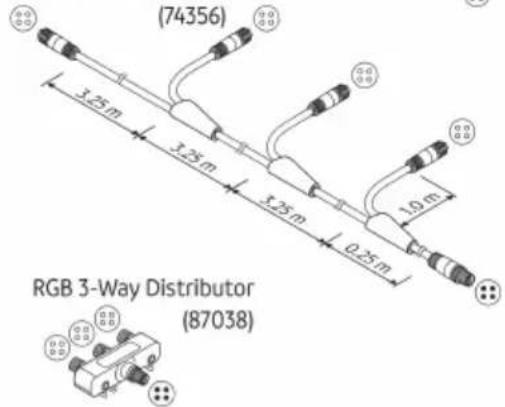 |
| LunAqua Connect | [S77X] | [C40Y] |
 |  |
LAA0071
UK
flowchart
LunAqua network architecture diagram showing connections between White and RGB devices, OASE switches, and power supply components.LAA0068
UK
LAA0069
Контролер
LAA0070
 |  | |
| LunAqua Connect WHITE | | |
| LunAqua Connect RGB | | RGB Outlet Cable 10 m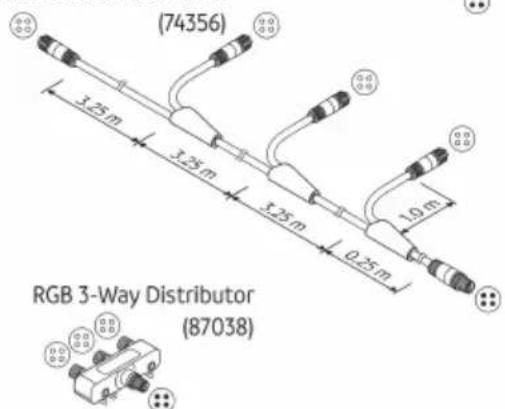 |
| LunAqua Connect |  |  |
| |
LAA0071
LAA0070
УКАЗАНИЕ
| LunAqua Connect | S | M | M RGB | L | Controller OASE Switch |
 |  |  |  |  | |
| 功率消耗: | 2.5 W | 4.0 W | 7.5 W | 6.5 W | 0.5 W |
机身上的标志
LAA0070
调试
接通 / 关闭
提示
发生紧急情况时,请务必立即关断电源。
1 94806
2 92567
3 90406
LAA0072
- LunAqua Connect
- HINWEIS
- Safety information
- Electrical connection
- Safe operation
- Intended use
- Product Description
- System components
- System configuration
- Symbols on the units
- Installation and connection
- Lights
- Controller
- Power supply
- WARNING
- Connect system
- Commissioning/start-up
- Switching ON/OFF
- NOTE
- System with Controller OASE Switch
- Starting up the Controller OASE Switch
- Operating the Controller OASE Switch
- Updating the firmware
- Maintenance and cleaning
- Malfunction remedy
- Spare parts
- Technical data
- Control system
- Disposal
- AVERTISSEMENT
- Mise en service
- Ingebruikname
- Controlador
- Puesta en marcha
- Messa in funzione
- Ibrugtagning
- Tænd / sluk
- BEMÆRK
- Styreenhet
- Igangsetting
- Slå av/på
- MERK
- Styrenhet
- Driftstart
- Säädin
- Käyttöönotto
- Üzembe helyezés
- Sterownik
- Rozruch
- Ovladač
- Uvedení do provozu
- Zapnutí / vypnutí
- UPOZORNĚNÍ
- Ovládač
- Regulator
- Napajanje
- OPOZORILO
- Zagon
- Vklop / izklop
- NASVET
- Zagon Controller OASE Switch
- Upravljač
- Opskrba strujom
- UPOZORENJE
- Stavljanje u pogon
- LunAqua Connect S, M, L
- LunAqua Connect M RGB
- LunAqua Connect Power Supply 36 W
- Контролер
- УКАЗАНИЕ
- 机身上的标志
- 调试
- 接通 / 关闭
- 提示
Brand : OASE
Model : LunAqua Connect
Category : Outdoor Lighting