Serie 6 MultiPower MFWS641 - Mincer BOSCH - Free user manual and instructions
Find the device manual for free Serie 6 MultiPower MFWS641 BOSCH in PDF.

| Product type | Meat grinder |
| Brand | Bosch |
| Model | Serie 6 MultiPower MFWS641 |
| Intended use | Grind raw or cooked food: meat, fish, vegetables |
| Included accessories | Meat grinder, sausage attachment, kibbeh attachment, cleaning brush, cookie kit (optional), grating attachment (depending on model) |
| Perforated discs | Coarse (8 mm), medium (4.5 mm), fine (3 mm) |
| Drums for grating insert | Grating drum, slicing drum, coarse grating drum, fine grating drum |
| Reverse function | Yes, to unblock food |
| Operating speed | min (low) and max (high) |
| Maximum continuous operating time | 10 minutes for the grinder, 2 minutes for the grating insert |
| Safety | Overload protection, thermal circuit breaker, programmed break zone, anti-restart |
| Cleaning | Hand wash or dishwasher depending on parts; do not dishwasher the metal housing, screw ring, and worm screw |
| Spare parts | Available from after-sales service, break zone connector part number 10029225 |
| Maximum altitude | 2000 m above sea level |
| Usage | Private household, enclosed rooms |
Frequently Asked Questions - Serie 6 MultiPower MFWS641 BOSCH
User questions about Serie 6 MultiPower MFWS641 BOSCH
0 question about this device. Answer the ones you know or ask your own.
Ask a new question about this device
Download the instructions for your Mincer in PDF format for free! Find your manual Serie 6 MultiPower MFWS641 - BOSCH and take your electronic device back in hand. On this page are published all the documents necessary for the use of your device. Serie 6 MultiPower MFWS641 by BOSCH.
USER MANUAL Serie 6 MultiPower MFWS641 BOSCH

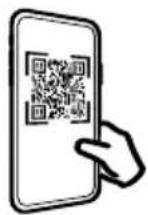
| [de] | Scannen Sie den QR-Code oder besuchen Sie die Webseite, um die erweiterten Hinweise zur Benutzung zu öffnen. Dort finden Sie zusätzliche Informationen zu Ihrem Gerät oder Zubehör. |
| [en] | Scan the QR code or visit the website to open the Further Notices for Use. You can find additional information about your appliance or accessory here. |
| [fr] | Scanner le code QR ou visiter le site Web pour ouvrir les informations d'utilisation complémentaires. Vous y trouverez des informations supplémentaires concernant votre appareil ou accessoire. |
| [it] | Scansionare il codice QR oppure visitare il sito Web per indicazioni dettagliate sull'uso. Si trovano informazioni aggiuntive sull'apparecchio o gli accessori. |
| [nl] | Scan de QR-code of bezoek de website om de uitgebreide gebruiksinstructies te openen. Hierin vindt u meer informatie over het apparaat of toebehoren. |
| [da] | Scan QR-koden, eller besøg hjemmesiden, for at åbne de udvidede anvisninger om anvendelse. Der kan der findes yderligere oplysninger om apparatet eller tilbehøret. |
| [no] | Skann QR-koden eller besøk nettstedet for å åpne mer informasjon om bruken. Der finner du mer informasjon om apparatet eller tilbehøret. |
| [sv] | Scanna QR-koden eller gå till webbplatsen och öppna de utökade användningsanvisningarna. Där finns mer information om din apparat eller dina tillbehör. |
| [fi] | Skannaa QR-koodi tai vieraile internet-sivustollamme, jotta voit avata laajennetut käyttötiedot. Sieltä löydät laitetta tai varustetta koskevia lisätietoja. |
| [es] | Para abrir las indicaciones ampliadas sobre el uso, visite la página web o escanee el código QR. Allí encontrará más información sobre el aparato o los accesorios. |
| [pt] | Leia o código QR ou visite a página web para abrir as indicações avançadas relativas à utilização. Aí encontra informações adicionais sobre o seu aparelho ou acessório. |
| [el] | Σαρώστε τον κωδικό QR ή επισκεφτείτε την ιστοσελίδα, για να ανοίξετε τις διευρυμένες υποδείξεις για τη χρήση. Εκεί θα βρείτε πρόσθετες πληροφορίες για τη συσκευή σας ή τα εξαρτήματα. |
| [tr] | Ayrıntılı kullanım bilgilerine ulaşmak için QR kodu taratin veya web sayfasını ziyaret ediniz. Cihaz ve aksesuarlar ile ilgili ayrıntılı bilgileri bu şekilde edinebilirsiniz. |
| [pl] | Aby uzyskać rozszerzone informacje na temat zastosowań urządzenia, należy zeskanować kod QR albo wejść na stronę internetową. Można tam znaleźć dodatkowe informacje na temat posiadanego urządzenia i akcesoriów. |
| [cs] | Pro další informace k používání načtěte QR kód nebo navštivte webovou stránku. Tam najdete další informace ke spotřebiči nebo příslušenství. |
| [sk] | Naskenujte QR kód alebo navštívte webovú stránku, aby ste sa dozvedeli rozšírené informácie o používaní. Tam nájdete d'alšie informácie o vašom spotrebiči alebo príslušenstve. |
| [ro] | Scanați codul QR sau accesăți site-ul web pentru a obține mai mult recomandări privind utilizarea. Acolo veți găsi mai multe informații privind aparatul dumneavoastră sau accesoriiile. |
| [bg] | Сканирайте QR кода или посетете уебстраницата, за да отворите разширените указания за използването. Там ще откриете допълнителна информация за Вашия уред или принадлежност. |

natural_image
Diagram showing a device with blue connectors inserted into a blue socket, with an arrow indicating the process (no text or symbols present)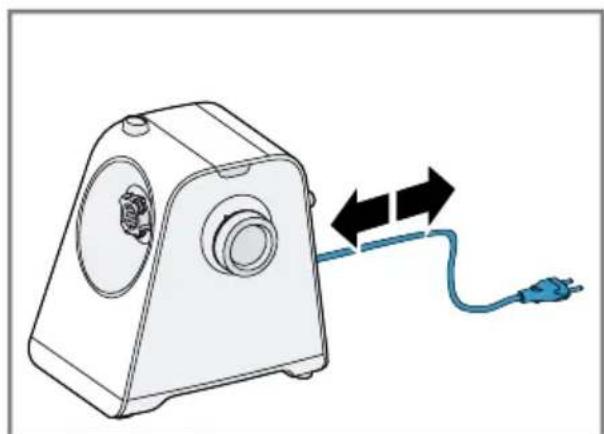
natural_image
Diagram of a device with a blue cable and black arrows indicating direction (no text or symbols)2
3
natural_image
Diagram showing a hair screw being inserted into a pipe fitting, with an inset image of the component (no text or symbols present)4
natural_image
Diagram showing a pipe fitting with a valve and a small valve, illustrating the process of adding pressure (no text or symbols present)5
6
natural_image
Illustration of a pipe fitting with a blue cover and black arrow indicating rotation, accompanied by a blue checkmark (no text or symbols)7

natural_image
Illustration of a blue plastic pipe fitting next to a white industrial machine component, with an arrow pointing to the component (no text or symbols present)8
9
natural_image
Technical line drawing of a mechanical device with a blue connector and pipe fitting (no text or symbols)10
The image is too blurry to recognize any text content.
natural_image
Illustration of a blue electrical plug inserted into a wall socket, with an arrow indicating direction (no text or symbols)12
The image is too blurry to recognize any text content.
natural_image
Illustration of a manual hand presser with a blue cup and arrow indicating compression (no text or symbols)14
The image is too blurry to recognize any text content.
natural_image
Illustration of hands installing or adjusting a wall socket with a blue tool (no text or symbols)16
The image is too blurry to recognize any text content.
18
natural_image
Diagram showing a mechanical component being processed into a T-shaped pipe fitting (no text or symbols present)The image is too blurry to recognize any text content.
20
natural_image
Mechanical assembly diagram showing a shaft being inserted into a pipe fitting (no text or symbols present)The image is too blurry to recognize any text content.
natural_image
Diagram of a mechanical valve or fitting with a blue and white component, no text or symbols present.22
natural_image
Diagram showing a mechanical assembly process: one pipe fitting and a threaded pipe being inserted into it (no text or symbols present)The image is too blurry to recognize any text content.
natural_image
Diagram showing a mechanical component being inserted into a blue plastic component, with no visible text or symbols.24
natural_image
Illustration of a mechanical pipe fitting with a blue and white component, no text or symbols present.The image is too blurry to recognize any text content.
natural_image
Diagram showing a mechanical component being processed into a T-shaped pipe fitting (no text or symbols present)26

The image is too blurry to recognize any text content.

natural_image
Diagram of a pipe fitting with blue and white components and an arrow indicating rotation (no text or symbols)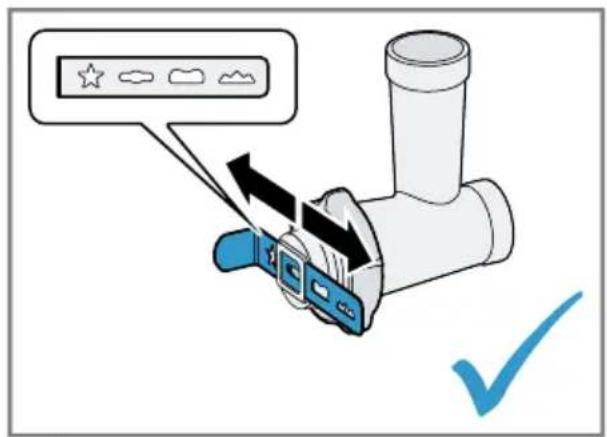
28

The image is too blurry to recognize any text content.
30
natural_image
Diagram showing a pipe fitting being processed into a plastic housing (no text or symbols present)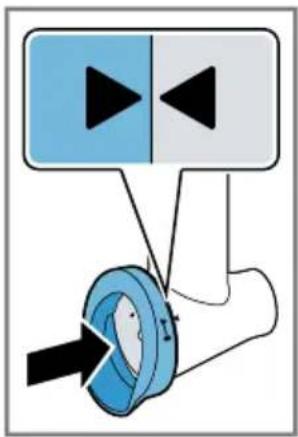
31
natural_image
Diagram showing a blue connector being inserted into a white mechanical device (no text or symbols present)The image is too blurry to recognize any text content.
33
natural_image
Diagram of a mechanical device with a blue rotary knob and a 'ON' button (no text or symbols on the device itself)35
natural_image
Two-step illustration of a manual manual shaver machine, showing tool application and powder being poured into a bowl (no text or symbols)The image is too blurry to recognize any text content.
37
natural_image
Mechanical component diagram showing a blue cap inserted into a housing with an arrow indicating direction (no text or symbols)The image is too blurry to recognize any text content.
39
The image is too blurry to recognize any text content.
 | √ | × | × | × | × |
 | √ | √ | ! | ! | × |
 | √ | √ | √ | √ | √ |
 | √ | √ | √ | √ | √ |
 | √ | √ | √ | √ | √ |
41
42


Sicherheit
Störungen beheben
- Read this instruction manual carefully.
- Keep the instruction manual and the product information safe for future reference or for the next owner.
■ Do not connect the appliance if it has been damaged in transit. Only use this appliance:
■ for applications described in these instructions.
■ for cutting up raw or cooked food, e.g. meat, fish and vegetables.
■ under supervision.
■ for normal processing quantities and for normal processing times for domestic use.
■ in private households and in enclosed spaces in a domestic environment at room temperature.
■ up to an altitude of max. 2000 m above sea level.
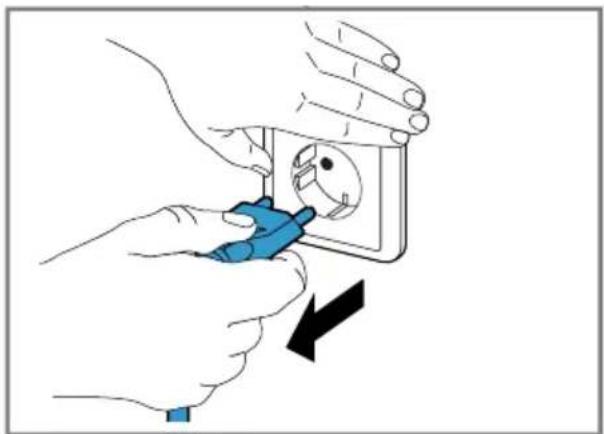
The appliance must always be disconnected from the mains after each use, whenever it is left unattended, prior to assembly, disassembly or cleaning, in the event of an error and when you are close to rotating parts.
This appliance can be used by persons with reduced physical, sensory or mental capabilities or a lack of experience and/or knowledge if they have been given supervision or instruction concerning use of the appliance in a safe way and if they understand the hazards involved.
Do not let children play with the appliance.
Cleaning and user maintenance must not be performed by children.
The appliance must not be used by children. Keep children away from the appliance and power cable.
▶ Never operate a damaged appliance.
▶ Never operate an appliance with a cracked or fractured surface.
▶ Never pull on the power cord to unplug the appliance. Always unplug the appliance at the mains.
- If the appliance or the power cord is damaged, immediately unplug the power cord or switch off the fuse in the fuse box.
▶ Call customer services. → Page 27
- Connect and operate the appliance only in accordance with the specifications on the rating plate.
▶ Never equip the appliance with an external switching device, e.g. a timer or remote control. - Repairs to the appliance should only be carried out by trained specialist staff.
▶ Only use genuine spare parts when repairing the appliance.
If the power cord of this appliance is damaged, it must be replaced by the manufacturer, the manufacturer's Customer Service or a similarly qualified person in order to prevent any risk.
▶ Never immerse the appliance or the power cord in water or clean in the dishwasher.
▶ Only use the appliance in enclosed spaces.
▶ Never expose the appliance to intense heat or humidity. - Do not use steam- or high-pressure cleaners to clean the appliance.
▶ Never let the power cord come into contact with hot appliance parts or heat sources. - Never let the power cord come into contact with sharp points or edges.
▶ Never kink, crush or modify the power cord.
▶ Never place the appliance on or near hot surfaces. - Keep hands, hair, clothing and utensils away from rotating parts.
▶ Only fit and remove attachments once the drive has stopped and the appliance has been unplugged.
▶ Do not reach into the filling shaft.
▶ Only use the pusher to push down ingredients. - Parts which show cracks or other damage or do not fit correctly must be replaced with genuine spare parts.
▶ Never assemble attachments on the main unit.
▶ Only use the attachments once they are fully assembled.
▶ Never touch the sharp blades and edges with bare hands. - Keep packaging material away from children.
- Do not let children play with packaging material.
- Keep small parts away from children.
▶ Do not let children play with small parts.
▶ Follow the cleaning instructions.
en Avoiding material damage
- Clean surfaces which come in contact with food before each use.
Avoiding material damage
▶ Never operate the appliance for more than 10 minutes without stopping. Then switch off the appliance and allow it to cool down to room temperature.
▶ Do not operate the appliance at no-load.
- Do not insert objects into the filling shaft or housing, e.g. wooden spoons.
▶ Before use, check the filling shaft and housing for foreign objects.
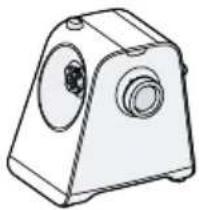
Familiarising yourself with your appliance
Overview
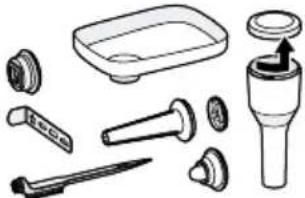
After unpacking all parts, check for any damage in transit and completeness of the delivery.
→ Fig. 1
| A | Main unit |
| B | Meat mincer attachment |
| C | Sausage filler attachment |
| D | Kebbe attachment ^1 |
| E | Cleaning brush ^1 |
| F | Cookie cutter attachment ^2 |
| G | Shredding attachment ^1 → "Shredding attachment",Page 23 |
| 1 | Grips for transporting |
| 2 | Rotary switch |
| 3 | Holder and drive for attachments |
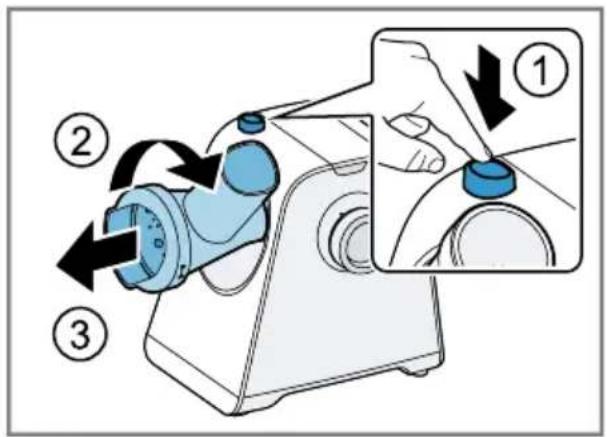
| 4 | Release button |
| 5 | Cover for storage compartment |
| 6 | Storage compartment for perforated discs |
| 7 | Cord storage |
^1 Depending on the model
^2 Special accessory
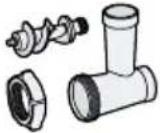
| 8 | Filling tray |
| 9 | Threaded ring |
| 10 | Perforated disc, coarse |
| 11 | Knife |
| 12 | Worm conveyor with clutch |
| 13 | Metal chamber housing |
| 14 | Perforated disc, medium ^1 |
| 15 | Perforated disc, fine ^1 |
| 16 | Pusher with storage compartment and lid |
| 17 | Sausage filler nozzle |
| 18 | Sausage filler bearing ring |
| 19 | Shape plate |
| 20 | Holder for shape plate |
^1 Depending on the model
^2 Special accessory
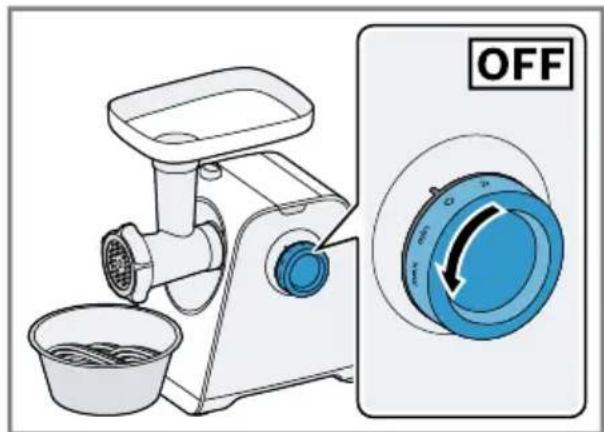
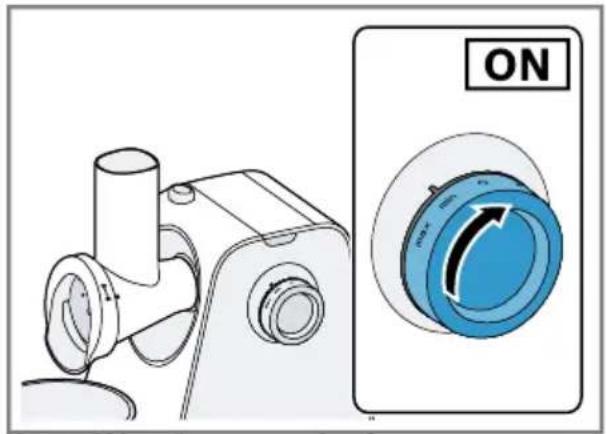
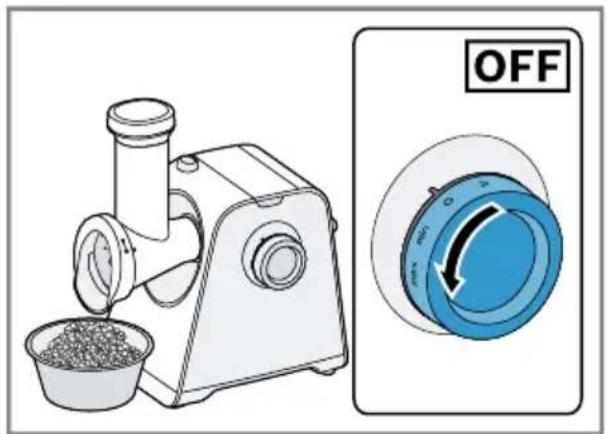
Rotary switch
| Symbol Function | |
| max | Process ingredients at maximum speed. |
| min | Process ingredients at low speed. |
| ○ | Stop processing. |
| ∅ | Food that has got stuck can be released using the reversing function. |
Reversing function
The reversing function is designed to release food that has got stuck by briefly running the worm conveyor in reverse.
→ "Troubleshooting", Page 25
Note: The reversing function should only be used with the meat mincer attachment.
Safety systems
Overload protection
The overload protection system prevents the motor and other components from being damaged through being overloaded. → "Troubleshooting", Page 25
Thermal circuit breaker
If the motor becomes overloaded or too hot, the thermal circuit breaker will switch the appliance off.
Predetermined breaking point
If the worm conveyor jams or becomes overloaded, the clutch will break at the predetermined breaking point.
Restart lock-out
Restart lock-out prevents your appliance from automatically restarting processing after a power failure.
The appliance is switched on again after a power failure. Processing cannot start again until the rotary switch has been set to O.
Operation
Cleaning the appliance and parts before using for the first time
- Clean all parts that come into contact with food before using for the first time.
- Put the cleaned and dried parts out ready for use.
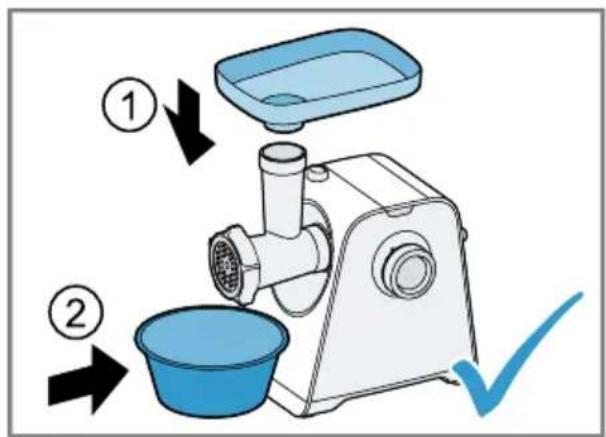
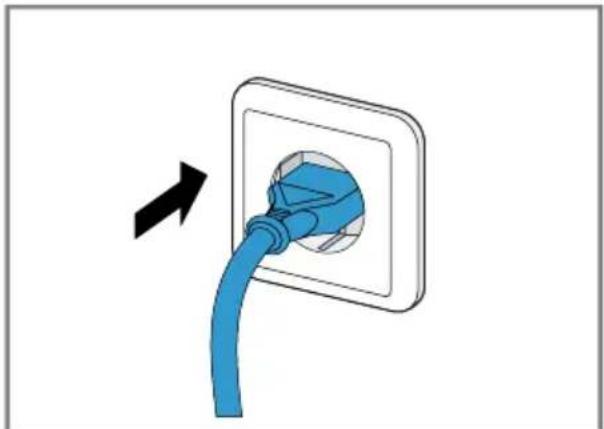
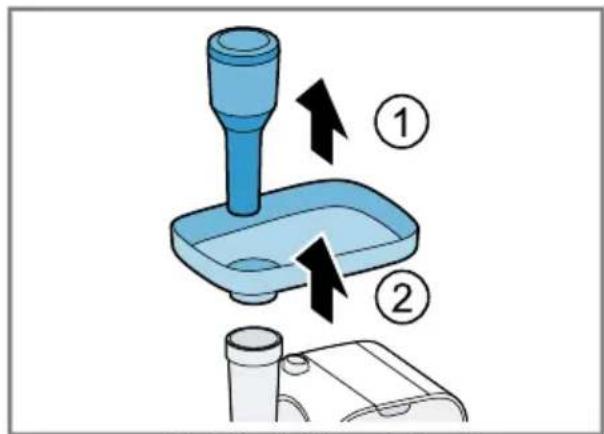
Preparing the main unit
→ Fig. 2 - 3
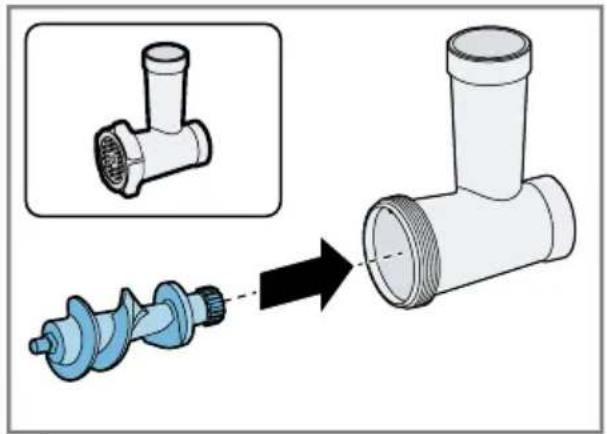
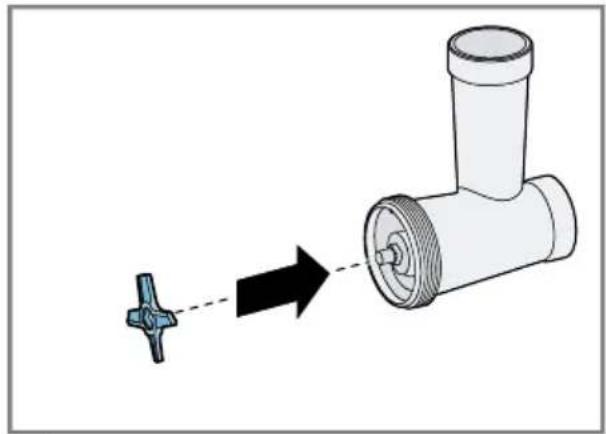
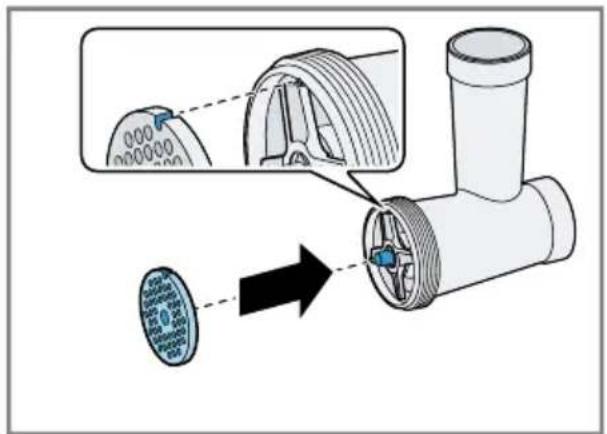
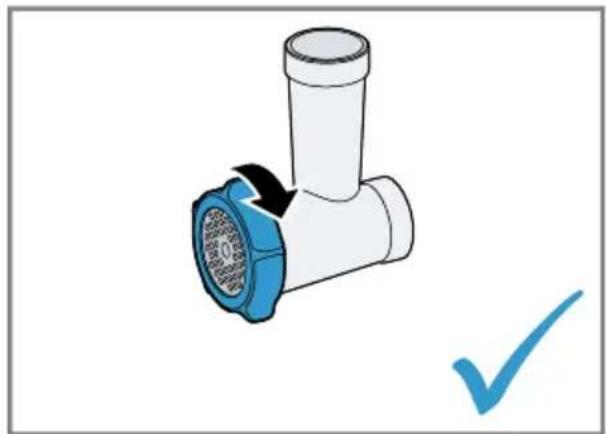
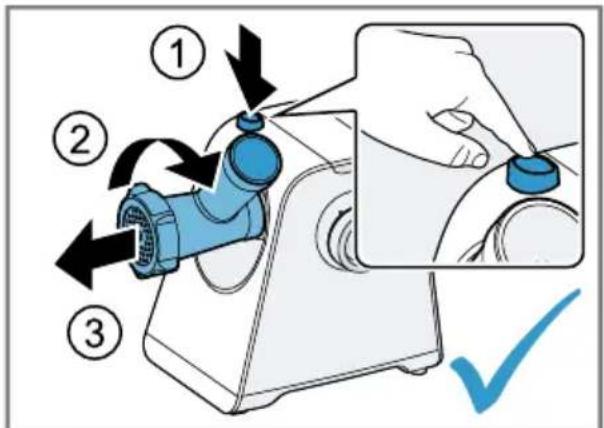
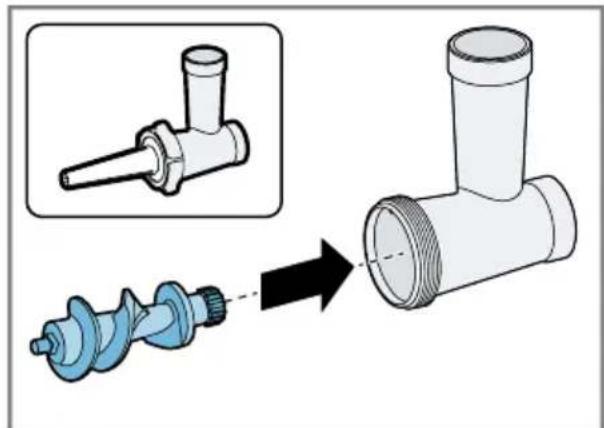
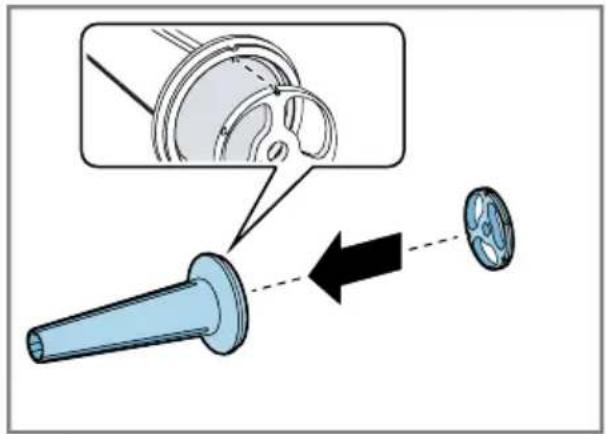
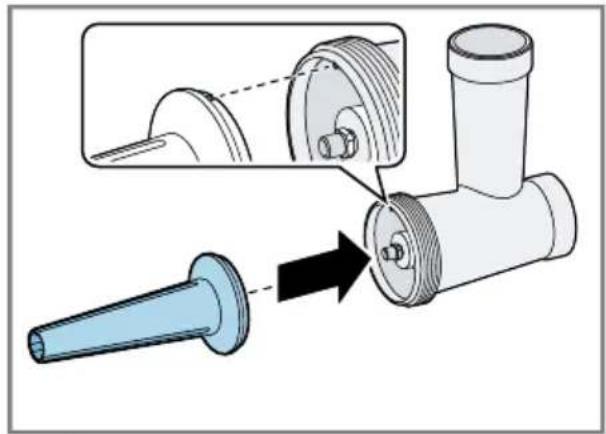
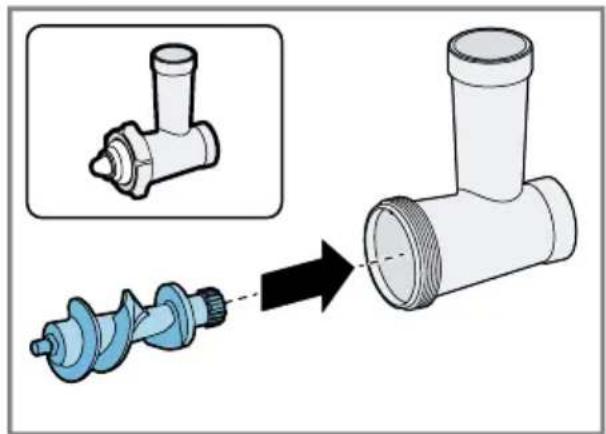
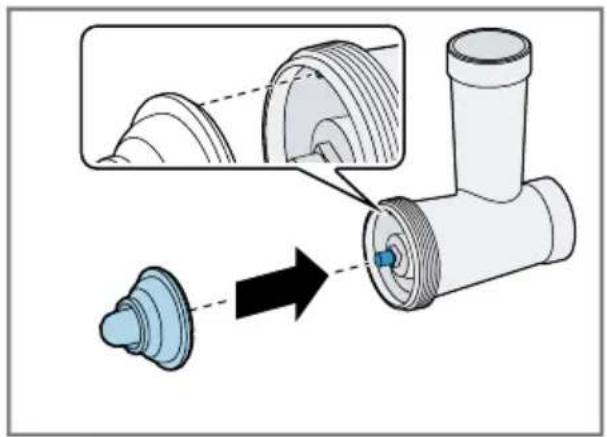
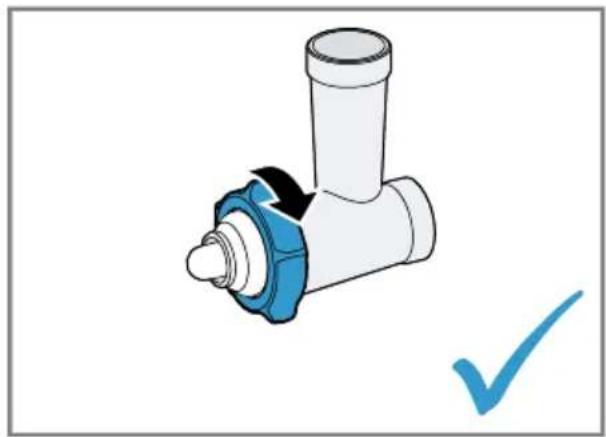
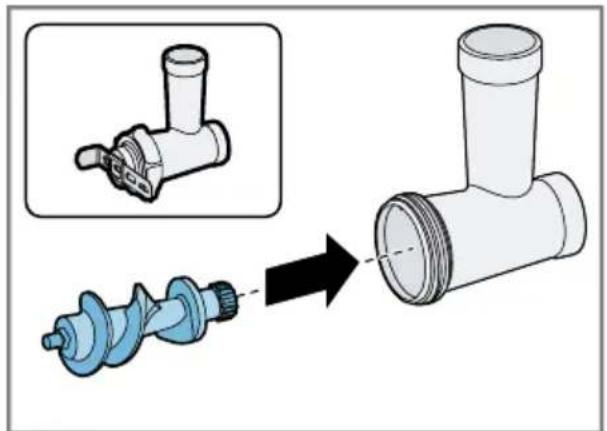
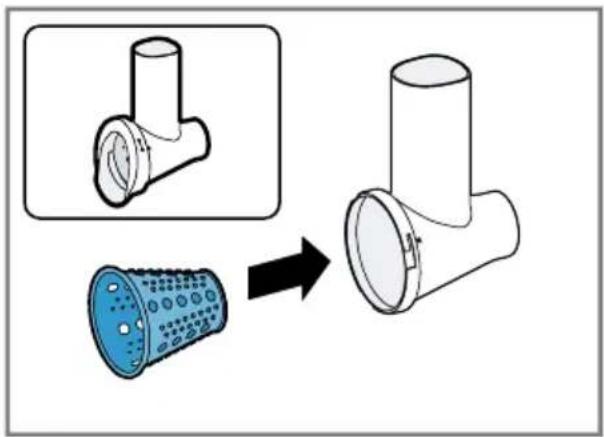
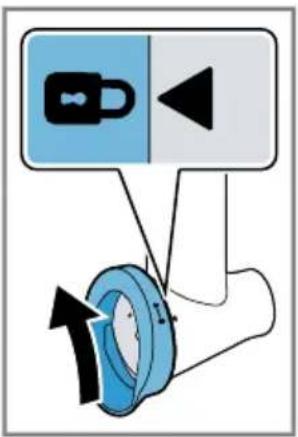
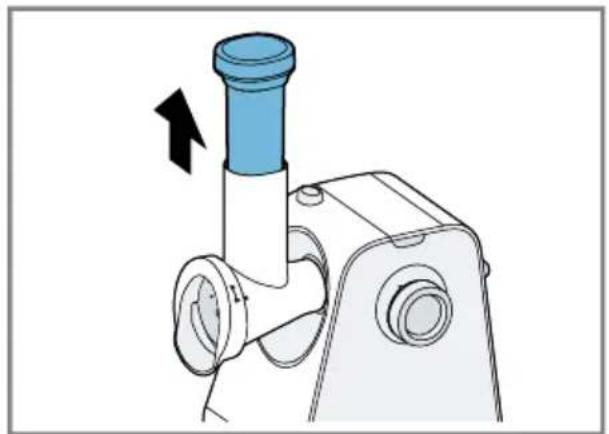
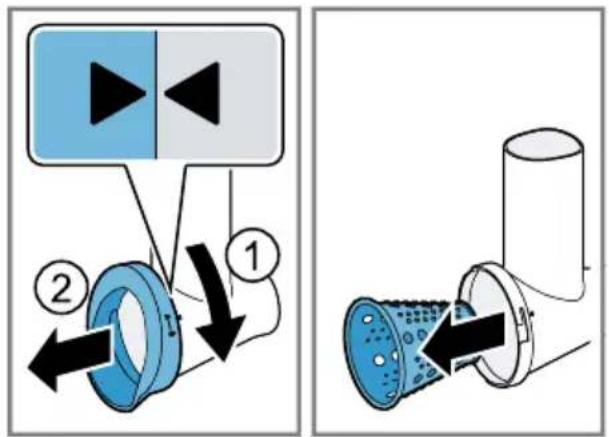
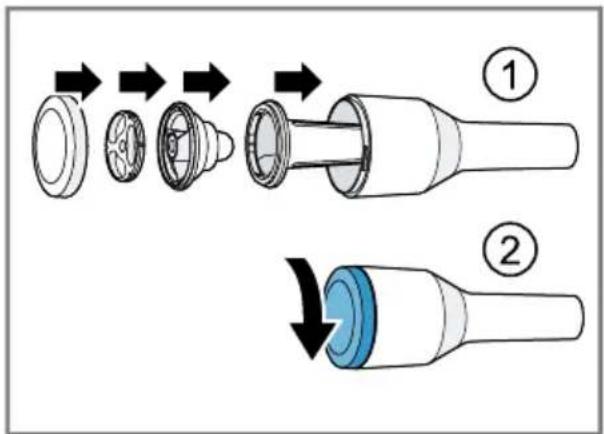
Assembling the meat mincer attachment
→ Fig. 4 - 7
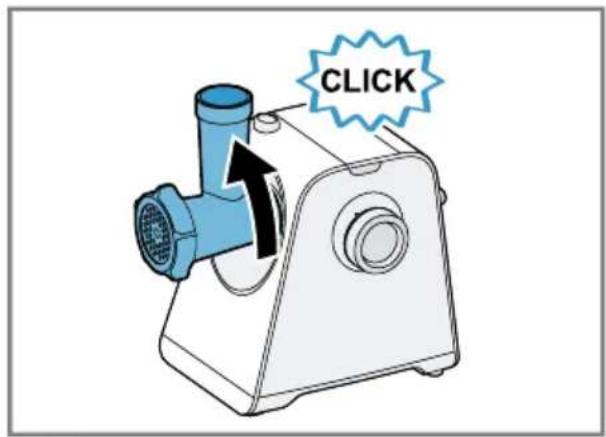
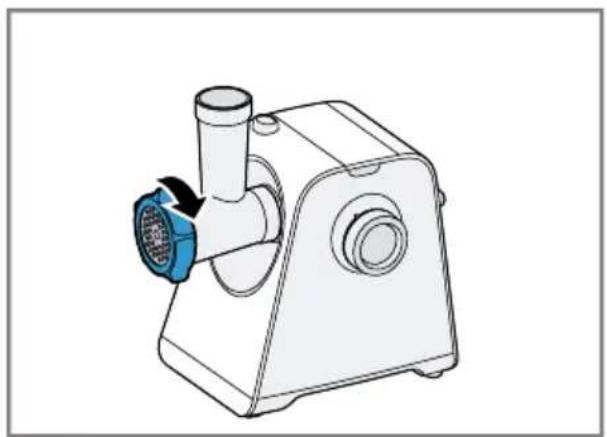
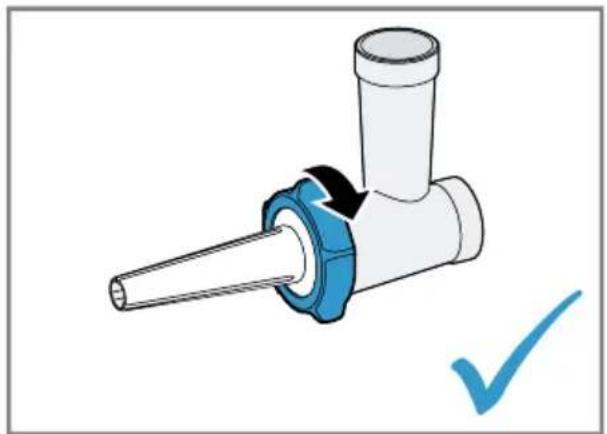
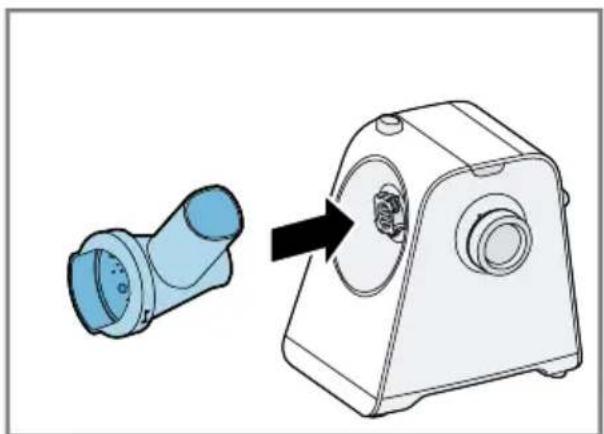
Fitting the attachment
→ Fig. 8 - 11
Recommended speeds
Setting Use
| min/max | Meat mincer attachment (perforated discs 3 mm, 4.5 mm, 8 mm) |
| Setting Use | |
| max | Sausage filler attachment |
| max | Kebbe attachment |
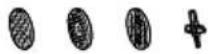
Perforated discs
 | Perforated disc, fine (3 mm) |
| [48HS] | Perforated disc, medium (4.5 mm) |
 | Perforated disc, coarse (8 mm)Note: The coarse perforated disc is suitable for processing chicken bones. |
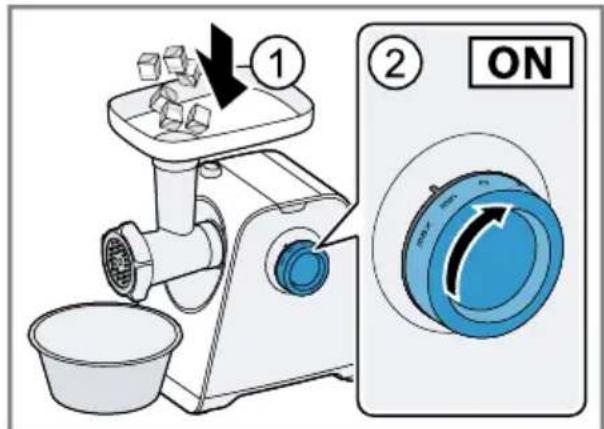
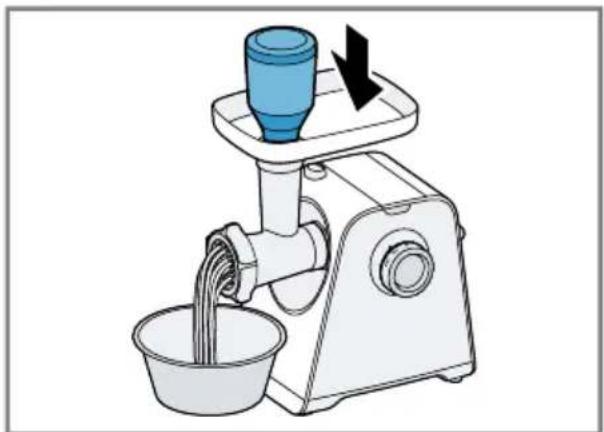
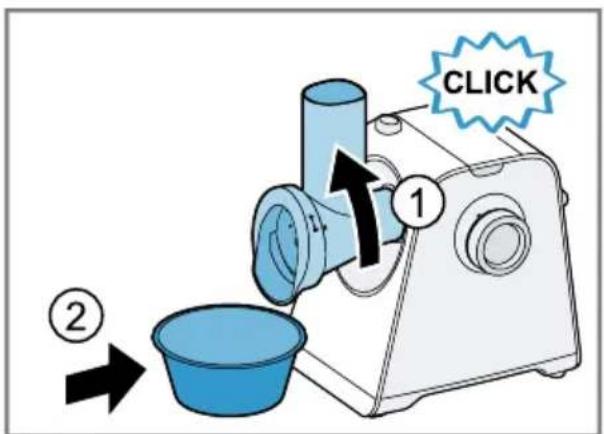
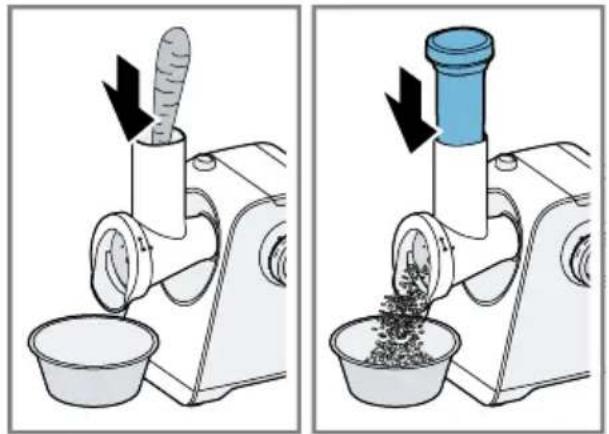
Processing food
→ Fig. 12 - 18
Additional applications
You can combine accessories with parts of the meat mincer attachment for additional applications.
Note: Assemble the attachment for the individual application you require. Use the prepared attachment as described for the meat mincer attachment.
→ "Fitting the attachment", Page 23
→ "Processing food", Page 23
Assembling the sausage filler attachment
The sausage filler attachment is suitable for filling artificial and natural casings with meat and for shaping rolls, e.g. cevapcici.
→ Fig. 19 - 22
Assembling the kebbe attachment
The kebbe attachment is suitable for shaping dough or minced meat pockets.
→ Fig. 23 - 25
Assembling the cookie cutter attachment
The cookie cutter attachment is suitable for shaping biscuit dough or shortcrust pastry.
→ Fig. 26 - 29
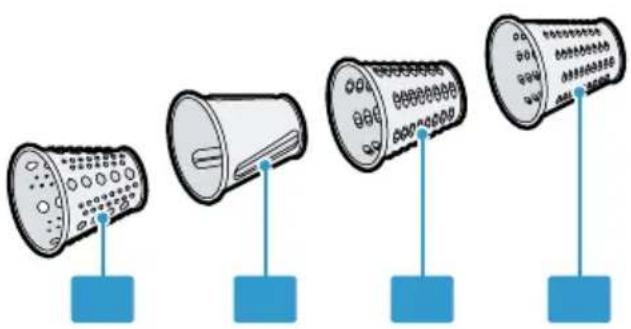
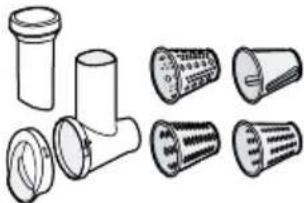
Shredding attachment
The shredding attachment is suitable for shredding, grating and slicing items such as cheese, fruit, vegetables, nuts, almonds or dry bread rolls.
Overview
| → Fig. | 30 |
| G | Shredding attachment1 |
| 1 | Closure for barrel safety |
| 2 | Shredding housing |
| 3 | Pusher for shredding attachment |
| 4 | Grating barrel |
| 5 | Slicing barrel |
| 6 | Shredding barrel coarse |
| 7 | Shredding barrel fine |
^1 Depending on the model
Recommended speeds
| Setting Use | |
| max | Grating barrel |
| min/max | Slicing barrel |
| min/max | Shredding barrel coarse |
| min/max | Shredding barrel fine |
Barrel inserts
 | Grating barrelGrating food finely, e.g. nuts, hard cheese, potatoes. |
 | Slicing barrelCutting food into slices, e.g. cucumbers, carrots, beetroot. |
 | Shredding barrel coarseShredding food into large pieces, e.g. fruit and vegetables like apples or carrots; cheese like Gouda or Edam. |
 | Shredding barrel fineShredding food into fine pieces, e.g. nuts; fruit and vegetables like apples or carrots; cheese like Gouda or Edam. |
Notes
■ The barrel inserts are not suitable for processing very soft or very fibrous foods.
■ The recommended continuous operating time is 2 minutes.
Using the shredding attachment
→ Fig. 31 - 40
Overview of cleaning
Clean all parts immediately after use so that residues do not dry on.
- Do not use cleaning agents containing alcohol or spirits.
- Do not use sharp, pointed or metal objects.
- Do not use abrasive cloths or cleaning agents.
Note: Never clean the following parts in the dishwasher: metal chamber housing, threaded ring and worm conveyor. If you clean these parts with detergent and water hotter than 40 °C, this may affect the shiny finish of the parts. It will not impair functioning of the parts.
Clean the individual parts as indicated in the table.
→ Fig. 41
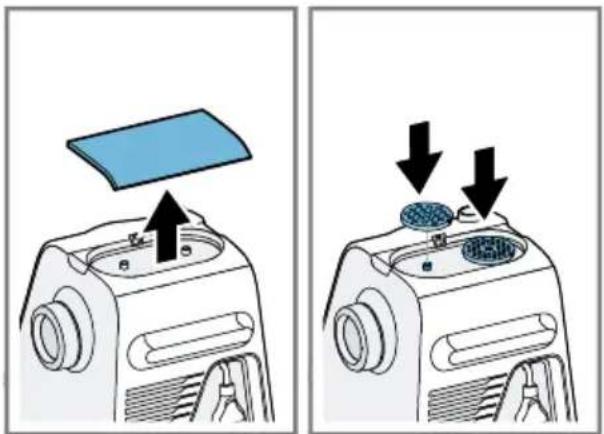
Storing individual parts
- After cleaning, keep the dried accessories of the meat mincer attachment in the storage compartment for the pusher.
→ Fig. 42 - To store the perforated discs, take off the cover of the storage compartment on top of the main unit. Fit the perforated discs onto the holders provided and close the lid again.
→ Fig. 43
Processing instructions and application examples
Processing instructions
Meat mincer attachment
■ All perforated discs are suitable for processing raw meat.
- Cut meat and large items of food into pieces so they fit into the filling shaft.
Sausage filler attachment
■ Only process food that has been cut up fine with the sausage filler attachment.
■ Soak natural casing in lukewarm water for 10 minutes before processing.
- Do not stuff casings too full or the sausages may burst during boiling or frying.
Sample recipe
You can find a sample recipe that has been specially developed for your appliance here.
Ground peanuts
Ingredients
■ 1500-2000 g fresh raw peanuts
Preparation
■ Prepare the meat mincer attachment with the fine perforated disc and fit.
■ Add the peanuts to the filling tray.
■ Set the rotary switch to max
■ Add the peanuts to the filling shaft evenly during processing and press down with the pusher.
■ Process the entire quantity within 2 minutes.
Note: The recommended continuous operating time is 2 minutes.
Tip: Season salads, sauces and other dishes with the ground peanuts or make them into crunchy peanut butter.
Crunchy peanut butter
Preparation
■ Process the ground peanuts another two times with the fine perforated disc.
■ Add 10 ml peanut oil or vegetable oil for every 100 g peanuts.
■ Stir the mixture with a whisk until creamy.
- Enjoy the finished peanut butter spread directly onto bread or use it as a seasoning.
Retrieve more recipes
- To retrieve more recipes online, scan the following QR code.

Troubleshooting
Fault Cause and troubleshooting
| Appliance does not start processing. | Rotary switch is set incorrectly. |
| ▶ Set the rotary switch to ○ before processing. |
Fault Cause and troubleshooting
| Food is not being processed although the main unit is running. | Food has got stuck and is blocking the attachment.Note: Only use the reversing function with the meat mincer attachment.1. Set the rotary switch to ○ and wait until the appliance stops.2. Set the rotary switch to ➡ for a few seconds to start the reversing function and release the food that has got stuck.3. Wait until the appliance stops.4. Set the rotary switch to min and check whether the food is being processed normally again.Note: If the fault cannot be eliminated in this manner, observe the following steps.1. Set the rotary switch to ○ and wait until the appliance stops.2. Remove the attachment and take it apart.3. Remove food that has got stuck und check whether the attachment or the food contains any sinews, bones or other hard pieces. |
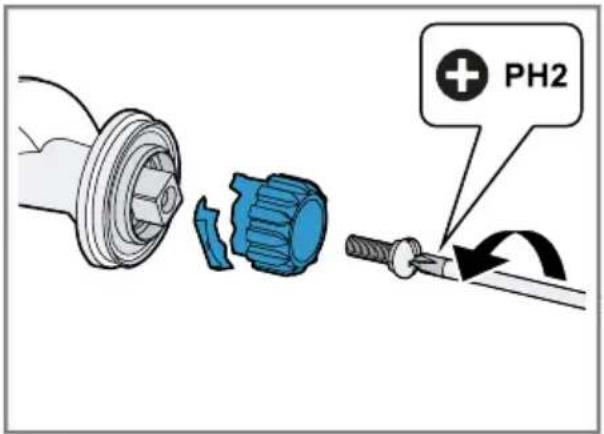
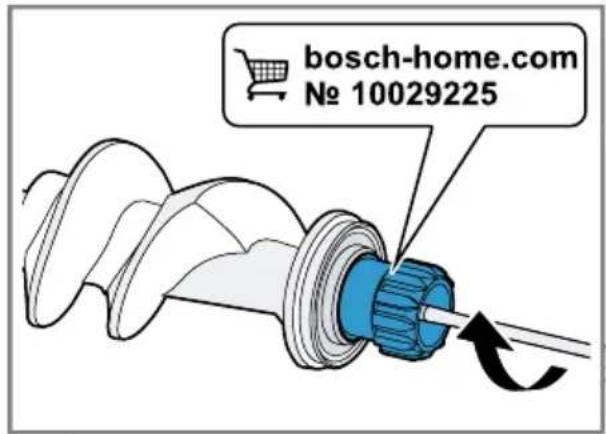
| The clutch of the worm conveyor has been overloaded and has broken at the predetermined breaking point.Note: Spare parts with a predetermined breaking point are not covered by our warranty obligations. A new clutch is available from customer service under order number 10029225.1. Release the screw and remove the faulty clutch.→ Fig. 442. Insert the new clutch and screw in tight.→ Fig. 45 | |
| Appliance switches off during processing. | Motor is overheated.1. Set the rotary switch to ○ and wait until the appliance stops.2. Allow the appliance to cool down to deactivate the overload protection device. |
Disposing of old appliance
- Unplug the appliance from the mains.
- Cut through the power cord.
- Dispose of the appliance in an environmentally friendly manner.
Information about current disposal methods are available from your specialist dealer or local authority.
This appliance is labelled in accordance with European Directive 2012/19/EU concerning used electrical and
electronic appliances (waste electrical and electronic equipment - WEEE). The guideline determines the framework for the return and recycling of used appliances as applicable throughout the EU.
Customer Service
Detailed information on the warranty period and terms of warranty in your country is available from our after-sales service, your retailer or on our website.
The contact details for Customer Service can be found in the enclosed Customer Service directory or on our website.

Sécurité
Sécurité anti-surcharge
Dépannage
Sistemazione guasti
Anomalia Causa e ricerca guasti
Storing Oorzaak en probleemoplossing
Afhjælpning af fejl
Utbedring av feil
Avhjälpning av fel