
CompactPower MFW3600W - Mincer BOSCH - Free user manual and instructions
Find the device manual for free CompactPower MFW3600W BOSCH in PDF.

| Product Type | Meat Mincer with Multi-Attachment System |
| Brand | Bosch |
| Model | CompactPower MFW3600W |
| Maximum Continuous Operation | 10 minutes, then cool down to room temperature |
| Overload Protection | Yes, agitator paddle with predetermined breaking point |
| Base Unit Material | Plastic |
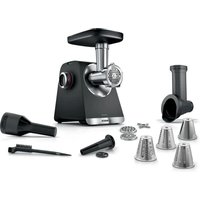
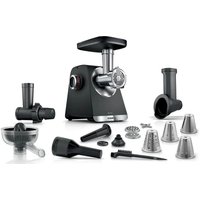
| Attachments Included | Meat mincer with 4mm and 8mm perforated discs, sausage filler, kebbe maker |
| Optional Accessories | Shredding attachment with slicing, coarse and fine shredding inserts; pasta maker; citrus press; fine perforated disc (2.7mm) |
| Cable Storage | Integrated cable storage compartment |
| Storage Compartment | Underneath base unit for perforated discs |
| Carrying Handle | Yes, integrated on base unit |
| Cleaning | Base unit wipe clean only; attachments hand wash with detergent, not dishwasher safe; dry metal parts and oil to prevent rust |
| Safety Features | Double safety: appliance switches off at overload; sharp blade guards; requires assembly without power |
| Intended Use | Domestic only; for mincing raw/cooked meat, fish, poultry; making sausages, kebbe; shredding vegetables/cheese |
| Compatible Spare Parts | Perforated discs (fine 2.7mm, medium 4mm, coarse 8mm), sausage filler nozzle, kebbe nozzle, shredding inserts, agitator paddle (No. 630701) |
| Warranty | As per national conditions; proof of purchase required |
| Height | Approx. 30 cm (estimated) |
| Width | Approx. 20 cm (estimated) |
| Depth | Approx. 25 cm (estimated) |
| Weight | Approx. 3.5 kg (estimated) |
Frequently Asked Questions - CompactPower MFW3600W BOSCH
User questions about CompactPower MFW3600W BOSCH
0 question about this device. Answer the ones you know or ask your own.
Ask a new question about this device
Download the instructions for your Mincer in PDF format for free! Find your manual CompactPower MFW3600W - BOSCH and take your electronic device back in hand. On this page are published all the documents necessary for the use of your device. CompactPower MFW3600W by BOSCH.
USER MANUAL CompactPower MFW3600W BOSCH
new device on MyBosch now and get free benefits:
bosch-home.com/ welcome
CompactPower
MFW3...
[en] Instruction manual Meat mincer 14
Read and follow the operating instructions carefully and keep for later reference! Enclose these instructions when you give this appliance to someone else.
If the instructions for correct use of the appliance are not observed, the manufacturer's liability for any resulting damage will be excluded.
This appliance is intended for domestic use only. Use the appliance for processing normal quantities of food for domestic use.
The appliance and accessories (depending on the model) are suitable for the following purposes:
Meat mincer: for cutting and mixing raw and cooked meat, bacon, poultry and fish.
Sausage filler: for making sausages and meat rolls.
Kebbe maker: for making dough and minced meat pockets.
Shredding attachment: for shredding and slicing food.
Food which is to be processed must not contain any hard components (e.g. bones). The appliance should not be used for processing other substances or objects. Additional applications are possible if the accessories approved by the manufacturer are used. Use the appliance only with genuine parts and accessories. Never use the attachments or slicing / shredding inserts on other appliances. Only use matching parts for the relevant attachments. Only use the appliance indoors at room temperature and up to 2000 m above sea level. Do not place the appliance on or near hot surfaces, e.g. hobs.
Your work surface should be easily accessible, resistant to moisture, firm, flat, dry and large enough to prevent any harm from splashing and to let you work unhindered.
This appliance can be used by persons with reduced physical, sensory or mental capabilities or lack of experience and knowledge if they have been given supervision or instruction concerning safe use of the appliance and if they understand the hazards involved. Keep children away from the appliance and connecting cable and do not allow them to use the appliance.
Children must not play with the appliance. Cleaning and user maintenance must not be performed by children.
Safety instructions
⚠️ Danger of electric shock and fire
Connect and operate the appliance only according to the type plate specifications. Do not use if the mains cable or appliance show any signs of damage. To avoid potential hazards, repairs such as replacing a damaged cable must only be carried out by our customer service personnel. Never connect the appliance to timer switches or remote-controllable sockets. Never leave the appliance unattended while it is switched on! We recommend that the appliance is never switched on for longer than is necessary to process the ingredients.
The mains cable must not come into contact with hot parts or be pulled across sharp edges. Never immerse the base unit in water or place it in the dishwasher. Do not steam-clean the appliance. Do not use the appliance with damp hands and do not operate at no load. The appliance must always be disconnected from the mains after each use, whenever the appliance is unattended, prior to assembly, disassembly or cleaning and in the event of a fault.
Risk of injury
Immediately after using the appliance wait for it to stop. Before fitting or replacing attachments, the appliance must be switched off and disconnected from the mains.
Do not grasp the sharp blades and edges of the shredding and slicing inserts. Keep hands clear of rotating parts. Never reach into the feed chute or outlet opening. Never put the food to be processed into the feed chute with your hands. Only use the pusher provided! Never clean the sharp blades and edges of the shredding and slicing inserts with your bare hands.
Caution! Risk of damaging the appliance
Check that there are no foreign objects in the feed chute or attachments. Do not poke objects (e.g. knives, spoons) in the feed chute or outlet opening.
Only allow the appliance to run uninterrupted for a maximum of 10 minutes. Then switch off and allow to cool down to room temperature.
⚠️ Important!
It is essential to clean the appliance as described after each use or after it has not been used for an extended period. → “Care and daily cleaning” see page 19
Congratulations on the purchase of your new Bosch appliance.
On the following pages of these operating instructions you will find useful information for safe use of this appliance.
We request that you read these operating instructions carefully and observe all instructions. This ensures you will be able to enjoy this appliance for a long time, and the results will confirm your choice of this appliance.
Retain these operating instructions for subsequent use or for the next owner.
You can find further information about our products on our website.
Content
Intended use....14
Safety instructions....15
Overview....16
Before using for the first time....17
Control and display elements ....17
Overload protection....17
Base unit....17
Base attachment....18
Shredding attachment ....19
Care and daily cleaning....19
Recipes....20
Tips....21
Disposal....21
Guarantee....21
Spare parts and accessories....22
Troubleshooting....23
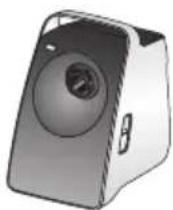
Overview
→ Fig. A
1 Base unit
a Drive for attachments
b Button I
c Button O
d Operation indicator
e Release button
f Carrying handle
g Storage compartment with cover
h Mains cable
i Cable storage compartment
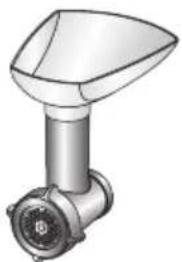
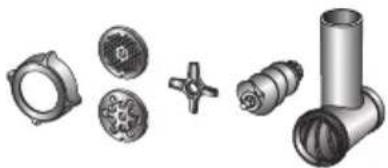
2 Base attachment
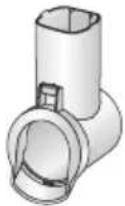
a Housing
b Feed chute
c Filling tray
d Pusher
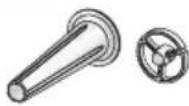
e Worm gear with agitator paddle
f Threaded ring
3 Meat mincer insert
a Blade
b Perforated disc, medium (4 mm) *
c Perforated disc, coarse (8 mm)
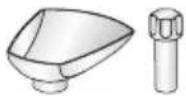
4 Sausage filler insert \*
a Bearing ring
b Sausage filler nozzle
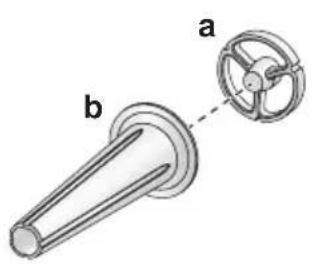
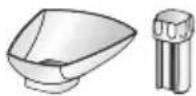
5 Kebbe insert \*
a Conical ring
b Kebbe nozzle
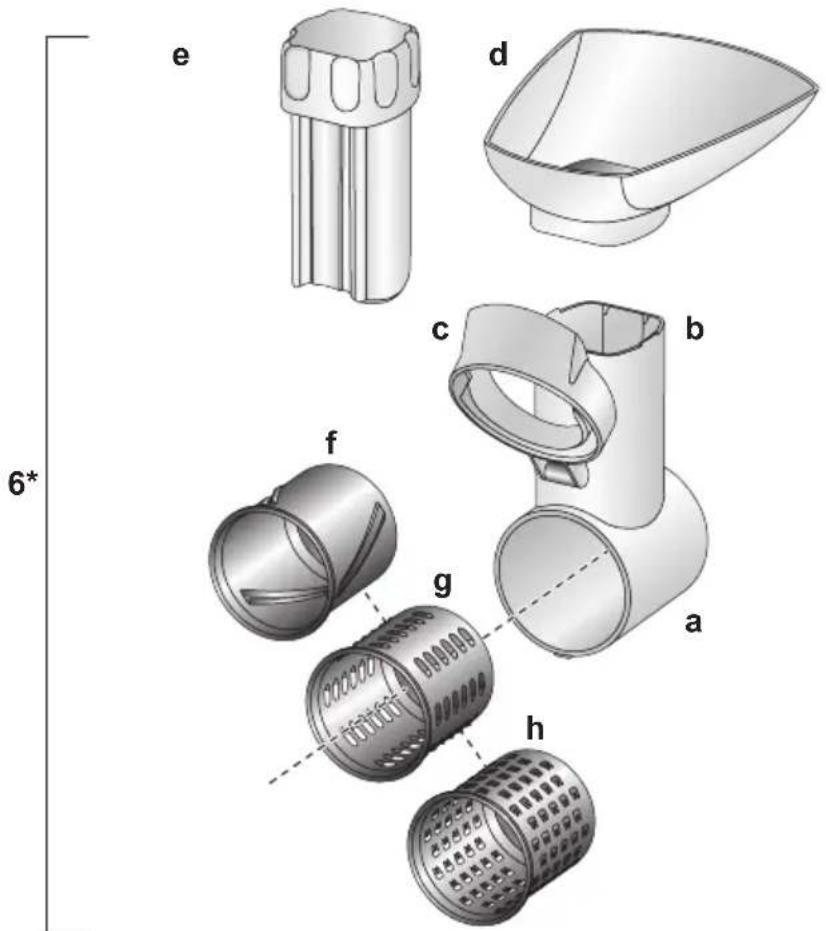
→ Fig. B
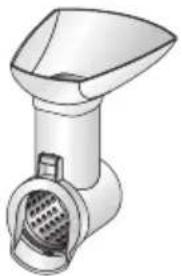
6 Shredding attachment \*
a Housing
b Feed chute
c Cap
d Filling tray
e Pusher
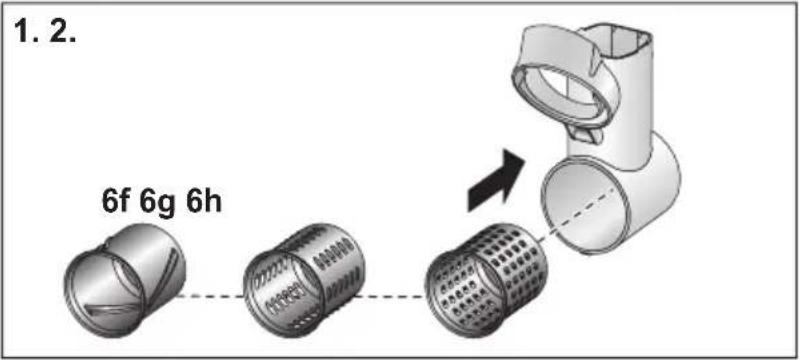
f Slicing insert
g Shredding insert, coarse
h Shredding insert, fine
* depending on the model
Spare parts and accessories are available from Customer Service or at
www.bosch-home.com. → "Spare parts and accessories" see page 22
Before using for the first time
Before the new appliance can be used, it must be fully unpacked, cleaned and checked.
Caution!
Never operate a damaged appliance!
■ Remove the base unit and all accessories from the packaging.
■ Remove the packaging material that is present.
■ Dismantle any assembled parts into their individual parts. Do this in reverse order, as described under „Preparation“.
■ Check all parts for completeness.
→ Fig. A / B
■ Inspect all parts for visible damage.
■ Thoroughly clean and dry all parts before using for the first time.
→ "Care and daily cleaning" see page 19
Control and display elements
Button |
Press button I to switch on the appliance. The drive will start up at once.
Button O
Press button O to switch off the appliance. The drive stops.
Operation indicator
The operation indicator lights up when the appliance is switched on.
Release button
Press the release button to unlock an attachment fitted on the appliance. Only when the release button is pressed is it possible to turn the attachment clockwise and remove it from the base unit.
Cable storage compartment
The mains cable can be pulled out of the cable storage compartment or pushed back in again. Only ever pull the cable out as much as is required.
Storage compartment
Unused perforated discs belonging to the meat mincer can be kept in the storage compartment and it closed with the cover.
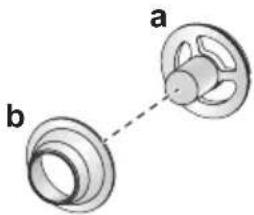
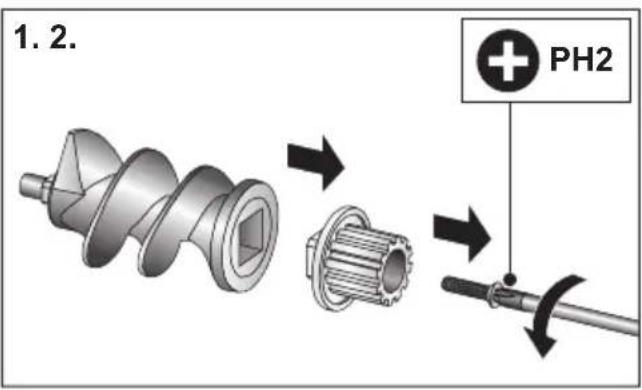
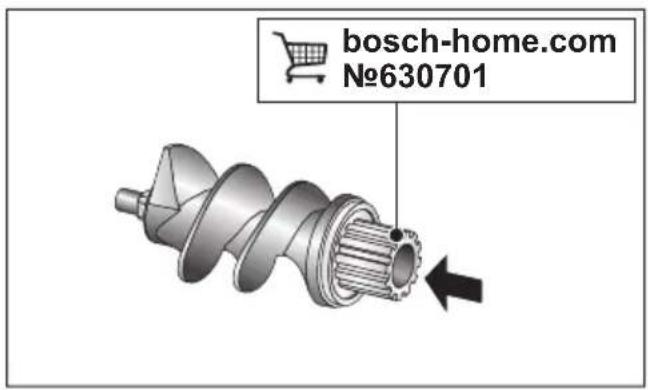
Overload protection
To prevent serious damage to your appliance if the base attachment is overloaded, the agitator paddle has a notch (predetermined breaking point). If overloading occurs, the agitator paddle will break at this point. A new agitator paddle is available from Customer Service (No. 630701). Spare parts with a predetermined breaking point are not covered by our warranty obligations.
Replace agitator paddle
→ Fig. ©
- Release the screw in the agitator paddle with a screwdriver (PH2) and remove the faulty paddle.
- Fit a new agitator paddle and screw tight again.
Base unit
Preparation
Risk of injury!
Do not insert the mains plug until all preparations for working with the appliance are complete and the required attachments are assembled correctly and connected to the base unit.
■ Place the base unit on a stable and level work surface.
■ Pull the mains cable out of the cable storage compartment to the required length.
The base unit is now prepared.
Base attachment
The base attachment can be used for the following applications:
Meat mincer
For chopping up raw or cooked food. Select the appropriate perforated disc depending on the type and consistency of the food to be processed. → "Tips" see page 21
Sausage filler
For filling artificial and natural casings with sausage meat. For producing meat rolls.
Kebbe maker
For producing tubes of dough or minced meat.
Note: Other applications are possible using the base attachment and appropriate accessories available from Customer Service.
Caution!
When assembling the different individual parts, make sure that the notched markings on the inserts match up with the relevant one on the housing.
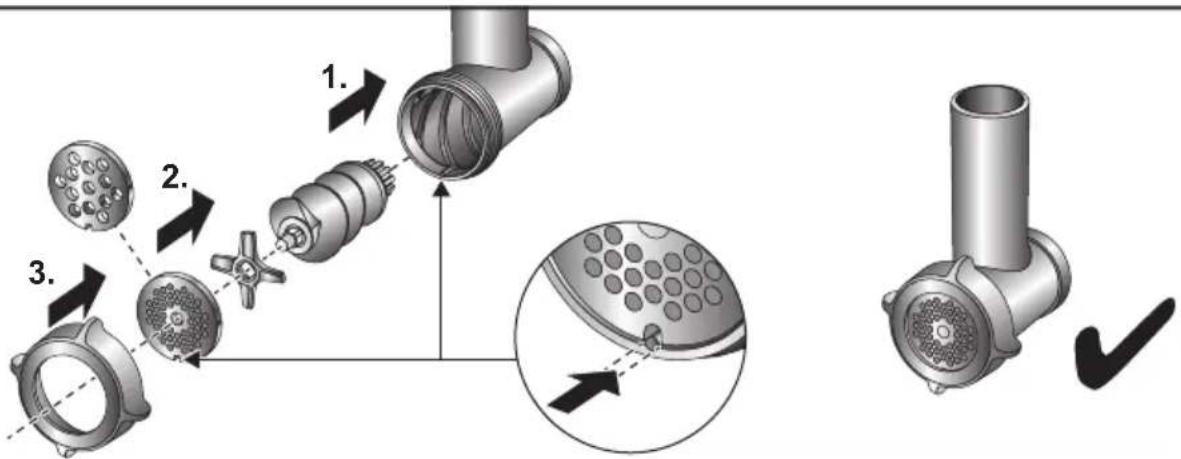
Preparation for meat mincer
Risk of injury!
Do not reach into the sharp knife.
Caution!
Always only use one perforated disc.
→ Fig. D
- Insert the worm gear with the agitator paddle at the front in the housing.
- First fit the knife and then the required perforated disc onto the worm gear.
- Fit the threaded ring onto the housing and screw tight in a clockwise direction without using force.
The meat mincer is now prepared.
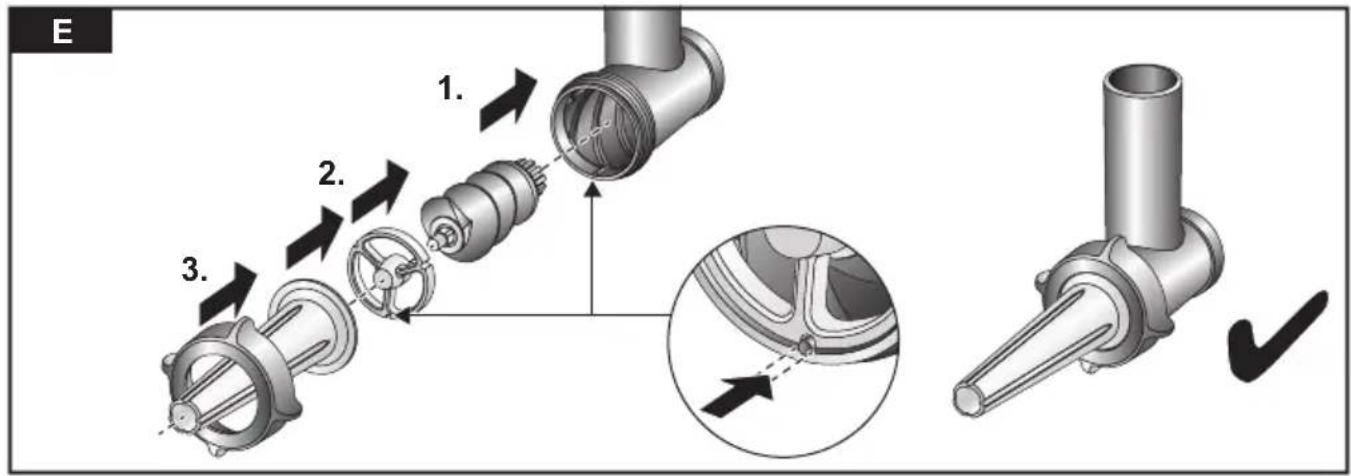
Preparation for sausage filler
→ Fig. E
- Insert the worm gear with the agitator paddle at the front in the housing.
- First fit the bearing ring onto the worm gear and then the sausage nozzle into the housing.
- Fit the threaded ring onto the housing and screw tight in a clockwise direction without using force.
The sausage filler is now prepared.
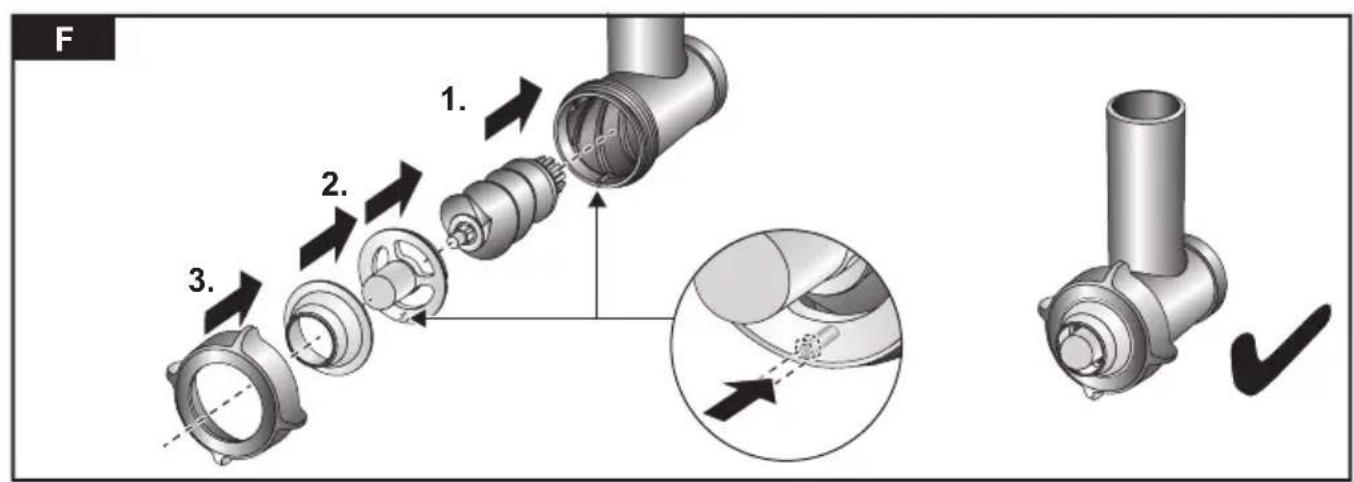
Preparation for kebbe maker
→ Fig. F
- Insert the worm gear with the agitator paddle at the front in the housing.
- First fit the conical ring onto the worm gear and then the kebbe nozzle into the housing.
- Fit the threaded ring onto the housing and screw tight in a clockwise direction without using force.
The kebbe maker is now prepared.
Use
Note: The food is processed in different ways depending on the application.
→ "Recipes" see page 20
The following example describes use of the base attachment as a meat mincer:
Risk of injury!
- Do not reach into the feed chute with your hands.
- Only use the pusher when adding more food.
Caution!
- Do not process bones, gristle, sinews or other solid components.
- Do not process frozen meat.
- Do not apply great force with the pusher.
→ Sequence of figures ©
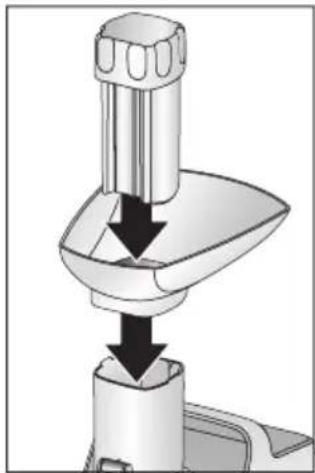
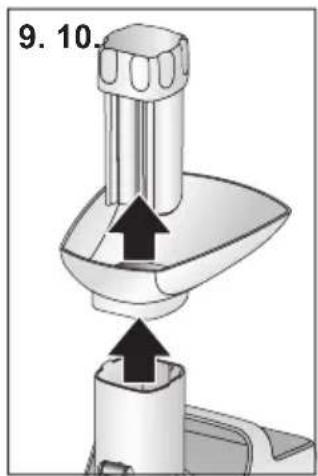
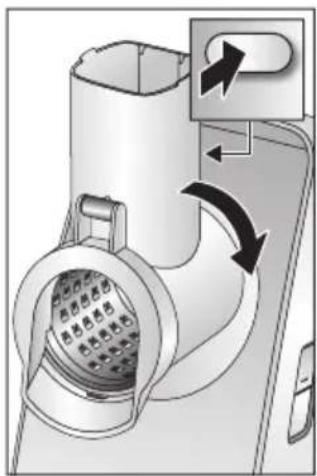
- Fit the prepared attachment onto the drive of the base unit, holding it at an angle.
- Turn the attachment anticlockwise until you hear it click into position.
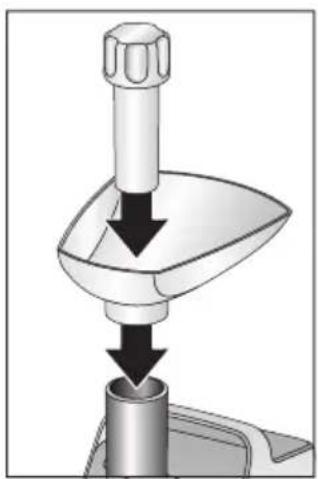
-
Fit the filling tray and insert the pusher in the feed chute.
-
Prepare your food. Chop up large parts beforehand so they fit into the feed chute without having to press them in.
- Place a suitable container under the attachment. Add the prepared food to the filling tray.
- Connect the mains plug. Switch on the appliance.
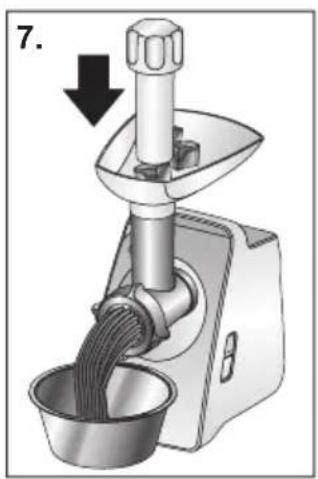
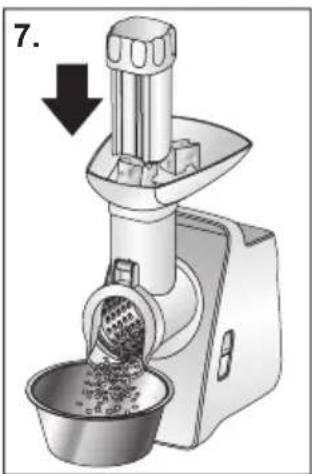
- Use the pusher to slide the food down the feed chute, applying light pressure.
- Once you have finished, switch off the appliance and pull out the mains plug.
- Remove the filling tray and pusher.
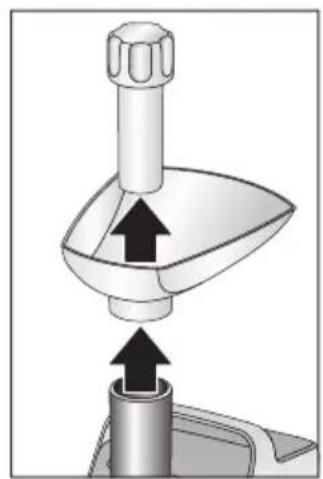
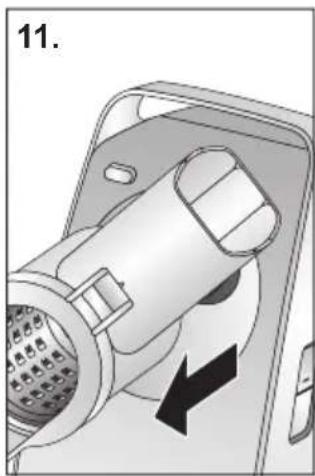
- Hold down the release button and turn the attachment clockwise until it disengages.
- Remove the attachment, take it apart and clean all parts. → "Care and daily cleaning" see page 19
Shredding attachment
For shredding, grating and slicing items such as cheese, fruit, vegetables, nuts, almonds, dried bread rolls and other hard foodstuffs. Select the appropriate insert depending on the type and consistency of the food to be processed. "Tips" see page 21
Preparation
Risk of injury!
Do not reach into the sharp blades and edges of the shredding, grating and slicing inserts.
→ Sequence of figures H
-
Open the cap. Fit the required insert into the housing.
-
Close the cap until you hear it click into position.
The shredding attachment is now prepared.
Use
Risk of injury!
- Do not reach into the feed chute with your hands.
- Only use the pusher when adding more food.
Caution!
- The pusher can only be inserted in one direction.
- Remove hard shells (e.g. on nuts).
- Do not apply great force with the pusher.
→ Sequence of figures Ⅰ
- Fit the prepared attachment onto the drive of the base unit, holding it at an angle.
- Turn the attachment anticlockwise until you hear it click into position.
- Fit the filling tray and insert the pusher in the feed chute.
- Prepare your food. Chop up large parts beforehand so they fit into the feed chute without having to press them in.
- Place a suitable container under the attachment. Add the prepared food to the filling tray.
- Connect the mains plug. Switch on the appliance.
- Use the pusher to slide the food down the feed chute, applying light pressure. The food is now cut up or shredded.
- Once you have finished, switch off the appliance and pull out the mains plug.
- Remove the filling tray and pusher.
- Hold down the release button and turn the attachment clockwise until it disengages.
- Remove the attachment, take it apart and clean all parts. → “Care and daily cleaning” see page 19
Care and daily cleaning
The appliance, all attachments and the relevant accessories must be thoroughly cleaned after each use.
⚠️ Risk of electric shock!
- Disconnect the mains cable from the socket prior to cleaning.
– Never immerse the base unit in liquids and do not clean in the dishwasher.
Risk of injury!
Do not reach into the sharp blades and edges of the shredding and slicing inserts.
en Recipes
Caution!
- Do not use any cleaning agents containing alcohol or spirits.
- Do not use any sharp, pointed or metal objects.
- Do not use abrasive cloths or cleaning agents.
Fig. J gives an overview of how to clean the individual parts.
■ Wipe the outside of the base unit with a soft, damp cloth and dry off.
■ Dismantle the attachments used in reverse order (see „Preparation“ for the relevant attachment).
■ Clean all accessories with a detergent solution and a soft cloth/sponge or with a soft brush.
■ Allow all parts to dry.
Notes:
- Immediately rub metal parts dry and apply a little cooking oil to protect them from rust.
- Discolouration of plastic parts may occur when processing foods such as carrots. This can be removed with a few drops of cooking oil.
Recipes
Bread dumplings
- 300 g fresh white bread
- 20 ml milk
- 40 g butter or margarine
- 3 eggs
- 1 tbsp finely chopped onions
- Parsley
- A little flour
- Salt and pepper
■ Cut the bread into slices 10 mm thick and halve lengthways. Add 20 ml of milk and soak.
■ Process the moistened bread for approx. 50 secs with the meat mincer (perforated disc, medium).
■ Add the finely chopped onions, parsley and melted butter and mix.
■ Add the whisked eggs, salt and pepper and mix into the bread dough.
■ Leave the dough to prove for several minutes. Then knead again.
■ Shape the dumplings with wet hands. Roll the dumplings in flour.
■ Place dumplings in boiling water and leave to simmer for approx. 20 minutes. Do not bring to the boil!
Kebbe
Dough pockets:
- 500 g lamb, cut into strips
- 500 g bulgur wheat, washed and drained
- 1 small onion, chopped
■ Process the lamb and wheat with the meat mincer, alternating between the two (perforated disc, fine).
■ Mix the dough thoroughly and mix in the onion.
■ Process the mixture another two times with the meat mincer.
Filling:
- 400 g lamb, cut into strips
- 2 medium-sized onions, chopped
- 1 tablespoon of oil
- 1 tablespoon of flour
- 2 teaspoons of pimento
- Salt and pepper
■ Process the lamb with the meat mincer (perforated disc, fine).
■ Fry the onions until golden brown.
■ Add the lamb and fry until well done.
■ Add the remaining ingredients.
■ Fry everything gently for about 1-2 minutes.
■ Pour off the excess fat.
■ Leave the filling to cool down.
Prepare the kebbe:
■ Use the kebbe maker to process the mixture for dough pockets.
■ Cut off pieces 7.5 cm in length from the hollow strand of dough.
■ Press one end of the dough pocket to seal.
■ Insert a little filling in the opening and also seal the other end of the dough pocket.
■ Heat the oil (approx. 180 °C) and deep-fry the dough pockets for about 6 minutes until golden brown.
Tips
Meat mincer
Using the perforated discs
- Perforated disc, medium (4 mm) for: pork and beef for pâté and Cervelat sausage
- Perforated disc, coarse (8 mm) for: roast pork for goulash soup; leftovers (joint, sausage) for bakes
■ If you require a finer consistence to your processed food, process it several times or use different perforated discs one after the other (coarse, medium).
■ You can add other ingredients (e.g. onions, spices) directly during processing. This ensures all ingredients are mixed together thoroughly.
Sausage filler
■ Soak natural casing in lukewarm water for about 10 minutes before processing.
■ Do not stuff casings too full or the sausages may burst during boiling or frying.
Shredding attachment
Using the inserts
- Slicing insert: for carrots, celery, kohlrabi, courgettes
- Shredding insert (coarse): for carrots, nuts, hard cheese (e.g. Emmentaler)
- Shredding insert (fine): for nuts, hard cheese, Parmesan cheese
Disposal
Dispose of packaging in an environmentally-friendly manner. This appliance is labelled in accordance with European Directive 2012/19/EU concerning used electrical and electronic appliances (waste electrica and electronic equipment – WEEE). The guideline determines the framework for the return and recycling of used appliances as applicable throughout the EU. Please ask your specialist retailer about current disposalfacilities.
Guarantee
The guarantee conditions for this appliance are as defined by our representative in the country in which it is sold. Details regarding these conditions can be obtained from the dealer from whom the appliance was purchased. The bill of sale or receipt must be produced when making any claim under the terms of this guarantee.
Changes reserved.
Spare parts and accessories
| Spare parts and accessories | ||||
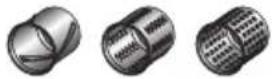
 | 2.7 mm |  | 638407 | Perforated disc (fine) for meat mincer |
 | 4 mm |  | 637985 | Perforated disc (medium) for meat mincer |
 | 8 mm |  | 637986 | Perforated disc (coarse) for meat mincer |
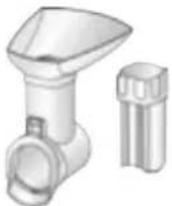
 |  | 637987 | Sausage filler: for filling artificial and natural casings with sausage meat. For producing meat rolls. | |
 | [ZSYW] | 12000397 | ||
 |  | 638281 | Kebbe maker: for producing tubes of dough or minced meat. | |
 |  |  | [TOSS] | Pasta maker:For producing spaghetti or tagliatelle.Whirl maker:For producing 3 different dough profiles for whirls. |
 | ||||
 | 12011263 | Shredding attachment: for shredding, grating and slicing | ||
 | [Y057] | 798161 | Slicing insert for the shredding attachment | |
 |  | 798162 | Shredding insert (coarse) for the shredding attachment | |
 | [Z6Y2] | 798160 | Shredding insert (fine) for the shredding attachment | |
 | [KTHG] | 798130 | Grating insert for the shredding attachment | |
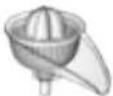 |  | 791603 | Citrus press attachment: for squeezing oranges, lemons and grapefruits. | |
Spare parts and accessories are available from retailers and Customer Service.
Troubleshooting
| Problem Cause Remedy | ||
| The appliance does not start when switched on. | Appliance has no power supply. | Insert the mains plug in the socket. |
| The appliance is running normally, but the food is not being processed. | The appliance was overloaded, and the agitator paddle has broken at the predetermined breaking point. | Switch the appliance off and wait until it has stopped. Unplug the appliance, remove the attachment, take it apart and clean. Replace the agitator paddle. → “Overload protection” see page 17 |
| The food is not being processed or only very slowly. | The attachment or worm gear is blocked. | Switch appliance off, wait until it has stopped and unplug. Remove the attachment, take it apart and clean to eliminate the blockage. → “Care and daily cleaning” see page 19 |
| The pressure on the pusher is too great or the feed chute is too full. | Reduce the pressure on the pusher and fill the feed chute with less food. | |
| The food to be processed still contains hard components. | Remove hard components. Precook/steam vegetables before processing them. | |
If you are unable to solve the problem, always call the hotline! You will find the telephone numbers at the back of these instructions.
Jebel Ali Free Zone – Dubai
Tel.: 04 881 4401
mailto:service.uae@bshg.com
www.bosch-home.com/ae
AL Republika e Shqiperise, Albania
ELEKTRO-SERVIS sh.p.k Rr. Shkelqim Fusha, Selite, Pallati "Matrix Konstruksion", Kati 0 dhe +1
1023 Tirane
Tel.: 4 2278 130, -131
Fax: 4 2278 130
mailto:info@elektro-servis.com
EXPERT SERVIS
Rruga e Kavajes,
Kulla B Nr 223/1 Kati I
1023 Tirane
Tel.: 4 480 6061
Tel.: 4 227 4941
Fax: 4 227 0448
Cel: +355 069 60 45555
mailto:info@expert-servis.al
www.bosch-home.com.au
* Mo-Fr: 24 hours
BA Bosna i Hercegovina, Bosnia-Herzegovina
"HIGH" d.o.o.
Gradačačka 29b
71000 Sarajevo
Tel.: 061 10 09 05
Fax: 033 21 35 13
mailto:bosch_siemens_sarajevo@yahoo.com
Business center FPI, floor 5, Cherni vrah Blvd. 51B
1407 Sofia
Tel.: 0700 208 17
mailto:informacia.servis-bg@bshg.com
www.bosch-home.bg
BH Bahrain
Khalaifat Est.
P.O. Box 5111
Manama
Tel.: 01 7400 553
mailto:service@khalafat.com
To arrange an engineer visit, to order
spare parts and accessories or for
product advice please visit
www.bosch-home.co.uk
or call Tel.: 0344 892 8979*
* Calls are charged at the basic rate, please check with your telephone service provider for exact charges
GR Greece, Ελλάς
BSH Ikiakes Siskeves A.B.E.
Central Branch Service
17 km E.O. Athinon-Lamias & Potamou 20
14564 Kifisia
Unit 1 & 2, 3rd Floor,
North Block, Skyway House,
3 Sham Mong Road
Tai Kok Tsui, Kowloon
Hong Kong
Tel.: 2565 6151
Fax: 2565 6681
mailto:bosch.hk.service@bshg.com
www.bosch-home.cn
HR Hrvatska, Croatia
www.bosch-home.com/hr
www.bosch-home.com/hu
IE Republic of Ireland
BSH Home Appliances Ltd.
M50 Business Park
Ballymount Road Upper
Walkinstown
Dublin 12
To arrange an engineer visit, to order spare parts and accessories or for product advice please call
Tel.: 01450 2655*
www.bosch-home.ie
* Calls are charged at the basic rate, please check with your telephone service provider for exact charges.
IL Israel,
C/S/B/ Home Appliance Ltd.
1, Hamasger St.
North Industrial Park
Lod, 7129801
Tel.: 08 9777 222
Fax: 08 9777 245
mailto:csb-serv@csb-ltd.co.il
www.bosch-home.co.il
IN India, Bhārat, भारत
BSH Household Appliances Mfg. Pvt. Ltd.
Arena House, Main Bldg, 2nd Floor,
Plot No. 103, Road No. 12,
MIDC, Andheri East
Mumbai 400 093
Toll Free 1800 266 1880*
www.bosch-home.com/in
* Mo-Sa: 8.00am to 8.00pm
(exclude public holidays)
IS Iceland
Smith & Norland hf.
Noatuni 4
105 Reykjavik
Tel.: 0520 3000
Fax: 0520 3011
www.sminor.is
IT Italia, Italy
www.bosch-home.com/it
KZ Kazakhstan, Казақстан
IP Anackiy A.N. PTN-Service
Kuyshi Dina str.23/1 N3
Astana
Tel.: 717 236 64 55
mailto: ptnservice@mail.ru
Technodom Service
Utegen Batira Str. 73
480096 Almaty
Tel.: 727 258 85 44
mailto: lsr@technodom.kz
www.technodom.kz
Kombitechnocentr
Zhambyl st. 117
480096 Almaty
Tel.: 727 338 45 55
mailto:cts_pavel@bk.ru
www.cts.kz
TOO Evrika Service
Shimkent, Riskulova 22.
Shimkent 160018
Tel.: 727 252 44 63 75
mailto:evrika kz@mail.ru
www.evrika.com
AV SERVICE
Abulhair hana Str. 51
Uralsk 090000
Tel.: 711 293 99 49
mailto:oastafiev@avservice.kz
www.avservice.kz
LB Lebanon,
Teheni, Hana & Co.
Boulevard Dora 4043 Beyrouth
P.O. Box 90449
Jdeideh, 1202 2040
Tel.: 01 255 211
mailto:Info@Teheni-Hana.com
LT Lietuva, Lithuania
Senuku prekybos centras UAB
Jonavos g. 62
44192 Kaunas
Tel.: 037 212 146
Fax: 037 212 165
www.senukai.lt
UAB "AG Service"
R. Kalantos g. 32
52494 Kaunas
Tel.: 070 055 655
Fax: 037 331 363
mailto:servisas@agservice.lt
www.agservice.lt
Baltic Continent Ltd.
Lukšio g. 23
09132 Vilnius
Tel.: 870 055 595
Fax: 052 741 722
mailto:info@balticcontinent.lt
www.balticcontinent.lt
UAB Emtoservis
S.R.L. "Rialto-Studio"
ул. Щусева 98
2012 Кишинев
Unit F 2, 4 Orbit Drive
Mairangi Bay
Auckland 0632
Tel.: 0800 245 700*
Fax: 0800 256 535
mailto:aftersales.nz@bshg.com
www.bosch-home.co.nz
* Mo-Fr: 8.30 am to 5.00 pm (exclude public holidays)
PL Polska, Poland
and Airconditioning Co. Ltd.
BOSCH Service centre,
Kilo 5 Old Makkah Road
(Next to Toyota), Jamiah Dist.
P.O.Box 7997
Jeddah 21472
Tel.: 800 127 9999
mailto:palakkaln@alj.com
www.aljelectronics.com.sa
SE Sverige, Sweden
BSH Home Appliances AB
Landsvägen 32
169 29 Solna
Tel.: 0771 19 70 00 local rate
Tel.: 0771 11 22 77 local rate
mailto:Bosch-Service-SE@bshg.com
www.bosch-home.se
SG Singapore新加坡
BSH Home Appliances Pte. Ltd.
Block 4012, Ang Mo Kio Avenue 10
01-01 Techplace 1
Singapore 569628
Tel.: 6751 5000*
Fax: 6751 5005
mailto:bshsgp.service@bshg.com
www.bosch-home.com.sg
* Mo-Fr: 8.30am to 7.00pm, Sa: 8.30am to 5.30pm (exclude public holidays)
SI Slovenija, Slovenia
BSH Hišni aparati d.o.o.
Litostrojska 48
1000 Ljubljana
Tel.: 01 583 07 00
Fax: 01 583 08 89
mailto:informacije.servis@bshg.com
www.bosch-home.com/si
SK Slovensko, Slovakia
www.bosch-home.com/tr
BSH Home Appliances Private Limited
台北市內湖區洲子街80號11樓
11F., No.80, Zhouzi St., Neihu Dist.
Taipei City 11493
Tel.: 0800 368 888
Fax: 02 2627 9788
mailto:bshtzn-service@bshg.com
Service-General SH.P.K.
Rruga Mag Prishtine-Ferizaj
70000 Ferizaj
Tel.: 0290 321 434
Tel.: 0290 330 723
mailto:a_service@
gama-electronics.com
XS Srbija, Serbia
BSH Kućni aparati d.o.o.
15th Road Randjespark
Private Bag X36, Randjespark
1685 Midrand – Johannesburg
Tel.: 086 002 6724
Fax: 086 617 1780
mailto:applianceserviceza@bshg.com
www.bosch-home.com/za
bosch-infoteam@bshg.com
Thank you for buying a Bosch Home Appliance!
Register your new device on MyBosch now and profit directly from:
- Expert tips & tricks for your appliance
- Warranty extension options
• Discounts for accessories & spare-parts
• Digital manual and all appliance data at hand - Easy access to Bosch Home Appliances Service
Free and easy registration – also on mobile phones:
www.bosch-home.com/welcome
BOSCH HOME APPLIANCES SERVICE
Looking for help? You'll find it here.
Expert advice for your Bosch home appliances, need help with problems or a repair from Bosch experts.
Find out everything about the many ways Bosch can support you:
www.bosch-home.com/service
Contact data of all countries are listed in the attached service directory.
natural_image
3D illustration of a conical bowl with labeled points C and E (no text or symbols on the object itself)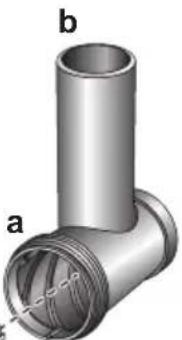
natural_image
3D rendering of a T-shaped pipe fitting with labeled parts (a and b), no text or symbols present.4*
natural_image
Technical diagram of a mechanical component with labeled parts (a and b), showing a cylindrical shaft and a circular dial (no text or symbols present)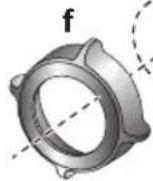

3 / 4* / 5*
5*
natural_image
Diagram showing two mechanical components labeled 'a' and 'b' connected by a dashed line (no text or symbols beyond labels)B
C
D
G

natural_image
Mechanical component diagram showing a cylindrical shaft inserted into a housing, with an arrow indicating direction (no text or symbols present)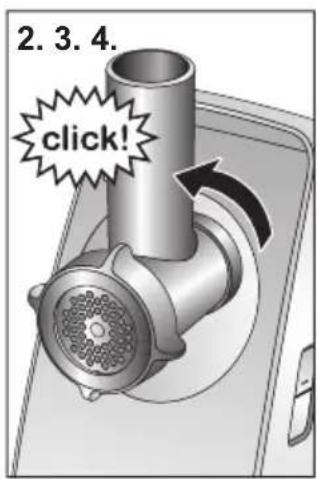
natural_image
Mechanical assembly diagram showing a tool pressing down on a cylindrical component (no text or symbols visible)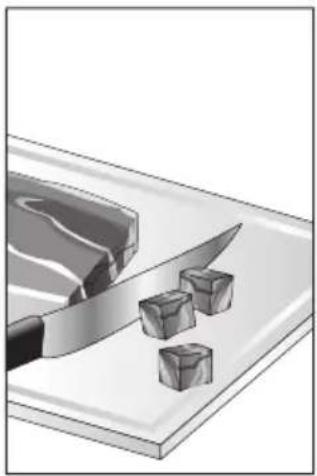
natural_image
Illustration of a knife cutting ice cubes on a cutting board (no text or symbols)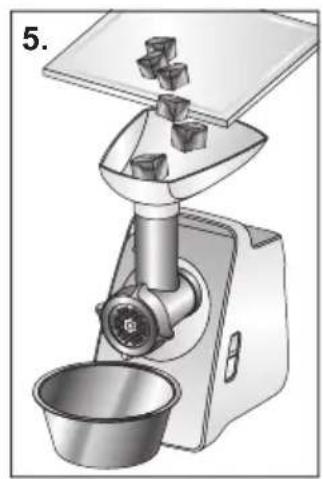
natural_image
Illustration of a food processing machine with a bowl and granules, no text or symbols present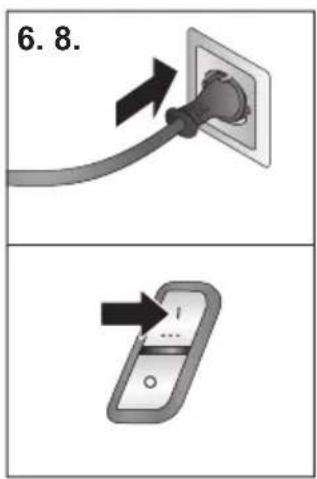
natural_image
Mechanical device with a lever and bowl, showing material flow or processing (no text or symbols)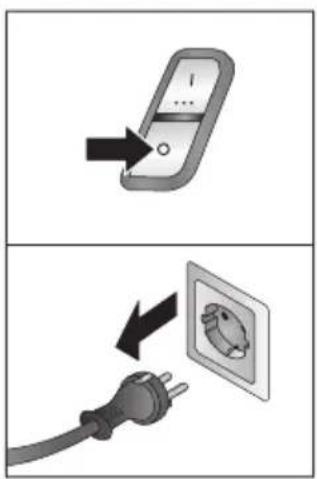
natural_image
Diagram of a mechanical device with an upward arrow indicating force or movement (no text or symbols present)
natural_image
Mechanical component diagram showing a motor handle and fan assembly with directional arrows (no text or symbols)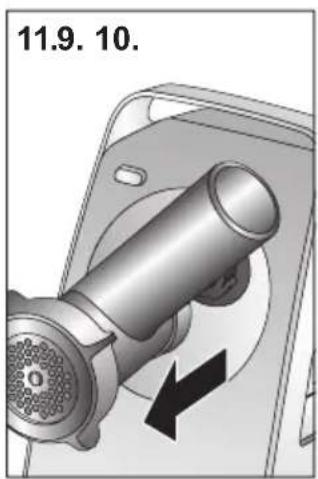
natural_image
Mechanical component diagram showing a cylindrical shaft with a rotating arrow, no text or symbols presentH
natural_image
Diagram of a connector with internal components and directional arrows indicating flow or movement (no text or symbols)
natural_image
Mechanical assembly diagram showing a lever mechanism with downward force arrows (no text or symbols)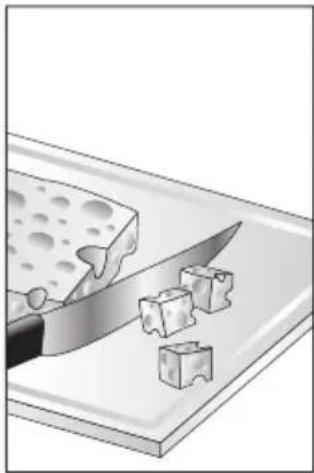
natural_image
Illustration of a knife slicing cheese on a cutting board (no text or symbols)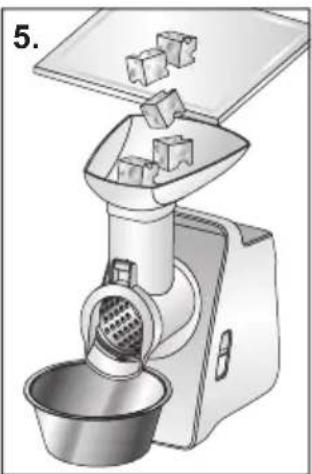
natural_image
Illustration of a kitchen grater with a bowl and lid, no text or symbols present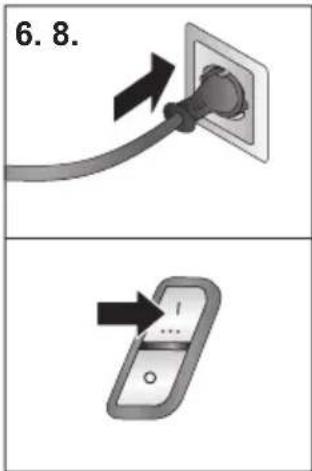
natural_image
Illustration of a manual hand mixer with a bowl of food being inserted (no text or symbols)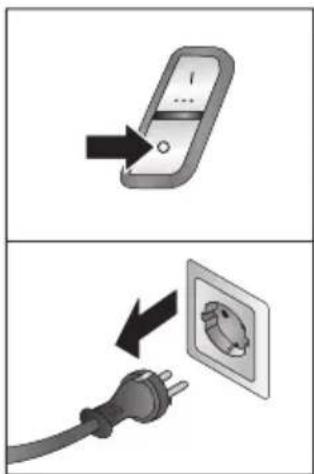
natural_image
Mechanical component diagram showing a valve mechanism with directional arrows (no text or symbols) |  |  | ||
 | √ |  |  | |
 |  | √ | √ |  |
 | √ | √ |  | |
 | √ | √ |  | |
 | √ | √ |  | |
 |  | √ | √ | [SAWS] |
 | √ | √ |  | |
 | X | √ | [3D5S] | |
- CompactPower
- Safety instructions
- ⚠️ Danger of electric shock and fire
- Risk of injury
- Caution! Risk of damaging the appliance
- ⚠️ Important!
- Congratulations on the purchase of your new Bosch appliance.
- Content
- Overview
- → Fig. A
- Base unit
- Base attachment
- Meat mincer insert
- Sausage filler insert \*
- Kebbe insert \*
- → Fig. B
- Shredding attachment \*
- Before using for the first time
- Caution!
- Control and display elements
- Button |
- Button O
- Operation indicator
- Release button
- Cable storage compartment
- Storage compartment
- Overload protection
- Replace agitator paddle
- → Fig. ©
- Base unit
- Preparation
- Risk of injury!
- Base attachment
- Meat mincer
- Sausage filler
- Kebbe maker
- Preparation for meat mincer
- → Fig. D
- Preparation for sausage filler
- → Fig. E
- Preparation for kebbe maker
- → Fig. F
- Use
- The following example describes use of the base attachment as a meat mincer:
- → Sequence of figures ©
- Shredding attachment
- → Sequence of figures H
- → Sequence of figures Ⅰ
- Care and daily cleaning
- ⚠️ Risk of electric shock!
- en Recipes
- Notes:
- Recipes
- Bread dumplings
- Kebbe
- Dough pockets:
- Filling:
- Prepare the kebbe:
- Tips
- Using the perforated discs
- Using the inserts
- Disposal
- Guarantee
- AL Republika e Shqiperise, Albania
- EXPERT SERVIS
- BA Bosna i Hercegovina, Bosnia-Herzegovina
- BH Bahrain
- GR Greece, Ελλάς
- HR Hrvatska, Croatia
- IE Republic of Ireland
- IL Israel,
- IN India, Bhārat, भारत
- IS Iceland
- IT Italia, Italy
- KZ Kazakhstan, Казақстан
- LB Lebanon,
- LT Lietuva, Lithuania
- PL Polska, Poland
- SE Sverige, Sweden
- SG Singapore新加坡
- 01-01 Techplace 1
- SI Slovenija, Slovenia
- SK Slovensko, Slovakia
- XS Srbija, Serbia
- Thank you for buying a Bosch Home Appliance!
- Looking for help? You'll find it here.
Brand : BOSCH
Model : CompactPower MFW3600W
Category : Mincer