CS507AC - Saw Vonroc - Free user manual and instructions
Find the device manual for free CS507AC Vonroc in PDF.

| Brand | Vonroc |
| Model | CS507AC |
| Product type | Electric chainsaw |
| Power supply | Mains - 230 V~, 50 Hz |
| Power | 2000 W |
| No-load speed | 8000 min⁻¹ |
| Guide bar length | 406 mm (16") |
| Cutting length | 395 mm |
| Chain pitch | 3/8" |
| Chain gauge | 0.05" |
| Drive sprocket teeth count | 6 |
| Oil tank capacity | 300 ml |
| Lubrication system | Automatic |
| Net weight | 5.1 kg |
| Sound pressure level LPA | 89.4 dB(A) (K=2.5) |
| Sound power level LWA | 100.4 dB(A) (K=2.5) |
| Guaranteed sound power LWA | 108 dB(A) |
| Vibration front handle | 6.15 m/s² (K=1.5) |
| Vibration rear handle | 4.72 m/s² (K=1.5) |
| Safety devices | Chain brake, kickback protection, hand guard |
| Protection class | Double insulation (Class II) |
| Oil level indicator | Yes |
| Extension cord hook | Yes |
| Warranty | Legal (defects in materials and workmanship) |
Frequently Asked Questions - CS507AC Vonroc
User questions about CS507AC Vonroc
0 question about this device. Answer the ones you know or ask your own.
Ask a new question about this device
Download the instructions for your Saw in PDF format for free! Find your manual CS507AC - Vonroc and take your electronic device back in hand. On this page are published all the documents necessary for the use of your device. CS507AC by Vonroc.
USER MANUAL CS507AC Vonroc
natural_image
Abstract geometric shape resembling a stylized letter 'V' on black background (no text or symbols)VONROC®
BUILD YOUR FUTURE
ELECTRIC CHAINSAW CS507AC

natural_image
White icon of a chainocenter on black background (no text or symbols)EN Original Instructions 08
CE Declaration of conformity 175
WEEE Directive 176
A

natural_image
Close-up of a power saw with labeled parts (17 and 18), no visible text or symbols beyond labelsB
C
natural_image
Close-up of a chain-link robotic device with gear and chains, showing mechanical components and part details (no readable text or symbols)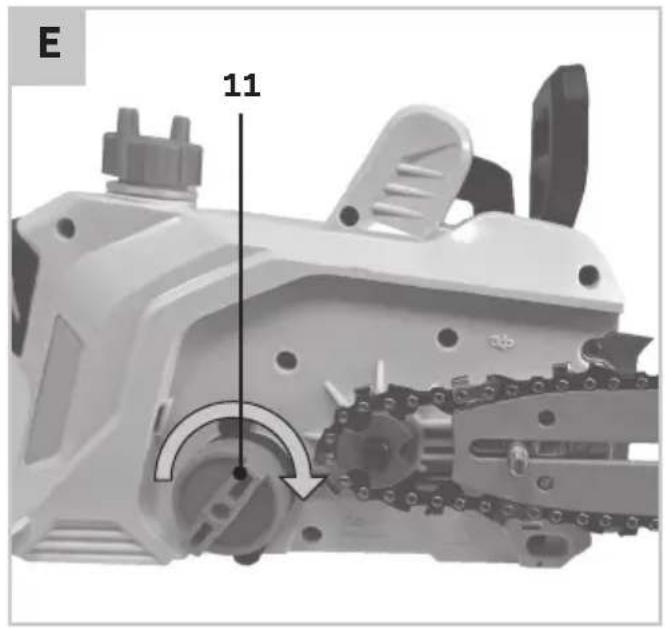
natural_image
Mechanical assembly diagram showing a chain-linking device with labeled part '11' and directional arrow (no readable text or symbols beyond label)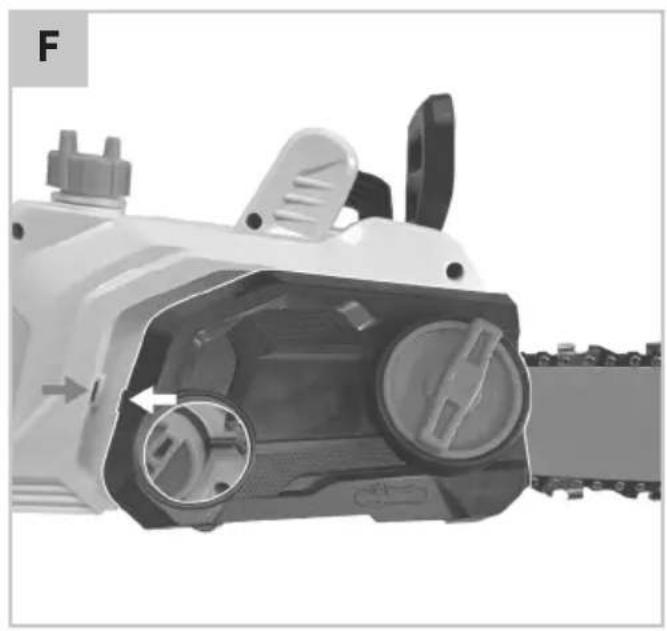
natural_image
Close-up of a white mechanical device with internal components and a directional arrow indicating flow or movement (no text or symbols visible)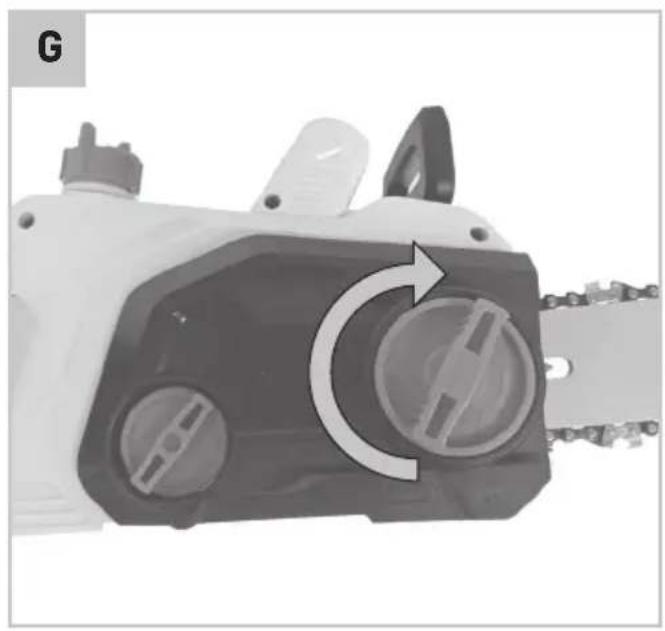
natural_image
Close-up of a mechanical device with circular components and a chain, showing no visible text or symbols.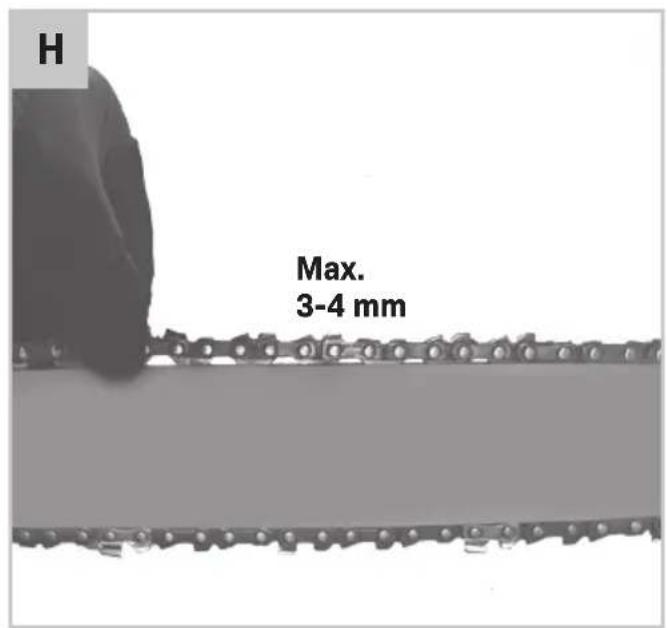

natural_image
Two-panel image showing a device being handled with wires, labeled K and L (no text or symbols on the devices themselves)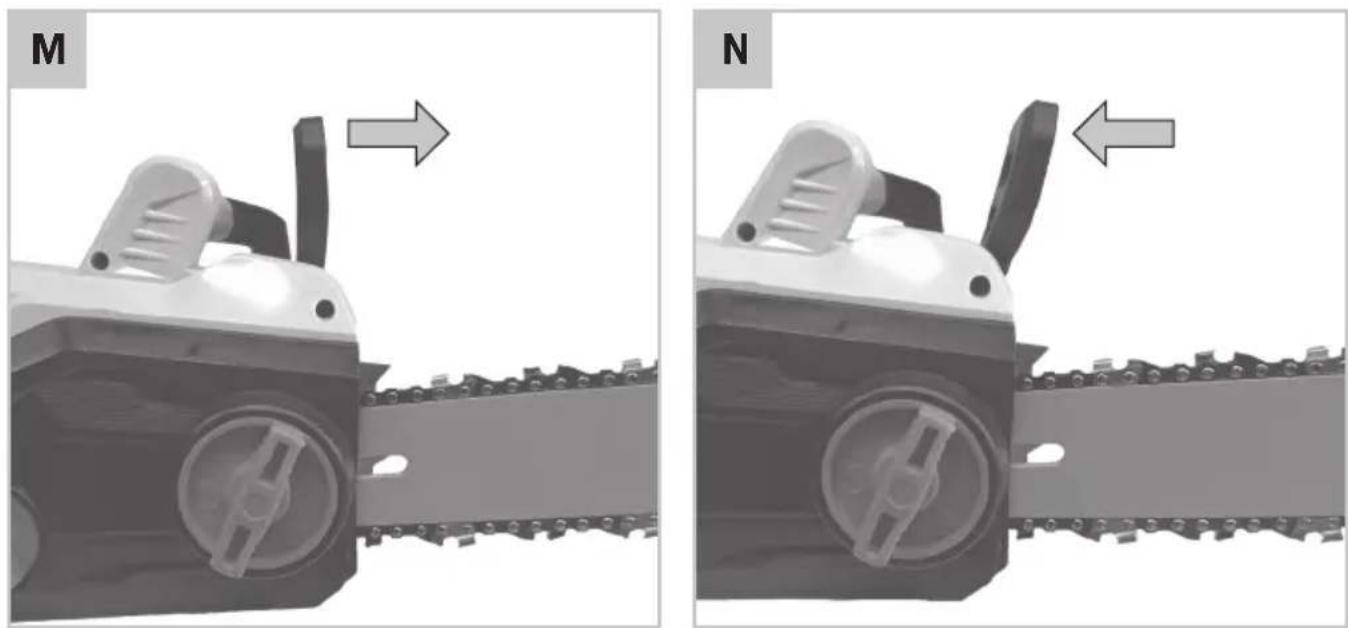
natural_image
Two mechanical chainings labeled M and N, showing blade assembly and tool path (no text or symbols beyond labels)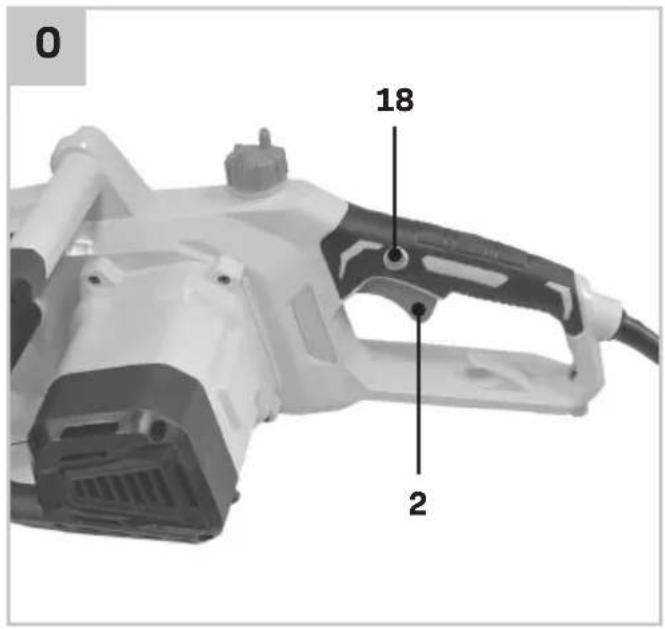

flowchart
graph TD
    A["Escape route"] --> B["Danger zone"]
    C["Felling direction"] --> D["Danger zone"]
    E["Escape route"] --> F["Danger zone"]
    G["Escape route"] --> H["Danger zone"]
    style A fill:#f9f,stroke:#333
    style C fill:#f9f,stroke:#333
    style E fill:#f9f,stroke:#333
    style G fill:#f9f,stroke:#333
    style B fill:#ccf,stroke:#333
    style F fill:#ccf,stroke:#333
    style H fill:#ccf,stroke:#333
S-2
natural_image
Simple line drawing of a tree stump with a rope tied to a hole, showing a downward arrow indicating compression (no text or symbols)T
natural_image
Illustration of a hand holding a log with arrows indicating force or movement (no text or symbols)U
Cut from top (overbuck) avoid cutting earth
natural_image
Diagram of a cylindrical object with a curved arrow indicating motion or force, resting on a textured surface (no text or symbols)V

W

X
1. SAFETY INSTRUCTIONS
Read the enclosed safety warnings, the additional safety warnings and the instructions. Failure to follow the safety warnings and the instructions may result in electric shock, fire and/or serious injury. Save the safety warnings and the instructions for future reference.
The following symbols are used in the user manual or on the product:

Read the user manual.

Denotes risk of personal injury, loss of life or damage to the tool in case of non-observance of the instructions in this manual.

Wear eye protection.

Wear hearing protection.

Wear head protection.

Wear safety gloves.

Wear safety boots to protect against electric shock.

Do not expose to rain.

Remove plug from the socket or mains immediately before carrying out any adjustments, servicing or maintenance or if the cable is damaged or cut.

Do not attempt to hold saw with one hand.

Recommended cutting procedure. Hold saw properly with both hands.

Avoid bar nose contact. Beware of kick back.

Avoid bar nose contact. Beware of kick back.

Class II machine - Double insulation - You don't need any earthed plug.

Information of the acoustic power level L_WA in dB.

Do not dispose of the product in unsuitable containers.

The product is in accordance with the applicable safety standards in the European directives.
GENERAL POWER TOOL SAFETY WARNINGS

WARNING! Read all safety warnings and all instructions. Failure to follow the warnings and instructions may result in electric shock, fire and/or serious injury.
Save all warnings and instructions for future reference.
The term “power tool” in the warnings refers to your mains-operated (corded) power tool or battery-operated (cordless) power tool.
1) Work area safety
a) Keep the work area clean and well lit. Cluttered or dark areas invite accidents.
b) Do not operate power tools in explosive atmospheres, such as in the presence of flammable liquids, gases or dust. Power tools create sparks which may ignite the dust or fumes.
c) Keep children and bystanders away while operating a power tool. Distractions can cause you to lose control.
2) Electrical safety
a) Power tool plugs must match the outlet. Never modify the plug in any way. Do not use any adapter plugs with earthed (grounded) power tools. Unmodified plugs and matching outlets will reduce risk of electric shock.
b) Avoid body contact with earthed or grounded surfaces, such as pipes, radiators, ranges and refrigerators. There is an increased risk of electric shock if your body is earthed or grounded.
c) Do not expose power tools to rain or wet conditions. Water entering a power tool will increase the risk of electric shock.
d) Do not abuse the cord. Never use the cord for carrying, pulling or unplugging the power tool. Keep cord away from heat, oil, sharp edges or moving parts. Damaged or entangled cords increase the risk of electric shock.
e) When operating a power tool outdoors, use an extension cord suitable for outdoor use. Use of a cord suitable for outdoor use reduces the risk of electric shock.
f) If operating a power tool in a damp location is unavoidable, use a residual current device (RCD) protected supply. Use of an RCD reduces the risk of electric shock.
3) Personal safety
a) Stay alert, watch what you are doing and use common sense when operating a power tool. Do not use a power tool while you are tired or under the influence of drugs, alcohol or medication.
A moment of inattention while operating power tools may result in serious personal injury.
b) Use personal protective equipment. Always wear eye protection. Protective equipment such as dust mask, non-skid safety shoes, hard hat, or hearing protection used for appropriate conditions will reduce personal injuries.
c) Prevent unintentional starting. Ensure the switch is in the off-position before connecting to power source and/or battery pack, picking up or carrying the tool. Carrying power tools with your finger on the switch or energising power tools that have the switch on invites accidents.
d) Remove any adjusting key or wrench before turning the power tool on. A wrench or a key left attached to a rotating part of the power tool may result in personal injury.
e) Do not overreach. Keep proper footing and balance at all times. This enables better control of the power tool in unexpected situations.
f) Dress properly. Do not wear loose clothing or jewellery. Keep your hair, clothing and gloves away from moving parts. Loose clothes, jewellery or long hair can be caught in moving parts.
g) If devices are provided for the connection of dust extraction and collection facilities, ensure these are connected and properly used. Use of dust collection can reduce dust related hazards.
h) Do not let familiarity gained from frequent use of tools allow you to become complacent and ignore tool safety principles. A careless action can cause severe injury within a fraction of a second.
4) Power tool use and care
a) Do not force the power tool. Use the correct power tool for your application.
The correct power tool will do the job better and safer at the rate for which it was designed.
b) Do not use the power tool if the switch does not turn it on and off. Any power tool that cannot be controlled with the switch is dangerous and must be repaired.
c) Disconnect the plug from the power source and/or the battery pack from the power tool before making any adjustments, changing accessories, or storing power tools. Such preventive safety measures reduce the risk of starting the power tool accidentally.
d) Store idle power tools out of the reach of children and do not allow persons unfamiliar with the power tool or these instructions to operate the power tool. Power tools are dangerous in the hands of untrained users.
e) Maintain power tools. Check for misalignment or binding of moving parts, breakage of parts and any other condition that may affect the power tool's operation. If damaged, have the power tool repaired before use. Many accidents are caused by poorly maintained power tools.
f) Keep cutting tools sharp and clean. Properly maintained cutting tools with sharp cutting edges are less likely to bind and are easier to control.
g) Use the power tool, accessories and tool bits etc. in accordance with these instructions, taking into account the working conditions and the work to be performed. Use of the power tool for operations different from those intended could result in a hazardous situation.
h) Keep handles and grasping surfaces dry, clean and free from oil and grease. Slippery handles and grasping surfaces do not allow for safe handling and control of the tool in unexpected situations.
5) Service
a) Have your power tool serviced by a qualified repair person using only identical replacement parts. This will ensure that the safety of the power tool is maintained.
SAFETY INSTRUCTIONS FOR CHAIN SAWS
1) General chain saw safety warnings:
a) Keep all parts of the body away from the saw chain when the chain saw is operating. Before you start the chain saw, make sure the saw chain is not contacting anything. A moment
of inattention while operating chain saws may cause entanglement of your clothing or body with the saw chain.
b) Always hold the chain saw with your right hand on the rear handle and your left hand on the front handle. Holding the chain saw with a reversed hand configuration increases the risk of personal injury and should never be done.
c) Hold the chain saw by insulated gripping surfaces only, because the saw chain may contact hidden wiring or its own cord. Saw chains contacting a "live" wire may make exposed metal parts of the chain saw "live" and could give the operator an electric shock.
d) Wear eye protection. Further protective equipment for hearing, head, hands, legs and feet is recommended. Adequate protective equipment will reduce personal injury from flying debris or accidental contact with the saw chain.
e) Do not operate a chain saw in a tree, on a ladder, from a rooftop, or any unstable support. Operation of a chain saw in this manner could result in serious personal injury.
f) Always keep proper footing and operate the chain saw only when standing on fixed, secure and level surface. Slippery or unstable surfaces may cause a loss of balance or control of the chain saw.
g) When cutting a limb that is under tension, be alert for spring back. When the tension in the wood fibres is released, the spring loaded limb may strike the operator and/or throw the chain saw out of control.
h) Use extreme caution when cutting brush and saplings. The slender material may catch the saw chain and be whipped toward you or pull you off balance.
i) Carry the chain saw by the front handle with the chain saw switched off and away from your body. When transporting or storing the chain saw, always fit the guide bar cover. Proper handling of the chain saw will reduce the likelihood of accidental contact with the moving saw chain.
j) Follow instructions for lubricating, chain tensioning and changing the bar and chain. Improperly tensioned or lubricated chain may either break or increase the chance for kick-back.
k) Cut wood only. Do not use chain saw for purposes not intended. For example: do not use chain
saw for cutting metal, plastic, masonry or non-wood building materials. Use of the chain saw for operations different than intended could result in a hazardous situation.
Do not attempt to fell a tree until you have an understanding of the risks and how to avoid them. Serious injury could occur to the operator or bystanders while felling a tree.
m) This chain saw is not intended for tree felling. Use of the chain saw for operations different than intended could result in serious injury to the operator or bystanders.
2) Causes and operator prevention of kickback:
Kickback may occur when the nose or tip of the guide bar touches an object, or when the wood closes in and pinches the saw chain in the cut. Tip contact in some cases may cause a sudden reverse reaction, kicking the guide bar up and back towards the operator.
Pinching the saw chain along the top of the guide bar may push the guide bar rapidly back towards the operator.
Either of these reactions may cause you to lose control of the saw which could result in serious personal injury. Do not rely exclusively upon the safety devices built into your saw.
As a chain saw user, you should take several steps to keep your cutting jobs free from accident or injury.
Kickback is the result of chain saw misuse and/or incorrect operating procedures or conditions and can be avoided by taking proper precautions as given below:
a) Maintain a firm grip, with thumbs and fingers encircling the chain saw handles, with both hands on the saw and position your body and arm to allow you to resist kickback forces.
Kickback forces can be controlled by the operator, if proper precautions are taken. Do not let go of the chain saw.
b) Do not overreach and do not cut above shoulder height. This helps prevent unintended tip contact and enables better control of the chain saw in unexpected situations.
c) Only use replacement guide bars and saw chains specified by the manufacturer. Incorrect replacement guide bars and saw chains may cause chain breakage and/or kickback.
d) Follow the manufacturer's sharpening and maintenance instructions for the saw chain.
Decreasing the depth gauge height can lead to increased kickback.
ADDITIONAL SAFETY WARNINGS
a) This tool is not intended for use by persons (including children) with reduced physical, sensory or mental capabilities, or lack of experience and knowledge, unless they have been given supervision or instruction concerning use of the appliance by a person responsible for their safety. Children should be supervised to ensure that they do not play with the appliance.
b) When working with the machine, always hold it firmly with both hands and provide for a secure stance. The power tool is guided more secure with both hands.
c) Always ensure all handles and guards are fitted when using the machine. Never attempt to use an incomplete machine or one fitted with an unauthorized modification.
d) Always lubricate the saw chain with protective spray before use.
e) Always wait until the machine has come to a complete stop before placing it down.
f) Other persons and animals should remain at a distance of 3 meters or more when the machine is being used. The operator is responsible for third persons in the working area.
g) Never grasp the saw chain.
h) Children or persons unfamiliar with these instructions must not operate the chain saw. Local regulations may restrict the age of the operator.
i) The user is responsible for accidents or hazards occurring to other people or their property.
j) Do not operate the chain saw when barefoot or wearing open sandals, always wear substantial footwear and long trousers. The use of sturdy gloves, non-skid footwear and safety glasses is recommended. Do not wear loose clothing or jewellery which can be caught in moving parts.
k) Thoroughly inspect the area where the chain saw is to be used and remove all wires and other foreign objects.
I) Prior to operation, check saw chain, bar, and bolts for wear or damage. Do not operate with a damaged or excessively worn chain saw.
m) Know how to stop the chain saw quickly in an emergency.
n) Use the chain saw only in daylight or in good artificial light.
o) Never operate the chain saw with defective guards or without the guard in place.
p) Never hold the chain saw by the guard.
q) When operating the chain saw, ensure to keep proper footing and balance at all times.
r) Always be aware of your surroundings and stay alert for possible hazards that you may not hear whilst operating the chain saw.
s) Keep all nuts, bolts and screws tight to ensure that the chain saw is always in a safe working condition.
t) The chain saw should be stored in a dry, high or locked up place out of the reach of children.
u) Replace worn or damaged parts for safety.
v) Do not attempt to repair the machine unless you are qualified to do so.
w) Hold the product securely with both hands.
2. MACHINE INFORMATION
Intended use
This chainsaw is designed for cutting wood and is intended for use by one person. It must be operated with the right hand on the rear handle and the left hand on the front handle. Any other use, such as cutting masonry or plastic, may result in serious injury and damage to the tool.
Restrictions
- Not suitable for commercial use.
- Intended for use by adults only.
- The manufacturer is not liable for damage caused by misuse or operation outside of its intended purpose.
Before using the chainsaw, carefully read and understand all instructions in this manual.
TECHNICAL SPECIFICATIONS
| Machine information | ||
| Model CS507AC | ||
| Voltage 230V~, 50 Hz | ||
| Power | 2000W | |
| Speed | 8000/min | |
| Guide bar | CS816AA | |
| Sprocket nose | 7 teeth x 3/8" | |
| Guide bar length | 406mm (16") | |
| Cutting length | 395mm | |
| Chain | CS815AA | |
| Chain pitch 3/8 inch | ||
| Chain gauge 0.05 inch | ||
| Drive sprocket 6 teeth | ||
| Net Weight (with guide bar and chain) | 5.1 kg | |
| Oil Capacity 300 ml | ||
| Measured sound pressure level L_PA | 89.4 dB(A) K=2.5dB(A) | |
| Calculated sound power L_WA | 100.4 dB(A) K=2.5dB(A) | |
| Guaranteed sound power level L_WA | 108 dB(A) | |
| Vibration | Front handle Max. 6.15 m/s ^2 K=1.5 m/s ^2 | |
| Rear handle Max. 4.72 m/s ^2 K=1.5 m/s ^2 | ||
Vibration level
The vibration emission level specified in this manual has been measured according to the standardized test outlined in EN 62841-1 and EN 62841-4-
-
This information can help you compare this tool with others and assess vibration exposure when used as intended.
-
Using the tool for different tasks or with poorly maintained accessories can significantly increase vibration exposure.
- Periods when the tool is switched off or running without cutting can greatly reduce exposure.
Tips for Reducing Vibration Exposure:
- Keep the tool and accessories in good condition.
- Maintain warm hands during use.
- Organize your work to minimize prolonged exposure to vibration.
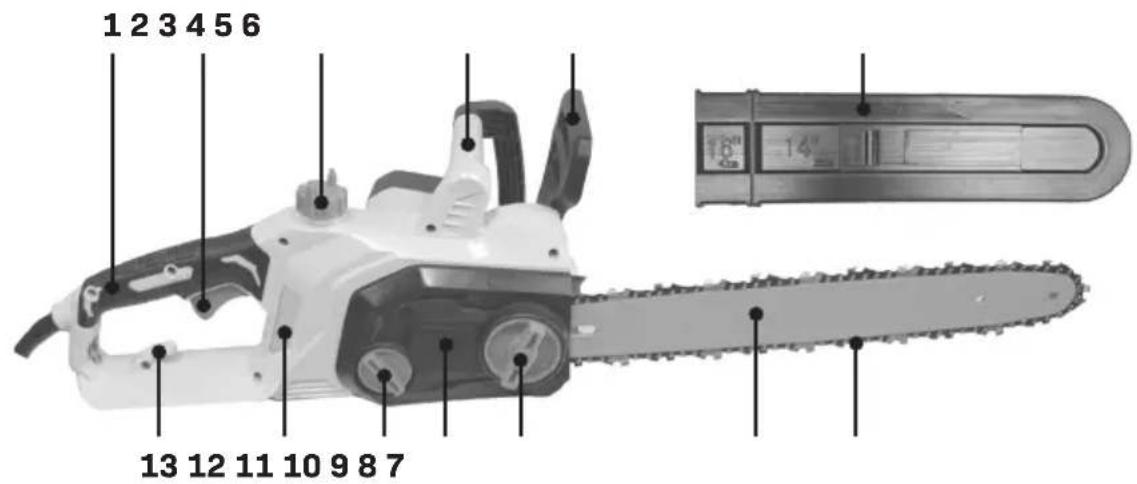
DESCRIPTION
The numbers in the text refer to the diagrams on page 2-7.
- Rear handle
- On/Off switch
- Oil filler cap
- Front handle
- Hand guard (kickback brake)
- Guide bar cover
- Saw chain
- Guide bar
- Clamping wheel
- Sprocket cover
-
Tension wheel
-
Oil level indicator
- Extension cord hook
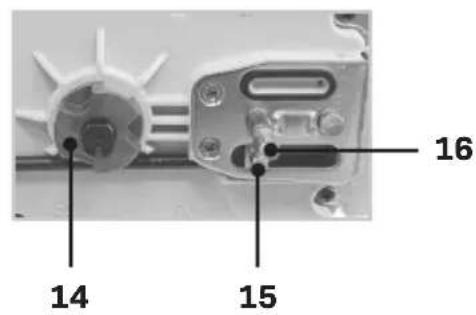
- Drive Sprocket
- Tension pin
- Clamping bolt
- Spiked bumper
- Lock-off button
3. ASSEMBLY

Before assembly, always switch off the machine and remove the mains plug from the mains.

The saw chain has very sharp edges. Always wear protective gloves for safety.

Do not connect the chainsaw to the power supply until it is fully assembled. The saw chain and guide bar are packed separately.
Steps for Mounting:
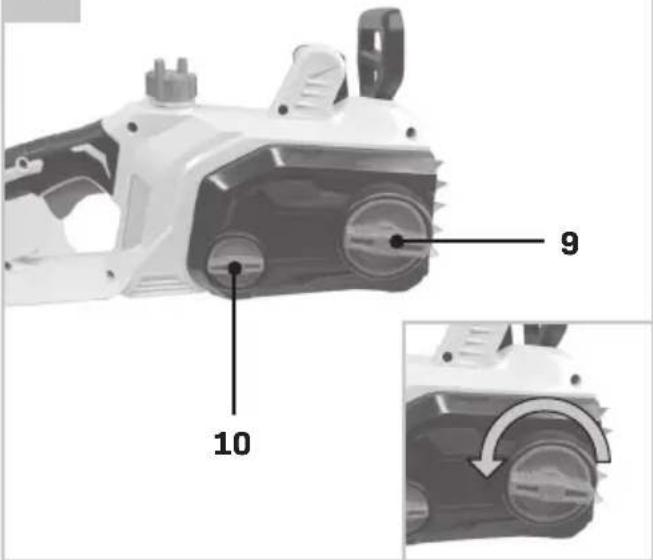
Assembly steps (Fig. B)
- Place the chainsaw on a stable surface, such as a firm table or the floor.
- Unscrew the clamping wheel (9) on the sprocket cover (10) and remove the cover.
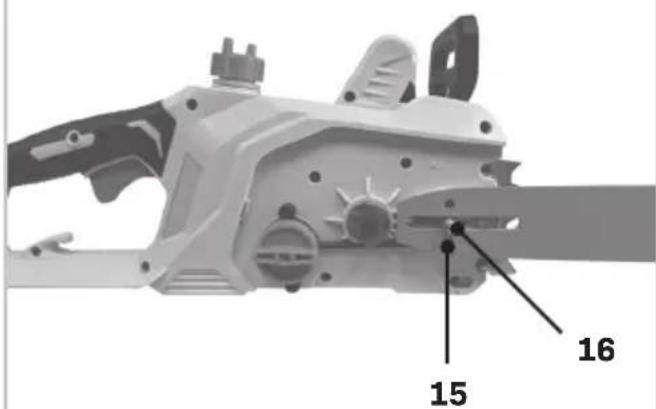
Installing the guide bar (Fig. C)
- Lay the guide bar on the machine.
- Pass the long slot of guide bar through the clamping bolt (16), and pass the tension pin (15) through the small hole on the guide bar.
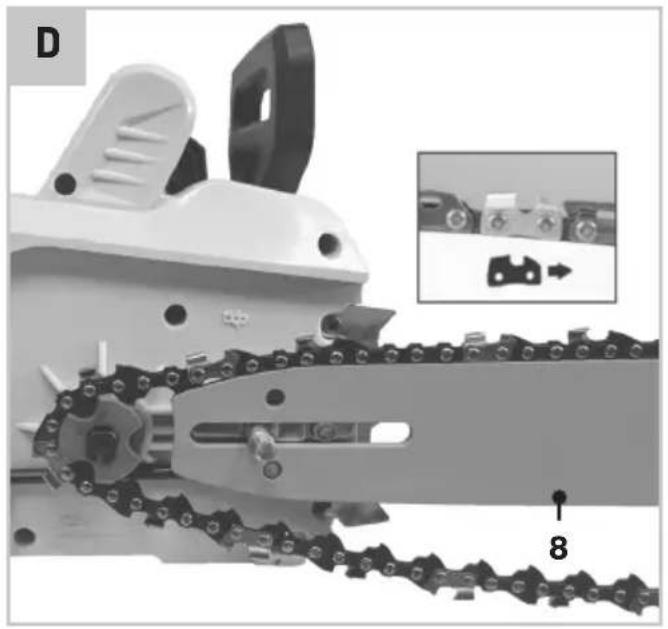
Fitting the saw chain (Fig. D)
- Spread out the saw chain (7) in a loop so that the cutting edges are aligned in a clockwise direction.
- Use the graphical symbol on the blade bar as a guide to align the saw chain.
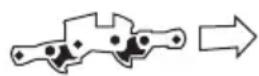
Saw chain travel direction.
Tightening the saw chain (Fig. E)
- Rotate the tension wheel (11) clockwise to tighten the saw chain.
Attaching the Sprocket Cover (Fig. F, G):
- Insert the stud on the sprocket cover into the hole on the housing (Fig. F).
- Screw the sprocket cover in place by turning the clamping wheel clockwise. (Fig. G).
Tensioning the saw chain (Fig. I)
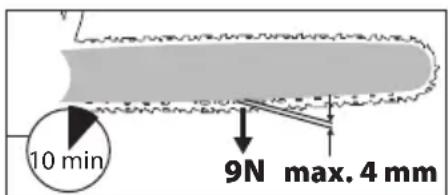
Regularly tightening the saw chain provides safety for the user and reduces and/or prevents wear and chain damages. Before the start of work and in approx. 10 minute intervals, we recommend the user to examine the chain tension and correct it, if necessary. The chain warms up when working with the saw and thus expands slightly. These “expansions” can be expected especially from newer chains.

WARNING!
- The saw chain has very sharp edges.
Always wear protective gloves for safety. - Always perform a test run before starting any work.
- Ensure that the tool is in good condition, properly mounted, and able to rotate freely. The trial run should last at least 30 seconds.
The chain is correctly tensioned if it does not sag at the rail underside and can be rotated completely around with the gloved hand. When the saw chain is tensioned with 9 N (approx. 1 kg), the gap between the saw chain and the guide rail may not be more than 4 mm.
- Unplug the chainsaw from the power supply before making any adjustments.
- Place the chainsaw on a firm and stable surface.
- To check the chain tension, grasp the chain in the middle of the guide bar using your thumb and middle finger. Pull the chain away from the guide bar (Fig. H).
-
The tension is correct when the chain snaps back after being pulled 3-4 mm away from the guide bar. There should be no sag between the chain and the guide bar.
-
If the tension is incorrect, turn the tension wheel to either increase or decrease the chain tension as needed. (Fig. I)

WARNING!
- Avoid Over-Tensioning Do not over-tighten the chain, as this can lead to excessive wear, shortening the lifespan of both the bar and chain. Over-tensioning also reduces the number of cuts you can achieve.
- Check Chain Alignment: Ensure that the chain is correctly seated in the groove of the guide bar before operation.
- Do not re-tighten or change the chain when it is hot because it shrinks slightly once it has cooled down. In case of non-observance, this can lead to damages on the guide rail or the engine because now the chain is too taut on the blade.
Chain tension and chain lubrication have a significant impact on the service life of the chain.
Oil filling
Note: The chain saw is shipped without oil. The tool must never be used without sufficient oil or if the oil level is below the indicator.

Warning: Always ensure the chainsaw is switched off and unplugged before making any adjustments.
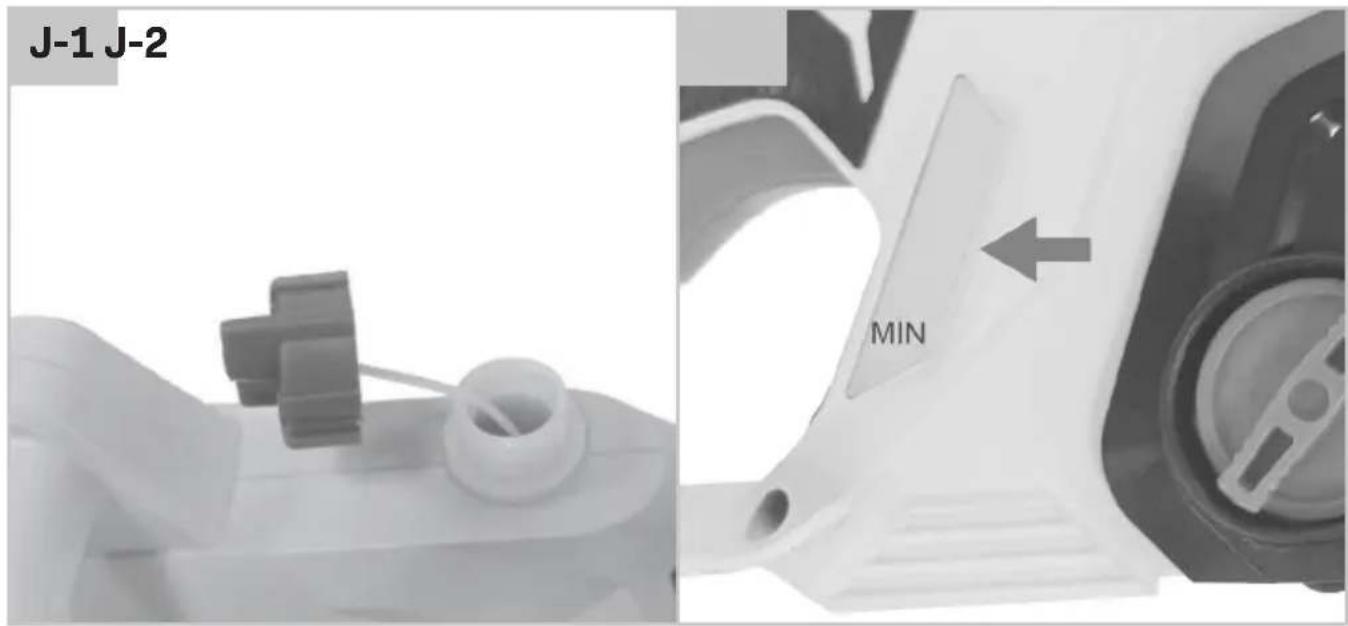
Steps for Oil Filling (Fig. J):
- Remove the Oil filler cap. (Fig. J-1)
- Fill the oil tank with chain lubricating oil. Use biodegradable chain saw oil only.
- Check the oil level periodically using the oil level indicator. (Fig. J-2)
- Tighten the Oil filler cap firmly to ensure a proper seal and avoid oil leakage.
- Wipe off any excess oil.
Note: It is normal for some oil to seep when the chainsaw is not in use. To prevent seepage, empty the oil tank after each use.
Checking the Automatic Oil Function

Warning!
Always check the automatic oil function before each use.
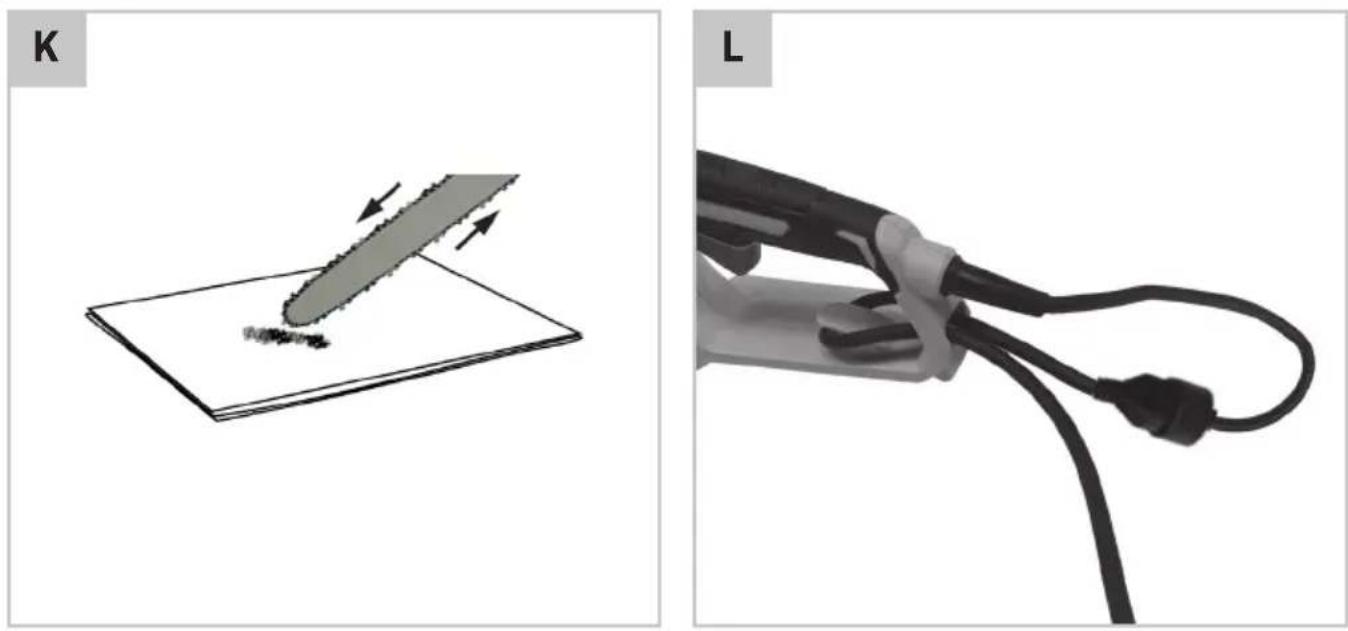
- To test, point the tip of the running chainsaw towards a piece of paper on the ground.
- If a patch of oil appears on the paper and grows, the automatic oil function is working properly. (Fig.K)
- If no traces of oil appear, despite the oil tank being full, the automatic oil function may be malfunctioning.
- Remove the chain bar and clean the oil pathways on both the chainsaw and chain bar.
- If the issue persists after reassembly, take the chainsaw to an authorized service center.
Extension cord support
When using the chainsaw, the extension cord will be pulled as you move between different areas. To help prevent the electrical connection between the extension cord and the chainsaw plug from being accidentally disconnected, an extension cord hook (13) is provided on the housing of the chainsaw.
Note: This support is specifically for the extension cord, not for the chainsaw's power cable.
Instructions for Fitting the Extension Cord (Fig. L)
- Create a loop: Make a tight loop in the extension cord approximately 300 mm from the socket end of the extension cord.
- Fit the loop: Insert the loop into the rectangular recess located at the back of the chainsaw.
- Push through: Push the loop through the housing by about 25 mm.
- Secure the loop: Push each side of the loop downwards so that it fits over the extension cord hook.
- Seat firmly: Gently pull on one of the two lengths of the extension cord on the right side of the chainsaw to ensure it is seated firmly.
- Plug in: Only after the cord is correctly seated, plug the chainsaw plug into the socket of the extension cord.
4. OPERATION
Before use
-
Inspect the Tool: Ensure the chainsaw and its cable are in good working order.
-
Check Chain Lubrication: Verify that the chain lubrication system is functioning and check the oil level (12).
- Check Chain Tension: Ensure that the chain tension is correct and that the chain brake is operational (Fig. H).
Caution: Pass the extension cable over your shoulder and keep it behind you while working. Never let the cable cross over the saw chain, as it may become caught.
Start-up
- Remove the Guide bar cover: Take off the guide bar cover (6) from the bar.
-
Release the Chain Brake: Pull the hand guard (kickback brake) (5) firmly towards the back of the chainsaw until you hear a click, indicating that the brake has been released.
-
Activating the Chain Brake: See Fig. M.
-
Releasing the Chain Brake: See Fig. N.
-
Check the Chain Brake: Ensure that the chain moves freely by confirming that the brake has been released.
- Note: Always check the brake's efficiency before use.
Warning: Never press the on-off switch before pulling back the hand guard (kickback brake).
- Grip the Chainsaw: Hold the chainsaw firmly with both hands (1,4).
- Start the Chainsaw: Press and hold the lock-off button (18), then pull the on-off switch (2) towards the handle. Release the lock-off button to activate.
- Stopping the chainsaw: To stop the chainsaw, simply release the on-off switch (2).
Warning: Maintain both hands on the chainsaw until the chain has completely stopped.
- Pre-operational check
Before operating, always check that the automatic oil function is working.
KICKBACK
Warning!
Kickback can occur when the nose or tip of the guide bar touches an object, or when the wood closes in and pinches the saw chain during a cut. Tip contact can trigger a sudden, rapid reverse
reaction, causing the guide bar to kick up and back towards the operator. Pinching the saw chain along the top can result in a loss of control, leading to serious injury.
Kickback safety devices (Fig. P):
This saw is equipped with a low-kickback chain and a reduced-kickback guide bar, both of which help lower the risk of kickback. However, kickback can still occur.
- Ensure the hand guard (kickback brake) is properly installed, as it can help reduce the risk of injury from kickback. Do not remove or replace the hand guard with a substitute.
Steps to Reduce the Risk of Kickback (Fig.P):
- Always grip the saw firmly with both hands while it is running, ensuring that your thumbs and fingers are wrapped around the saw handles.
- Keep all safety devices in place and ensure they are functioning properly.
- Avoid overreaching or cutting above shoulder height.
- Maintain solid footing and balance at all times.
- Stand slightly to the left side of the saw, keeping your body out of direct alignment with the chain.
- Ensure the nose of the guide bar does not touch anything while the chain is moving.
- Never attempt to cut through two logs simultaneously; cut one log at a time.
- Do not bury the guide bar nose or attempt a plunge cut (boring into wood using the nose of the guide bar).
- Be cautious of shifting wood or forces that may pinch the chain.
- Use extreme care when re-entering a previous cut.
- Always use the low-kickback chain and guide bar supplied with this chainsaw. Only replace these components with those listed in this manual.
- Never use a dull or loose chain—keep the chain sharp and at the correct tension.
- For models with automatic chain sharpening (fast-sharp), do not hand-sharpen the chain.
Avoid jams
- When cutting, always begin with the compression wood (the wood under tension that is likely to close the cut), until the cut starts to close.
- If the log or limb is suspended from one end, make the compression cut from beneath. If it is supported at both ends, make the compression cut on top. Then, cut from the opposite side towards the compression cut.
- Use a wedge to prevent the compression cut from jamming the chainsaw blade.
Note: To avoid damaging the motor, do not keep the chainsaw running if the chain becomes lodged in the wood.
TROUBLESHOOTING
| Problem Possible cause Corrective action | ||
| Chain saw fails to operate | Kickback brake is activated | Pull hand guard (kickback brake) back to disengage brake. |
| Plug not connected | Connect plug to the mains | |
| Faulty mains socket | Try connecting to another socket. | |
| Extension cable damaged | Inspect the cord and replace if necessary. | |
| Saw chain dry | No oil in oil tank Refill the oil tank. | |
| Vent in Oil filler cap clogged | Clean the oil filler cap. | |
| Oil passage clogged | Clean the oil passage. | |
| Brake doesn’t stop saw chain | Kickback brake is defective | Contact after-sales service. |
| Saw chain / guide bar is hot | No oil in oil tank Refill the oil tank. | |
| Vent in Oil filler cap clogged | Clean the Oil filler cap. | |
| Oil passage clogged | Clean the oil passage. | |
| Chain tension is too high | Adjust the chain tension. | |
| Dull saw chain | Sharpen or replace the saw chain. | |
| Chainsaw vibrates, rips, or does not saw properly | Chain tension is too loose | Adjust the chain tension. |
| Dull saw chain | Sharpen or replace the saw chain. | |
| Chain worn out | Replace the saw chain. | |
| Chain teeth are facing in the wrong direction | Reassemble the chain in the correct direction. | |
SAWING TECHNIQUES
General information

When using the tool, always observe noise protection rules and other local regulations. In some cases, a suitability test may be required.
- Remove any dirt, stones, loose bark, nails, clips, or wires from the tree before starting.
- When sawing on slopes, always stand above the tree trunk for better control.
- To maintain full control during the sawing process, reduce pressure toward the end of the cut without loosening your grip. Ensure that the saw chain does not touch the ground. Wait for the saw to stop completely before removing it.
- Always switch off the motor before moving between trees.
- For better control, saw using the lower edge of the blade bar with the chain moving in a pulling direction.
- Ensure that the saw chain does not touch the ground or any other object during or after cutting.
- To avoid the saw getting stuck, make sure the log does not break or splinter unexpectedly.
- Always follow precautionary measures to prevent kickback (refer to the safety information).
For sawing on hillsides:
- Always stand above the log for optimal control. Reduce pressure at the end of the cut, ensuring that the saw chain does not touch the ground.
- If the saw chain gets stuck, do not forcefully pull the device out. Turn off the motor and use a lever arm or wedge to release the saw. This prevents injury.
Pruning a Tree (Trimming)
Warnings:
- Kickback Hazard: Kickback can result in serious injury or death (see the safety information).
- Do Not Operate:
- While in a tree.
- On a ladder or unstable surface.
- In an awkward position.
- Height Caution: Avoid cutting limbs higher than shoulder level.
Pruning involves cutting limbs from a living tree.
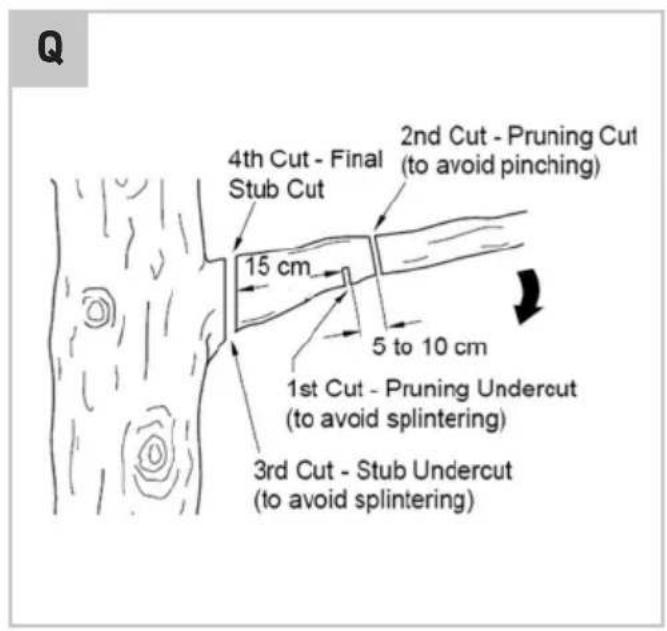
Ensure your footing is secure by keeping your feet apart and distributing your weight evenly. Follow these steps to trim a tree (Fig. Q):
- Make the first cut 15 cm from the trunk on the underside of the limb using the top of the guide bar. Cut one-third through the limb's diameter.
- Move 5-10 cm farther out on the limb and make a second cut from above. Continue cutting until the limb is severed.
- Make a third cut as close to the tree trunk as possible on the underside of the limb stub, using the top of the guide bar. Cut one-third through the stub's diameter.
- Make a final cut directly above the third cut, sawing down to meet it. This will remove the limb stub.
CAUTION: Seek professional help if conditions exceed your skill level.
Felling Trees
Important: Felling large trees requires experience. Inexperienced users should avoid this task.
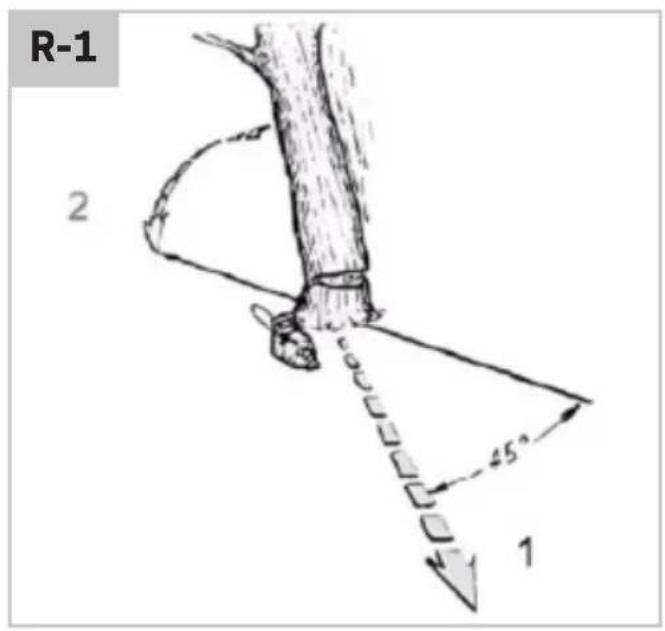
Escape Route (Fig. R)
Plan and clear an escape route at a 45-degree angle (1) behind the anticipated fall direction (2).
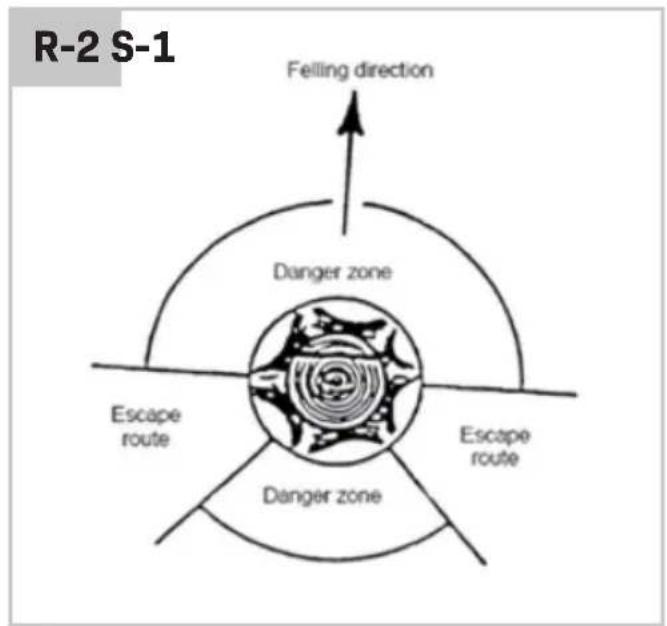
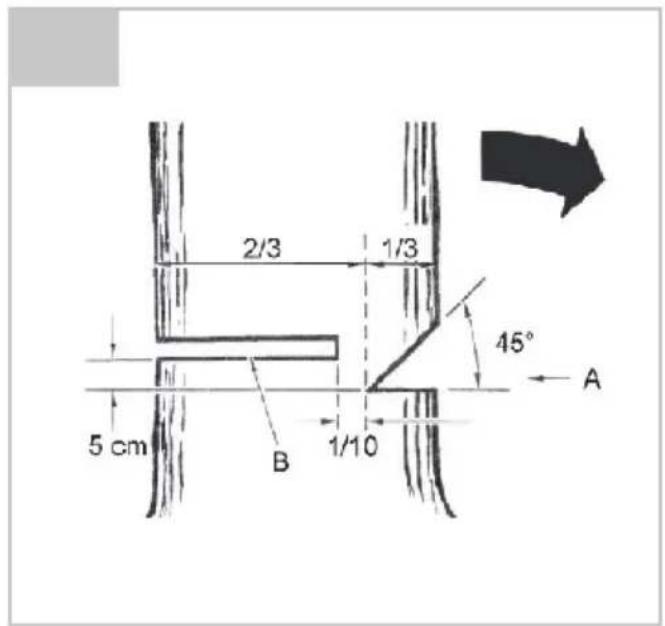
Notching Undercut (S-1):
Create a felling notch in the direction of the desired fall. Start by making a horizontal cut at the base of the tree, approximately one-third of the tree's diameter. Then, make a slanted cut from above at a 45-degree angle to meet the horizontal cut.
Felling Back Cut (S-2):
Make this cut horizontally about 5 cm higher than the notching cut, leaving a hinge of uncut wood
(around 1/10 of the tree's diameter). This hinge helps control the fall direction and prevents the tree from twisting. Avoid cutting through the hinge. If the saw becomes pinched, insert a wedge to release it. Use wedges made of wood, plastic, or aluminium to open the cut and fell the tree.
As soon as the tree begins to fall:
- Withdraw the saw.
- Turn off the motor.
- Use the escape route to leave the area. Be mindful of falling branches and avoid tripping hazards.
Limbing (Removing Branches)
Limbing involves cutting branches and boughs from a felled tree.
Warnings:
- Many accidents occur while removing branches. Never stand on the log when cutting limbs.
- Be aware of branches under tension to avoid injury from spring-back.
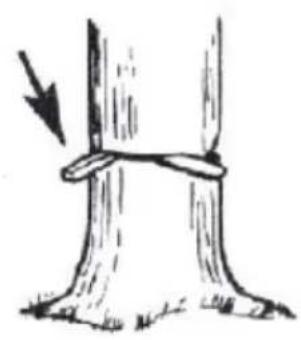
Follow these steps (Fig. T):
- Do not remove support branches until after the main branches are cut.
- Remove smaller limbs in a single cut as shown in Fig. T
- When dealing with branches under tension, cut from below to prevent the chainsaw from getting jammed.
For thicker branches, use the same technique as for cutting a felled trunk:
- Position yourself on the left side of the log and keep the chainsaw close to the tree. Let the weight of the saw rest on the log whenever possible.
- Change positions to remove branches on the other side of the trunk.
- Cut protruding branches separately.
Bucking (Cutting to Length)
Bucking is the process of sawing felled tree trunks into smaller sections.
- Ensure stable footing and balance your body weight evenly. Whenever possible, support the trunk with branches, logs, or wedges.
- Be cautious that the saw chain does not touch the ground while cutting.
- On sloping terrain, stand above the trunk for better control. Reduce pressure at the end of the cut and wait until the saw chain has stopped before removing the saw.
Bucking Techniques:
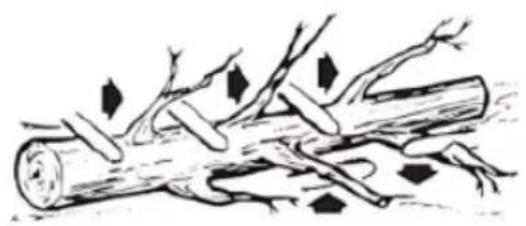
-
Log on the Ground (Fig. U): Saw through the log from above. Be careful to avoid touching the ground at the end of the cut.
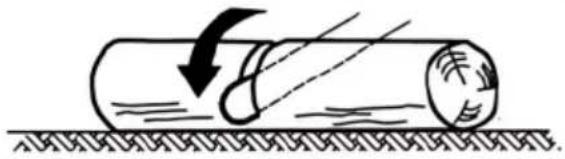
-
Log Supported at One End (Fig. V): Saw two-thirds of the way through the log, then rotate the trunk and finish cutting from the opposite side.
-
Log Supported at Both Ends / on a Sawhorse (Fig. W):
-
Hold the chainsaw firmly with both hands, keeping it in front of you while cutting.
- After completing the cut, guide the saw past your right side while maintaining control (1). Hold your left arm as straight as you can (2).
- Stay alert to prevent injury from falling trunks (3), and maintain your balance at all times.
5. MAINTENANCE
Proper maintenance is essential for safe, economical, and trouble-free operation of your chainsaw. The following maintenance and adjustment schedule helps keep the machine in optimal working condition.
Important: Always use recommended accessories and never use unapproved components. Do not remove safety devices during maintenance. Accessories of inferior quality can damage the machine.
Clean the machine casings regularly with a soft cloth, preferably after each use. Make sure that the ventilation openings are free of dust and dirt. Remove very persistent dirt using a soft cloth moistened with soapsuds. Do not use any solvents such as gasoline, alcohol, ammonia, etc. Chemicals such as these will damage the synthetic components of the machine.
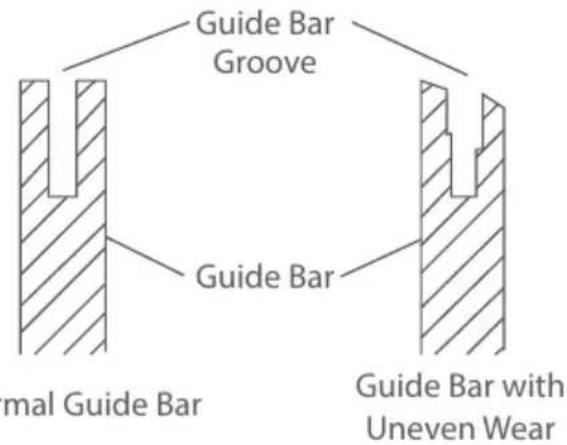
Care of guide bar (Fig.P)
Uneven wear on the guide bar can cause various issues, often due to incorrect sharpening of the chain cutter and depth gauge settings. Replace the
guide bar if it wears unevenly, as this may lead to inaccurate cuts.
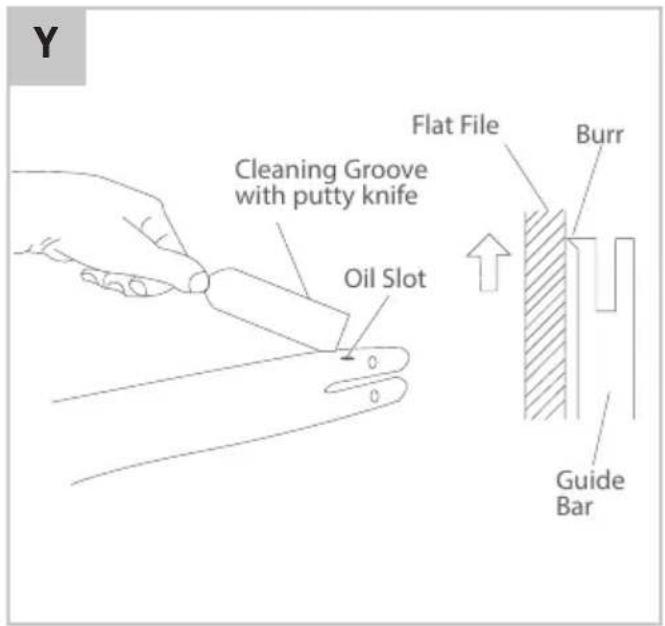
Normal Guide Bar Maintenance (Fig.Q)
- Remove the guide bar from the chainsaw.
- Periodically clear sawdust from the guide bar groove using a putty knife or wire.
- Clean the oil slots after each day of use.
- Remove any burrs from the sides of the guide bar using a flat file to ensure the edges are square.
Replace guide bar when:
- It is bent or cracked.
- The inside groove is badly worn.
Chain sharpening
Warning: Always ensure the tool is switched off and unplugged before performing maintenance or adjustments. The chain needs sharpening when the chainsaw fails to cut properly. Special tools are required for accurate sharpening; we recommend having the chain sharpened by a professional or service centre.
The electric chain saw should be kept in a safe, dry place, well out of the reach of children. Do not place other objects on top of it. Note that there is a small breather channel in the oil reservoir cap (3). The machine must be stored in a horizontal position, with the reservoir cap uppermost, to prevent oil leakage through the channel in the cap. Alternatively, if the machine must be stored in a different position, the oil should be drained from the reservoir into a suitable container to prevent leaking during storage.
WARRANTY
VONROC products are designed to the highest quality standards and are guaranteed free from defects in materials and workmanship for the legally stipulated period starting from the date of original purchase. If the product fails during this period due to defective materials or workmanship, please contact VONROC directly.
The following circumstances are excluded from this guarantee:
- Repairs and or alterations have been made or attempted to the machine by unauthorized service centres;
- Normal wear and tear;
- The tool has been abused, misused or improperly maintained;
- Non-original spare parts have been used.
This constitutes the sole warranty made by company either expressed or implied. There are no other warranties expressed or implied which extend beyond the face hereof, herein, including the implied warranties of merchantability and fitness for a particular purpose. In no event shall VONROC be liable for any incidental or consequential damages. The dealers remedies shall be limited to repair or replacement of nonconforming units or parts.
The product and the user manual are subject to change. Specifications can be changed without further notice.
EXTRA VEILIGHEIDSWAARSCHUWINGEN
2. MACHINE-INFORMATIE
Beoogd gebruik
Measured sound power level: 100.4 dB(A)
Guaranteed sound power level: 108 dB(A)
Conformity assessment method to Annex V Directive 2000/14/EC amended by 2005/88/EC.
The notified body involved: TÜV SÜD Industrie Service GmbH, Certification Body of the Notified Body 0036
EN 62841-1, EN 62841-4-1, EN 62233, EN 55014-1, EN 55014-2, EN 61000-3-2, EN 61000-3-3, 2006/42/EC, 2014/30/EU, 2000/14/EC ANNEX V & 2005/88/EC, 2012/19/EC, 2011/65/EU
Zwolle, 01-11-2024 H.G.FRosberg CEO
VONROC • Lingenstraat 6 • 8028 PM Zwolle • The Netherlands
(EN) This product is labelled with this crossed out wheel bin symbol in accordance with European Directive 2012/19/EU to indicate that it must not be disposed of with your other household waste. Due to the presence of hazardous substances, mixtures or components, electrical and electronic devices that are not subject to selective sorting are potentially dangerous to the environment and human health. Please check your local city office or waste disposal service for the return and recycling of this product.


- VONROC®
- BUILD YOUR FUTURE
- ELECTRIC CHAINSAW CS507AC
- SAFETY INSTRUCTIONS
- GENERAL POWER TOOL SAFETY WARNINGS
- Save all warnings and instructions for future reference.
- 1) Work area safety
- 2) Electrical safety
- SAFETY INSTRUCTIONS FOR CHAIN SAWS
- ADDITIONAL SAFETY WARNINGS
- MACHINE INFORMATION
- Intended use
- Restrictions
- Vibration level
- Tips for Reducing Vibration Exposure:
- DESCRIPTION
- ASSEMBLY
- Steps for Mounting:
- Tightening the saw chain (Fig. E)
- Attaching the Sprocket Cover (Fig. F, G):
- Tensioning the saw chain (Fig. I)
- WARNING!
- Oil filling
- Steps for Oil Filling (Fig. J):
- Checking the Automatic Oil Function
- Extension cord support
- Instructions for Fitting the Extension Cord (Fig. L)
- OPERATION
- Before use
- Start-up
- KICKBACK
- Kickback safety devices (Fig. P):
- Steps to Reduce the Risk of Kickback (Fig.P):
- Avoid jams
- SAWING TECHNIQUES
- General information
- For sawing on hillsides:
- Pruning a Tree (Trimming)
- Warnings:
- Felling Trees
- Escape Route (Fig. R)
- Notching Undercut (S-1):
- Felling Back Cut (S-2):
- As soon as the tree begins to fall:
- Limbing (Removing Branches)
- Follow these steps (Fig. T):
- For thicker branches, use the same technique as for cutting a felled trunk:
- Bucking (Cutting to Length)
- Bucking Techniques:
- MAINTENANCE
- Care of guide bar (Fig.P)
- Normal Guide Bar Maintenance (Fig.Q)
- Replace guide bar when:
- Chain sharpening
- WARRANTY
- EXTRA VEILIGHEIDSWAARSCHUWINGEN
- MACHINE-INFORMATIE
- Beoogd gebruik
Brand : Vonroc
Model : CS507AC
Category : Saw