
Dolceclima Compact 9 M - Air Conditioning OLIMPIA SPLENDID - Free user manual and instructions
Find the device manual for free Dolceclima Compact 9 M OLIMPIA SPLENDID in PDF.

| Product Type | Monoblock mobile air conditioner |
| Brand | Olimpia Splendid |
| Model | Dolceclima Compact 9 M |
| Dimensions (W x H x D) | 345 x 703 x 355 mm |
| Weight (without packaging) | 24 kg |
| Power supply | Single phase, 220-240 V / 50 Hz |
| Refrigerant gas | R290 (flammable, quantity indicated on label) |
| Operating modes | Cooling, dehumidification, fan only, auto, night |
| Temperature range (cooling) | 17 °C to 30 °C |
| Remote control | Yes, with AAA batteries (2 x 1.5 V) |
| Special functions | Follow Me, shortcut, auto restart, Wi-Fi (depending on model) |
| Timer | Programmed on and off from 0.5 to 24 h |
| Air filter | Washable, clean every 250 h (F1 message) |
| Additional filter | Replace after 500 h (depending on model) |
| Condensate drainage | Internal tank with audible alarm, manual drain via plug |
| Hot air exhaust | Hose included, mobile or fixed installation (hole Ø 127 mm) |
| Safety zone | Minimum free distance 50 cm around and above |
| Max/min service temperatures (cooling) | Max DB 35°C / 43°C (int/ext) - Min 17°C / 16°C |
| Routine maintenance | Clean filters, check grilles, drain condensate if necessary |
| Safety | Thermal protection, fault stop (codes E1, E2, E4, P1) |
Frequently Asked Questions - Dolceclima Compact 9 M OLIMPIA SPLENDID
User questions about Dolceclima Compact 9 M OLIMPIA SPLENDID
0 question about this device. Answer the ones you know or ask your own.
Ask a new question about this device
Download the instructions for your Air Conditioning in PDF format for free! Find your manual Dolceclima Compact 9 M - OLIMPIA SPLENDID and take your electronic device back in hand. On this page are published all the documents necessary for the use of your device. Dolceclima Compact 9 M by OLIMPIA SPLENDID.
USER MANUAL Dolceclima Compact 9 M OLIMPIA SPLENDID
DOLCECLIMA COMPACT M
INSTRUÇOES PARA O USO E MANUTENÇÃO PT
IHCTPYKl3 BNIKOPNUCTAHHRA TOBCIyROBYAHHUK
BRUGS-OGVEDLIGEHOLDELSANVISNING DA
Caution: risk of fire
Ppooxh: KivouoT Nupkayias
Uwaga: rzyko pozaru
isc de inc
Varning: brandrisk
2.6.a - Use as dehumidifier 12
3 - USE OF THE APPLIANCE 12
3.1- CONTROL PANEL SYMBOLS AND KEYS 13
3.2- REMOTE CONTROL KEYS 13
3.3 - USE OF THE REMOTE CONTROL 14
3.3.a - Insertion of batteries 14
3.3.b - Replacement of batteries 14
3.3.c - Location of the remote control 14
3.4 - USE OF THE APPLIANCE 15
3.4.a - Preliminary operations 15
3.4.b - Appliance switching on/off 15
3.5 - VENTILATION MODE (FAN) 15
3.6 - COOLING MODE (COOL) 15
3.7- DEHUMIDIFICATION MODE (DRY) 15
3.8 - AUTO MODE (Automatic) 16
3.9 - NIGHT FUNCTION 16
3.10- TIMER MODE 16
3.10.a - Programmed switching on 16
3.10.b - Programmed switching off 16
3.11- SETTING THE UNIT OF MEASUREMENT OF TEMPERATURE 16
3.12-OTHER FUNCTIONS 17
3.12.a - FOLLOW ME function 17
3.12.b - Short Cut function 17
3.12.c - Auto-Restart 17
3.12.d - Wi-Fi 17
4 - MAINTENANCE AND CLEANING 17
4.1 - CLEANING 17
4.1.a - Cleaning the appliance and the remote control 17
4.1.b - Cleaning the suction filter 18
4.1.c - Recommendations for energy saving 18
4.2 - MAINTENANCE 18
4.2.a - Discharging condensation 19
4.2.b - Error codes 19
5-TECHNICAL DATA 19
6 - WIRING DIAGRAM 19
7 - INCONVENIENCES AND POSSIBLE REMEDIES 20
EN-1
0 - WARNINGS
0.1 - GENERAL INFORMATION
First of all, we would like to thank you for choosing our appliance.
0.2 - SYMBOLS
The pictograms in the next chapter provide the necessary information for correct, safe use of the machine in a rapid, unmistakable way.
0.2.1 - Editorial pictograms
| Indicates that this document must be read carefully before installing and/or using the appliance. | |
| Indicates that this document must be read carefully before any maintenance and/or cleaning operation. | |
| Indicates that there may be additional information in attached manuals. | |
| Indicates that information is available in the user manual or in the installation manual. | |
| Indicates that the assistance personnel must handle the appliance following the installation manual. | |
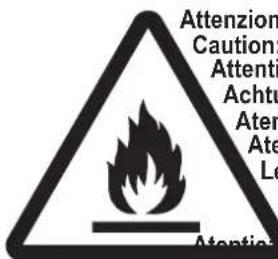
| Indicates that the appliance uses inflammable refrigerant. If the refrigerant escapes and is exposed to a source of external ignition, there is a fire risk. | |
| Signals to the personnel that the operation described could cause electrocution if not performed according to the safety rules. | |
| It informs the personnel concerned that if the operation is not carried out in compliance with the safety regulations, it presents the risk of suffering physical damage. | |
| It informs the personnel concerned that if the operation is not carried out in compliance with the safety regulations, it presents the risk of burns due to contact with components at very high temperatures. | |
| Paragraphs marked with this symbol contain very important information and recommendations, particularly as regards safety. Failure to comply with them may result in: - danger of injury to the operators - loss of the warranty - refusal of liability by the manufacturer. | |
| Refers to actions that absolutely must not be performed. | |
| Indicates to the personnel concerned, that it is prohibited to cover the appliance, to prevent over-heating. |
0.3 - GENERAL WARNINGS
WHEN USING ELECTRICAL EQUIPMENT, BASIC SAFETY PRECAUTIONS MUST ALWAYS BE FOLLOWED IN ORDER TO REDUCE RISKS OF FIRE, ELECTRIC SHOCKS AND INJURY, INCLUDING THE FOLLOWING:

To prevent possible damages to the compressor, each start is delayed by 3 minutes with respect to the last switching off.

- This document is restricted in use to the terms of the law and may not be copied or transferred to third parties without the express authorization of the manufacturer, OLIMPIA SPLENDID.
Our machines are subject to change and some parts may appear different from the ones shown here, without this affecting the text of the manual in any way.

ad this manual carefully before performing any operation (installation, maintenance, use) and follow the instructions contained in each chapter.

ep the manual carefully for future reference.
- After removing the packaging, check that the appliance is in perfect condition. The packaging materials must not be left within reach of children as they can be dangerous.
- THE MANUFACTURER IS NOT RESPONSIBLE FOR DAMAGES TO PERSONS OR PROPERTY CAUSED BY FAILURE TO FOLLOW THE INSTRUCTIONS IN THIS MANUAL.
- The manufacturer reserves the right to make any changes it deems advisable to its models, although the essential features described in this manual remain the same.

- The maintenance of equipment for conditioning such as this one may result dangerous since inside this appliance a refrigerant gas under pressure and live electrical components are present.
For this reason, possible maintenance interventions (with the exception of filters cleaning) must be performed exclusively by authorized and qualified personnel.
-
Failing to comply with the instructions contained in this manual, and using the unit with temperatures exceeding the permissible temperature range will invalidate the warranty.
-
Routine maintenance of the filters and general external cleaning can be done by the user as these operations are not difficult or dangerous.
-
During assembly and at each maintenance operation, it is necessary to respect the precautions indicated in this manual and on the labels located inside or on the appliance, as well as to take all the precautions suggested by common sense and by the Safety Regulations in force in the country of installation.

- In case of replacement of parts, use only original OLIMPIA SPLENDID parts.

- If the unit is unused for a long period, or no-one uses the climate-controlled room, it is recommended to disconnect the electric power supply in order to prevent accidents.

- Do not use liquid or corrosive detergents to clean the unit, do not spray water or other liquids onto the unit, since they could damage the plastic components or even cause electric shocks.

- Do not wet the indoor unit and the remote control. Short circuits or fires may occur.

- In case of functioning anomalies (for example: abnormal noise, bad smell, smoke, abnormal increase in temperature, electrical dispersions, etc.), immediately switch off the appliance and disconnect the plug from the power socket.
For repair work contact solely the technical service centres authorised by the manufacturer and ask for original spare parts to be used. Failure to do this can affect the safety of the appliance.
EN-3
- Do not let the air conditioner run for a long time when the humidity is very high and a door or a windows is left open.
Moisture may condense and wet or damage furniture.
-
Do not disconnect the power plug during functioning. Fire or electrical shocks hazard.
-
Do not place heavy or hot objects on top of the appliance.
-
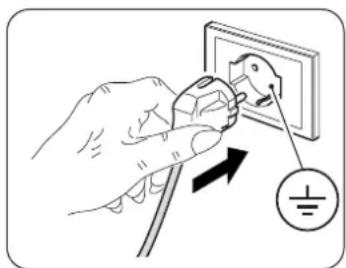
Before electrically connecting the appliance, make sure the plate data correspond to those of the distribution network. The power socket must be equipped with a Ground System. The plate (20) is located on the sides of the appliance (Fig.2).
-
Install the appliance according to the manufacturer's instructions. An incorrect installation can cause damage to people, animals or property for which the manufacturer accepts no responsibility.
-
If the appliance's plug is incompatible with the socket, have the socket replaced with a suitable one by a qualified technician, who must ascertain that the section of the socket cables is compatible with the power absorbed by the appliance. We do not recommend using adaptors and/or extension cables. If they cannot be avoided, however, they must comply with current safety regulations and their ampacity (A) must not be below the maximum ampacity of the appliance.
-
This appliance is not intended to be run via an external timer or with a separate remote control system.
-
Always and only use the appliance in a vertical position.
-
Do not obstruct the air inlet and outlet grids in any manner.
-
Do not insert extraneous items in the air inlet and outlet grids as this will create the risk of electrical shocks, fire or damages to the appliance.
-
Do not use the appliance:
-
with wet or damp hands; - barefoot.
-
Do not pull the power cable or the appliance itself to remove the plug from the socket.
-
Do not use this product under direct sunlight or near a heat source such as a stove, heater or radiator (Fig.3).
-
Do not use the appliance near gas equipment (Fig.3).
-
Always place the appliance on a stable, plane and levelled surface.
-
Leave at least 50cm of free space on both sides and behind the appliance and leave at least 50cm of free space above it (Fig.1).
-
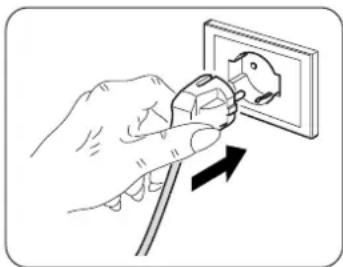
Do not place the appliance near a power socket (Fig.4).
-
The socket must be easily accessible so that the plug can be removed easily in an emergency.
-
Do not handle the plug with wet hands.
-
Do not excessively bend, twist, pull or damage the power cord.
-
Do not run the cord under carpeting, throw rugs or runners etc. Arrange cord away from traffic areas so that it will not be tripped over.
-
Unplug the cord when unit is not in use for an extended period of time and/or when no one is home.
-
Do not use the appliance in particularly moist environments (bathroom, kitchen, etc.).
-
Do not use the appliance outdoors or on wet surfaces. Avoid dropping liquids on the appliance. Do not use the appliance near sinks and taps.
-
Do not immerse the appliance in water or in other liquids.
-
Clean the appliance with a damp cloth; do not use abrasive products or materials. See the appropriate paragraph for the filters cleaning.
-
The most common cause of overheating is dust or lint deposit in the appliance. Regularly remove these accumulations by disconnecting the appliance from the power socket and vacuuming the grids.
-
Do not use the appliance in environments subject to significant temperature changes as condensation could form inside the appliance itself.
-
Install the appliance at at least 2 meters from other electronic devices (TV, radio, computer,DVD player, etc.) in order to avoid disturbances (Fig.6).
-
Do not use the appliance if insecticide gas has just been sprayed in the room or in the presence of burning incenses, chemical vapours or oily residues.
-
Do not use the appliance if the filters are not positioned correctly.
-
Disassembly, repair or reconversion performed by an unauthorized person could cause heavy damages and will cancel the manufacturer warranty.
-
Do not use the appliance in case of malfunctioning or faults, if the cord or plug are damaged, or if it has been dropped or damaged in any manner. Turn the appliance off, disconnect the plug from the socket and let it be checked by professionally qualified personnel.
-
Neither disassemble nor modify the appliance.
-
Repairing the appliance by yourself is extremely dangerous.
-
If you no longer wish to use this appliance, it must be made inoperative by cutting the power supply cable after removing the plug from the power socket. Hazardous parts of the appliance must be rendered harmless, especially as there is a risk of children playing with it.
-
Do not use tools different from those recommended by the manufacturer for the defrosting process and for the appliance cleaning.
-
The appliance is equipped with a thermal protector which preserves the circuit board in case of over-temperature. If this safety device intervenes, disconnect the plug from the power socket and wait for the appliance to completely cool down (at least 20÷ 30 minutes) and then reconnect the plug to the power socket and restart the appliance. If the appliance doesn't restart, disconnect the plug from the power socket and contact an Assistance Centre.
-
FUSE: 3.15A/250VAC Slow fusing.
0.4 - PROPER USE
-
The air conditioner must be used exclusively to produce cold air or to dehumidify air (based on your choice) with the only purpose of making the temperature in the room comfortable.
-
This appliance is only intended for a domestic use or similar.
-
An improper use of the appliance with possible damages caused to people, things or animals releases OLIMPIA SPLENDID from any responsibility.
0.5 - HAZARDOUS ZONES
- The climate controllers must not be installed in environments with the presence of inflammable gases, explosive gases, in very humid environments (laundries, greenhouses, etc.), or in places with other machines that generate a strong heat source, in proximity of a sources of salt water or sulphurous water.

DO NOT use gas, gasoline or other inflammable liquids near to the climate controller.
- Only use supplied components (see paragraph 1.1). The use of non-standard parts may cause water leaks, electric shocks, fires and injuries or damages to things.

This product must be used exclusively according to the specifications indicated in this manual. Use different to that specified, could cause serious injuries. THE MANUFACTURER IS NOT LIABLE FOR INJURY/Damage TO PERSONS/ OBJECTS DERIVING FROM FAILURE TO COMPLY WITH THE REGULATIONS CONTAINED IN THIS MANUAL.
0.6 - WARNINGS FOR R290 REFRIGERANT GAS
-
THE APPLIANCE CONTAINS R290 GAS (FLAMMABILITY CLASSIFICATION A3).
-
THE APPLIANCE SHALL BE STORED IN A WELL-VENTILATED AREA WHERE THE ROOM SIZE CORRESPONDS TO THE ROOM AREA AS SPECIFIED FOR OPERATION.
-
APPLIANCE SHALL BE INSTALLED, OPERATED AND STORED IN A ROOM WITH A FLOOR AREA LARGER THAN X M² (X = INDICATED IN THE CHART).
| Quantity of R290 gas in Kg (see data label on the appliance) | 0,120 | 0,130 0, | 140 0,15 | 0,160 | 0,170 | 0,180 0, | 190 0,20 | 0,210 | 0,220 | ||
| Minimum size of the site for use and storage (m2) | 6 7 7 | 8 8 9 9 | 10 10 11 | 11 |
- THIS APPLIANCE CONTAINS A QUANTITY OF REFRIGERANT GAS R290 EQUAL TO THE ONE INDICATED IN THE DATA LABEL LOCATED ON THE APPLIANCE.
- THE APPLIANCE SHALL BE STORED IN A ROOM WITHOUT CONTINUOUSLY OPERATING IGNITION SOURCES (FOR EXAMPLE: OPEN FLAMES, AN OPERATING GAS APPLIANCE OR AN OPERATING ELECTRIC HEATER).
- Do not pierce or burn.
- Be aware that the refrigerants may not contain an odour.
- R290 is a refrigerant gas in compliance with the European directives on environment. Do not pierce any part of the refrigerant circuit.
- Do not use means to accelerate the defrosting process or to clean, other than those recommended by the manufacturer.
- Do not use tools different from those recommended by the manufacturer when defrosting and cleaning the appliance.
- If the appliance is installed, used or stored in a non-ventilated area, the room must be designed to prevent the accumulation of refrigerant leaks with the consequent fire or explosion hazard due to the refrigerant combustion caused by electrical heaters, stoves or others sources of ignition.
- Compliance with national gas regulations shall be observed.
- Keep ventilation openings clear of obstruction.
- The appliance shall be stored so as to prevent mechanical damage from occurring.
- Any person who is involved with working on or breaking into a refrigerant circuit should hold a current valid certificate from an industry-accredited assessment authority, which authorises their competence to handle refrigerants safely in accordance with an industry recognised assessment specification.

-
All working procedure that affects safety means shall only be carried by competent persons. Maintenance and repair requiring the assistance of other skilled personnel shall be carried out under the supervision of the person competent in the use of flammable refrigerants.
-
TRANSPORT OF EQUIPMENT CONTAINING FLAMMABLE REFRIGERANTS
Compliance with the transport regulations.
- MARKING OF EQUIPMENT USING SIGNS
Compliance with local regulations.
- DISPOSAL OF EQUIPMENT USING FLAMMABLE REFRIGERANTS
Compliance with national regulations.
- STORAGE OF EQUIPMENT/APPLIANCES
The storage of equipment should be in accordance with the manufacturer's instructions.
- STORAGE OF PACKED (UNSOLD) EQUIPMENT
Storage package protection should be constructed such that mechanical damage to the equipment inside the package will not cause a leak of the refrigerant charge.
The maximum number of pieces of equipment permitted to be stored together will be determined by local regulations.

- INFORMATION ON SERVICING
a) Checks to the area
Prior to beginning work on systems containing flammable refrigerants, safety checks are necessary to ensure that the risk of ignition is minimised.
For repair to the refrigerating system, the following precautions shall be complied with prior to conducting work on the system.
b) Work procedure
Work shall be undertaken under a controlled procedure so as to minimise the risk of a flammable gas or vapour being present while the work is being performed.
c) General work area
All maintenance staff and others working in the local area shall be instructed on the nature of work being carried out.
EN-6
Work in confined spaces shall be avoided.
The area around the workspace shall be sectioned off.
Ensure that the conditions within the area have been made safe by control of flammable material.
d) Checking for presence of refrigerant
The area shall be checked with an appropriate refrigerant detector prior to and during work, to ensure the technician is aware of potentially flammable atmospheres.
Ensure that the leak detection equipment being used is suitable for use with flammable refrigerants, i.e. non-sparking, adequately sealed or intrinsically safe.
e) Presence of fire extinguisher
If any hot work is to be conducted on the refrigeration equipment or any associated parts, appropriate fire extinguishing equipment shall be available at hand.
Have a dry powder or CO2 fire extinguisher adjacent to the charging area.
f) No ignition sources
No person carrying out work in relation to a refrigeration system which involves exposing any pipe work that contains or has contained flammable refrigerant shall use any sources of ignition in such a manner that it may lead to the risk of fire or explosion.
All possible ignition sources, including cigarette smoking, should be kept sufficiently far away from the site of installation, repairing, removing and disposal, during which flammable refrigerant can possibly be released to the surrounding space.
Prior to work taking place, the area around the equipment is to be surveyed to make sure that there are no flammable hazards or ignition risks. No Smoking signs shall be displayed.
g) Ventilated area
Ensure that the area is in the open or that it is adequately ventilated before breaking into the system or conducting any hot work.
A degree of ventilation shall continue during the period that the work is carried out.
The ventilation should safely disperse any released refrigerant and preferably expel it externally into the atmosphere.
h) Checks to the refrigeration equipment
Where electrical components are being changed, they shall be fit for the purpose and to the correct specification. At all times the manufacturer's maintenance and service guidelines shall be followed. If in doubt consult the manufacturer's technical department for assistance.
The following checks shall be applied to installations using flammable refrigerants:
The charge size is in accordance with the room size within which the refrigerant containing parts are installed; The ventilation machinery and outlets are operating adequately and are not obstructed; If an indirect refrigerating circuit is being used, the secondary circuit shall be checked for the presence of refrigerant; Marking to the equipment continues to be visible and legible. Markings and signs that are illegible shall be corrected; Refrigeration pipe or components are installed in a position where they are unlikely to be exposed to any substance which may corrode refrigerant containing components, unless the components are constructed of materials which are inherently resistant to being corroded or are suitably protected against being so corroded.
i) Checks to electrical devices
Repair and maintenance to electrical components shall include initial safety checks and component inspection procedures. If a fault exists that could compromise safety, then no electrical supply shall be connected to the circuit until it is satisfactorily dealt with. If the fault cannot be corrected immediately but it is necessary to continue operation, an adequate temporary solution shall be used. This shall be reported to the owner of the equipment so all parties are advised. Initial safety checks shall include: That capacitors are discharged: this shall be done in a safe manner to avoid possibility of sparking; That there no live electrical components and wiring are exposed while charging, recovering or purging the system; That there is continuity of earth bonding.
23. REPAIRS TO SEALED COMPONENTS
a) During repairs to sealed components, all electrical supplies shall be disconnected from the equipment being worked upon prior to any removal of sealed covers, etc. If it is absolutely necessary to have an electrical supply to equipment during servicing, then a permanently operating form of leak detection shall be located at the most critical point to warn of a potentially hazardous situation.
b) Particular attention shall be paid to the following to ensure that by working on electrical components, the casing is not altered in such a way that the level of protection is affected.
This shall include damage to cables, excessive number of connections, terminals not made to original specification, damage to seals, incorrect fitting of glands, etc.
Ensure that apparatus is mounted securely.
Ensure that seals or sealing materials have not degraded such that they no longer serve the purpose of preventing the ingress of flammable atmospheres. Replacement parts shall be in accordance with the manufacturer's specifications.

The use of silicon sealant may inhibit the effectiveness of some types of leak detection equipment. Intrinsically safe components do not have to be isolated prior to working on them.
24. REPAIR TO INTRINSICALLY SAFE COMPONENTS
Do not apply any permanent inductive or capacitance loads to the circuit without ensuring that this will not exceed the permissible voltage and current permitted for the equipment in use. Intrinsically safe components are the only types that can be worked on while live in the presence of a flammable atmosphere. The test apparatus shall be at the correct rating.
Replace components only with parts specified by the manufacturer.
Other parts may result in the ignition of refrigerant in the atmosphere from a leak.
25. CABLING
Check that cabling will not be subject to wear, corrosion, excessive pressure, vibration, sharp edges or any other adverse environmental effects. The check shall also take into account the effects of aging or continual vibration from sources such as compressors or fans.
26. DETECTION OF FLAMMABLE REFRIGERANTS
Under no circumstances shall potential sources of ignition be used in the searching for or detection of refrigerant leaks.
A halide torch (or any other detector using a naked flame) shall not be used.
27. LEAK DETECTION METHODS
The following leak detection methods are deemed acceptable for systems containing flammable refrigerants.
Electronic leak detectors shall be used to detect flammable refrigerants, but the sensitivity may not be adequate, or may need re-calibration. (Detection equipment shall be calibrated in a refrigerant-free area).
Ensure that the detector is not a potential source of ignition and is suitable for the refrigerant used. Leak detection equipment shall be set at a percentage of the LFL of the refrigerant and shall be calibrated to the refrigerant employed and the appropriate percentage of gas (25 % maximum) is confirmed.
Leak detection fluids are suitable for use with most refrigerants but the use of detergents containing chlorine shall be avoided as the chlorine may react with the refrigerant and corrode the copper pipework.
If a leak is suspected, all naked flames shall be removed/ extinguished.
If a leakage of refrigerant is found which requires brazing, all of the refrigerant shall be recovered from the system, or isolated (by means of shut off valves) in a part of the system remote from the leak. Oxygen free nitrogen (OFN) shall then be purged through the system both before and during the brazing process.
28. REMOVAL AND EVACUATION
When breaking into the refrigerant circuit to make repairs or for any other purpose conventional procedures shall be used.
However, it is important that best practice is followed since flammability is a consideration.
The following procedure shall be adhered to:
- Remove refrigerant;
- Purge the circuit with inert gas;
Evacuate; - Purge again with inert gas;
- Open the circuit by cutting or brazing.
The refrigerant charge shall be recovered into the correct recovery cylinders. The system shall be flushed with OFN to render the unit safe.
This process may need to be repeated several times.
Compressed air or oxygen shall not be used for this task.
Flushing shall be achieved by breaking the vacuum in the system with OFN and continuing to fill until the working pressure is achieved, then venting to atmosphere, and finally pulling down to a vacuum.
This process shall be repeated until no refrigerant is within the system. When the final OFN charge is used, the system shall be vented down to atmospheric pressure to enable work to take place.
This operation is absolutely vital if brazing operations on the pipe-work are to take place.
Ensure that the outlet for the vacuum pump is not close to any ignition sources and there is ventilation available.
29. CHARGING PROCEDURES
In addition to conventional charging procedures, the following requirements shall be followed.
Ensure that contamination of different refrigerants does not occur when using charging equipment.
Hoses or lines shall be as short as possible to minimise the amount of refrigerant contained in them.
Cylinders shall be kept upright.
Ensure that the refrigeration system is earthed prior to charging the system with refrigerant.
Label the system when charging is complete (if not already).
Extreme care shall be taken not to overfill the refrigeration system. Prior to recharging the system it shall be pressure tested with OFN.
The system shall be leak tested on completion of charging but prior to commissioning. A follow up leak test shall be carried out prior to leaving the site.
30. DECOMMISSIONING
Before carrying out this procedure, it is essential that the technician is completely familiar with the equipment and all its detail. It is recommended good practice that all refrigerants are recovered safely.
Prior to the task being carried out, an oil and refrigerant sample shall be taken in case analysis is required prior to re-use of reclaimed refrigerant. It is essential that electrical power is available before the task is commenced.
a) Become familiar with the equipment and its operation.
b) Isolate system electrically.
c) Before attempting the procedure ensure that:
- Mechanical handling equipment is available, if required, for handling refrigerant cylinders;
- All personal protective equipment is available and being used correctly;
- The recovery process is supervised at all times by a competent person;
- Recovery equipment and cylinders conform to the appropriate standards.
d) Pump down refrigerant system, if possible.
e) If a vacuum is not possible, make a manifold so that refrigerant can be removed from various parts of the system.
f) Make sure that cylinder is situated on the scales before recovery takes place.
g) Start the recovery machine and operate in accordance with manufacturer's instructions.
h) Do not overfill cylinders. (No more than 80% volume liquid charge).
i) Do not exceed the maximum working pressure of the cylinder, even temporarily.
j) When the cylinders have been filled correctly and the process completed, make sure that the cylinders and the equipment are removed from site promptly and all isolation valves on the equipment are closed off.
k) Recovered refrigerant shall not be charged into another refrigeration system unless it has been cleaned and checked.
31. LABELLING
Equipment shall be labelled stating that it has been de-commissioned and emptied of refrigerant. The label shall be dated and signed.
Ensure that there are labels on the equipment stating the equipment contains flammable refrigerant.
32. RECOVERY
When removing refrigerant from a system, either for servicing or decommissioning, it is recommended good practice that all refrigerants are removed safely.
When transferring refrigerant into cylinders, ensure that only appropriate refrigerant recovery cylinders are employed. Ensure that the correct number of cylinders for holding the total system charge is available. All cylinders to be used are designated for the recovered refrigerant and labelled for that refrigerant (i.e. special cylinders for the recovery of refrigerant). Cylinders shall be complete with pressure relief valve and associated shut-off valves in good working order. Empty recovery cylinders are evacuated and, if possible, cooled before recovery occurs.
The recovery equipment shall be in good working order with a set of instructions concerning the equipment that is at hand and shall be suitable for the recovery of flammable refrigerants.
In addition, a set of calibrated weighing scales shall be available and in good working order.
Hoses shall be complete with leak-free disconnect couplings and in good condition.
Before using the recovery machine, check that it is in satisfactory working order, has been properly maintained and that any associated electrical components are sealed to prevent ignition in the event
of a refrigerant release. Consult manufacturer if in doubt. The recovered refrigerant shall be returned to the refrigerant supplier in the correct recovery cylinder, and the relevant Waste Transfer Note arranged. Do not mix refrigerants in recovery units and especially not in cylinders. If compressors or compressor oils are to be removed, ensure that they have been evacuated to an acceptable level to make certain that flammable refrigerant does not remain within the lubricant. The evacuation process shall be carried out prior to returning the compressor to the suppliers. Only electric heating to the compressor body shall be employed to accelerate this process. When oil is drained from a system, it shall be carried out safely.
1 - DESCRIPTION OF THE APPLIANCE
1.1 - LIST OF THE COMPONENTS SUPPLIED (Fig.5)
The appliance is packaged singularly in a cardboard packaging.
The packaging can be transported by hand by two operators or loaded on a forklift.

Store the packaging singularly; do not stack it.
- Flexible hose for air expulsion (cooling and automatic mode)
- Terminal for flexible hose machine side
- Terminal for flexible hose for fixed / slider installation
- SLIDER for installation on sliding/roller window
- Terminal for slider / window installation
-
Flange for fixed installation
-
Condensation discharge pipe (dehumidification mode only)
8-9. Seal for Slider installation - Plugs for fixed installation flange
- Remote control
- Manual
- Additional filter (only for models provided)
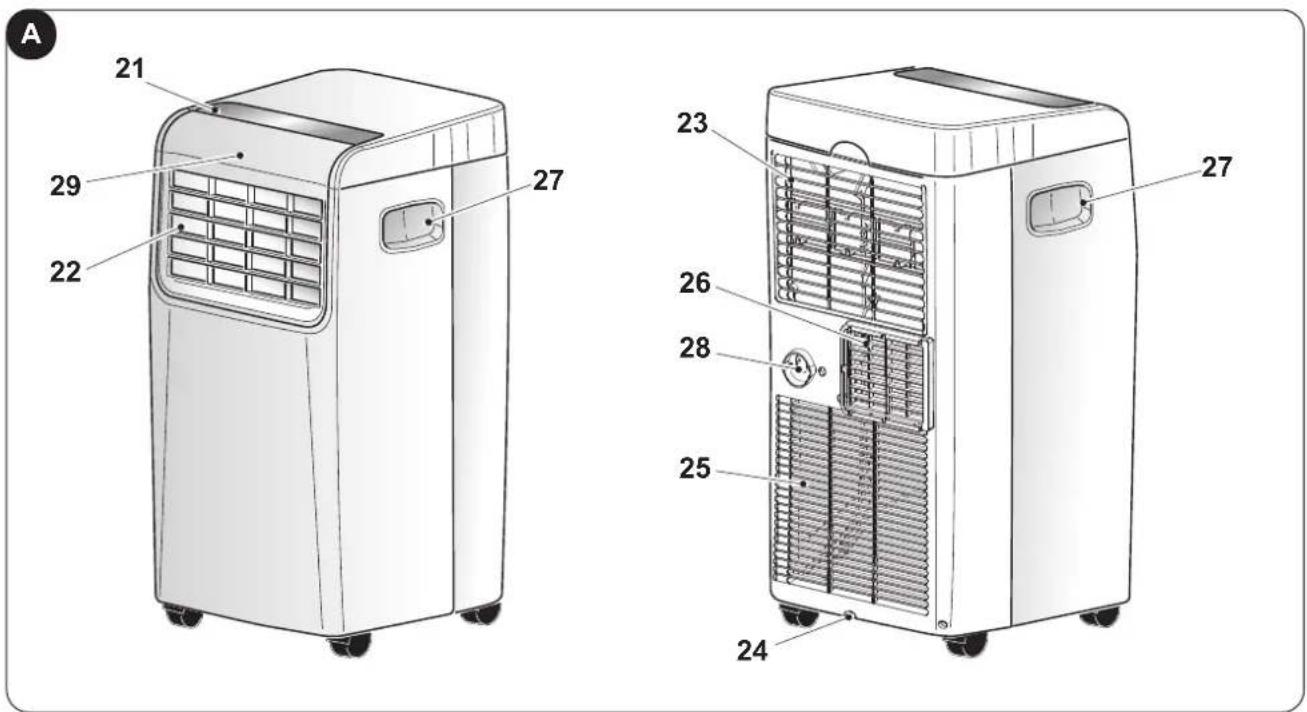
1.2 - IDENTIFICATION OF THE MAIN COMPONENTS (Fig.A)
- Control panel
- Air outlet grille
- Air filter with grille
-
Plug for draining condensation water (in case of transport, maintenance or excessive buildup of water)
-
Air inlet
- Air outlet
- Handle for moving
- Cap for condensate drain (dehumidification mode only)
- IR remote control receiver
EN-10
2 - INSTALLATION
2.1 - HOW TO TRANSPORT THE CONDITIONER
Transport and handling of the appliance must be carried out in vertical position. If it is transported in a horizontal position, wait at least one hour before starting it. Before moving or transporting the appliance, completely drain condensation by working as described in paragraph 4.2.a
CAUTION
Moving the air conditioner on delicate flooring (e.g. wooden flooring): Completely drain condensation.
- Take great care when moving the conditioner as the wheels could mark the flooring. Although the wheels are made from a rigid material and are swivelling, they could get damaged by use or excessive dirt. It is recommended to check that the wheels are clean and that they can move freely.
2.2 - WARNINGS

A failure to respect what follows may cause damages to the appliance.
a. Install the air conditioner on flat and stable surfaces and on the floor.
b. Only connect the air conditioner to power sockets equipped with a ground system.
c. Make sure that curtains or other objects do not obstruct the air suction filters (Fig.7).
d. Make sure to keep a minimum distance of 50~cm (Fig.1) between the air conditioner and the adjacent figures.
e. The appliance must always be activated paying attention that there are no obstacles for air suction and output.
f. The air conditioner must not be used in laundries.
g. The air conditioner must be installed in a dry place only.
h. The air conditioner must not be started in presence of dangerous materials, steams or liquids.
i. Clean the air filters at least once a week.
2.3 - MOBILE INSTALLATION
The air conditioner must be installed in a suitable environment.
It is recommended to reduce solar radiation through curtains, Venetian blinds and to keep doors and windows closed.
a. Position the air conditioner in front of a window or French window.
b. Position the machine side terminal (2) on the flexible hose (1) as shown by Fig.8.
c. Position the terminal (3) on the opposite side of the flexible hose (1) (Fig.8).
d. Insert the machine side terminal (2) on the air outlet grid of the appliance (26) as shown in figure 9.
e. Position the terminal (3) in such a way as to make air exit to the exterior (Fig.10)
f. If you possess a sliding window (vertical or horizontal) or a shutter, it is possible to use the supplied "SLIDER KIT" (4) which allows a more efficient installation.
For the installation with KIT SLIDER, proceed as shown in figures 11 and 12.
g. Apply the adhesive seal (8) (Fig.12)
h. Position the "SLIDER KIT" (4) and adapt it (Fig.12)
i. Position the flexible hose (1) and apply the seal (9) (Fig.12)

Extend the pipe only to the necessary extent, so that the air conveyor remains closed between the fixture shutters.
2.4 - FIXED INSTALLATION
The air conditioner can also be installed with fixed holes in windows or walls.
Air flow must not be obstructed by protective mesh or similar.
Any forms of protection must have a total cross-section for air flow of not less than 140~cm^2
a. Position the machine side terminal (2) on the flexible hose (1) as shown by Fig.8.
b. Drill a 127mm hole in the glass or in the wall at a height above the floor included between 300 and 1200 mm (Fig.13).
c. Position the terminal (6) in the wall hole and mark the drilling points (Fig. 14-a, 14-b).
d. Remove the terminal (6) and drill 6 mm holes (Fig. 14-c, 14-d).
e. Insert the supplied wallplugs (10) in the holes (Fig. 14-e).
f. Position the terminal (6) in the hole of the wall and fix it with the supplied screws (10) (Fig. 14-f, 14-g).
g. Insert the machine side terminal (2) on the air outlet grid of the appliance (26) as shown in figure 9.
h. Connect the other extremity of the flexible hose (1) on the terminal (6) (Fig.14-i).
i. Close the cap (6a) when the appliance is not running (Fig.14-h).
2.5 - ELECTRICAL CONNECTION
The appliance is fitted with a power cable with plug.
Before connecting the air conditioner ensure that:
- The voltage and power frequency values match those specified on the appliance plate data.
- The power line is equipped with an effective earth connection and is correctly sized for maximum power consumption of the air conditioner.
- The appliances power network must be equipped with a suitable omnipolar disconnection device compliant with national installation regulations.
- The appliance is powered solely through a socket compatible with the plug provided.

CAUTION
replacement of the power cable must be carried out solely by Olimpia Splendid technical support or by similarly qualified personnel.
2.6 - DRAINAGE
Depending on the modality of use of the appliance, it is necessary to connect the condensation discharge pipe.
2.6.a - Use as dehumidifier
For the correct use of the appliance, work as follows (figures 15 and 16):
a. Remove the cap (28).
b. Insert the supplied pipe (7) in the connector.

Make sure the end of the discharge pipe (7) is positioned on a drain well or in a container.
Make sure the pipe (7) is not clogged.
3 - USE OF THE APPLIANCE
The functioning modes if the air conditioner can be selected both through the remote control and through the control panel located on board of the air conditioner.
The reception of the selected function is confirmed by the emission of a "beep" by the buzzer.
3.1 - CONTROL PANEL SYMBOLS AND KEYS (Fig.B)

B
- SW1: Running / Stand-by; Wi-Fi Search (*);
- SW2: Working mode selection
cooling =>
=> automatic =>
=> fan only =>
```python
dehumidification => cooling => ...
- SW3: Temperature/delay set increase;
- SW4: Temperature/delay set decrease;
S1: Standby mode.
D1: Tset/Timer
S2: Timer mode/Wi-Fi (*);
S3: Cooling mode;
S4: Dehumidification mode;
S5: Ventilation mode.
3.2 - REMOTE CONTROL KEYS (Fig. C)
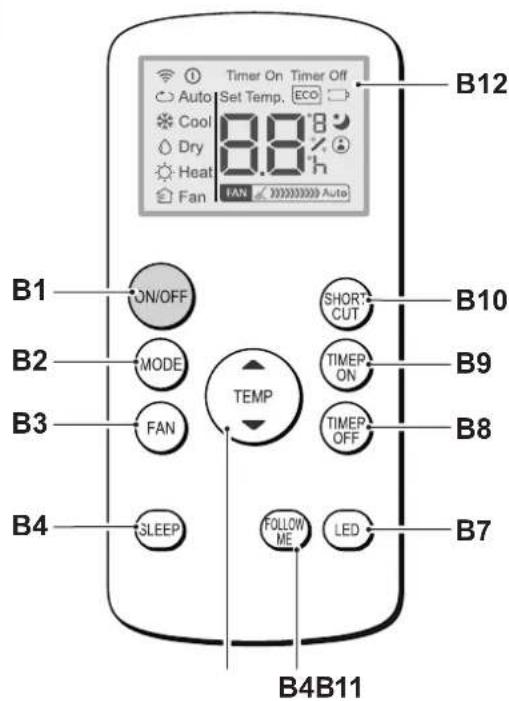
C
B1: On/Off key for the appliance switching on/off
B2: Operation mode select AUTO (Automatic) => cooling => dehumidification => fan only => ...
B3: Fan speed selection
Minimum speed FAN 》>> => Maximum speed FAN 》
B4: SLEEP mode activation (ON/OFF)
B5: Not available for this model
B6: Activate/deactivate FOLLOW ME function
B7: Activate/deactivate display on machine control panel
B8: Unit switch OFF delay setting
B9: Unit programmed switch-on setting
B10: SHORT CUT
B11: Temperature set increase ▲ Temperature set decrease ▼
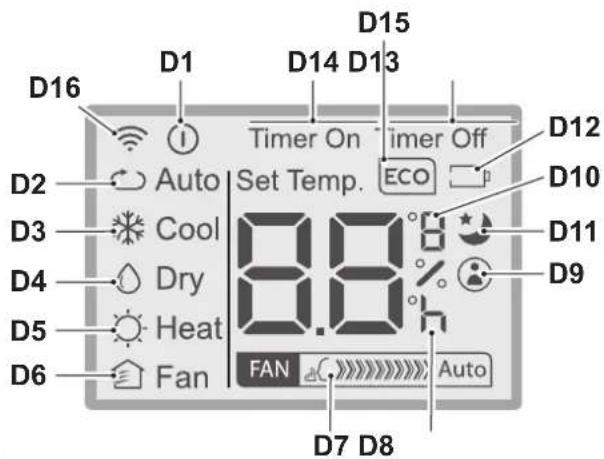
B12:Display
D1: Appliance running indicator
D2: Automatic mode (ECO)
D3: Cooling mode (COOL)
D4: Dehumidification mode (DRY)
D5: Not available for this model
D6: Fan only mode (FAN)
D7: Fan speed indication (vederte "B3")
D8: Programmed switching on/off "hour" indicator
D9: "FOLLOW ME" function active indicator
D10: Temperature indicator in ^ C (F)
D11: "SLEEP" function active indicator
D12: Remote control battery low indicator
D13: "TIME OFF" function active indicator
D14: "TIME ON" function active indicator
D15: Not available for this model
D16: Remote control transmission signal
3.3 - USE OF THE REMOTE CONTROL
The remote control supplied with the air conditioner is the tool which allows You to use the appliance in the most comfortable manner.
It should be handled with care and in particular:
- Keep it dry (do not clean it with water or leave it outdoors in bad weather).
- Avoid dropping or bumping it.
- Keep it out of direct sunlight.

- The remote control operates by means of an infrared beam.
- During use, there must not be any obstacle between the remote control and the air-conditioner.
If other appliances in the room have remote controls (TV, stereo, etc...), there may be interference. - Electronic and fluorescent lights may also interfere with transmissions between remote control and air-conditioner.
- Remove the batteries in case of prolonged disuse of the remote control.
3.3.a - Insertion of batteries
To insert the batteries correctly:
a. Remove the batteries compartment cover (figure 17).
b. Insert the batteries into the relevant compartment (figure 17).

Check the polarity indicated on the bottom of the compartment.
c. Close the compartment correctly (figure 18).
3.3.b - Replacement of batteries
The batteries must be replaced when the icon appears on the display.

Always use new batteries. The use of old or different batteries could generate malfunctioning of the remote control.
- The remote control uses two dry alkaline 1.5V batteries (AAA.) (Fig.17).

When replacing batteries, replace both and dispose of the dead batteries in the appropriate collection centres and as required by law.
- If the remote control is not used for several weeks or longer, remove the batteries.
Any leaks from the batteries could damage the remote control.

Do not re-charge or disassemble the batteries. Do not throw the batteries into the fire. They can burn and explode.

If the battery liquid falls onto the skin or clothes, wash well with clean water. Do not use the remote control with batteries that have leaked.
The chemical products contained in the batteries can cause burns or other risks to health.
3.3.c - Location of the remote control
- Keep the remote control in a position from which the signal can reach the receiver (29) of the appliance (maximum distance is approx. 8 metres - with charged batteries) (figure 19).
The presence of obstacles (furniture, curtains, walls, etc.) between the remote control and the appliance reduces the remote control range.
3.4 - USE OF THE APPLIANCE
Work as follows in order to use the appliance.

To prevent possible damages to the compressor, each start is delayed by 3 minutes with respect to the last switching off.
3.4.a - Preliminary operations

- Place the appliance on a stable and not inclined base, at at least 30~cm from the wall or from any other object, in order to ensure the correct air circulation. Place it on a water-resistant surface since the possible water leakage could damage furniture or the floor.
- Do not place the appliance directly on carpets, towels, blankets or other absorbent surfaces.
- Insert the plug in the power socket; the appliance emits a "beep", on the display appears the icon and the environment temperature in ^ C .

Before electrically connecting the appliance, make sure the plate data correspond to those of the electricity distribution network.
3.4.b - Appliance switching on/off
a. The appliance can be switched ON or OFF for short periods by pressing B1 on the remote control or SW1 on the control panel (if the appliance is switched off for a long period then it should be deactivated by removing the plug from the mains supply.
b. The corresponding LED L2 lights up to indicate that the appliance is switched off.
c. In this condition, press B1 again on the remote control (or SW1 on the control panel) to restore all the formerly selected functions.
When the appliance is OFF all the working timers are 'reset'.
3.5 - VENTILATION MODE (FAN)
a. When this operating mode is used the appliance has no effect on the temperature or humidity of the environment, it merely circulates the air.
b. This mode can be selected by pressing B3 or SW2 until when the fan only symbol (S) is activated on the display of the control panel, while the symbol D6 appears on the remote controller display.
c. In this operating mode the internal fan is always on and the required fan speed can be selected at any time by pressing key B3 (only from the remote control) (symbol D7 on the remote control).
3.6 - COOLING MODE (COOL)
a. In this mode the appliance cools and dehumidifies the environment.
This mode can be selected by pressing B2 or SW2 until the cooling only symbol (D3) is activated on the remote control and on the control panel display.
b. The internal fan is always on at automatic speed or (only from the remote control) at the selected speed.
c. The temperature set-point (Tset) can be adjusted from 17^ to 30^ (from 62 F to 86 F if present) in 1^ steps by means of B11 or SW3/SW4, and its value is shown both on remote and local interfaces.
d. Three minutes (maximum) after the activation of this operating mode the compressor starts and the appliance starts to distribute cold air.
3.7 - DEHUMIDIFICATION MODE (DRY)
a. This mode can be selected by pressing B2 or SW2 until the dehumidification only symbol ( /D4) is activated on the remote control and on the control panel display.
EN-15
b. This mode is similar to cooling mode, except that:
fan speed selection not active (Set temperature) set equal to "Tamb" (ambient temperature).
c. In dehumidification mode only, the appliance can operate with only the condensate drain pipe connected (12) and without the flexible air expulsion hose.
3.8 - AUTO MODE (Automatic)
a. This mode can be selected by pressing B2 or SW2 until the automatic symbol (AUTO/ D2) is displayed on the remote control.
b. In this mode, the COOLING and FAN functions are selected automatically depending on the continuously monitored room temperature value to ensure that there is a perfect comfort-level in the conditioned room.
a. This mode can only be selected from the remote controller by pressing the B4 key, the symbol D11 appears on the display; this mode can only be used combined with cooling and automatic modes.
b. When this mode is enabled, the internal fan is forced to run at automatic speed and the set room temperature is automatically increased by 1^ after 1/2 hour and by another 1^ again after 1/2 hour (starting from function activation and consequent modification of the set temperature).
c. After 7 hours the initial temperature is automatically restored.
d. When the set temperature is modified from the remote control, when the appliance is placed in standby, or when the power supply is disconnected, the night function is disabled.
e. To deactivate the function press the B4 button again.
3.10 - TIMER MODE
a. This mode allows to program the switching on or the switching off of the appliance.
b. The delay time can be set by the remote control.
3.10.a - Programmed switching on
Select the operating mode, the desired temperature and the ventilation speed with which the unit will activate automatically as programmed.
a. By pressing B9, set the desired time delay (from 0.5 to 24 hours) after which the unit will switch ON (starting from timer confirmation).
If no button is pressed within 5 seconds the timer setting function will terminate automatically.
b. When the delay time set has elapsed, the unit switches ON with latest selected settings.
c. To cancel the delayed power-on, press button B9 again until a value of 0 is set.
d. When the timer is active, the symbol D14 lights up on the remote control, while, for the models without Wi-Fi, the LED S2 lights up.
3.10.b - Programmed switching off
a. With the unit in any working mode, press B8 to set the desired time delay (from 0.5 to 24 hours) after which the unit will switch OFF (starting from timer confirmation).
Each following B8 key operation increases the delay time value by 1 hour.
b. If no button is pressed within 5 seconds the timer setting function will terminate automatically.
When the delay time set has elapsed, the overall unit switches OFF.
c. To cancel the delayed shutdown, press button B8 again until a value of 0 is set.
d. When the timer is active, the symbol D13 lights up on the remote control, while, for the models without Wi-Fi, the LED S2 lights up.
3.11 - SETTING THE UNIT OF MEASUREMENT OF TEMPERATURE
On pressing buttons SW3 SW4 simultaneously for 3 seconds you can change the temperature unit of measure indicated on the machine display from CELSIUS (^) to FAHRENHEIT (F) and vice versa.
3.12 - OTHER FUNCTIONS
3.12.a - FOLLOW ME function
- This function can be activated only from the remote control.
- This function is not available while the Dehumidification (DRY) and Fan Only (FAN) modes are active.
In this function, the remote control serves as a thermostat.
a. When the appliance is running, press the key "FOLLOW ME" on the remote control.
b. Move with the remote control in an area of the room different from where the appliance is positioned (maximum distance is 7 + 8 metres) directing it towards the appliance itself and making sure there are no obstacles between them.
c. Set the desired temperature on the remote control; the appliance works until it takes the temperature of the area where the remote control is positioned to the value set on the remote control itself.
d. The remote control sends a signal to the appliance and, if it doesn't receive a response within a maximum time of 7 minutes, the function deactivates.
e. Press the key "FOLLOW ME" on the remote control or switch the appliance off to stop the function.
3.12.b - Short Cut function
- This function can be activated only from the remote control.
a. When the appliance is running in any of its modes, press the key "SHORT CUT" on the remote control and the appliance automatically configures itself to "AUTO" with a set temperature of 26^ (80 F).
3.12.c - Auto-Restart
a. If the appliance switches off due to interruption of power supply, it automatically restarts with the previous settings when electrical power is restored.
3.12.d - Wi-Fi (only for models provided)
a. Press SW1 for approximately 3 seconds to activate the "Wifi" function, on the display appears the message "AP" waiting for connection to the device.

For the connection to the Wi-Fi network and the use of the App, please refer to the Wi-Fi manual.
b. When the appliance is connected, the LED S2 remains on.
4 - MAINTENANCE AND CLEANING

Before proceeding with any maintenance and cleaning intervention, always make sure you disconnected the power plug from the power socket.

Do not touch the metal parts of the appliance when you remove the filter.
There is a risk of injury due to the sharp metal edges.

Do not use water to clean the internal parts of the air conditioner.
sure to water can ruin the isolation, with the risk of electric shocks.
4.1 - CLEANING
4.1.a - Cleaning the appliance and the remote control
a. Use a dry cloth to clean the appliance and the remote control.
b. It is possible to use a cloth moistened with cold water to clean the appliance in case it's very dirty.
EN-17

Do not use a chemically treated or antistatic cloth to clean the appliance.

Do not use gasoline, solvent, polish or similar solvents.
e products could cause the breakage or deformation of the plastic surface.
4.1.b - Cleaning the suction filter
To ensure the indoor air is filtered correctly and to guarantee that your air conditioner runs efficiently, it is vital to clean the air filters regularly (Fig.20).
The filtering system is composed of an air filter (fig.20 ref.23) and an additional filter * (fig.5 ref.13).

Message F1 appears every 250 hours of operation of the fan motor.
The additional filters must be replaced after approximately 500 hours of operation
Proceed with the filters cleaning and reset the hours counting by keeping key "ON/OFF" on the appliance control panel pressed for 5 seconds.
a. Switch off the conditioner and then remove the filters from the conditioner as indicated in figure 20.
b. Wash the filter with a water jet aimed at the side opposite the accumulation of dust.
c. If the dirt is particularly difficult to remove (such as grease or other types of deposit), first immerse the filter in a solution of water and a neutral detergent.
d. Shake off any water before reinserting the filter.

Provide for the filter (23) replacement if it is damaged.
e. Make sure the filter (23) has dried completely.
f. Correctly reposition the filter (23) in its specific seat.
g. Suck possible fluff from the grille (Fig. 21).

Do not use the appliance without the filter (23).
4.1.c - Recommendations for energy saving
Below find simple recommendations for reducing consumption:
- Always and constantly keep the filters clean (see maintenance and cleaning chapter).
- Keep the doors and windows of the rooms to be climate controlled closed.
- Do not let sun rays penetrate freely into the room (we recommend using curtains or lowering blinds or closing the shutters).
- Do not obstruct the air flow path (input and output) of the appliance; this, in addition to obtaining a non-optimal yield, also affects the correct operation of the appliance and the possibility of irreparable damages to the appliance itself.
4.2 - MAINTENANCE
If you do not intend to use the appliance for a long period of time, work as follows:
a. Activate the fan only mode for a few hours (approximately 1÷ 2 hours) to dry the interior of the appliance.
b. Stop the air conditioner and disconnect the power supply.
c. Clean the air filter.
d. Completely discharge condensation.
e. Remove the batteries from the remote control.
Checks before resuming use of the air conditioner:
a. Clean the filters after a long period of inactivity of the air conditioner.
b. Check that the air outlet or inlet are not obstructed (especially after a long period of inactivity of the air conditioner).
(^*) only for models provided
EN-18
4.2.a - Discharging condensation
When condensation in the lower tray reaches the predetermined level, the appliance emits beeps.
In this case:
a. Disconnect the plug from the power socket.
b. Carefully move the appliance in position suitable to unload water.
c. Remove the drain cap (24) and the rubber cap (24a) (Fig.22).

Make sure you correctly tightened the drain cap (24) in order to avoid water leak.
d. Make water unload completely.
e. Reposition the rubber cap (24a) and screw the drain cap (24) (Fig.23).
f. Insert the plug in the power socket.

If the error repeats, please contact an Assistance Centre.
4.2.b - Error codes
During the appliance functioning, a few anomalies which stop its functioning could appear. In these cases, some error codes appear on the control panel.
P1 Lower tray full.
F1 Filters cleaning.
E1 E2 E3 E4
In these cases:
a. electrically disconnect the appliance
b. wait a few minutes
c. connect the plug to the power socket
d. restart the appliance.

If the inconvenience persists and the error code doesn't turn off, electrically disconnect the appliance and refer to an Assistance Centre.
5 - TECHNICAL DATA
For the technical data, please consult the data plate applied to the product (Fig.2).
| Dimensions (W x H x D) 345 x 703 x 355 mm | |
| Weight (without packing) 24 Kg | |
| Maximum operating temperature in cooling mode | DB 35°C - WB 24°C * / DB 43°C - WB 32°C ** |
| Minimum operating temperature in cooling mode | 17°C * / 16°C ** |
| * Internal ambient temp. ** Outside ambient temp. | |
6 - WIRING DIAGRAM
The wiring diagram is shown in image 24.
7 - INCONVENIENCES AND POSSIBLE REMEDIES
| MALFUNCTION · The conditioner does not work. | CAUSE · No power. · The plug has not been inserted. · Timer is ON | WHAT DO I DO? · Wait. · Plug in the conditioner. · Switch off the timer |
| · The conditioner works only for a short period. | · The temperature set is too close to ambient temperature. · Suction of outside air is obstructed. | · Lower the temperature set. · Remove the obstructions. · Call the Service Center. |
| · The conditioner works but does not refresh the room. | · Window open. · Some source of heat is operating in the room (burner, lamps, etc.) or the room is crowded. · The temperature set is too high. · The power of the conditioner is not suitable for ambient conditions or dimensions. | · Close the window. · Eliminate sources of heat. · Lower the temperature set. |
| · Water leaks from the conditioner during transport. | · The conditioner has been tilted or laid flat. | · Remove the plug (fig.2 ref. n°4) and drain the water before moving the conditioner. |
| · The conditioner switches off, the controls on the remote control and the control panel do not respond and alarm signal “E1” flashes on the control panel display. | · Pull out the plug · Call the Service Centre. | |
| · The conditioner switches off, the controls on the remote control and the control panel do not respond and alarm signal “E2” flashes on the control panel display. | · Pull out the plug · Call the Service Centre. | |
| · The conditioner switches off, the controls on the remote control and the control panel do not respond and alarm signal “E4” flashes on the control panel display. | · Pull out the plug · Call the Service Centre. | |
| · The conditioner switches off, the controls on the remote control and the control panel do not respond and alarm signal “P1” flashes on the control panel display. | · Excessive build-up of water inside the conditioner | · Pull out the plug · Dain the water contained by removing the plug (fig.2 ref. n°4). If this alarm is displayed too frequently, call the Service Centre. |
| · In cooling, night-time or automatic mode, minimum speed cannot be selected. | · Ambient temperature too low | · Air conditioner behaviour is normal. |
Do not try to repair the appliance by yourself.
If the problem has not been solved, please contact your local retailer or the closest assistance service. Supply detailed information about the malfunction and the equipment version.
EN-20
0-MISES EN GARDE 2
0.1 - INFORMATIONS GENE RALES 2
0.2 - SYMBOLOGIE 2
3.5 - MODE VENTILATION (FAN)
0.6 - WAARSCHUWINGEN VOOR HET KOELGAS R290
- HET APPARAAT BEVAT GAS R290 (ONTVLAMBAARHEIDSCATEGORIE A3)
- HET APPARAAT MOET OPGESLAGEN WORDEN IN EEN GOED GEVENTILEERD VERTREK, WAARVAN DE AFMETINGEN OVEREENKOMEN MET DE MATEN DIE GESPECIFICEERD ZIJN VOOR HET GEBRUIK VAN HET APPARAAT.
- HET APPARAAT MOET GEINSTALLEERD, GEBRUIKT EN BEWAARD WORDEN IN EEN RUIMTE WAARVAN HET OPPERVLAK VAN DE VLOER GROTER IS DAN X M (X = AANGEGEVEN IN DE TABEL).
NL-5
1 - OMSCHRIJVING VAN HET APPARAAT
1.1 - LIJST VAN DE MEEGELEVERDE ONDERDELEN
2.2 - WAARSCHUWINGEN

3.5 - VENTILATIEWERKWIJZE (FAN)
2.3 - KINHTH EΓΚATAΣΤΑΣH
To kaiuotiko npenei va toooteetial e kataaanxwpo.
Zuotnyetai va nAikn akTioBoia Tn BOnTeia TapaOpouAAw, Koupivov, Otopiw, kai va diatnpouvtai oI Toptec kai ta TapaOupa KkEiota.
AkoouoovepiKaonuoue yia n e iown ts katavawons:
- Diatnpetie Tavta kai ouvexw ta iatpa (deite kepalaio yia tn ouvtnponkai tov kaopapio).
KpatnoTE KAEIOTA TIC TIOPEc KA tA TAPaTHUPa TWv DOWATIW TPoC KLIPAtIOI.
Mny aqiveticakivec tou naiou va dianepvovv eueuepa oTo Tepiabaaov (oac ouviotouve xnpoiotioite kouptivec n va katebaeTE peoiidec n va kaeivte ta navtoupiia).
Mny eTIOBICIe Tn pon Tou aepa (Otnv EIOO kai tyn EIOO) Tns oukeunc. Auto, EkTOC aTO nTv EITIEUgN un BéAIOTNs antooons, EINpeaeI EIION ts Owotn AEToupyia Tou kai Tnv TIaovtnta aventavopWtWbAβw otic movacec.
4.2 - ΣYNTHPHΣH
Eav devokotteve xa npoioutoinote Tn oukeun yia eayao xovikobiaotma, tpoxwnpote me tov akolouo tpanto:
a. EvpyoTOnTe Tov tpOTo AetoupyiaC mOvo avEoiTnpac yia liyo (Tepiou 1+2 wpeC) ia va oEvvwoeI eowepikto unxavna.
b. ΣταμαπθεΤΟΚΑλιματιοίκο Kαι αισούνδεόθεΤΟροφοδοτικό.
c. KaopioTe Ta pIaTpa aepa.
d. AedeioTe EVTEAωT O uμTIUKVωμa.
e. ApaipoeTicmuatapiec aTo To nAExepiOtnpio.
EeYTe TPIV eOeTe EaVa oE aeIOTpyia To kIaIaTIOKo:
3.5 - TRYB WENTYLACJI (FAN)
3.5 - MOD VENTILATIE (FAN)
3.5 - VENTILATIONSLAGE (FAN)
3.5 - ILMANVAIHTOTAPA (FAN)
3.12 - MUUT TOIMINNOT
3-BRUKAVAPPPARATET 12
3.1 - SYMBOLER OG TASTER PAKONTROLLPANELET 13
3.2 - TASTER FJERNKONTROLL 13
3.3 - BRUK AV FJERNKONTROLLEN 14
- MERKING AV APPARATET MED SYMBOLER
Referer til lokale lover og regler.
- KASSERING AV APPARATER SOM INNEHOLDER BRENNBARE KJOLEVAESKER
- INFORMASJON OM VEDLIKEHOLD
4 - VEDLIKEHOLD OG RENGJØRING

För du setter i gang med et hvilket som helst vedlikeholdseller rengjøringsinngrep ma du alltid forsikre deg om at du har koblet fra stopselet på systemet.


Ta pa metalldelene pa apparatet nár du fjerner filteret.
e for Å skade seg pä de skarpe metallkantene.

Mohly by zañt horenebo explodovat.

3.5 - REZIM VENTILACE (FAN)
3.10 - REŽIM CAsOVACE
3aBJIKKoHTpOJIHOHABHOCtIJeK03aMmCTNXMaTePiaJIIB.
d) IpepeBipka HaeBHocTi XoJIOdoareHTy
3Ony Heo6xIHO nepeBipuTn 3a DonomoroIO BiIDNOBIDHOrO DeTeKTopa XonoOaReHTy Do Ta nD yac po- botN, uO6 rapaHTyBaTn, 10 oNePAPOp 3HaC npo Hae BHCtB NoteHcuiHo NERKO3aIMNCToi aTMoccepeH. PepeKoHaTncsA, 10 O6NaHAnHH dIpa BnBHeHH BtOKIB pndatHE dIpa BnKOpNCTaHH 3 JERKO3aIMNC-TMmXoNoOaREHTAMn, TO6TO BOHO He c DxepeJOM icKOp, HApexHMM YHOM RePMeTn3OBaHO a60 B3araJIb 6e3neUHO.
e) HaBbHcTb BORHeracNkIB
Y BnnaKy, Kaio Ha XoIOnuHbHomy 6bHaHaHHi a6o Ha 6yNb-kaH yactnHi, Nob'a3aH 3 Hm, Heo6xHIO npOBecTu 6yNb-ky p60Ty 3 iDnBnueHNr TMnepaTpy, Heo6xH0 MaTu npiD pyKo BiNobiHe npToTHOKeJHe 6bHaHaHH. 3abXd TpMaTe BorHerachHK i3 cyxM nopOwKOM a6o CO2 no6n3y Micra 3apAKn.
f) BiDcyTHICtB DkepeJ IerKo3aMnCTnx peOBOH
KoJen onepaTOp, kIn BVKOHye pOobToN 3 XOJIOINbHOIO CnCTeMOIO, NOB'3aHI 3 orOJIeHNHm 6yDb-RAKx Tpy60npoBODiB, kI MicTb a6o MICTuN JERKO3aMnCtN XOJOoAReHT, He NOBHeH BIKOPNCTOByBaTN 6yDb-8Ki DKepeNa JERKO3aMnCtNX peOBuN TaKIM YNHOM, 0o6 BOH MOrN CnpuHHIT NooKexy a6o Bv6yx. Yci MoXnBi DKepeNa JERKO3aMnCtNX peOBuN, BKNIOUHO CNOXNBHaHH CNrapET, NOBHHI 3hAXoDNTnca Ha DoCTaTHI BiDCTaHI BiD MICsY cTaHOBKn, PemOH TY, DEMoHTaxy Ta yTNI3aCi, NiD Yac RaKOr OERKO3aMnCTn XOJIOoareHT Moke NotpAnTuB HABKOINuHni npocTip. IpeP noaTKom po6Ot N He06xIDHO OrJMyTn Tepntopio HabKOOnO obnaHaHH, 0o6 NepekoHaTcN y BIDcyTHOcTI JERKO3aMnCtNX eEmeHTIB a6o pn3kky 3aMaHH. BIKOPNCTOByBatn 3HaKn Ipno 3abOpoh Ky piriHH.
g)BeHTnIaIzIa30Hn
IpekoHATCBA TOMy, 0oMICe BCTaHOBHeHHa3haoDITbCSHa BIDKpNTomy nobitpi a6oMaHaleXHy BeHTnJIaIO nepei 3anyckOM cNCTeMM a6o BVKOHaHHM 6yb-kyx po6it 3 iIBuIeHHa TMnepaTyPi. Ctyinb BeHTnJauiMa6 6yTu NoCTiHm IpOTARom ycBOrO nepioy po6otn. BeHTnJaui NOBHHa 6yTu 3daTHa 63neHo PO3CIOBAtn 6yb-4kN BvBilbHeHn XOnoDoareHt i, 6axaHO, BvDaIaTn Ioro Ha3OBHi.
h) IpebeBipKn xoJouInbHorO oBaHaHn
Y pa3i 3aMInH eNEKTPnHINX KOMNOHEHTIB BOHN MaIOb6byTN npuDAtHMN DnB NKOPNCtAHN Ta BIDNOBIdATN 3a3HaueHIM CneUPhiKaJiM. Heo6xIHDo 3aBXdN DoTPmYBaTncBkazIBOK BnPO6Hnka 0do TExHIOO6cIyROyBaHHra Ta DOnomOrn.Y pa3i cyMHIB 3BepHiTbcra 3a DOnomORO IO texHIOHO CTyKbN BnPO6HnKa. Ha yCTahOBkax, kki BnKOpNCTOByOT bERKO3aMMCTI XONOaReHTN, Heo6xIDHO BnKOHATNa HAcTyHNIpeBipKn: nepeKoHaTnc, 10 po3Mp 3aBAHTaeHNN BIDNOBIDAe PO3mpam PpIMiJeHH, De BCTAHOBHeO YactHIN, 10 MICrTaB XONOaReHT; 10 CNTema Ta BEHTNJIaHI OTBOPN OyHKIOHyOTb HALeKHIM YNHOM I 10 BOHN He 3akPIT; pni BnKOpNCtAHHI KOHTpy XONOaReHTy, NepeBipTe HaRBHICTb XONOaReHTy y BTOpHHOMy KOHTpyi; 106 MapkyBaHH, HaHeceHe Ha MaUnHy, 3aIIuAnoc BNDIMM i po3bipNBIM. Hepo3bipNBi No3hauKn Ta 3hAK NOBHHI byTN BnPabNeH; 106 xONODNbHITpybN Ta KOMNoHETN 6yNN BCTAHOBJIeHBI Mlci, De ManoMOBIPHO, 10 BOHN 6yDyTB NIDanHi BnLHy BySyB-RAOIp eChOBnH, kA MoKE BnKlNKATN Kopo3HIO KOMNOHEHTB, 10 MICrTaB XONOaReHT, kIIO Taki KOMNOHEHTN He BnROTOBJIeHl 3i CTIKORO Do Kopo3ii, icKpOBe3neuHOro MaTepiany abo HaneHHM YNHOM He 3axuSeHi BiD zuboro.
i) IpeBipKn eIeKtpuHnx KOMnoHeHTi
Pemont I texhiue o6cnyrobyaHH eNEKtpnHIX KOMnoHeHTIB NOBHHI BKNIOuATn NOATKOi nepebipkn 6e3neKn Ta ORJd KOMNOHeTIB. Y pa3i HecnpabHocTi, kA MoKe NoCTabTu NiID 3arpo3y 6e3neKy, He BMKATN JKBnEHHN, DOK II He 6yde HaneXHM YHOM yCyHeHO. BkOpNCTOByaTu BiNDOBiDHE TImuAcOBe piJehn, kUo HeCnpabHicTB He MOxHa ycHyTu HeraiHo, aNe nToPi6HO npOdoBxHTn pOboty. PpO cTuayio Heo6XiHO NobIDomTu BlaChnka ObnaHahn, uO6 yci CTopoHb 6yn IpOHfOpMOBaHi. PepeBipKa 6e3neKn CknaadaTbcra 3: nepeBipKn TOrO, UO KOHNecCaTOPn PO3pJxHeH, kA MaC BkOnHYBaTncB 6e3neHomy peKMI, UOb yHNKHTn iCKOp; nepeBipTe, uO6 eNEKtpnuHl KOMnoHEnTu NaPOBOJa Ka N daHn, cn DaHHn YN OUYeHHn CnCTEMN; nepeBipTe 6e3nepePBHicTb 3a3eMJIeHHN.
23. PEMOHT TEPMETN3OBAHIX KOMNOHEHTIB
a)Пдчac pemontу repeMtunHx komnoentlb yci dxepeena kNbIeHHЯ NOBHHi 6ytu BiKlnOeHI BID oBnadHaHHa,Ha kOMy noBHHI npoBoNTncpobTo, nepu Hix 3Hrtn 6yd-b-kyrepeMeTn3auio ToIO. Raio nId Yac pemonty BkpaH Heo6xIDHO nIKNIOHTNo OblaHaHHa DO eJeKTPnuHOrO KNBLeHHa, y HaBilbW KpnTUnHtouci Heo6xIDHO pO3TaUByaTN NoCTiHo DIOHpy npucptpiB NIABHeHHa BITOKIB, IO6 nonepeHTOn onepatopapno notehuiHO Hebe3neHy cnTuayio.
b) 3BepHt b oc6blnby ybary Heo6xHicTb nepeKohHH B TOMy, IIO NOKpTTra He 3MiHeHO TaKIMu YHOM, knn BnBa e H pBeHb 6e3neKn iD vac po60Tu 3 eNEKtpuHmN KOMNOHeHTaMn.
LcBKnHoua e N0wKoJxehn Ka6enib, HAdMipHy KInbKicTb 3'EdHaHb, KNeMn, 10 He BIDNObiaOToB opnriHaNbHM XapaKTepNCtHKam, NOXKOJxehn PpOKJaADOK, HEnpaBnIbHy yCTaHOBky Ka6eJIbHnx BBOiBTO. PepeKoHaTncB TOMy, 10 KOMNoHEHTN BCTaHOBJeHO 3 DToPmAHnRm npabn J63neKn. PepeKoHaTncB TOMy, 10 PpOKJaKn a60 uJilbHIOBaJIbHi MaTepiAn He 3incyBaINcR hactInkN, 10 6IlbWe He MOxyTB NepeWkoJxATn PpOHnKHeHHIO JeKo3aIMNCtNX peOBHN. 3anachI qACTnHn NobHHi BiDNOiDaTn CneuΦikaqiam Bnpo6Hnka.

BnKOpNCTaHHc nIiKOHOBORe repMeTnKa MoKe 3Hn3HTu epeKTNBHicTh DeaKnx TnIB CNCTeM BnABJIeHHa BNTOKIB. Ickpo6e3neHi KOMnoHeHTn He Notpi6Ho i3OIOBAtn neped pOboTOIO 3 HMM.
24. PEMOHT ICKPOE3NEUHIX KOMNOHEHTIB
He hanaBAtn iNdyKTHNBHe habaHTaXeHH Ta NoCTiH He habaTaxeHH, He nepeKoHaBwncb, 10 BOH He nepeBnIyO b MaKcMaIbHy HAnpyrTa Ctpym, D03BOJehi DnBnKOpNCToByBaHO O6NaHnH. IckpoBe3neHi KOMnoHEtN E EDINHM, 3 kIMM MoxHa PpaIOBAtn NiD HappyroB B JERKOaMMCTOa ATMocpepi. TectOba CnCTema NOBHHa Matn npabInbHy CNy CTpyMy. 3MiHOBAtn KOMNoHEtN TiIbKn Ha 3aNaCTHn, peKomeHdoBahi Bnp6Hnikom. YactHH, BiDiMH Hi BiD 3a3HaueHHx, MoKyTB npu3BecTu DO 3aImaHH XONOdoAeHTy B atmocpepi nicra BVTOky.
25. ПЮВОДКА
IpebipnEneKtpoBokHyHa npMeT 3HOweHH, Kopo3i, HAdMpHoro TCKy, Biopaqii, roctpnx kpaib a6o Byb-kaNX IHxN 30BhiHix HeratNBHX BnIIIB. Iid Yac nepebipKn TaKox Nam'rTaTI pO HacNiDKn CTapinHra6noocInHy Biopaio, cnpuHHeHy TaKIMNeEmeHTAMN, Jk KomPecOpu NBeHTNJrTopN.
26. BIVBILHIIJIERKO3AIMMCTX XOJIODOHTIB
Hikon He BnKOpNCToBbATn NOTeHcuiH IxKepeNa 3aMHaHH DaBnBHeHH BnTOky XoNoDoareHTy. He BnKOpNCToBnyTe KUCHEBO-BODHeBn NaIbHnk (a6o Byb-ky IHsy CnCTeMy BnRBeHH, Ra Ka BnKOpNCToBye BiKnPte NoLyMa).
27. METOДN BIVBJIeHH BNTOKIB
Дя сntem,як мicтгьлergko3aIMMCTI xonofoareHTN,ВвжаOTbca ринЯTHHmHn HAcTyHni MeToDN BnBJIeHHBA ToKIB. BnKOpNCTOByBaTN eNeKTPOHHI DeTeKTopu BnTOKIB IЯлгko3aIMMCTNX XONOoareHTIB,HaBtЯкоуТПИВICTb MoKe 6ByTN HeOCTaTHbOIO a60 IX Heo6xIDHO BiKaNlIbpyBatn NobTOpHO.(ObnaHannBnBJIeHHMa6 ByTN BiKaNlIbPOBaHBe 30HI,Як He MICTNBxONooareHT.)пepeKoHATSC,цо DeTeKTop He cNOTEHINHM dxepeHOM 3aMAnHH, i SO BI NipXoHITb IЯлб ВнКOPNCTOBYBaHOrO xONOoareHTy.ObnaHannJDA BnBJIeHHBA ToKIB Ma6 ByTN HanaSTOBaHO y BiDCOTkax LFL xONOoareHTy ta MaC 6ByTN BiKaNlIbPOBaHe BiINOBiDHO Do BnKOpNCTOByBaHOrO xONOoareHTy, a TAKOX NiITBepdKyBaTN BiINOBiDHN BiDCOTOK r3y (MAKcUMym 25%). PdINH DЯ BnBJIeHHBAToKIB MOxHa BnKOpNCTOByBaTN 3 bIbSiCTU XONOoareHTIB, ane CnID yHnkATN BnKOpNCTAHHЯ MNouhX 3acO6IB, IO MICTaTB XLOP, OCKIbKN XLOP MOKe BCTynrN B peakuio 3 XONOoareHOM I BnKnikatN Kopo3IO MiHNx Tpy6. Y pa3i nIO3pr BNTIKaHHra3y Heo6xIDHO pRbpaTn/3a-racHTN yci dxepeNa BiNKPIToro NOyM'Я.Kso BnBJIeHo BNTIK XONOoareHTy,Якnotpe6ye 3aBapBOHHB, BnTARHITb BeCb xONOoareHT cIid BuNyHTN i3 cSteMHn a60 i3ONIOBATN (3a DonomorIO 3anobixHnx KnanaHIB) y ToJ qactNIcCTeMH, B JKOI He MaE BnTOKy. Do Ta nId qac cnaIOBaHHra CnID OUYUATN BCIO CnCTeMy a3OTOM 6eKCHIO (OFN)
28. BIDALEHHRA TACNOPOXHEHHRA
BnKOpNCTOByBaTn 3BnuaHni npOeDpyn nIac po6OTn 3 KOHTypom XoNoDoareHTy dIpaemOnTy a6o 3 bJb- koi iHooi npuHH. He3BaXaHouH na ue, BaxJIbBO doTPmByBaTncb hai6e3neHixn x pakTik, ockIbKn Heo6- xiHo 6patn do yBarn 3aMnCTicThpeoBuHH. DToPmByBaTncs HactynHOi npOeDpyn:
BUNyUHTN XOJIOaReH;
- npOdyTN KOHTyp iHePTHM rA3OM;
CnOPOXHHTN KOHTyp;
3HOB npOdyTN KOHTyp iHeptHM ra3OM;
- po3iMKHyTu KOHTyp IJnxom piaHHa 60 naHHa.
3anpaBka xonoloaereHMy 6ytu 3diincheHa y BiDnOBiDiHi BiDHOJIIOBaIbHi 6aJOnH. CnCTemy Heo6xIdno «npocnttN» 3 BVKOpNCtAHm OFN, 06 3a6e3neHTu 6e3neue He BUKOpNCtAHn npCtpoU. MoKlnBO ue npocec NotpiHo 6ytu BIKOHaTu KInbKa pa3iB. Iy niie npoeDpyn He BUKOpNCTOByBaTu CTncHeNe NOBITpr u KInceHb.
Почишня сд вконьатишлхом ii 3anobhenha OFN, noк He 6уde docehytmonpoochy tck,notim Bnuckaнн FOB n atmocpepy i,napeHTi, bntarybaHHdo doocrhenha Bakyym. NOBTOBATn, noKn B cncTeMi He 3aHnWbCg XonoDoareHTy. Pn 3diChenHi KIncEBO rAnpaBHeHH OFN cnCTemy cnd BnnpoxHN T dIg DOcRHeHH 3HaueHb aTMocepHoro TCKy, uO6 3a6e3neuHTn fYHKUioHyBaHH KOHTpy. Lr onepaia 6be3yMOH Heo6xIdHO y pa3i BkOHAA H naHH Tpy6. NepeKoTHsc, lo BnypckHn OTbip BakyMHoro Hacoca He 3haxoDITbcra no6Jnx DkepeT 3aMaHnn Ta 3a6e3neuTn 63nepepBHy BeHTnlaIO.
UK-8
29. INPOUEDYPA 3AINPABJIEHH
Okpim 3BnuaHnX npoceDpy 3anpaBHeHHcIid DoTpmyBaTncb HAcTyHnx BmOr.
IpekoHaTc, 0 npn 3anpaBneHni npnaHy He BID6ydeTBc3MiuaHH p3Hnx xonoaareHTIB. IhaHn a6o TpybMaToB 6yTu kOMORA KOPOTuMM, 0o6 Mihim3yBaTu KINbKicTB 3acTOcoByBaHOrO XonoaareHTy. BaONH MaToB 3haxoDntnc y BepTKaJIbHOMy nIOXeHHI. IpekoHaTc, 0o6 nepei 3anpaBneHHm XonoDoareHtOM cnCTema 6yNa 3a3emHeHa.
Iicna 3anpaBJIeHHaHeCTn eTNKeTky 3 ycima daHIMN (y pa3i II BiDcyTHOcTi).
Bytn obepehHm, 06 He nepeBaHTaxnTcNCTeMy oxoOnjkyBaHHa. Peep 3anpaBneHNm cNCTeMH Heo6xIDHO npeBipTu Tnck 3a Donomoro OFN. Picra 3abepeHHa 3anpaBneHHa, aJe Do BBeDeHHa Eeknpyataio CNTeMy Heo6xIDHO npOBecTu npeBipKy Ha BntiKaHHa. PeepBipKy BnToKy cnid npOBeCTn do nobHoro 3abepeHHa po6it.
30. BIBEDEHHRA 3 EKCPIYATAUII
Ipeed BIKOHaHHM 16i npoeDpyn texHicn CneuiNt OOB'3KOBO Mae NOBHCIO O3HaOMNTnc 3 06-
JaHaHHMa Ta pInHcHmno HOro cyHKioHyBaHH. PekomeHdyEcbc BIKOpNCTOBvBatn cyacHi eFekTbHI
MeToDN 6e3NeuHoro 3bnpaHHxOnoaoareHTIB.Ipeed BIKOHAAHM 16i npoeDpyn Heo6xIDHO 3aJINWHTN
3pa3Kn Macna Ta XOnoOareHTy Ha BInaDOK Heo6xIDHOCTi B aHaJI3i DnA NOBTopHORO BIKOpNCtAHHH BiHOB-
JeHoro XOnoOareHTy. Iepsh HIX po3NoaTHn BIKOHAAPOB 3a6e3neHTn HABHICTb ENEKTPNUHO
eHeprII.
a) O3haHOMMNTnC3 npuJaOM Ta noTo pO6oToI.
b) I3oiIOBAtn eIeKtpuHne XJbJIeHHa CntTeMn.
C) Nepu Hix BnKoHaTn npOeDpy, nepekoHaTncra, lo:
y pa3i noTpe6n 6ynde DocTyHne MexaHicHe oBlaHaHHra TpaHCnOpTyBaHHra 6aNoHIB 3 XoJIOOa- rHTOM;
- Bci 3acobn 3axncty B harnBHOCTI Ta BnKOpNCBOYtbc npaBnJIbHO;
- pOuec NoCTiHNO KOHTpOJIHOETbC KOMnTeHTHOIO OOCoI0;
- 06laɪdɪnHaɪnɪ Ta 6aɪloɪn Biɪnɒbɪdaɪər b tcaɪndapTAM.
d) 3a moxlnbocti BuaanTn XOIOoareHT 3cnTeMn.
e) RaKIO He MOKINBO CTBOPNTN BAKyM, 3a6e3neuHT N haBHCtB po3noiNbOro KOJEKTopy, 106 XoIIOOA-REHT MOKHA 6yTN BuaJIHTN 3 pi3Hx YacTHN CnCTemN.
f) IpekeohaiTeec, 0o 6aioh po3taoBaHn Ha Barax, nepu Hix BkoHyBaTu 36ip.
g) 3aynctntn npocec 3abopy BiinobiHOn 3 IHCTpyKcIyMn BInpo6hNka.
h) He nepenobnOBaTu 6aJIoH. (3aPabTu He 6iJbue 80% o6'Emy piDInH).
i) He nepeBnuCyBaTu MAKcMmaIbHn po6OuN TnCK B 6aJOnHi, HABITb TmUHaCoBO.
j) Kono 6aIohn 6dyb3anOBHehi kOnn npocec 6yde 3aBepseHo, nepeKoHaTncs, 10 6aIohn Ta 6naHn HaHH 3pa3y J Bnlyehi 3 Micu 3anpabHeHH i Bci 3ano6xHi KNaHn Ha 6naDHaHH 3akpiTi.
k) OTPMaHn XoIooaReHT He MoXHa BnKOpncToBbTaN dIa3npabJIeHHra IHWOcNCTeMn nepu HIX BIn 6yde OunueHn Ta nepeBipeHn.
31. HAHECEHHETIKETOK
Ha npnla Heo6xio Hahectu etkeky 3 Bka3aHnM TORO, KOJI BOHO 6yNy BvBeJeHe 3 ekCnnyataui Ta ouHne H BiXoJIOoareHTy. HaecTu DaTy Ta NiDnucTu eTKeKty. IpekoHaTncsI Ho HA npnaI npCyTHI etIKETN, Ha kIX 3a3NaYeHO, 00 BiH MCTITb JERKO3aMmCTN XoJIOoareHT.
32. BIVDALEHNNXOLODOAHTY
Пид ус видаленихолоагentу i3 сnteMH, bdy TO ДЯ ТхнчHOr O6cnyroByBaHn YN BInBeeHn 3 ekcnnyatauii, Heo6xidno 6e3neuho BndaHITn yci xolnoaereHTn. ПпnpeneriueHHI xolnoaoreHTY B 6anOH npekoHaTncs, SO BnKOpNCTOBvOyTBcra Nlwe BiNobDiHbAloHN, npin3naeHi dJr 360py xolnoaoreHTy. IpekoHaTncs, so B HAReBHOCTi e Heo6xIDha KInbKiCtB cUINHdpB dJa BMseHHN NOBHO 3anpaBKn CNTeMH. Bci BnKOpNCTOBVAH bAlONH MaIOb ByTN npin3naeHi dJr BnDAleHORO xolnoaoreHTy 3 BiNOBiDHMn IO3NaueHHAMN (To6To MaIOb ByTN npin3naeHi cNeJIaHbNO DJI BnDAleHNN XOLNOaoreHTy). BaONH MaIOb ByTN yKomNNEKTOBaHI 3anobixHHM KNAHOM, a BiNobHdHI 3anobixHHI KNAHAN MauTb 6byTN B cnpabHom y poboohmy CTahi. IpopoXHi 6aIoHN, npin3naeHi dJr BnDAleHNN, notpi6HO BnOpoxHHN Do CTAHy BAKyyMy Ta 3a MoKJIIBOCti oxoNoHTn nepez 3actocyBaHHM. ObnaHaHHN dJI BnDAleHNN MaE 6byTN B cnpabHom y poboohmy CTahi 3 HApom IHCTpyKsi, kRmMae 3hAxOnHTbcra NiD pyko, ta NiXoHTN dJI BnDAleHNN JERKOaIMNC-THX xolnoaoreHTB. Kpim TOrO NiD qac zuie opeaui, MaE 6byTN DOctynHM HaBP BiKaIIbPoBaHnx TA nobHicTHO pobochx Bar. UHaHn abo Tpyb MaOTb 6byTN OchaSeHi rePMeTuHMM WBNkOPo3HIMHMN 3'EDHyBaayAmn B cnpabHom CTahi. Iepw HIX BnKOpNCTOBvBATn pInCTpiJ dJa BnDAleHNN, nepeBipuTn, YI 3haxOnTbcB BinB 3aIOBilbHOMy pofooyom CTahi, YN BnKohyBaIOsc Noro HanexKHe O6cnyroByBaHn Ta YI rePMeTu3OBaHI BiIOBdiH eJeKtpnuHi KomNoHENTn dJI 3anobirahnn 3aropHHO y pa3i BNtOKy xolnoaoreHTy. Y pa3i BInHKHeHHa CmHIBIB 3BepHyTncd BOpo6Hka. BnDAleHNI XOLNOaERHT Heo6xIDHO NobepHyTn noCTaaylbHnky
xonoaoarentb y BiinobinHomy 6aohoi, npn3naeHomy dnn 360py, 3doabaHm CynpOBOyBaHoro aKty npo nepeaduy Bixodib. He 3miuBatn xonoaoereHTN B npcTpo i nra BuaJeHH Ta ocobnbo B 6aNohax. Raio kOmnpecopn abo kOmnpecopni Macna Heo6xidHO BuaJNTn, nepekoHaTNC, 0o BOH BuOpoxHei Do npnHrTHORo pIBn I JERKO3aMnCTn XonoaoareHT 3MiuaHo 3 MaCtIOM. Ppoec BuaJeHH Notpi6ho 3diChNTn DO NOBepHeHH KOnnpecopa noctaunBuHKy. Dn npckopeHH zboro npoucey BuKOpncTOByeTbcr NIIwe cncTeMn eNeKtpnHOro HarpBaHH KOpNcy KOnnpecopa. BuaJIHTn 3 CnCTeMn Macno 3 DotpMaHHm npabIn 6e3neKn.
1 -ОПИС ПИЛАДУ
1.1 - INPEJIIK HADAHNX KOMNOHEHTIB (Pnc. 5)
PpnaIaNoCTaHaetbCnHINBIDyAnbHOynakOBaHnB KApToHHyynakOBky. YnakOBky MoKHa nepeHocHTn BpyHy DbOMa OcObAMn a6o 3aBaHTaXHTn Ha Bi3OK.

36epiaume ynaokky okpmo; He yknadamu cmonkamu.
- Hnyka Tpy6a dna BnBOy NOBITpR (peKIM OXIOJDKeHH Ta aBTOMATuHn peKIM)
- KoneKTOp IJI rHyUKOITpy6n, BCTaHOBJeHn Ha npnnadi
- Konektop Дягунков Труб Дя noctиюi fiikcauii/Slider
- P03CyBHH npntpi dna pfikcaui Ha po3cyBHOMy BIKHI/poNETax
-
KoneKTOp dIy yCTaHOBkn Slider/Ha BIKHi
-
Φηαneζν ἔπη NOCTIΗΟ MONTAXγ
- Tpy6a nIy BnIaJIeHnKoHdeHcAty (NIIwE y pexmI ocUsyBaay noBITpr)
8-9. 13074i jycaHOBk Slider
10.Дюбенидяфпанцдя noctiHoiyoCTaHOBKn - NylbT DnctaHuiHoro KepyBaHHa
- Inctpykui
13.ДоаТКOBиФINbTp(TINbKNДЯнаданx MoDEJIeN)
1.2 - ПОЗHAUCEHЯ OCHOBHIX VACTINH
- NaheJIb KepyBaHHa
- Peuitka Bnucy knoBITpr
- Φπbtp nobitpr 3 pewiTkoio
- Kpnuka dnia 3nBy KOHdeHcAty (y pa3i TpaHCnOpTyBaHH, O6CnyroByBaHH yu HAdMipHorO ckyuHHeHH BOdi)
(Pnc.A)
- Bxid nobitpr
- Buxi nobitpr
- Puyka dans nepemieHHa
- Kpnska 3nBky KOHcHcAty (niD yac BnKOpNCTAHRA kOcyuBaay noBITpy)
- DAtyHK iHpaepBOHO rHany nyIbTy
A
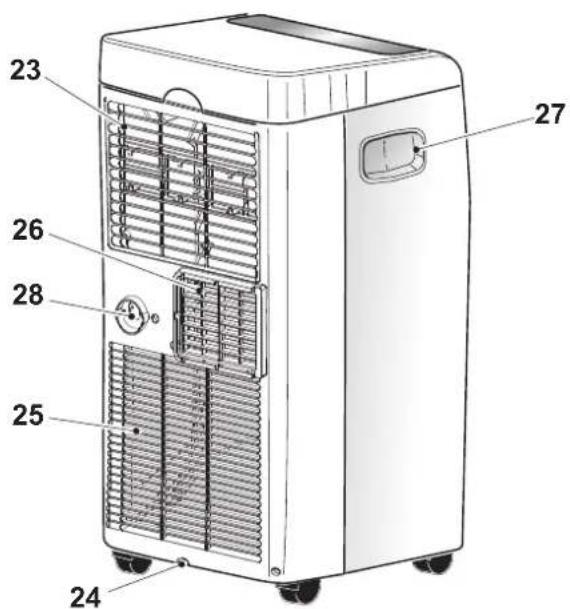
UK-10
2 - YCTAHOBKA
2.1 - TPAHCIOPTYBAHNNI PUNJADY

Ipunad Heo6xio mpaHcnopmyamu ma nepemiuyeamu y eepmuKaIbHomy noJIOKeHHI.
- pa3i mpaHcnpmyeaHH e 2Opu3OHmaJIbHOMy noJoxeHHI 3auekamu npuHaUMHI zoDuHy neped noemopHm 3anyckom.
- Ipeod nepemiueHHa6o mpaHcnpmyeaHHaM npuady noBicmIO 3nuim KOndeHcam, buKohabwu dii, onucahi e napaaepi 3.4.a

NONEPEDXEHH
Bemiuyeaann npunaoy no denikamHum nidnozam (Hanpuknad: 3 depeuHu):
PobHicmIO 3Jumu KOHdeHcam.
Oco6nueo yeaxno nepemicmum npunad, ockibku koneca moxymb nomimum nio2y. He3eaiaouu ha me, uo koneca eueomoehei 3 kopcmko0 mamepiany, ma o6epmaombcra, moxymb 6ymu nowkodxehi nd ac uokopucmanna a6o 3a6pydnehi.
Pekomehodycmbcnpebipumu, yu koneca yucmi ma bilbno pyxaombcn.
2.2 - NOPEДЖEHЯ

Hedompumahnna hacmynhux pekomehdaui Moke npu3ecmu do nowkoxdxehn npunady.
a. YctaHOBHTn npJnaH na pIBHni CTiKiNOBepXHi Na NiINo3i.
b.ПдклочаТnpипад TiЛькДо 3a3eMЛeHnx po3eTOK.
c. Ipekeohatncs, 00 wtopn uHsi npedmetn He 6IokyIOTb notik nobitpr (Pnc.7).
d. IpeBipuHnHaBhicTb MImaIbHoI BiIcTaHI 50 cm mix npuaom Ta cyciHIMnpedmTaMn (Pnc.B).
e. Pnnaad cIi3aBKnBnKOpNCToByBaTn, nepekoHaBunCb, 0 HeMaE nepeWKO dIg BXOy Ta BNnyCKy NOBITpR.
f. PpnaH He MoXHa BnKOpncTOBbATn y npMiuEHHx, ObnaHaHnx IpaHHa.
g. BcTaHOBIOBAtn npnaT iJbKn B cyxnx npmiueHHx.
h. IpnnaH Me MoXHa BnKOpncToBbATn B npcyTHoCTi He6e3neuHnx MaTepiJIIB, napIB a6o piJINH.
i. OunuataH NOBITpHi fJIbTpH npHaMHi pa3 Ha TnKDeHb.

2.3 - YCTAHOBKA 3 MOBJIbHOIO ΦIKCALIEIO
PpnilaH Heo6xidHO yCTAHOBHTN y BiINOBiHNOMy cepeOBNU.
PekomeHnyetcb 3MeHunTu COHnue BnnpomIHOBaHHra 3a DonOMoroIO BIKOHnU, UTOP, XaJIIO3i, TpIMaTn DBepi Ta BIKHa 3akpITmN.
a. Po3mictnTnpnnaD npeB BIKHOM qn DpaHcy3bKIMN DBepnma.
b. Ппесдати КОЕТOP npида (2)do rHyckoi Tpy6kn (1)як Ha Puc.8.
c. Po3mictnTn KOJIeKTop (3) Ha iHJOMy 6oCi rHyKOiT py6Kn (1) (Pnc. 8).
d. BcTaBnT KoNEkTOp npuJa (2) Do hacaKn BVbOy nobiTpra 3 npuna (26) Ka Ha Pnc.9.
e. Po3mictntn KOlektop (3) TakIM YHOM, 06 BBOIDNTN NOBITpR 3OBHI (Pnc.10)
f. RaIIO npINaI MOHTyEbCra Ha po3CyBHe BIKHO (BepTKaJIbHe YI rOpN3OHTaJIbHe) a6o Ha pOneTaX, dIa 6InbIo eFekTnBHOCTI MoKHa BnKOpNCtATu [SLIDER KIT] (4), kMn HAdaETcB R KomnJIeKTI.
3.5 - PEXKIM BEHTNJRAI (FAN)
a. Y cybomy pekimi npnilad He BnnaBac Ha TemnepaTpy uHa BOIORY nobITpr cepedobu, a IiuepiDTPmUe Horo uPKyJauio.
b. Ley pekim moxha obaTn, HATNCyBnHa KhoNky B3 nn SW2 doKn Ha dinCnei naHeni KepyBaHH He 3'ABNTbc CmBOJ NIIe BEHTnIaTOPa a Ha nyIbTi dncTaHoiHoro KepyBaHH He 3'ABNTbc CmBOJ D6.
c.Пдчс рбOTи u cybOMy peKIMi BHytrHmBENTnIaTOp 3aBXnI npaIOc, TOMy MoXHa Bn6paTn 6axaHy WbNdkicTB (Ntwe 3a DonomoroIpynbTa dncTaHuiHoro KepyBaHH), HATNCHyBUn KhoNky B3 (CmBoJ D7 Ha NpblTi dncTaHuiHoro KepyBaHH).
3.6 - PEXKIM OXOJIOxYBAHHa (COOL)
a. U cybomy pejimi npnlaocyu ta oxoOnkye cepenobuie.
Cen pexm moxha obaTn, HATNCyBn Ha KhoNky B2 a6o SW2 nokn Ha dinpnei nyIbTa Ta naHeJI KepyBaHH He 3'ABNTbcnMBOJ NIIwe OxonoDkeHH ( /D3)
b. BnytpiHn BEHTnIaTOp 3aBKn npauoE Ha aBTOMaTuHni WbnKocTi a6o Ha o6paHni WbnKocTi (MOxHa Bn6paTn Nnwe 3a DonomoroIO nyIbTa DnCTaHciHOrO KepyBaHH).
c. 3a anahe 3haeHHa TemnepaTyPi (HaIaIbObaHa TemnepaTypa) MoXHa peryIIOBAtu BiD 17^ do 30^ (BiD 62 Fdo86F npn HABHOCTi) 3 KOINBaHHm y 1^ 3a Donomoro B11 a6o SW3/SW4. Lc e 3haeHHa 3'ABJIETbcraK HA Nylti DuctanHOrO KepyBaHHa, TaK i Ha dncnneipnnaNy.
d. Iicn3 XbHIN (MaKcHMaJIbHO) 3 MOMeHTy aKTtBaUcII cIbOro peKIMy KOMnPecOp nouHae npaIOBAtn, a 3 npunady BxOoNTb XOnoDHe nobITpr.
3.7 - PEXKIM OCYUSEHHA NOBITPR (DRY)
a. Léi pexk mokhna Bn6paTn, HATNCKAHOu B2 a6o SW2 nOKn Ha nybTi dncTaHIO KepyBaHH Ta Hdncnne i naHJI kepyBaHH He 3'BBNTbc IINe CmBOJ OcyuBaHH NOBITpr (D/D4).
UK-15
b. LcH peKIM CxOKN 3 peKIMOM OXONJyBaHHa, OKPIM: He MoKHa Bn6paTn WBNikCTb BeHTnIaTOpY (HaJaWToBaHa TempePaTpa), Ra Ka HanaWTOByeTbcra Ha «Tamb» (KimHaTHa TempePaTpa).
c. Y peximi I nIe ocuybHa noBITp MoKHa BnKOpNCTOByBaTn npIaD I nIe 3 Tpy6koIO dIra 3JIHy KOHdeHCaty (12) Ta 6e3 Tpy6Kn dIra BnBOdy nobITp.
3.8 - PEXKIM «AUTO» (aBtOMaTnUHn)
a. LcH peKIM MOXHa Bn6paTn, HATNCKAoun B2 a6o SW2 noKn Ha npNbTi nucTaHIO KepyBaHH He 3'ABNTBCr CmBOJ ABTomatuHORO peKIMy (AUTO/D2).
b. Y cybomy pexkmi npnlaabTOMATUHO hanauToBye OXOJIOJXEHHra Ta BEHTNIAU3aHexho BID Tempeatypn cepedOBuua, kna NoCTiHo KOHTpONHeBcIg nOtpmAHH MaKcMaJIbHoro KOMΦopTy.
3.9 - HICHIN PEXKIM
a. LepexMM MoxHa o6paTn Iiue 3a donomoroio npIbTa dncTaHoiHoro KepyBaHHa, HATNCKAIOUHN KHONKY B4, KOJI Na hdcnnpei 3'ABNTbcra CmBOn D11; pexMM MoxHa BkOpNCTOByBatn pa3OM JInwe 3 peXHMOM OXoIoQyBaHHa Ta 3 ABToMaTHuHIM peXHMOM.
b. Konin npinad npaioe y cboMy pexkmi, BHytpiHni BeHTnIaTOp nepemkaetbca Ha aBTOMaTHHy WBNKicTB, a HanaTobHa TemnepaTypa cepedOBuHa aBtOMaTHNo 36JIbUyETbcra Ha 1^ nicra 1/2 roDHH Ta Ie Ha 1^ nicra 1/2 roDHH (3 MOMeHTy AKTNBaui pexkmy Ta 3MiHn HanaTobAoHoi TemnepaTypn).
c.Пися 7 roDIN abTOMaTHUHO NOHOBnHOETbCЯ NOaTkoBa TemnepaTypa.
d. KOnn HanaTobAHa TemnepaTpa 3miHIOeTbCra 3a DonomoroIO NylbTa DnCTaHcHOro KepyBaHHa a6o KOnn npnIad 3haxOHTbcra y pexmimi «Stand-by», a6o KOnn BUNKa BNTaRHyta 3 po3eTK, HiHN peXm DeakTNByTbcra.
e.ДЯdeakTnBaui pexmy Heo6xioHO 3HOby HaTnchTy KhoNky B4.
3.10 - PEXKIM «TIMER»
a. LcIeI pexkIM Do3BOJLJe nporpaMyBaTu yBIMKHeHH Ta BIMKHeHH npNJaNy.
b. Yac 3aTpumkmoKHa HalaTuBaTn 3a DonomoroIyIbTa nCTaHuiHOro KepyBaHHra.
3.10.a - 3anporpamObaHe yBimKHeHHn npuJa
Bn6paTn pexm, 6axaHny temnepatyp Ta uBnKicTB BeHTnJrTopa, kki 6ydyb aKtNBoBaHi niD yac 3anporpamOBaHO rYbIMKHeHH.
a. HatnckauOy B9, HanaWtByBatn 6aKaHy 3atpumky (BID 0,5 do 24 roDnH), nicra koi npnaI noHe npauoBatn (BID MOMeHTy NiTBePdKeHH TaMepa).
Jku npotrom 5 ckyHn He 6ynde HATNCHyTO KOHOI KHONK, yHKui HaJaUHTyBaHHa TaMepa aBtOMaTNUHO DeAKTNByETbcra.
b. KOnB CToHOBJIeHn Yac MMHe, npuIaYbIMKHeTbcra 3 OCTAHIMN BbpaHIMN HaJauSyBaHHaMn.
c. 06 de3aKbByaTn 3aTpMkY, Heo6xioHO 3HOy HATNCHTN KONky B9 do HanaTsyBaHHNo3HaueHHr 0.
d. Amikor az idóztó aktív, a tívárványítán a D14 jel világít, mig a WIFI csatlakozás nélküli gépeken az S2 LED gyullad ki.
3.10.b-3anporpamObaHe BmKHeHH npuJaIy
a. Y 6ydb komy peximi po60n npnaNy haTncHyB8 nna HanaWtYBaHHa 6axaHOi 3atpumkn (BiD 0,5do 24 roHN), nicra yoro npnaad BmKHeTbcR (BiD MOMHTy niTBePdKeHHa TaMepa).
Yci HAcTyNHi HaTnCKaHHK HonKn B8 36iJIbSyIbTb 3aTpIMKy Ha 1 roDInHy.
b. RaKIO npOTAROM 5ceyHHe 6yeHaTNCHYoKOHOI KHOKN, cyHKUHaJIaHTyBaHHa TaMepa aBTOMaTHHO DeAKTNByETbcra. KOJI BCTAHOBJIeHN Yac MNHe, npNJaD BUMKHETbcra.
c. 06 De3akTbByBaTN 3aTpMky BmKHeHH, Heo6xioHO 3HOy HATnCHyTN KONKy B8 do HaJauTyBaHH no3HaueHH O.
d. Amikor az idózító aktiv, a távirányítón a D13 jal világít, mig a WIFI csatlakozás nélküli gépeken az S2 LED gyullad ki.
3.11 - HAJAHTYBAHNA ODNHHU BIMIPIOBAHHA TEMNEPATUPN
Ondohache HaTnckahhhKhoNOK SW3 SW4 npoTrom 3 cekyHddo3BOJle 3miHOBaTu OmHnUoBmipBoHHa TEmnepaIpyu, no3haueHy ha dncnnei npnaLy 3 rpaucicB LcJIbC1r (^) Ha rpaucn APAEHFEITA (F) Ta HABnKn.
UK-16
3.12 -IHSSIPEXKIMN
3.12.a - PeXKIM «FOLLOW ME»
- LcE peKIM MOKH aKTbByBaTn IIne 3a DOnOMoTO yIbTa dNCTaHciHoro KepyBaHHra.
- Lép épxkM He cymichn 3 pexkmom Ocyuehn nobitpr (DRY) ta Behtnlaii (FAN).
U cybomy pexkmi npblT dncTaHuiHoro KepyBaHHaIe kTepMOCTaT.
a. Kolni npnilad npauqoe HATNCHTN KHOKNKy FOLLOW MEHa npblti dncTaHnHoro kepyBaHHra.
b. B3rtn nylt Ta BiDn Tn Bi npnay (Ha makcmaIbHy BiIcTaHb 7-8 MeptB), HnpaBnT nIyt Ha npnaTa nepeBipu Tn BiCyTHicTb nepekoJ.
c. 3a donomoroio nyibTa obpatn 6axaHny Temnepatypy; npnaad 6yde npauoBAtn do TOrO, kdoBeTeMnepatypy y 30Hi po3miueHHra nybTa Do hanaustobahoTtemnepatypu.
d. IyIbT BiIDnpabnE CnHaN Ha npHa i kUo He OTPMaE BiINOBiNb npOTaROM 7 XBUNH, pEXIM DeAKTNByETbcra.
e.ДЯ BUMKHeHHHaTnCHyTN Ha KONky FOLLOW ME>Ha nyIbTi a6o BUMKHyTN npuJa.
4.2 - OBCJNYROBYAHNJa
JaKuo npuaad He BnKOpncTOBYeTbC npoTARom TpUbaIoro nepioy, Heo6xIDHO 3po6ntn HAcTyHHe:
a. AKTINByBaTn peXm IInIe BeHTnlaqii npotrrom DeKiIbKOx roDHH (npi6JI3HO 1-2 roDHH) oO6 BnCyuHTN BHyTpIshI yacTHHn npinady.
b. 3yinnHnTn npnnaT Ta BiKnIOChTu XNBJIeHHa.
c. OuNTnTn fIbTp nOBiTpr.
d. NobHicTIO 3NITKoHdeHcT.
e. BnHrTn 6atapeKn 3 npbTa nctaHuiHoro KepyBaHHra.
Ipebeipka nepei noBToPnHm 3aynckom npnilaNy:
a. Pnicra Tpnbano npoctoo KOHNIOHepa OOHTn fInbtpn.
b. IpeBipntu BiicyTnicThpeewkoD y OTbopax dna BxOdy Ta BxOdy nobitpr (ocobno nicra Tpnbaloro nepioody npoctoo npnla).
UK-18
4.2.a - 3πιν KOHДeHcAty
KoN KOHcAT y HxhMbmy iDOnHi Docrae no3HaHeHoro pIBn, lyHae 3BykOBn cunHan «beep».
YuBomy pa3i:
a. BnHrTn BnJky 3 pO3eTKn.
b. 06epexno nepemictn npnna y noJoxHeH, npuaThe dIy 3NBy BOn
c. 3HrTn KpnsKy 3InBy (24) Ta rymoBy npo6ky (24a) (Pnc. 22).

IpekehAmucy KoepkmHomy po3miueHHi KpuuKU dna 3ano6izahnEumoky 6odu.
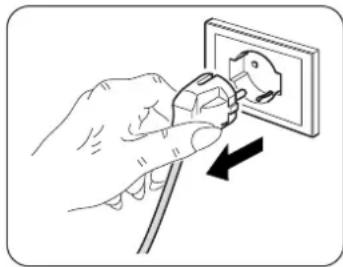
d. 3nTynyOBOy.
e. BcTaNTH Ha Micce rymOby npo6ky (24a) Ta 3akpyTNk pniuKy 3nBy (24)(Pnc. 23).
f. BctaBntn BNlky B po3eTky.

Jkuo nomulka noemopioembc, 3eepymca do uehmpy ocbnyoeyeaHn.
4.2.b - Kodni nomnloK
IiD yac po60Tu npunady mokytb BnHkaTu HecnpabHocti, kki np3BODy TB DO 3ynHKn po60Tu. Y cbomy pa3i Ha ducnle i naHeni kepyBaHHa 3'ABnEeTBcK KO nOMnIKN.
P1 3anOBHeHn HxKHi NiDIOH.
Fi OunueneHn fiNbtpy.
E1·E2·E3·E4
YuBomy pa3i:
a. BiiKJIIOUHTI npnnaB BiD KINBneHHA
b.3auekaTn Deeklbka XbInH
C. BCTABNTU BUNKy Do pO3eTKN
d. nepe3anyctnT npuiJa.

Ku npo6nema ma k od nomunku He 3Hukaomb, iDknoumu npunaed iD xueenna ma 3eephymcdo uehmpy o6cnyoeybaHH.
5 - TEXHIUHA IHΦOPMALJI
Ipy OtpmamHnTexhiHOi HOpMaui DInBntncs EtnkKTo 3 Ta6niuKo, Ra 3HaXoDntbcn Ha npna (Pnc.2).
3.5 - BLAESERFUNKTION (FAN)
This symbol on the product or its packaging indicates that the appliance cannot be treated as normal domestic trash, but must be handed in at a collection point for recycling electric and electronic appliances. Your contribution to the correct disposal of this product protects the environment and the health of your fellow men. Health and the environment are endangered by incorrect disposal. Further information about the recycling of this product can be obtained from your local town hall, your refuse collection service, or in the store at which you bought the product. This regulation is valid only in EU member states.