
MSG-12 - Food Dehydrator MPM - Free user manual and instructions
Find the device manual for free MSG-12 MPM in PDF.

| Product type | Food dehydrator |
| Brand | MPM |
| Model | MSG-12 |
| Tray dimensions | 31.5 × 29.5 cm |
| Temperature range | 35°C to 75°C (adjustable in 5°C increments, plus FA mode fan only) |
| Timer | From 30 minutes to 36 hours (in 30-minute increments) |
| Operating mode | Hot air with fan |
| Number of trays | Multiple trays included (removable) |
| Tray material | Plastic |
| Housing material | Plastic |
| Power supply | 220-240 V, 50/60 Hz |
| Power cord length | 1.18 m |
| Maintenance | Trays and lid washable with warm water; do not wash in dishwasher. Wipe base with a damp cloth. |
| Safety functions | Automatic shut-off after timer; do not immerse base; supervision during use |
| Recommended uses | Fruits, vegetables, herbs, mushrooms, meat, fish, flowers |
| Storage of dried foods | In airtight glass jars, away from light, between 5 and 20°C |
| Cleaning | Clean after each use, dry thoroughly |
| Non-slip feet | Yes |
Frequently Asked Questions - MSG-12 MPM
User questions about MSG-12 MPM
0 question about this device. Answer the ones you know or ask your own.
Ask a new question about this device
Download the instructions for your Food Dehydrator in PDF format for free! Find your manual MSG-12 - MPM and take your electronic device back in hand. On this page are published all the documents necessary for the use of your device. MSG-12 by MPM.
USER MANUAL MSG-12 MPM
EN We wish you satisfaction from using the product and invite you to check a wide range of other MPM appliances.
natural_image
Clear multi-tiered industrial steamer with digital display (no visible text or symbols)cz NAVOD K OBSLUZE 3
DE BEDENUNGSANLEITUNG 9
EE KASUTUSJUHEND 15
EL EXEIPATIO XPH21E 21
EN USER MANUAL 25
ES MANUAL DE INSTRUCCIONES 34
FR MANUEL DE L'UTILISATEUR? 20
HU HASZNALATI UTASITAS 46
IT MANUALE D'USO 52
LT VARTOTOJO VADOVAS 58
LV LIETOTAJA ROKASGRAMATA 64
NL GEBRIJIKERSHANDLEIDING /C
PL NSTRUKCJA OBSLUGI 76
RO MANUAL DE UTILIZARE 82
RU АНСТРУКЦИПО ОБСЛУЖИВАНИЮ 88
SK POUZIVATELSKA PRIRUCKA 94
UA ПОСІБНИК КОРИСТУВАЧА 100
MPM and S.A.
POKYNY TÝKAJÍCÍ SE BEZPEČNÉHO UŽÍVÁNÍ
natural_image
Exterior view of a multi-tiered stainless steel steamer with digital display (no visible text or symbols)TECHNISCHE DATEN
natural_image
Exterior view of a modern stainless steel steamer with a digital display (no text or symbols visible)natural_image
Exterior view of a modern stainless steel steamer with multi-tiered heat exchanger (no visible text or symbols)TEXNIKA ΣΤΟΙΧΕΙΑ
Read the instructions carefully before use.
Take special care when children are near the device.
Do not hang the cable on sharp edges or allow it to come into contact with hot surfaces.
Always remove the plug from the mains socket when not in use or before cleaning.
▶Never use a damaged device, including one with a damaged cord or plug, in which case have it repaired at an authorised service centre.
Do not use the device for purposes other than those for which it was intended.
Do not immerse the device, cable or plug in water or other liquids!
Do not leave the device unattended during operation.
Do not place the unit near walls, curtains, drapes, etc. during operation.
Do not place anything on the lid of the unit.
Remember to always switch off the device first before removing the plug from the mains socket.
Do not place the device near other electric cookers, burners, ovens, etc.
- Avoid placing the unit on metal surfaces.
The device is intended for domestic use only.
To disconnect the unit from the power supply remove the cable plug from the mains socket.
This equipment may be used by children of at least 8 years of age and by persons of diminished physical, mental capacity and lack of experience and knowledge of the equipment if supervision or instruction is provided regarding the safe use of the equipment so that the hazards involved are understood. Cleaning and maintenance must not be carried out by children unless they are at least 8 years old and are supervised. Unsupervised children must not carry out cleaning/maintenance.
Children must not play with the device.
Do not use the device outdoors.
The equipment is not designed to operate using external timers or a separate remote control.
Keep the device and its cord out of reach of children under 8 years of age.
Do not pull the plug out of the power socket by pulling the cord.
Do not connect the plug to the power socket with wet hands.
Do not cover the ventilation openings in the appliance cover during operation.
For the safety of children, please do not leave freely accessible parts of the packaging (plastic bags, cardboard boxes, polystyrene, etc.).
Check that the power parameters on the device's rating plate correspond to the parameters of your power supply network.
WARNING! Do not allow children to play with the film. Danger of suffocation!
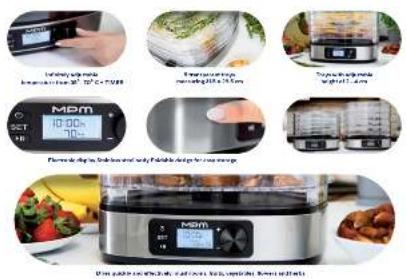
DEVICE DESCRIPTION
- Dryer base
- Anti-slip feet
- Dryer on/off button
- SET button
-
Start/PAUSE button
-
+/- adjustment knob
- Display
- Warm air outlet
- Sieves measuring 31.5x29.5cm
- Dryer cover
BEFORE USE
- Remove the device from the box and remove all protective cardboard and foil.
- Assemble the dryer correctly. Place the sieves one by one on the dryer base (1) and place the cover (10) on the last sieve.
- Connect the device to the mains and run it for about 30 minutes without any products on the sieves.
- After the indicated time, turn off the dryer and disconnect it from the power supply. Wait until it cools down completely and then clean it according to the instructions in the section "CLEANING AND MAINTENANCE"
- Drying food products is an effective way to preserve them.
- Warm air circulates inside the dryer between the cover, the individual sieves and the base of the dryer.
- In this way, all products on the dryer screens are thoroughly dried without losing their nutritional value.
- Thanks to this, you can enjoy fruit, vegetables and mushrooms all year round without adding any artificial preservatives.
- With this device it is also possible to dry flowers, herbs, prepare products for muesli, etc.
STORING DRIED PRODUCTS
- Containers in which dried food products will be stored must be clean and dry.
- The best way to store dried products is in glass jars with tight-fitting lids, placed in a dark and dry place at a temperature of 5^ C- 20^ C.
- During the first week after drying, check the containers in which your produce is stored for moisture. If it is, it means that the products were not completely dried and need to be dried again.
ATTENTION! Do not put hot or even warm products into containers for storage!
USING A DRYER
- Place the device on a flat, dry and even surface.
- Arrange products to be dried on sieves. It is important to install only those sieves in the dryer that will hold the products to be dried. The standard distance between sieves is approximately 20 mm. You can increase the distance between the sieves to approx. 40 mm by stacking the
sieves on top of each other using the inner tongues and the corresponding bulges at the top of the sieves.
ATTENTION! Do not place products intended for drying on the dryer base(1).
- Place the cover (10) on the last sieve placed on.
- Plug the power cord into the wall outlet. The device will beep.
- Turn on the device using the button (3).
- The display (7) will show an example of the time and temperature.
- Press the SET (4) button, the displayed time will start flashing. Set the drying time using the knob (6). Time setting range from 30min to 36h in 30min steps. Then press the SET (4) button again and the displayed temperature will start flashing. Set the drying temperature using the knob (6). Temperature setting range from 35°C to 75°C in 5°C steps. There is also an FA temperature setting at which the heating does not operate, only the fan operates.
- Then use the button (5) to start drying.
- Once work is finished, the device will turn off automatically after a while.
- Disconnect the plug from the power source, wait for the dryer to cool down and then clean it thoroughly (see: "CLEANING AND MAINTENANCE").
ATTENTION! If you do not perform any actions after turning on the dryer, the device will turn off after approximately 1 minute.
FINAL TIPS
- Always wash ingredients thoroughly before placing them in the dryer.
- All types of food products should be cut so that they fit freely between evenly arranged sieves.
- Drying time depends on the properties of the individual products, the thickness of the cut pieces, etc.
- If the products dry unevenly, swap the positions of the individual sieves - move the upper ones to the bottom and the lower ones to the top.
- To prevent fruit intended for drying from turning brown, you can spray it with lemon or pineapple juice.
- Some vegetables or fruits may be covered with a natural protective layer, so the drying time may be longer. To prevent this, you should, for example, peel them.
DRYING FRUITS AND MUSHROOMS
- Wash fruit or mushrooms thoroughly.
- Remove any seeds, rotten parts, etc.
- Divide the fruit or mushrooms into pieces so that they fit freely between the subsequent sieves.
- Fruits or mushrooms should be dried until the desired effect is achieved at a temperature of approximately 55^ C- 65^ C.
DRYING VEGETABLES
- Wash vegetables thoroughly.
- Remove any seeds, rotten parts, etc.
- Vegetables that take a long time to cook require steaming before drying.
-
To do this, place the vegetables in a sieve or strainer and place over a pot of boiling water for 1-5 minutes. Then place in cold water and dry.
-
You can also briefly blanch the vegetables in boiling water for 1-2 minutes, then put them in cold water, remove them and dry them.
-
Dry vegetables at 50^ C- 55^ C.
DRYING HERBS
- It is advisable to dry only young leaves.
- Once herbs have been dried, they should not be stored in paper bags, as the odor and fat will be absorbed by the paper.
- Store in a cool, dark place.
- Dry herbs at a temperature of approximately 40^ C.
DRYING MEAT AND FISH
- Before drying, remove fat from the meat, cut it (preferably into long ribbon-shaped pieces) and then marinate for 6-8 hours.
- Dry continuously until the desired effect is achieved at a temperature of 65^ C- 70^ C.
- Fish intended for drying must be fresh.
- It must be cleaned and all bones removed.
- Then spray it with lemon juice and immerse it in a salt water solution.
DRYING FLOWERS
- For drying, it is best to choose flowers that are not yet fully developed.
- Cut them into pieces.
- Dry until the desired effect is achieved at a temperature of approximately 40^ C.
CLEANING AND MAINTENANCE
ATTENTION! Before cleaning, disconnect the appliance from the power supply, wait until it cools down, and then remove all sieves. Do not immerse the dryer base (1) in water or other liquids.
- Wash the sieves (9) and the cover (10) in warm water with a small amount of detergent. Dry them thoroughly after washing.
- Wipe the base of the dryer with a damp cloth, then wipe dry.
- You can remove stubborn stains by rubbing them gently with a soft brush.
- Do not use solvents, strong detergents or sharp objects as they may damage the device casing.
- Do not wash any dryer parts in dishwashers.
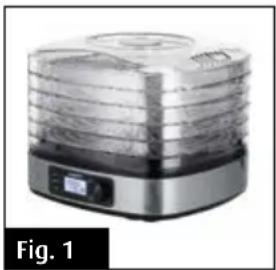
- Store the dryer in the position with the sieves folded (Fig. 1).
natural_image
Exterior view of a modern stainless steel steamer with multiple drying units (no text or symbols visible)TECHNICAL DATA
Technical parameters are given on the product nameplate. Length of power cord: 1.18m

ATTENTION! MPM agd SA reserves the right to make technical changes.
This manual has been machine translated.
Proper disposal of the product (waste electrical and electronic equipment)
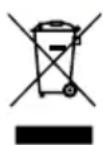
Marking on the product indicates that after the service-life of the product expires, it should not be disposed with other type of municipal waste. Used equipment may have a negative impact on the environment and health of people due to potentially containing hazardous substances, mixtures and components. Mixing electric waste with other types of waste or disassembling those in an unprofessional manner may cause a release of substances that are hazardous to the environment and health.
Used equipment should be handed-over to a point for collection of electric waste. In order to obtain detailed information regarding the electric waste collection points, the user should contact the municipal point of electric waste collection or used equipment processing department.
natural_image
Stacked stainless steel steamer with digital display (no visible text or symbols)DATOS TÉCNICOS
CONSERVATION DES PRODUITS SÉCHÉS
natural_image
Exterior view of a modern stainless steel steamer with a digital display (no text or symbols visible)natural_image
Exterior view of a modern stainless steel steamer with clear lid and control panel (no text or symbols visible)DATI TECNICI
natural_image
Exterior view of a modern stainless steel steamer with digital display (no text or symbols visible)TECHNINIAI DUOMENYS
natural_image
Exterior view of a modern stainless steel steamer with multiple circular trays (no visible text or symbols)TEHNISKIE DATI
BESCHRIJVING VAN HET APPARAAT
WERKING VAN HET APPARAAT
OPSLAG VAN GEDROOGDE PRODUCTEN
natural_image
Exterior view of a modern kitchen appliance with a digital display (no visible text or symbols)DANE TECHNICZNE
natural_image
Exterior view of a modern stainless steel steamer with a digital display (no text or symbols visible)DATE TEHNICE
natural_image
Exterior view of a modern stainless steel steamer with digital display (no visible text or symbols)ТЕХНИЧЕСКИЕ ДАННЫЕ
natural_image
Exterior view of a multi-tiered stainless steel steamer with digital display (no visible text or symbols)natural_image
Stacked stainless steel steamer with digital display (no visible text or symbols)ТЕХНІЧНІ ДАНІ
Legible signature of the buyer