
PS101 - Stapler RAPID - Free user manual and instructions
Find the device manual for free PS101 RAPID in PDF.
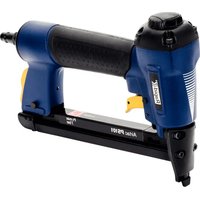


| Product type | Pneumatic stapler |
| Brand | RAPID |
| Model | PS101 |
| Height | 168 mm |
| Length | 225 mm |
| Width | 48 mm |
| Weight without staple | 0.89 kg |
| Weight with staples | 0.90 kg |
| Power source | Compressed air, 1/4\" fitting |
| Working pressure | 5 to 7 bar |
| Maximum pressure | 7 bar |
| Trigger type | Contact trip |
| Recommended staples | RAPID No. 53, No. 140, No. 12 (6 to 16 mm) |
| Magazine capacity | 190 staples |
| Recommended lubricant | Hydraulic oil ISO 46 |
| Sound level (LpA) | 84.2 dB |
| Vibration level | 4.48 m/s² |
| Routine maintenance | Regular lubrication, cleaning with a cloth |
| Safety | Safety glasses and hearing protection mandatory |
| Spare parts | Repair kits A, B, C available |
| Repairability | By qualified personnel or after-sales service |
Frequently Asked Questions - PS101 RAPID
User questions about PS101 RAPID
0 question about this device. Answer the ones you know or ask your own.
Ask a new question about this device
Download the instructions for your Stapler in PDF format for free! Find your manual PS101 - RAPID and take your electronic device back in hand. On this page are published all the documents necessary for the use of your device. PS101 by RAPID.
USER MANUAL PS101 RAPID
PS101 PS111 PS141 (M2)
Rapid
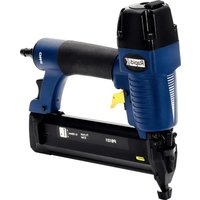
Professional pneumatic stapler DB Professioneller Drucklufttacker FR Agrafeuse pneumatique professionnelle NL Professionele pneumatische tacker IT Graffatrice pneumatica professionale ES Grapadora neumatica professional PT Agrafador pneumatico profissional SE Professionell pneumatisk haftpistol OK Professionel pneumatisk hæftepistol NO Profesjonell pneumatisk stiftepistol FI Ammattilaisen paineilmanaulain PL Profesjonalny zszywacz pneumatyczny RU Профессиональный пневматический степлер
WARNING: Please read the instructions and warnings for this tool carefully before use. Failure to do so could lead to serious injury.
These values are tool-related characteristic values and do not represent noise generation at the point of use. Noise at the point of use will for example depend on the working environment, the working piece, the workpiece support, and the number of driving operations. Workplace design can also serve to reduce noise levels, for example placing workpiece on sound-damping supports.
| Vibration Information (ISO 8662-11:1999) | Vibration | 4.48 m/s2 | 3.21 m/s2 | < 2.5 m/s2 |
| uncertainty | 0.191 m/s2 | 0.206 m/s2 |
This value is a tool-related characteristic value and does not represent the influence to the hand-arm system when using the tool. Any influence to the hand-arm system when using the tool will for example depend on the gripping force, the contact pressure force, the working direction, the adjustment of energy supply, the workpiece, the workpiece support.
SYMBOLS
The following show the symbols used for the equipment. Be sure that you understand their meaning before use.

Read and understand tool labels and manual. Failure to follow warnings could result in serious injury.

Operators and others in work area shall wear impact-resistant eye protection with side shields.

Operators and others in work area shall wear hearing protection.
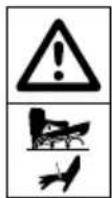
The tool has the capability of operating in contact actuation mode.

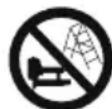
Do not use the tool when you are on a scale, stairs or scaffolds, ladders, or ladder alike constructions, e.g. roof laths, when boxes or crates, when fitting transportation safety systems e.g. on vehicles and wagons.

Never use oxygen, carbon dioxide or any other bottled gas as a power source for this tool.
GENERAL SAFETY WARNINGS
- For personal safety and proper operation and maintenance of the tool, read this instruction manual before using the tool.

- Save all warnings and instructions for future reference.
- The tool is intended to be used for professional application only. Do not use it for any other purpose. It is not designed to drive fasteners directly on a hard surface like steel and concrete.
- The user should assess the specific risks that are present as a result of each use.
- Any other use except for intended use of this tool is forbidden. Fastener driving tools with continual contact actuation or contact actuation shall only be used for production applications.
- Keep fingers away from trigger when not operating this tool and when moving from one operating position to another.
- Multiple hazards. Read and understand the safety instructions before connecting, disconnecting, loading, operating, maintaining, changing accessories on, or working near the tool. Failure to do so can result in serious bodily injury.
- Keep all body parts such as hands and legs etc. away from firing direction and ensure fastener cannot penetrate workpiece into parts of the body.
- When using the tool, be aware that the fastener could deflect and cause injury.
- Hold the tool with a firm grasp and be prepared to manage recoil.
- Only technically skilled operators should use the fastener driving tool.
Do not modify the fastener driving tool. Modifications may reduce the effectiveness of safety measures and increase the risks to the operator and/or bystander.
- Do not modify the fastener driving tool. Modifications may reduce the effectiveness of safety measures and increase the risks to the operator and/or bystander.
- Do not use a tool if the tool has been damaged.
- Do not use a tool if it has been damaged.
- Be careful when handling fasteners, especially when loading and unloading, as the fasteners have sharp points which could cause injury.
- Always check the tool before use for broken, misconnected or worn parts.
- Do not overreach. Only use in a safe working place. Keep proper footing and balance at all times.
- Keep bystanders away (when working in an area where there is a likelihood of through traffic of people). Clearly mark off your operating area.
- Never point the tool at yourself or others.
- Do not rest your finger on the trigger when picking up the tool, moving between operating areas and positions or walking, as resting finger on trigger can lead to inadvertent operation. For tools with selective actuation, always check the tool before use to ascertain the correct mode is selected.
- Only wear gloves that provide adequate feel and safe control of triggers and any adjusting devices.
- When resting the tool, lay it down on the flat surface. If you use the hook equipped with the tool, hook the tool securely on the stable surface.
- Do not operate when under the influence of alcohol, drugs or the like.
- Do not use the tool when you are on a scale, stairs or scaffolds, ladders, or ladder alike constructions, e.g. roof laths, when closing boxes or crates, when fitting transportation safety systems e.g. on vehicles and wagons.
Projectile hazards
- The fastener driving tool shall be disconnected when unloading fasteners, making adjustments, clearing jams or changing accessories.
- During operation be careful that fasteners penetrate material correctly and cannot be deflected/ misfired towards operator and/or any bystanders.
- During operation, debris from workpiece and fastening/collation system may be discharged.
- Always wear protective goggles to protect your eyes from injury when using power tools. The goggles must comply with ANSI Z87.1 in the USA, EN 166 in Europe, or AS/NZS 1336 in Australia/New Zealand. In Australia/New Zealand, it is legally required to wear a face shield to protect your face, too. It is an employer's responsibility to enforce the use of appropriate safety protective equipment by the tool operators and by other persons in the immediate working area.
- The operator shall assess the risks to others.
- Be careful with tools that are not in contact with the workpiece, as they can fire unintentionally and injure the operator and/or bystanders.
- Ensure the tool is always safely engaged on the workpiece and cannot slip.
- Wear hearing protection to protect your ears against exhaust noise and head protection. Also wear light but not loose clothing.
Sleeves should be buttoned or rolled up. No necktie should be worn.
Operating hazards
- Hold the tool correctly: be ready to counteract normal or sudden movements such as recoil.
- Maintain a balanced body position and secure footing.
- Appropriate safety glasses shall be used, and appropriate gloves and protective clothing are recommended.
- Appropriate hearing protection shall be worn.
- Use the correct energy supply as directed in the instruction manual.
- Do not use the tool on moving platforms or the back of trucks. Sudden movement of the platform may cause loss of control of the tool and result in injury.
- Always assume that the tool contains fasteners.
- Do not rush the job or force the tool. Handle the tool carefully.
- Watch your footing and maintain your balance with the tool. Make sure there is no one below when working in high locations, and secure the air hose to prevent danger if there is sudden jerking or catching.
- On rooftops and other high locations, drive fasteners as you move forward. It is easy to lose your footing if you drive fasteners while inching backward. When driving fasteners against a perpendicular surface, work from the top to the bottom. You can perform driving operations with less fatigue by doing so.
- A fastener will be bent or the tool can become jammed if you mistakenly drive a fastener on top of another fastener or strike a knot in the wood. The fastener may be thrown and hit someone, or the tool itself can react dangerously. Place the fasteners with care.
- Do not leave the loaded tool or the air compressor under pressure for a long time out in the sun. Be sure that dust, sand, chips, and foreign matter will not enter the tool in the place where you leave it setting.
- Never attempt to drive fasteners from both the inside and outside at the same time. Fasteners may rip through and/or fly off, presenting a grave danger.
Repetitive motions hazards
- When using a tool for long periods, the operator may experience discomfort in the hands, arms, shoulders, neck, or other parts of the body.
- While using a tool, the operator should adopt a suitable but ergonomic posture. Maintain secure footing and avoid awkward or off-balanced postures.
- If the operator experiences symptoms such as persistent or recurring discomfort, pain, throbbing, aching, tingling, numbness, burning sensation, or stiffness, do not ignore these warning signs. The operator should consult a qualified health professional regarding overall activities.
- The continuous use of the tool may cause repetitive strain injury due to recoil produced by the tool.
- To avoid repetitive strain injury, the operator should not overreach or use excessive force. Additionally, the operator should take a rest when feeling fatigue.
- Conduct a risk assessment regarding repetitive motion hazards. It should focus on musculoskeletal disorders and be preferentially based on the assumption that decreasing fatigue during work is
effective in reducing disorders.
Accessory and consumable hazards
- Disconnect the energy supply to the tool, such as air or gas or battery as applicable, before changing/replacing accessories such as workpiece contact, or making any adjustments.
- Use only the sizes and types of accessories that are provided by the manufacturer.
- Use only lubricants recommended in this manual.
Workplace hazards
- Slips, trips and falls are major causes of workplace injury. Be aware of slippery surfaces caused by use of the tool and also of trip hazards caused by the air-line hose.
- Proceed with additional care in unfamiliar surroundings. Hidden hazards may exist, such as electricity or other utility lines.
- This tool is not intended for use in potentially explosive atmospheres and is not insulated from coming into contact with electric power.
- Make sure there are no electrical cables, gas pipes etc. that could cause a hazard if damaged by use of the tool.
- Keep work area clean and well lit. Cluttered or dark areas invite accidents.
- There may be local regulations concerning noise which must be complied with by keeping noise levels within prescribed limits. In certain cases, shutters should be used to contain noise.
Dust and exhaust hazards
- Always check your surroundings. The air exhausted from the tool may blow dust or objects and hit operator and/or bystanders.
- Direct the exhaust so as to minimize disturbance of dust in a dust filled environment.
- If dust or objects are emitted in the work area, reduce the emission as much as possible to reduce the health hazards and risk of injury.
Noise hazards
- Unprotected exposure to high noise levels can cause permanent, disabling, hearing loss and other problems such as tinnitus (ringing, buzzing, whistling or humming in the ears).
- Conduct a risk assessment regarding noise hazards in the work area and implement appropriate controls for these hazards.
- Appropriate controls to reduce the risk may include actions such as damping materials to prevent workpieces from "ringing".
- Use appropriate hearing protection.
- Operate and maintain the tool as recommended in these instructions, to prevent an unnecessary increase in noise levels.
- Take noise reduction measures, for example placing workpieces on sound damping supports.
Vibration hazards
- The vibration emission during operation depends on the gripping force, the contact pressure force, the working direction, the adjustment of energy supply, the workpiece, the workpiece support. Conduct a
risk assessment regarding vibration hazards and implement appropriate controls for these hazards.
- Exposure to vibration can cause disabling damage to the nerves and blood supply of the hands and arms.
- Wear warm clothing when working in cold conditions, keep your hands warm and dry.
- If you experience numbness, tingling, pain or whitening of the skin in your fingers or hands, seek medical advice from a qualified occupational health professional regarding overall activities.
- Operate and maintain the tool as recommended in these instructions, to prevent an unnecessary increase in vibration levels.
- Hold the tool with a light, but safe, grip because the risk from vibration is generally greater when the grip force is higher.
Additional warnings for pneumatic tools
- Compressed air can cause severe injury.
- Always shut off air supply, and disconnect tool from air supply when not in use.
- Always disconnect the tool from the compressed air supply before changing accessories, making adjustments and/or repairs, when moving away from an operating area to a different area.
- Keep fingers away from trigger when not operating the tool and when moving from one operating position to another.
- Never direct compressed air at yourself or anyone else.
- Whipping hoses can cause severe injury. Always check for damaged or loose hoses or fittings.
- Never carry a pneumatic tool by its hose.
- Never drag a pneumatic tool by its hose.
- When using pneumatic tools, do not exceed the maximum operating pressure ps max.
- Pneumatic tools should only be powered by compressed air at the lowest pressure required for the work process to reduce noise and vibration, and minimize wear.
- Using oxygen or combustible gases for operating pneumatic tools creates a fire and explosion hazard.
- Be careful when using pneumatic tools as the tool could become cold, affecting grip and control.
Additional warnings for tools with contact actuation capability.
- Do not rest your finger on the trigger when picking up the tool, moving between operating areas and positions or walking, as resting finger on trigger can lead to inadvertent operation.
- If this tool has either selective actuation for contact actuation or continuous contact actuation by actuation mode selectors or is a contact actuation or continuous actuation contact tool and marked with beside symbol, intended uses are for production applications such as pallets, furniture, manufactured housings, upholstery and sheeting.
- Do not use this tool in contact actuation for applications such as closing boxes or crates and fitting transportation safety systems on trailers and lorries.
- Warning that the tool shall only be used in safe

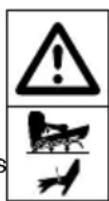
working places.
- Be careful when changing from one driving location to another.
LOADING
- Disconnect the tool from air supply. (Figure 3) Release magazine by squeezing click lever. (Figure 4)
- Loading staples: Turn the gun over. Load a strip of staples into the magazine, with the points upwards. Then shut the magazine by pushing it fully frontwards. (Figure 5)
- Use only recommended fasteners (see technical specifications).
- The tool and the fasteners specified in the operating instructions are to be considered as one unit safety system.
TOOL USE
- Keep tool pointed away from yourself and others and connect tool to air supply. (Figure 1)
- Tools shall be operated at the lowest pressure needed for the application. This will reduce noise levels, part wear and energy use.
- Press the nose of the tool onto the workpiece to be fastened and press the trigger to fire staples. (Figure 6)
Adjust the mini pressure which is necessary for the penetration of the fasteners. Then, make some tests in starting with the lowest pressure.
- Check whether the fastener has been driven into the workpiece in accordance with the requirements.
- if the fastener is protruding, increase the air pressure in increments of 0,5 bar, checking the result after each new adjustment;
- If the fastener is driven into an excessive depth, reduce the air pressure in increments of 0.5 bar until the result is satisfactory.
- You should endeavour in any event to work with the lowest possible air pressure.
- Hold the tool during the work operation in such a way that no injuries can be caused to the head or to the body in the event of a possible recoil consequent upon a disruption in the energy supply or hard areas within the workpiece.
- The tool shall be disconnected from the compressed air system for the purpose of transportation, especially where ladders are used or where an unusual physical posture is adopted whilst moving.
- Carry the fastener driving tool at the workplace using only the handle, and never with the trigger actuated.
- Take conditions at the workplace into account. Fasteners can penetrate thin workpieces or slip off corners and edges of workpieces, and thus put people at risk.
- For personal safety, use protective equipment such as hearing and eye protection.
- The trigger and the safety yoke have to be actuated for each driving operation, with the order of actuation not being specified. For repeated driving operations, it is sufficient if either the trigger remains activated and the safety yoke is activated thereafter, or vice versa.
- Avoid triggering the tool if the magazine is empty.
- Any defective or improperly functioning tool must immediately be disconnected from the compressed air
supply and passed to a specialist for inspection.
- In the event of longer breaks in work or at the end of the working shift, disconnect the tool from the compressed air supply and it is recommended to empty the magazine.
- The compressed air connectors of the tool and the hoses should be protected against contamination. The ingress of coarse dust, chips, sand, etc. will result in leaks and damage to the tool and the couplings.
COMPRESSED AIR SYSTEM
- Proper functioning of the fastener driving tool requires filtered, dry, and lubricated compressed air in adequate quantities.
- If the air pressure in the line system exceeds the maximum allowable pressure of the fastener driving tool, a pressure reducing valve followed by a downstream safety valve shall additionally be fitted in the supply line to the tool.
- Connect the fastener driving tool to the compressed air supply using a suitable pressure hose equipped with quick-action connectors. (Figure 1)
- The compressor plant shall be adequately dimensioned in terms of pressure output and performance (volumetric flow) for the consumption which is to be expected. Line sections which are too small in relation to the length of the line (pipes and hoses), as well as overloading the compressor, will result in pressure drops.
- Permanently laid compressed air pipelines should have an internal diameter of at least 19 mm and a correspondingly larger diameter where relatively long pipelines or multiple users are involved.
- Compressed air pipelines should be laid so as to form a gradient (highest point in the direction to the compressor). Easily accessible water separators should be installed at the lowest points.
- Junctions for users should be joined to the pipelines from above.
- Connecting points for fastener driving tools should be fitted with a compressed air servicing unit (filter/water separator/oiler) directly at the junction point.
- Oilers must be checked on a daily basis and if necessary topped up with the recommended grade of oil (see TECHNICAL DATA). Where hose lengths of over 10 m are used, the oil supply for the fastener driving tool cannot be guaranteed. We therefore recommend that 2 to 5 drops (depending on the loading of the fastener driving tool) of the recommended oil (see TECHNICAL DATA) should be added via the air inlet of the tool, or an oiler attached directly to the fastener driving tool.
TROUBLESHOOTING AND MAINTENANCE
- If a staple jam occurs, disconnect tool from air supply. (Figure 3)
- Release magazine and slide the rail back. (Figure 4)
- Remove jammed fasteners. (Figure 7)
MAINTENANCE:
- While the tool is disconnected from the air supply, perform a daily inspection to ensure free movement of the safety yoke and trigger. (Figure 2)
- All screws should be kept tight. Loose screws can result in unsafe operation and parts
breakage. Squirt 2 or 3 drops of oil lightly into the air inlet.
- Only use the recommended oil as specified in the technical specifications. Keep the tool clean. Wipe it regularly with a dry cloth and inspect for wear. Lubricate the sliding parts of the magazine occasionally to prevent wear.
- Do not use flammable cleaning solutions. Do not soak or use solvents, as such solutions may damage O-rings and other sensitive tool parts. Use clean, dry air. Preferably, use a compressed air processing unit upstream of the tool connection. Repairs other than those described here should be performed only by trained, qualified personnel or by the producer's after-sales service.
SPARE PARTS LIST
Follow local regulations when disposing of the tool.
PS101 Spare Parts list (Figure 8)
| Index A | Art. No | Description |
| A 50 | 01145 | Repair Kit A for PS101 M2 |
| B 50 | 00143 | Repair Kit B for PS101 |
| C 50 | 00144 | Repair Kit C for PS101 |
| 5000145 | No-Mar Pad (bag of 5pcs) |
PS111 Spare Parts list (Figure 8)
| Index Art. No Description |
| A 5001146 Repair Kit A for PS111 M2 |
| B 5000147 Repair Kit B for PS111 |
| C 5000148 Repair Kit C for PS111 |
| 5000145 No-Mar Pad (bag of 5pcs) |
PS141 Spare Parts list (Figure 8)
| Index Art. No Description |
| A 5001147 Repair Kit A for PS141 M2 |
| B 5000158 Repair Kit B for PS141 |
| C 5000159 Repair Kit C for PS141 |
| 5000178 NoMar Pad (x5pcs) |
PNEUMATIC STAPLER PS101 PS111 PS141 (M2)
GENERAL SAFETY WARNINGS
PS101 Spare Parts List (Figure 8)
PS111 Spare Parts List (Figure 8)
PS141 Spare Parts List (Figure 8)
AIR COMPRESSOR GUN PS101 PS111 PS141 (M2)
Colored dust and exhaust gases
When using the tool, follow local
rules.
PS101 Spare Parts List (Figure 8)
GENERAL SAFETY WARNINGS
OPERATION AND MAINTENANCE
GENERAL SAFETY INSTRUCTIONS
- For proper operation and maintenance of the tool, read this manual before using the tool.

- Store all instructions and manuals for future reference.
- The tool is intended for professional use only. Do not use it for other purposes. It is not designed to guide untrained users safely in hazardous situations such as stairs and ladders.
- The user must be aware of the potential risks that may arise during use.
- Any other use of this tool is prohibited. The
COMPRESSED AIR SYSTEM
The tools are designed for work on surfaces.
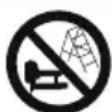
Do not use the tool when standing on a ladder or scaffold, ladder or similar structure; when pulling sanders or chisels; when mounting transport safety systems, e.g. on wheeled platforms and wagons.

Never use the tool with a damaged or cracked disc or other type of bottle for the tool.
SAFETY INSTRUCTIONS
- For your own safety and proper operation and maintenance of the tool, read this instruction manual before using the tool.

- Store all instructions for future reference.
- The tools are intended for professional use only. Do not use them for other purposes. They are not designed for fixing fasteners directly onto hard surfaces such as concrete.
- The user must carefully assess the specific risks associated with each use.
- Any other use, except for the intended purpose of this tool, is prohibited. Tools with contact or non-contact engagement must only be used for production purposes.
6. Keep your fingers away from the trigger when not working with the tool and when moving from one work position to another. 7. Multiple hazards. Read and understand the safety instructions before connecting, charging, operating, adjusting, replacing accessories, or working near the tool. Failure to do so may lead to serious injuries. 8. Keep your hands, feet, and other body parts away from the nozzle and the staple exit, and make sure there is no danger of them being pierced by the staples. 9. When using the tool, be aware that the staple may ricochet and cause injury. 10. Keep the tool in good condition and be ready for unexpected events. 11. Only technically qualified operators should use the tool. 12. Do not modify the tool. Modifications may reduce the effectiveness of safety measures and increase risks to the operator and/or bystanders. 13. Do not discard the instruction manual. 14. Do not use the tool if it is damaged. 15. Pay attention to working with fasteners, especially when driving or removing them, as they have sharp surfaces that can cause injury. 16. Always wear safety glasses when using the tool. 17. Do not overreach. Use only a safe working area. Maintain a stable stance and balance at all times. 18. Keep bystanders away (when working in an area with potential traffic of people). Clearly mark the work area. 19. Never point the tool at yourself or others. 20. Do not place your fingers on the trigger when carrying the tool, moving between work areas, or positioning it, as placing your finger on the trigger may lead to unintended operation. For tools with selective actuation, check the tool before use to ensure the correct mode is selected. 21. Wear only gloves that provide adequate grip and safe control of the trigger and other adjustment devices. 22. When not using the tool, place it on a flat surface. If using a tool equipped with a hook, hang the tool safely on a stable surface. 23. Do not use the tool while under the influence of alcohol, drugs, or other similar substances. 24. Do not use the tool when on a ladder, scaffolding, or similar structure; when closing staples or nails; when mounting transport...
Safety systems, e.g., on wheeled platforms and wagons.
Projectile risks
- The tool must be disconnected from the power supply when inserting fasteners, performing adjustments, clearing jams, or changing accessories. 2. During work, pay attention to fasteners to ensure they penetrate correctly into the material, and be aware that they may be ejected or misdirected towards the operator and/or bystanders.
- Do not work with the tool if there is a possibility of damaging the workpiece. 4. Wear protective glasses to protect your eyes from injury when using the tool. The glasses must comply with ANSI Z87.1 in the USA, EN 166 in Europe, or AS/NZS 1336 in Australia/New Zealand. In Australia/New Zealand, it is legally required to wear a face shield to protect your face. It is the employer's responsibility to ensure the use of appropriate protective equipment by the tool operators and other persons in the immediate work area.
- Risks to other persons are reduced by the operator of the tool.
- Be careful with tools with a contact trip, as they can easily cause an accidental discharge and injure the operator or bystanders.
- Make sure the tool is in safe interaction with the workpiece and there is a risk of explosion. 8. Wear protective equipment for the head and ears to protect against noise from the exhaust collector. Also wear safety glasses, but not loose ones. Gloves must be closed or fitted. Do not wear a tie.
Risk during work
1. Hold the tool correctly: be prepared for any normal or sudden movements, as they may occur. 2. Maintain a stable stance and balance, and keep your body in a proper position. 3. Wear appropriate protective glasses. It is recommended to wear suitable protective gloves and clothing. 4. Wear hearing protection. 5. Use the correct fastening method as indicated in the instructions for use. 6. Do not use the tool on moving platforms or in vehicles. Sudden movement of the platform may cause loss of control of the tool and lead to injury. 7. Be careful not to let the tool come into contact with electrical elements. 8. Do not work with a tool that is damaged or malfunctioning. Work carefully with it. 9. Watch your stability and support.
Be careful with the tool. Make sure there is enough clearance when working at height, and ensure proper ventilation to prevent the risk of fire or explosion.
- When fastening on high places, shoot the fasteners while moving forward. It is easy to lose your footing if you work with the tool pulled backwards. When fastening fasteners onto a perpendicular surface, work from top to bottom. In this way, you will reduce the effort and fatigue.
- The fastener may bounce or the tool may jam if you accidentally shoot directly onto another fastener or into a knot in the wood. There is a risk that the fastener may ricochet and hit someone, or the tool may react dangerously. Fasten the fasteners carefully. 12. Do not leave the tool connected to the compressor under pressure for a long time. Make sure that at the place where you leave the tool, there is no risk of dust, debris, chips, or other particles entering it.
- The fastening elements can be tightened or loosened on the surface from both sides simultaneously. The fastening elements can be turned and/or detached from the surface, posing a serious danger.
Risk of injury from moving parts
- When using the tool for long periods, the worker may experience discomfort in the hands, arms, shoulders, or other parts of the body. 2. Before using the tool, the worker must adopt a suitable and ergonomic posture. To maintain a stable posture and avoid awkward positions or unbalanced postures. 3. If the worker experiences symptoms of persistent or recurring discomfort, pain, throbbing, tingling, numbness, burning, or stiffness, do not ignore these warning signs. The worker should consult a qualified medical specialist regarding these activities. 4. Prolonged use of the tool may lead to repetitive strain injuries or damage to the tool.
- To avoid repetitive strain injuries, the operator should not exert excessive force and should use the recommended force throughout the work. In addition, the operator should take breaks when feeling tired.
- Direct the exhaust air away from the danger zone during operation. It should be directed at the musculoskeletal system, mainly based on the assumption that reducing fatigue during work is effective in reducing injuries.
Possible risks from accessories and consumables
1. Disconnect the tool from the air supply or battery before changing/
Change accessories such as the work surface guide or adjust the tool correctly.
2. Use only accessories recommended by the manufacturer. 3. Use self-lubricating accessories according to the instructions.
Risks of the workplace
1. Slipping, tripping, and falling are the main causes of workplace injuries. Be aware of slippery surfaces, the use of the tool, and the risk of tripping, especially when moving around. 2. Pay extra attention to unfamiliar surroundings and hidden dangers such as electricity or other utilities. 3. This tool is not intended for use in potentially explosive atmospheres and is not insulated for contact with live electrical circuits. 4. Ensure that electrical cables, gas pipes, etc., which could be dangerous if damaged during use of the tool, are avoided. 5. Keep the work area clean and well-lit. Cluttered or dark work areas are prone to accidents. 6. There may be local regulations regarding noise that must be followed, such as limiting the noise level in residential areas. In certain cases, hearing protection must be used to limit noise.
Risks from dust and gases
- Check the environment around you. The air exhaust from the tool may blow dust or objects that could hit the operator and/or bystanders.
- Always wear hearing protection in the minimum required area. Before entering the work zone, remove any objects that may cause noise, and ensure maximum noise reduction to minimize health risks and hearing damage.
Risks from noise
- Exposure to high noise levels can cause hearing damage and other problems such as tinnitus (ringing, buzzing, hissing, or humming in the ears).
- Assess the risk regarding noise hazards in the work area and implement appropriate controls for these hazards.
- Appropriate controls for noise risk may include actions such as "acoustic materials" to reduce the "ringing" of working parts. 4. Use appropriate hearing protection. 5. Use and maintain the tool as specified in these instructions to prevent unnecessary increases in noise levels.
- Take measures to reduce noise, for example, placing working parts on noise-absorbing supports.
Risks from vibration
1. Exposure to vibration during work depends on the grip, the contact force, the work position, the adjustment of the guard, the working parts, and the support of the parts. Assess the risk in relation to vibration hazards and implement appropriate controls for these hazards. 2. Exposure to vibration can cause damage to the nerves and blood supply to the hands. 3. Wear warm gloves when working in cold conditions; keep your hands warm and dry. 4. If you experience numbness, tingling, pain, or whitening of the skin on your fingers or hands, seek medical advice from a qualified medical professional. 5. Use and maintain the tool as specified in these instructions to prevent unnecessary increases in vibration levels. 6. Hold the tool with a light but safe grip, as the risk from vibration is greater when the grip force is greater.
Additional risks when working with pneumatic tools
- The air system can cause serious injuries.
- Always shut off the air supply and disconnect the tool from the air supply when not in use.
- Disconnect the tool from the air supply before changing accessories, performing adjustments or repairs, or when leaving the work area. 4. Keep your fingers away from the trigger when not using the tool and when moving from one working position to another.
- Never point the air system at yourself or at anyone else.
- WARNING: Read the instruction manual before use. Always check for damage or wear of the pneumatic tool.
- Never hold a pneumatic tool by its hose.
- Never disconnect a pneumatic tool from the hose.
- When using pneumatic tools, do not exceed the maximum working pressure (ps max). 10. Pneumatic tools must be supplied only from a system with the lowest possible pressure necessary for the work process, to reduce noise and vibration and to minimize wear. 11. Using oxygen or flammable gases with pneumatic tools is dangerous and may cause fire or explosion. 12. Be careful when using
pneumatic tools, as the tool may become cold and this may affect grip and control.
Additional risks when working with tools with contact activation
1. Do not press the trigger when carrying the tool, when moving between work zones or positions, as an accidental trigger may cause unwanted actions. 2. If the tool is equipped with a selector for contact or sequential contact triggers, or if it is not intended for work with contact or sequential contact triggers and is marked with a special symbol, then the intended use is for applications in the production of nails, staples, or similar.
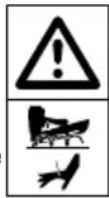
3. Do not use the tool with contact triggers for applications such as closing crates or pallets or for securing loads during transport on platforms or trucks. 4. The tool must be used only in places safe for work. 5. Be careful when switching from one mode to another.
LOADING
- Disconnect the tool from the air supply. (Figure 3) Disconnect the magazine, release the pusher. (Figure 4)
- Loading staples: Turn the tool upside down. Place the staples in the magazine, then close the magazine, release the pusher, and adjust the depth. (Figure 5) 3. Use only the recommended fasteners (see technical specifications). 4. The tool and its connecting elements, as indicated in the operating instructions, must be regarded as a single unit with the safety system.
USE OF THE TOOL
- Point the tool away from yourself and others and connect it to the air supply. (Figure 1) 2. The tool must operate at the lowest pressure necessary for the application. This reduces noise, wear, and energy consumption.
- Press the tool against the workpiece and press the trigger to drive the staples. (Figure 6) Adjust the minimum pressure necessary for driving the fasteners. After that, adjust the depth, starting with the lowest pressure.
- Check that the fasteners are correctly driven into the workpiece according to the specifications:
Check the air pressure in the range of 0.5 bar, then verify the results after each new adjustment; - if the cracks have penetrated the clogged
head, adjust the air pressure in the range of 0.5 bar until you achieve the desired result.
- It is advisable in every case to strive to work with the lowest possible air pressure.
- During operation, hold the instrument firmly so as to avoid slipping of the plate or injury, in case of accidental release of the instrument due to clogging or falling of solid parts from the working tool.
- The instrument must be disconnected from the compressed air system during its transport and especially when using low-pressure hoses, to avoid the risk of unusual physical stress.
- Carry the instrument only by the handle and never by the hose.
- Take into account the working conditions. The clamping elements may be subject to thin working parts or may be damaged by the vibrations of the working parts and may cause injury to people at risk.
- For personal safety, use protective equipment such as hearing and eye protection. 11. The hose and the contact device are designed to be activated at every single stroke, and the sequence of activation is not important. In case of multiple consecutive strokes, it is sufficient for the hose to remain activated and the contact device to be activated after that or vice versa. 12. Avoid activating the instrument when the plates are dirty. 13. Any defective or incorrectly working instrument must be immediately disconnected from the compressed air system and handed over to a qualified specialist for inspection.
- In case of prolonged interruption of work or at the end of the working day, disconnect the instrument from the compressed air system. It is recommended to clean the plates.
- The hoses and connections to the instrument in the compressed air system must be protected against damage. The entry into the system of dust, abrasive particles, debris, sand, etc. will lead to wear and damage of the instrument and connections.
COMPRESSED AIR SYSTEM
- For proper functioning of the instrument, clean, dry and lubricated compressed air is required in sufficient quantity. 2. If the pressure in the system exceeds the maximum permissible value for the instrument, it is necessary to install a pressure regulator, filter, and lubricator, followed by a shut-off valve with full flow to the compressed air source.
- Connect the instrument to the compressed air source using suitable hoses and appropriate fittings. (Figure 1)
- The compressor installation must be properly adjusted with respect to the output
pressure and operational characteristics (capacity) for the expected consumption. The parts that are hard in relation to the hardness of the tube (tube fittings) and the compressor treatment will lead to a drop in pressure.
- The air supply piping must be sized so that the system air flow is sufficient for the tool's air consumption at the recommended diameter, when compared to the actual piping diameter and the number of consumers.
- The air supply piping must be installed so that it forms a slope (the highest point is towards the compressor). The connections must be installed at the highest points and at the highest points of the system.
- The connections for the different operators must be connected to the air supply from the main side.
- Do not connect the tool's inlet directly to the corresponding element, service, or the air supply system (filter/water separator/lubricator).
- The lubricators must be checked regularly and, if necessary, filled with the recommended oil type (see the technical specification). Using a lubricator for more than 10 m cannot guarantee proper lubrication oil supply to the tool. In this case, it is recommended to add 2 to 5 drops (depending on the tool's consumption) of the specified oil (see the technical specification). In the tool's air inlet or for alternative mounting of the lubricator directly to the tool.
TROUBLESHOOTING
1. If the blade is jammed, release the air pressure. (Figure 3) 2. Remove the magazine and pull the blade back. (Figure 4) 3. Tighten the locking elements. (Figure 7)
MAINTENANCE:
1. Disconnect the tool from the air supply, perform daily inspections to ensure free movement of the safety catch and trigger. 2. All screws must be tightened. (Figure 2)
Loose screws can cause unsafe operation and damage to parts. Add 2 to 3 drops of oil into the air inlet.
3. Use only the recommended oil in the technical specifications. Keep the tool clean. Wipe it with a dry cloth and check for wear. Lubricate the moving parts of the magazine from time to time to prevent wear. 4. Do not use flammable cleaning agents. Do not immerse or use solvents, as this may damage the O-rings and other rubber parts of the tool. Use clean, dry air. It is recommended to use
a filter-regulator-lubricator unit in the air supply system before connecting the tool. Repairs and adjustments not described here must be performed only by qualified personnel following the manufacturer's maintenance procedures.
SPARE PARTS LIST
When ordering the tool, follow local regulations.
PS101 Spare parts list (Figure 8)
UK Importer and authorised representative:
ACCO UK Limited
Oxford House Oxford Road
Aylesbury HP21 8SZ
United Kingdom

Isaberg Rapid AB
SE-335 71 Hestra, Sweden
www.rapid.com



- PS101 PS111 PS141 (M2)
- RAPID
- SYMBOLS
- GENERAL SAFETY WARNINGS
- PROJECTILE HAZARDS
- OPERATING HAZARDS
- REPETITIVE MOTIONS HAZARDS
- ACCESSORY AND CONSUMABLE HAZARDS
- WORKPLACE HAZARDS
- DUST AND EXHAUST HAZARDS
- NOISE HAZARDS
- VIBRATION HAZARDS
- ADDITIONAL WARNINGS FOR PNEUMATIC TOOLS
- ADDITIONAL WARNINGS FOR TOOLS WITH CONTACT ACTUATION CAPABILITY
- LOADING
- TOOL USE
- COMPRESSED AIR SYSTEM
- TROUBLESHOOTING AND MAINTENANCE
- MAINTENANCE
- SPARE PARTS LIST
- PNEUMATIC STAPLER PS101 PS111 PS141 (M2)
- AIR COMPRESSOR GUN PS101 PS111 PS141 (M2)
- COLORED DUST AND EXHAUST GASES
- OPERATION AND MAINTENANCE
- GENERAL SAFETY INSTRUCTIONS
- SAFETY INSTRUCTIONS
- PROJECTILE RISKS
- RISK DURING WORK
- RISK OF INJURY FROM MOVING PARTS
- POSSIBLE RISKS FROM ACCESSORIES AND CONSUMABLES
- RISKS OF THE WORKPLACE
- RISKS FROM DUST AND GASES
- RISKS FROM NOISE
- RISKS FROM VIBRATION
- ADDITIONAL RISKS WHEN WORKING WITH PNEUMATIC TOOLS
- ADDITIONAL RISKS WHEN WORKING WITH TOOLS WITH CONTACT ACTIVATION
- USE OF THE TOOL
- TROUBLESHOOTING
Brand : RAPID
Model : PS101
Category : Stapler