KM 70/25 C Bp - Vacuum Cleaner Kärcher - Free user manual and instructions
Find the device manual for free KM 70/25 C Bp Kärcher in PDF.

| Product type | Sweeping vacuum |
| Brand | Kärcher |
| Model | KM 70/25 C Bp |
| Intended use | Cleaning of indoor and outdoor surfaces, professional use |
| Power supply | 36 V battery (Kärcher Battery Power / Battery Power+ system) |
| Battery voltage | 36 V |
| Working width | 480 mm |
| Working width with side brushes | 980 mm |
| Surface coverage (max.) | 3920 m²/h |
| Dust container volume | 45 l (38 kg) |
| Filter type | Pleated flat filter |
| Filter surface area | 0.6 m² |
| Dust class | M |
| Sound pressure level | 51 dB(A) |
| Sound power level | 74 dB(A) |
| Hand-arm vibration value | 2.1 m/s² |
| Weight (empty) | 33 kg |
| Dimensions (L × W × H) | 1200 × 770 × 1070 mm |
| IP protection | IPX3 |
| Ambient temperature | 0 to +45 °C |
| Ambient humidity | 40% to 90% |
| Daily maintenance | Check wear of roller brush and side brushes, function of controls |
| Weekly maintenance | Check filter, mobility of parts, wear of sealing strips |
| Semi-annual maintenance | Check drive belts |
| Spare parts | Roller brush, side brushes, sealing strips, pleated flat filter, belts |
Frequently Asked Questions - KM 70/25 C Bp Kärcher
User questions about KM 70/25 C Bp Kärcher
0 question about this device. Answer the ones you know or ask your own.
Ask a new question about this device
Download the instructions for your Vacuum Cleaner in PDF format for free! Find your manual KM 70/25 C Bp - Kärcher and take your electronic device back in hand. On this page are published all the documents necessary for the use of your device. KM 70/25 C Bp by Kärcher.
USER MANUAL KM 70/25 C Bp Kärcher
natural_image
3D rendering of a cleaning or cleaning machine with yellow brush blades and a gray body (no text or symbols visible)Deutsch 4
English 9
Français 15
Italiano 20
Español 25
Português 30
Nederlands 35
Türkçe 40
Svenska 45
Suomi 50
Norsk 55
Dansk 60
Eesti 65
Latviešu 70
Lietuviškai 75
Polski 80
Magyar 85
Čeština 90
Slovenčina 95
Slovenščina 100
Românește 105
Hrvatski 110
Srpski 115
Ελληνικά 120
Русский 126
Українська 132
Български 138
日本語 144

natural_image
Illustration showing a chemical reaction setup with a flask and a cross-shaped object (no text or symbols)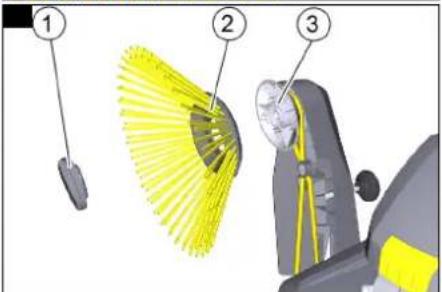
natural_image
3D rendering of a mechanical device with mounting brackets and a yellow label (no readable text or symbols)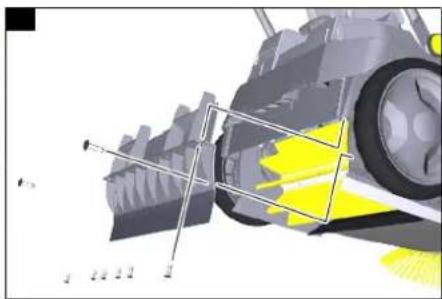
natural_image
3D mechanical assembly diagram showing a car wheel with yellow highlighted components and alignment lines (no text or symbols)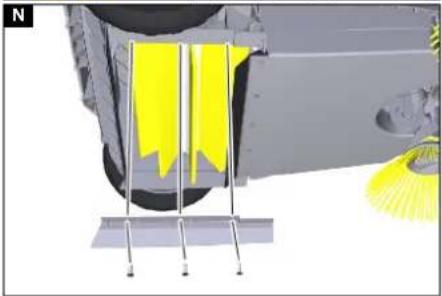
natural_image
3D diagram of a mechanical assembly with yellow ribbons and metal supports (no text or symbols)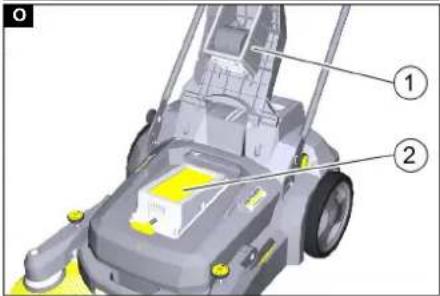
Inhalt
Chairman of the Board of Management

S. Reiser
Manager Regulatory Affairs & Certification
71364 Winnenden (Germany)
Tel.: +49 7195 14-0
Fax: +49 7195 14-2212
Winnenden, 2023/03/01
Contents
General notes 9
Intended use 9
Safety instructions 9
Device description.... 10
Initial startup 10
Operation 10
Shutting down 11
Transport.... 11
Storage 11
Care and maintenance 11
Troubleshooting guide 12
Technical data.... 13
Declaration of Conformity 13
General notes
Read these original instructions and the safety instructions chapter before using the device for the first time. Act in accordance with them.
Keep them safe for future reference or for future owners.
Checking the delivery
Please report any defects or shipping damage identified on the vehicle when it is received directly to your dealer or department store.
Environmental protection

The packing materials can be recycled. Please dispose of packaging in accordance with the environmental regula-
tions.

Electrical and electronic devices contain valuable, recyclable materials and often components such as batteries, re-
chargeable batteries or oil, which - if handled or disposed of incorrectly - can pose a potential danger to human health and the environment. However, these components are required for the correct operation of the device. Devices marked by this symbol are not allowed to be disposed of together with the household rubbish.
Notes on the content materials (REACH)
Current information on content materials can be found at: www.kaercher.de/REACH
Warranty
The warranty conditions issued by our relevant sales company apply in all countries. We shall remedy possible malfunctions on your appliance within the warranty period free of cost, provided that a material or manufacturing flaw is the cause. In a warranty case, please contact your dealer (with the purchase receipt) or the next authorised customer service site.
(See overleaf for the address)
Further warranty information (if available) can be found in the service area of your local Kärcher website under "Downloads".
Accessories and spare parts
Only use original accessories and original spare parts. They ensure that the appliance will run fault-free and safely.
Information on accessories and spare parts can be found at www.kaercher.com.
Hazard levels
△DANGER
- Indication of an imminent threat of danger that will lead to severe injuries or even death.
⚠ WARNING
- Indication of a potentially dangerous situation that may lead to severe injuries or even death.
△CAUTION
- Indication of a potentially dangerous situation that may lead to minor injuries.
ATTENTION
- Indication of a potentially dangerous situation that may lead to damage to property.
Symbols on the device
| Contact pressure of roller brush | |
| Parking position of roller brush | |
| Filter cleaning | |
| Contact pressure of side brushes |
Intended use
Use the sweeper for cleaning indoor and outdoor surfaces.
The sweeper is designed for commercial use.
Only use the sweeper in accordance with the information in these operating instructions. Any other use is considered as improper use. The manufacturer assumes no liability for any resultant damage. The user is solely responsible for the risk.
No modifications must be made to the sweeper.
The sweeper is only suitable for use on the surfaces listed in the operating instructions.
Foreseeable misuse
The device is not designed for driving on slopes.
Never sweep or suction up explosive liquids, gases, non-diluted acids or solvents (e.g. petrol, paint thinner, heating oil) because they form explosive vapours or mixtures in conjunction with the suction air.
Never sweep or suction up acetone, non-diluted acids or solvents, as they will corrode and damage the materials used on the device.
Never sweep or suction up reactive metal dusts (e.g. aluminium, magnesium, zinc). They form explosive gases in conjunction with highly alkaline or acidic cleaning agents.
Do not sweep or suction up burning or smouldering objects.
There is a risk of fire.
Do not sweep up any harmful substances.
The device is not suitable for sweeping up fluids.
Standing in hazard zones is prohibited. Operation in explosive spaces is prohibited.
This device must not be used to push/pull or transport objects.
Suitable surfaces
The device is suitable for the following surfaces:
- Asphalt
- Industrial floors
- Screed
- Concrete
- Paving stones
Safety instructions
⚠ WARNING
The device is not intended for use by children, persons with restricted physical, sensory or mental abilities or persons unfamiliar with these instructions.
△WARNING
Children must be supervised to prevent them from playing with the appliance.
⚠ WARNING
Only use the device for its proper use. Take into account the local conditions and beware of third parties, in particular children, when working with the device.
△CAUTION
Check the device with the equipment prior to each use to make sure it is safe and working correctly. Only use the device when it is in a correct condition.
DANGER
No changes may be made to the device.
△DANGER
Risk of explosion! Keep highly flammable substances away from the device.
△DANGER
Risk of injury! Before carrying out any work on the device, turn the programme switch to "0" and remove the battery.
⚠ WARNING
Risk of crushing and chafing on belts, side brushes, container and push handle.
△CAUTION
Risk of injury! Wear sturdy protective gloves when removing glass, metal or other sharp-edged materials from the dirt receptacle.
Device description
The device requires a 36 V battery pack from the Kärcher Battery Power / Battery Power+ system and the corresponding charger to operate. Both are not included in the scope of delivery and can be purchased separately according to the application requirement.
Information on suitable battery packs and chargers can be found at www.kaercher.com.
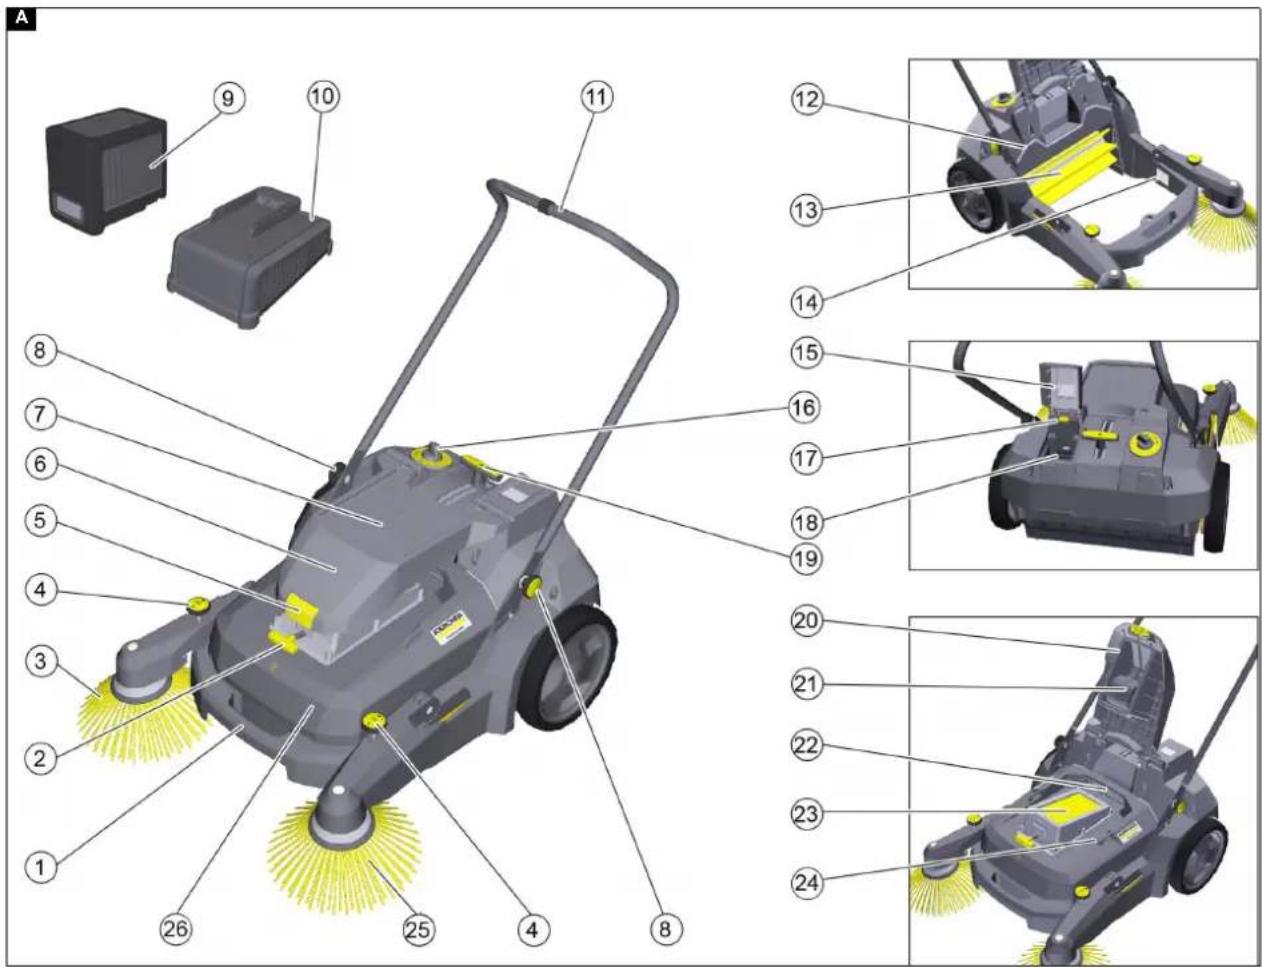
Device illustration
Illustration A
①Carrying handle
②Filter cleaning handle
③Right side brush
④ Twist grip for side brush contact pressure
⑤ Dust suction release mechanism
⑥ Cover of fan for dust suction
⑦ Storage shelf for accessories, maximum load 5 kg
⑧Star grip for push handle adjustment (2x)
⑨Rechargeable battery pack*
⑩Charger*
⑪Push handle
⑫ Waste container seal
⑬Roller brush
⑭Type plate
⑮Cover of battery pack holder
⑯Program switch
⑰Battery pack release
⑱Battery pack holder
⑲ Lever for roller brush contact pressure (sweeping pattern)
⑳Dust suction seal
②1Fan for dust suction
②2 Waste container handle
23 Flat fold filter
⑳Fastening eyelet
25 Left side brush
26Removable waste container
*Option, not included in the scope of delivery.
Initial startup
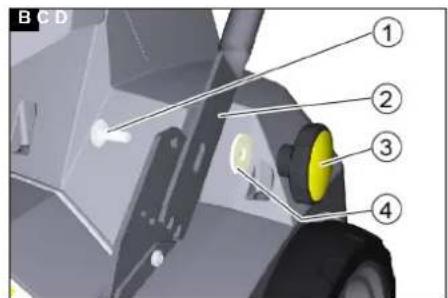
Mounting the push handle
- Position the push handle on the device. Illustration B
① Screw
②Push handle
③Star grip
④ Washer
-
Insert the screw through the push handle holder and the push handle.
-
Put on the washer.
-
Put on the star grip and tighten it.
-
Repeat entire procedure on the opposite side.
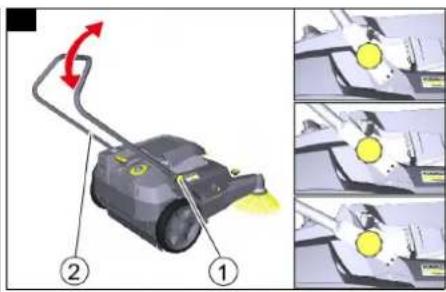
Adjusting the push handle
- Release both star grips. Illustration C
①Star grip
②Push handle
-
Pull the push handle backwards and swivel it into the desired position.
-
Push the push handle forward and engage.
-
Tighten the star grips.
Installing the side brush
The side brushes are supplied with the device on delivery and must be attached to the device before the initial startup. See chapter "Changing the side brushes".
Charging/inserting the battery pack
Charge the battery pack before the initial startup.
Please observe the instructions for charging and operation in the operating instructions and safety instructions enclosed with the battery pack and charger.
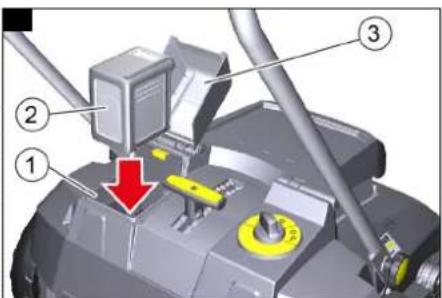
- Fold up the cover of the battery pack holder. Illustration D
①Battery pack holder
②Rechargeable battery pack
③Cover of battery pack holder
-
Insert the charged battery pack into the battery pack compartment, push it in up to the stop and snap it in place.
-
Close the cover of the battery pack holder.
Operation
Selecting the programme
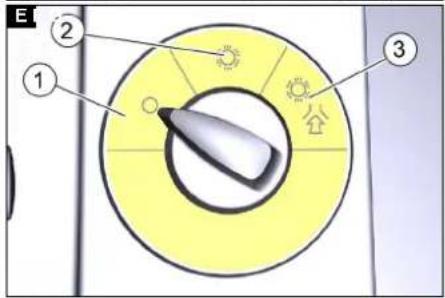
- Turn the programme switch to the desired programme. Illustration E
①0 - Device is switched off
② Sweeping
③ Sweep vacuuming
Sweeping
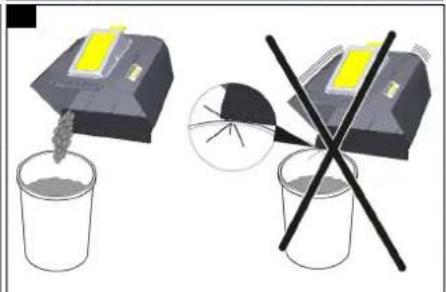
ATTENTION
Risk of damage
Packing tapes, wires or similar can damage the sweeping mechanism.
Keep packing tapes, wires or similar away from the device.
Note
Adjust the travel speed to the conditions in order to achieve optimum cleaning results.
Empty the waste container at regular intervals.
Lower the side brushes to clean side edges.
Note
A bucket or other container up to a maximum of 5 kg can be placed on the cover of the dust suction blower.
- If necessary, secure the container to the cover with a tensioning strap. Guide the tensioning strap through the fastening eyelet.
- Swing the side brushes up or down depending on the task.
Note
Dust whirled up by the side brushes is not vacuumed. Only use the side brushes when sweeping the edges.
- Set the programme switch to sweeping or sweep vacuuming.
Note
Only use the sweep vacuuming programme when the floor is dry.
- Push the device over the surface to be swept.
Setting the contact pressure of the roller brush
- Pulling out, adjusting and lowering the lever for the contact pressure of the roller brush.
Illustration F
① Lever for contact pressure of roller brush
5 - highest contact pressure
1 - lowest contact pressure
P - roller brush raised
Note
Higher contact pressure results in higher energy requirements and shorter operating times.
Note
To park and transport the device, move the lever to the "P" position. Roller brush is fully raised and damage to the bristles is avoided.
Setting the contact pressure of the side brushes
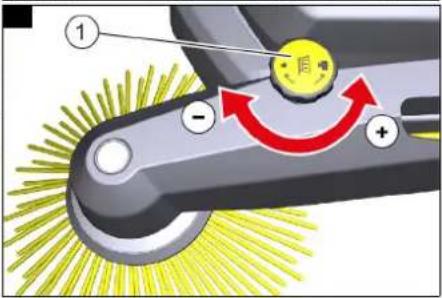
- Turn the twist grip for the contact pressure of side brushes in the desired direction.
Illustration G
① Twist grip for contact pressure of side brushes
+ Increase the contact pressure
- Reduce the contact pressure
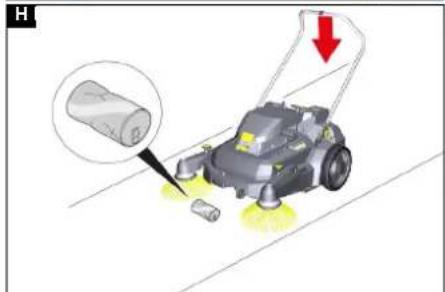
Picking up coarse dirt
- Press the push handle slightly downward so that the device lifts up towards the front.
Illustration H
-
Push the device over the coarse dirt with the front part raised.
-
Lower the device again.
Emptying the waste container
⚠ WARNING
Risk of injury
The rotating roller brush can cause injuries.
Before removing the waste container, switch off the device and wait until the roller brush stops rotating.
Note
Empty the waste container outdoors if possible, as dust is released.
- Turn the programme selection switch to "0" and wait until the roller brush stops rotating.
- Pull and release the filter cleaning handle several times.
- Unlock the dust suction and swing it upwards.
- Pull the waste container upwards by the handle and remove it from the device.
- Dispose of the waste in accordance with local regulations. Illustration I
ATTENTION
Risk of damage
Do not bump into objects when emptying the waste container.
Shutting down
If the device will not be used for a long time, carry out the following points.
- Place the device on a level surface.
- Turn the programme switch to "0".
-
Move the lever for the contact pressure of the roller brush to position "P".
-
Remove the battery pack.
- Clean the device inside and out.
- Park the device in a protected and dry place.
Transport
△CAUTION
Risk of injury and damage
Be aware of the weight of the device during transportation.
- Turn the programme switch to "0".
- Move the lever for the contact pressure to position "P".
- To load, lift the device by the carrying handles.
- Secure the device to the wheels with wedges.
- Secure the device with ropes or lashing straps.
- When transporting in vehicles, secure the device against slipping and tipping over according to the applicable guidelines.
Storage
⚠ WARNING
Risk of injury and damage
Note the weight of the device.
- Carry out shutting down.
- Observe the battery pack storage instructions in the operating instructions.
Care and maintenance
General notes
△DANGER
Risk of accidents and injuries due to unintentional movement of the device
Switch off the device and remove the rechargeable battery before carrying out any care and maintenance work.
Cleaning the device
△CAUTION
Risk of short circuits due to water stream
Do not clean the device with a hose or high-pressure water jet.
DANGER
Health risk from dust
Wear a dust mask and safety goggles when cleaning with compressed air.
ATTENTION
Risk of damage to the surfaces
Do not use any scouring agents or aggressive cleaning agents for cleaning purposes.
- Blow out the inside of the device with compressed air.
- Clean the inside and outside of the device with a damp cloth, soaked in mild detergent.
Maintenance intervals
The performance of the maintenance work is described in the chapter "Maintenance work".
Daily
- Check the roller brush and side brushes for wear and tear and any tangled pieces of tape.
- Check that the control elements are fully functional.
Weekly
- Check the flat fold filter.
- Check the moving parts to make sure that they move smoothly.
- Check the sealing strips in the sweeping area to check for wear.
Half-yearly
- Check the tension, wear and tear and functionality of the drive belts.
After wear and tear
- Replace the sealing strips.
- Replace the roller brush.
- Replace the side brush.
Maintenance work
Note
If maintenance is carried out by the customer, all service and maintenance work must be carried out by qualified staff. A Kärcher specialist dealer can be consulted at any time if needed.
- Place the device on a level surface.
- Turn the programme switch to "0".
- Remove the battery pack.
Replacing the side brush
- Swing the side brush upwards.
- Unscrew the lock on the underside.
a Open: Turn anticlockwise
b Close: Turn clockwise
Illustration J
①Lock
②Side brush
③Mount
- Remove the side brush.
- If necessary, clean the mount.
- Connect the new side brush to the mount and fasten it in place with the lock.
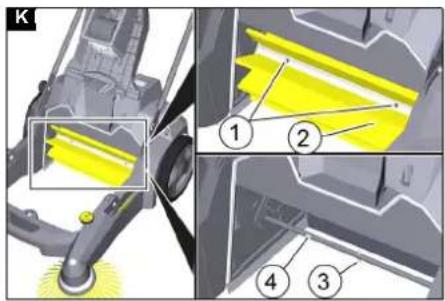
Replacing the roller brush
The roller brush must be replaced when the sweeping result visibly decreases and it is no longer possible to adjust it with the "roller brush contact pressure lever".
- Remove the waste container.
- Move the lever for the contact pressure of the roller brush to position "P".
- Unscrew 2 screws on each side of the roller brush Illustration K
①Screw
②Roller brush half
③Drive pin
④Roller brush shaft
- Pull the roller halves apart and remove them.
- Place the new roller halves on the roller brush shaft. Ensure that the drive pin is fitted properly.
- Screw in and tighten the screws.
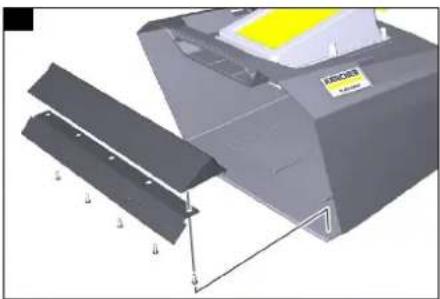
Replacing the sealing strips
- Unscrew the screws as shown in the respective picture.
- Remove the sealing strip and replace it with a new one.
- Screw in and tighten the screws again.
Illustration L
Front sealing strip (on the waste container)
Illustration M
Rear sealing strip
Illustration N
Side sealing strips
Replacing the flat fold filter
△DANGER
Health risk from dust
Wear a dust mark and safety goggles when working on the filter system.
- Pull and release the filter cleaning handle several times.
- Release the lock and swing the dust suction cover upwards.
- Lift out the flat fold filter and insert a new flat fold filter.
Illustration O
① Dust suction
②Flat fold filter
Troubleshooting guide
Note
Contact the Customer Service department in the case of any faults not listed!
△WARNING
Risk of injury
The rotating roller brush and side brushes can cause injuries. Switch off the device and wait until the roller brush and side brushes stop rotating.
Device does not start
- Insert the battery pack.
- Press the battery pack down completely until it clicks into place.
- Charge the battery pack.
Sweeping performance not satisfactory
- Adjust the roller brush and side brushes according to the cleaning task.
- Roller brush and side brush are too worn, replace them.
- Check the sealing strips for wear, replace them if necessary.
Device generates dust
● Empty the waste container.
- Check the filter, replace if necessary.
- Check the sealing strips for wear, replace if necessary.
Poor sweeping at the edges
- Replace the side brush.
- Check the sealing strips for wear, replace them if necessary.
Poor suction performance
- Check the dust suction seal.
- Check the waste container seal.
Roller brush does not rotate
- Remove ribbons or cords from the roller brush.
- Set the lever for the contact pressure of roller brush to a lower value.
The contact pressure of the roller brush cannot be changed
- Remove and clean the rear sealing strip as shown in Figure M.
Technical data
| KM 70/30C Bp | |
| Device performance data | |
| Working width mm 480 | |
| Working width with 2 side brushes mm 980 | |
| Theoretical surface performance | |
| Surface performance (max) m ^2 /h 3920 | |
| Degree of protection IPX3 | |
| Battery | |
| Battery type Battery | |
| Power /BatteryPower+ | |
Working voltage of the battery V 36
| Ambient conditions | ||
| Ambient temperature °C 0 bis +45 | ||
| Humidity, non-condensing % | 40 - 90 | |
| Dimensions and weights | ||
| Length | mm 1200 | |
| Width | mm 770 | |
| Height | mm 1070 | |
| Net weight (transport weight) | kg | 33 |
| Approved total weight | kg | 60 |
| Width of roller brush | mm 480 | |
| Diameter of roller brush | mm 240 | |
| Diameter of side brush | mm 327 | |
| Waste container | ||
| Waste container volume | l (kg) | 45 (38) |
| Filter and suction system | ||
| Filter system | Flat fold filter | |
| Filter area | m^2 | 0,6 |
| Dust class | M | |
| Suction system nominal negative pres- sure | kPa | 0,04 |
| Suction system nominal volumetric flow | l/s | 18,6 |
| Blower motor (electric) | ||
| Nominal power | W | 30 |
| Roller brush motor (electric) | ||
| Nominal power | W | 37,5 |
| Determined values in acc. with EN 60335-2-72 | ||
| Hand-arm vibration value | m/s^2 | 2,1 |
| Uncertainty K | m/s^2 | 0,2 |
| Sound pressure level L_pA | dB(A) | 51 |
| Uncertainty K_pA | dB(A) | 3 |
| Sound power level L_WA + uncertainty K_WA | dB(A) | 74 |
| Uncertainty K_WA | dB(A) | 3 |
Subject to technical modifications.
Declaration of Conformity
EU Declaration of Conformity
We hereby declare that the machine described below complies with the relevant basic safety and health requirements in the EU Directives, both in its basic design and construction as well as in the version placed in circulation by us. This declaration is invalidated by any changes made to the machine that are not approved by us.
Product: Sweeper vacuum
Type: 1.517-xxx
Currently applicable EU Directives
2006/42/EC (+2009/127/EC)
2014/30/EU
2011/65/EU
2000/14/EC
Harmonised standards used
EN 60335-1
EN 60335-2-72
EN 62233: 2008
EN 55014-1: 2017 + A11: 2020
EN 55014-2: 1997 + A1: 2001 + A2: 2008
EN IEC 63000: 2018
Sound power level dB(A)
Measured: 71
Guaranteed: 74
The signatories act on behalf of and with the authority of the company management.

H. Jenner
Chairman of the Board of Management

S. Reiser
Manager Regulatory Affairs & Certification
Documentation supervisor:
S. Reiser
Alfred Kärcher SE & Co. KG
Alfred-Kärcher-Str. 28 - 40
71364 Winnenden (Germany)
Ph.: +49 7195 14-0
Fax: +49 7195 14-2212
Winnenden, 2023/03/01
Declaration of Conformity (UK)
We hereby declare that the product described below complies with the relevant provisions of the following UK Regulations, both in its basic design and construction as well as in the version put into circulation by us. This declaration shall cease to be valid if the product is modified without our prior approval.
Product: Sweeper vacuum
Type: 1.517-xxx
Currently applicable UK Regulations
S.I. 2008/1597 (as amended)
S.I. 2016/1091 (as amended)
S.I. 2012/3032 (as amended)
S.I. 2001/1701 (as amended)
Designated standards used
EN 60335-1
EN 60335-2-72
EN 62233: 2008
EN 55014-1: 2017 + A11: 2020
EN 55014-2: 1997 + A1: 2001 + A2: 2008
EN IEC 63000: 2018
Sound power level dB(A)
Measured: 71
Guaranteed: 74
The signatories act on behalf of and with the authority of the company management.

Chairman of the Board of Management

S. Reiser
Manager Regulatory Affairs & Certification
Documentation supervisor:
S. Reiser
Alfred Kärcher SE & Co. KG
Alfred-Kärcher-Str. 28 - 40
71364 Winnenden (Germany)
Ph.: +49 7195 14-0
Fax: +49 7195 14-2212
Winnenden, 2023/03/01
Contenu
2006/42/CE (+2009/127/CE)
2014/30/UE
2011/65/UE
2000/14/CE
H. Jenner
Chairman of the Board of Management
S. Reiser
Manager Regulatory Affairs & Certification
71364 Winnenden (Germany)

Chairman of the Board of Management

S. Reiser
Manager Regulatory Affairs & Certification
71364 Winnenden (Germany)
Tel.: +49 7195 14-0
Fax: +49 7195 14-2212
Winnenden, 01/03/2023
2006/42/CE (+2009/127/CE)
2014/30/UE
2011/65/UE
2000/14/CE
Chairman of the Board of Management
S. Reiser
Manager Regulatory Affairs & Certification
71364 Winnenden (Germany)
Tel.: +49 7195 14-0
Fax: +49 7195 14-2212
Winnenden, 01/03/2023
Índice
2006/42/CE (+2009/127/CE)
2014/30/UE
2011/65/UE
2000/14/CE
Chairman of the Board of Management

S. Reiser
Manager Regulatory Affairs & Certification
Chairman of the Board of Management

S. Reiser
Manager Regulatory Affairs & Certification
71364 Winnenden (Germany)
Tel.: +49 7195 14-0
Fax: +49 7195 14-2212
Winnenden, 2023/03/01
İçindekiler
Genel uyarılar 40
2006/42/AT (+2009/127/AT)
2014/30/AB
2011/65/AB
2000/14/EG

Chairman of the Board of Management
S. Reiser
Manager Regulatory Affairs & Certification
Winnenden, 2023/03/01
Innehåll
Allmän information 45

Chairman of the Board of Management

S. Reiser
Manager Regulatory Affairs & Certification
D-71364 Winnenden (Germany)
Tfn: +49 7195 14-0
Fax: +49 7195 14-2212
Winnenden, 01.03.2023
Sisältö

Chairman of the Board of Management

S. Reiser
Manager Regulatory Affairs & Certification
71364 Winnenden (Germany)
Puh.: +49 7195 14-0
23 Flatt foldefilter
24Festeøye
2006/42/EF (+2009/127/EF)
2014/30/EU
2011/65/EU
2000/14/EF
Anvendte harmoniserte standarder
EN 60335-1
EN 60335-2-72
EN 62233: 2008
EN 55014-1: 2017 + A11: 2020
EN 55014-2: 1997 + A1: 2001 + A2: 2008
EN IEC 63000: 2018
Lydeffektnivå dB(A)
Målt: 71
Garantert: 74

Chairman of the Board of Management
S. Reiser
Manager Regulatory Affairs & Certification
71364 Winnenden (Germany)
Tlf.: +49 7195 14-0
Winnenden, 2023/03/01
Indhold
2006/42/EF (+2009/127/EF)
2014/30/EU
2011/65/EU
2000/14/EF

Chairman of the Board of Management

S. Reiser
Manager Regulatory Affairs & Certification
71364 Winnenden (Germany)
Tlf.: +49 7195 14-0
Fax: +49 7195 14-2212
Winnenden, 2023/03/01
Sisukord
Üldised juhised 65
Tõukesanga monteerimine
2006/42/EÜ (+2009/127/EÜ)
2014/30/EL
2011/65/EL
2000/14/EÜ

Chairman of the Board of Management

S. Reiser
Manager Regulatory Affairs & Certification
71364 Winnenden (Germany)
Tel: +49 7195 14-0
Winnenden, 2023/03/01
Saturs

Chairman of the Board of Management

S. Reiser
Manager Regulatory Affairs & Certification

Chairman of the Board of Management
S. Reiser
Manager Regulatory Affairs & Certification
2006/42/WE (+2009/127/WE)
2014/30/UE
2011/65/UE
2000/14/WE
Chairman of the Board of Management
S. Reiser
Manager Regulatory Affairs & Certification
71364 Winnenden (Germany)
Tel.: +49 7195 14-0

H. Jenner
Chairman of the Board of Management

S. Reiser
Manager Regulatory Affairs & Certification
Winnenden, 2023/03/01
Obsah
Obecné pokyny....90
2006/42/ES (+2009/127/ES)
2014/30/EU
2011/65/EU
2000/14/ES
Chairman of the Board of Management

S. Reiser
Manager Regulatory Affairs & Certification
Winnenden, 2023/03/01
Obsah
Všeobecné upozornenia 95
2006/42/ES (+2009/127/ES)
2014/30/EÚ
2011/65/EÚ
2000/14/ES
Chairman of the Board of Management

S. Reiser
Manager Regulatory Affairs & Certification
71364 Winnenden (Germany)
Tel.: +49 7195 14-0
Fax: +49 7195 14-2212
Winnenden, 01.03.2023
Kazalo
Splošni napotki 100
Namenska uporaba 100
Varnostna navodila 100
Opis naprave 101
Zagon....101
Delovanje.... 101
Priprava na mirovanje.... 102
Transport.... 102
2006/42/ES (+2009/127/ES)
2014/30/EU
2011/65/EU
2000/14/ES

Chairman of the Board of Management

S. Reiser
Manager Regulatory Affairs & Certification
Winnenden, 1. 3. 2023
Cuprins
Indicatii generale.... 105
Directive UE relevante
2006/42/UE (+2009/127/UE)
2014/30/UE
2011/65/UE
2000/14/UE
Norme armonizate aplicate
EN 60335-1
EN 60335-2-72
EN 62233: 2008
EN 55014-1: 2017 + A11: 2020
EN 55014-2: 1997 + A1: 2001 + A2: 2008
EN IEC 63000: 2018
H. Jenner
Chairman of the Board of Management

S. Reiser
Manager Regulatory Affairs & Certification
71364 Winnenden (Germania)
Tel.: +49 7195 14-0
Fax: +49 7195 14-2212
Winnenden, 2023/03/01
Sadržaj
Opće napomene 110
2006/42/EZ (+2009/127/EZ)
2014/30/EU
2011/65/EU
2000/14/EZ
Primijenjene uskladene norme
EN 60335-1
EN 60335-2-72
EN 62233: 2008
EN 55014-1: 2017 + A11: 2020
EN 55014-2: 1997 + A1: 2001 + A2: 2008
EN IEC 63000: 2018
Razina zvučne snage dB(A)
Izmjereno: 71
Zajamčeno: 74

Chairman of the Board of Management

S. Reiser
Manager Regulatory Affairs & Certification
Opunomoćenik za dokumentaciju:
S. Reiser
Alfred Kärcher SE & Co. KG
Alfred-Kärcher-Str. 28 - 40
71364 Winnenden (Njemačka)
Tel.: +49 7195 14-0
Telefaks: +49 7195 14-2212
Winnenden, 01.03.2023.
Sadržaj
Opšte napomene 115
Namenska upotreba 115
Sigurnosne napomene.... 115
Opis uređaja 116
Puštanje u pogon.... 116
Rad 116
Mirovanje 117
Transport.... 117
Skladištenje 117
2006/42/EZ (+2009/127/EZ)
2014/30/EU
2011/65/EU
2000/14/EZ
Primenjene harmonizovane norme
EN 60335-1
EN 60335-2-72
EN 62233: 2008
EN 55014-1: 2017 + A11: 2020
EN 55014-2: 1997 + A1: 2001 + A2: 2008
EN IEC 63000: 2018
Nivo zvučne snage dB(A)
Izmereno: 71
Garantovano: 74
Potpisnici deluju po nalogu i uz punomoć upravnog odbora.

Chairman of the Board of Management

S. Reiser
Manager Regulatory Affairs & Certification
Lice ovlašćeno za dokumentaciju:
S. Reiser
Alfred Kärcher SE & Co. KG
Alfred-Kärcher-Str. 28 - 40
71364 Winnenden (Germany)
Tel.: +49 7195 14-0
Winnenden, 2023/03/01
Περιεχόμενα

Chairman of the Board of Management

S. Reiser
Manager Regulatory Affairs & Certification
71364 Winnenden (Germany)
Tηλ.: +49 7195 14-0
Φαξ: +49 7195 14-2212
Winnenden, 2023/03/01
Содержание
Chairman of the Board of Management
S. Reiser
Manager Regulatory Affairs & Certification
71364 Winnenden (Germany)
Тел.: +49 7195 14-0
Факс: +49 7195 14-2212
H. Jenner
Chairman of the Board of Management
S. Reiser
Manager Regulatory Affairs & Certification
71364 Winnenden (Germany)
Тел.: +49 7195 14-0
Факс: +49 7195 14-2212

Chairman of the Board of Management
S. Reiser
Manager Regulatory Affairs & Certification
71364 Winnenden (Germany)
Тел.: +49 7195 14-0
Факс: +49 7195 14-2212
Виненден, 2023/03/01
目次
Chairman of the Board of Management

S. Reiser
Manager Regulatory Affairs & Certification
文書の全権委員:
S. Reiser
Alfred Kärcher SE & Co. KG
Alfred-Kärcher-Str. 28 - 40
71364 Winnenden (Germany)
電話番号:+49 7195 14-0
natural_image
Black silhouette of a hand giving a thumbs-up gesture (no text or symbols)THANK YOU!
MERCI! DANKE! iGRACIAS!
Registrieren Sie Ihr Produkt und profitieren Sie von vielen Vorteilen. Register your product and benefit from many advantages. Enregistrez votre produit et bénéficier de nombreux avantages. Registre su producto y aproveche de muchas ventajas.
www.kaercher.com/welcome

Bewerten Sie Ihr Produkt und sagen Sie uns Ihre Meinung. Rate your product and tell us your opinion. Évaluer votre produit et dites-nous votre opinion. Reseñe su producto y díganos su opinión.

natural_image
Icon showing a gear and wrench inside a square frame (no text or symbols)www.kaercher.com/dealersearch
Alfred Kärcher SE & Co. KG
Alfred-Kärcher-Str. 28-40
71364 Winnenden (Germany)