
HW-Q64C - Soundbar SAMSUNG - Free user manual and instructions
Find the device manual for free HW-Q64C SAMSUNG in PDF.
| Product Type | Soundbar |
| Brand | Samsung |
| Model | HW-Q64C |
| Dimensions (W x H x D) | 1030 x 57 x 105 mm |
| Weight | 3.5 kg |
| Total output power | 340 W (Soundbar 180 W + Subwoofer 160 W) |
| Number of channels | 3.1 channels (expandable to 5.1 with rear kit) |
| Supported audio formats | Dolby 5.1, Dolby Digital Plus, Dolby TrueHD, Dolby Atmos, DTS Digital Surround, LPCM 8 channels |
| Connectivity | HDMI eARC/ARC, HDMI input, optical, Bluetooth, USB |
| Bluetooth version | Not specified, supports SBC |
| Audio features | Surround Mode, Adaptive Sound, DTS Virtual:X, Voice Enhance, Night Mode, 7-band EQ |
| Subwoofer | Wireless, model PS-WC67B, 160 W |
| Power supply | AC/DC adapter, DC 24 V |
| Standby power consumption | 2.0 W |
| Operating temperature | +5°C to +35°C |
| Operating humidity | 10% ~ 75% |
| Care and cleaning | Unplug before cleaning, use a dry cloth |
| Safety | Do not open, risk of electric shock. Avoid moisture and excessive heat. |
| Spare parts and repairability | No user-serviceable parts. Contact a qualified after-sales service. |
| General information | 999-page manual available for download |
Frequently Asked Questions - HW-Q64C SAMSUNG
User questions about HW-Q64C SAMSUNG
0 question about this device. Answer the ones you know or ask your own.
Ask a new question about this device
Download the instructions for your Soundbar in PDF format for free! Find your manual HW-Q64C - SAMSUNG and take your electronic device back in hand. On this page are published all the documents necessary for the use of your device. HW-Q64C by SAMSUNG.
USER MANUAL HW-Q64C SAMSUNG
Thank you for purchasing this Samsung product.
To receive more complete service, please register
your product at www.samsung.com/register
SAFETY INFORMATION
SAFETY WARNINGS
TO REDUCE THE RISK OF ELECTRIC SHOCK, DO NOT REMOVE THE COVER (OR BACK).
NO USER-SERVICEABLE PARTS ARE INSIDE.
REFER SERVICING TO QUALIFIED SERVICE PERSONNEL.
Refer to the table below for an explanation of symbols which may be on your Samsung product.
 | CAUTIONRISK OF ELECTRIC SHOCK.DO NOT OPEN. |  |
 | This symbol indicates that high voltage is present inside. It is dangerous to make any kind of contact with any internal part of this product. | |
 | This symbol indicates that this product has included important literature concerning operation and maintenance. | |
| [Tc2C] | Class II product: This symbol indicates that it does not require a safety connection to electrical earth (ground). If this symbol is not present on a product with a power cord, the product MUST have a reliable connection to protective earth (ground). | |
 | AC voltage: This symbol indicates that the rated voltage marked with the symbol is AC voltage. | |
 | DC voltage: This symbol indicates that the rated voltage marked with the symbol is DC voltage. | |
 | Caution, Consult instructions for use: This symbol instructs the user to consult the user manual for further safety related information. | |
CAUTION
WARNING
- To reduce the risk of fire or electric shock, do not expose this appliance to rain or moisture.
CAUTION
• TO PREVENT ELECTRIC SHOCK, MATCH WIDE BLADE OF PLUG TO WIDE SLOT, FULLY INSERT.
- This apparatus shall always be connected to a AC outlet with a protective grounding connection.
- To disconnect the apparatus from the mains, the plug must be pulled out from the mains socket, therefore the mains plug shall be readily operable.
- Do not expose this apparatus to dripping or splashing. Do not put objects filled with liquids, such as vases on the apparatus.
- To turn this apparatus off completely, you must pull the power plug out of the wall socket. Consequently, the power plug must be easily and readily accessible at all times.
PRECAUTIONS
- Ensure that the AC power supply in your house complies with the power requirements listed on the identification sticker located on the bottom of your product. Install your product horizontally, on a suitable base (furniture), with enough space around it for ventilation (7\~10 cm). Make sure the ventilation slots are not covered. Do not place the unit on amplifiers or other equipment which may become hot. This unit is designed for continuous use. To fully turn off the unit, disconnect the AC plug from the wall outlet. Unplug the unit if you intend to leave it unused for a long period of time.
- During thunderstorms, disconnect the AC plug from the wall outlet. Voltage peaks due to lightning could damage the unit.
- Do not expose the unit to direct sunlight or other heat sources. This could lead to overheating and cause the unit to malfunction.
-
Protect the product from moisture (i.e. vases), and excess heat (e.g. a fireplace) or equipment creating strong magnetic or electric fields. Unplug the power cable from the AC wall socket if the unit malfunctions. Your product is not intended for industrial use. It is for personal use only. Condensation may occur if your product has been stored in cold temperatures. If transporting the unit during the winter, wait approximately 2 hours or until the unit has reached room temperature before using.
-
The battery used with this product contains chemicals that are harmful to the environment. Do not dispose of the battery in the general household trash. Do not expose the battery to excess heat, direct sunlight, or fire. Do not short circuit, disassemble, or overheat the battery.
CAUTION : Danger of explosion if the battery is replaced incorrectly. Replace only with the same or equivalent type.
CONTENTS
01 Checking the Components 6
02 Product Overview 7
Front Panel / Top Panel of the Soundbar 7
Bottom Panel of the Soundbar 8
03 Using the Remote Control 9
Inserting Batteries before using the Remote Control (AAA batteries X 2) ____ 9
How to Use the Remote Control ____ 9
Using the Hidden Buttons (Buttons with more than one function) ____ 12
Output specifications for the different sound effect modes ____ 13
Adjusting the Soundbar volume with a TV remote control 14
04 Connecting the Soundbar 15
Connecting Electrical Power 15
Connecting the Samsung Wireless Rear Kit to your Soundbar 18
05 Connecting to a TV 19
Method 1. Connecting with HDMI ____ 19
Method 2. Connecting using an Optical Cable ____ 21
Method 3. Connecting via Bluetooth ____ 23
06 Connecting an External Device 25
Method 1. Connecting using an HDMI Cable
(Capable of Dolby Atmos® decoding and playback) 25
Method 2. Connecting using an Optical Cable ____ 26
07 Connecting a USB drive 27
08 Connecting a Mobile Device 28
Connecting via Bluetooth 28
Using Tap Sound ____ 32
09 Installing the Wall Mount 33
Installation Precautions 33
Wallmount Components 33
10 Installing the Soundbar in front of TV 35
11 Software Update 36
USB Update 36
Reset 37
12 Troubleshooting 38
13 Licence 40
14 Open Source Licence Notice 41
15 Important Notes About Service 41
16 Specifications and Guide 42
Specifications 42
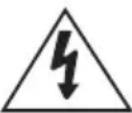
01 CHECKING THE COMPONENTS
- For more information about the power supply and power consumption, refer to the label attached to the product. (Label: Bottom of the Soundbar Main Unit)
- To purchase additional components or optional cables, contact a Samsung Service Centre or Samsung Customer Care.
- For more information about the wallmount see page 33.
- Design and specifications are subject to change without prior notice.
- The appearance of the components may differ slightly from the illustrations above.
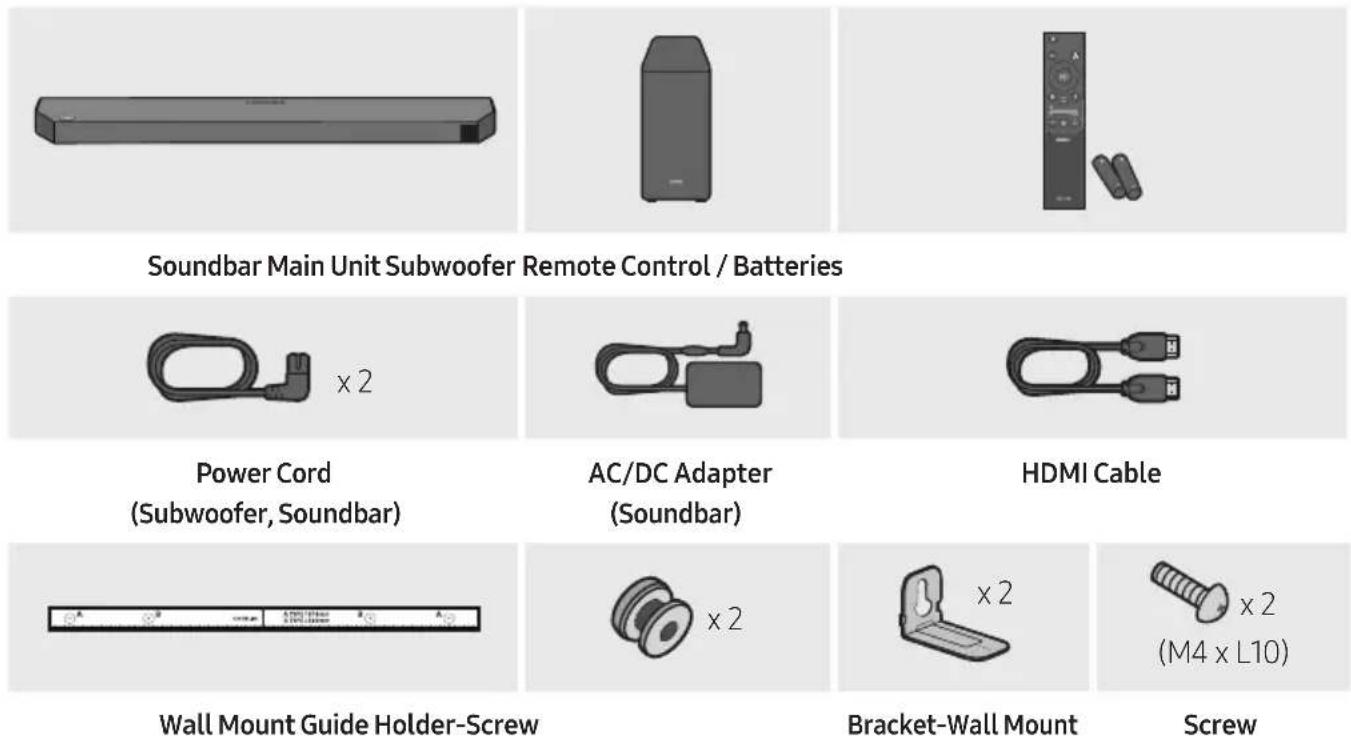
02 PRODUCT OVERVIEW
Front Panel / Top Panel of the Soundbar
| 1 | DisplayDisplays the product's status and current mode. | |
| 2 | (Power) ButtonTurns the power on and off.Auto Power Down FunctionThe unit turns off automatically in the following situations:In D.IN / HDMI / BT / USB Mode : If there is no audio signal for 18 minutes. | |
| 3 | +(Volume) ButtonAdjusts the volume.When adjusted, the volume level appears on the Soundbar's front display. | |
| 4 | (Source) ButtonSelects the source input mode. | |
| Input mode Display | ||
| Optical D.IN | ||
| eARC/ARC (HDMI OUT) | * D.IN → TV eARC (Auto conversion) | |
| D.IN → TV ARC (Auto conversion) | ||
| HDMI HDMI | ||
| BLUETOOTH mode BT | ||
| USB mode USB | ||
| • To turn on "BT PAIRING" mode, change the source to "BT" mode, and then press and hold the(Source) button for more than 5 seconds. | ||
- “*” mode is supported when the eARC function in the TV setting is On.
-
When you plug in the AC cord, the power button will begin working in 4 to 6 seconds.
-
When you turn on this unit, there will be a 4 to 5 second delay before it produces sound.
- If you hear sounds from both the TV and Soundbar, go to the Settings menu for the TV audio and change the TV speaker to External Speaker.
Bottom Panel of the Soundbar
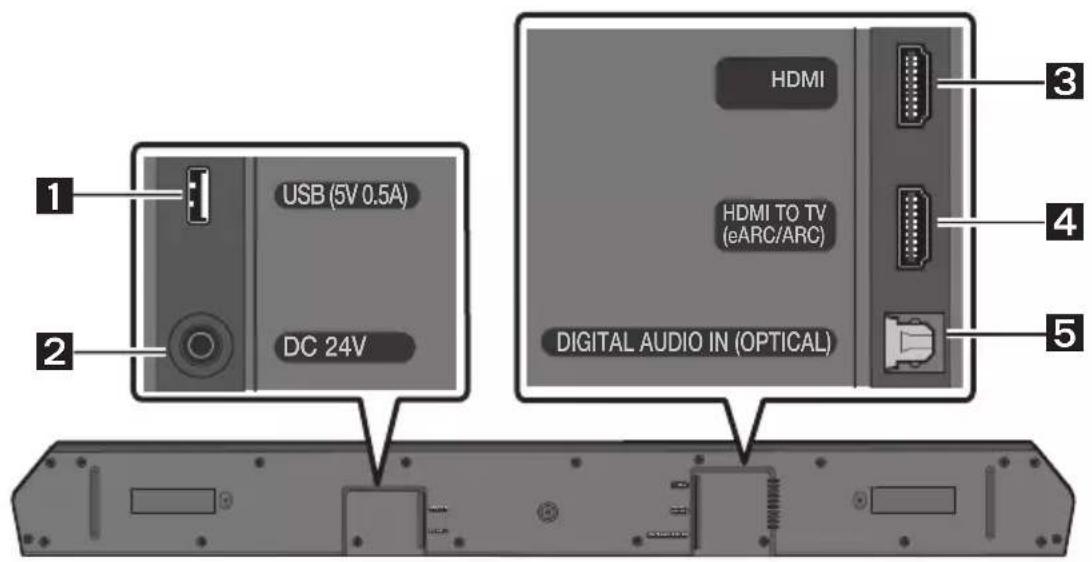
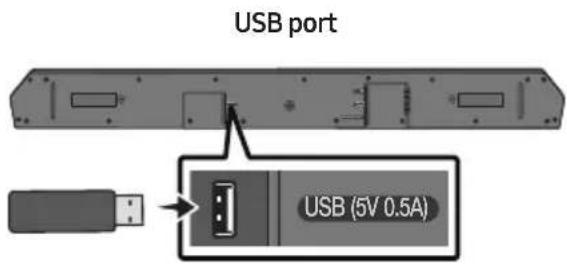
| 1 | USB (5V 0.5A)Connect a USB drive here to play music files stored on the USB drive through the Soundbar. (See page 27) |
| 2 | DC 24V (Power Supply In)Connect the AC/DC power adapter. (See page 15) |
| 3 | HDMIInputs digital video and audio signals simultaneously using an HDMI cable.Connect to the HDMI output of an external device. (See page 25) |
| 4 | HDMI TO TV (eARC/ARC)Connect to the HDMI IN (eARC) port on a TV. (See page 19) |
| 5 | DIGITAL AUDIO IN (OPTICAL)Connect to the digital (optical) output of an external device. (See page 26) |
- When disconnecting the power cable of the AC/DC power adapter from a wall outlet, pull the plug. Do not pull the cable.
- Do not connect this unit or other components to an AC outlet until all connections between components are complete.
03 USING THE REMOTE CONTROL
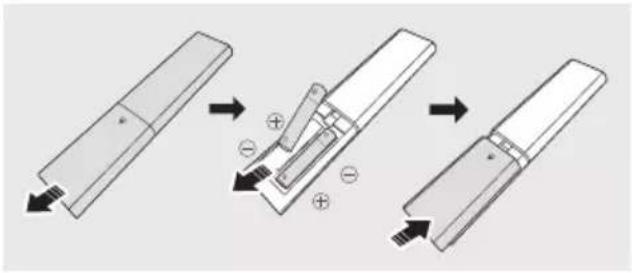
Inserting Batteries before using the Remote Control (AAA batteries X 2)
Slide the back cover in the direction of the arrow until it is completely removed.
Insert 2 AAA batteries (1.5V) so that their orientation is correct. Slide the back cover back into position.
How to Use the Remote Control

| 1 |  Power Power | Turns the Soundbar on and off. |
| 2 |  Source Source | Press to select a source connected to the Soundbar. |
| 3 |  Mute Mute | Press the (Mute) button to mute the sound. Press it again to unmute the sound. |
| 4 |  Volume Volume | 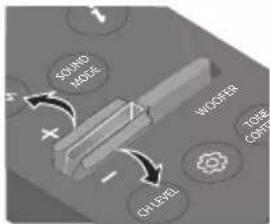 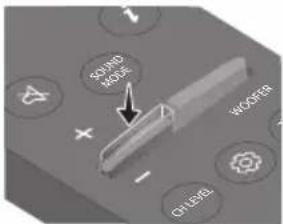 Push the button up or down to adjust the volume.• MutePress the Volume button in to mute the sound. Press it in again to unmute the sound. Push the button up or down to adjust the volume.• MutePress the Volume button in to mute the sound. Press it in again to unmute the sound. |
| 5 |  CH LEVEL CH LEVEL | By pressing the button, you can adjust the volume of the each speaker.Press the button to selectCENTER LEVELand then adjust the volume between -6~+6 by using theUp/Downbuttons.If the Rear Speakers (sold separately) are connected, the settingREAR LEVELis supported. To adjust the volume of theREAR LEVELbetween -6 to +6 by using theUp/Downbuttons. |
| 6 |  Sound Control Sound Control | By pressing the button, you can set the audio function. The desired settings can be adjusted using theUp/Downbuttons.VOICE ENHANCE ON/OFF → NIGHT MODE ON/OFF → SYNC → VIRTUAL ON/OFF- VOICE ENHANCE ON/OFFThis mode is makes it easier to hear spoken dialog in movies and TV.- NIGHT MODE ON/OFFThis mode is optimized for nighttime viewing with the settings adjusted to bring the volume down but keep the dialog clear.-SYNCIf the video on the TV and audio from the Soundbar are not synchronized, press the(Sound Control)button to selectSYNCand then set the audio delay between 0~300 milliseconds by using theUp/Downbuttons. (Not available in “USB” or “BT” mode.)- VIRTUAL ON/OFFDolby Virtual function can be turnedON/OFF.TheVOICE ENHANCE, NIGHT MODE, and VIRTUALaudio function can be turned ON/OFF by using theUp/Downbuttons. (VIRTUALfunction is not available in “USB” or “BT” mode.)Press and hold the(Sound Control)button for about 5 seconds to adjust the sound for each frequency band. 150Hz, 300Hz, 600Hz, 1.2kHz, 2.5kHz, 5kHz, and 10kHz are selectable using theLeft/Rightbuttons and each can be adjusted to a setting between -6 to +6 using theUp/Downbuttons. (Make sure the Sound mode is set to “STANDARD”.) |
| 7 |  BluetoothPAIR BluetoothPAIR | Switch the Soundbar to Bluetooth pairing mode.Press thePAIRbutton and wait for the “BT PAIRING” screen to connect to a new Bluetooth device. |
| 8 |  Play / Pause Play / Pause | You can also play or pause music by pressing the button. |
| 9 |  Up/Down/Left/Right Up/Down/Left/Right | 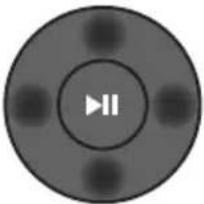 Press the indicated areas to select Up/Down/Left/Right.Press Up/Down/Left/Right on the button to select or set functions.RepeatTo use the Repeat function in “USB” mode, press the Up button.Music SkipPress the Right button to select the next music file. Press the Left button to select the previous music file.ID SETPress and hold the Up button for 5 seconds to complete ID SET (when connecting to a wireless subwoofer or wireless rear speakers). Press the indicated areas to select Up/Down/Left/Right.Press Up/Down/Left/Right on the button to select or set functions.RepeatTo use the Repeat function in “USB” mode, press the Up button.Music SkipPress the Right button to select the next music file. Press the Left button to select the previous music file.ID SETPress and hold the Up button for 5 seconds to complete ID SET (when connecting to a wireless subwoofer or wireless rear speakers). |
| 10 | iInfo | Press to display information about the active function or the codec available. |
| 11 | SOUND MODE | By pressing the button, you can select the desired sound mode.SURROUND SOUND → GAME → ADAPTIVE SOUND → DTS VIRTUAL:X → STANDARD– SURROUND SOUNDProvides a wider sound field than standard.– GAMEProvides stereoscopic sound to immerse you in the action while gaming.– ADAPTIVE SOUNDAnalyzes the content in real time and automatically provides an optimal sound field based on the characteristics of the content.– DTS VIRTUAL:X Immersive 3D sound from any content.– STANDARDOutputs the original sound.• DRC (Dynamic Range Control)Lets you apply dynamic range control to Dolby Digital tracks. Press and hold the SOUND MODE button for more than 5 seconds while the Soundbar is powered off to turn DRC (Dynamic Range Control) on or off. With the DRC turned on, loud sound is reduced. (The sound may be distorted.)• Bluetooth PowerThis feature automatically turns the Soundbar on when it receives a connection request from a previously connected TV or Bluetooth device. The setting is On by default.– Press and hold the SOUND MODE button for more than 5 seconds to turn off the Bluetooth Power function. |
| 12 |  WOOFER WOOFER (BASS) LEVEL WOOFER WOOFER (BASS) LEVEL | 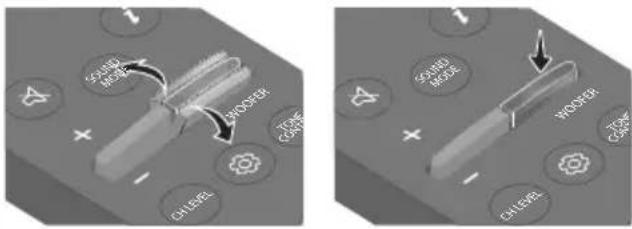 Push the button up or down to adjust the level of the woofer (bass) to -12 or between -6 to +6. To set the woofer (bass) volume level to 0 (Default), press the button. Push the button up or down to adjust the level of the woofer (bass) to -12 or between -6 to +6. To set the woofer (bass) volume level to 0 (Default), press the button. |
| 13 | 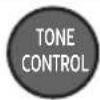 TONE CONTROL TONE CONTROL | By pressing the button, you can adjust the volume of the treble or bass sound.Press the button to select TREBLE or BASS and then adjust the volume between -6~+6 by using the Up/Down buttons. Once the bass level is changed, the woofer level will be also adjusted accordingly. |
Using the Hidden Buttons (Buttons with more than one function)
| Hidden Button | Reference page | |
| Remote Control Button Function | ||
| WOOFER (Up) | TV remote control On/Off (Standby) | page 14 |
| Left | TV Auto connect On/Off (BT Ready) | page 24 |
| Up ID SET page 11 | ||
| (Sound Control) | 7 Band EQ page 10 | |
| SOUND MODE | DRC ON/OFF (Standby) page 11 | |
| Bluetooth Power page 11 | ||
Output specifications for the different sound effect modes
| Effect Input | Output | |||
| With Subwoofer Only | With Subwoofer & Wireless Rear Speaker Kit | |||
| [SOUND MODE] | SURROUND SOUND | 2.0 ch | 3.1 ch 5.1 ch | |
| 5.1 ch 3.1 ch 5.1 ch | ||||
| Dolby Atmos® 3.1 ch | 5.1 ch | |||
| GAME | 2.0 ch | 3.1 ch 5.1 ch | ||
| 5.1 ch 3.1 ch 5.1 ch | ||||
| Dolby Atmos® 3.1 ch | 5.1 ch | |||
| ADAPTIVE SOUND | 2.0 ch | 3.1 ch 5.1 ch | ||
| 5.1 ch 3.1 ch 5.1 ch | ||||
| Dolby Atmos® 3.1 ch | 5.1 ch | |||
| DTS VIRTUAL:X | 2.0 ch | 3.1 ch 5.1 ch | ||
| 5.1 ch 3.1 ch 5.1 ch | ||||
| Dolby Atmos® 3.1 ch | 5.1 ch | |||
| STANDARD | 2.0 ch | 2.1 ch 2.1 ch | ||
| 5.1 ch 3.1 ch 5.1 ch | ||||
| Dolby Atmos® 3.1 ch | 5.1 ch | |||
- The Samsung Wireless Rear Speaker Kit can be purchased separately. To purchase a Kit, contact the vendor you purchased the Soundbar from.
- When the input source is Dolby Atmos® the Subwoofer-only setup provides 3.1 channel audio, while the Subwoofer & Wireless Rear Speaker Kit setup provides 5.1 channel audio.
- The Rear Speakers will not produce sounds for 2 channel output while STANDARD mode is in use. To enable sound for the Rear Speakers, change the effect mode to SURROUND SOUND.
Adjusting the Soundbar volume with a TV remote control
Adjust the Soundbar volume using the TV's remote control.
- This function can be used with IR remote controls only. Bluetooth remote controls (remote controls that require pairing) are not supported.
-
Set the TV speaker to External Speaker to use this function.
• Manufacturers supporting this function: Samsung, VIZIO, LG, Sony, Sharp, PHILIPS, PANASONIC, TOSHIBA, Hisense, RCA -
Turn Off the Soundbar.
- Push up and hold the WOOFER button for 5 seconds.
Each time you push the WOOFER button up and hold it for 5 seconds, the mode switches in the following order: "OFF-TV REMOTE" (Default mode), "SAMSUNG-TV REMOTE", "ALL-TV REMOTE".
Remote Control Button Display Status
| (Default mode) | ||
| 5 Sec | OFF-TV REMOTE | Disable the TV remote control. |
| 5 Sec | SAMSUNG-TV REMOTE | Enable a Samsung TV's IR remote control. |
| 5 Sec | ALL-TV REMOTE | Enable a third-party TV's IR remote control. |
04 CONNECTING THE SOUNDBAR
Connecting Electrical Power
Use the power components to connect the Subwoofer and Soundbar to an electrical outlet in the following order:
- For more information about the required electrical power and power consumption, refer to the label attached to the product. (Label: Bottom of the Soundbar Main Unit)
-
Connect the power cord to the Subwoofer.
-
Connect the power cord to the AC/DC adapter. Connect the AC/DC adapter (with the power cord) to the Soundbar.
-
Connect power to the Soundbar and Subwoofer.
- Connect power to the Subwoofer first. The Subwoofer will be automatically connected when turning on the Soundbar.
flowchart
graph LR
    A["Power Cord"] -->|Connecting Electrical Power| B["AC/DC Adapter"]
    B --> C["Bottom of the Soundbar Main Unit"]
    D["Rear of Subwoofer"] --> A
    E["Power Cord"] --> F["Power Cord"]
    style A fill:#f9f,stroke:#333
    style B fill:#ccf,stroke:#333
    style C fill:#cfc,stroke:#333
    style D fill:#fcc,stroke:#333
    style E fill:#cff,stroke:#333
- Make sure to rest the AC/DC Adapter flat on a table or the floor. If you place the AC/DC Adapter so that it is hanging with the AC cord input facing upwards, water or other foreign substances could enter the Adapter and cause the Adapter to malfunction.
- If you unplug and reconnect the power cord when the product is turned on, the Soundbar turns on automatically.
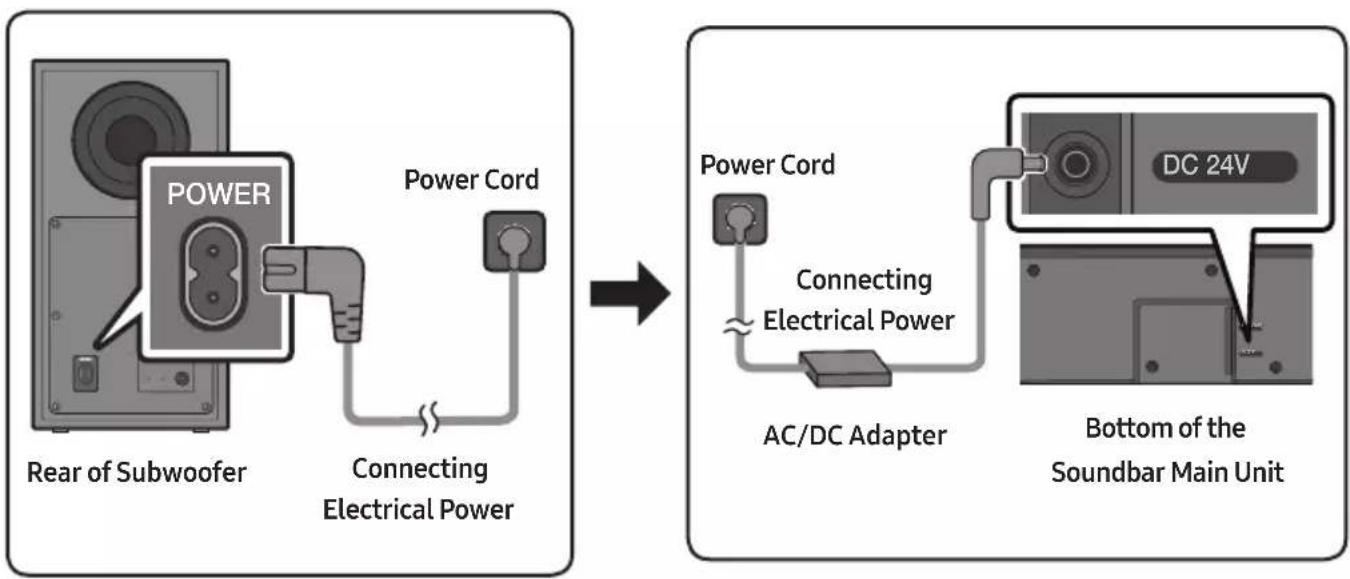
Manually connecting the Subwoofer if automatic connection fails
Before performing the manual connection procedure below:
-
Check whether the power cables for the Soundbar and subwoofer are connected properly.
• Make sure that the Soundbar is turned on. -
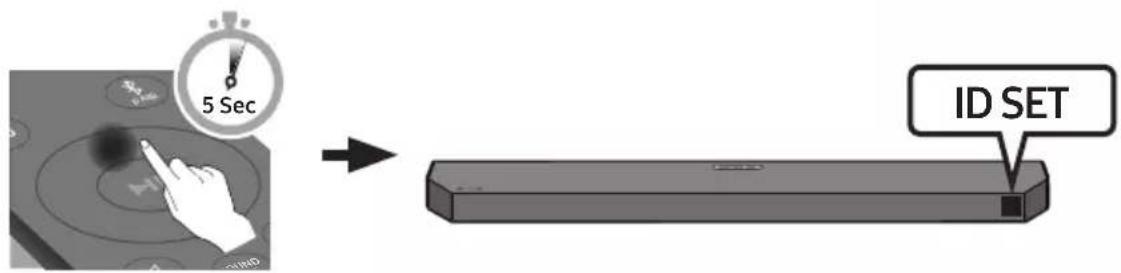
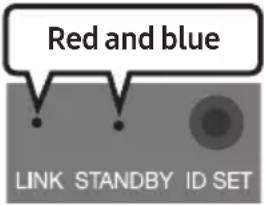
Press and hold ID SET on the rear of the subwoofer for at least 5 seconds.
- The red indicator on the rear of the subwoofer turns off and the blue indicator blinks.
flowchart
graph TD
    A["LINK STANDBY ID SET"] -->|5 Sec| B["LINK"]
    B --> C["Blinking blue fast"]
Rear of Subwoofer Rear of Subwoofer
-
Press and hold the Up button on the remote control for at least 5 seconds.
-
The ID SET message appears on the display of the Soundbar for a moment, and then it disappears.
- The Soundbar will automatically power on when ID SET is complete.
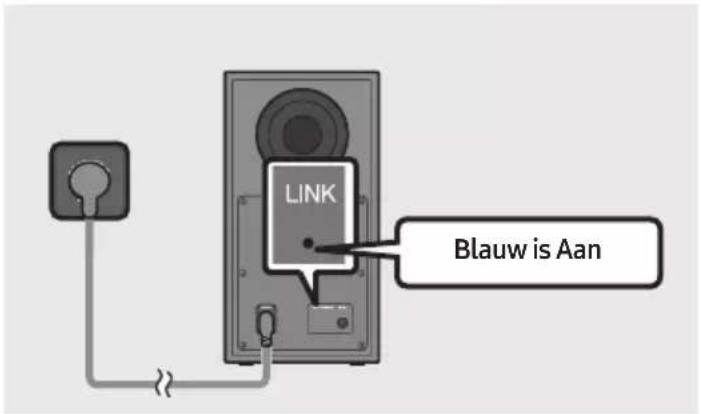
- Check if the LINK LED is solid blue (connection complete).
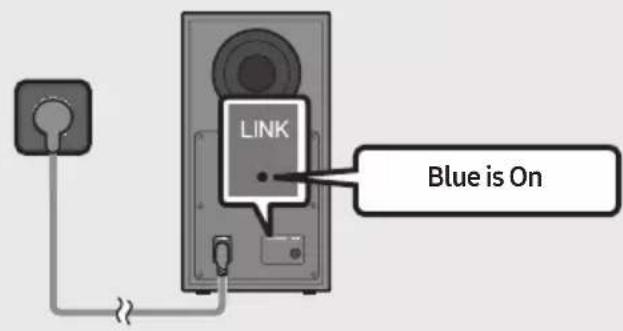
The LINK LED indicator stops blinking and glows a solid blue when a connection is established between the Soundbar and the Wireless Subwoofer.
LED Indicator Lights on the Rear of Subwoofer
| LED Status Description Resolution | |||
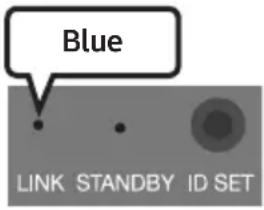 | On | Successfully connected (normal operation) | - |
| Blinking Re | recovering the connection | Check if the power cable attached to the main Soundbar unit is connected properly or wait about 5 minutes. If blinking persists, try manually connecting the subwoofer. See page 16. | |
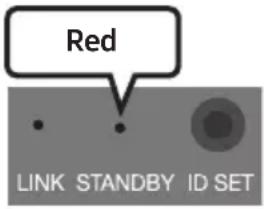 | On | Standby (with the Soundbar main unit turned off) | Check if the power cable attached to the main Soundbar unit is connected properly. |
| Connection failed | Connect again. See the instructions for manual connection on page 16. | ||
 | Blinking Malfunction | See the contact information for the Samsung Service Centre in this manual. | |
NOTES
- Before moving or installing this product, be sure to turn off the power and disconnect the power cord.
- If the main unit is powered off, the wireless subwoofer will go into stand-by mode and the STANDBY LED on the rear of the sub-woofer will turn red after blinking blue several times.
- If you use a device that uses the same frequency as the Soundbar near the Soundbar, interference may cause some sound interruption.
- The maximum transmission distance of the main unit's wireless signal is about 10 m, but may vary depending on your operating environment. If a steel-concrete or metallic wall is between the main unit and the wireless subwoofer, the system may not operate at all because the wireless signal cannot penetrate metal.
CAUTION
- Wireless receiving antennas are built into the wireless subwoofer. Keep the unit away from water and moisture.
- For optimal listening performance, make sure that the area around the wireless subwoofer and the Wireless Rear Speakers (sold separately) are clear of any obstructions.
Connecting the Samsung Wireless Rear Kit to your Soundbar
Expand to true wireless surround sound by connecting the Samsung Wireless Rear Speaker Kit (SWA-9200S sold separately) to your Soundbar.
For detailed information on connections, see the Samsung Wireless Rear Speaker Kit manual.
05 CONNECTING TO A TV
Method 1. Connecting with HDMI
Connecting the TV that supports HDMI ARC/eARC (Audio Return Channel/Enhanced Audio Return Channel)

CAUTION
- When both the HDMI cable and optical cable are connected, the HDMI signal is received first.
- To connect the HDMI cable between the TV and Soundbar, be sure to connect the terminals marked ARC or eARC. Otherwise, the TV sound output may not work.
- The recommended cable is High Speed HDMI Cable with Ethernet.
- When connecting a TV that supports the eARC function, "TV eARC" appears on the display and the sound is heard.
- Dolby Atmos® is supported in the ARC/eARC function.

flowchart
graph TD
    A["TV"] --> B["HDMI IN (eARC)"]
    B --> C["Connect to the HDMI IN (ARC) or (eARC) port of your TV."]
    C --> D["HDMI Cable 1"]
    D --> E["Bottom of the Soundbar"]
    E --> F["HDMI TO TV (eARC/ARC)"]
    F --> G["Top of the Soundbar"]
    G --> H["Top of the Soundbar"]
    H --> I["TV ARC or TV eARC"]
-
With the Soundbar and TV turned on, connect the HDMI cable as shown in the figure.
-
"TV ARC" or "TV eARC" appears in the display window of the Soundbar main unit and the Soundbar plays TV sound.
- "TV eARC" is displayed when the eARC function in the TV setting is On.
- To connect with eARC, the eARC function in the TV menu should be set to On. Refer to the TV user manual for details on setting. (e.g. Samsung TV: Home (☐) → Menu → Settings (☒) → All Settings (☒) → Sound → Expert Settings → HDMI-eARC Mode (Auto))
- If TV sound is inaudible, press the → (Source) button on the remote control or on the top of the Soundbar to switch to "D.IN" mode. The screen displays "D.IN" and "TV ARC" or "TV eARC" in sequence, and TV sound is played.
- If "TV ARC" or "TV eARC" does not appear in the display window of the Soundbar main unit, confirm that the HDMI cable is connected to the correct port.
- Use the volume buttons on the TV's remote control to change the volume on the Soundbar.
NOTES
- When you connect the TV that supports the HDMI ARC/eARC (Audio Return Channel/Enhanced Audio Return Channel) to the Soundbar with an HDMI cable, you can transmit the digital video and audio data without connecting a separate optical cable.
- We recommend you use a coreless HDMI cable if possible. If you use a cored HDMI cable, use one with a diameter that is less than 14 mm.
- This function is not available if the HDMI cable does not support ARC or eARC.
- ARC and eARC differ in bandwidth. eARC that is enhanced version of the audio return channel has significantly higher bandwidth than ARC. Higher bandwidth increases the amount of data that can be transmitted. So, with the eARC channel, you can enjoy the sound through formats such as Dolby Atmos®.
- When the audio in a broadcast is encoded in Dolby Digital and the “Digital Output Audio Format” on your TV is set to PCM, we recommend that you change the setting to Dolby Digital. When the setting on the TV is changed, you will experience better sound quality. (The TV menu may use different words for Dolby Digital and PCM depending on the TV manufacturer.)
Method 2. Connecting using an Optical Cable
Pre-connection Checklist
- When both the HDMI cable and optical cable are connected, the HDMI signal is received first.
- When you use an optical cable and the terminals have covers, be sure to remove the covers.

natural_image
Diagram showing a mechanical component before and after assembly, with no visible text or symbols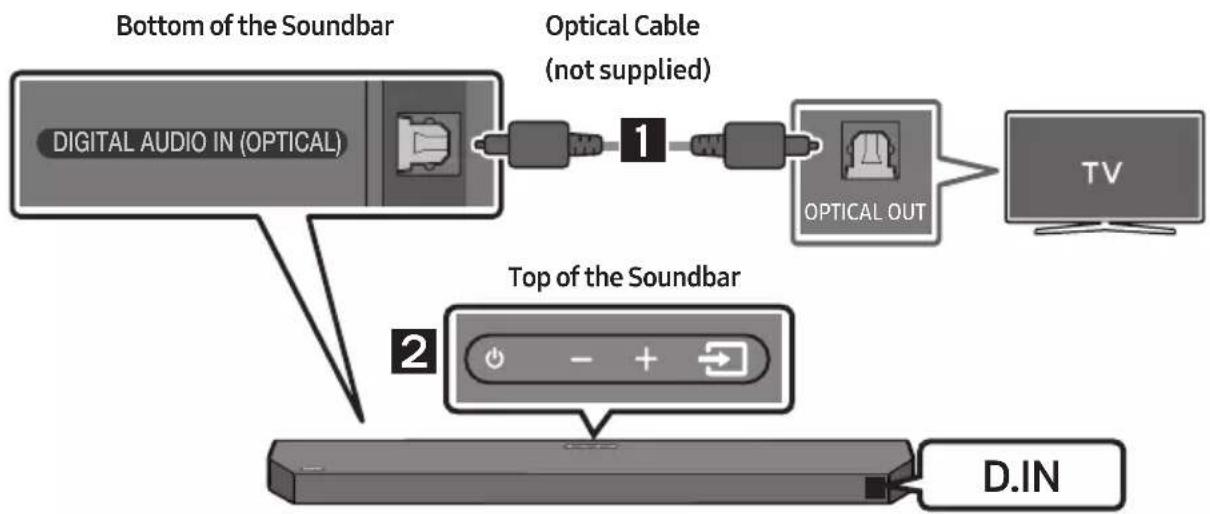
flowchart
graph TD
    A["Bottom of the Soundbar"] --> B["Digital Audio IN (OPTICAL)"]
    B --> C["Optical Cable (not supplied)"]
    C --> D["1"]
    D --> E["OPTICAL OUT"]
    E --> F["TV"]
    G["Top of the Soundbar"] --> H["2"]
    H --> I["D.IN"]
- Connect the DIGITAL AUDIO IN (OPTICAL) port on the Soundbar to the OPTICAL OUT port of the TV with a digital Optical Cable (not supplied).
- Press the → (Source) button on the top panel or remote control, and then select the "D.IN" mode.
- The TV sound is played from the Soundbar.
Using the Q-Symphony Function
For Q-Symphony, the Soundbar syncs with a Samsung TV to output sound through two devices for optimum surround effect. When the Soundbar is connected, the menu, "TV+Soundbar" appears under the Sound Output menu of the TV. Select the corresponding menu.
• TV menu example: TV + [AV] Soundbar series name (HDMI)
NOTES
• It can operate according to the Codec supported by TV.
- This function is supported only when the HDMI Cable or Optical Cable (not supplied) is connected.
• The message displayed may differ with the TV model.
- This function is available in some Samsung TVs and some Soundbar models.
Method 3. Connecting via Bluetooth
When a TV is connected using Bluetooth, you can hear stereo sound without the hassle of cabling.
- Only one TV can be connected at a time.
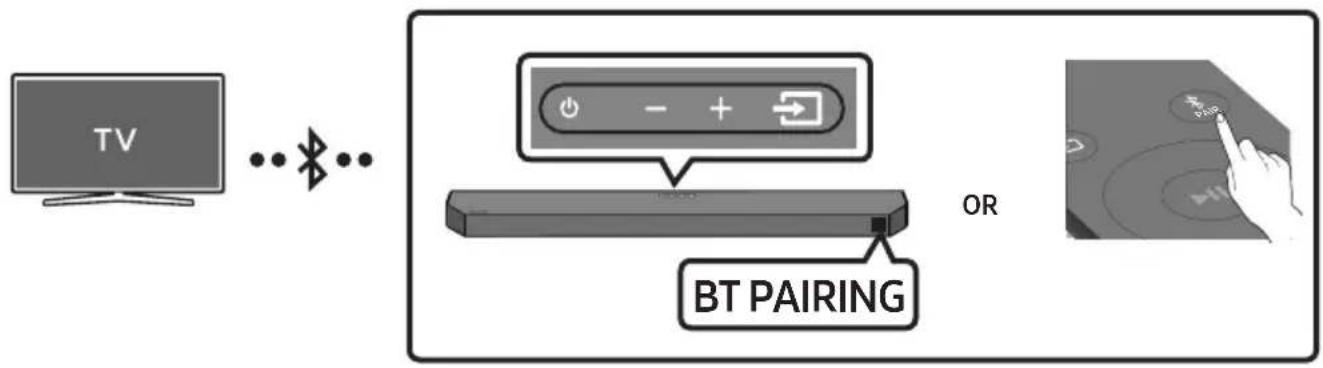
flowchart
graph LR
    A["TV"] --> B["Bluetooth"]
    B --> C["BT PAIRING"]
    C --> D["OR"]
The initial connection
- Press the ✗PAIR button on the remote control to enter the "BT PAIRING" mode.
(OR) a. Press the → (Source) button on the top panel and then select "BT".
"BT" changes to "BT PAIRING" in a few seconds automatically or changes to "BT READY" if there is a connect record.
b. When "BT READY" appears, press and hold the → (Source) button on the top panel of the Soundbar for more than 5 seconds to display "BT PAIRING".
-
Select Bluetooth mode on the TV. (For more information, see the TV's manual.)
-
Select "Soundbar Q6C-Series(Bluetooth)" from the list on TV's screen.
An available Soundbar is indicated with "Need Pairing" or "Paired" on the TV's Bluetooth device list. To connect the TV to the Soundbar, select the message, and then establish a connection.
- When the TV is connected, [TV Name] "BT" appears on the Soundbar's front display.
- You can now hear TV sound from the Soundbar.
- After you have connected the Soundbar to your TV the first time, use the "BT READY" mode to reconnect.
If the device fails to connect
- If a previously connected Soundbar listing (e.g. "Soundbar Q6C-Series(Bluetooth)") appears in the list, delete it.
- Then repeat steps 1 through 3.
Disconnecting the Soundbar from the TV
Press the → (Source) button on the top panel or on the remote control and switch to any mode but "BT".
- Disconnecting takes time because the TV must receive a response from the Soundbar. (The time required may differ, depending on the TV model.)
- To cancel the automatic Bluetooth connection between the Soundbar and TV, press the Left button on the remote control for 5 seconds with the Soundbar in "BT READY" status. (Toggle On → Off)
What is the difference between BT READY and BT PAIRING?
- BT READY : In this mode, you can reconnect TV or mobile device that was connected before.
- BT PAIRING : In this mode, you can connect a new device to the Soundbar. (Press the ✗PAIR button on the remote control or press and hold the ➞(Source) button on the top of the Soundbar for more than 5 seconds while the Soundbar is in "BT" mode.)
Notes on Bluetooth connection
- Locate a new device within 1 m to connect via Bluetooth communication.
- If asked for a PIN code when connecting a Bluetooth device, enter <0000>.
- In Bluetooth connection mode, the Bluetooth connection will be lost if the distance between the Soundbar and the Bluetooth device exceeds 10 m.
- The Soundbar automatically turns off after 18 minutes in the Ready state.
-
The Soundbar may not perform Bluetooth search or connection correctly under the following circumstances:
-
If there is a strong electrical field around the Soundbar.
- If several Bluetooth devices are simultaneously paired with the Soundbar.
- If the Bluetooth device is turned off, not in place, or malfunctions.
- Electronic devices may cause radio interference. Devices that generate electromagnetic waves must be kept away from the Soundbar main unit - e.g., microwaves, wireless LAN devices, etc.
06 CONNECTING AN EXTERNAL DEVICE
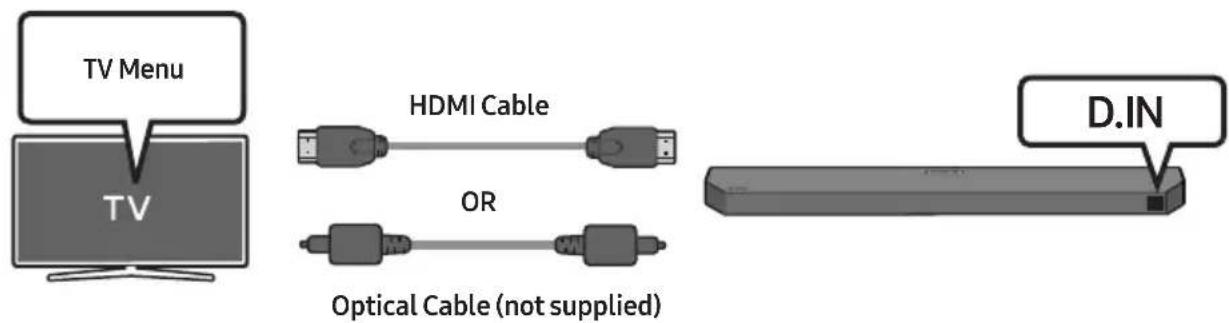
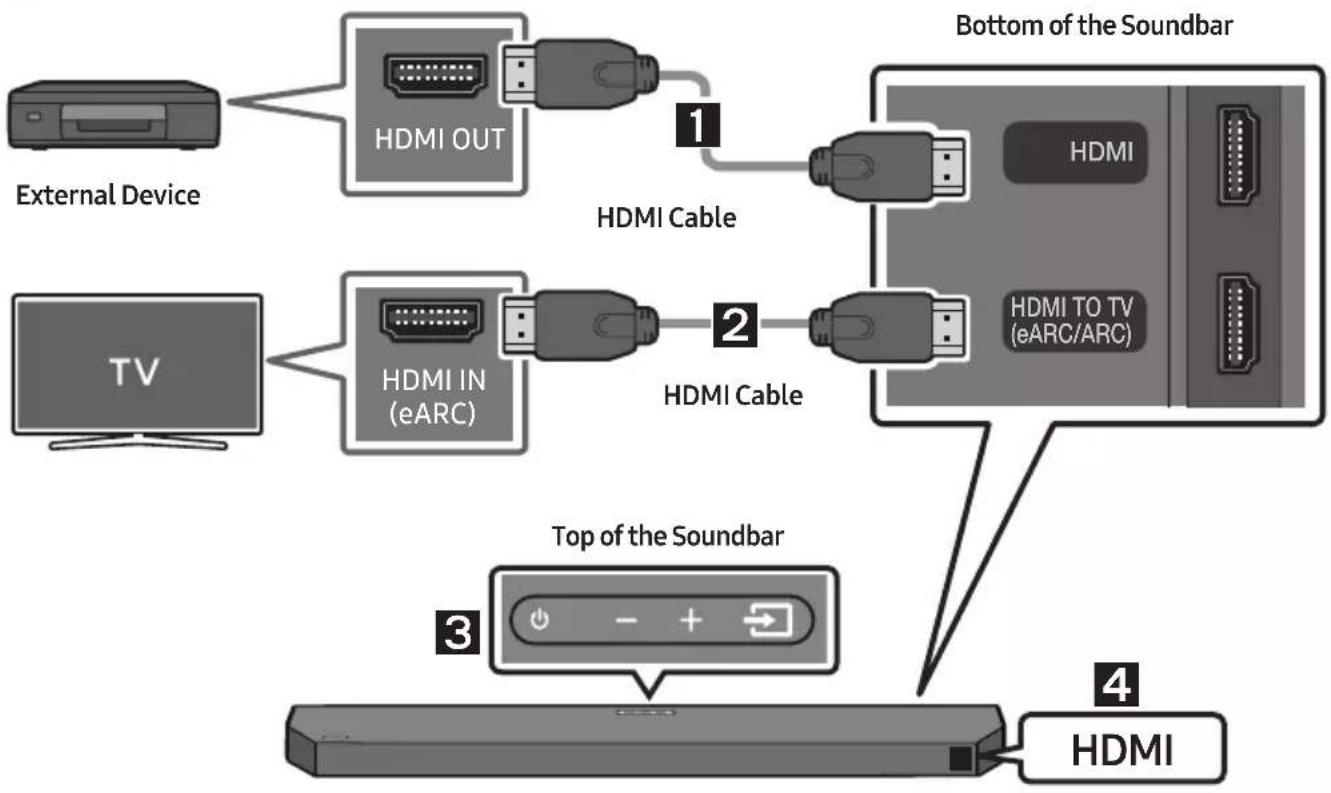
Method 1. Connecting using an HDMI Cable (Capable of Dolby Atmos® decoding and playback)
Pre-connection Checklist
- If the Audio Output options include Secondary Audio, make sure Secondary Audio is set to Off.
• Make sure that the content supports Dolby Atmos®.
flowchart
graph TD
    A["External Device"] --> B["HDMI OUT"]
    B --> C["HDMI Cable"]
    D["TV"] --> E["HDMI IN (eARC)"]
    E --> F["HDMI Cable"]
    F --> G["HDMI TO TV (eARC/ARC)"]
    G --> H["Bottom of the Soundbar"]
    I["Top of the Soundbar"] --> J["+ - +"]
    K["HDMI"] --> L["Bottom of the Soundbar"]
- Connect an HDMI cable from the HDMI port on the bottom of the Soundbar to the HDMI OUT port on your digital device.
- Connect an HDMI cable from the HDMI TO TV (eARC/ARC) port on the bottom of the Soundbar to the HDMI IN (eARC) port on your TV.
- Press the → (Source) button on the top panel or on the remote control, and then select "HDMI".
- "HDMI" mode is displayed on the Soundbar display panel and sound plays.
NOTES
- When you use Dolby Atmos®: If the input source is Dolby Atmos®, refer to "Output specifications for the different sound effect modes" on page 13.
- When Dolby Atmos® is activated, "DOLBY ATMOS" appears in the front display.
- Configuring Dolby Atmos® on your BD player or other device.
Open the audio output options on the settings menu of your BD player or other device and make sure that "No Encoding" is selected for Bitstream. For example, on a Samsung BD Player, go to Home Menu → Sound → Digital Output and then select Bitstream (unprocessed).
- HDMI Pass-Through is that the Soundbar plays the audio from the source through its own speakers and sends the unaltered video signal to a TV via the second HDMI cable.
Supported UHD Signals Specification (3840 x 2160p)
| Frame rate (fps) | Colour depth | RGB 4:4:4 | YCbCr 4:4:4 | YCbCr 4:2:2 | YCbCr 4:2:0 |
| <60 | 8 bit 0 0 0 0 | ||||
| 10 bit -- 0 0 | |||||
| 12 bit -- 0 0 | |||||
| 120 | 8 bit ---- | ||||
| 10 bit ---- |
- Supported specification may vary depending on the connected external device or usage conditions.
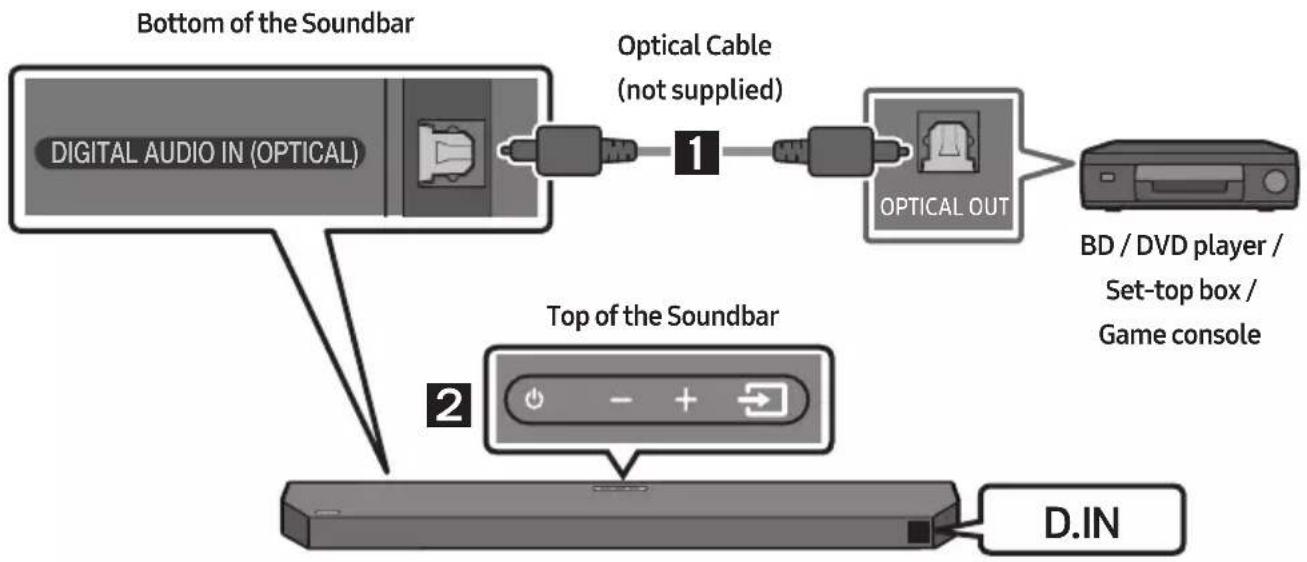
Method 2. Connecting using an Optical Cable
flowchart
graph TD
    A["Bottom of the Soundbar"] --> B["Digital Audio IN (OPTICAL)"]
    B --> C["Optical Cable (not supplied)"]
    C --> D["1"]
    D --> E["OPTICAL OUT"]
    E --> F["BD / DVD player / Set-top box / Game console"]
    G["Top of the Soundbar"] --> H["2"]
    H --> I["D.IN"]
- Connect the DIGITAL AUDIO IN (OPTICAL) port on the Soundbar and the OPTICAL OUT port on the external device with the optical cable (not supplied), as shown in the figure.
- Select "D.IN" mode by pressing the → (Source) button on the top panel or on the remote control.
- The external device sound is output from the Soundbar.
07 CONNECTING A USB DRIVE
You can play music files located on USB drive through the Soundbar.
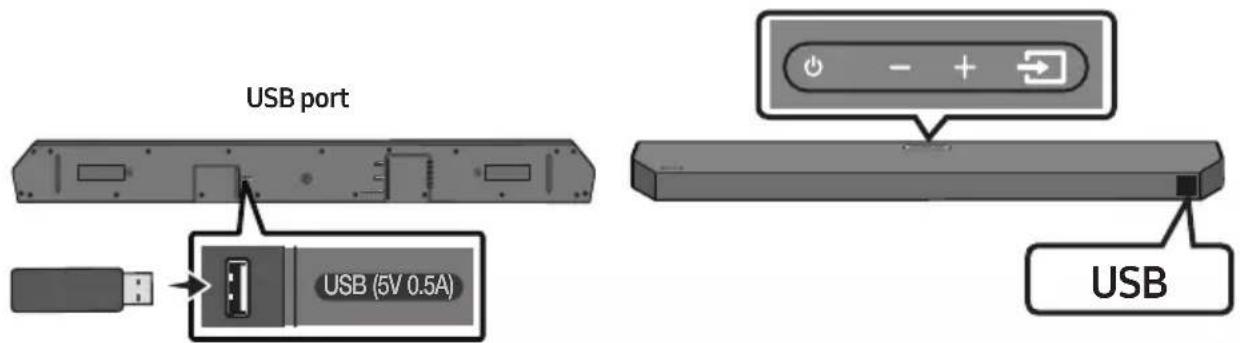
- Connect the USB drive to the USB port on the bottom of the product.
- Press the → (Source) button on the top panel or on the remote control, and then select "USB".
- "USB" appears in the display screen.
- Play music files from the USB drive through the Soundbar.
- The Soundbar automatically turns off (Auto Power Down) if there is no audio signal from USB drive or no USB drive connection for more than 18 minutes.
File Format Type Compatibility list
| Extension | Codec | Sampling Rate | Bit Rate |
| *.mp3 MPEG1 Layer2 32 | kHz ~ 48kHz 32kbps ~ 320kbps | ||
| MPEG1 Layer3 32kHz ~ 48kHz 32kbps ~ 320kbps | |||
| MPEG2 Layer3 | 16kHz ~ 24kHz | 8kbps ~ 160kbps | |
| MPEG2.5 Layer3 | 8kHz ~ 12kHz | 8kbps ~ 160kbps | |
| *.wma | WMA7/8/9 (Audio Only) | 32kHz ~ 48kHz | 32kbps ~ 320kbps |
| *.ogg | Vorbis | 32kHz ~ 48kHz | 45kbps ~ 500kbps |
| *.aac*.m4a*.mp4 | AAC-LC(MPEG2/MPEG4 Audio Only) | 32kHz ~ 48kHz 32kbps ~ 320kbps | |
| *.wav | LPCM | 32kHz ~ 192kHz | 1,024kbps ~ 9,216kbps |
| *.flac | FLAC | 32kHz ~ 192kHz | 162kbps ~ 8,100kbps |
| *.aiff | AIFF | 32kHz ~ 192kHz | 1,024kbps ~ 9,216kbps |
- If there are too many folders (about 200) and files (about 2000) stored on the USB drive, it may take the Soundbar some time to access and play files.
• Supported USB file system : FAT16, FAT32, NTFS
08 CONNECTING A MOBILE DEVICE
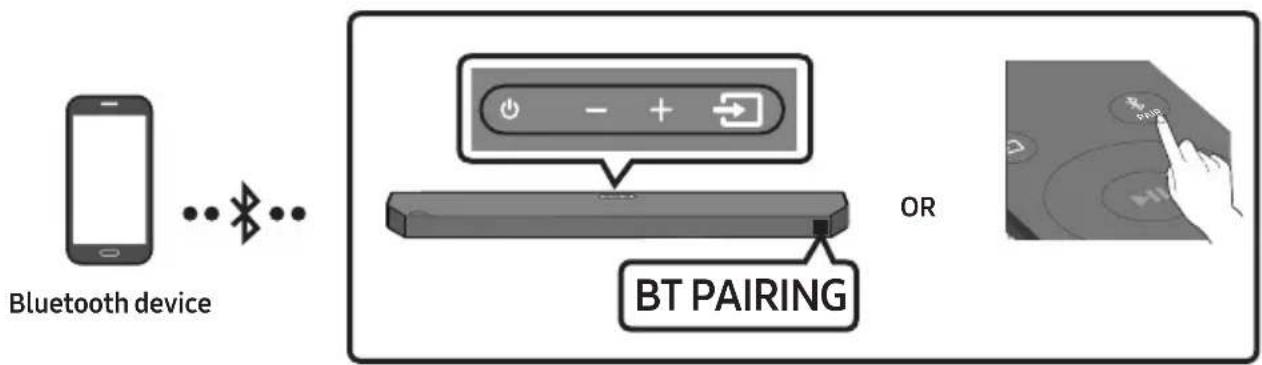
Connecting via Bluetooth
When a mobile device is connected using Bluetooth, you can hear stereo sound without the hassle of cabling.
- When you connect a paired Bluetooth device with the Soundbar off, the Soundbar automatically turns on.
• The connection is limited to one TV or two Bluetooth devices at the same time.
flowchart
graph LR
    A["Bluetooth device"] --> B["..."]
    B --> C["BT PAIRING"]
    C --> D["OR"]
    D --> E["Hand interacting with a screen displaying 'OK', 'Cancel', 'Hold', 'Reset'"]
    style A fill:#f9f,stroke:#333
    style B fill:#ccf,stroke:#333
    style C fill:#cfc,stroke:#333
    style D fill:#fcc,stroke:#333
    style E fill:#cff,stroke:#333
The initial connection
- When connecting to a new Bluetooth device, make sure the device is within 1 m distance.
- Press the ✦PAIR button on the remote control to enter the "BT PAIRING" mode.
(OR)
a. Press the Source) button on the top panel and then select "BT". "BT" changes to "BT PAIRING" in a few seconds automatically or changes to "BT READY" if there is a connect record.
b. When "BT READY" appears, press and hold the (Source) button on the top panel of the Soundbar for more than 5 seconds to display "BT PAIRING".
- On your device, select “[AV]Samsung Soundbar Q6C-Series” from the list that appears.
- When the Soundbar is connected to the Mobile device, [Mobile Device Name] "BT" appears in the front display.
- Play music files from the device connected via Bluetooth through the Soundbar.
- After you have connected the Soundbar to your mobile device the first time, use the "BT READY" mode to reconnect.
If the device fails to connect
- If you have an existing Soundbar (e.g., "[AV]Samsung Soundbar Q6C-Series") on the list of speakers on the Mobile device, delete it.
- Then repeat steps 1 and 2.
What is the difference between BT READY and BT PAIRING?
- BT READY : In this mode, you can reconnect TV or mobile device that was connected before.
- BT PAIRING : In this mode, you can connect a new device to the Soundbar. (Press the ✗PAIR button on the remote control or press and hold the ➕ (Source) button on the top of the Soundbar for more than 5 seconds while the Soundbar is in "BT" mode.)
Notes on Bluetooth connection
- Locate a new device within 1 m to connect via Bluetooth communication.
- If asked for a PIN code when connecting a Bluetooth device, enter <0000>.
- In Bluetooth connection mode, the Bluetooth connection will be lost if the distance between the Soundbar and the Bluetooth device exceeds 10 m.
- The Soundbar automatically turns off after 18 minutes in the Ready state.
-
The Soundbar may not perform Bluetooth search or connection correctly under the following circumstances:
-
If there is a strong electrical field around the Soundbar.
- If several Bluetooth devices are simultaneously paired with the Soundbar.
-
If the Bluetooth device is turned off, not in place, or malfunctions.
-
Electronic devices may cause radio interference. Devices that generate electromagnetic waves must be kept away from the Soundbar main unit - e.g., microwaves, wireless LAN devices, etc.
- The Soundbar supports SBC data (44.1kHz, 48kHz).
- Connect only to a Bluetooth device that supports the A2DP (AV) function.
- You cannot connect the Soundbar to a Bluetooth device that supports only the HF (Hands Free) function.
- Once you have paired the Soundbar to a Bluetooth device, selecting "[AV]Samsung Soundbar Q6C-Series" from the device's scanned devices list will automatically change the Soundbar to "BT" mode.
- Available only if the Soundbar is listed among the Bluetooth device's paired devices.
(The Bluetooth device and the Soundbar must have been previously paired at least once.)
- The Soundbar will appear in the Bluetooth device's searched devices list only when the Soundbar is displaying "BT READY".
- When connecting the Soundbar to a Bluetooth device, place them as close to each other as possible.
- The farther the Soundbar and Bluetooth device are from each other, the lower the sound quality will become. The Bluetooth connection may disconnect when the devices are out of the effective range.
- The Bluetooth connection may not function as intended in areas with poor reception.
- A Bluetooth device may experience noise or malfunction under in the following conditions:
- When the body is in contact with the signal transceiver on the Bluetooth device or Soundbar
- In corners or when there is an obstacle in proximity, such as a wall or partition, where electrical changes may occur.
- When exposed to radio interferences by other products operating on the same frequency ranges, such as medical equipment, microwave ovens, and wireless LAN devices.
- Obstacles such as doors and walls may still impact the sound quality even when the devices are within the effective range.
- Note that your Soundbar cannot be paired with other Bluetooth devices while using the Bluetooth option.
- This wireless device may cause electrical interference during operation.
Bluetooth Power On (SOUND MODE)
If a previously paired Bluetooth device tries to pair with the Soundbar when the Bluetooth Power On function is on and the Soundbar is turned off, the Soundbar turns on automatically.
-
Press and hold the SOUND MODE button for more than 5 seconds on the remote while the Soundbar is turned on.
-
"ON-BLUETOOTH POWER" appears on the Soundbar's display.
Disconnecting the Bluetooth device from a Soundbar
You can disconnect a Bluetooth device from the Soundbar. For instructions, see the Bluetooth device's user manual.
• The Soundbar will be disconnected.
- When the Soundbar is disconnected from the Bluetooth device, the Soundbar will display "BT DISCONNECTED" on the front display.
Disconnecting the Soundbar from the Bluetooth device
Press the → (Source) button on the top panel or on the remote control, and then change to any mode except "BT".
- Disconnecting takes time because the Bluetooth device must receive a response from the Soundbar. (Disconnection time may differ, depending on the Bluetooth device)
- When the Soundbar is disconnected from the Bluetooth device, the Soundbar will display "BT DISCONNECTED" on the front display.
Bluetooth Multi connection
The Soundbar can be connected to 2 Bluetooth devices at the same time.
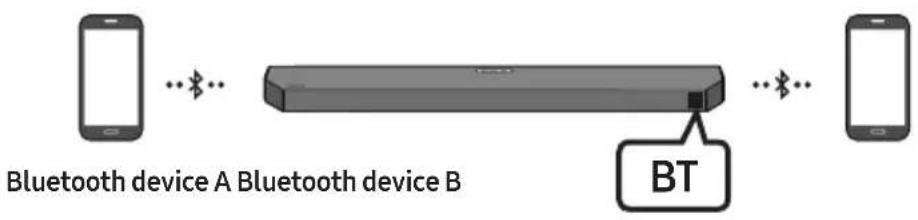
flowchart
graph LR
    A["Bluetooth device A"] -->|Bluetooth| B["Bluetooth device B"]
    B -->|Bluetooth| C["BT"]
- Connect the Soundbar to up to two Bluetooth devices. (See page 28)
- Play music from one of the connected Bluetooth devices while two devices are connected.
- If music is played from the Bluetooth device "B" while playing from the device "A", the music is started playing on the device "B" and automatically being stopped/paused playback on the device "A".
- In versions prior to AVRCP V1.4, the switching time of the device playing music may be delayed.
NOTES
- The device can be switched by notification or alarm on some devices.
- Some devices do not support Bluetooth multi connection.
- "BT PAIRING" mode stops when no device is paired within 3 minutes.
- Switching devices may take about 7 seconds on some apps.
- If you attempt to connect a 3rd Bluetooth device, the A or B devices will be disconnected. (A device that is not currently playing will be disconnected.)
- Only one Samsung TV, or 2 Bluetooth devices can be connected at the same time.
- The Soundbar will be disconnected from Bluetooth devices when it receives a connection request from a Samsung TV.
Using Tap Sound
Tap the Soundbar with your mobile device to play audio from the mobile device through the Soundbar.
- This function may not be supported, depending on the mobile device.
- This function is only compatible with Samsung mobile devices with Android 8.1 or later.
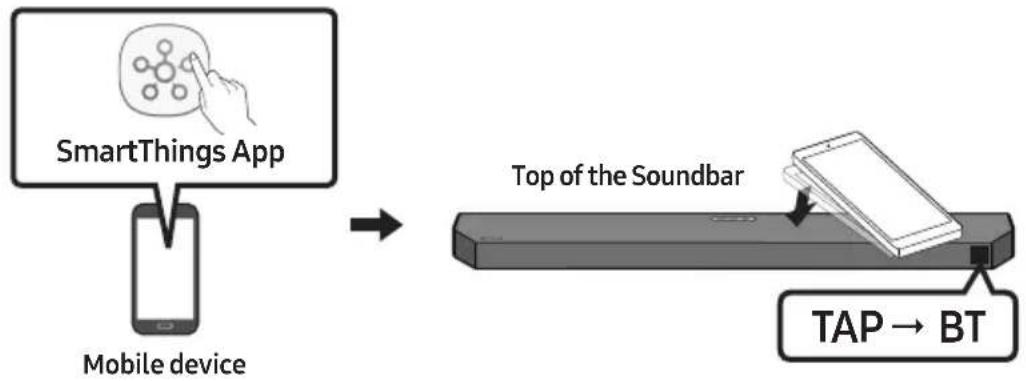
flowchart
graph LR
    A["SmartThings App"] --> B["Mobile device"]
    B --> C["Top of the Soundbar"]
    C --> D["TAP → BT"]
-
Turn on the Tap Sound function on your mobile device.
-
For details on how to turn on the function, refer to "Enable the Tap Sound function" below.
- Tap the Soundbar with the mobile device. Select "Start now" in the displayed message window. A connection is established between the mobile device and Soundbar via Bluetooth.
-
Play audio from the mobile device through the Soundbar.
-
This function connects a mobile device to the Soundbar via Bluetooth by detecting vibration that occurs when the device touches the Soundbar.
- Make sure the mobile device does not tap a sharp corner of the Soundbar. The Soundbar or mobile device may become scratched or damaged.
- It is recommended that the mobile device be covered with a case. Lightly tap the wide area in the upper portion of the Soundbar, without using excessive force.
- To use this function, update the SmartThings app to the latest version.
The function may not be supported, depending on the app version.
Enable the Tap Sound function
Use the SmartThings app to turn on the Tap View, Tap Sound function.
- On the mobile device, run the SmartThings app.
- Select (≡→_) in the SmartThings app screen displayed on the mobile device.
- Set "Tap View, Tap Sound" to On to allow the function to work when a mobile device moves close to the Soundbar.
NOTES
- When the mobile device is in power-saving mode, the Tap Sound function does not work.
- The Tap Sound function may not work if there are devices near the Soundbar that cause radio interference such as electric devices. Make sure devices that may cause radio interference are placed at a sufficient distance away from the Soundbar.
09 INSTALLING THE WALL MOUNT
Installation Precautions
• Install on a vertical wall only.
- Do not install in a place with high temperature or humidity.
- Verify whether the wall is strong enough to support the product's weight. If not, reinforce the wall or choose another installation point.
• Purchase and use the fixing screws or anchors appropriate for the kind of wall you have (plaster board, iron board, wood, etc.). If possible, fix the support screws into wall studs.
• Purchase wall mounting screws according to the type and thickness of the wall you want to mount the Soundbar on.
- Diameter: M5
- Length: 35 mm or longer recommended.
- Connect cables from the unit to external devices before you install the Soundbar on the wall.
- Make sure the unit is turned off and unplugged from the power source before you install it. Otherwise, it may cause an electric shock.
Wallmount Components

Wall Mount Guide
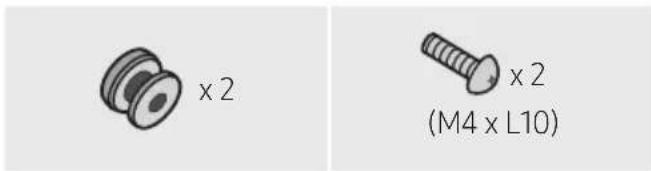
Holder-Screw Screw

natural_image
Simple line drawing of a bracket with no text or symbolsBracket-Wall Mount
- Place the Wall Mount Guide against the wall surface.
• The Wall Mount Guide must be level.
- If your TV is mounted on the wall, install the Soundbar at least 5 cm below the TV.
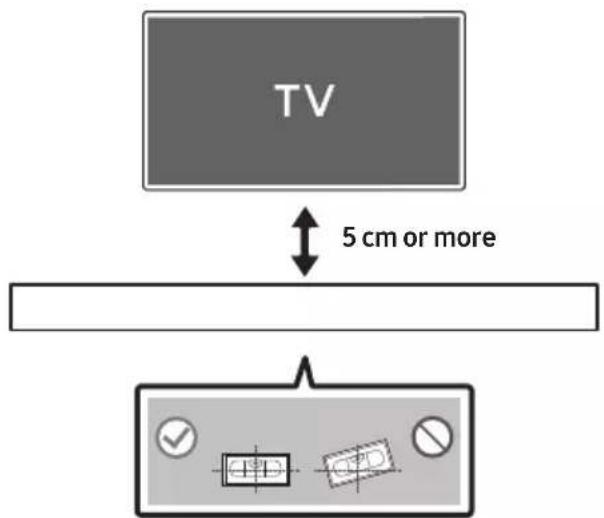
- Align the Wall Mount Guide's Centre Line with the centre of your TV (if you are mounting the Soundbar below your TV), and then fix the Wall Mount Guide to the wall using tape.
- If you are not mounting below a TV, place the Centre Line in the centre of the installation area.
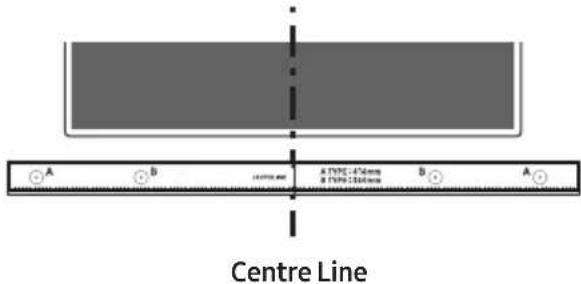
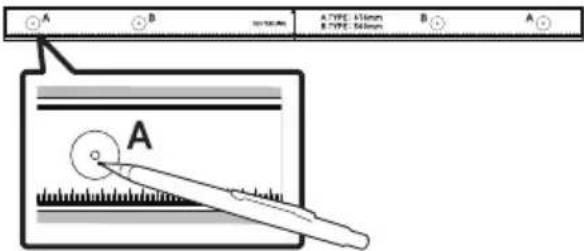
- Push a pen tip or sharpened pencil tip through the centre of the A-TYPE images on each end of the Guide to mark the holes for the supporting screws, and then remove the Wall Mount Guide.
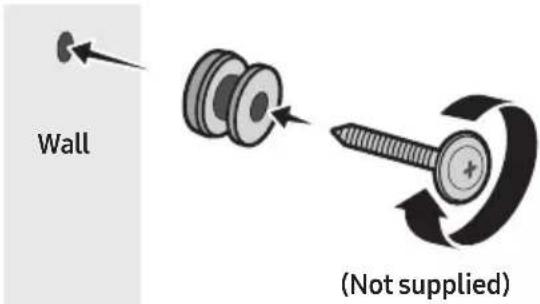
- Using an appropriately sized drill bit, drill a hole in the wall at each marking.
- If the markings do not correspond to the positions of studs, make sure you insert appropriate anchors into the holes before you insert the support screws. If you use anchors, make sure the holes you drill are large enough for the anchors you use.
- Push a screw (not supplied) through each Holder-Screw, and then screw each screw firmly into a support screw hole.
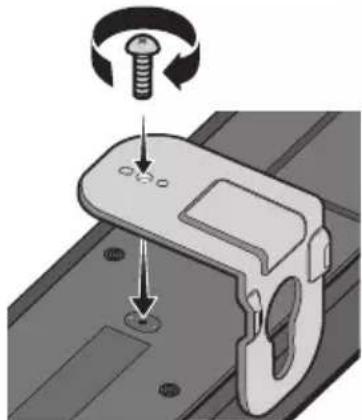
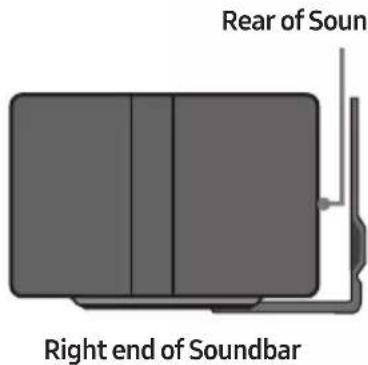
- Install the 2 Bracket-Wall Mounts in the correct orientation on the bottom of the Soundbar using 2 Screws.
natural_image
Mechanical assembly diagram showing a screw being inserted into a bracket with a circular base (no text or symbols)- When assembling, make sure the hanger part of the Bracket-Wall Mounts are located behind the rear of the Soundbar.
- Install the Soundbar with the attached Bracket-Wall Mounts by hanging the Bracket-Wall Mounts on the Holder-Screws on the wall.
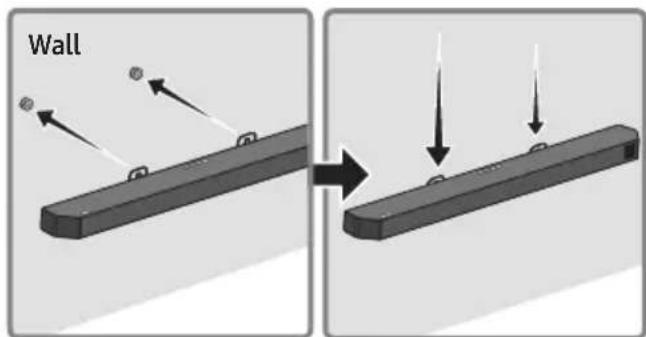
- Slide the Soundbar down as shown below so that the Bracket-Wall Mounts rest securely on the Holder-Screws.
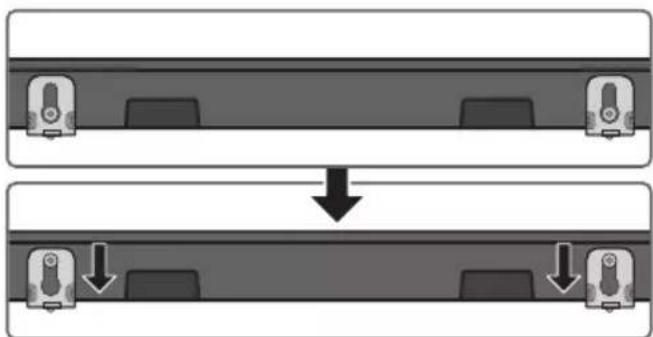
- Insert the Holder-Screws into the wide (bottom) part of the Bracket-Wall Mounts, and then slide the Bracket-Wall Mounts down so that the Bracket-Wall Mounts rest securely on the Holder-Screws.
flowchart
graph TD
    A["Top: Device icon"] --> B["Downward arrow"]
    B --> C["Bottom: Device icon with downward arrows"]
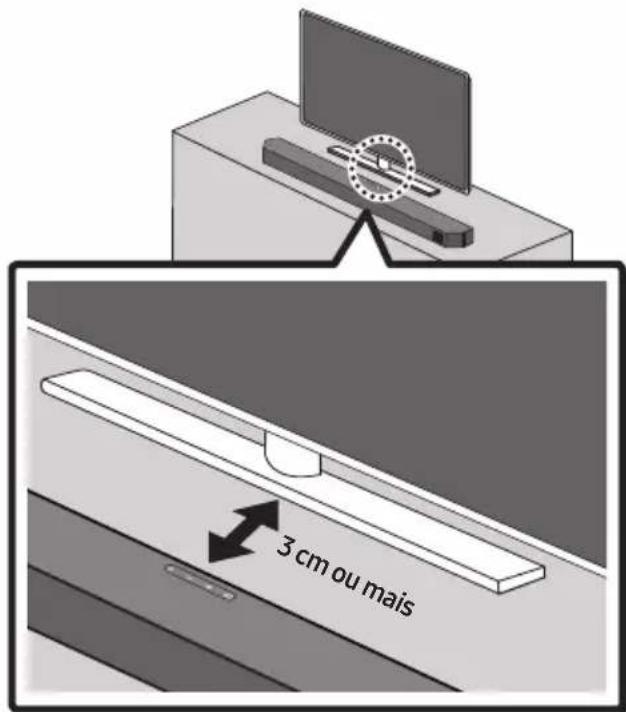
10 INSTALLING THE SOUNDBAR IN FRONT OF TV
Place the Soundbar on a TV stand.

As illustrated in the image, align the centre of the Soundbar with the centre of the TV, carefully place the Soundbar onto the TV stand.
For optimal sound quality, position the Soundbar at least 3 cm away from the TV front.
NOTES
- Make sure the Soundbar is placed on a flat and solid surface.
• Insufficient gap from the TV may cause acoustic problems.
11 SOFTWARE UPDATE
Samsung may offer updates for the Soundbar's system—rmware—in the future.
If an update is offered, you can update the firmware by connecting a USB drive with the firmware update stored on it to the USB port on your Soundbar.
USB Update
After the update completes, all your customized user settings are maintained.
- Connect a USB drive to the USB port on your computer.
Important: Make sure there are no music files on the USB drive. This may cause the firmware update to fail.
- Go to (www.samsung.com) → search for the model name from the customer support menu option.
- For more information about update, refer to Upgrade Guide.
-
Download the upgrade file (USB type).
-
Unzip the downloaded upgrade file and copy the *.bin file to the root directory of the USB drive.
-
Turn off the Soundbar and connect the USB drive containing the firmware update to the USB port on the Soundbar.
-
Turn on the Soundbar and press the

(Source) button to select USB source.
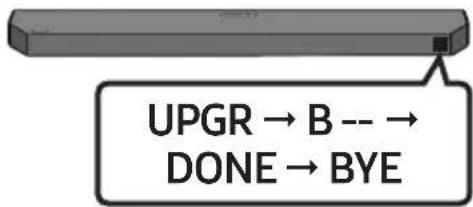
"UPGR" will be displayed, this may take up to 3 minutes.
flowchart
graph TD
    A["UPGR"] --> B["B --"]
    B --> C["DONE → BYE"]
    C --> A
- The process of firmware update is displayed UPGR -> B -- -> DONE -> BYE in sequence, B or H can be displayed according to the firmware that is updated.
NOTES
- Soundbar is rebooted automatically when the update is completed.
- This product has a DUAL BOOT function. If the firmware fails to update, you can update the firmware again.
- During update, do not turn it off or remove the USB.
- If update does not proceed, disconnect and reconnect the Soundbar power cord.
- When the latest version is installed, no update is performed.
- Depending on the USB type, update may not be supported.
- If the connection to the subwoofer is not re-established automatically after the update, refer to page 16.
- If the software update fails, check if the USB drive is defective.
• Mac OS users should use MS-DOS (FAT) as the USB format.
Reset
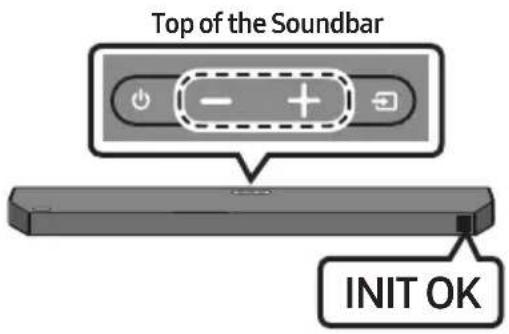
With the Soundbar on, press the - + (Volume) buttons on the top of the Soundbar at the same time for at least 5 seconds. "INIT OK" appears on the display and then the Soundbar is reset.

CAUTION
- All the settings of the Soundbar are reset. Be sure to perform this only when a reset is required.
12 TROUBLESHOOTING
Before seeking assistance, check the following.
Soundbar does not turn on.
→Check whether the power cord of the Soundbar is correctly inserted into the outlet.
Soundbar works erratically.
→After removing the power cord, insert it again.
→Unplug the power cord and plug it back into the external device and try again.
→If there is no signal, the Soundbar automatically turns off after a certain period of time. Turn on the power. (See page 7.)
If the remote control does not work.
→Point the remote directly at the Soundbar.
→Replace the batteries with new ones.
Soundbar does not output any sound.
→The volume of the Soundbar is too low or muted. Adjust the volume.
→When any external device (STB, Bluetooth device, mobile device, etc.) is connected, adjust the volume of the external device.
→For sound output of the TV, select Soundbar. (Samsung TV: Home (
Menu → Settings ( Ⓞ→ All Settings ( )
→ Sound → Sound Output → Select Soundbar)
→The cable connection to the Soundbar may be loose. Remove the cable and connect again.
→Remove the power cord completely, reconnect, and turn the power on.
→Reset the product and try again.
(See page 37.)
Subwoofer does not output any sound.
→Check whether the LED indicator on the rear of the Subwoofer is on in blue. Reconnect the Soundbar and Subwoofer if the indicator is blinking in blue or turned red. (See page 16.)
→You may experience an issue if there is an obstacle between the Soundbar and Subwoofer. Move devices to an area away from obstacles.
→Other devices sending radio frequency signals in proximity may interrupt the connection. Keep your speaker away from such devices.
→Remove and reconnect the power plug.
In case there is sound jitter, delays, or noise from the Subwoofer.
→If there are any objects between the Soundbar and Subwoofer speaker, this could cause a problem. Please reposition these to a place without interference from that object.
→There may be sound jitter or delays when the Subwoofer is far from the Soundbar. Please place it near the Soundbar.
→There may be sound jitter or delays when the Soundbar is near an instrument or electrical device that can cause radio interference.
Place the Soundbar far from such devices that can cause radio interference. (E.g., wireless router)
→Change the TV network connection status from wireless to wired.
The Subwoofer volume is too low.
→The original volume of the content you are playing may be low. Try adjusting the Subwoofer level. (See page 12.)
→Bring the Subwoofer speaker closer to you.
If the TV is not connected via HDMI TO TV (eARC/ARC).
→Check whether the HDMI cable is correctly connected to the eARC terminal.
(See page 19.)
→Connection may not be possible due to the connected external device (set-top box, game machine, etc.). Directly connect the Soundbar.
→HDMI-CEC may not be activated on the TV. Turn on the CEC on the TV menu. (Samsung
TV: Home ( )→ Menu → Settings ( )
All Settings ( → Connection → External Device Manager → Anynet+ (HDMI-CEC) ON)
→To connect with eARC, the eARC function in the TV menu should be set to On.
(Samsung TV: Home (→Menu →
Settings ( Ⓧ→ All Settings ( ) Ⓧ → Sound
→ Expert Settings → HDMI-eARC Mode (Auto))
There is no sound in when connecting to the TV in HDMI TO TV (eARC/ARC) mode.
→Your device is unable to play the input signal. Change the TV's audio output to PCM or AUTO.
(Samsung TV: Home (→Menu →
Settings ( ⏻→ All Settings ( )→Sound
→ Expert Settings → Digital Output Audio Format)
Soundbar does not connect via Bluetooth.
→When connecting a new device, switch to "BT PAIRING" for connection. (Press the
*PAIR button on the remote control or press the → (Source) button on the body for at least 5 seconds.)
→If the Soundbar is connected to another device, disconnect that device first to switch the device.
→Reconnect it after removing the Bluetooth speaker list on the device to connect.
(Samsung TV: Home ( → Menu →
Settings ( ◎→ All Settings ( ) ➕ Sound
→ Sound Output → Bluetooth Speaker List)
→The automatic TV connection may be disabled. While the Soundbar is in "BT
READY", press and hold the Left button on the Soundbar remote control for 5 seconds to select ON-TV CONNECT. If you see
OFF-TV CONNECT, press and hold Left button again for 5 seconds to switch the selection.
→Remove and reconnect the power plug, then try again.
→Reset the product and try again.
(See page 37.)
Sound drops out when connected via Bluetooth.
→Some devices can cause radio interference if they are located too close to the Soundbar. e. g. microwaves, wireless routers, etc.
→If your device that is connected via Bluetooth moves too far away from the Soundbar, it may cause the sound to drop out. Move the device closer to the Soundbar.
→If a part of your body is in contact with the Bluetooth transceiver or the product is installed on metal furniture, sound may drop out. Check the installation environment and conditions for use.
Bluetooth multi connection does not work.
→When the TV is connected to the soundbar, Bluetooth multi connection may not operate. Disconnect the Soundbar from the TV and try again.
→Check whether the Bluetooth Multi connection setting is turned on.
(Refer to the "Soundbar does not connect via Bluetooth." section.)
→Disconnect the device currently playing, pair with the device that you want to connect, and reconnect the previous device.
→If the sound is inaudible even after connecting properly, refer to the "Sound drops out when connected via Bluetooth." section.
Soundbar does not turn on automatically with the TV.
→When you turn off the Soundbar while watching TV, power synchronization with the TV is disabled. First turn off the TV.
13 LICENCE
Dolby
ATMOS
Dolby, Dolby Atmos, and the double-D symbol are registered trademarks of Dolby Laboratories Licensing Corporation. Manufactured under license from Dolby Laboratories. Confidential unpublished works. Copyright © 2012-2021 Dolby Laboratories. All rights reserved.
dts.
For DTS patents, see http://patents.dts.com. Manufactured under license from DTS, Inc. or DTS Licensing Limited. DTS, Digital Surround, Virtual:X, and the DTS logo are registered trademarks or trademarks of DTS, Inc. in the United States and other countries. © 2021 DTS, Inc. ALL RIGHTS RESERVED.
HDMI ^TM
HIGH-DEFINITION MULTIMEDIA INTERFACE
The terms HDMI, HDMI High-Definition Multimedia Interface, HDMI Trade dress and the HDMI Logos are trademarks or registered trademarks of HDMI Licensing Administrator, Inc.

Bluetooth®
The Bluetooth® word mark and logos are registered trademarks owned by Bluetooth SIG, Inc. and any use of such marks by Samsung Electronics Co., Ltd. is under license. Other trademarks and trade names are those of their respective owners.

[ENERGY STAR]
ENERGY STAR qualified model only
- Your Samsung product is ENERGY STAR qualified in its factory default setting. Change to certain features, settings and functionality in this product can change the power consumption, possibly beyond the limits required for ENERGY STAR qualification.
- Environmental Protection Agency and Department of Energy. ENERGY STAR is a joint program of the Government agencies, designed to promote energy efficient products and practices.
Refer to www.energystar.gov for more information of the ENERGY STAR Program.
ENERGY STAR qualified model only (Applicable to Thin Client models only)
As an ENERGY STAR® Partner, SAMSUNG has determined that this product meets the ENERGY STAR® guidelines for energy efficiency.
– The ENERGY STAR Program has been to reduced greenhouse gas emissions and save energy through voluntary labeling.
- Power management setting of this product have been enabled by default, and have various timing setting from 1 minutes to 5 hours.
- The product can wake with a button press on the chassis from sleep mode.
ENERGY STAR qualified model only (The other models)
- As an ENERGY STAR Partner, Samsung has determined that this product or product models meets the ENERGY STAR guideline for energy efficiency.
14 OPEN SOURCE LICENCE NOTICE
To send inquiries and requests for questions regarding open sources, contact Samsung Open Source (http://opensource.samsung.com)
15 IMPORTANT NOTES ABOUT SERVICE
- Figures and illustrations in this User Manual are provided for reference only and may differ from actual product appearance.
- An administration fee may be charged if either
(a) an engineer is called out at your request and there is no defect with the product (i.e. where the user manual has not been read).
(b) you bring the unit to a repair centre and there is no defect with the product (i.e. where the user manual has not been read). - You will be informed of the administration fee amount before a technician visits.
16 SPECIFICATIONS AND GUIDE
Specifications
| Model Name HW-Q60C / HW-Q64C / HW-Q64GC | |
| USB 5V/0.5A | |
| Weight 3.5 kg | |
| Dimensions (W x H x D) 1030.0 x 57.0 x 105.0 mm | |
| Operating Temperature Range +5°C to +35°C | |
| Operating Humidity Range 10 % ~ 75 % | |
| AMPLIFIERRated Output power | 180W (30W x 6) |
| Supported play formats | Dolby 5.1ch / Dolby Digital Plus / Dolby TRUE HD/Dolby ATMOS / DTS Digital Surround/LPCM 8ch |
| Subwoofer Name PS-WC67B | |
| Weight 5.5 kg | |
| Dimensions (W x H x D) 184.0 x 343.0 x 295.0 mm | |
| AMPLIFIERRated Output power | 160W |
| Overall Standby Power Consumption (W) 2.0W | |
| BluetoothPort deactivation method | Press and hold the SOUND MODE button for more than 5 seconds to turn off Bluetooth Power function. |
NOTES
- Samsung Electronics Co., Ltd reserves the right to change the specifications without notice.
• Weight and dimensions are approximate.
- Hereby, Samsung declares that this radio equipment is in compliance with Directive 2014/53/EU and the relevant UK statutory requirements. The full text of the declaration of conformity is available at the following internet address: http://www.samsung.com go to Support and enter the model name. This equipment may be operated in all EU countries and in the UK.
- WIRELESS DEVICE OUTPUT POWER
RF max transmitter power
100mW at 2.4GHz - 2.4835GHz
25mW at 5.725GHz - 5.825GHz
[Correct disposal of batteries in this product]
(Applicable in countries with separate collection systems)
This marking on the battery, manual or packaging indicates that the batteries in this product should not be disposed of with other household waste at the end of their working life. Where marked, the chemical symbols Hg, Cd or Pb indicate that the battery contains mercury, cadmium or lead above the reference levels in EC Directive 2006/66.
If batteries are not properly disposed of, these substances can cause harm to human health or the environment.
To protect natural resources and to promote material reuse, please separate batteries from other types of waste and recycle them through your local, free battery return system.
Correct Disposal of This Product
(Waste Electrical & Electronic Equipment)
(Applicable in countries with separate collection systems)
This marking on the product, accessories or literature indicates that the product and its electronic accessories (e.g. charger, headset, USB cable) should not be disposed of with other household waste at the end of their working life. To prevent possible harm to the environment or human health from uncontrolled waste disposal, please separate these items from other types of waste and recycle them responsibly to promote the sustainable reuse of material resources.
Household users should contact either the retailer where they purchased this product, or their local government office, for details of where and how they can take these items for environmentally safe recycling.
Business users should contact their supplier and check the terms and conditions of the purchase contract. This product and its electronic accessories should not be mixed with other commercial wastes for disposal.
For information on Samsung's environmental commitments and product specific regulatory obligations e.g. REACH, WEEE, Batteries, visit:
www.samsung.com/uk/aboutsamsung/sustainability/environment/our-commitment/data/
COMMISSION REGULATION (EU) 2019/1782
Ecodesign requirements for external power supplies :
www.samsung.com/global/ecodesign_component
INFORMATIONS RELATIVES À LA SÉCURITÉ
AVERTISSEMENTS
natural_image
Diagram showing a mechanical component before and after assembly, with no visible text or symbols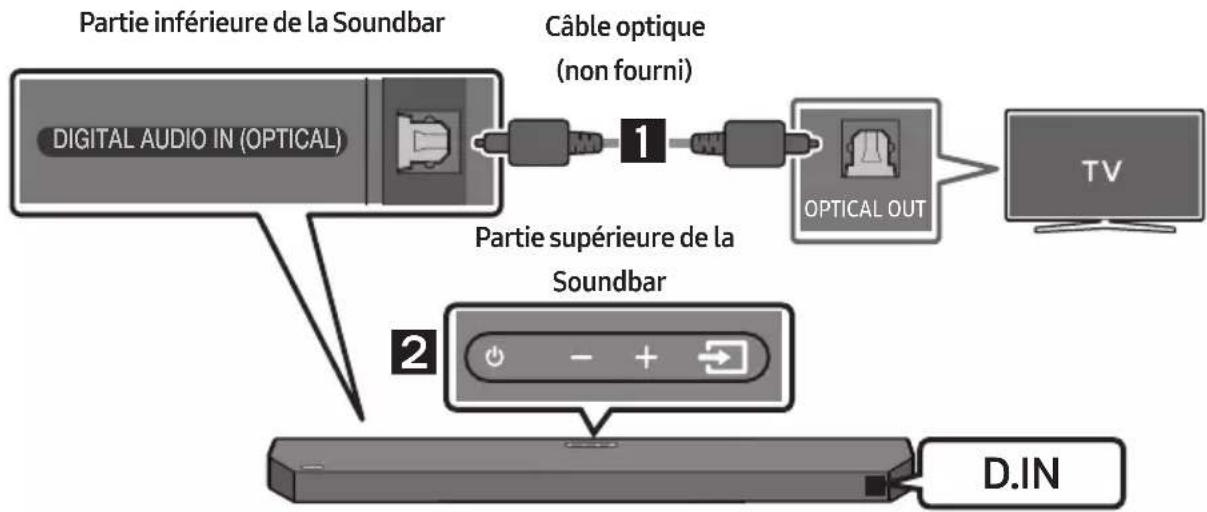
flowchart
graph TD
    A["Partie inférieure de la Soundbar"] --> B["Câble optique (non fourni)"]
    B --> C["OPTICAL OUT"]
    C --> D["TV"]
    E["Partie supérieure de la Soundbar"] --> F["D.IN"]
Guide de fixation murale

Vis de fixation Vis

natural_image
Simple 3D illustration of a bracket with a hole and label 'x2' (no other text or symbols)Support de fixation murale
natural_image
Mechanical component diagram showing a screw being inserted into a housing (no text or symbols)natural_image
Diagram showing a mechanical assembly or assembly process with two stages of transformation, indicated by arrows (no text or symbols present)10 INSTALLATION DE LA SOUNDBAR DEVANT LE TÉLÉVISEUR
flowchart
graph TD
    A["UPGR → B -- → DONE → BYE"] --> B["Next Step"]
Dolby, Dolby Atmos, and the double-D symbol are registered trademarks of Dolby Laboratories Licensing Corporation. Manufactured under license from Dolby Laboratories. Confidential unpublished works. Copyright © 2012-2021 Dolby Laboratories. All rights reserved.
dts.
For DTS patents, see http://patents.dts.com. Manufactured under license from DTS, Inc. or DTS Licensing Limited. DTS, Digital Surround, Virtual:X, and the DTS logo are registered trademarks or trademarks of DTS, Inc. in the United States and other countries. © 2021 DTS, Inc. ALL RIGHTS RESERVED.
HDMI™
HIGH-DEFINITION MULTIMEDIA INTERFACE
The terms HDMI, HDMI High-Definition Multimedia Interface, HDMI Trade dress and the HDMI Logos are trademarks or registered trademarks of HDMI Licensing Administrator, Inc.

Bluetooth®
The Bluetooth® word mark and logos are registered trademarks owned by Bluetooth SIG, Inc. and any use of such marks by Samsung Electronics Co., Ltd. is under license. Other trademarks and trade names are those of their respective owners.

[ENERGY STAR]
ENERGY STAR qualified model only
- Your Samsung product is ENERGY STAR qualified in its factory default setting. Change to certain features, settings and functionality in this product can change the power consumption, possibly beyond the limits required for ENERGY STAR qualification.
- Environmental Protection Agency and Department of Energy. ENERGY STAR is a joint program of the Government agencies, designed to promote energy efficient products and practices.
Refer to www.energystar.gov for more information of the ENERGY STAR Program.
ENERGY STAR qualified model only (Applicable to Thin Client models only)
As an ENERGY STAR® Partner, SAMSUNG has determined that this product meets the ENERGY STAR® guidelines for energy efficiency.
- The ENERGY STAR Program has been to reduced greenhouse gas emissions and save energy through voluntary labeling.
- Power management setting of this product have been enabled by default, and have various timing setting from 1 minutes to 5 hours.
- The product can wake with a button press on the chassis from sleep mode.
ENERGY STAR qualified model only (The other models)
- As an ENERGY STAR Partner, Samsung has determined that this product or product models meets the ENERGY STAR guideline for energy efficiency.
14 AVIS DE LICENCE LIBRE
www.samsung.com/uk/aboutsamsung/sustainability/environment/our-commitment/data/
RÈGLEMENT (UE) 2019/1782 DE LA COMMISSION
natural_image
Three-step diagram showing a device transitioning from a circular component to a rectangular housing, with arrows indicating direction (no text or symbols)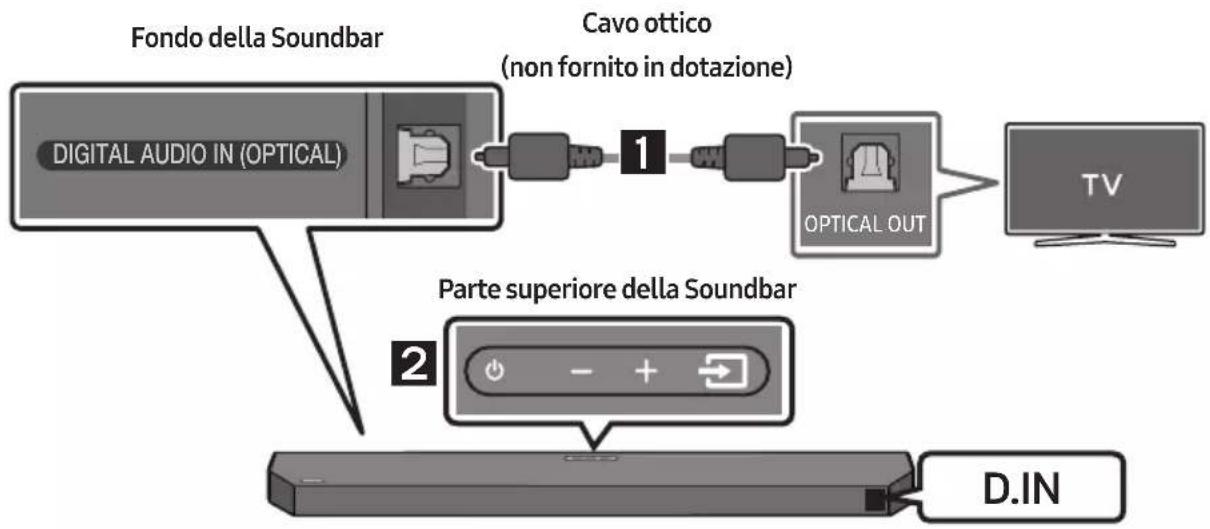
flowchart
graph LR
    A["TV"] -->|Wireless Signal| B["OPPURE"]
    B --> C["BT PAIRING"]
    C --> D["Hand icon pointing at button with 'OFF' and 'PASS' labels"]
natural_image
Simple 3D illustration of a bracket with a cutout and label 'x2' (no other text or symbols)natural_image
Mechanical component diagram showing a screw being inserted into a housing (no text or symbols)Dolby, Dolby Atmos, and the double-D symbol are registered trademarks of Dolby Laboratories Licensing Corporation.
Manufactured under license from Dolby Laboratories. Confidential unpublished works. Copyright © 2012-2021 Dolby Laboratories. All rights reserved.
dts.
For DTS patents, see http://patents.dts.com. Manufactured under license from DTS, Inc. or DTS Licensing Limited. DTS, Digital Surround, Virtual:X, and the DTS logo are registered trademarks or trademarks of DTS, Inc. in the United States and other countries. © 2021 DTS, Inc. ALL RIGHTS RESERVED.
HDMI ^TM
HIGH-DEFINITION MULTIMEDIA INTERFACE
The terms HDMI, HDMI High-Definition Multimedia Interface, HDMI Trade dress and the HDMI Logos are trademarks or registered trademarks of HDMI Licensing Administrator, Inc.

Bluetooth®
The Bluetooth® word mark and logos are registered trademarks owned by Bluetooth SIG, Inc. and any use of such marks by Samsung Electronics Co., Ltd. is under license. Other trademarks and trade names are those of their respective owners.

[ENERGY STAR]
ENERGY STAR qualified model only
- Your Samsung product is ENERGY STAR qualified in its factory default setting. Change to certain features, settings and functionality in this product can change the power consumption, possibly beyond the limits required for ENERGY STAR qualification.
- Environmental Protection Agency and Department of Energy. ENERGY STAR is a joint program of the Government agencies, designed to promote energy efficient products and practices.
Refer to www.energystar.gov for more information of the ENERGY STAR Program.
ENERGY STAR qualified model only (Applicable to Thin Client models only)
As an ENERGY STAR® Partner, SAMSUNG has determined that this product meets the ENERGY STAR® guidelines for energy efficiency.
– The ENERGY STAR Program has been to reduced greenhouse gas emissions and save energy through voluntary labeling.
– Power management setting of this product have been enabled by default, and have various timing setting from 1 minutes to 5 hours.
- The product can wake with a button press on the chassis from sleep mode.
ENERGY STAR qualified model only (The other models)
- As an ENERGY STAR Partner, Samsung has determined that this product or product models meets the ENERGY STAR guideline for energy efficiency.
14 AVVISO DI LICENZA OPEN SOURCE
http://www.samsung.com/it/aboutsamsung/sustainability/environment/our-commitment/data/
REGOLAMENTO (UE) 2019/1782 DELLA COMMISSIONE
natural_image
Diagram showing a mechanical component before and after assembly, with no visible text or symbols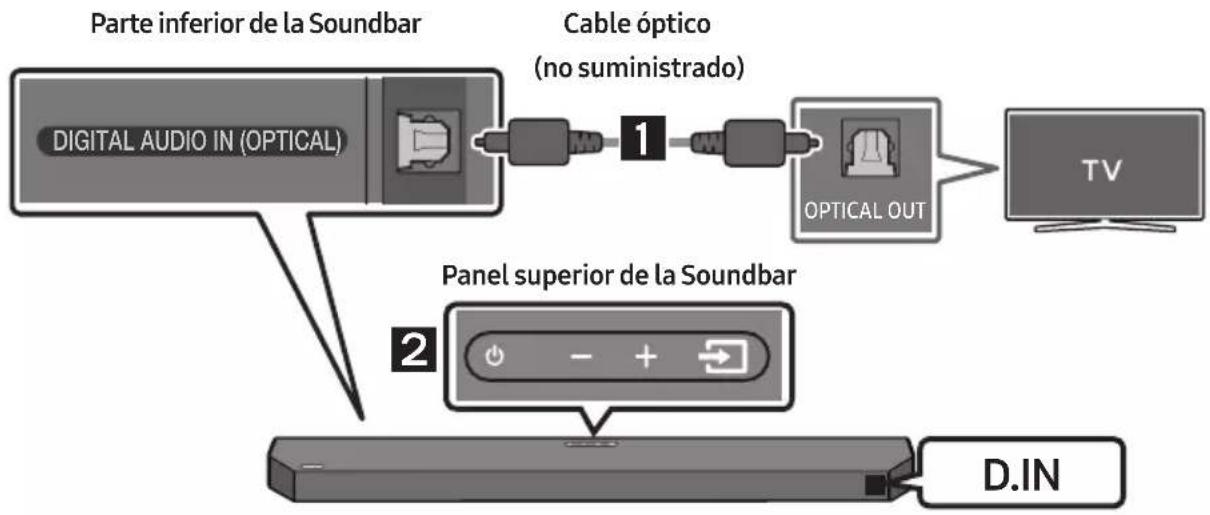
flowchart
graph TD
    A["Parte inferior de la Soundbar"] --> B["DIGITAL AUDIO IN (OPTICAL)"]
    B --> C["Cable óptico (no suministrado)"]
    C --> D["Cable"]
    D --> E["OPTICAL OUT"]
    E --> F["TV"]
    G["Panel superior de la Soundbar"] --> H["D.IN"]
natural_image
Simple line drawing of a chair or bench with no text or symbolsnatural_image
Pure electrical circuit lines without any symbolsnatural_image
Mechanical assembly diagram showing a screw being inserted into a bracket with a base, no text or symbols presentflowchart
graph TD
    A["UPGR"] --> B["B"]
    B --> C["DONE"]
    C --> D["BYE"]
Dolby, Dolby Atmos, and the double-D symbol are registered trademarks of Dolby Laboratories Licensing Corporation. Manufactured under license from Dolby Laboratories. Confidential unpublished works. Copyright © 2012-2021 Dolby Laboratories. All rights reserved.
dts.
For DTS patents, see http://patents.dts.com. Manufactured under license from DTS, Inc. or DTS Licensing Limited. DTS, Digital Surround, Virtual:X, and the DTS logo are registered trademarks or trademarks of DTS, Inc. in the United States and other countries. © 2021 DTS, Inc. ALL RIGHTS RESERVED.

The terms HDMI, HDMI High-Definition Multimedia Interface, HDMI Trade dress and the HDMI Logos are trademarks or registered trademarks of HDMI Licensing Administrator, Inc.
Bluetooth®
The Bluetooth® word mark and logos are registered trademarks owned by Bluetooth SIG, Inc. and any use of such marks by Samsung Electronics Co., Ltd. is under license. Other trademarks and trade names are those of their respective owners.

[ENERGY STAR]
ENERGY STAR qualified model only
- Your Samsung product is ENERGY STAR qualified in its factory default setting. Change to certain features, settings and functionality in this product can change the power consumption, possibly beyond the limits required for ENERGY STAR qualification.
- Environmental Protection Agency and Department of Energy. ENERGY STAR is a joint program of the Government agencies, designed to promote energy efficient products and practices.
Refer to www.energystar.gov for more information of the ENERGY STAR Program.
ENERGY STAR qualified model only (Applicable to Thin Client models only)
As an ENERGY STAR® Partner, SAMSUNG has determined that this product meets the ENERGY STAR® guidelines for energy efficiency.
– The ENERGY STAR Program has been to reduced greenhouse gas emissions and save energy through voluntary labeling.
– Power management setting of this product have been enabled by default, and have various timing setting from 1 minutes to 5 hours.
- The product can wake with a button press on the chassis from sleep mode.
ENERGY STAR qualified model only (The other models)
- As an ENERGY STAR Partner, Samsung has determined that this product or product models meets the ENERGY STAR guideline for energy efficiency.
14 AVISO SOBRE LICENCIA DE CÓDIGO ABIERTO
www.samsung.com/uk/aboutsamsung/sustainability/environment/our-commitment/data/
natural_image
Diagram showing a mechanical component before and after assembly, with no visible text or symbols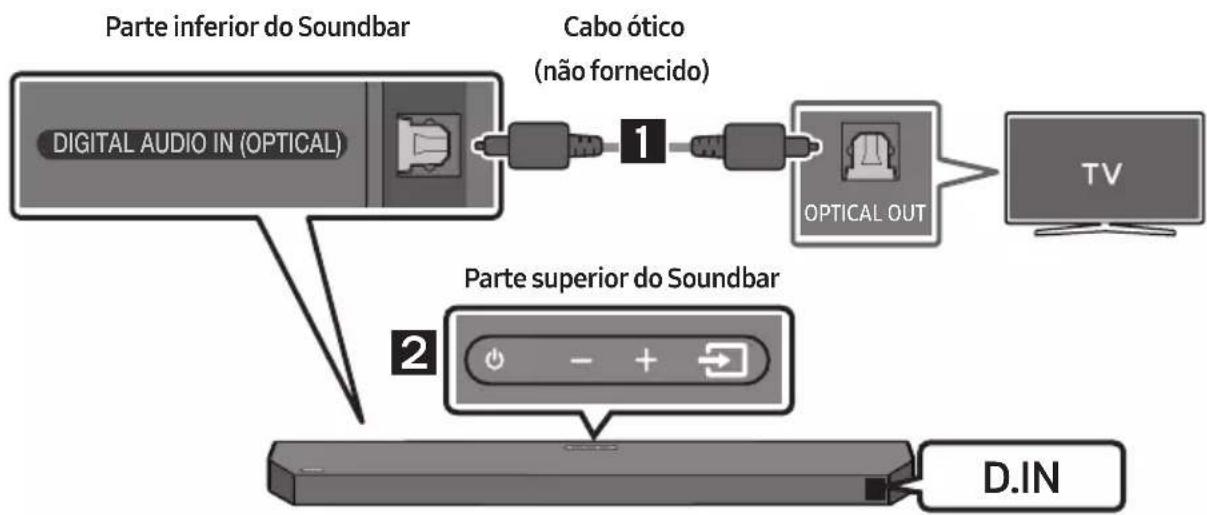
flowchart
graph TD
    A["Digital Audio IN (OPTICAL)"] --> B["Cabo ótico (não fornecido)"]
    B --> C["OPTICAL OUT"]
    C --> D["TV"]
    E["Parte inferior do Soundbar"] --> A
    F["Parte superior do Soundbar"] --> G["D.IN"]
natural_image
Mechanical component diagram showing a screw being inserted into a housing (no text or symbols)natural_image
Diagram showing a mechanical assembly or assembly process with two stages of a component, indicated by arrows (no text or symbols present)10 INSTALAR O SOUNDBAR EM FRENTE À TV
Coloque o Soundbar sobre o suporte do televisor.
Dolby, Dolby Atmos, and the double-D symbol are registered trademarks of Dolby Laboratories Licensing Corporation. Manufactured under license from Dolby Laboratories. Confidential unpublished works. Copyright © 2012-2021 Dolby Laboratories. All rights reserved.

For DTS patents, see http://patents.dts.com. Manufactured under license from DTS, Inc. or DTS Licensing Limited. DTS, Digital Surround, Virtual:X, and the DTS logo are registered trademarks or trademarks of DTS, Inc. in the United States and other countries. © 2021 DTS, Inc. ALL RIGHTS RESERVED.

HIGH-DEFINITION MULTIMEDIA INTERFACE
The terms HDMI, HDMI High-Definition Multimedia Interface, HDMI Trade dress and the HDMI Logos are trademarks or registered trademarks of HDMI Licensing Administrator, Inc.

Bluetooth®
The Bluetooth® word mark and logos are registered trademarks owned by Bluetooth SIG, Inc. and any use of such marks by Samsung Electronics Co., Ltd. is under license. Other trademarks and trade names are those of their respective owners.

[ENERGY STAR]
ENERGY STAR qualified model only
- Your Samsung product is ENERGY STAR qualified in its factory default setting. Change to certain features, settings and functionality in this product can change the power consumption, possibly beyond the limits required for ENERGY STAR qualification.
- Environmental Protection Agency and Department of Energy. ENERGY STAR is a joint program of the Government agencies, designed to promote energy efficient products and practices.
Refer to www.energystar.gov for more information of the ENERGY STAR Program.
ENERGY STAR qualified model only (Applicable to Thin Client models only)
As an ENERGY STAR® Partner, SAMSUNG has determined that this product meets the ENERGY STAR® guidelines for energy efficiency.
- The ENERGY STAR Program has been to reduced greenhouse gas emissions and save energy through voluntary labeling.
- Power management setting of this product have been enabled by default, and have various timing setting from 1 minutes to 5 hours.
- The product can wake with a button press on the chassis from sleep mode.
ENERGY STAR qualified model only (The other models)
- As an ENERGY STAR Partner, Samsung has determined that this product or product models meets the ENERGY STAR guideline for energy efficiency.
14 AVISO DE LICENÇA DE OPEN SOURCE
Para enviar perguntas e pedidos de esclarecimento relativamente a fontes abertas, contacte a Samsung Open Source por e-mail (http://opensource.samsung.com)
15 NOTA IMPORTANTE SOBRE O SERVIÇO
www.samsung.com/uk/aboutsamsung/sustainability/environment/our-commitment/data/
- Controleer of de LINK LED vast blauw is (verbinding voltooid).
natural_image
Diagram showing a mechanical component before and after assembly, with no visible text or symbols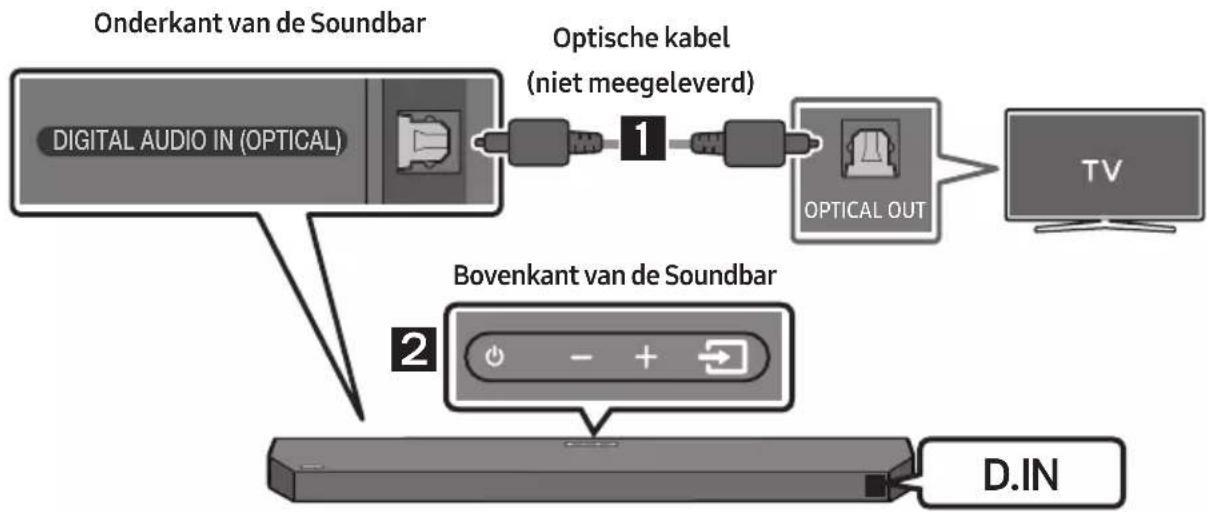
flowchart
graph TD
    A["Digital Audio IN (OPTICAL)"] --> B["Optische kabel (niet meegeleverd)"]
    B --> C["Optical OUT"]
    C --> D["TV"]
    E["Bovenkant van de Soundbar"] --> F["D.IN"]
natural_image
Pure electrical circuit lines without any symbolsnatural_image
Mechanical assembly diagram showing a screw being inserted into a bracket with a bolt, no text or symbols presentflowchart
graph TD
    A["Top: Device icon"] --> B["Downward arrow"]
    B --> C["Bottom: Device icon with downward arrow"]
10 DE SOUNDBAR INSTALLEREN VÓÓR DE TV
flowchart
graph TD
    A["UPGR"] --> B["B --"]
    B --> C["DONE → BYE"]
Dolby, Dolby Atmos, and the double-D symbol are registered trademarks of Dolby Laboratories Licensing Corporation. Manufactured under license from Dolby Laboratories. Confidential unpublished works. Copyright © 2012-2021 Dolby Laboratories. All rights reserved.

For DTS patents, see http://patents.dts.com. Manufactured under license from DTS, Inc. or DTS Licensing Limited. DTS, Digital Surround, Virtual:X, and the DTS logo are registered trademarks or trademarks of DTS, Inc. in the United States and other countries. © 2021 DTS, Inc. ALL RIGHTS RESERVED.

HIGH-DEFINITION MULTIMEDIA INTERFACE
The terms HDMI, HDMI High-Definition Multimedia Interface, HDMI Trade dress and the HDMI Logos are trademarks or registered trademarks of HDMI Licensing Administrator, Inc.

Bluetooth®
The Bluetooth® word mark and logos are registered trademarks owned by Bluetooth SIG, Inc. and any use of such marks by Samsung Electronics Co., Ltd. is under license. Other trademarks and trade names are those of their respective owners.

[ENERGY STAR]
ENERGY STAR qualified model only
- Your Samsung product is ENERGY STAR qualified in its factory default setting. Change to certain features, settings and functionality in this product can change the power consumption, possibly beyond the limits required for ENERGY STAR qualification.
- Environmental Protection Agency and Department of Energy. ENERGY STAR is a joint program of the Government agencies, designed to promote energy efficient products and practices.
Refer to www.energystar.gov for more information of the ENERGY STAR Program.
ENERGY STAR qualified model only (Applicable to Thin Client models only)
As an ENERGY STAR® Partner, SAMSUNG has determined that this product meets the ENERGY STAR® guidelines for energy efficiency.
– The ENERGY STAR Program has been to reduced greenhouse gas emissions and save energy through voluntary labeling.
- Power management setting of this product have been enabled by default, and have various timing setting from 1 minutes to 5 hours.
- The product can wake with a button press on the chassis from sleep mode.
ENERGY STAR qualified model only (The other models)
- As an ENERGY STAR Partner, Samsung has determined that this product or product models meets the ENERGY STAR guideline for energy efficiency.
14 KENNISGEVING OPEN SOURCE- LICENTIE
• UITGANGSVERMOGEN DRAADLOOS APPARAAT
RF max. zendvermogen
100 mW op 2,4 GHz - 2,4835 GHz
25 mW op 5,725 GHz – 5,825 GHz
www.samsung.com/uk/aboutsamsung/sustainability/environment/our-commitment/data/
VERORDENING (EU) 2019/1782 VAN DE COMMISSIE
natural_image
Diagram showing a mechanical component before and after assembly, with no visible text or symbols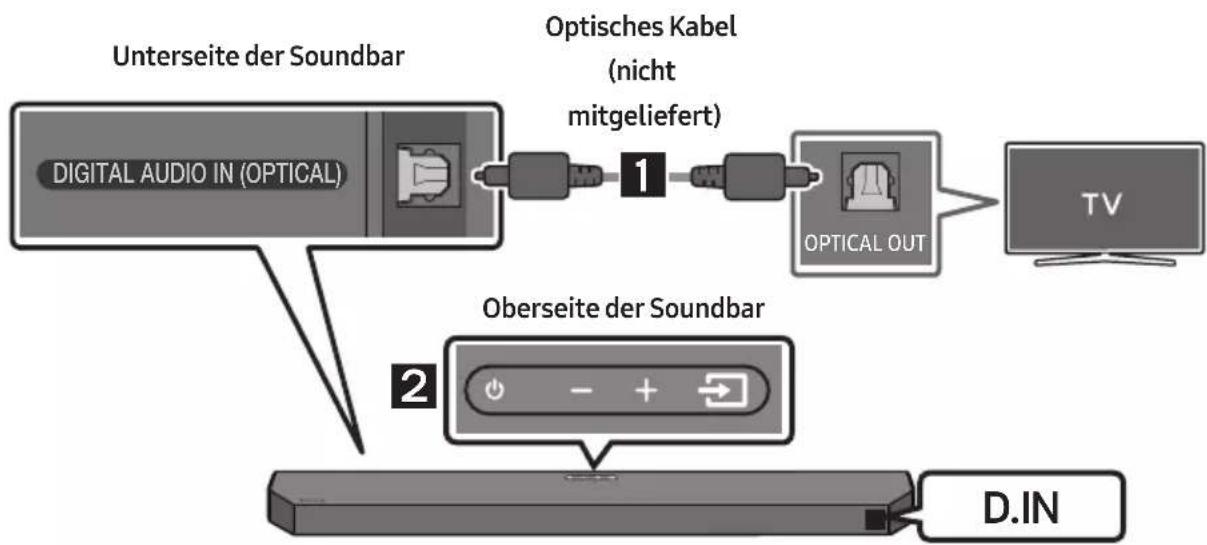
natural_image
Mechanical component diagram showing a screw being inserted into a housing (no text or symbols)natural_image
Diagram showing two mechanical components with downward arrows indicating motion or assembly (no text or symbols)10 INSTALLIEREN DER SOUNDBAR VOR DEM FERNSEHER
Dolby, Dolby Atmos, and the double-D symbol are registered trademarks of Dolby Laboratories Licensing Corporation. Manufactured under license from Dolby Laboratories. Confidential unpublished works. Copyright © 2012-2021 Dolby Laboratories. All rights reserved.
dts.
For DTS patents, see http://patents.dts.com. Manufactured under license from DTS, Inc. or DTS Licensing Limited. DTS, Digital Surround, Virtual:X, and the DTS logo are registered trademarks or trademarks of DTS, Inc. in the United States and other countries. © 2021 DTS, Inc. ALL RIGHTS RESERVED.
HDMI ^TM
HIGH-DEFINITION MULTIMEDIA INTERFACE
The terms HDMI, HDMI High-Definition Multimedia Interface, HDMI Trade dress and the HDMI Logos are trademarks or registered trademarks of HDMI Licensing Administrator, Inc.

Bluetooth®
The Bluetooth® word mark and logos are registered trademarks owned by Bluetooth SIG, Inc. and any use of such marks by Samsung Electronics Co., Ltd. is under license. Other trademarks and trade names are those of their respective owners.

[ENERGY STAR]
ENERGY STAR qualified model only
- Your Samsung product is ENERGY STAR qualified in its factory default setting. Change to certain features, settings and functionality in this product can change the power consumption, possibly beyond the limits required for ENERGY STAR qualification.
- Environmental Protection Agency and Department of Energy. ENERGY STAR is a joint program of the Government agencies, designed to promote energy efficient products and practices.
Refer to www.energystar.gov for more information of the ENERGY STAR Program.
ENERGY STAR qualified model only
(Applicable to Thin Client models only)
As an ENERGY STAR® Partner, SAMSUNG has determined that this product meets the ENERGY STAR® guidelines for energy efficiency.
- The ENERGY STAR Program has been to reduced greenhouse gas emissions and save energy through voluntary labeling.
- Power management setting of this product have been enabled by default, and have various timing setting from 1 minutes to 5 hours.
- The product can wake with a button press on the chassis from sleep mode.
ENERGY STAR qualified model only (The other models)
- As an ENERGY STAR Partner, Samsung has determined that this product or product models meets the ENERGY STAR guideline for energy efficiency.
14 BEKANNTMACHUNG ZU OPEN SOURCE LIZENZEN
www.samsung.com/uk/aboutsamsung/sustainability/environment/our-commitment/data/
VERORDNUNG (EU) 2019/1782 DER KOMMISSION
INNEHÅLLSFÖRTECKNING
01 Kontrollera komponenterna 6
natural_image
Diagram showing a mechanical component before and after assembly, with no visible text or symbols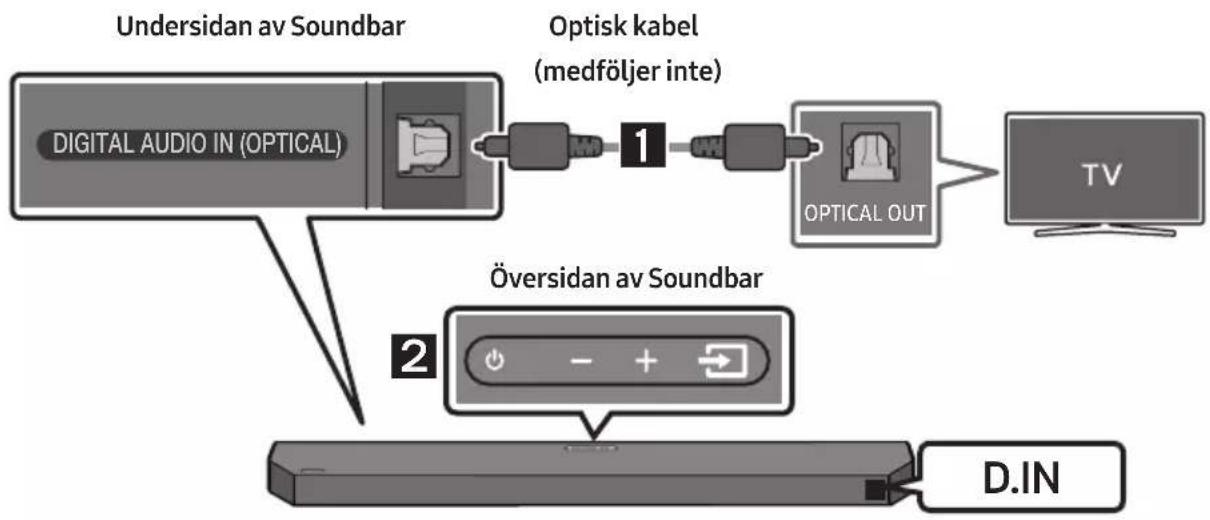
flowchart
graph TD
    A["Digital Audio IN (OPTICAL)"] --> B["Optisk kabel (medföljer inte)"]
    B --> C["OPTICAL OUT"]
    C --> D["TV"]
    E["Undersidan av Soundbar"] --> F["Översidan av Soundbar"]
    F --> G["D.IN"]
flowchart
graph LR
    A["Bluetooth-enhet"] --> B["ELLER"]
    B --> C["BT PAIRING"]
    C --> D["Hand icon pointing to ELLER with 'PHP' button"]
natural_image
Simple 3D illustration of a bracket-like object with no text or symbolsVäggfäste
natural_image
Mechanical component with screw and adjustment knob, no visible text or symbolsflowchart
graph TD
    A["UPGR"] --> B["B --"]
    B --> C["DONE → BYE"]
Dolby, Dolby Atmos, and the double-D symbol are registered trademarks of Dolby Laboratories Licensing Corporation. Manufactured under license from Dolby Laboratories. Confidential unpublished works. Copyright © 2012-2021 Dolby Laboratories. All rights reserved.
dts.
For DTS patents, see http://patents.dts.com. Manufactured under license from DTS, Inc. or DTS Licensing Limited. DTS, Digital Surround, Virtual:X, and the DTS logo are registered trademarks or trademarks of DTS, Inc. in the United States and other countries. © 2021 DTS, Inc. ALL RIGHTS RESERVED.
HDMI ^TM
HIGH-DEFINITION MULTIMEDIA INTERFACE
The terms HDMI, HDMI High-Definition Multimedia Interface, HDMI Trade dress and the HDMI Logos are trademarks or registered trademarks of HDMI Licensing Administrator, Inc.

Bluetooth®
The Bluetooth® word mark and logos are registered trademarks owned by Bluetooth SIG, Inc. and any use of such marks by Samsung Electronics Co., Ltd. is under license. Other trademarks and trade names are those of their respective owners.

[ENERGY STAR]
ENERGY STAR qualified model only
- Your Samsung product is ENERGY STAR qualified in its factory default setting. Change to certain features, settings and functionality in this product can change the power consumption, possibly beyond the limits required for ENERGY STAR qualification.
- Environmental Protection Agency and Department of Energy. ENERGY STAR is a joint program of the Government agencies, designed to promote energy efficient products and practices.
Refer to www.energystar.gov for more information of the ENERGY STAR Program.
ENERGY STAR qualified model only (Applicable to Thin Client models only)
As an ENERGY STAR® Partner, SAMSUNG has determined that this product meets the ENERGY STAR® guidelines for energy efficiency.
– The ENERGY STAR Program has been to reduced greenhouse gas emissions and save energy through voluntary labeling.
- Power management setting of this product have been enabled by default, and have various timing setting from 1 minutes to 5 hours.
- The product can wake with a button press on the chassis from sleep mode.
ENERGY STAR qualified model only (The other models)
- As an ENERGY STAR Partner, Samsung has determined that this product or product models meets the ENERGY STAR guideline for energy efficiency.
14 LICENSMEDDELANDE FÖR OPEN SOURCE
www.samsung.com/uk/aboutsamsung/sustainability/environment/our-commitment/data/
KOMMISSIONENS FÖRORDNING (EU) 2019/1782
natural_image
Three-step diagram showing a mechanical component before and after assembly, with no visible text or symbols.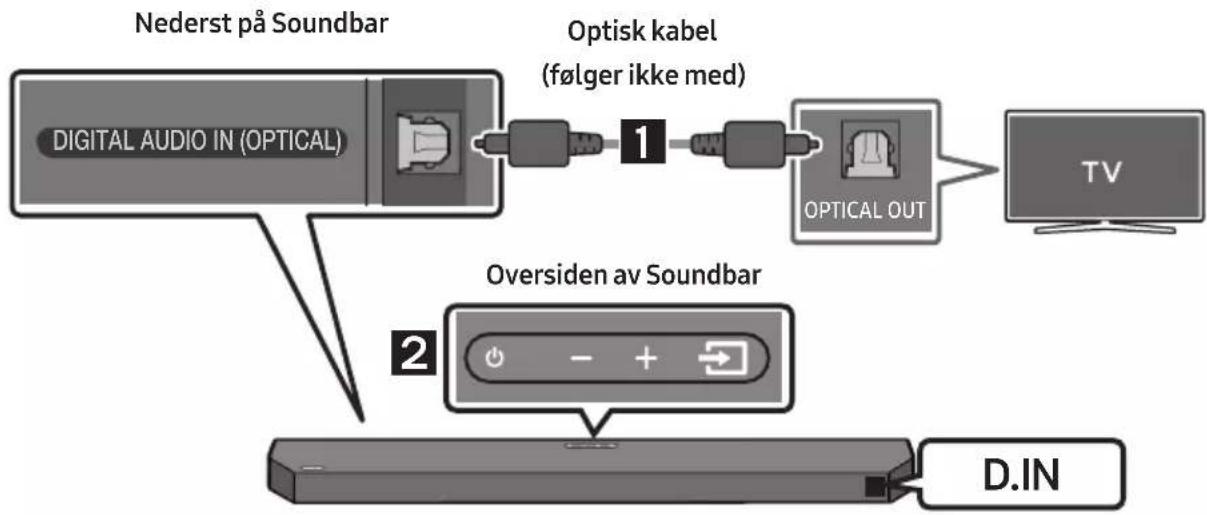
Bluetooth-multitilkobling
Soundbar kan kobles til 2 Bluetooth-enheter samtidig.
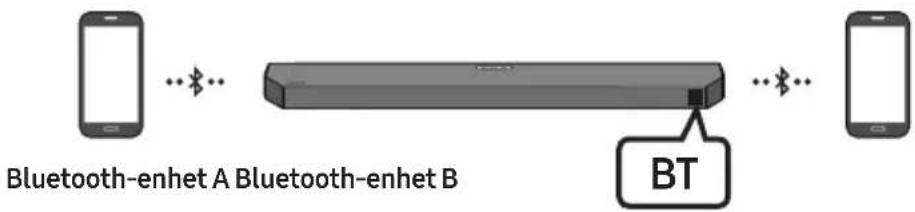
flowchart
graph LR
    A["Smartphone"] -->|Bluetooth| B["Bluetooth"]
    B -->|Bluetooth| C["Smartphone"]
    D["Bluetooth-enhet A Bluetooth-enhet B"] -->|Bluetooth| E["BT"]
natural_image
Simple line drawing of a bracket-like object with no text or symbolsVeggfestebraketten
1. Plasser Veggfestestyring mot veggoverflaten.
natural_image
Mechanical component diagram showing a screw being inserted into a housing, with no visible text or symbolsnatural_image
Simple line drawing of a rectangular device with vertical divisions and a side-mounted cable (no text or symbols)flowchart
graph TD
    A["Top: Device icon"] --> B["Downward arrow"]
    B --> C["Bottom: Device icon with downward arrows"]
10 MONTERING AV SOUNDBAR FORAN TV
Dolby, Dolby Atmos, and the double-D symbol are registered trademarks of Dolby Laboratories Licensing Corporation. Manufactured under license from Dolby Laboratories. Confidential unpublished works. Copyright © 2012-2021 Dolby Laboratories. All rights reserved.
dts.
For DTS patents, see http://patents.dts.com. Manufactured under license from DTS, Inc. or DTS Licensing Limited. DTS, Digital Surround, Virtual:X, and the DTS logo are registered trademarks or trademarks of DTS, Inc. in the United States and other countries. © 2021 DTS, Inc. ALL RIGHTS RESERVED.
HDMI ^TM
HIGH-DEFINITION MULTIMEDIA INTERFACE
The terms HDMI, HDMI High-Definition Multimedia Interface, HDMI Trade dress and the HDMI Logos are trademarks or registered trademarks of HDMI Licensing Administrator, Inc.

Bluetooth®
The Bluetooth® word mark and logos are registered trademarks owned by Bluetooth SIG, Inc. and any use of such marks by Samsung Electronics Co., Ltd. is under license. Other trademarks and trade names are those of their respective owners.

[ENERGY STAR]
ENERGY STAR qualified model only
- Your Samsung product is ENERGY STAR qualified in its factory default setting. Change to certain features, settings and functionality in this product can change the power consumption, possibly beyond the limits required for ENERGY STAR qualification.
- Environmental Protection Agency and Department of Energy. ENERGY STAR is a joint program of the Government agencies, designed to promote energy efficient products and practices.
Refer to www.energystar.gov for more information of the ENERGY STAR Program.
ENERGY STAR qualified model only (Applicable to Thin Client models only)
As an ENERGY STAR® Partner, SAMSUNG has determined that this product meets the ENERGY STAR® guidelines for energy efficiency.
– The ENERGY STAR Program has been to reduced greenhouse gas emissions and save energy through voluntary labeling.
– Power management setting of this product have been enabled by default, and have various timing setting from 1 minutes to 5 hours.
- The product can wake with a button press on the chassis from sleep mode.
ENERGY STAR qualified model only (The other models)
- As an ENERGY STAR Partner, Samsung has determined that this product or product models meets the ENERGY STAR guideline for energy efficiency.
14 LISENSMERKNADER OM ÅPEN KILDEKODE
www.samsung.com/uk/aboutsamsung/sustainability/environment/our-commitment/data/
KOMMISJONSFORORDNING (EU) 2019/1782
HDMI ARC/eARC (Audio Return Channel/Enhanced Audio Return Channel)
natural_image
Diagram showing a mechanical component before and after assembly, with no visible text or symbols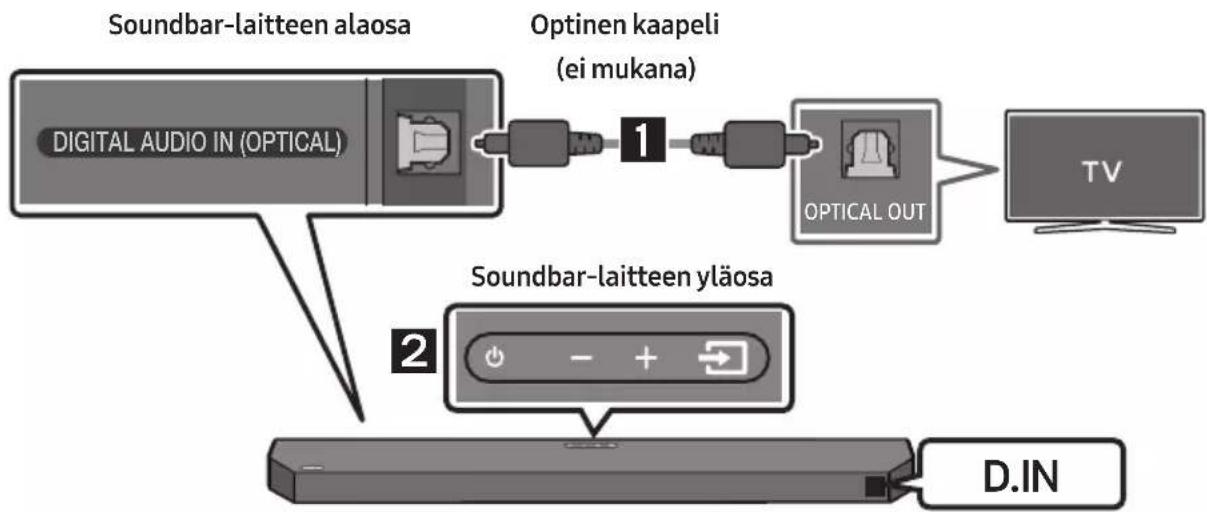
flowchart
graph TD
    A["Digital Audio IN (OPTICAL)"] --> B["Optinen kaapeli (ei mukana)"]
    B --> C["OPTICAL OUT"]
    C --> D["TV"]
    E["Soundbar-laitteen alaosa"] --> F["Soundbar-laitteen yläosa"]
    F --> G["D.IN"]
Seinäkiinnitysopas
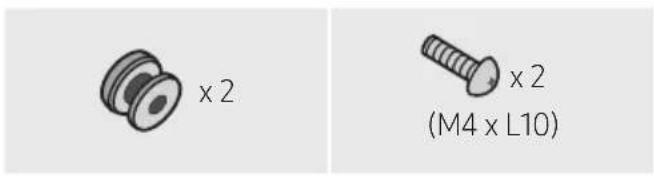
Pidikeruuvi Ruuvi

natural_image
Simple line drawing of a bracket-like object with no text or symbolsSeinäkiinnittimien
natural_image
Mechanical component diagram showing a screw being inserted into a housing (no text or symbols)Dolby, Dolby Atmos, and the double-D symbol are registered trademarks of Dolby Laboratories Licensing Corporation. Manufactured under license from Dolby Laboratories. Confidential unpublished works. Copyright © 2012-2021 Dolby Laboratories. All rights reserved.
dts.
For DTS patents, see http://patents.dts.com. Manufactured under license from DTS, Inc. or DTS Licensing Limited. DTS, Digital Surround, Virtual:X, and the DTS logo are registered trademarks or trademarks of DTS, Inc. in the United States and other countries. © 2021 DTS, Inc. ALL RIGHTS RESERVED.
HDMI ^TM
HIGH-DEFINITION MULTIMEDIA INTERFACE
The terms HDMI, HDMI High-Definition Multimedia Interface, HDMI Trade dress and the HDMI Logos are trademarks or registered trademarks of HDMI Licensing Administrator, Inc.

Bluetooth®
The Bluetooth® word mark and logos are registered trademarks owned by Bluetooth SIG, Inc. and any use of such marks by Samsung Electronics Co., Ltd. is under license. Other trademarks and trade names are those of their respective owners.

[ENERGY STAR]
ENERGY STAR qualified model only
- Your Samsung product is ENERGY STAR qualified in its factory default setting. Change to certain features, settings and functionality in this product can change the power consumption, possibly beyond the limits required for ENERGY STAR qualification.
- Environmental Protection Agency and Department of Energy. ENERGY STAR is a joint program of the Government agencies, designed to promote energy efficient products and practices.
Refer to www.energystar.gov for more information of the ENERGY STAR Program.
ENERGY STAR qualified model only (Applicable to Thin Client models only)
As an ENERGY STAR® Partner, SAMSUNG has determined that this product meets the ENERGY STAR® guidelines for energy efficiency.
– The ENERGY STAR Program has been to reduced greenhouse gas emissions and save energy through voluntary labeling.
- Power management setting of this product have been enabled by default, and have various timing setting from 1 minutes to 5 hours.
- The product can wake with a button press on the chassis from sleep mode.
ENERGY STAR qualified model only (The other models)
- As an ENERGY STAR Partner, Samsung has determined that this product or product models meets the ENERGY STAR guideline for energy efficiency.
14 AVOIMEN LÄHDEKIELEN LISENSSI- ILMOITUS
www.samsung.com/uk/aboutsamsung/sustainability/environment/our-commitment/data/
KOMISSION ASETUS (EU) 2019/1782
Subwooferens bagside Subwooferens bagside
- Kontroller, om LINK LED lyser konstant blåt (forbindelsen er oprettet).
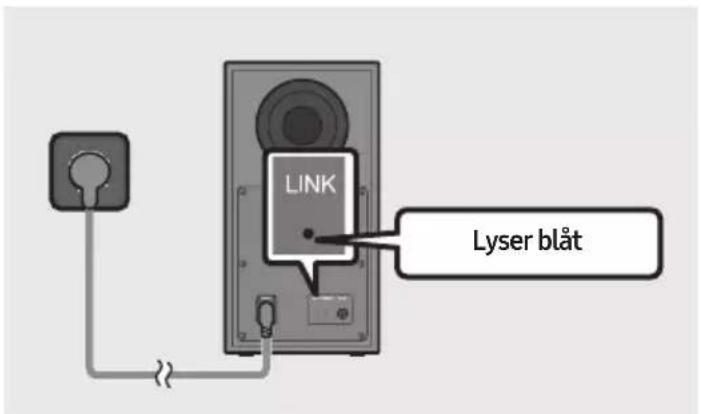
natural_image
Diagram showing a mechanical component before and after assembly, with no visible text or symbols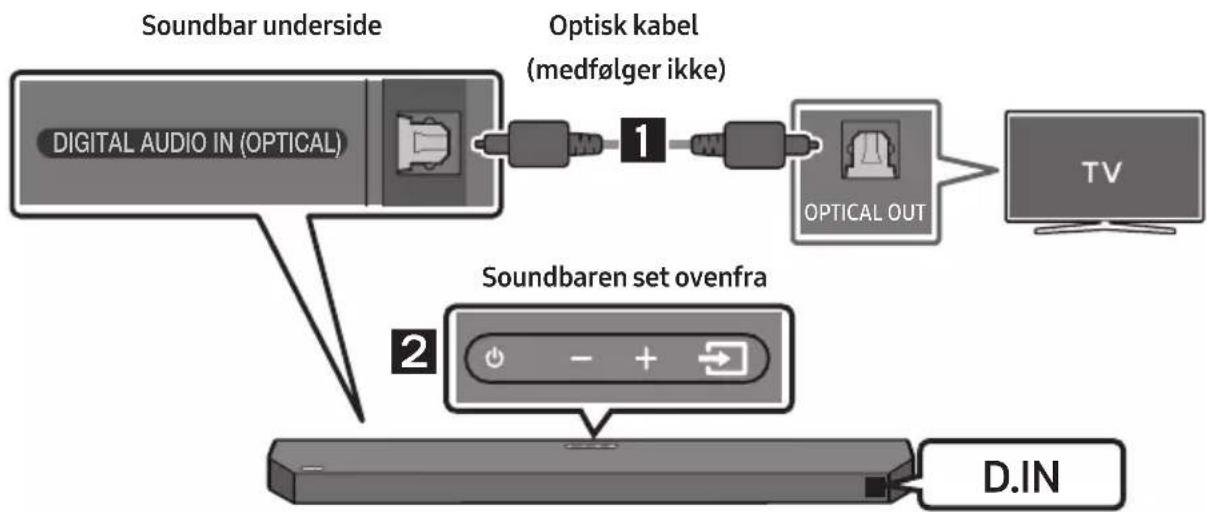
flowchart
graph TD
    A["Digital Audio IN (OPTICAL)"] --> B["Optisk kabel (medfølger ikke)"]
    B --> C["Optical OUT"]
    C --> D["TV"]
    E["Soundbar underside"] --> A
    F["Soundbaren set ovenfra"] --> G["D.IN"]
flowchart
graph LR
    A["Smartphone"] --> B["Bluetooth-enhanced"]
    B --> C["BT PAIRING"]
    C --> D["ELLER"]
    D --> E["Handheld device with '700' button"]
Vægmonteringens styreskinne
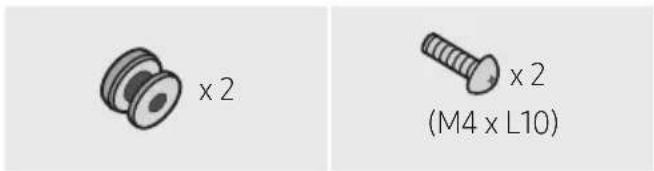
Holderskrue Skrue

natural_image
Simple line drawing of a chair or bench with a double-headed arrow labeled 'x 2' (no other text or symbols)natural_image
Mechanical component diagram showing a screw being inserted into a housing (no text or symbols)Dolby, Dolby Atmos, and the double-D symbol are registered trademarks of Dolby Laboratories Licensing Corporation. Manufactured under license from Dolby Laboratories. Confidential unpublished works. Copyright © 2012-2021 Dolby Laboratories. All rights reserved.

For DTS patents, see http://patents.dts.com. Manufactured under license from DTS, Inc. or DTS Licensing Limited. DTS, Digital Surround, Virtual:X, and the DTS logo are registered trademarks or trademarks of DTS, Inc. in the United States and other countries. © 2021 DTS, Inc. ALL RIGHTS RESERVED.

The terms HDMI, HDMI High-Definition Multimedia Interface, HDMI Trade dress and the HDMI Logos are trademarks or registered trademarks of HDMI Licensing Administrator, Inc.

The Bluetooth® word mark and logos are registered trademarks owned by Bluetooth SIG, Inc. and any use of such marks by Samsung Electronics Co., Ltd. is under license. Other trademarks and trade names are those of their respective owners.

[ENERGY STAR]
ENERGY STAR qualified model only
- Your Samsung product is ENERGY STAR qualified in its factory default setting. Change to certain features, settings and functionality in this product can change the power consumption, possibly beyond the limits required for ENERGY STAR qualification.
- Environmental Protection Agency and Department of Energy. ENERGY STAR is a joint program of the Government agencies, designed to promote energy efficient products and practices.
Refer to www.energystar.gov for more information of the ENERGY STAR Program.
ENERGY STAR qualified model only (Applicable to Thin Client models only)
As an ENERGY STAR® Partner, SAMSUNG has determined that this product meets the ENERGY STAR® guidelines for energy efficiency.
- The ENERGY STAR Program has been to reduced greenhouse gas emissions and save energy through voluntary labeling.
– Power management setting of this product have been enabled by default, and have various timing setting from 1 minutes to 5 hours. - The product can wake with a button press on the chassis from sleep mode.
ENERGY STAR qualified model only (The other models)
- As an ENERGY STAR Partner, Samsung has determined that this product or product models meets the ENERGY STAR guideline for energy efficiency.
14 BEMAERKNING VEDR. OPEN SOURCE-LICENS
www.samsung.com/uk/aboutsamsung/sustainability/environment/our-commitment/data/
KOMMISSIONENS FORORDNING (EU) 2019/1782
natural_image
Three-step diagram showing a mechanical component before and after rotation, with no visible text or symbols.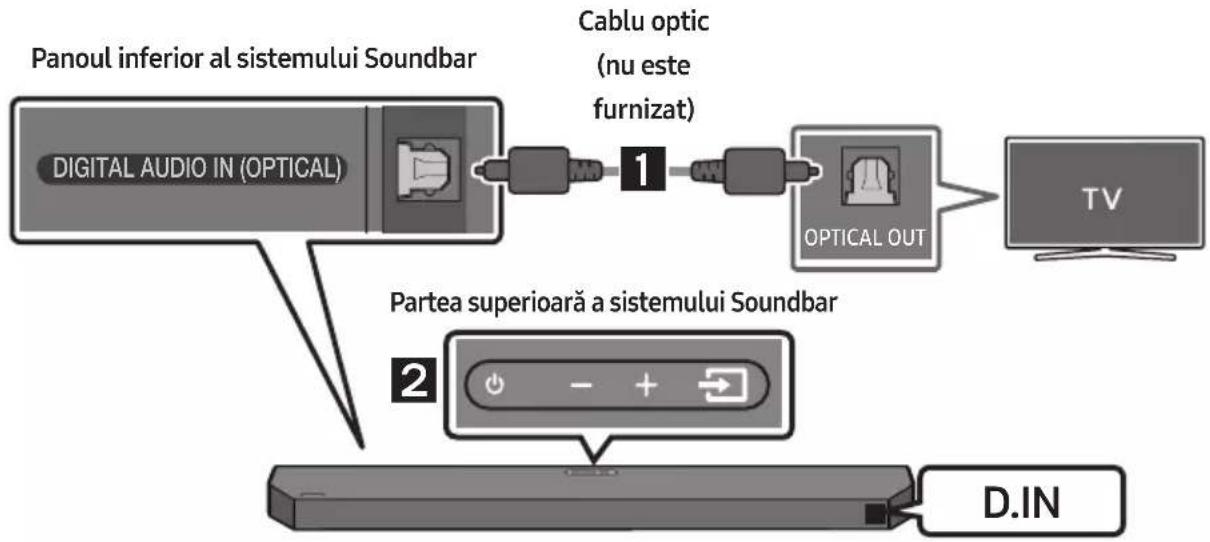
flowchart
graph TD
    A["Panoul inferior al sistemului Soundbar"] --> B["DIGITAL AUDIO IN (OPTICAL)"]
    B --> C["Cablu optic (nu este furnizat)"]
    C --> D["OPTICAL OUT"]
    D --> E["TV"]
    F["Partea superioară a sistemului Soundbar"] --> G["2"]
    G --> H["D.IN"]
Conectarea inițială
Şurub suport Şurub

natural_image
Simple line drawing of a 3D object resembling a bracket or connector (no text or symbols)Suport de fixare pe perete
natural_image
Mechanical component diagram showing a screw being inserted into a housing (no text or symbols)flowchart
graph TD
    A["Top Panel"] --> B["Down Arrow"]
    B --> C["Bottom Panel"]
10 INSTALAREA SISTEMULUI SOUNDBAR ÎN FATA TELEVIZORULUI
flowchart
graph TD
    A["UPGR"] --> B["B"]
    B --> C["DONE"]
    C --> D["BYE"]
Dolby, Dolby Atmos, and the double-D symbol are registered trademarks of Dolby Laboratories Licensing Corporation. Manufactured under license from Dolby Laboratories. Confidential unpublished works. Copyright © 2012-2021 Dolby Laboratories. All rights reserved.
dtsx
For DTS patents, see http://patents.dts.com. Manufactured under license from DTS, Inc. or DTS Licensing Limited. DTS, DTS:X, and the DTS:X logo are registered trademarks or trademarks of DTS, Inc. in the United States and other countries. © 2021 DTS, Inc. ALL RIGHTS RESERVED.
HDMI ^TM
HIGH-DEFINITION MULTIMEDIA INTERFACE
The terms HDMI, HDMI High-Definition Multimedia Interface, HDMI Trade dress and the HDMI Logos are trademarks or registered trademarks of HDMI Licensing Administrator, Inc.
Bluetooth®
The Bluetooth® word mark and logos are registered trademarks owned by Bluetooth SIG, Inc. and any use of such marks by Samsung Electronics Co., Ltd. is under license. Other trademarks and trade names are those of their respective owners.

[ENERGY STAR]
ENERGY STAR qualified model only
- Your Samsung product is ENERGY STAR qualified in its factory default setting. Change to certain features, settings and functionality in this product can change the power consumption, possibly beyond the limits required for ENERGY STAR qualification.
- Environmental Protection Agency and Department of Energy. ENERGY STAR is a joint program of the Government agencies, designed to promote energy efficient products and practices.
Refer to www.energystar.gov for more information of the ENERGY STAR Program.
ENERGY STAR qualified model only (Applicable to Thin Client models only)
As an ENERGY STAR® Partner, SAMSUNG has determined that this product meets the ENERGY STAR® guidelines for energy efficiency.
– The ENERGY STAR Program has been to reduced greenhouse gas emissions and save energy through voluntary labeling.
- Power management setting of this product have been enabled by default, and have various timing setting from 1 minutes to 5 hours.
- The product can wake with a button press on the chassis from sleep mode.
ENERGY STAR qualified model only (The other models)
- As an ENERGY STAR Partner, Samsung has determined that this product or product models meets the ENERGY STAR guideline for energy efficiency.
14 NOTIFICARE DE LICENȚĂ OPEN SOURCE
15 NOTĂ IMPORTANTĂ DESPRE SERVICE
natural_image
Three-step diagram showing a mechanical component before and after assembly, with no visible text or symbols.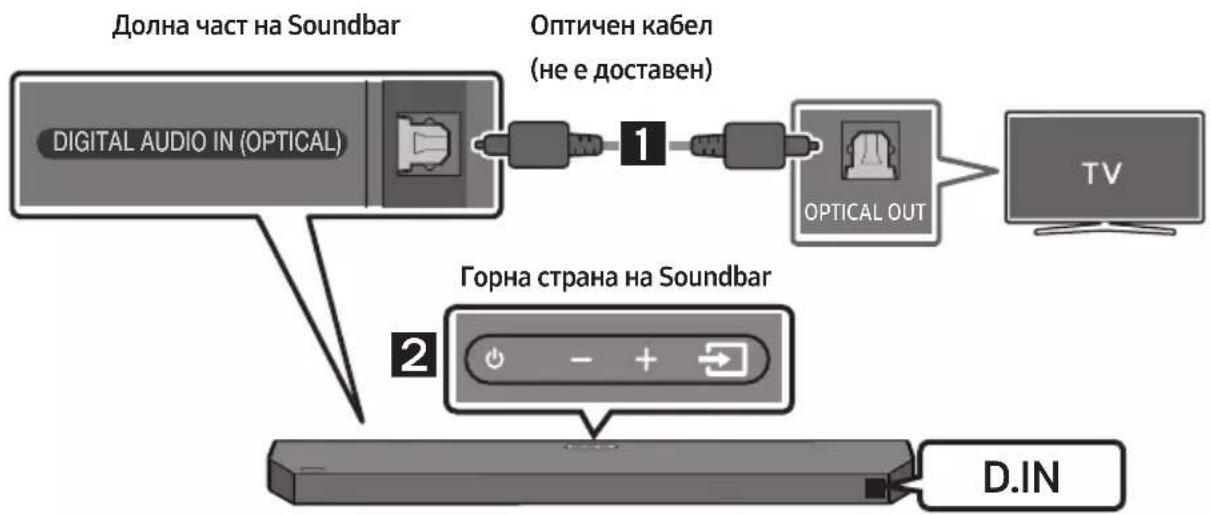
flowchart
graph TD
    A["Digital Audio IN (OPTICAL)"] --> B["1"]
    B --> C["OPTICAL OUT"]
    C --> D["TV"]
    E["DOLHA част на Soundbar"] --> A
    F["Горна страна на Soundbar"] --> G["2"]
    H["D.IN"] --> I["End"]
natural_image
Simple 3D illustration of a bracket with a hole and label 'x2' (no other text or symbols)Скоба за монтаж на стена
natural_image
Pure electrical circuit lines without any symbolsnatural_image
Mechanical component diagram showing a screw being inserted into a housing, with no visible text or symbolsnatural_image
Diagram showing a mechanical assembly or assembly process with two identical components and directional arrows indicating movement (no text or symbols present)10 ИНСТАЛИРАНЕ НА SOUNDBAR ПРЕД ТЕЛЕВИЗОР
Поставете Soundbar на стойка за телевизор.
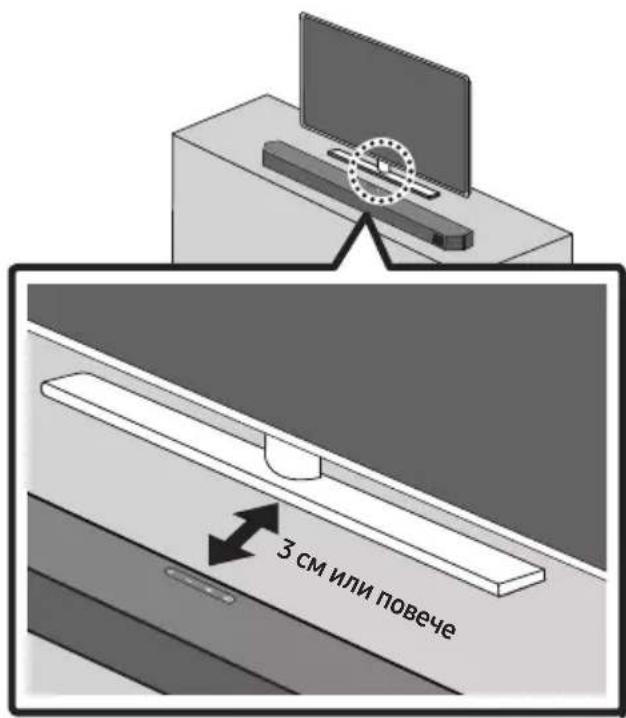
flowchart
graph TD
    A["UPGR"] --> B["B"]
    B --> C["DONE"]
    C --> D["BYE"]
Dolby, Dolby Atmos, and the double-D symbol are registered trademarks of Dolby Laboratories Licensing Corporation. Manufactured under license from Dolby Laboratories. Confidential unpublished works. Copyright © 2012-2021 Dolby Laboratories. All rights reserved.
dts
For DTS patents, see http://patents.dts.com. Manufactured under license from DTS, Inc. or DTS Licensing Limited. DTS, Digital Surround, Virtual:X, and the DTS logo are registered trademarks or trademarks of DTS, Inc. in the United States and other countries. © 2021 DTS, Inc. ALL RIGHTS RESERVED.
HDMI™
HIGH-DEFINITION MULTIMEDIA INTERFACE
The terms HDMI, HDMI High-Definition Multimedia Interface, HDMI Trade dress and the HDMI Logos are trademarks or registered trademarks of HDMI Licensing Administrator, Inc.

Bluetooth®
The Bluetooth® word mark and logos are registered trademarks owned by Bluetooth SIG, Inc. and any use of such marks by Samsung Electronics Co., Ltd. is under license. Other trademarks and trade names are those of their respective owners.

[ENERGY STAR]
ENERGY STAR qualified model only
- Your Samsung product is ENERGY STAR qualified in its factory default setting. Change to certain features, settings and functionality in this product can change the power consumption, possibly beyond the limits required for ENERGY STAR qualification.
- Environmental Protection Agency and Department of Energy. ENERGY STAR is a joint program of the Government agencies, designed to promote energy efficient products and practices.
Refer to www.energystar.gov for more information of the ENERGY STAR Program.
ENERGY STAR qualified model only
(Applicable to Thin Client models only)
As an ENERGY STAR® Partner, SAMSUNG has determined that this product meets the ENERGY STAR® guidelines for energy efficiency.
– The ENERGY STAR Program has been to reduced greenhouse gas emissions and save energy through voluntary labeling.
– Power management setting of this product have been enabled by default, and have various timing setting from 1 minutes to 5 hours.
- The product can wake with a button press on the chassis from sleep mode.
ENERGY STAR qualified model only (The other models)
- As an ENERGY STAR Partner, Samsung has determined that this product or product models meets the ENERGY STAR guideline for energy efficiency.
14 БЕЛЕЖКА ЗА ЛИЦЕНЗА ЗА ОТВОРЕН КОД
natural_image
Diagram showing a mechanical component before and after assembly, with no visible text or symbols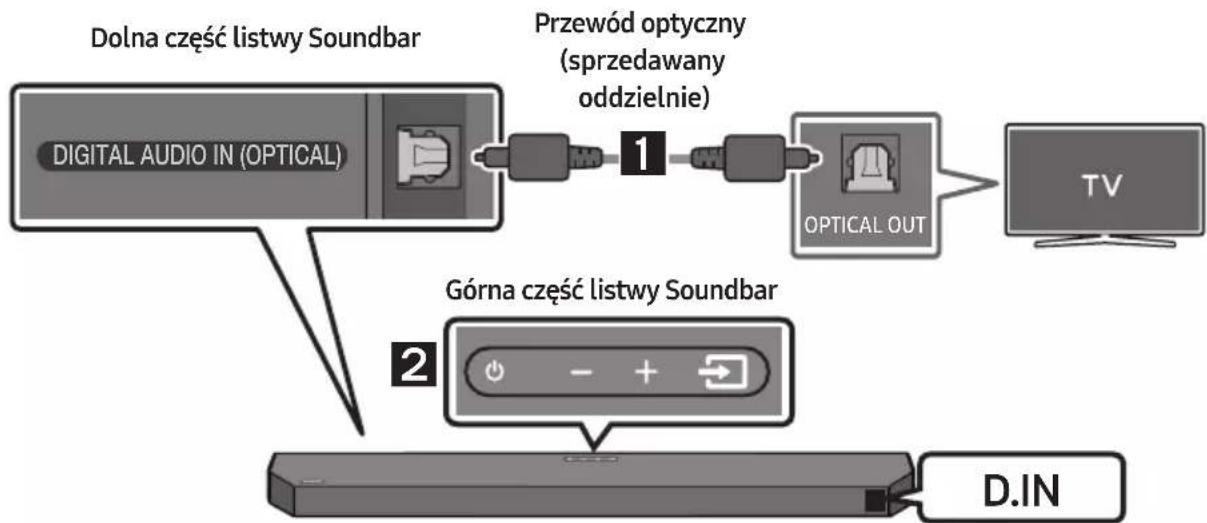
natural_image
Simple 3D illustration of a bracket with a hole and side slot, labeled 'x2' (no text or symbols on the object itself)natural_image
Mechanical component diagram showing a screw being inserted into a housing (no text or symbols)flowchart
graph TD
    A["Rectangular Block"] --> B["Downward Arrow"]
    B --> C["Single Rectangle"]
10 INSTALACJA LISTWY SOUNDBAR PRZED TELEWIZOREM
flowchart
graph TD
    A["UPGR → B -- → DONE → BYE"] --> B["Next Step"]
Dolby, Dolby Atmos, and the double-D symbol are registered trademarks of Dolby Laboratories Licensing Corporation. Manufactured under license from Dolby Laboratories. Confidential unpublished works. Copyright © 2012-2021 Dolby Laboratories. All rights reserved.
dts.
For DTS patents, see http://patents.dts.com. Manufactured under license from DTS, Inc. or DTS Licensing Limited. DTS, Digital Surround, Virtual:X, and the DTS logo are registered trademarks or trademarks of DTS, Inc. in the United States and other countries. © 2021 DTS, Inc. ALL RIGHTS RESERVED.
HDMI ^TM
HIGH-DEFINITION MULTIMEDIA INTERFACE
The terms HDMI, HDMI High-Definition Multimedia Interface, HDMI Trade dress and the HDMI Logos are trademarks or registered trademarks of HDMI Licensing Administrator, Inc.

Bluetooth®
The Bluetooth® word mark and logos are registered trademarks owned by Bluetooth SIG, Inc. and any use of such marks by Samsung Electronics Co., Ltd. is under license. Other trademarks and trade names are those of their respective owners.

[ENERGY STAR]
ENERGY STAR qualified model only
- Your Samsung product is ENERGY STAR qualified in its factory default setting. Change to certain features, settings and functionality in this product can change the power consumption, possibly beyond the limits required for ENERGY STAR qualification.
- Environmental Protection Agency and Department of Energy. ENERGY STAR is a joint program of the Government agencies, designed to promote energy efficient products and practices.
Refer to www.energystar.gov for more information of the ENERGY STAR Program.
ENERGY STAR qualified model only
(Applicable to Thin Client models only)
As an ENERGY STAR® Partner, SAMSUNG has determined that this product meets the ENERGY STAR® guidelines for energy efficiency.
– The ENERGY STAR Program has been to reduced greenhouse gas emissions and save energy through voluntary labeling.
- Power management setting of this product have been enabled by default, and have various timing setting from 1 minutes to 5 hours.
- The product can wake with a button press on the chassis from sleep mode.
ENERGY STAR qualified model only (The other models)
- As an ENERGY STAR Partner, Samsung has determined that this product or product models meets the ENERGY STAR guideline for energy efficiency.
14 INFORMACJA O LICENCJI OPEN SOURCE
www.samsung.com/uk/aboutsamsung/sustainability/environment/our-commitment/data/
ROZPORZĄDZENIE KOMISJI (UE) 2019/1782
natural_image
Diagram showing a mechanical component before and after assembly, with no visible text or symbols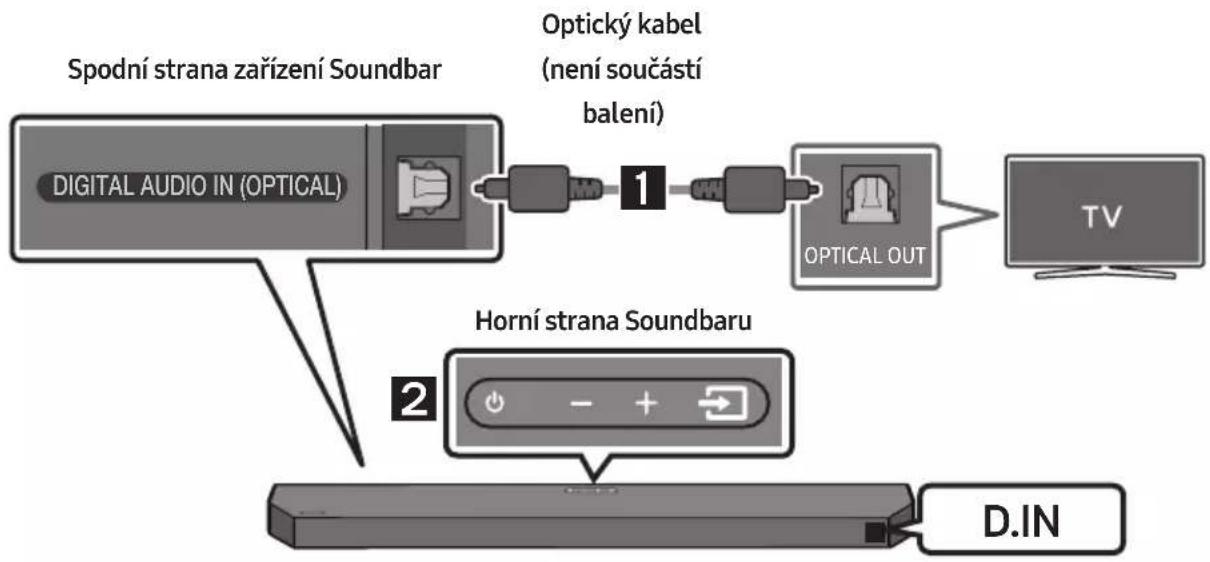
natural_image
Simple 3D illustration of a bracket-like object with no text or symbolsnatural_image
Mechanical assembly diagram showing a screw being inserted into a component with a base, no text or symbols presentflowchart
graph TD
    A["Rectangular Block 1"] --> B["Downward Arrow"]
    B --> C["Rectangular Device with Down Arrow"]
10 INSTALACE ZAŘÍZENÍ SOUNDBAR PŘED TELEVIZOREM
flowchart
graph TD
    A["UPGR"] --> B["B"]
    B --> C["DONE"]
    C --> D["BYE"]
Dolby, Dolby Atmos, and the double-D symbol are registered trademarks of Dolby Laboratories Licensing Corporation. Manufactured under license from Dolby Laboratories. Confidential unpublished works. Copyright © 2012-2021 Dolby Laboratories. All rights reserved.
dts.
For DTS patents, see http://patents.dts.com. Manufactured under license from DTS, Inc. or DTS Licensing Limited. DTS, Digital Surround, Virtual:X, and the DTS logo are registered trademarks or trademarks of DTS, Inc. in the United States and other countries. © 2021 DTS, Inc. ALL RIGHTS RESERVED.
HDMI™
HIGH-DEFINITION MULTIMEDIA INTERFACE
The terms HDMI, HDMI High-Definition Multimedia Interface, HDMI Trade dress and the HDMI Logos are trademarks or registered trademarks of HDMI Licensing Administrator, Inc.

Bluetooth®
The Bluetooth® word mark and logos are registered trademarks owned by Bluetooth SIG, Inc. and any use of such marks by Samsung Electronics Co., Ltd. is under license. Other trademarks and trade names are those of their respective owners.

[ENERGY STAR]
ENERGY STAR qualified model only
- Your Samsung product is ENERGY STAR qualified in its factory default setting. Change to certain features, settings and functionality in this product can change the power consumption, possibly beyond the limits required for ENERGY STAR qualification.
- Environmental Protection Agency and Department of Energy. ENERGY STAR is a joint program of the Government agencies, designed to promote energy efficient products and practices.
Refer to www.energystar.gov for more information of the ENERGY STAR Program.
ENERGY STAR qualified model only (Applicable to Thin Client models only)
As an ENERGY STAR® Partner, SAMSUNG has determined that this product meets the ENERGY STAR® guidelines for energy efficiency.
– The ENERGY STAR Program has been to reduced greenhouse gas emissions and save energy through voluntary labeling.
– Power management setting of this product have been enabled by default, and have various timing setting from 1 minutes to 5 hours.
- The product can wake with a button press on the chassis from sleep mode.
ENERGY STAR qualified model only (The other models)
- As an ENERGY STAR Partner, Samsung has determined that this product or product models meets the ENERGY STAR guideline for energy efficiency.
14 POZNÁMKA K LICENCI OTEVŘENÉHO SOFTWARU
- Overte, či LED dióda LINK svieti na modro (pripojenie dokončené).
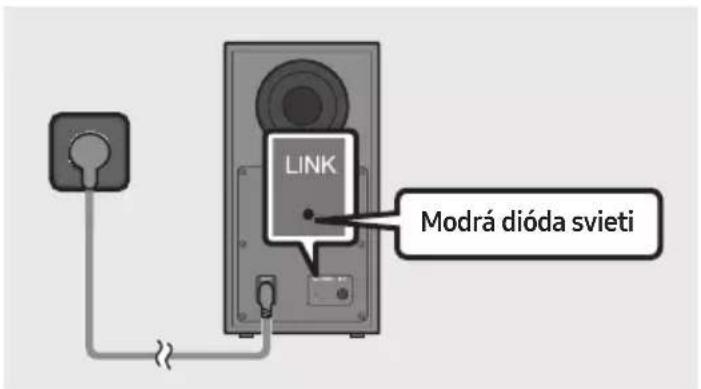
natural_image
Three-step diagram showing a mechanical component before and after assembly, with no visible text or symbols.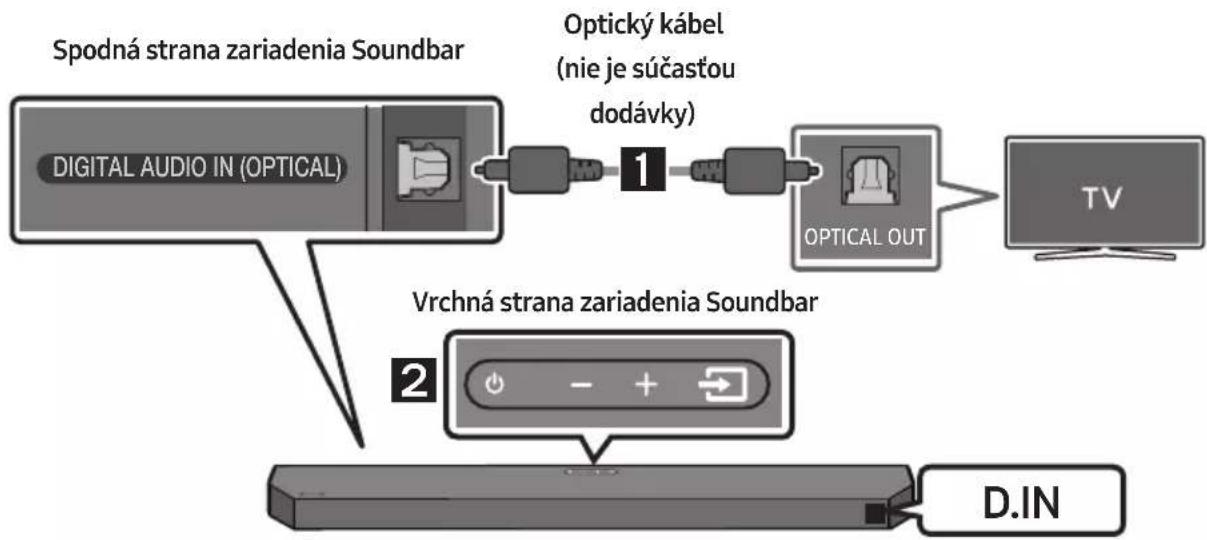
flowchart
graph TD
    A["Spodná strana zariadenia Soundbar"] --> B["OPTICKÍ KÁBEL (nie je súčastou dodávky)"]
    B --> C["OPTICAL OUT"]
    C --> D["TV"]
    E["Vrchná strana zariadenia Soundbar"] --> F["Power/Control buttons"]
    F --> G["D.IN"]
natural_image
Simple line drawing of a bracket-like object with no text or symbolsnatural_image
Mechanical component diagram showing a screw being inserted into a housing (no text or symbols)flowchart
graph TD
    A["UPGR"] --> B["B"]
    B --> C["DONE"]
    C --> D["BYE"]
Dolby, Dolby Atmos, and the double-D symbol are registered trademarks of Dolby Laboratories Licensing Corporation. Manufactured under license from Dolby Laboratories. Confidential unpublished works. Copyright © 2012-2021 Dolby Laboratories. All rights reserved.
dts.
For DTS patents, see http://patents.dts.com. Manufactured under license from DTS, Inc. or DTS Licensing Limited. DTS, Digital Surround, Virtual:X, and the DTS logo are registered trademarks or trademarks of DTS, Inc. in the United States and other countries. © 2021 DTS, Inc. ALL RIGHTS RESERVED.
HDMI ^TM
HIGH-DEFINITION MULTIMEDIA INTERFACE
The terms HDMI, HDMI High-Definition Multimedia Interface, HDMI Trade dress and the HDMI Logos are trademarks or registered trademarks of HDMI Licensing Administrator, Inc.

Bluetooth®
The Bluetooth® word mark and logos are registered trademarks owned by Bluetooth SIG, Inc. and any use of such marks by Samsung Electronics Co., Ltd. is under license. Other trademarks and trade names are those of their respective owners.

[ENERGY STAR]
ENERGY STAR qualified model only
- Your Samsung product is ENERGY STAR qualified in its factory default setting. Change to certain features, settings and functionality in this product can change the power consumption, possibly beyond the limits required for ENERGY STAR qualification.
- Environmental Protection Agency and Department of Energy. ENERGY STAR is a joint program of the Government agencies, designed to promote energy efficient products and practices.
Refer to www.energystar.gov for more information of the ENERGY STAR Program.
ENERGY STAR qualified model only
(Applicable to Thin Client models only)
As an ENERGY STAR® Partner, SAMSUNG has determined that this product meets the ENERGY STAR® guidelines for energy efficiency.
– The ENERGY STAR Program has been to reduced greenhouse gas emissions and save energy through voluntary labeling.
- Power management setting of this product have been enabled by default, and have various timing setting from 1 minutes to 5 hours.
- The product can wake with a button press on the chassis from sleep mode.
ENERGY STAR qualified model only (The other models)
- As an ENERGY STAR Partner, Samsung has determined that this product or product models meets the ENERGY STAR guideline for energy efficiency.
14 POZNÁMKA K LICENCII S OTVORENÝM ZDROJOVÝM KÓDOM
A HDMI ARC/eARC (Audio Return Channel/Enhanced Audio Return Channel)
natural_image
Diagram showing a mechanical component before and after assembly, with no visible text or symbols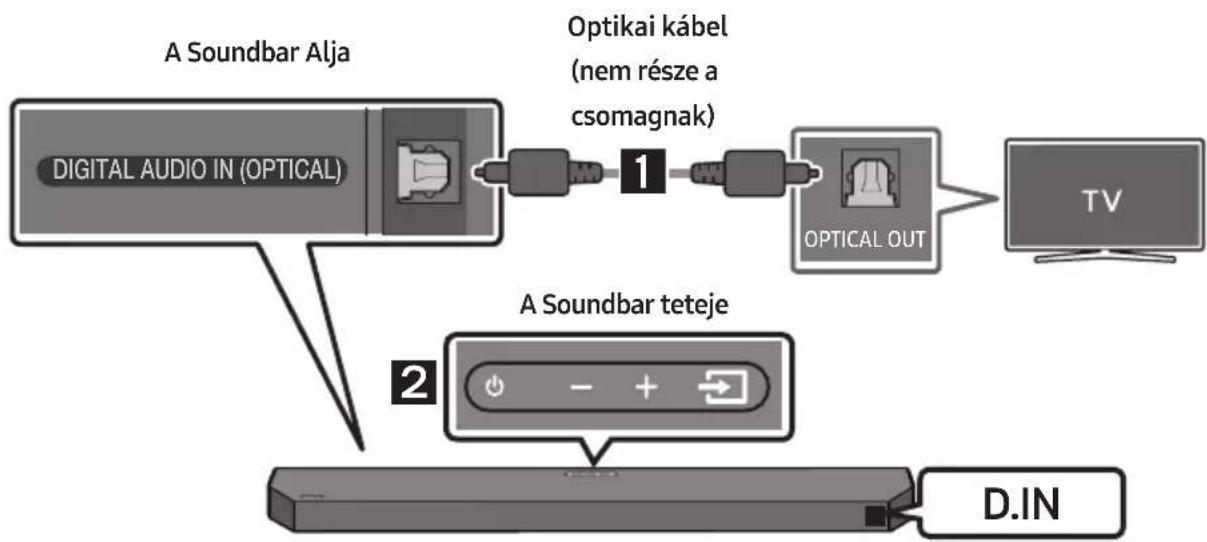
flowchart
graph TD
    A["Digital Audio IN (OPTICAL)"] --> B["Optikai kabel (nem része a csomagnak)"]
    B --> C["OPTICAL OUT"]
    C --> D["TV"]
    E["A Soundbar teteje"] --> F["D.IN"]
Falikonzol sín

Tartócsavar Csavar

natural_image
Simple 3D illustration of a bracket-like object with no text or symbolsFali Konzol
natural_image
Mechanical component diagram showing a screw being inserted into a housing with a base, no text or symbols presentflowchart
graph TD
    A["Top: Device icon"] --> B["Downward arrow"]
    B --> C["Bottom: Device icon with downward arrows"]
10 A SOUNDBAR TELEPÍTÉSE A TV ELÓTT
flowchart
graph TD
    A["UPGR → B -- → DONE → BYE"] --> B["Next Step"]
Dolby, Dolby Atmos, and the double-D symbol are registered trademarks of Dolby Laboratories Licensing Corporation. Manufactured under license from Dolby Laboratories. Confidential unpublished works. Copyright © 2012-2021 Dolby Laboratories. All rights reserved.
dts.
For DTS patents, see http://patents.dts.com. Manufactured under license from DTS, Inc. or DTS Licensing Limited. DTS, Digital Surround, Virtual:X, and the DTS logo are registered trademarks or trademarks of DTS, Inc. in the United States and other countries. © 2021 DTS, Inc. ALL RIGHTS RESERVED.
HDMI ^TM
HIGH-DEFINITION MULTIMEDIA INTERFACE
The terms HDMI, HDMI High-Definition Multimedia Interface, HDMI Trade dress and the HDMI Logos are trademarks or registered trademarks of HDMI Licensing Administrator, Inc.

Bluetooth®
The Bluetooth® word mark and logos are registered trademarks owned by Bluetooth SIG, Inc. and any use of such marks by Samsung Electronics Co., Ltd. is under license. Other trademarks and trade names are those of their respective owners.

[ENERGY STAR]
ENERGY STAR qualified model only
- Your Samsung product is ENERGY STAR qualified in its factory default setting. Change to certain features, settings and functionality in this product can change the power consumption, possibly beyond the limits required for ENERGY STAR qualification.
- Environmental Protection Agency and Department of Energy. ENERGY STAR is a joint program of the Government agencies, designed to promote energy efficient products and practices.
Refer to www.energystar.gov for more information of the ENERGY STAR Program.
ENERGY STAR qualified model only
(Applicable to Thin Client models only)
As an ENERGY STAR® Partner, SAMSUNG has determined that this product meets the ENERGY STAR® guidelines for energy efficiency.
– The ENERGY STAR Program has been to reduced greenhouse gas emissions and save energy through voluntary labeling.
- Power management setting of this product have been enabled by default, and have various timing setting from 1 minutes to 5 hours.
- The product can wake with a button press on the chassis from sleep mode.
ENERGY STAR qualified model only (The other models)
- As an ENERGY STAR Partner, Samsung has determined that this product or product models meets the ENERGY STAR guideline for energy efficiency.
14 NYÍLT FORRÁSKÓDÚ LICENC MEGJEGYZÉS
Kako upotrebljavati daljinski upravljač
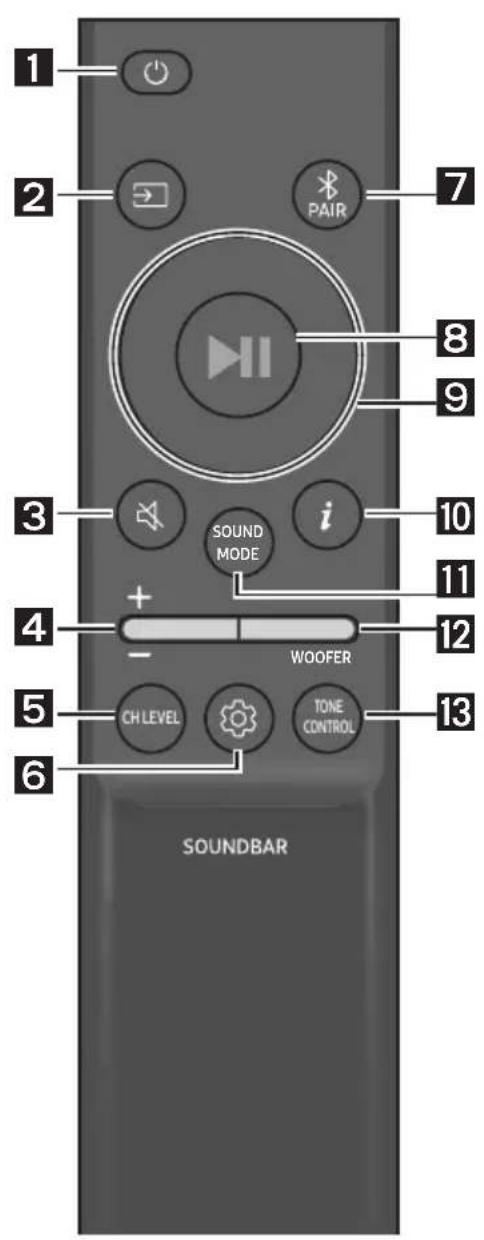
- Provjerite svijetli li indikator LINK LED postojano plavo (uspostavljanje veze dovršeno).
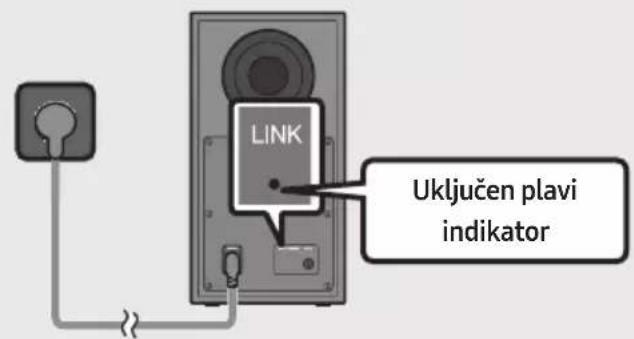
LINK LED prestat će treptati i počet će postojano svijetliti plavo nakon uspostavljanja veze između sustava Soundbar i bežičnog subwoofera.
natural_image
Diagram showing three stages of a mechanical or electrical component with arrows indicating direction (no text or symbols)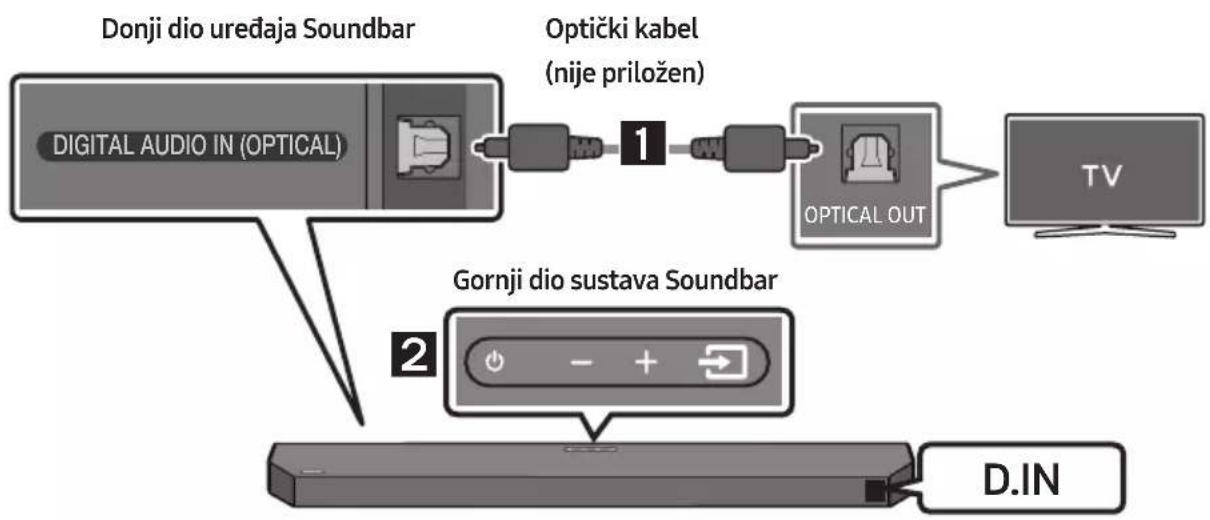
flowchart
graph TD
    A["Digital Audio IN (OPTICAL)"] --> B["Optički kabel (nije priložen)"]
    B --> C["OPTICAL OUT"]
    C --> D["TV"]
    E["Gornji dio sustava Soundbar"] --> F["D.IN"]
- Spojite priključak DIGITAL AUDIO IN (OPTICAL) na uređaju Soundbar u priključak OPTICAL OUT televizora pomoću digitalnog optičkog kabela (nije priložen).
- Pritisnite gumb 📄 (Izvor) na gornjoj ploči ili na daljinskom upravljaču, a zatim odaberite način „D.IN”.
- Zvuk televizora se čuje iz sustava Soundbar.
Upotreba funkcije Q-Symphony
Kad je funkcija Q-Symphony uključena, Soundbar se sinkronizira sa Samsung TV-om kako bi se zvuk emitirao putem dva uređaja radi optimalnog surround efekta. Kad se Soundbar poveže, pojavljuje se izbornik, „TV+Soundbar” u izborniku TV-a Izlaz zvuka. Odaberite odgovarajući izbornik.

natural_image
Simple 3D illustration of a bracket with a cutout and label 'x2' (no other text or symbols)Zidni nosač
-
Stavite Vodilicu zidnog nosača na zid.
-
Vodilicu zidnog nosača mora biti u ravnini.
- Ako je vaš televizor postavljen na zid, postavite Soundbar barem 5 cm ispod televizora.
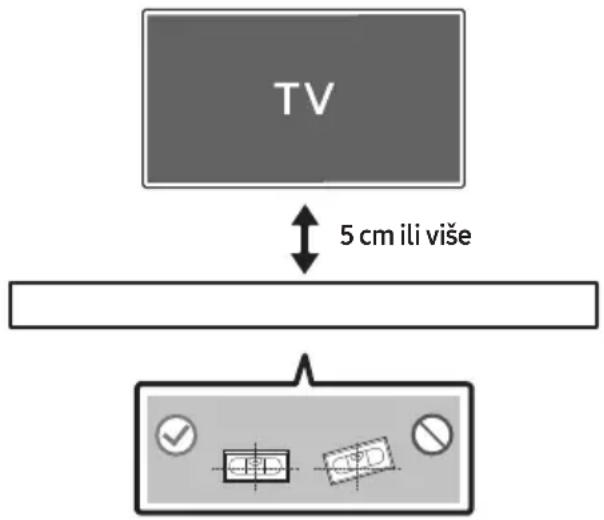
- Poravnajte Središnja linija vodilice zidnog nosača sa sredinom televizora (ako montirate Soundbar ispod televizora), a zatim trakom pričvrstite Vodilica zidnog nosača na zid.
- Ako ne postavljate ispod televizora, postavite Središnju liniju u sredinu područja za postavljanje.
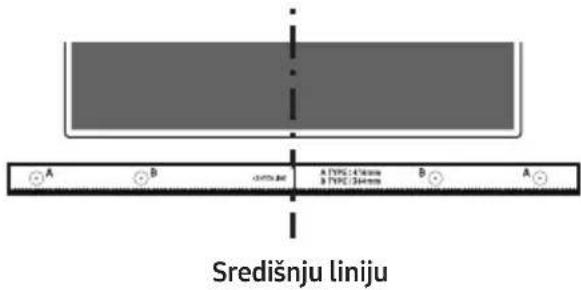
- Gurnite vrh kemijske olovke ili naoštrene olovke kroz sredinu slika A-TYPE na svakoj strani vodilice da biste označili otvore za potporne vijke, a zatim uklonite Vodilica zidnog nosača.
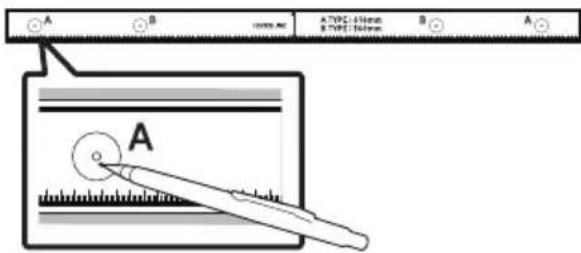
natural_image
Mechanical component with screw and adjustment knob, no visible text or symbolsnatural_image
Diagram showing two mechanical components with downward arrows indicating motion or assembly (no text or symbols)10 POSTAVLJANJE SUSTAVA SOUNDBAR ISPRED TELEVIZORA
Dolby, Dolby Atmos, and the double-D symbol are registered trademarks of Dolby Laboratories Licensing Corporation. Manufactured under license from Dolby Laboratories. Confidential unpublished works. Copyright © 2012-2021 Dolby Laboratories. All rights reserved.
dts.
For DTS patents, see http://patents.dts.com. Manufactured under license from DTS, Inc. or DTS Licensing Limited. DTS, Digital Surround, Virtual:X, and the DTS logo are registered trademarks or trademarks of DTS, Inc. in the United States and other countries. © 2021 DTS, Inc. ALL RIGHTS RESERVED.
HDMI ^TM
HIGH-DEFINITION MULTIMEDIA INTERFACE
The terms HDMI, HDMI High-Definition Multimedia Interface, HDMI Trade dress and the HDMI Logos are trademarks or registered trademarks of HDMI Licensing Administrator, Inc.

Bluetooth®
The Bluetooth® word mark and logos are registered trademarks owned by Bluetooth SIG, Inc. and any use of such marks by Samsung Electronics Co., Ltd. is under license. Other trademarks and trade names are those of their respective owners.

[ENERGY STAR]
ENERGY STAR qualified model only
- Your Samsung product is ENERGY STAR qualified in its factory default setting. Change to certain features, settings and functionality in this product can change the power consumption, possibly beyond the limits required for ENERGY STAR qualification.
- Environmental Protection Agency and Department of Energy. ENERGY STAR is a joint program of the Government agencies, designed to promote energy efficient products and practices.
Refer to www.energystar.gov for more information of the ENERGY STAR Program.
ENERGY STAR qualified model only (Applicable to Thin Client models only)
As an ENERGY STAR® Partner, SAMSUNG has determined that this product meets the ENERGY STAR® guidelines for energy efficiency.
- The ENERGY STAR Program has been to reduced greenhouse gas emissions and save energy through voluntary labeling.
- Power management setting of this product have been enabled by default, and have various timing setting from 1 minutes to 5 hours.
- The product can wake with a button press on the chassis from sleep mode.
ENERGY STAR qualified model only (The other models)
- As an ENERGY STAR Partner, Samsung has determined that this product or product models meets the ENERGY STAR guideline for energy efficiency.
14 OBAVIJEST O LICENCI ZA UPORABU SOFTVERA OTVORENOG KODA
Želite li poslati upite i zahtjeve u vezi sa softverom otvorenog koda, obratite se grupi Samsung Open Source (http://opensource.samsung.com)
15 VAŽNA NAPOMENA VEZANA UZ SERVIS
- Slike u ovom korisničkom priručniku služe kao samo kao referenca i mogu se razlikovati od stvarnog izgleda proizvoda.
- Moguća je naplata administrativne pristojbe u slučaju
www.samsung.com/uk/aboutsamsung/sustainability/environment/our-commitment/data/
UREDBA KOMISIJE (EU) 2019/1782
| 1 | EkranPrikazuje status proizvoda i trenutni režim. | |
| 2 | Dugme (napajanje)Uključuje i isključuje napajanje.Funkcija Auto Power DownUređaj se automatski isključuje u sledećim situacijama.- D.IN / HDMI / BT / USB režim : Ako nema zvučnog signala 18 minuta. | |
| 3 | Dugme (Jačina zvuka)Podešava jačinu zvuka.Kada se podesi, nivo jačine zvuka se prikazuje na prednjem ekranu uređaja Soundbar. | |
| 4 | Dugme (Izvor)Bira režim ulaza izvora. | |
| Režim ulaza Ekran | ||
| Optički D.IN | ||
| eARC/ARC (HDMI OUT) | * D.IN → TV eARC (automatska konverzija) | |
| D.IN → TV ARC (automatska konverzija) | ||
| HDMI HDMI | ||
| BLUETOOTH režim BT | ||
| USB režim USB | ||
| Da biste uključili režim „BT PAIRING“, promenite izvor na režim „BT“, a zatim pritisnite i zadržite dugme (Izvor) duže od 5 sekundi. | ||
Kako da koristite daljinski upravljač
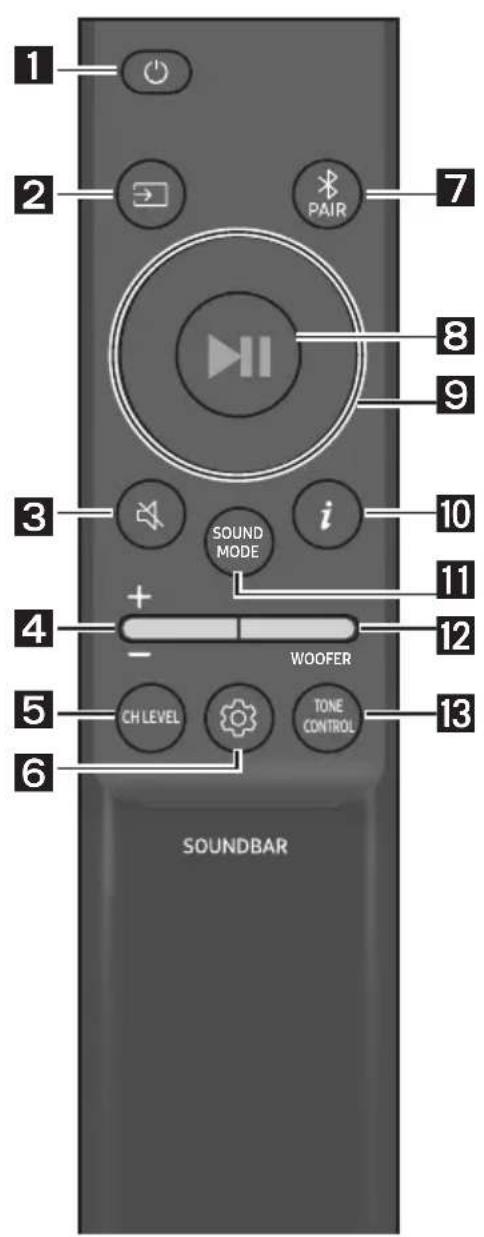
| 1 |  Napajanje Napajanje | Uključuje i isključuje uređaj Soundbar. | |
| 2 |  Izvor Izvor | Pritisnite da biste izabrali izvor povezan sa uređajem Soundbar. | |
| 3 |  Isključivanje zvuka Isključivanje zvuka | Pritisnite dugme (Isključivanje zvuka) kako biste isključili zvuk.Ponovo ga pritisnite da biste uključili zvuk. | |
| 4 |  Jačina zvuka Jačina zvuka | 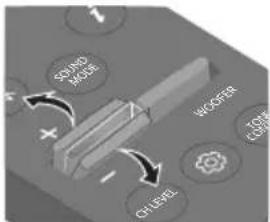 | 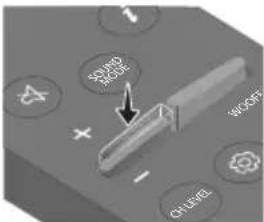 |
| Pritisnite dugme nagore ili nadole da biste prilagodili jačinu zvuka.• Isključivanje zvukaPritisnite dugme Jačina zvuka da biste isključili zvuk. Ponovo ga pritisnite da biste uključili zvuk. | |||
| 5 |  CH LEVEL CH LEVEL | Pritiskom na dugme možete podesiti jačinu zvuka svakog zvučnika.Pritisnite dugme da biste izabraliCENTER LEVELi prilagodite jačinu zvuka između -6 i +6 pomoću dugmadi Gore/dole.Ako su povezani zadnji zvučnici (prodaju se odvojeno), podržana je postavkaREAR LEVEL. Da biste prilagodili jačinu zvuka delaREAR LEVELizmeđu -6 i +6, koristite dugmadNagore/Nadole. |
| 6 |  Kontrola zvuka Kontrola zvuka | Pritiskom na dugme možete postaviti audio funkciju. Željenu postavku možete da prilagodite pomoću dugmetaNagore/Nadole.VOICE ENHANCE ON/OFF → NIGHT MODE ON/OFF → SYNC → VIRTUAL ON/OFF- VOICE ENHANCE ON/OFFU ovom režimu lakše možete da čujete dijalog u filmovima i TV emisijama.- NIGHT MODE ON/OFOvaj režim je optimizovan za gledanje noću jer su postavke prilagođene tako da je jačina zvuka mala, a dijalog jasan.- SYNCUkoliko slika na televizoru i zvuk sa uređaja Soundbar nisu sinhronizovani, pritisnite dugme(Kontrola zvuka) da biste izabraliSYNC, a zatim podesite kašnjenje zvuka u rasponu od 0 do 300 milisekundi pomoću dugmadi zaNagore/Nadole.(Nije dostupno u režimima „USB“ ili „BT“.)- VIRTUAL ON/OFFFunkciju Dolby Virtual možete da postavite naON/OFF.Audio funkcijeVOICE ENHANCE, NIGHT MODE i VIRTUAL moguće je postaviti naON/OFF pomoću dugmadiNagore/Nadole.(Funkcija VIRTUAL nije dostupna u režimu „USB“ ili „BT“.)Pritisnite i držite dugme(Kontrola zvuka) oko 5 sekundi kako biste podesili zvuk za svaki frekventni opseg. Mogu se izabrati 150 Hz, 300 Hz, 600 Hz, 1,2 kHz, 2,5 kHz, 5 kHz i 10 kHz pomoću dugmadiNalevo/Nadesno, a svaka opcija se može podesiti na postavku između -6 i +6 pomoću dugmadiNagore/Nadole.(Uverite se da je režim zvuka podešen na „STANDARD“.) |
| 7 |  BluetoothPAIR BluetoothPAIR | Prebacuje Soundbar u režim za Bluetooth uparivanje.Pritisnite dugmePAIRi sačekajte da se prikaže ekran „BT PAIRING“ da biste povezali novi Bluetooth uređaj. |
| 8 |  Reprodukcija /Pauza Reprodukcija /Pauza | Pritiskom na ovo dugme takođe možete pokrenuti reprodukciju muzike ili je pauzirati. |
| 9 |  Nagore/Nadole/Nalevo/Nadesno Nagore/Nadole/Nalevo/Nadesno | 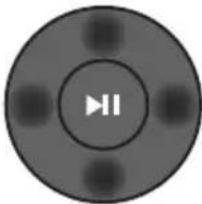 Pritisnite označene oblasti da biste izabrali Nagore/Nadole/Nalevo/Nadesno.Pritisnite Nagore/Nadole/Nalevo/Nadesno na dugmetu da biste izabrali ili podesili funkcije.PonoviDa biste koristili funkciju Ponovi u režimu „USB“, pritisnite dugme Nagore.Preskoči muzičku datotekuPritisnite dugme Nadesno da biste izabrali sledeću muzičku datoteku.Pritisnite dugme Nalevo da biste izabrali prethodnu muzičku datoteku.ID SETPritisnite i držite dugme Nagore 5 sekundi kako biste izvršili ID SET (prilikom povezivanja sa bežičnim sabvuferom ili bežičnim zadnjim zvučnicima). Pritisnite označene oblasti da biste izabrali Nagore/Nadole/Nalevo/Nadesno.Pritisnite Nagore/Nadole/Nalevo/Nadesno na dugmetu da biste izabrali ili podesili funkcije.PonoviDa biste koristili funkciju Ponovi u režimu „USB“, pritisnite dugme Nagore.Preskoči muzičku datotekuPritisnite dugme Nadesno da biste izabrali sledeću muzičku datoteku.Pritisnite dugme Nalevo da biste izabrali prethodnu muzičku datoteku.ID SETPritisnite i držite dugme Nagore 5 sekundi kako biste izvršili ID SET (prilikom povezivanja sa bežičnim sabvuferom ili bežičnim zadnjim zvučnicima). |
| 10 | iInformacije | Pritisnite dugme za prikaz informacija o aktivnoj funkciji na dostupnom kodeku. |
| 11 | SOUND MODE | Pritiskom na dugme možete izabrati željeni režim zvuka.SURROUND SOUND → GAME → ADAPTIVE SOUND → DTS VIRTUAL:X → STANDARD– SURROUND SOUNDObezbeđuje šire zvučno polje od standardnog.– GAMEObezbeđuje stereoskopski zvuk da biste potpuno uronili u akciju tokom igranja.– ADAPTIVE SOUNDAnalizira sadržaj u stvarnom vremenu i automatski obezbeđuje optimalno zvučno polje na osnovu karakteristika sadržaja.– DTS VIRTUAL:XSveobuhvatan 3D zvuk sa bilo kog sadržaja.– STANDARDReprodukuje originalni zvuk.DRC (Dynamic Range Control)Omogućuje vam primenu kontrole dinamičkog opsega na Dolby Digital numere.Pritisnite i zadržite dugme SOUND MODE duže od 5 sekundi dok je Soundbar isključen da biste uključili ili isključili DRC (Dynamic Range Control). Kada je DRC uključen, glasan se zvuk stišava. (Zvuk bi mogao da se izobliči.)Bluetooth PowerOva funkcija automatski uključuje uređaj Soundbar kada primi zahtev za povezivanjem sa prethodno povezanog TV ili Bluetooth uređaja. Podešavanje je podrazumevano uključeno.– Pritisnite i zadržite dugme SOUND MODE tokom više od 5 sekundi kako biste isključili funkciju Bluetooth Power. |
| 12 |  WOOFERWOOFER(BAS) NIVO WOOFERWOOFER(BAS) NIVO | 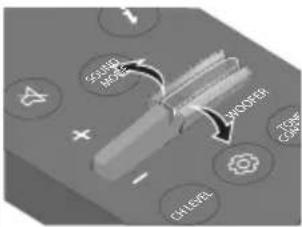 | 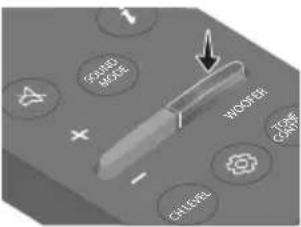 |
| Pritisnite dugme nagore ili nadole da biste prilagodili jačinu zvuka vufera (basa) na -12 ili između -6 i +6. Da biste podesili jačinu zvuka vufera (basa) na 0 (podrazumevana vrednost), pritisnite dugme. | |||
| 13 |  TONECONTROL TONECONTROL | Pritiskom na dugme možete podesiti jačinu zvuka visokih ili niskih tonova.Pritisnite dugme da biste izabrali TREBLE ili BASS i prilagodite jačinu zvuka između -6 i +6 pomoću dugmadi Nagore/Nadole. Kada se promeni nivo niskih tonova, nivo vufera će se takođe prilagoditi u skladu sa tim. | |
Korišćenje skrivenih dugmadi (dugmadi sa više funkcija)
| Skriveno dugme | Referentna stranica | |
| Dugme na daljinskom upravljaču Funkcija | ||
| WOOFER (Nagore) | Daljinski upravljač televizoraUključeno/isključeno (Pripravnost) | Stranica 14 |
| Nalevo | Automatsko povezivanje TV-a uključeno/isključeno (BT spremno) | Stranica 23 |
| Nagore ID SET Stranica 11 | ||
| [1825] (Kontrola zvuka) | 7-kanalni EQ Stranica 10 | |
| SOUND MODE | DRC ON/OFF (Pripravnost) Stranica 11 | |
| Bluetooth Power | Stranica 11 | |
Specifikacije izlaza za različite režime zvučnih efekata
| Efekat Ulaz | Izlaz | |||
| Samo sa sabvuferom | Sa sabvuferom i bežičnim kompletom zadnjih zvučnika | |||
| [SIGNATURE] SOUND MODE | SURROUND SOUND | 2.0 kanala | 3.1 kanala 5.1 kanala | |
| 5.1 kanala 3.1 kanala | 5.1 kanala | |||
| Dolby Atmos® 3.1 kanala | 5.1 kanala | |||
| GAME | 2.0 kanala | 3.1 kanala 5.1 kanala | ||
| 5.1 kanala 3.1 kanala | 5.1 kanala | |||
| Dolby Atmos® 3.1 kanala | 5.1 kanala | |||
| ADAPTIVE SOUND | 2.0 kanala | 3.1 kanala 5.1 kanala | ||
| 5.1 kanala 3.1 kanala | 5.1 kanala | |||
| Dolby Atmos® 3.1 kanala | 5.1 kanala | |||
| DTS VIRTUAL:X | 2.0 kanala | 3.1 kanala 5.1 kanala | ||
| 5.1 kanala 3.1 kanala | 5.1 kanala | |||
| Dolby Atmos® 3.1 kanala | 5.1 kanala | |||
| STANDARD | 2.0 kanala | 2.1 kanala 2.1 kanala | ||
| 5.1 kanala 3.1 kanala | 5.1 kanala | |||
| Dolby Atmos® 3.1 kanala | 5.1 kanala | |||
- Proverite da li LED lampica za vezu (LINK) svetli plavom bojom (povezivanje je završeno).

LED indikator za vezu (LINK) prestaje da treperi i počinje neprekidno da svetli plavom bojom kada se uspostavi veza između uređaja Soundbar i bežičnog sabvufera.
LED lampice indikatora na zadnjoj strani sabvufera
| LED Status Opis Rešenje | |||
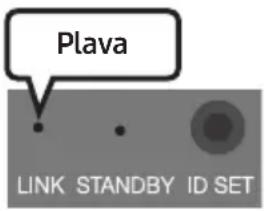 | Svetli | Uspešno povezano (normalan rad) | - |
| Treperi Ponovno uspostavljanje veze | Proverite da li je kabl za napajanje ispravno povezan za glavni uređaj Soundbar ili sačekajte oko 5 minuta. Ukoliko se treperenje nastavi pokušajte ručno da povežete sabvufer. Pogledajte str. 16. | ||
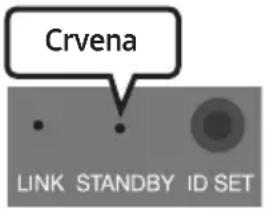 | Svetli | Režim pripravnosti (sa isključenim glavnim uređajem Soundbar) | Proverite da li je kabl za napajanje glavnog uređaja Soundbar pravilno povezan. |
| Povezivanje neuspešno | Povežite ponovo. Pogledajte uputstva za ručno povezivanje na str. 16. | ||
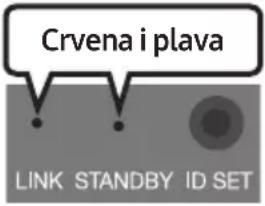 | Treperi Kvar | Pogledajte kontakt informacije servisnog centra kompanije Samsung u priručniku. | |
NAPOMENE
- Pre pomeranja ili montiranja ovog proizvoda, uverite se da ste isključili napajanje i iskopčali priključni kabl.
- Ako je isključeno napajanje glavnog uređaja, bežični sabvufer će preći u režim mirovanja, a LED lampica za režim STANDBY na zadnjoj strani će postati crven nakon što trepne plavom bojom nekoliko puta.
- Ako koristite uređaj koji koristi istu frekvenciju kao Soundbar u blizini uređaja Soundbar, interferencija može dovesti do prekida zvuka.
- Maksimalno rastojanje prenosa bežičnog signala glavnog uređaja je oko 10 metara, ali može da se razlikuje u zavisnosti od radnog okruženja. Ako se zid od armiranog betona ili metalni zid nalazi između glavnog uređaja i bežičnog sabvufera, sistem možda neće raditi pošto bežični signal ne može da prođe kroz metal.

OPREZ
- Bežične prijemne antene su ugrađene u bežični sabvufer. Uređaj držite daleko od vode i vlage.
- Ako želite optimalne performanse slušanja, proverite da li ima prepreka u blizini bežičnog sabvufera i bežičnih zadnjih zvučnika (prodaju se zasebno).
Povezivanje bežičnog kompleta zadnjeg zvučnika Samsung sa uređajem Soundbar
Povežite bežični komplet zadnjeg zvučnika Samsung (model SWA-9200S, prodaje se zasebno) sa svojim Soundbar zvučnikom da biste proširili ozvučenje na istinsko prostorno ozvučenje.
Detaljne informacije o vezama potražite u priručniku bežičnog kompleta zadnjeg zvučnika kompanije Samsung.
05 POVEZIVANJE SA TELEVIZOROM
Metoda 1. Povezivanje putem HDMI kabla
natural_image
Diagram showing a mechanical component before and after assembly, with no visible text or symbols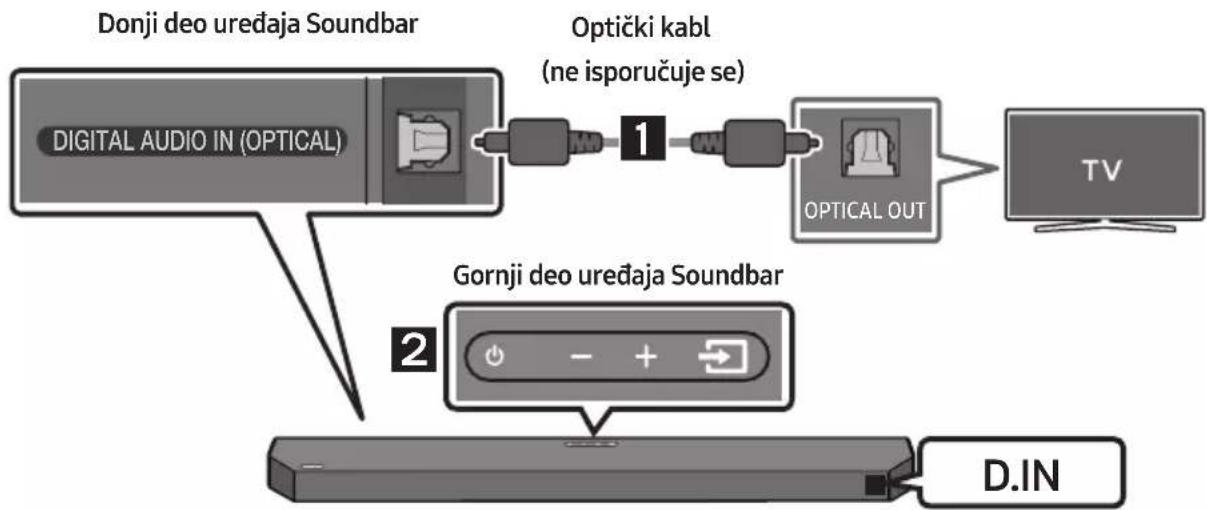
flowchart
graph TD
    A["Digital Audio IN (OPTICAL)"] --> B["Optički kabl (ne isporučuje se)"]
    B --> C["OPTICAL OUT"]
    C --> D["TV"]
    E["DIN"] --> F["Gornji deo uređaja Soundbar"]
- Povežite konektor DIGITAL AUDIO IN (OPTICAL) na uređaju Soundbar sa konektorom OPTICAL OUT na televizoru koristeći digitalni optički kabl (ne isporučuje se).
- Pritisnite dugme ➞ (Izvor) na gornjem panelu ili na daljinskom upravljaču i potom izaberite režim „D.IN“.
- Soundbar emituje zvuk sa televizora.
Upotreba funkcije Q-Symphony
Vodica za montažu na zid

natural_image
Simple 3D illustration of a bracket with a hole and side slot, labeled 'x2' (no text or symbols on the object itself)Nosača za montažu na zid
-
Postavite Vodicu za montažu na zid na zidnu površinu.
-
Vođicu za montažu na zid mora biti nivelisana.
- Postavite uređaj Soundbar najmanje 5 cm ispod televizora, ako je televizor montiran na zid.
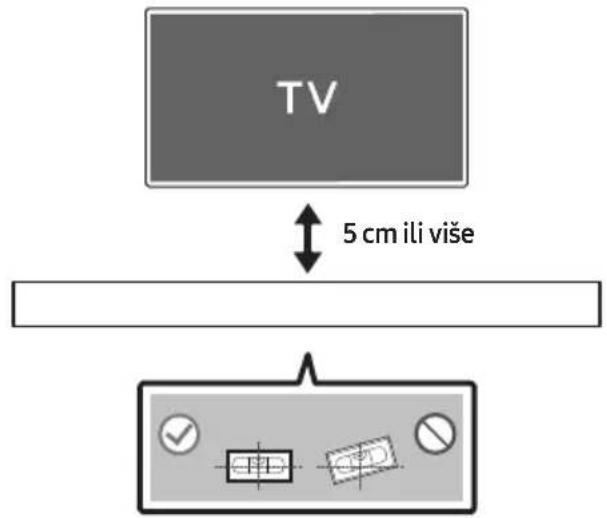
- Poravnajte Osu vodice za montažu na zid sa sredinom televizora (ako montirate uređaj Soundbar ispod televizora), a zatim pričvrstite Vodica za montažu na zid za zid koristeći traku.
- Ako ne montirate uredaj ispod televizora, postavite Osa na sredinu oblasti za montiranje.
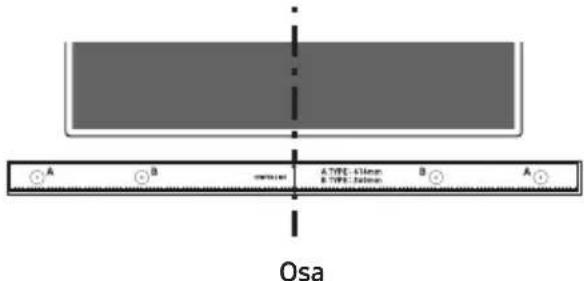
natural_image
Mechanical assembly diagram showing a screw being inserted into a housing component (no text or symbols)- Prilikom sklapanja noseći delovi Nosač za montažu na zid treba da se nalaze sa zadnje strane uređaja Soundbar.
Zadnja strana uređaja Soundbar
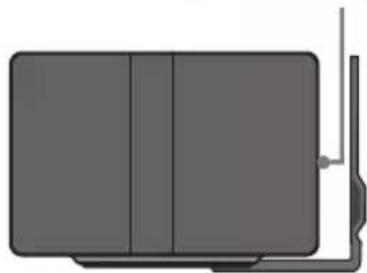
natural_image
Pure diagram of a rectangular device with internal vertical sections and a small protruding arm (no text or symbols)flowchart
graph TD
    A["Top: Device icon"] --> B["Downward arrow"]
    B --> C["Bottom: Device icon with downward arrows"]
10 POSTAVLJANJE SOUNDBAR-A ISPRED TV-A
Postavite Soundbar uređaj na postolje za televizor.

Kao što je prikazano na slici, poravnajte sredinu Soundbar-a sa sredinom TV-a i pažljivo postavite Soundbar u stalak za televizor.
Za optimalni kvalitet zvuka, Soundbar uređaj postavite najmanje 3 cm od prednje strane TV-a.
NAPOMENE
- Uverite se da je Soundbar uređaj postavljen na ravnu i čvrstu površinu.
- Nedovoljna udaljenost od TV-a može dovesti do problema sa akustikom.
11 AŽURIRANJE SOFTVERA
flowchart
graph TD
    A["UPGR"] --> B["B"]
    B --> C["DONE"]
    C --> D["BYE"]
Dolby, Dolby Atmos, and the double-D symbol are registered trademarks of Dolby Laboratories Licensing Corporation. Manufactured under license from Dolby Laboratories. Confidential unpublished works. Copyright © 2012-2021 Dolby Laboratories. All rights reserved.
dts.
For DTS patents, see http://patents.dts.com. Manufactured under license from DTS, Inc. or DTS Licensing Limited. DTS, Digital Surround, Virtual:X, and the DTS logo are registered trademarks or trademarks of DTS, Inc. in the United States and other countries. © 2021 DTS, Inc. ALL RIGHTS RESERVED.
HDMI ^TM
HIGH-DEFINITION MULTIMEDIA INTERFACE
The terms HDMI, HDMI High-Definition Multimedia Interface, HDMI Trade dress and the HDMI Logos are trademarks or registered trademarks of HDMI Licensing Administrator, Inc.

Bluetooth®
The Bluetooth® word mark and logos are registered trademarks owned by Bluetooth SIG, Inc. and any use of such marks by Samsung Electronics Co., Ltd. is under license. Other trademarks and trade names are those of their respective owners.

[ENERGY STAR]
ENERGY STAR qualified model only
- Your Samsung product is ENERGY STAR qualified in its factory default setting. Change to certain features, settings and functionality in this product can change the power consumption, possibly beyond the limits required for ENERGY STAR qualification.
- Environmental Protection Agency and Department of Energy. ENERGY STAR is a joint program of the Government agencies, designed to promote energy efficient products and practices.
Refer to www.energystar.gov for more information of the ENERGY STAR Program.
ENERGY STAR qualified model only (Applicable to Thin Client models only)
As an ENERGY STAR® Partner, SAMSUNG has determined that this product meets the ENERGY STAR® guidelines for energy efficiency.
– The ENERGY STAR Program has been to reduced greenhouse gas emissions and save energy through voluntary labeling.
- Power management setting of this product have been enabled by default, and have various timing setting from 1 minutes to 5 hours.
- The product can wake with a button press on the chassis from sleep mode.
ENERGY STAR qualified model only (The other models)
- As an ENERGY STAR Partner, Samsung has determined that this product or product models meets the ENERGY STAR guideline for energy efficiency.
14 OBAVEŠTENJE O LICENCI OTVORENOG IZVORNOG KODA
Da biste poslali pitanja i zahteve u vezi sa softverom otvorenog koda obratite se grupi Samsung Open Source (http://opensource.samsung.com).
15 VAŽNA NAPOMENA O SERVISIRANJU
- Slike i ilustracije koje su upotrebljene u ovom korisničkom uputstvu date su samo kao reference i mogu se razlikovati od vašeg proizvoda.
- Administrativni troškovi mogu biti naplaćeni u sledećim slučajevima:
(a) tehničar je pozvan u vaš dom na vaš zahtev i ako proizvod nije u kvaru (tj. ako niste pročitali ovo korisničko uputstvo),
(b) vi donesete uređaj u servisni centar, a proizvod nije u kvaru (tj. ako niste pročitali ovo korisničko uputstvo). - I znos tih administrativnih troškova biće vam saopšten pre obavljanja bilo kakvih radova ili kućne posete.
16 SPECIFIKACIJE I VODIČ
Specifikacije
| Naziv modela HW-Q60C | |
| USB 5V/0,5A | |
| Težina 3,5 kg | |
| Dimenzije (Š x V x D) 1030,0 x 57,0 x 105,0 mm | |
| Opseg radne temperature +5°C do +35°C | |
| Radni opseg vlažnosti vazduha 10 % ~ 75 % | |
| POJAČALONominalna izlazna snaga | 180W (30W x 6) |
| Podržani formati za reprodukciju | Dolby 5.1ch / Dolby Digital Plus / Dolby TRUE HD / Dolby ATMOS / DTS Digital Surround / LPCM 8ch |
| Naziv sabvufera PS-WC67B | |
| Težina 5,5 kg | |
| Dimenzije (Š x V x D) 184,0 x 343,0 x 295,0 mm | |
| POJAČALONominalna izlazna snaga | 160W |
| Ukupna potrošnja energije u režimu mirovanja (W) | 2,0W |
| BluetoothNačin deaktivacije porta | Pritisnite i zadržite dugme SOUND MODE tokom više od 5 sekundi kako biste isključili funkciju Bluetooth Power. |
NAPOMENE
- Samsung Electronics Co., Ltd zadržava pravo da promeni specifikacije bez prethodne najave.
- Težina i dimenzije su približne.
- Kompanija Samsung ovim izjavljuje da je ova radio-oprema u skladu sa Direktivom 2014/53/EU i relevantnim zakonskim odredbama Ujedinjenog Kraljevstva. Ceo tekst izjave o usklađenosti dostupan je na sledećoj internet adresi: http://www.samsung.com; idite na stavku Podrška i unesite naziv modela. Ova oprema sme da se koristi u svim državama članicama EU i Ujedinjenom Kraljevstvu.
- IZLAZNA SNAGA BEŽIČNOG UREĐAJA
RF maks. snaga predajnika
100mW pri 2,4GHz - 2,4835GHz
25mW pri 5,725GHz - 5,825GHz
[Ispravno odlaganje baterija za ovaj uređaj]
www.samsung.com/uk/aboutsamsung/sustainability/environment/our-commitment/data/
VARNOSTNI PODATKI
VARNOSTNA OPOZORILA
ZARADI NEVARNOSTI ELEKTRIČNEGA UDARA NE ODPIRAJTE ZADNJEGA (HRBTNEGA) POKROVA.
NAPRAVA NIMA DELOV, KI BI JIH LAHKO POPRAVIL UPORABNIK. SERVIS NAJ OPRAVI USTREZNO USPOSOBLJENA OSEBA.
- Preverite, ali kazalnik LINK LED sveti modro (povezava končana).
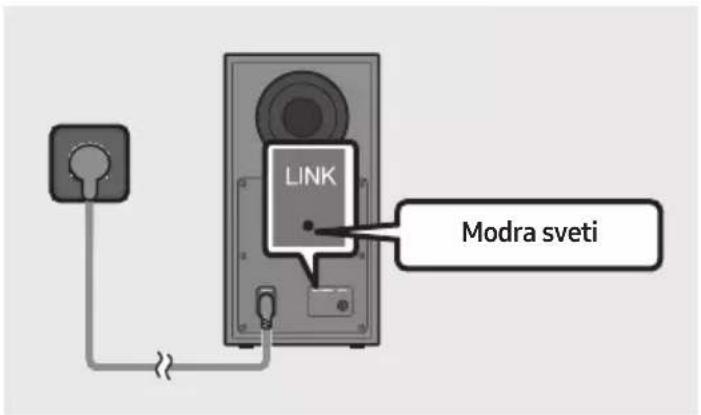
natural_image
Three-step diagram showing a mechanical component before and after assembly, with no visible text or symbols.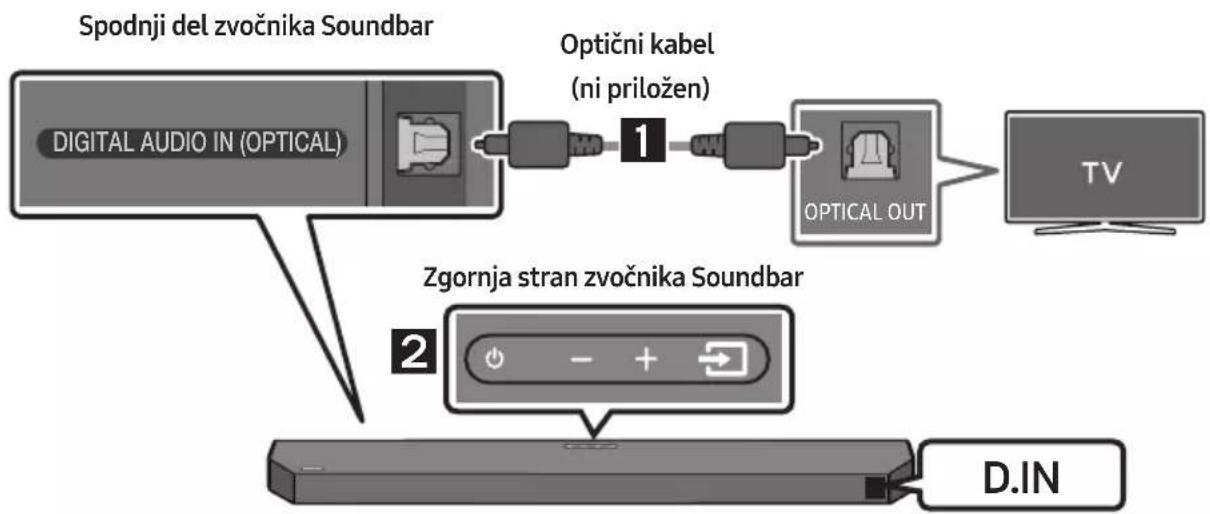
flowchart
graph TD
    A["Spodnji del zvočnika Soundbar"] --> B["Optični kabel (ni priložen)"]
    B --> C["Optical OUT"]
    C --> D["TV"]
    E["Zgornja stran zvočnika Soundbar"] --> F["D.IN"]
natural_image
Simple 3D illustration of a bracket with a hole and label 'x2' (no other text or symbols)Stenskega nosilca
natural_image
Mechanical component diagram showing a screw being inserted into a housing (no text or symbols)natural_image
Simple diagram of a rectangular device with vertical panels and a side arm, no text or symbols present.natural_image
Diagram showing two mechanical components with downward arrows indicating motion or assembly (no text or symbols)10 NAMESTITEV ZVOČNIKA SOUNDBAR PRED TELEVIZOR
Zvočnik Soundbar postavite na stojalo za televizor.
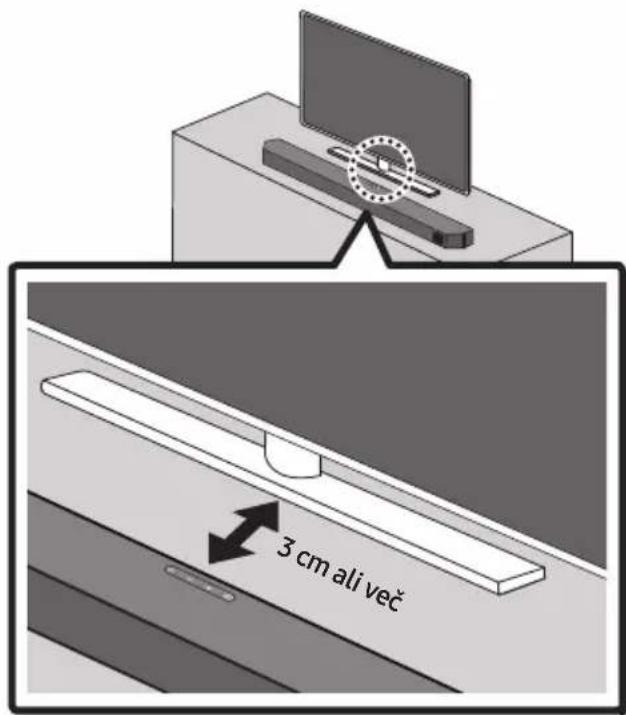
flowchart
graph TD
    A["UPGR"] --> B["B -- →"]
    B --> C["DONE → BYE"]
Dolby, Dolby Atmos, and the double-D symbol are registered trademarks of Dolby Laboratories Licensing Corporation. Manufactured under license from Dolby Laboratories. Confidential unpublished works. Copyright © 2012-2021 Dolby Laboratories. All rights reserved.
dts.
For DTS patents, see http://patents.dts.com. Manufactured under license from DTS, Inc. or DTS Licensing Limited. DTS, Digital Surround, Virtual:X, and the DTS logo are registered trademarks or trademarks of DTS, Inc. in the United States and other countries. © 2021 DTS, Inc. ALL RIGHTS RESERVED.
HDMI ^TM
HIGH-DEFINITION MULTIMEDIA INTERFACE
The terms HDMI, HDMI High-Definition Multimedia Interface, HDMI Trade dress and the HDMI Logos are trademarks or registered trademarks of HDMI Licensing Administrator, Inc.

Bluetooth®
The Bluetooth® word mark and logos are registered trademarks owned by Bluetooth SIG, Inc. and any use of such marks by Samsung Electronics Co., Ltd. is under license. Other trademarks and trade names are those of their respective owners.

[ENERGY STAR]
ENERGY STAR qualified model only
- Your Samsung product is ENERGY STAR qualified in its factory default setting. Change to certain features, settings and functionality in this product can change the power consumption, possibly beyond the limits required for ENERGY STAR qualification.
- Environmental Protection Agency and Department of Energy. ENERGY STAR is a joint program of the Government agencies, designed to promote energy efficient products and practices.
Refer to www.energystar.gov for more information of the ENERGY STAR Program.
ENERGY STAR qualified model only
(Applicable to Thin Client models only)
As an ENERGY STAR® Partner, SAMSUNG has determined that this product meets the ENERGY STAR® guidelines for energy efficiency.
- The ENERGY STAR Program has been to reduced greenhouse gas emissions and save energy through voluntary labeling.
- Power management setting of this product have been enabled by default, and have various timing setting from 1 minutes to 5 hours.
- The product can wake with a button press on the chassis from sleep mode.
ENERGY STAR qualified model only (The other models)
- As an ENERGY STAR Partner, Samsung has determined that this product or product models meets the ENERGY STAR guideline for energy efficiency.
14 OBVESTILO O ODPRTOKODNIH LICENCAH
www.samsung.com/uk/aboutsamsung/sustainability/environment/our-commitment/data/
UREDBA KOMISIJE (EU) 2019/1782
natural_image
Diagram showing a mechanical component before and after assembly, with no visible text or symbols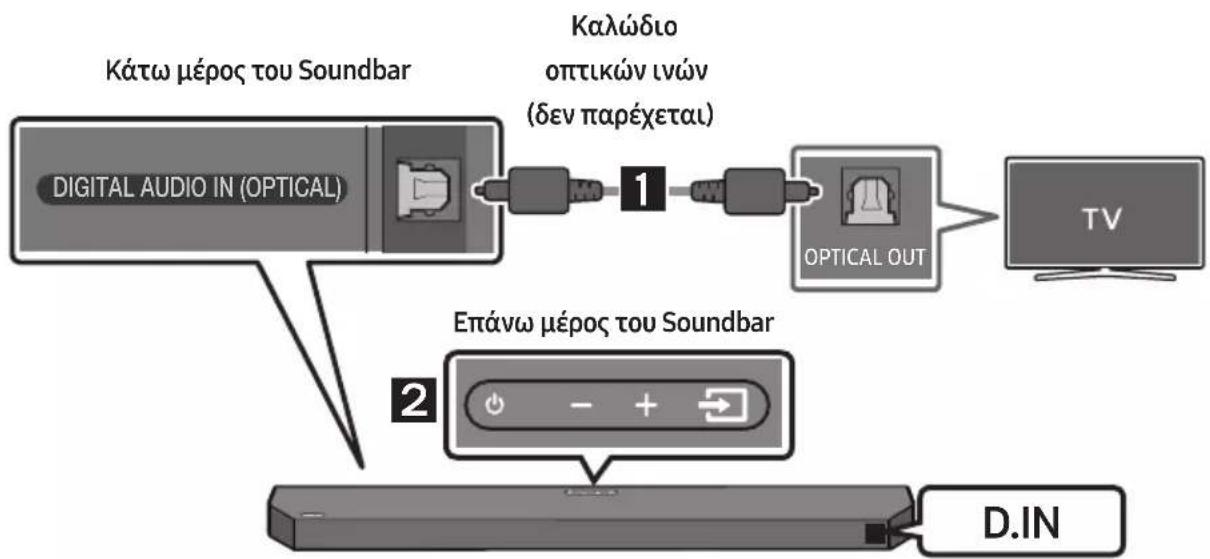
natural_image
Mechanical assembly diagram showing a screw being inserted into a component, with no visible text or symbols.flowchart
graph TD
    A["Top: Device icon"] --> B["Downward arrow"]
    B --> C["Bottom: Device icon with downward arrows"]
flowchart
graph TD
    A["UPGR → B -- → DONE → BYE"] --> B["Next Step"]
Dolby, Dolby Atmos, and the double-D symbol are registered trademarks of Dolby Laboratories Licensing Corporation. Manufactured under license from Dolby Laboratories. Confidential unpublished works. Copyright © 2012-2021 Dolby Laboratories. All rights reserved.
dts.
For DTS patents, see http://patents.dts.com. Manufactured under license from DTS, Inc. or DTS Licensing Limited. DTS, Digital Surround, Virtual:X, and the DTS logo are registered trademarks or trademarks of DTS, Inc. in the United States and other countries. © 2021 DTS, Inc. ALL RIGHTS RESERVED.
HDMI ^TM
HIGH-DEFINITION MULTIMEDIA INTERFACE
The terms HDMI, HDMI High-Definition Multimedia Interface, HDMI Trade dress and the HDMI Logos are trademarks or registered trademarks of HDMI Licensing Administrator, Inc.

Bluetooth®
The Bluetooth® word mark and logos are registered trademarks owned by Bluetooth SIG, Inc. and any use of such marks by Samsung Electronics Co., Ltd. is under license. Other trademarks and trade names are those of their respective owners.

[ENERGY STAR]
ENERGY STAR qualified model only
- Your Samsung product is ENERGY STAR qualified in its factory default setting. Change to certain features, settings and functionality in this product can change the power consumption, possibly beyond the limits required for ENERGY STAR qualification.
- Environmental Protection Agency and Department of Energy. ENERGY STAR is a joint program of the Government agencies, designed to promote energy efficient products and practices.
Refer to www.energystar.gov for more information of the ENERGY STAR Program.
ENERGY STAR qualified model only (Applicable to Thin Client models only)
As an ENERGY STAR® Partner, SAMSUNG has determined that this product meets the ENERGY STAR® guidelines for energy efficiency.
– The ENERGY STAR Program has been to reduced greenhouse gas emissions and save energy through voluntary labeling.
- Power management setting of this product have been enabled by default, and have various timing setting from 1 minutes to 5 hours.
- The product can wake with a button press on the chassis from sleep mode.
ENERGY STAR qualified model only (The other models)
- As an ENERGY STAR Partner, Samsung has determined that this product or product models meets the ENERGY STAR guideline for energy efficiency.
natural_image
Diagram showing a mechanical component before and after assembly, with no visible text or symbols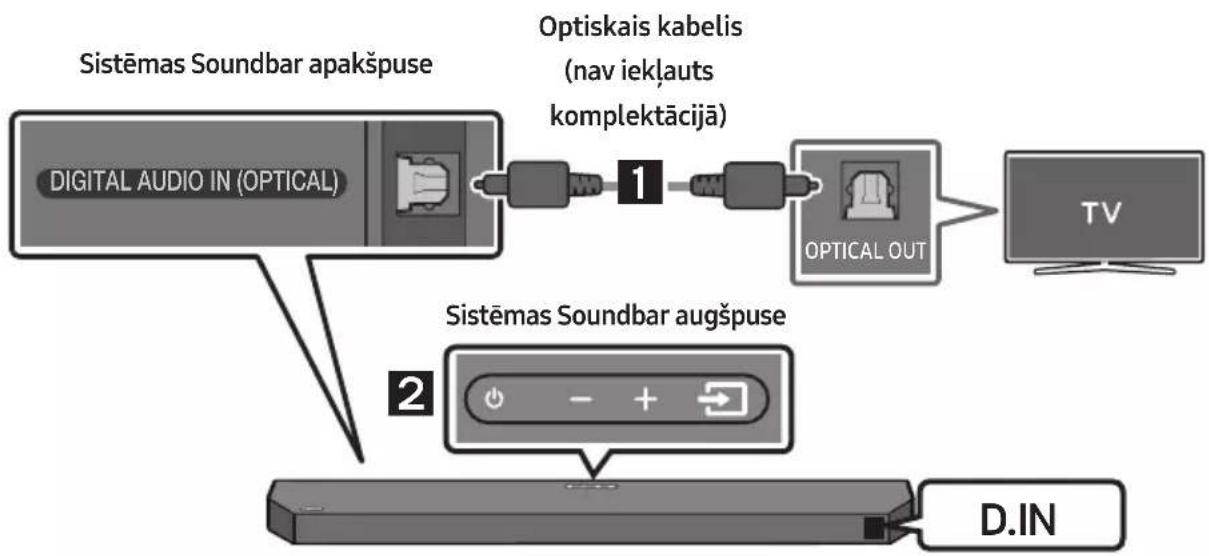
flowchart
graph TD
    A["SISTEMAS SOUNDBAR apakšpuse"] --> B["OPTISKAI KABELIS (nav iekļauts komplektācijā)"]
    B --> C["OPTICAL OUT"]
    C --> D["TV"]
    E["SISTEMAS SOUNDBAR augšpuse"] --> F["D.IN"]
natural_image
Simple line drawing of a chair or bench with a double-headed arrow labeled 'x 2' (no other text or symbols)natural_image
Mechanical component diagram showing a screw being inserted into a housing (no text or symbols)flowchart
graph TD
    A["Top State"] --> B["Downward Arrow"]
    B --> C["Left State"]
    C --> D["Downward Arrow"]
10 SOUNDBAR UZSTĀDĪŠANA TV PRIEKŠĀ
flowchart
graph TD
    A["UPGR"] --> B["B"]
    B --> C["DONE"]
    C --> D["BYE"]
12 PROBLÉMU NOVĚRŠANA
Dolby, Dolby Atmos, and the double-D symbol are registered trademarks of Dolby Laboratories Licensing Corporation. Manufactured under license from Dolby Laboratories. Confidential unpublished works. Copyright © 2012-2021 Dolby Laboratories. All rights reserved.
dts
For DTS patents, see http://patents.dts.com. Manufactured under license from DTS, Inc. or DTS Licensing Limited. DTS, Digital Surround, Virtual:X, and the DTS logo are registered trademarks or trademarks of DTS, Inc. in the United States and other countries. © 2021 DTS, Inc. ALL RIGHTS RESERVED.
HDMI ^TM
HIGH-DEFINITION MULTIMEDIA INTERFACE
The terms HDMI, HDMI High-Definition Multimedia Interface, HDMI Trade dress and the HDMI Logos are trademarks or registered trademarks of HDMI Licensing Administrator, Inc.

Bluetooth®
The Bluetooth® word mark and logos are registered trademarks owned by Bluetooth SIG, Inc. and any use of such marks by Samsung Electronics Co., Ltd. is under license. Other trademarks and trade names are those of their respective owners.

[ENERGY STAR]
ENERGY STAR qualified model only
- Your Samsung product is ENERGY STAR qualified in its factory default setting. Change to certain features, settings and functionality in this product can change the power consumption, possibly beyond the limits required for ENERGY STAR qualification.
- Environmental Protection Agency and Department of Energy. ENERGY STAR is a joint program of the Government agencies, designed to promote energy efficient products and practices.
Refer to www.energystar.gov for more information of the ENERGY STAR Program.
ENERGY STAR qualified model only (Applicable to Thin Client models only)
As an ENERGY STAR® Partner, SAMSUNG has determined that this product meets the ENERGY STAR® guidelines for energy efficiency.
– The ENERGY STAR Program has been to reduced greenhouse gas emissions and save energy through voluntary labeling.
- Power management setting of this product have been enabled by default, and have various timing setting from 1 minutes to 5 hours.
- The product can wake with a button press on the chassis from sleep mode.
ENERGY STAR qualified model only (The other models)
- As an ENERGY STAR Partner, Samsung has determined that this product or product models meets the ENERGY STAR guideline for energy efficiency.
14 PAZIÑOJUMS PAR ATVÉRTÃ PIRMKODA LICENCI
natural_image
Three-step diagram showing a mechanical component before and after assembly, with no visible text or symbols.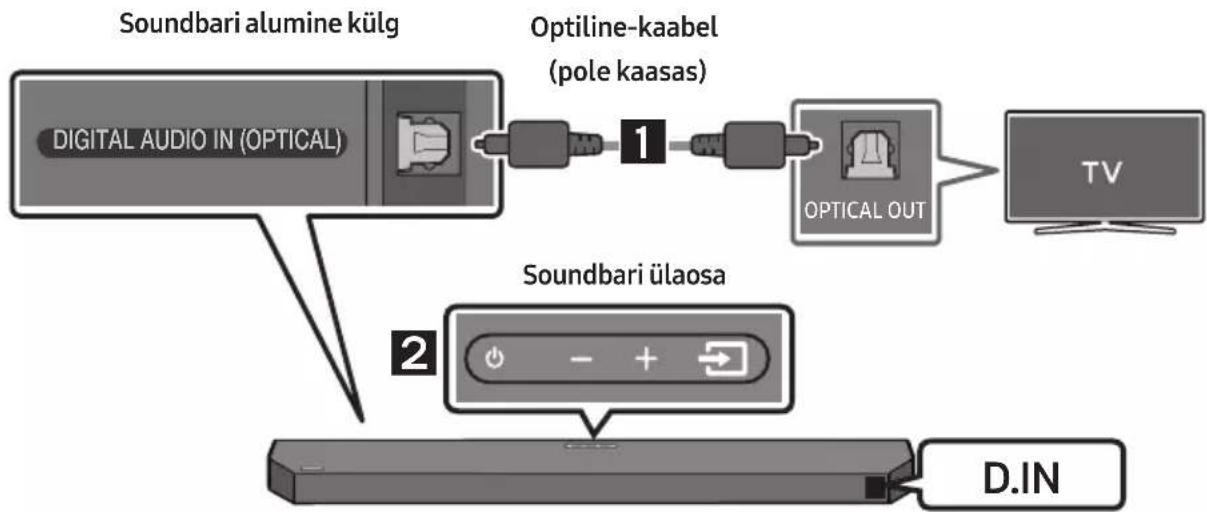
flowchart
graph TD
    A["Digital Audio IN (OPTICAL)"] --> B["Optiline-kaabel (pole kaasas)"]
    B --> C["OPTICAL OUT"]
    C --> D["TV"]
    E["Soundbari ülaosa"] --> F["D.IN"]
Seinakinnitusjuhik

Hoidikkruvi Kruvi

natural_image
Simple line drawing of a 3D object resembling a bracket or connector (no text or symbols)Seinakinnituskronsteini
-
Asetage Seinakinnitusjuhik vastu seinapinda.
-
Seinakinnitusjuhik peab olema loodis.
- Kui teler on seinale kinnitatud, paigaldage Soundbar vähemalt 5 cm telerist allapoole.

natural_image
Mechanical assembly diagram showing a screw being inserted into a housing component (no text or symbols)- Kokkupanekul veenduge, et Seinakinnituskronstein riputusosad jääksid Soundbari taha.
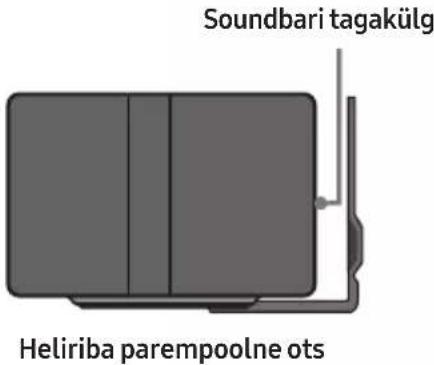
- Paigaldage Soundbar koos selle külge kinnitatud Seinakinnituskronstein, riputades Seinakinnituskronstein seinal olevatele Hoidikkruvi.
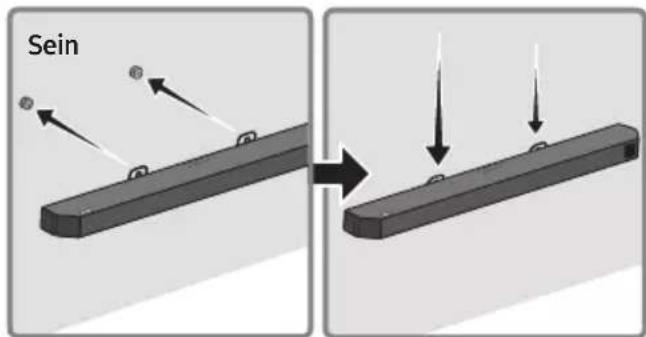
- Libistage Soundbari alla, nagu on allpool näidatud, nii et Seinakinnituskronstein toetuksid Kruvihoidikutele.
- Sisestage Kruvihoidikutele Seinakinnituskronstein laia (alumisse) ossa ja seejärel libistage Seinakinnituskronstein allapoole, nii et Seinakinnituskronstein toetuksid kindlalt Kruvihoidikutele.
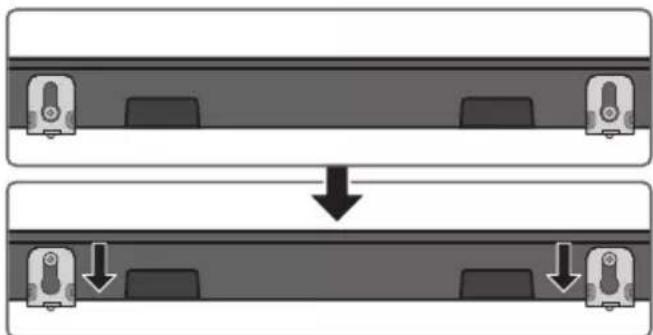
flowchart
graph TD
    A["Top: Device icon"] --> B["Downward arrow"]
    B --> C["Bottom: Device icon with downward arrows"]
10 SOUNDBARI PAIGALDAMINE TELERI ETTE
Asetage Soundbar telerialusele.
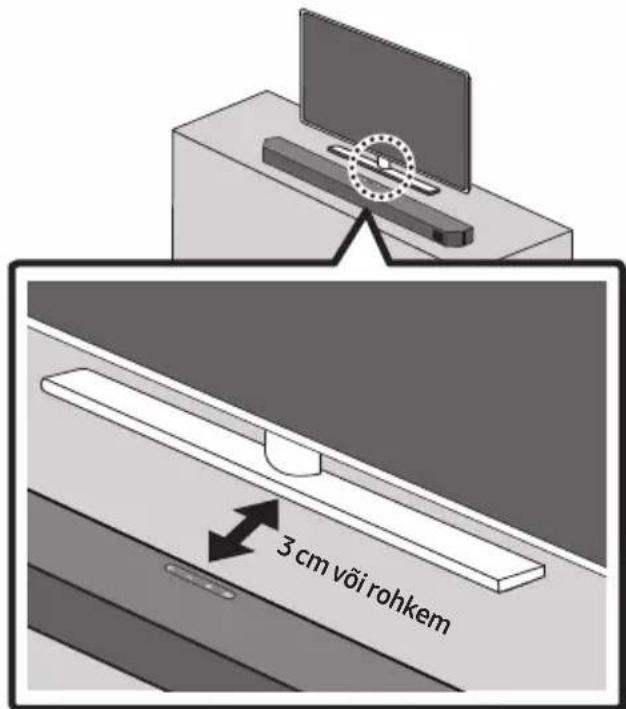
flowchart
graph TD
    A["UPGR → B -- → DONE → BYE"] --> B["Next Step"]
Dolby, Dolby Atmos, and the double-D symbol are registered trademarks of Dolby Laboratories Licensing Corporation. Manufactured under license from Dolby Laboratories. Confidential unpublished works. Copyright © 2012-2021 Dolby Laboratories. All rights reserved.
dts.
For DTS patents, see http://patents.dts.com. Manufactured under license from DTS, Inc. or DTS Licensing Limited. DTS, Digital Surround, Virtual:X, and the DTS logo are registered trademarks or trademarks of DTS, Inc. in the United States and other countries. © 2021 DTS, Inc. ALL RIGHTS RESERVED.
HDMI ^TM
HIGH-DEFINITION MULTIMEDIA INTERFACE
The terms HDMI, HDMI High-Definition Multimedia Interface, HDMI Trade dress and the HDMI Logos are trademarks or registered trademarks of HDMI Licensing Administrator, Inc.

Bluetooth®
The Bluetooth® word mark and logos are registered trademarks owned by Bluetooth SIG, Inc. and any use of such marks by Samsung Electronics Co., Ltd. is under license. Other trademarks and trade names are those of their respective owners.

[ENERGY STAR]
ENERGY STAR qualified model only
- Your Samsung product is ENERGY STAR qualified in its factory default setting. Change to certain features, settings and functionality in this product can change the power consumption, possibly beyond the limits required for ENERGY STAR qualification.
- Environmental Protection Agency and Department of Energy. ENERGY STAR is a joint program of the Government agencies, designed to promote energy efficient products and practices.
Refer to www.energystar.gov for more information of the ENERGY STAR Program.
ENERGY STAR qualified model only (Applicable to Thin Client models only)
As an ENERGY STAR® Partner, SAMSUNG has determined that this product meets the ENERGY STAR® guidelines for energy efficiency.
– The ENERGY STAR Program has been to reduced greenhouse gas emissions and save energy through voluntary labeling.
- Power management setting of this product have been enabled by default, and have various timing setting from 1 minutes to 5 hours.
- The product can wake with a button press on the chassis from sleep mode.
ENERGY STAR qualified model only (The other models)
- As an ENERGY STAR Partner, Samsung has determined that this product or product models meets the ENERGY STAR guideline for energy efficiency.
14 AVATUD LÄHTEKOODI LITSENTSI TEATIS
www.samsung.com/ee/aboutsamsung/sustainability/environment/our-commitment/data/
KOMISJONI MÄÄRUS (EL) 2019/1782
natural_image
Diagram showing a mechanical component before and after assembly, with no visible text or symbols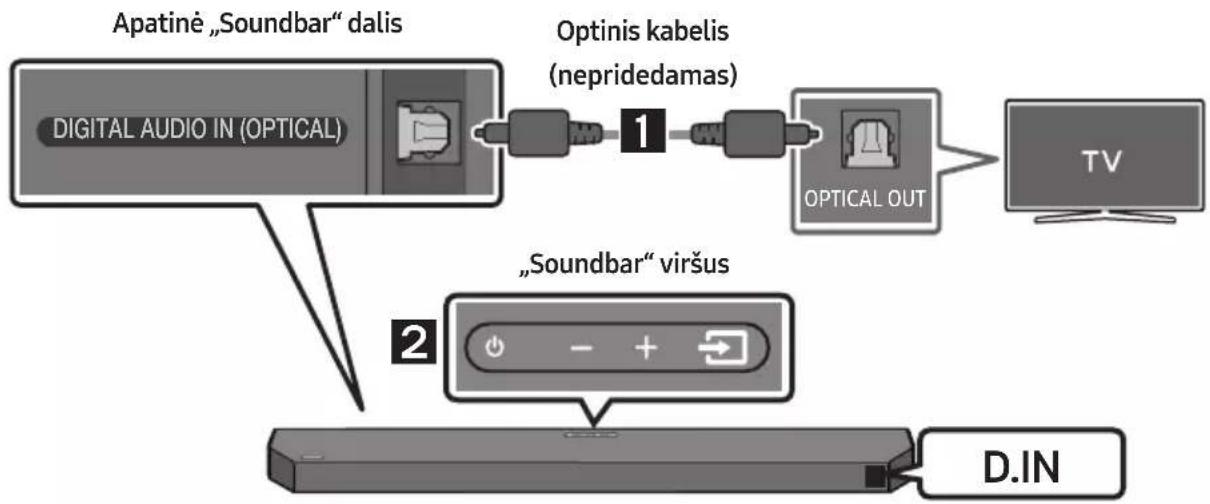
flowchart
graph TD
    A["Digital Audio IN (OPTICAL)"] --> B["Optinis kabelis (nepridedamas)"]
    B --> C["OPTICAL OUT"]
    C --> D["TV"]
    E["“Soundbar” viršus"] --> F["D.IN"]
    G["Apatinė „Soundbar“ dalis"] --> B
natural_image
Simple 3D illustration of a bracket with a cutout and label 'x2' (no other text or symbols)Sieninis laikiklis