USER MANUAL PGHSA 12 C2 PARKSIDE

natural_image
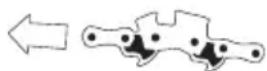
Black Parkside chain-linking tool with chain link and handle (no text or symbols visible)
Translation of the original instructions
FR BE
MINI-TRONÇONNEUSE À BOIS SANS FIL 12 V
natural_image
Technical line drawing of a mechanical component with no visible text or symbols
B

C
D
E
natural_image
Illustration of a wooden log being dragged with a hammer, showing the impact on the surface (no text or symbols present)
Authorised Signatory
List of pictograms used ...... Page 31
Introduction Page 32
Intended use....Page 32
Scope of delivery....Page 32
Parts list Page 33
Technical data Page 33
General safety instructions....Page 34
Genral power tool safety warnings....Page 34
Special safety directions for pruning saw 36 Page
Causes and operator prevention kickback....Page 37
Further safety directions....Page 38
Vibration and noise reduction ...... Page 38
Behaviour in emergency situations....Page 38
Residual risks Page 39
First use Page 39
Accessories Page 39
Unpacking Page 39
Assembly Page 39
Assemble the blade bar and saw chain. Page 39
Tensioning the saw chain....Page 40
Removing/inserting the battery pack....Page 41
Operation....Page 41
Switching on....Page 41
Battery charge level indicator Page 41
Changing the blade bar....Page 41
Sawing techniques ...... Page 41
General information....Page 41
Cut to length.... Page 42
Log is lying on the ground Page 42
Limbing....Page 42
Troubleshooting......Page 43
Cleaning and maintenance Page 43
Cleaning....Page 43
Saw chain oiling Page 44
Maintenance intervals Page 44
Maintenance interval table Page 45
Sharpening the saw chain....Page 45
Adjusting the chain tension Page 46
Starting up a new saw chain....Page 46
Maintaining the chain Page 46
Turning the blade bar....Page 46
Replacement parts / Accessories....Page 46
Storage Page 46
Disposal Page 47
Warranty Page 48
Warranty claim procedure....Page 48
Service Page 48
EU Declaration of conformity Page 49
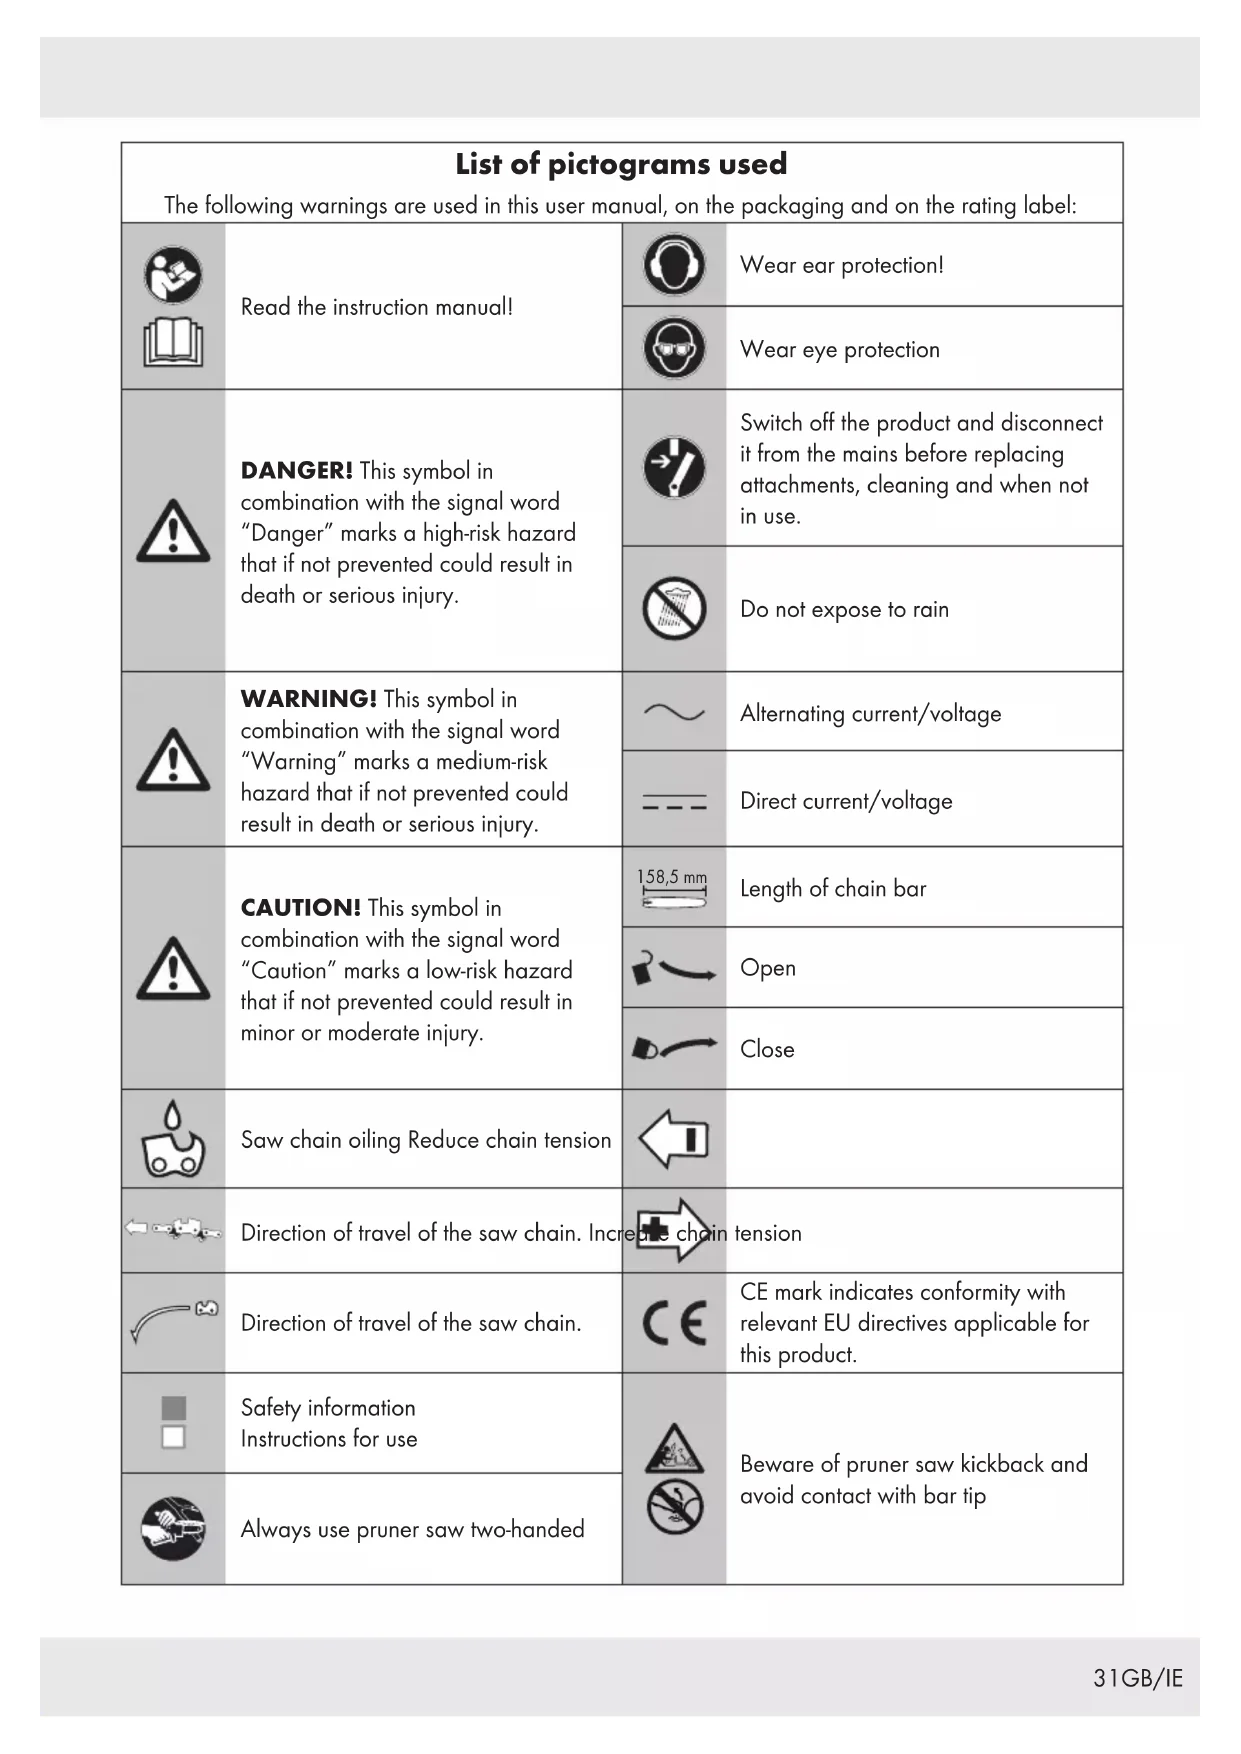
| List of pictograms usedThe following warnings are used in this user manual, on the packaging and on the rating label: |
  | Read the instruction manual! |  | Wear ear protection! |
 | Wear eye protection |
 | DANGER! This symbol in combination with the signal word "Danger" marks a high-risk hazard that if not prevented could result in death or serious injury. |  | Switch off the product and disconnect it from the mains before replacing attachments, cleaning and when not in use. |
 | Do not expose to rain |
 | WARNING! This symbol in combination with the signal word "Warning" marks a medium-risk hazard that if not prevented could result in death or serious injury. |  | Alternating current/voltage |
 | Direct current/voltage |
 | CAUTION! This symbol in combination with the signal word "Caution" marks a low-risk hazard that if not prevented could result in minor or moderate injury. | 158,5 mm | Length of chain bar |
 | Open |
| Close | |
 | Saw chain oiling Reduce chain tension |  | |
| Direction of travel of the saw chain. Incret |  | CE mark indicates conformity with relevant EU directives applicable for this product. |
 | Direction of travel of the saw chain. |  | |
| Safety informationInstructions for use |   | Beware of pruner saw kickback and avoid contact with bar tip |
 | Always use pruner saw two-handed |
Congratulations on the purchase of your new product, hereafter referred to only as "the product".
You have chosen a high-quality product. The user manual forms an integral part of this product. It contains important information on operation, safety, use and disposal. Prior to the use of the product, familiarise yourself with the product and all operation and safety notes. For this purpose, carefully read the following user manual and safety notes.
Only use the product as described and for the applications stated. Keep this manual in a safe place. If you hand the product on to third parties, all documentation must be passed on as well.
Intended use
The cordless pruning saw is designed only for sawing wood. This pruning saw is not suitable for felling trees. The product is not intended for any other types of application (e.g. cutting masonry, plastic or food). Using the pruning saw for work other than that for which it is intended may result in serious injury to the user or other persons.
The cordless pruning saw may only be used by one person and for sawing wood. The pruning saw must be held with the right hand on the handgrip and the left hand on the grip surface. Before using the pruning saw, the user must read and understand all information and instructions in the user manual. The user must wear appropriate personal protective equipment (PPE). Only wood may be sawed with the pruning saw. Materials such as plastic, rock, metal or wood containing foreign bodies (e.g. nails or screws) must not be processed!
Any other use or modification of the product are considered improper use and can result in hazards such as death, life-threatening injuries and damage. The manufacturer is not liable for any damages caused by improper use.
This product is designed for domestic use and similar applications. The product is not suitable for commercial use.
The product is designed for use by adults. Adolescents over the age of 16 may use the product only under supervision. The operator or user is responsible for accidents or damage to other people or their property.
The product is part of the Parkside X 12 V TEAM series and can be operated using Parkside X 12 V TEAM series batteries. The batteries may only be charged using chargers from the Parkside X 12 V TEAM series.
- Scope of delivery
WARNING!
The product and the packaging are not children's toys! Children must not play with plastic bags, sheets and small parts! There is a danger of choking and suffocations!
1xCordlesspruning saw
1x Chain bar (guide rail) (already mounted)
1x Saw chain (already mounted)
1x Saw bar protection sheath
1x Oil bottle with 50 ml bio chain oil
1x User manual
Parts list
Fig. A
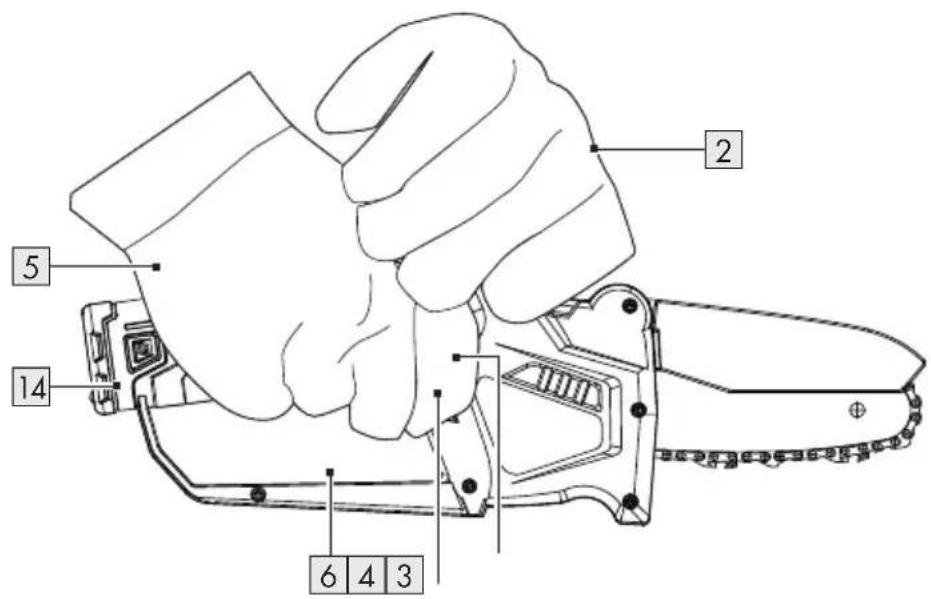
| 1 | Front hand protection |
| 2 | Handgrip area |
| 3 | Switch lock |
| 4 | On/off switch |
| 5 | Handle |
| 6 | Rear hand protection |
| 7 | Battery charge level indicator |
| 8 | Screw of the chain quick tensioning system |
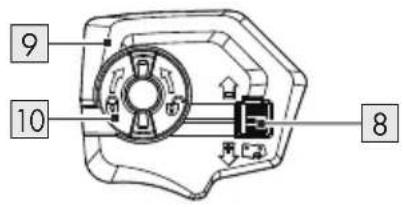
| 9 | Sprocket cover |
| 10 | Mounting screw |
| 11 | Blade bar (guide rail) |
| 12 | Saw chain |
| 13 | Blade encasing |
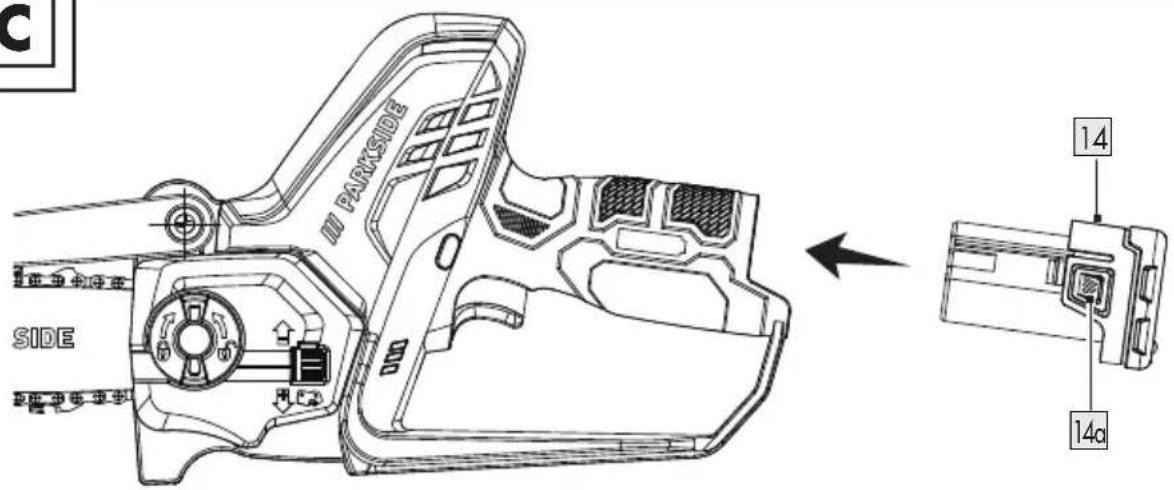
| 14 | Battery pack* |
| 14a | Release button |
| 15 | Charger* |
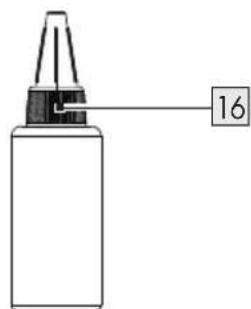
| 16 | Oil bottle |
Fig. B
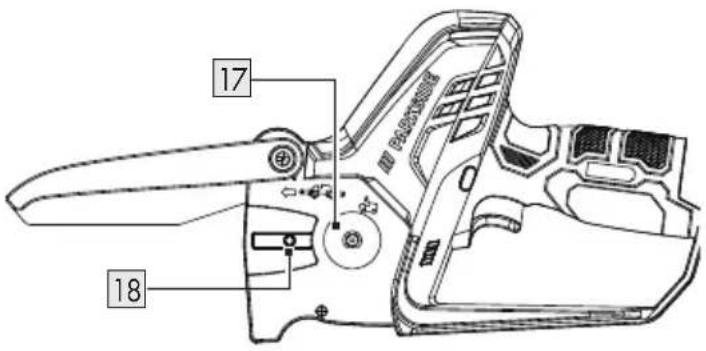
| 17 | Chain sprocket |
| 18 | Threaded bore |
| 19 | Chain tensioner pin holder |
| 20 | Chain tensioner pin |
* Battery pack and charger are not included.
- Technical data
12 V cordless pruning saw PGHSA 12 C2
| Rated input voltage 12 V |
| Protection category IP20 |
| Chain bar . Hangzhou |
| Jingfeng Tools Co. Ltd WA0142 |
| Chain Hangzhou |
| Jingfeng Tools Co. Ltd WA0151 |
| Chain pitch 1/4" |
| Chain width 1.1 mm |
| Teeth of the sprocket |
| chain wheel 7 |
| Length of the chain bar |
| approx. approx. 158.5 mm |
| Sawing length approx. 125 mm |
| Weight (without charger+ batteries) 1.28 kg |
Switch lock
The switch-on block must be released for switching on the product.
On-off switch with safety chain brake
On releasing the On/Off switch, the product immediately switches off.
Handle with rear hand protection
Protects the hand against branches and boughs in the case of springing away by the chain.
Saw chain with small spring-back
Helps you to catch spring-backs with specially developed control systems.
Recommended ambient temperature
| Temperature max 50 °C |
| Charging process | 4-40 °C |
| Operation | -20-50 °C |
| Storage | 0-45 °C |
Noise emission value
The measured values have been determined in accordance with EN 62841. The A-rated noise level of the power tool is typically as follows:
Sound pressure level L_PA 76.2 dB(A)
Uncertainty K_PA 2.40 dB
Sound power level L_WA :
guaranteed 90 dB(A)
measured 87.2 dB(A)
Uncertainty K_WA 2.4 dB
Vibration emission value
Vibration total values (triaxial vector sum)
determined according to EN 62841:
Vibration (α) 2.205 m/s²;
$$
K = 1. 5 \mathrm{m} / \mathrm{s} ^ {2}
$$

WARNING!
▶ Wear ear protection!
The vibration and noise emissions during actual use of the power tool can differ from the declared values depending on the manner in which the tool is used, especially what kind of work-piece is processed.
It is necessary to identify safety measures to protect the operator that are based on an estimation of exposure in the actual conditions of use (taking account of all parts of the operating cycle such as the times when the tool is switched off and when it is running idle in addition to the trigger time).
NOTE
The declared vibration total value and the declared noise emission value have been measured in accordance with a standard test method and may be used for comparing one tool with another.
The declared total vibration value and the declared noise emission value may also be used for a preliminary assessment of exposure.

General safety instructions
● Genral power tool safety warnings

WARNING!
Read all safety warnings, instructions, illustrations and specifications provided with this power tool. Failure to follow all instructions listed below may result in electric shock, fire and/or serious injury.
Save all warnings and instructions for future reference.
The term "power tool" in the warnings refers to your mains-operated (corded) power tool or battery-operated (cordless) power tool.
Work area safety
- Keep work area clean and well lit.
Cluttered or dark areas invite accidents.
Do not operate power tools in explosive atmospheres, such as in the presence of flammable liquids, gases or dust. Power tools create sparks which may ignite the dust or fumes.
- Keep children and bystanders away while operating a power tool.
Distractions can cause you to lose control.
Electrical safety
Power tool plugs must match the outlet. Never modify the plug in any way. Do not use any adapter plugs with earthed (grounded) power tools. Unmodified plugs and matching outlets will reduce risk of electric shock.
- Avoid body contact with earthed or grounded surfaces, such as pipes, radiators, ranges and refrigerators.
There is an increased risk of electric shock if your body is earthed or grounded.
Do not expose power tools to rain or wet conditions. Water entering a power tool will increase the risk of electric shock.
- Do not abuse the cord. Never use the cord for carrying, pulling or unplugging the power tool. Keep cord away from heat, oil, sharp edges or moving parts. Damaged or entangled cords increase the risk of electric shock.
- When operating a power tool outdoors, use an extension cord suitable for outdoor use. Use of a cord suitable for outdoor use reduces the risk of electric shock.
If operating a power tool in a damp location is unavoidable, use a residual current device (RCD) protected supply. Use of an RCD reduces the risk of electric shock.
Personal safety
- Stay alert, watch what you are doing and use common sense when operating a power tool. Do not use a power tool while you are tired or under the influence of drugs, alcohol or medication. A moment of inattention while operating power tools may result in serious personal injury.
Use personal protective equipment. Always wear eye protection. Protective equipment such as dust mask, non-skid safety shoes, hard hat, or hearing protection used for appropriate conditions will reduce personal injuries.
■ Prevent unintentional starting. Ensure the switch is in the offposition before connecting to power source and/or battery pack, picking up or carrying the tool. Carrying power tools with your finger on the switch or energising power tools that have the switch on invites accidents.
■ Remove any adjusting key or wrench before turning the power tool on. A wrench or a key left attached to a rotating part of the power tool may result in personal injury.
Do not overreach. Keep proper footing and balance at all times. This enables better control of the power tool in unexpected situations.
■ Dress properly. Do not wear loose clothing or jewellery. Keep your hair, clothing and gloves away from moving parts. Loose clothes, jewellery or long hair can be caught in moving parts.
If devices are provided for the connection of dust extraction and collection facilities, ensure these are connected and properly used. Use of dust collection can reduce dust-related hazards.
Do not let familiarity gained from frequent use of tools allow you to become complacent and ignore tool safety principles. A careless action can cause severe injury within a fraction of a second.
- Do not force the power tool. Use the correct power tool for your application. The correct power tool will do the job better and safer at the rate for which it was designed.
- Do not use the power tool if the switch does not turn it on and off. Any power tool that cannot be controlled with the switch is dangerous and must be repaired.
- Disconnect the plug from the power source and/or the battery pack from the power tool before making any adjustments, changing accessories, or storing power tools. Such preventive safety measures reduce the risk of starting the power tool accidentally.
■ Store idle power tools out of the reach of children and do not allow persons unfamiliar with the power tool or these instructions to operate the power tool. Power tools are dangerous in the hands of untrained users.
- Maintain power tools and accessories. Check for misalignment or binding of moving parts, breakage of parts and any other condition that may affect the power tool's operation. If damaged, have the power tool repaired before use. Many accidents are caused by poorly maintained power tools.
- Keep cutting tools sharp and clean.
Properly maintained cutting tools with sharp cutting edges are less likely to bind and are easier to control.
Use the power tool, accessories and tool bits etc. in accordance with these instructions, taking into account the working conditions and the work to be performed. Use of the power tool for operations different from those intended could result in a hazardous situation.
- Keep handles and grasping surfaces dry, clean and free from oil and grease. Slippery handles and grasping surfaces do not allow for safe handling and control of the tool in unexpected situations.
■ Recharge only with the charger specified by the manufacturer. A charger that is suitable for one type of battery pack may create a risk of fire when used with another battery pack.
■ Use power tools only with specifically designated battery packs. Use of any other battery packs may create a risk of injury and fire.
When a battery pack is not in use, keep it away from other metal objects, like paper clips, coins, keys, nails, screws or other small metal objects, that can make a connection from one terminal to another. Shorting the battery terminals together may cause burns or a fire.
■ Under abusive conditions, liquid may be ejected from the battery; avoid contact. If contact accidentally occurs, flush with water. If liquid contacts eyes, additionally seek medical help. Liquid ejected from the battery may cause irritation or burns.
- Do not use a battery pack for tool that is damaged or modified.
Damaged or modified batteries exhibit unpredictable behaviour resulting in fire, explosion or risk of injury.
- Do not expose a battery pack or tool to fire or excessive temperature.
Exposure to fire or temperature above 130 °C may cause explosion.
■ Follow all charging instruction and do not charge the battery pack or tool outside the temperature range specified in the instruction. Charging improperly or at temperatures outside the specified range may damage the battery and increase the risk of the fire.
Service
- Have your power tool serviced by a qualified repair person using only identical replacement parts. This will ensure that the safety of the power tool is maintained.
■ Never service damaged battery packs. Service of battery packs should be only be performed by the manufactured or authorized service providers.
● Special safety directions for pruning saw
- Keep all parts of the body away from the saw chain when the chain saw is operating. Before you start the chain saw, make sure the saw chain is not contacting anything.
A moment of inattention while operating chain saws may cause entanglement of your clothing or body with the saw chain.
■ Always hold the chain saw with your right hand on the rear handle and your left hand on the front handle. Holding the chain saw with a reversed hand configuration increases the risk of personal injury and should never be done.
■ Wear safety glasses and hearing protection. Further protective equipment for head, hands, legs and feet is recommended. Adequate protective clothing will reduce personal injury by flying debris or accidental contact with the saw chain.
Do not operate a chain saw in a tree.
Operation of a chain saw while up in a tree may result in personal injury.
■ Always keep proper footing and operate the chain saw only when standing on fixed, secure and level surface. Slippery or unstable surfaces such as ladders may cause a loss of balance or control of the chain saw.
- When cutting a limb that is under tension be alert for spring back.
When the tension in the wood fibres is released the spring loaded limb may strike the operator and/or throw the chain saw out of control.
Use extreme caution when cutting brush and saplings. The slender material may catch the saw chain and be whipped toward you or pull you off balance.
- Carry the chain saw by the front handle with the chain saw switched off and away from your body. When transporting or storing the chain saw always fit the guide bar cover.
Proper handling of the chain saw will reduce the likelihood of accidental contact with the moving saw chain.
■ Follow instructions for lubricating, chain tensioning and changing accessories. Improperly tensioned or lubricated chain may either break or increase the chance for kickback.
- Keep handles dry, clean, and free from oil and grease. Greasy, oily handles are slippery causing loss of control.
- Cut wood only. Do not use chain saw for purposes not intended. For example: do not use chain saw for cutting plastic, masonry or non-wood building materials. Use of the chain saw for operations different than intended could result in a hazardous situation.
- Hold the power tool by insulated gripping surfaces only, because the saw chain may contact hidden wiring. Saw chains contacting a "live" wire may make exposed metal parts of the power tool "live" and could give the operator an electric shock.
This chain saw is not suitable for felling trees. Using the chainsaw for work other than that for which it is intended may result in serious injury to the user or other persons.
■ Follow all instructions when clearing jammed material, storing or servicing the chain saw. Make sure the switch is off and the battery pack is removed. Unexpected actuation of the chain saw while clearing jammed material or servicing may result in serious personal injury.
● Causes and operator prevention kickback
Kickback may occur when the nose or tip of the guide bar touches an object, or when the wood closes in and pinches the saw chain in the cut.
Tip contact in some cases may cause a sudden reverse reaction, kicking the guide bar up and back towards the operator.
Pinching the saw chain along the top of the guide bar may push the guide bar rapidly back towards the operator.
Either of these reactions may cause you to lose control of the saw which could result in serious personal injury. Do not rely exclusively upon the safety devices built into your saw. As a chain saw user, you should take several steps to keep your cutting jobs free from accident or injury.
Kickback is the result of tool misuse and/or incorrect operating procedures or conditions and can be avoided by taking proper precautions as given below:
- Maintain a firm grip, with thumbs and fingers encircling the chain saw handles, with both hands on the saw and position your body and arm to allow you to resist kickback forces.
Kickback forces can be controlled by the operator, if proper precautions are taken. Do not let go of the chain saw.
Do not overreach and do not cut above shoulder height. This helps prevent unintended tip contact and enables better control of the chain saw in unexpected situations.
■ Only use replacement bars and chains specified by the manufacturer.
Incorrect replacement bars and chains may cause chain breakage and/or kickback.
Follow the manufacturer's sharpening and maintenance instructions for the saw chain.
Decreasing the depth gauge height can lead to increased kickback.
● Further safety directions
■ Comply carefully with maintenance, control and service instructions in this manual.
Damaged protective devices and parts have to be repaired or changed except as noted otherwise in this manual.
It is recommended that a first-time user at least practice the cutting of logs on a saw log or frame.
For sawing work on hillsides, always stand in the area above the log. To keep total control while sawing through, reduce the pressure at the end of the cut without loosening your grip on the handles of the pruning saw. Make sure the saw chain does not touch the ground. After finishing the cut, wait until the pruning saw comes to a stop before removing it there. Always switch off the motor of the pruning saw before changing between trees.
- Dirt, stones, loose bark, nails, clips and wires must be removed from the tree.
- Do not use any accessories that are not recommended by PARKSIDE. This can result in electric shock or fire.
● Vibration and noise reduction
To reduce the impact of noise and vibration emission, limit the time of operation, use low vibration and low-noise operating modes as well as wear personal protective equipment.
Take the following points into account to minimise the vibration and noise exposure risks:
■ Only use the product as intended by its design and these instructions.
- Ensure that the product is in good condition and well maintained.
- Use correct accessory tools for the product and ensure they are in good condition.
- Keep tight grip on the handles/grip surface.
- Maintain this product in accordance with these instructions and keep it well lubricated (where appropriate).
Plan your work schedule to spread any high vibration tool use across a longer period of time.
● Behaviour in emergency situations
Familiarise yourself with the use of this product by means of this user manual. Memorise the safety warnings and follow them to the letter. This will help to prevent risks and hazards.
■ Always be alert when using this product, so that you can recognise and handle risks early. Fast intervention can prevent serious injury and damage to property.
■ Switch the product off and disconnect it from the mains if there are malfunctions. Have the product checked by a qualified professional and repaired, if necessary, before you operate it again.
Residual risks
Even if properly operating and handling the product, some residual risks will remain. Due to its construction and build, the product may present the following hazards:
Cuts
■ Hearing loss if working without hearing protection.
■ Damage caused to your health resulting from hand/arm vibrations if the power tool is used over a longer period of time or if it is not properly used and maintained.
⚠ WARNING!
This product produces an electromagnetic field during operation! This field may under some circumstances interfere with active or passive medical implants! To reduce the risk of serious or fatal injury, we recommend persons with medical implants to consult their doctor and the medical implant manufacturer before operating this product!
- First use
Accessories
To operate this product safely and correctly, always wear suitable personal protective equipment.
This includes:
Safety goggles
■ Hearing protection
■ Protective gloves
■ Protective footwear
Unpacking
- Open the packaging and remove the product carefully.
- Remove the packaging material as well as the packaging and transport bracing (if available).
- Check that the delivery is complete.
- Check the product for transport damage.
WARNING!
The product and packaging materials are not toys! Children must not be allowed to play with plastic bags, film and small parts! There is a risk of swallowing and suffocation
Assembly
WARNING!
Always wear protective gloves when working with the pruning saw, and use original parts only. Switch off the product and remove the battery pack 14 before doing any work on the pruning saw. Risk of injury!
Before operating the pruning saw, you must:
■ adjust the saw chain tension
■ lubricate and insert the battery
- Assemble the blade bar and saw chain
WARNING!
Switch off the product and remove the battery pack 14 before carrying out any maintenance work!
- Place the product on a level surface.
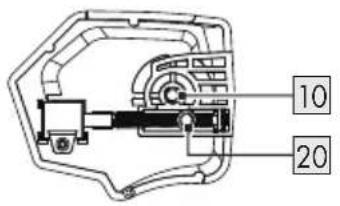
- Turn the mounting screw 10 of the sprocket cover in an anticlockwise direction in order to remove the sprocket cover 9.
- Spread out the saw chain 12 in a loop so that the cutting edges are aligned in a clockwise direction. Use the graphical symbol on the blade bar 11 or above the chain sprocket 17 as a guide to align the saw chain 12.
Direction of travel of the saw chain.
- Place the saw chain 12 into the blade bar groove. To assemble, hold the blade bar 11 tilted upwards at an angle of approx. 45 degrees in order to be able to guide the saw chain 12 more easily onto the chain sprocket 17.
- Place the blade bar 11 and saw chain 12. It is normal for the saw chain 12 to sag.
- Turn the screw for the chain quick-tensioning system 8 until the chain tensioner pin 20 is approximately level with the mounting screw 10.
- Place the sprocket cover 9 into position. The chain tensioner pin 20 on the inside of the sprocket cover 9 must be guided into the chain tension pin holder 19.
- Screw the mounting screws 10 into the threaded hole 18.
- Pre-tension the saw chain 12 by turning the screw for the chain quick-tensioning system 8 in the direction
- Tighten the mounting screw 10 of the sprocket cover ▶.

CAUTION
Caution! The pruning saw is prone to leak.
Prior to changing the saw chain 12, the groove of the guide rail 11 must be cleaned of dirt because dirt deposits available can cause the saw chain 12 to break out of the rail. The deposits can also absorb the chain oil. So the consequence would be that the chain oil would not or only a small part of it would reach the underside of the rail and the lubrication would be reduced.

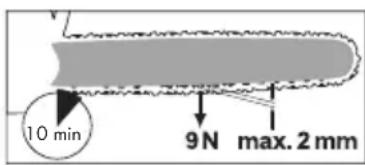
Tensioning the saw chain
Regularly tightening the saw chain 12 provides safety for the user and reduces and/or prevents wear and chain damages. Before the start of work and in approx. 10 minute intervals, we recommend the user to examine the chain tension and correct it, if necessary. The chain warms up when working with the saw and thus expands slightly. These “expansions” can be expected especially from newer chains.
NOTE
Do not re-tighten or change the chain when it is hot because it shrinks slightly once it has cooled down. In case of non-observance, this can lead to damages on the guide rail 11 or the engine because now the chain is too taut on the blade. Chain tension and chain lubrication have a significant impact on the service life of the chain.
The chain is correctly tensioned if it does not sag at the rail underside and can be rotated completely around with the gloved hand. When the saw chain 12 is tensioned with 9 N (approx. 1 kg), the gap between the saw chain 12 and the guide rail 11 may not be more than 2 mm.

WARNING!
Switch off the product and remove the battery pack 14 before carrying out any maintenance work!
- Loosen the mounting screw 10 of the sprocket cover 9
- To tension the saw chain 12, turn the screw 8 for the chain quick-tensioning system in the direction + to loosen the saw chain, turn the screw 8 for the chain quick-tensioning system in the direction ↩.
- Tighten the mounting screw 10 of the sprocket cover 9 again
NOTE
The chain tension of a new chain saw 12 must be readjusted after a maximum of 5 cuts.
- Removing/inserting the battery pack
- To insert the battery pack 14 into the product, push the battery pack along the guide rails into the product.
- To remove the battery pack 14 from the product, press the release button 14a on the battery pack and pull the batteries out.
Operation

WARNING!
Switch on the pruning saw only when chain bar, saw chain and sprocket chain wheel covering are correctly assembled.
Make sure you have a secure stance. Before starting, ensure that the cordless pruning saw is in contact with no objects.
▶ Never operate the product without the front hand protection 1. Risk of injury!

Switching on
- Place the battery 14 into the product (see "Inserting/removing the rechargeable battery").
- Check the load status of the battery pack 14 before starting.
- Hold the product firmly with both hands, with your right hand on the handle 5 and left hand on the grip 2. Your thumb and fingers must tightly clasp the handle 5.

WARNING!
▶ Never use the product one-handed. Risk of injury!
- To turn on, press the switch lock 3 with your thumb or index finger and then press the on/off switch 4; the product will run at maximum speed. Release the switch lock 3.
- The product will switch off again when you release the on/off switch 4. The device cannot be switched to continuous operation.
● Battery charge level indicator
The charge level of the batteries is indicated by illumination of the corresponding LED lights of the battery charge level indicator during operation.
3 LEDs illuminated (red, orange and green):
Batteries charged
2 LEDs illuminated (red and orange):
■ Batteries partially charged
1 LED illuminated (red):
■ Batteries need to be charged
● Changing the blade bar
- Switch off the product and remove the battery pack 14 from the product.
- Place the product on a level surface.
- Turn the mounting screw 10 of the sprocket cover 9 in a counter-clockwise direction in order to loosen the chain tension and to remove the sprocket cover 9.
- Remove the blade bar 11 and saw chain 12. To disassemble, hold the blade bar 11 tilted upwards at an angle of approx. 45 degrees in order to be able to remove the saw chain 12 more easily from the chain sprocket 17.
- Replace the blade bar 11 and install the blade bar and saw chain as described under "Installing the saw chain and blade bar".
NOTE
The tensioning of the saw chain is described in the "Assembly" section.
● Sawing techniques
General information
NOTE
Observe noise protection rules and other local regulations when working with the tool. Local regulations may require a suitability test. Check with the forestry administration.
- Dirt, stones, loose bark, nails, clips and wires must be removed from the tree.
■ Always stand above the tree trunk when sawing on slopes.
To keep total control while sawing through, reduce the pressure at the end of the cut without loosening your grip on the handles of the pruning saw. Make sure the saw chain does not touch the ground. After finishing the cut, wait until the pruning saw comes to a stop before removing it.
■ Always switch off the motor of the pruning saw before changing between trees.
- You will have better control over the product if you saw using the lower edge of the blade bar (chain in pulling direction).
The saw chain must not touch the ground or any object while sawing through the material or thereafter.
- Ensure that the saw chain does not get stuck while sawing. The log must not break or splinter.
Please also observe the precautionary measures to protect against kickback (see the safety information).
For sawing work on hillsides, always stand in the area above the log. To keep total control while sawing through, reduce the pressure at the end of the cut without loosening your grip on the handles of the pruning saw. Make sure the saw chain does not touch the ground After finishing the cut, wait until the saw chain comes to a stop before removing it. Always switch off the motor of the pruning saw before changing between trees.

WARNING!
If the saw chain gets stuck, do not attempt to pull out the product with force. There is a risk of injury. Turn the motor off and use a lever arm or wedge to release the product.
Cut to length
Cutting to length means sawing felled tree trunks into small sections. Ensure that you have secure footing and balance your body weight evenly on both feet. If possible, the trunk should be
protected and supported by branches, logs or wedges.
■ Make sure that the saw chain does not touch the ground when sawing.
■ Make sure you have good footing and stand above the trunk on sloping terrain. To keep total control while sawing through, reduce the pressure at the end of the cut without loosening your grip on the handles of the pruning saw. After finishing the cut, wait until the saw chain comes to a stop before removing it. Always switch off the motor of the pruning saw before changing between trees.
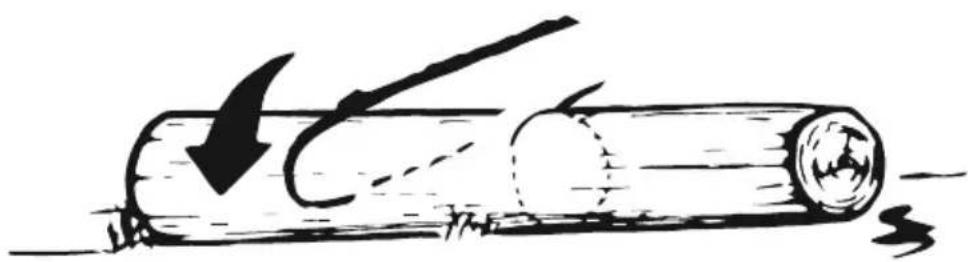
- Log is lying on the ground
Saw through the log completely from above and ensure at the end of the cut not to contact the ground. If you can turn the tree trunk, saw two-thirds of the way through it. Then turn the trunk around and saw the rest of the way through from above.
Limbing
Limbing is the designation for the sawing off of branches and boughs from a felled tree.

WARNING!
Many accidents occur during the removal of branches. Never cut tree limbs when you are standing on the log. Keep the spring back area in mind if branches are under tension.
- Do not remove support branches until after the sawing off.
- Branches under tension must be sawed from below to above, in order to prevent jamming of the chainsaw. When working on thicker branches, use the same technique as when you are sawing up a felled trunk.
■ Work to the left of the log and as near as possible to the electric chainsaw. As far as possible, the weight of the saw should rest on the log.
- Change position to saw off branches on the other side of the trunk.
■ Branches sticking out are cut off separately.
● Troubleshooting
Problem Possible cause Fault correction
| Device does not start | The battery pack 14 is empty or not inserted | Check the charge level. and have repairs carried out by a qualified electrician, if necessary. |
| Defective On/Off switch 4 | Have repairs carried out by a qualified electrician, if necessary. |
| Defective motor |
| Inferior cutting performance | Incorrectly mounted saw chain 12 | Mount saw chain correctly |
| Saw chain 12 blunt | Sharpen cutting teeth or place on new chain |
| Chain tension insufficient Check chain tension |
| Saw runs with difficulty, chain comes off | Chain tension insufficient Check chain tension |
| Chain becomes hot, smoke development during sawing, discolouration of the rail | Too little chain oil Chain lubrication |
● Cleaning and maintenance
WARNING!
▶ Maintenance and cleaning work must always be carried out with the motor switched off and the battery removed. Risk of injury!
Have any repair and maintenance work that is not described in this user manual carried out by our specialist workshop.
Only use original spare parts. Allow the product to cool off before undertaking any maintenance or cleaning work. There is a danger of burns!
▶ Use cut-protection gloves when handling the chain or the chain bar. Risk of cuts!
▶ Switch off the product and remove the battery before carrying out any maintenance work.
Cleaning
Clean the machine thoroughly after every use. In this way, you extend the life of the machine and avoid accidents.
- Keep the gripping handles free of petrol, oil or grease. Clean the gripping handles, where appropriate, with a moist cloth soaked in soap. Use no solvents or petrol for cleaning!
- Clean the saw chain after every use. Use a paint brush or wipe for that. Do not use any liquids to clean the chain. After cleaning, oil the chain lightly with chain oil.
- Clean the ventilation slots and the surfaces of the machine with a paint brush, whisk or dry cloth. Do not use any liquids for cleaning.
- Saw chain oiling

CAUTION!
Clean and oil the chain regularly. This keeps the chain sharp and achieves optimum machine performance. Damage due to insufficient maintenance of the saw chain will invalidate the warranty. Remove the battery and use cut-resistant gloves when working with the chain or with the blade bar.
The blade bar and chain must never be operated without oil. If the cordless pruning saw is used with too little oil, the cutting performance and lifespan of the saw chain will decrease as the chain will become blunt more quickly. You can identify when there is too little oil if smoke develops or the blade bar changes colour.

WARNING!
▶ Switch off the product and remove the battery before carrying out any maintenance work.
Oil the chain after cleaning, after 10 hours of use or at least once a week, whichever comes first.
Before oiling, the blade bar, especially the teeth of the blade bar, must be thoroughly cleaned. Use a hand brush and a dry cloth for this purpose.
Oil the individual chain links using an oil syringe with a needle tip (available from specialist dealers). Apply individual drops of oil on the joints and on the tooth tips of the individual chain links.
● Maintenance intervals
Regularly carry out the maintenance operations listed in the following table. The life of the saw is extended by regular maintenance of your chainsaw. Furthermore, you get optimum cutting performance and avoid accidents.
● Maintenance interval table
| Machine part Action Before every use | After 10 hours of operation |
| Components of the chain brake | Check, replace if required | Yes | |
| Sprocket chain wheel 17 | Check for wear indentations, replace if necessary | Yes | |
| Saw chain 12 | Check oil, regrind or replace if required | Yes | |
| Guide bar 11 | Check, clean and oil Yes | | |
| Guide bar 11 | Turn around Yes | | |
● Sharpening the saw chain

WARNING!
An incorrectly sharpened saw chain increases the danger of spring-back! Use cut-protection gloves when you are handling the chain or the chain bar.
NOTE
A sharp chain guarantees an optimal cutting performance. It eats effortlessly through the wood and leaves large, long wooden chips. A saw chain is blunt if you have to press the cutting equipment through the wood and the wooden chips are very small. In the case of a very blunt saw chain, no chip cuttings result at all, only sawdust.
The sawing parts of the chain are the cutting elements, which consist of a cutting tooth and a depth limiting projection. The vertical separation distance between these two determines the sharpness depth.
The following values must be noted in sharpening the cutting teeth:
■ Sharp edge angle (30°)
■ Breast angle (85°)
■ Apex angle (60°)
■ Sharpness depth (0.65 mm)
■ Round file diameter (4.0 mm)

WARNING!
▶ Deviations from the measurement data of the cutting geometry can lead to an increase of the spring-back slope of the machine. Increased danger of accident!
Special tools are necessary for sharpening the chain, which guarantee that the cutting edges are sharpened at the correct angle and to the correct depth. For the inexperienced user of chainsaws, we recommend to have the saw chain sharpened by a specialist or a specialist workshop. If you are familiar with the sharpening of the chain, you can purchase the tools, for example from Parkside (e.g. chain sharpener).
- The chain should be well-tensioned to ensure proper sharpening.
- For the sharpening, a round file with 4.0 mm diameter is necessary.

WARNING!
▶ Other diameters damage the chain and can lead to danger during work!
-
Sharpen only from the inside to the outside. Guide the file from the inner side of the cutting teeth to the outer side. Lift the file when you are withdrawing it.
-
Sharpen first the teeth on one side. Turn the saw around and sharpen the teeth of the other side.
-
The chain is worn and must be replaced by a new saw chain if only approx. 4 mm of the cutting teeth is remaining.
- After the sharpening, all cutting elements must now be equal in length and width.
- After every third sharpening, the sharpness depth (depth limitation) must be checked and the height filed with the aid of a flat file. The depth limitation should be set back about 0.65 mm from the cutting tooth. After the setting back of depth limitation, round it off a little at the front.
- Adjusting the chain tension
The adjustment of the chain tension is described in the chapter "Assembly - tensioning chainsaw".
■ Switch off the product and remove the battery 14 from the product.
- Check the chain tension regularly and re-adjust this as often as possible. When the saw chain is tensioned with 9 N (approx. 1 kg), the gap between the saw chain and the guide rail may not be more than 2 mm.
Starting up a new saw chain
In the case of a new chain, the tensioning force decreases after some time. Therefore, you have to re-tension the chain after the first 5 cuts and no later than after 10 minutes' sawing time.

WARNING!
▶ Never attach a new chain to a worn drive pinion or place onto a damaged or worn chain bar. The chain could spring back or break, potentially leading to serious injury.
- Maintaining the chain
- Use cut-protection gloves when handling the chain or the chain bar.
- Switch off the product and remove the battery 14 from the product.
- Remove the sprocket chain wheel covering 9, the saw chain 12 and the chain bar 11.
- Check the chain bar 11 for wear.
-
Remove burrs and straighten the guide surfaces with a flat file.
-
Mount chain bar 11, chainsaw 12 and sprocket chain wheel covering 9 and tighten the chainsaw.
● Turning the blade bar

WARNING!
▶ Use cut-resistant gloves when working with the saw chain or with the blade bar.
The blade bar 11 needs to be reversed regularly after a working time of about 10 hours in order to ensure even wear.
- Switch off the product and remove the battery pack 14 from the product.
- Remove the sprocket cover 9, saw chain 12 and blade bar 11.
- Turn the blade bar around its horizontal axis and install the blade bar and chain as described under "Installing the saw chain and blade bar". When doing so, pay attention to the correct rotation direction of the saw chain!
● Replacement parts / Accessories
Compatible replacement parts for this device can be purchased at www.Optimex-Shop.com. Please have the order-no. ready for your order. Orders can only be placed and processed online. If you are not sure where you can purchase compatible parts, please contact the Lidl Service Hotline.
Position Description Order-No
| 11 6" blade bar | 944399802 |
| 12 Saw chain | 944399803 |
| 13 Blade encasing | 944399804 |
Customers can obtain compatible replacement batteries and chargers from the LIDL online shop www.lidl.de.
Storage
■ Clean the equipment before putting it away.
- Put on saw bar protection sheath.
■ Store the appliance in a dry place well out of reach of children.
● Disposal
The packaging is made of environmentally friendly materials, which may be disposed of through your local recycling facilities.
Observe the marking of the packaging materials for waste separation, which are marked with abbreviations (a) and numbers (b) with following meaning: 1-7: plastics/20-22: paper and fibreboard/80-98: composite materials.
Product:

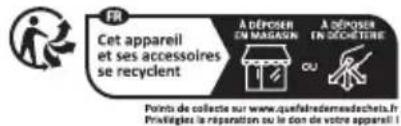
The product incl. accessories and packaging materials are recyclable and are subject to extended producer responsibility.
Dispose them separately, following the illustrated Info-tri (sorting information), for better waste treatment.
The Triman logo is valid in France only.

Contact your local refuse disposal authority for more details of how to dispose of your wornout product.

To help protect the environment, please dispose of the product properly when it has reached the end of its useful life and not in the household waste. Information on collection points and their opening hours can be obtained from your local authority.
Faulty or used batteries / rechargeable batteries must be recycled in accordance with Directive 2006/66/EC and its amendments. Please return the batteries / rechargeable batteries and / or the product to the available collection points.
Environmental damage through incorrect disposal of the batteries / rechargeable batteries!
Remove the batteries / battery pack from the product before disposal.
Batteries / rechargeable batteries may not be disposed of with the usual domestic waste. They may contain toxic heavy metals and are subject to hazardous waste treatment rules and regulations.
The chemical symbols for heavy metals are as follows: Cd = cadmium, Hg = mercury, Pb = lead. That is why you should dispose of used batteries / rechargeable batteries at a local collection point..
Warranty
The product has been manufactured to strict quality guidelines and meticulously examined before delivery. In the event of material or manufacturing defects you have legal rights against the retailer of this product. Your legal rights are not limited in any way by our warranty detailed below.
The warranty for this product is 3 years from the date of purchase. The warranty period begins on the date of purchase. Keep the original sales receipt in a safe location as this document is required as proof of purchase.
Any damage or defects already present at the time of purchase must be reported without delay after unpacking the product.
Should the product show any fault in materials or manufacture within 3 years from the date of purchase, we will repair or replace it – at our choice – free of charge to you. The warranty period is not extended as a result of a claim being granted. This also applies to replaced and repaired parts.
This warranty becomes void if the product has been damaged, or used or maintained improperly.
The warranty covers material or manufacturing defects. This warranty does not cover product parts subject to normal wear and tear, thus considered consumables (e.g. batteries, rechargeable batteries, tubes, cartridges), nor damage to fragile parts, e.g. switches or glass parts.
● Warranty claim procedure
To ensure quick processing of your claim, observe the following instructions:
Make sure to have the original sales receipt and the item number (IAN 443998_2207) available as proof of purchase.
You can find the item number on the rating plate, an engraving on the product, on the front page of the user manual (bottom left), or as a sticker on the rear or bottom of the product.
If functional or other defects occur, contact the service department listed below either by telephone or by e-mail.
Once the product has been recorded as defective you can return it free of charge to the service address that will be provided to you. Ensure to enclose the proof of purchase (sales receipt) and a short, written description outlining the details of the defect and when it occurred.
Service
GB Service Great Britain
Tel.:08000569216
E-Mail:owim@lidl.co.uk
IE Service Ireland
Tel.:1800200736
E-Mail:owim@lidl.ie
IAN: 443998_2207
Product identification: PARKSIDE Cordless Pruning Saw 12V
Model Number: HG10043
The object of the declaration described above is in conformity with the relevant Union harmonisation legislation:
| Directive 2006/42/EC |
| Directive 2014/30/EU |
| Directive 2000/14/EC |
| Directive 2005/88/EC |
References to the relevant harmonised standards used or references to the other technical specifications in relation to which conformity is declared:
| N° / Parts |
| Directive 2006/42/EC |
| EN 62841-1:2015 |
| PPP 58106A:2022 |
| Directive 2014/30/EU |
| EN IEC 55014-1:2021 |
| EN IEC 55014-2:2021 |
The object of the declaration described above is in conformity with Directive 2011/65/EU of the European Parliament and of the Council of 8 June 2011 on the restriction of the use of certain hazardous substances in electrical and electronic equipment:
| N° / Parts |
| Directive 2011/65/EU |
| EN IEC 63000:2018 |
The notified body TÜV SÜD Product Service GmbH (NB 0123), Ridlerstraße 65,
80339 MÜNCHEN, Germany, performed EC type-examination and issued the EU-type examination certificate: M6A 065194 5130 Rev. 00
Conformity Assessment procedure / name&adress notified body where appropriate: Annex V
Measured sound power level on an equipment representative for this type: 87,2 dB(A)
Guaranteed sound power level for this equipment: 90 dB(A)
Keeper of the technical documentation: OWIM GmbH & Co.KG
Signed for and on behalf:
This declaration of conformity is issued under the sole responsibility of the manufacturer.
Original declaration of conformity
Neckarsulm 07.12.2022
Place
Date


Managing Director Authorised Signatory
Tools Co. Ltd WA0142
Chaîne Hangzhou
Jingfeng Tools Co. Ltd WA0151
Pas de chaîne 1/4"
IAN:443998_2207
| Directive 2006/42/EC |
| Directive 2014/30/EU |
| Directive 2000/14/EC |
| Directive 2005/88/EC |
1 led brandt (rood):
| Directive 2006/42/EC |
| Directive 2014/30/EU |
| Directive 2000/14/EC |
| Directive 2005/88/EC |
Managing Director Authorised Signatory
NL
Tools Co. Ltd WA0142
Chain Hangzhou
Jingfeng Tools Co. Ltd WA0151
DEKLARACJA ZGODNOŚCI WE
IAN: 443998_2207
Nazwa produktu:
| Directive 2006/42/EC |
| Directive 2014/30/EU |
| Directive 2000/14/EC |
| Directive 2005/88/EC |
Managing Director Authorised Signatory
PL
| Directive 2006/42/EC |
| Directive 2014/30/EU |
| Directive 2000/14/EC |
| Directive 2005/88/EC |
Authorised Signatory
Tools Co. Ltd WA0142
Chain Hangzhou
Jingfeng Tools Co. Ltd WA0151
Rozstup ref'aze 1/4"
Šírka refaze 1,1 mm
Zuby ref'azového
kolesa 7
| Directive 2006/42/EC |
| Directive 2014/30/EU |
| Directive 2000/14/EC |
| Directive 2005/88/EC |
Managing Director Authorised Signatory
SK
| Directive 2006/42/EC |
| Directive 2014/30/EU |
| Directive 2000/14/EC |
| Directive 2005/88/EC |
Managing Director Authorised Signatory
ES
| Directive 2006/42/EC |
| Directive 2014/30/EU |
| Directive 2000/14/EC |
| Directive 2005/88/EC |
Authorised Signatory
DK
| Directive 2006/42/EC |
| Directive 2014/30/EU |
| Directive 2000/14/EC |
| Directive 2005/88/EC |
Managing Director Authorised Signatory
| Directive 2006/42/EC |
| Directive 2014/30/EU |
| Directive 2000/14/EC |
| Directive 2005/88/EC |
Managing Director Authorised Signatory
HU
Jingfeng Tools Co. Ltd WA0142
Chain Hangzhou
Jingfeng Tools Co. Ltd WA0151
Naklon verige 1/4"
Širina verige 1,1 mm
Zobniki 7
Približna dolžina
verižnika pribl. 158,5 mm
Dolžina žaganja pribl. 125 mm
Teža (brez polnilnika in
Negotovost K_PA 2,40 dB
Stopnja zvočne moči
L_WA :
Zajamčena 90 dB(A)
Izmerjena 87,2 dB(A)
Negotovost K_WA 2,4 dB
Vrednost emisij tresljajev
Skupna vrednost tresljajev (triosna vektorska vsota), določena v skladu s standardom EN 62841:
Tresljaji ( a_h ) 2,205 m/s ^2 ; K = 1,.5 m/s ^2

OPOZORILO!
Pooblaščeni serviser:
OWIM GmbH & Co. KG
Stiftsbergstraße 1
74167 Neckarsulm
NEMČIJA
| Directive 2006/42/EC |
| Directive 2014/30/EU |
| Directive 2000/14/EC |
| Directive 2005/88/EC |
Sklicevanja na uporabljene harmonizirane standarde ali sklicevanja na druge tehnične specifikacije v zvezi s skladnostjo, ki je navedena v izjavi:
| Št. / Deli |
| Directive 2006/42/EC |
| EN 62841-1:2015 |
| PPP 58106A:2022 |
| Directive 2014/30/EU |
| EN IEC 55014-1:2021 |
| EN IEC 55014-2:2021 |
Managing Director Authorised Signatory
Popis korištenih piktograma.... Stranica 281
Uvod. Stranica 282
Predviđena upotreba.... Stranica 282
Sadržaj isporuke . . . . . . . . . . . . . . . . . . . . . . . . . . . . . . . . . . . . . . . . . . . . . . . . . . . . . . . . . . . . . . . . . . . . . . . . . . . . . . . . . Stranica 282
Tools Co. Ltd WA0142
Chain Hangzhou
Jingfeng Tools Co. Ltd WA0151
Korak Ianca 1/4"
Širina lanca 1,1 mm
Zupci lančanika lanca 7
Približna duljina
| Directive 2006/42/EC |
| Directive 2014/30/EU |
| Directive 2000/14/EC |
| Directive 2005/88/EC |
Managing Director Authorised Signatory
HR
Lista pictogramelor utilizate ...... Pagina 303
Introducere ...... Pagina 304
Tools Co. Ltd WA0142
Chain Hangzhou
Jingfeng Tools Co. Ltd WA0151
Tangaj lan† 1/4"
Lățime lanț 1,1 mm
| Directive 2006/42/EC |
| Directive 2014/30/EU |
| Directive 2000/14/EC |
| Directive 2005/88/EC |
Managing Director Authorised Signatory
RO
Tools Co. Ltd WA0142
Верига Hangzhou
Jingfeng Tools Co. Ltd WA0151
| Directive 2006/42/EC |
| Directive 2014/30/EU |
| Directive 2000/14/EC |
| Directive 2005/88/EC |
Managing Director Authorised Signatory
Tools Co. Ltd WA0142
Αλυσίδα Hangzhou
Jingfeng Tools Co. Ltd WA0151
Βήμα αλυσίδας 1/4"
| Directive 2006/42/EC |
| Directive 2014/30/EU |
| Directive 2000/14/EC |
| Directive 2005/88/EC |
GR
OWIM GmbH & Co. KG
Stiftsbergstraße 1
74167 Neckarsulm
GERMANY
Model No.: HG10043
Version: 01/2023
IAN 443998_2207
8=