
PKSA 20-Li C3 - Electric saw PARKSIDE - Free user manual and instructions
Find the device manual for free PKSA 20-Li C3 PARKSIDE in PDF.
| Product type | Cordless chainsaw |
| Brand | Parkside |
| Model | PKSA 20-Li C3 |
| Rated voltage | 20 V |
| Cutting speed | 6.5 m/s |
| Weight (without battery/charger) | approx. 3.25 kg |
| Weight (with 4 Ah battery) | approx. 4 kg |
| Oil tank capacity | 270 ml |
| Bar length | 307 mm (10") |
| Cutting length | approx. 230 mm |
| Chain pitch | 3/8" (9.5 mm) |
| Chain gauge | 1.1 mm |
| Chain type | TRILINK CL14340TL |
| Guide bar type | TRILINK M1431040-1041TL |
| Sound pressure level | 93.9 dB(A) |
| Guaranteed sound power level | 98 dB(A) |
| Rear handle vibration | 1.41 m/s² |
| Front handle vibration | 3.97 m/s² |
| Charging temperature range | 4-40 °C |
| Operating temperature range | -20-50 °C |
| Protection type | IPXO |
| Chain brake | Yes, inertial and manual |
| Automatic lubrication | Yes |
| Chain quick tensioning system | Yes |
Frequently Asked Questions - PKSA 20-Li C3 PARKSIDE
User questions about PKSA 20-Li C3 PARKSIDE
0 question about this device. Answer the ones you know or ask your own.
Ask a new question about this device
Download the instructions for your Electric saw in PDF format for free! Find your manual PKSA 20-Li C3 - PARKSIDE and take your electronic device back in hand. On this page are published all the documents necessary for the use of your device. PKSA 20-Li C3 by PARKSIDE.
USER MANUAL PKSA 20-Li C3 PARKSIDE
natural_image
Black Parkside chain-link robotic device with visible gear and handle (no text or symbols on the device itself)

Akku-Kettensäge 20 V / Cordless Chainsaw 20V / Tronçonneuse sans fi l 20 V PKSA 20-Li C3
DE AT CH
Cordless Chainsaw 20V
Translation of the original instructions
NL BE
Accu-kettingzaag 20 V
Before reading, unfold the page containing the illustrations and familiarise yourself with all functions of the device.
FR BE
natural_image
Close-up of a black industrial chain-linking tool with labeled part '24' (no text or symbols on the device itself)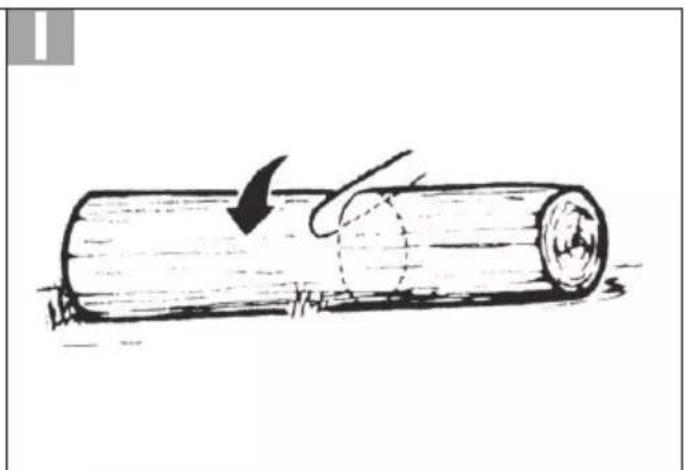
natural_image
Simple line drawing of a wooden log being cut with a black arrow indicating the direction (no text or symbols)
natural_image
Illustration of a wooden log being struck by a hammer, with no visible text or symbols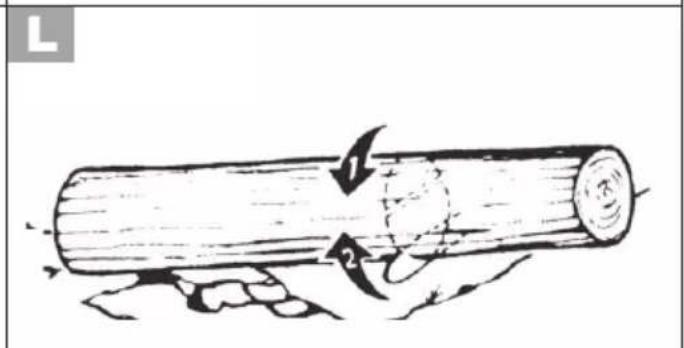
natural_image
Illustration of a tree with leaves and branches, showing magnetic field direction (no text or symbols)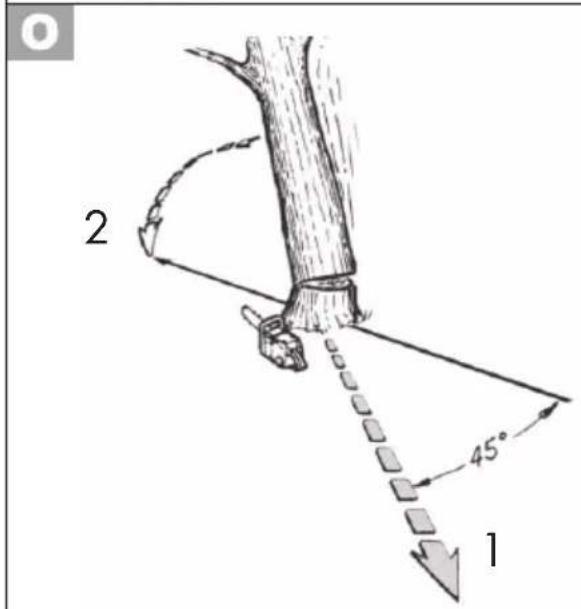
| DE / AT / CH | Originalbetriebsanleitung | Seite | 6 |
| GB / MT Translation of the original instructions Page | 35 | ||
| FR / BE | Traduction des instructions d'origine | Page | 62 |
| NL / BE | Vertaling van de originele gebruiksaanwijzing | Pagina | 94 |
| PL | Tłumaczenie oryginalnej instrukcji obsługi | Strona | 122 |
| CZ | Překład originálního provozního návodu | Strana | 151 |
| SK | Preklad originálneho návodu na obsluhu | Strana | 178 |
| DK | Oversættelse af den originale driftsvejledning | Side | 205 |
| ES | Traducción del manual de instrucciones original | Página | 231 |
| IT/MT | Traduzione delle istruzioni d'uso originali | Pagina | 261 |
| HU | Az originál használati utasítás fordítása | Oldal | 290 |
| SI | Prevod originalnega navodila za uporabo | Stran | 319 |
| HR | Prijevod originalnih uputa za uporabu | Stranica | 346 |
| RO | Traducerea instructiunilor de utilizare originale | Pagina | 373 |
| BG | Превод на оригиналното ръководство за експлоатация | Страница | 401 |
| GR | Μετάφραση των αυθεντικών οδηγιών λειτουργίας | Σελίδα | 431 |
Inhalt
Einleitung......6
Bestimmungsgemäße
Verwendung....7
Service-Center....34
Importeur ....34
Original-
Intended purpose......36
General description......36
Extent of the delivery 36
Function description......36
Overview....36
Safety functions....37
Technical Data......37
Charging time 38
Notes on safety......39
Symbols used in the instructions .....39
Symbols used on the saw 39
General Safety Directions for Power
Tools....40
General safety instructions
for chainsaws....43
Kickback causes and how to
avoid them....44
Further safety directions .....45
Residual risks......45
Charging......45
Recharging the battery......46
Assembly......46
Mounting the saw chain and blade ...46
Tensioning the saw chain 47
Chain lubrication 48
Inserting/removing the
rechargeable battery 48
Operating 48
Switching on 49
Battery charge level indicator .....49
Checking the chain brake .....49
Checking the oil automatic system.....50
Changing the saw bar....50
Sawing techniques......50
General 50
Bucking 51
Limbing....52
Felling trees....52
Maintenance and cleaning .....54
Cleaning....54
Oiling the saw chain 54
Sharpening the saw chain....54
Adjusting the chain tension....55
Starting up a new saw chain 56
Maintaining the chain bar....56
Turn the chain bar 56
Maintenance intervals....57
Storage....57
Waste disposal and environmental protection ....57
Replacement parts/Accessories ..58
Trouble shooting ....59
Guarantee 60
Repair Service......61
Service-Center......61
Importer 61
Translation of the original EC declaration of conformity......461
Exploded Drawing ......477
Introduction
Congratulations on the purchase of your new device. With it, you have chosen a high quality product. During production, this equipment has been checked for quality and subjected to a final inspection. The functionality of your equipment is therefore guaranteed. In some cases, residual amounts of lubricants may be present on or in the device. This is not a flaw or a defect and is no cause for concern.

The operating instructions constitute part of this product. They contain important information on safety, use and disposal.
Before using the product, familiarise yourself with all of the operating and safety instructions. Use the product only as described and for the applications specified.
Keep this manual safely and in the event that the product is passed on, hand over all documents to the third party.
Intended purpose
The cordless chainsaw is constructed for sawing wood only. The saw is not designed for any other types of application (e.g. cutting of brickwork, plastic or food). The device is part of the (Parkside) X 20 V TEAM series and can be operated using (Parkside) X 20 V TEAM series batteries. The batteries may only be charged using chargers from the (Parkside) X 20 V TEAM series.
The chainsaw is designed for employment in the do-it-yourselfer sector. It was not designed for continuous employment in the commercial sector.
The device is designed for use by adults. Young people over 16 years old may use the chainsaw under supervision only. The manufacturer is not liable for damages, which were caused through use in applications for which it was not designed, or incorrect operation. This equipment is not suitable for commercial use. Commercial use will invalidate the guarantee.
This electric chainsaw is to be used only by one person and only for sawing wood. The chainsaw must be held with the right hand on the rear handle and the left hand on the front handle. Before use, the user must have read and understood all of the information and directions in the operating instructions. The user must wear appropriate personal protective equipment (PPE). The chainsaw is to be used only for sawing wood. Materials such as plastic, stone, metal or wood containing foreign objects (e.g. nails or screws) must not be cut with the chain saw!
General description
An illustration of the most important functional components can be found on the fold-out pages.
Extent of the delivery
Carefully unpack the appliance and check that it is complete:
- Cordless chainsaw (already mounted)
- Saw bar protection sheath (already mounted)
- Oil bottle with 180 ml bio chain oil
- Instruction Manual

The rechargeable batteries and the charger are not included in delivery.
Dispose of the packaging material correctly.
Function description
The cordless chainsaw is equipped with a chain quick-tensioning system. The circulating saw chain is guided over a blade (guide rail). An automatic oil system ensures continuous chain lubrication. The device is provided with various protective devices to protect the user.
Refer to the following descriptions for the function of control elements.
Overview
1 Rear handle
2 On/Off switch
3 Switch lock
4 Oil tank cover
5 Front handle
6 Chain brake lever/front hand protection
7 Saw chain
8 Blade (guide rail)
9 Chain catch
10 Mounting screw for the sprocket cover
11 Screw for the chain quick-tensioning system
12 Sprocket cover
13 Oil level indicator
14 Rear hand protection
15 Blade encasing
16 Rechargeable battery
16a Battery release button
17 Charger
18 Oil bottle
B 19 Coach screw 19a Pin
20 Chain sprocket
21 Chain tensioner pin
22 Chain tensioner pin holder
23 Guide rails for battery
24 Oil passage
A Safety functions
1 Rear grip with hand guard (14)
Protects the hand against branches and boughs in the case of springing away by the chain.
2 On-off switch with safety chain brake
On releasing the On/Off switch, the device immediately switches off.
3 Switch-on block
The switch-on block must be released for switching on the device.
6 Chain braking lever/hand guard
Control system, which stops the saw chain immediately in case of a spring-back; lever can also be activated manually; protects the left hand of the
operator if it slides from the front grip.
7 Saw chain with small spring-back
helps you to catch spring-backs with specially developed control systems.
9 Metal stop claw
Reinforces the stability when vertical cuts are carried out and facilitates sawing.
Technical Data
Cordless chainsaw 20V....PKSA 20-Li C3
Rated input voltage ....20 V ==
Protection category.....IPXO
Chain speed v_0 6.5 m/s
Weight (without charger+
batteries)......approx. 3.25 kg
Weight (with 4 Ah battery)......approx. 4 kg
Oiltank 270 ml
Chain bar 10" TRILINK M1431040-1041TL
Chain .... TRILINK CL14340TL
Chain pitch 3/8" (9.5 mm)
Chain link separation ..... 18.5 mm
Chain width 1.1 mm
Teeth of the sprocket chain wheel ..... 6
Length of the chain bar 307 mm
Sawing length .... approx. 230 mm
Temperature.....max. 50 °C
Charging 4 - 40 °C
Operation....-20 - 50 °C
Storage....0 - 45 °C
Acoustic pressure level
(L_pA) 85.0 dB; K_pA = 3.0 dB
Sound power level ( L_WA )
measured......93.9 dB; K_WA=2.40 dB
guaranteed 98 dB
Vibration ( a_h ) at the
Front handle .... 1.41 m/s ^2 ; K= 1.5 m/s ^2
Rear handle.....3.97 m/s ^2 ; K=1.5 m/s ^2
Noise and vibration values were determined according to the standards and stipulations mentioned in the declaration of conformity.
The stated vibration emission value was measured in accordance with a standard testing procedure and may be used to compare one power tool to another.
The stated vibration emission value may also be used for a preliminary exposure assessment.

Warning: The vibration emission value may differ during actual use of the power tool from the stated value depending on the manner in which the power tool is used.
Try to keep the exposure to vibrations as low as possible. Examples of measures to reduce vibration exposure are the wearing of gloves when using the tool and limiting the working hours. All parts of the operating cycle are to be taken into account in this (for example times in which the electric tool is turned off and those in which even though it is turned on, it is not running under a load).
Charging time
The device is part of the (Parkside)
X 20 V TEAM series and can be operated with batteries of the (Parkside) X 20 V TEAM series.
Batteries of the (Parkside) X 20 V TEAM series may only be charged using chargers of the (Parkside) X 20 V TEAM series.
We recommend that you operate this appliance with the following batteries only: PAP 20 B1, PAP 20 B3.
We recommend charging these batteries with the following chargers: PLG 20 A3, PLG 20 A4, PLG 20 C1, PLG 20 C3, PDSLG 20 A1
| Charging time (min) | PAP 20 A1 PAP 20 B1 | PAP 20 A2 | PAP 20 A3 PAP 20 B3 Smart PAPS 204 A1 | Smart PAPS 208 A1 |
| PLG 20 A1 PLG 20 A4 PLG 20 C1 | 60 90 | 120 240 | ||
| PLG 20 A2 45 60 | 80 165 | |||
| PLG 20 A3 PLG 20 C3 | 35 45 | 60 120 | ||
| PDSLG 20 A1 35 | 45 60 120 | |||
| Smart PLGS 2012 A1 | 35 40 | 40 55 |
Notes on safety
This section deals with the basic safety regulations while working with the chainsaw.

A chainsaw is a dangerous device, which can cause serious or even fatal injuries with incorrect or careless use. Thus, for your own safety and the safety of others, you should always take note of the instructions on safety and, in case of difficulties, consult a specialist for advice.
Symbols used in the instructions

Hazard symbols with information on prevention of personal injury and property damage.

Precaution symbol (explanation of precaution instead of exclamation mark) with information on prevention of harm / damage.

Notice symbol with information on how to handle the device properly.

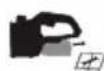
Wear protective gloves in order to avoid cutting yourself!
Symbols used on the saw

A chainsaw is a dangerous device, which can cause serious or even fatal injuries with incorrect or careless use. Thus, for your own safety and the safety of others, you should always take note of the instructions on safety and, in case of difficulties, consult a specialist for advice.

Read and take note of the operating manual belonging to the machine

Wear personal protective equipment. Basically, wear protective goggles or, even better, face protection, safety helmet, cut-protection

working clothes and ear protection

Use protective clothing

Wear cut-protection gloves

Wear cut-protection safety boots with anti-slip soles.
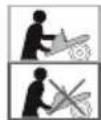
Always use the chainsaw with both hands.

Caution! Spring-back - Be careful of spring-back of the machine during work.

Do not expose the unit to rain. The device must not be wet, nor should it be operated in a moist environment.
Maintenance and cleaning work must always be carried out with the motor switched off and the batteries removed.

Sound power level guaranteed

Length of the chain bar

Machines do not belong with domestic waste.

Chain brake
GBMT

This device is part of the (Parkside) X 20 V TEAM series
Graphical symbol beneath the chain sprocket:
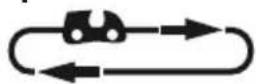

Observe direction of travel of the saw chain. Caution! Read the operating instructions.
Graphical symbol on the blade:
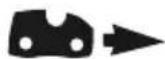
Direction of travel of the saw chain

Graphical symbol on the oil tank cap: Saw chain lubrication.
Graphical symbol on the fi xing screw for the chain sprocket cover:
OPEN
CLOSE
Graphical symbol on the chain brake lever:

chain brake: OFF

chain brake: ON
Symbol on the screw for the chain quick-tensioning system:
loosen

tighten
General Safety Directions for Power Tools

WARNING! Read all safety notices, instructions, illustrations and technical data that have been provided with this power tool. Omissions in the compliance with safety directions and instructions can cause electrical shock, fire and/or severe injuries.
Retain all safety directions and instructions for future use.
The term „power tool“ in the warnings refers to your mains-operated (corded) power tool or battery-operated (cordless) power tool).
1) Work area safety
a) Keep work area clean and well lit. Cluttered or dark areas invite accidents.
b) Do not operate power tools in explosive atmospheres, such as in the presence of fl ammable liquids, gases or dust. Power tools create sparks which may ignite the dust or fumes.
c) Keep children and bystanders away while operating a power tool. Distractions can cause you to lose control.
2) Electrical safety
a) Power tool plugs must match the outlet. Never modify the plug in any way. Do not use any adapter plugs with earthed (grounded) power tools. Unmodified plugs and matching outlets will reduce risk of electric shock.
b) Avoid body contact with earthed or grounded surfaces, such as pipes, radiators, ranges and refrigerators. There is an increased risk of electric shock if your body is earthed or grounded.
c) Do not expose power tools to rain or wet conditions. Water entering a power tool will increase the risk of electric shock.
d) Do not abuse the cord. Never use the cord for carrying, pulling or unplugging the power tool. Keep cord away from heat, oil, sharp edges or moving parts. Damaged or entangled cords increase the risk of electric shock.
e) When operating a power tool outdoors, use an extension cord suitable for outdoor use. Use of a cord suitable for outdoor use reduces the risk of electric shock.
f) If operating a power tool in a damp location is unavoidable, use a RCD (Residual Current Device). Use of an RCD reduces the risk of electric shock.
3) Personal safety
a) Stay alert, watch what you are doing and use common sense when operating a power tool. Do not use a power tool while you are tired or under the infl u-
ence of drugs, alcohol or medication. A moment of inattention white operating power tools may result in serious personal injury.
b) Use personal protective equipment. Always wear eye protection. Protective equipment such as dust mask, non-skid safety shoes, hard hat, or hearing protection used for appropriate conditions will reduce personal injuries.
c) Prevent unintentional starting. Ensure the switch is in the off-position before connecting to power source and/or battery pack, picking up or carrying the tool. Carrying power tools with your fi nger on the switch or energising pow- er tools that have the switch on invites accidents.
d) Remove any adjusting key or wrench before turning the power tool on. A wrench or a key left attached to a rotating part of the power tool may result in personal injury.
e) Do not overreach. Keep proper footing and balance at all times. This enables better control of the power tool in unexpected situations.
f) Dress properly. Do not wear loose clothing or jewellery. Keep your hair, clothing and gloves away from moving parts. Loose clothes, jewellery or long hair can be caught in moving parts.
g) If dust extraction and collection devices can be installed, make sure that these are connected and used correctly. Use of dust collection can reduce dust-related hazards.
h) Do not allow yourself to be lulled into a false sense of security and do not disregard the safety rules for power tools,
even if you are familiar with the power tool after using it many times. Careless action can lead to serious injuries within a fraction of a second.
4) Power tool use and care
a) Do not force the power tool. Use the correct power tool for your application. The correct power tool will do the job better and safer at the rate for which it was designed.
b) Do not use the power tool if the switch does not turn it on and off. Any power tool that cannot be controlled with the switch is dangerous and must be repaired.
c) Remove the plug from the wall socket and/or remove the rechargeable battery before you change the device's settings, change accessory parts or put away the power tool. Such preventive safety measures reduce the risk of starting the power tool accidentally.
d) Store idle power tools out of the reach of children and do not allow persons unfamiliar with the power tool or these instructions to operate the power tool. Power tools are dangerous in the hands of untrained users.
e) Look after the power tool and application tool carefully. Check for misalignment or binding of moving parts, breakage of parts and any other condition that may affect the power tool's operation. If damaged, have the power tool repaired before use. Many accidents are caused by poorly maintained power tools.
f) Keep cutting tools sharp and
clean. Properly maintained cutting tools with sharp cutting edges are less likely to bind and are easier to control.
g) Use the power tool, accessories and tool bits etc. in accordance with these instructions, taking into account the working conditions and the work to be performed. Use of the power tool for operations different from those intended could result in a hazardous situation.
h) Keep handles and grip surfaces dry, clean and free from oil and grease. Slippery handles and grip surfaces do not permit safe operation and control over the power tool in unexpected situations.
5) Careful handling and use of battery devices
a) Charge the batteries only in chargers that are recommended by the manufacturer. Risk of fire if a charger that is suitable for a specific type of battery is used with other batteries.
b) In the power tools, use only the batteries designed for the purpose. The use of other batteries may result in injuries and risk of fire.
c) Keep the unused battery away from paper clips, coins, keys, nails, screws and other small metal objects, which could cause bridging of the contacts. A short circuit between the battery contacts may cause burns or fire.
d) If used incorrectly, liquid may leak from the battery. Avoid contact with this. In the event of accidental contact, rinse off with water. If the liquid gets into eyes, seek medical assistance. Leaking battery fluid may cause skin irritations or burns.
e) Do not use damaged or altered batteries. Damaged or altered batteries can be unpredictable and lead to fire, explosion or risk of injury.
f) Do not expose batteries to fi re or elevated temperatures. Fire or temperatures over 130 °C can cause an explosion.
g) Follow all instructions for charging and never charge the battery or the battery-powered tool outside the temperature range stated in the operating instructions. Incorrect charging or charging outside the permitted temperature range may destroy the battery and increase the risk of fire.
6) Service
a) Have your power tool serviced by a qualified repair person using only identical replacement parts. This will ensure that the safety of the power tool is maintained.
b) Never repair damaged batteries. All battery repairs should be carried out by the manufacturer or authorised customer service centres only.
General safety instructions for chainsaws
a) Keep all parts of the body away from the saw chain when the chain saw is operating. Before you start the chain saw, make sure the saw chain is not contacting anything. A moment of inattention white operating chain saws may cause entanglement of your clothing or body with the saw chain.
b) Always hold the chain saw with
your right hand on the rear handle and your left hand on the front handle. Holding the chain saw with a reversed hand configuration increases the risk of personal injury and should never be done.
c) Hold the chainsaw only by the insulated gripping surfaces, as the saw chain may come into contact with concealed power lines. Contact with a live wire by the saw chain can also cause a charge in metal parts of the device and result in an electric shock.
d) Wear eye protection. Further protective equipment for the ears, head, hands, legs and feet is recommended. Contact between the saw chain and a live cable may render metallic components live and result in an electric shock.
e) Do not use the chainsaw to work from trees, ladders, a roof or other unstable surfaces. Operating the device in such a way poses a serious risk of injury.
f) Always keep proper footing and operate the chain saw only when standing on fi xed, secure and level surface. Slippery or unstable surfaces such as ladders may cause a loss of balance or control of the chain saw.
g) When cutting a branch that is under tension be alert for spring back. When the tension in the wood fi bres is released the spring loaded limb may strike the operator and/or throw the chain saw out of control.
h) Use extreme caution when cutting brush and saplings. The slender material may catch the saw chain and be whipped toward you or pull you off balance.
i) Carry the chain saw by the front handle with the chain saw switched off and away from your body. When transporting or storing the chain saw always fit the guide bar cover. Proper handling of the chain saw will reduce the likelihood of accidental contact with the moving saw chain.
j) Follow instructions for lubricating, chain tensioning and changing accessories. Improperly tensioned or lubricated chain may either break or increase the chance for kickback.
k) Cut wood only. Do not use chain saw for purposes not intended. For example: do not use chain saw for cutting plastic, masonry or non-wood building materials. Use of the chain saw for operations different than intended could result in a hazardous situation
I) Do not attempt to fell a tree until you have a clear understanding of the risks and how to avoid them. The user or other persons can be seriously injured by a falling tree.
Kickback causes and how to avoid them

Beware of kickback! Be careful of kickback of the machine during work. There is danger of injury here. You can avoid kickbacks by exercising caution and using a correct sawing technique.
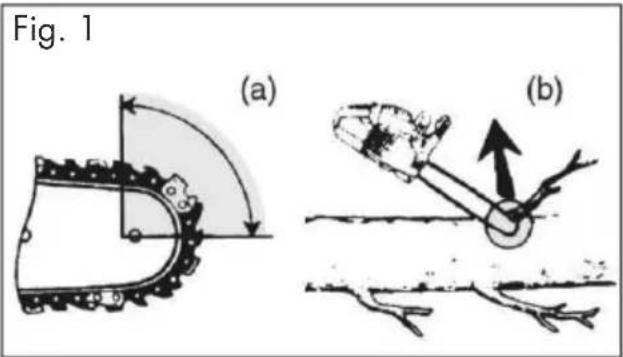
Kickback may occur when the nose or tip of the guide bar touches an object, or when the wood closes in and pinches the saw chain in the cut (cf. image 1/fi g. B). Tip contact in some cases may cause a sudden reverse reaction, kicking the guide bar up and back towards the operator (cf. image 1/fi g. A).
Pinching the saw chain along the top of the guide bar may push the guide bar rapidly back towards the operator.
Either of these reactions may cause you to lose control of the saw which could result in serious personal injury. Do not rely exclusively upon the safety devices built into your saw. As a chain saw user, you should take several steps to keep your cutting jobs free from accident or injury.
Kickback is caused by wrongly or incorrectly operating the chainsaw. It can be avoided by taking proper precautions as given below:
a) Maintain a fi rm grip, with thumbs and fi ngers encircling the chain saw handles, with both hands on the saw and position your body and arm to allow you to resist kickback forces. Kickback forces can be controlled by the operator, if proper precautions are taken. Do not let go of the chain saw.
b) Do not overreach and do not cut
above shoulder height. This helps prevent unintended tip contact and enables better control of the chain saw in unexpected situations.
c) Only use replacement bars and chains specified by the manufacturer. Incorrect replacement bars and chains may cause chain breakage and/or kickback.
d) Follow the manufacturer's sharpening and maintenance instructions for the saw chain. Decreasing the depth gauge height can lead to increased kickback.
Further safety directions
- Comply carefully with maintenance, control and service instructions in this manual.
Damaged protective devices and parts have to be repaired or changed except as noted otherwise in this manual. - It is recommended that a first-time user at least practice the cutting of logs on a saw log or frame.
- For sowing work on hillsides, always stand in the area above the log. To keep total control while sawing through, reduce the pressure at the end of the cut without loosening your grip on the handles of the electric chain saw. Make sure the saw chain does not touch the ground. After finishing the cut, wait until the electric chain saw comes to a halt before removing it. Always shut off the engine of the electric chain saw before switching between trees.
- Dirt, stones, loose bark, nails, clips and wires must be removed from the tree.
- Do not use any accessories that are not recommended by PARK-SIDE. This can result in electric shock or fire.
Residual risks
Even if properly operating and handling this electric tool, some residual risks will remain. Due to its construction and build, this electric tool may present the following hazards:
a) Cuts
b) Ear damage if working without ear protection.
c) Damage to your health caused by swinging your hands and arms when operating the appliance for longer periods of time or if the unit is not held or maintained properly.

Warning! During operation, this electric tool generates an electromagnetic fi eld which, under certain circumstances, may impair the functionality of active or passive medical implants. To reduce the risk of serious or lethal injuries, we recommend that persons with medical implants consult their doctor and the manufacturer of their medical implant before operating the machine.

Observe the safety information and notes on charging and proper use as shown in the instruction manual for your battery and charger from the (Parkside) X 20 V TEAM series. A detailed description of the charging process and further information can be found in the separate operating instructions.
Charging

Do not expose the battery to extreme conditions such as heat and shocks. There is a risk of injury caused by leaking electrolyte solution! In case
of contact with eyes or skin, rinse the affected sites with water or a neutralizer and seek medical attention.

The battery must only be charged up in dry areas. The external surface of the battery must be clean and dry before being connected to the charger. There is a risk of personal injuries from an electric shock.

To recharge batteries of the (PARKSIde)X 20 V TEAMseries, only use a charger belonging to the (PARKSIde)X 20 V TEAMseries.
- Charge the battery before using it for the first time.
- Always comply with the latest safety information, as well as the regulations and information relating to environmental protection.

Recharging the battery

Allow a hot battery to cool before charging. Only charge the battery (16) when the red LED on the charge status indicator is on.
- Remove the battery (16) from the appliance, as necessary (see „Removing/inserting the battery“).
- Insert the battery (16) in the charging compartment of the battery charger (17).
- Plug the battery charger (17) into a mains outlet.
- When the battery is fully recharged unplug the battery charger from the mains.
- Remove the battery (16) from the charger (17).
Overview of the control display on the charger:
Green LED lights up without battery inserted: Charger ready.
Green LED lights up:
Battery such alleged charged.
Red LED lights up: Battery charging.
Red LED fl ashes: Battery overheated
Red + green LEDs fl ash: Defective battery
Assembly

Always wear protective gloves when working with the chainsaw and employ only original parts. Pull out the power plug before doing any work on the chainsaw itself – injury hazard!
Before putting the electric chain saw into operation, you must:
- adjust the saw chain tension,
- pour in chain oil,
- Charge and insert the battery
- check the function of the chain brake and the automatic oil pump.

Mounting the saw chain and blade

Switch off the device and remove the battery before carrying out any maintenance work.
- Lay the saw on a fl at surface.
- Turn the fastening bolt (10) anti-clockwise (→) to remove the sprocket chain wheel covering (12).
- Spread the chain (7) out into a loop with the cutting edges running clockwise. Use the graphical symbol on the blade or below the chain sprocket (20) as a guide to align the saw chain (7).
Direction of travel of the saw chain
- Slide the saw chain (7) into the bar guide groove. To mount the guide bar, raise it to an angle of approx. 45 degrees. This will make it easier to replace the saw chain (7) onto the sprocket (20).
- Place the chain bar (8) and saw chain (7) on the bar bolts (19). When the pin (19a) to the right of the coach screw (19) sits in the slotted recess on the blade, the blade is placed correctly. It is normal that the saw chain (7) is slack.
- Position the sprocket chain wheel covering (12). The chain tensioner pin (21) on the inside of the sprocket cover (12) must be guided into the chain tension pin holder (22).
- Pre-tension the saw chain (7) by turning the screw for the chain quick-tensioning system (11) in clockwise direction.
- Tighten the fastening bolt (10) (→).

Note that the saw can re-oil.
Please note that the saw re-oils after use and oil may leak out if it is stored on its side or on the head. This is a normal process due to the necessary ventilation opening on the upper edge of the tank and does not constitute a reason for complaint. As each saw is checked during production and tested with oil, a small residue may be in the tank despite draining, which may slightly dirty the housing with oil in transit. Please clean the housing with a cloth.
Prior to changing the chain, the nut of the guide rail must be cleaned of dirt because dirt deposits available can cause the chain to break out of the rail. The deposits can
also absorb the chain oil. So the consequence would be that the chain oil would not or only a small part of it would reach the underside of the rail and the lubrication would be reduced.
Tensioning the saw chain
Regularly tightening the saw chain provides safety for the user and reduces and/or prevents wear and chain damages.
Before the start of work and in approx. 10 minute intervals, we recommend the user to examine the chain tension and correct it, if necessary.
The chain warms up when working with the saw and thus expands slightly. These “expansions” can be expected especially from newer chains.

Do not re-tighten or change the chain when it is hot because it shrinks slightly once it has cooled down. In case of non-observance, this can lead to damages on the guide rail or the engine because now the chain is too taut on the blade. Chain tension and chain lubrication have a signifi cant impact on the service life of the chain.
The chain is correctly tensioned if it does not sag at the rail underside and can be rotated completely around with the gloved hand. When the saw chain is tensioned with 9 N (approx. 1 kg), the gap between the saw chain and the guide rail may not be more than 2 mm.

GBMT

Switch off the device and remove the battery before carrying out any maintenance work.

-
Ensure that the chain brake has been released, that is, that the chain brake lever (6) is pulled up against the front grip (5).
-
Unscrew the fastening bolt (10)
- To tension the saw chain, turn the screw (11) for the chain quick-tensioning system in clockwise direction.
To loosen the tension, turn the screw (11) in counter-clock-wise direction.
- Tighten up the fastening bolt (10) again (→).

With a new saw chain, you must readjust the chain tension after at least 5 cutting operations.
Chain lubrication

The rail and chain must never be without oil. If the cordless chainsaw is used with too little oil, the cutting performance and lifespan of the saw chain will decrease as the chain will become blunt more quickly. You can identify a case of too little oil where smoke development or discoloration of the rail occurs.
The chainsaw is equipped with an automatic oiling system. As soon as the motor is speeded up, the oil also flows faster to the chain bar (8).

Switch off the device and remove the battery before carrying out any maintenance work.
Filling up with chain oil:
- Check the oil fi ll level and regularly top up with oil (13).
- Use bio-oil; this product contains additives that reduce wear and tear and does not damage the pump system. You can order this from our online shop (see "Spare parts/Accessories").
- If you have no bio-oil available, use chain lubrication oil with low adhesive additive content.
• Empty the oil tank before longer periods (6-8 weeks) of non-use.

-
Unscrew the oil fi ll cap (4) and fi ll up with chain oil.
-
Wipe off any spilled oil and close the cap again.

Always switch off the device and allow the motor to cool before fi lling with chain oil. There is a risk of fi re if oil overfl ows.

Inserting/removing the rechargeable battery
- To insert the battery (16) into the device, push the battery along the guide rails (23) into the device. You will hear them click into place.
- To remove the battery (16) from the device, press the release button (A 16a) on the battery and pull the battery out.
Operating

Switch on the chainsaw only when chain bar, saw chain and sprocket chain wheel covering are correctly assembled.
Make sure you have a secure stance. Before starting, ensure that
the electric chainsaw is in contact with no objects.

Caution! Saw can oil up, see notes on Operation startup.

Switching on
- Place the battery (E 16) into the device (see "Inserting/removing the rechargeable battery").
- Check before the start,
- whether suffi cient chain oil is in the tank and, if necessary, refi ll with chain oil (see Chapter Operation Start).
- the charge status of the battery.
- Release the chain brake, where you shift the brake arm (6) back against the front grip (5).
- Hold the chainsaw firmly with both hands, with the right hand on the rear grip (1) and the left hand on the front handle (5). Thumb and finger must close securely over the handles.
- For switching on, activate the switch-on block (3) with the right thumb and then press the On/Off switch (2), the chain-saw runs with highest speed. Release the switch-on block (3) again
- The power saw switches off when you release the On/Off switch (2) again. Switching for continuous running is not possible.
Battery charge level indicator
The battery's charge level is indicated by the charge state indicator.
The LEDs indicate the battery's charge level, when the device is in operation. To do this, press the softkey of the charge level indicator.
3 LEDs illuminated (red, orange and green): Battery charged
2 LEDs illuminated (red and orange):
Battery partially charged
1 LED illuminated (red):
Battery needs to be charged

Checking the chain brake

The motor cannot be turned on if the chain brake has engaged. Do not employ the chain brake in order to start the chainsaw or to switch it off.
- Place the chainsaw onto a solid, fl at surface. It must not contact any objects.
- Ensure that the chain brake has been released, that is, that the chain brake lever (6) is pulled up against the front grip (5).
- Hold the chainsaw firmly with both hands, with the right hand on the rear handle (F 1) and the left hand on the front handle (F 5). Thumb and finger must close securely over the handles.
- Turn on the chainsaw.
- Activate the chain braking lever (6), with running motor, with the left hand.
- Once the chain brake is working properly, release the on/off switch (2) and the chain brake.

If the chain brake does not function correctly, you must not use the chainsaw. A slack saw chain leads to danger of injury. Return the chainsaw to our Service-Center for repair.
Checking the oil automatic system
Check the oil level and the automatic oil system before commencement of work.
- Switch on the chainsaw and hold it above a bright background. The saw must not touch the ground. If an oil trace can be seen, the chainsaw is working trouble-free.

If no oil trace can be seen clean the oil passages or turn the chainsaw to our Service-Center for repair.

Clean the oil passages of the chain bar (24), in order to guarantee a trouble-free, automatic oiling of the saw chain during operation.

Changing the saw bar
- Place the battery (E 16) into the device (see "Inserting/removing the rechargeable battery").
- Lay the saw on a fl at surface.
- Turn the fastening bolt (10) and the screw for the chain quick-tensioning system (11) in counter-clockwise direction in order to loosen the chain tension and to remove the sprocket chain wheel cover (12).
- Remove the saw bar (8) and saw (7). To remove the guide bar (8), raise it to an angle of approx. 45 degrees. This will make it easier to take the saw chain (7) off the sprocket (20).
- Replace the blade and install the blade and chain as described under "Installing the sawing chain and blade".

Refer to the start-up section on how to tension the saw chain.
Sawing techniques
General

Observe the noise protection and local regulations when cutting wood. Local requirements may require a suitability test. Ask the forestry commission.
- Dirt, stones, loose bark, nails, staples and wire must be removed from the tree.
- For sawing work on a slope, always stand above the tree trunk.
- To keep control at the moment of "sawing through", reduce the contact pressure at the end of the cut without loosening the firm grip on the chainsaw handles. Ensure that the saw chain does not come into contact with the ground.
- After completing the cut, wait for the chainsaw to come to a standstill before removing the chainsaw.
- Always switch off the chainsaw motor before moving from one tree to another.
- Lay the connecting lead such that it will not be caught on branches or similar during sawing.
- For each cut, apply the claw stop securely and only then start sawing.
- You have better control when you saw with the bottom side of the chain bar (with pulling saw chain) and not to with the top side of the chain bar (with pushing saw chain).
- The saw chain must not contact either the ground or another object during sawing through or after sawing completion.
• Make sure that the saw chain does not become jammed in the wood. Do not
let the tree trunk break or split off.
- Consider also the precautions against spring-back (see notes on safety).
- For sawing work on a slope, always stand above the tree trunk. To keep control at the moment of “sawing through”, reduce the contact pressure at the end of the cut without loosening the fi rm grip on the chainsaw handles. Ensure that the saw chain does not come into contact with the ground. After completing the cut, wait for the chainsaw to come to a standstill before removing the chainsaw. Always switch off the chainsaw motor before moving from one tree to another.

If the saw chain jams, you do not attempt to pull out the electric chainsaw using power. There is a danger of injury here. Switch off the motor and use a lever or wedge to free the electric chainsaw.
Bucking
This refers to sawing up a felled tree trunk into smaller sections.
Ensure that you are in a secure position and that your body weight is distributed evenly on both feet. If possible, underpin and support the stem with branches, beams or wedges.
- Ensure that the saw chain does not come in contact with the ground during sawing.
- Make sure you have a secure stance and, in the case of sloping ground, stand above the log. To maintain full control at the moment of "sawing through", reduce the contact pressure at the end of the cut, without releasing the firm grip on the chain
saw handles. Once cutting is complete, wait for the saw chain to come to a standstill before removing the chain saw from there. Always switch off the chain saw before changing from tree to tree.

1. Log is lying on the ground:
Saw through the log completely from above and ensure at the end of the cut not to contact the ground.
If you can turn the tree trunk, saw two-thirds of the way through it. Then turn the trunk around and saw the rest of the way through from above.

2. Log is supported at one end:
Start sawing from the bottom and work your way up (with the upper edge of the bar) a third of the way into the diameter of the trunk to prevent splitting. Then saw from the top downwards with the lower edge of the bar towards the first cut to prevent the bar from becoming jammed in the wood.

3. Log is supported at both ends:
Start from the top and work down (with the lower edge of the bar) to a third of the diameter of the trunk. Then saw from underneath with the upper edge of the bar until the two cuts meet.

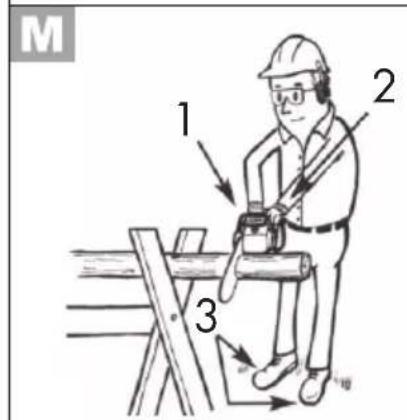
4. Sawing on a sawhorse:
Hold the electric chainsaw steady with both hands, keeping the saw in front of you while sawing. Once the saw is through the wood, guide the machine passed you on the right (1). Hold your left arm as straight as you can (2). Watch out for the falling trunk.
Position yourself to prevent any danger from the separated trunk. Watch your feet. The trunk may cause injuries when falling. Keep your balance (3).
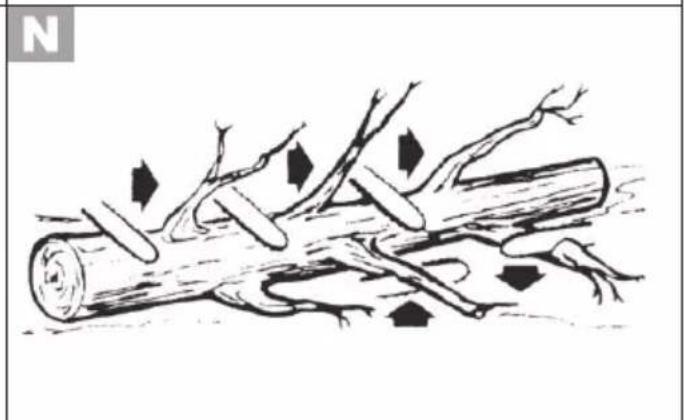
N Limbing
Limbing is the designation for the sawing off of branches and boughs from a felled tree.

Many accidents occur during the removal of branches. Never cut tree limbs when you are standing on the log. Keep the spring-back area in mind if branches are under tension.
- Do not remove support branches until after the sawing off.
- Branches under tension must be sawed from below to above, in order to prevent jamming of the chainsaw.
When working on thicker branches, use the same technique as when you are sawing up a felled trunk. - Work to the left of the log and as near as possible to the electric chainsaw. As far as possible, the weight of the saw should rest on the log.
- Change position to saw off branches on the other side of the trunk.
- Branches sticking out are cut off separately.(see N).
Felling trees

A lot of experience is necessary in felling trees. Cut down trees only when you can safely handle the electric chainsaw. In no case should you use the electric chainsaw if you feel unsure about anything.
- Ensure that no people or animals are in the fi eld of action. The safety distance between the tree to be felled and the nearest-located workplace must be 2 ½ tree lengths.
• Note the felling direction:
The user must be able to move safely near the felled tree, to saw off the tree easily and remove branches. It is to be avoided that the felled tree snags itself on another tree. Note the natural felling direction, which is dependent on the slope and curvature characteristic of the tree, wind direction and the number of branches.
- In the case of sloping ground, stand above the tree to be felled.
- Small trees, with a diameter of 15-18 cm, can usually be sawn off with one cut.
- In case of trees with a larger diameter, a notched cut and a back cut must be implemented (siehe „P 3. Cutting notch“ and „P 4. Felling back cut“).
- If cutting and felling is being carried out by two or more persons simultaneously, the distance between the felling and cutting persons must be at least twice the height of the tree to be fellled. When felling trees, ensure that no other persons are subject to hazards and that no material damage is caused. If a tree should come into contact with a power line, the supply company must be informed immediately.
- Dirt, stones, loose bark, nails, clips and wires must be removed from the tree.

Do not fell any trees when a strong or changing wind is blowing, if the danger of property damage exists or if the tree could fall on electric wires.

Immediately after termination of the sawing procedure, remove the ear protection so that you can hear hooter and alarm signals.

1. Removal of branches:
Remove hanging branches by positioning the cut from above the branch. With removal of branches, never work higher than shoulder level.

2. Escape area:
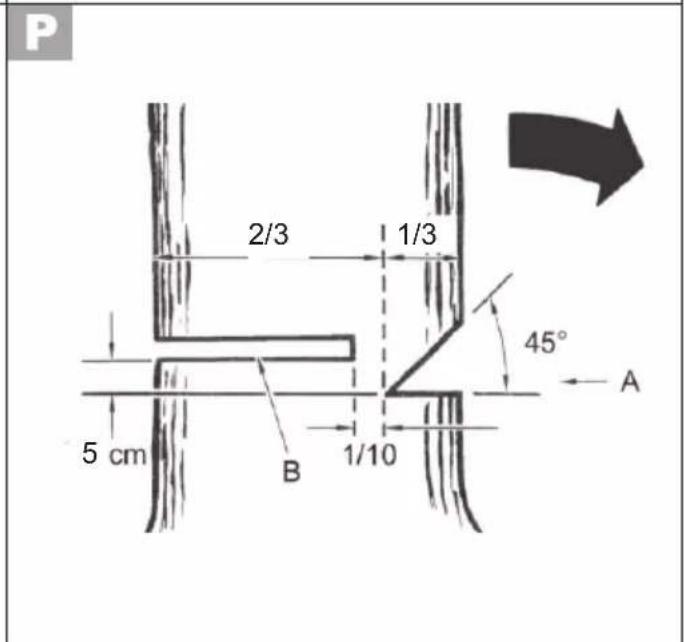
Remove the undergrowth around the tree to ensure an easy escape. The escape area (1) should be around 45^ either side behind the planned felling direction (2).

3. Cutting notch (A):
Make a felling notch in the direction in which you wish the tree to fall. Start with the bottom, horizontal cut. The cut depth should be around 1/3 of the trunk diameter. This will prevent the saw chain or the guard rails from jamming when placing the second chamfer. Now make a slanted saw cut from above at an angle of roughly 45° to meet exactly with the bottom saw cut.

Never step in front of a tree which is notched.

4. Felling back cut (B):
Make the back cut from the other side of the log, where you stand to the left of the log and saw with the chainsaw pulling. The back cut must run horizontally 5 cm above the horizontal notched cut.
The back cut should be so deep that the separation distance between the back cut and the notch
cutting line is at least 1/10 of the trunk diameter. The part of the stem not sawn through is called a stay (felling gib). The stay prevents the tree from turning and falling in the wrong direction. Do not saw through the stay.

- As you approach the felling cut on the stay the tree should start falling. If it becomes apparent that the tree may not fall in the required direction or is leaning back, and the saw chain is jamming, stop felling and use wedges made of wood, plastic or aluminium to open the cut and to tilt the tree in the required felling line.

- If the trunk diameter is larger than the length of the chain bar, make two cuts.

For safety reasons, we advise inexperienced users not to fell any logs with a rail length which is smaller than the trunk diameter.
- After carrying out of the back cut, the tree falls by itself or with the aid of the felling wedge or crowbar.

As soon as the tree begins to fall, pull out the saw from the section, stop the motor, place the chainsaw down and leave the workplace using the withdrawal path. Pay attention to falling branches and do not stumble.
Maintenance and cleaning

Maintenance and cleaning work must always be carried out with the motor switched off and the batteries removed. Danger of injury! Leave any maintenance and servicing work not covered by this manual to our Service-Center. Use only original spare parts. Allow the machine to cool down before all maintenance and cleaning works. Danger of burn injuries!

Use cut-protection gloves when handling the chain or the chain bar. Risk of cuts!

Switch off the device and remove the battery before carrying out any maintenance work.
Cleaning
- Clean the machine thoroughly after every use. In this way, you extend the life of the machine and avoid accidents.
- Keep the gripping handles free of petrol, oil or grease. Clean the gripping handles, where appropriate, with a moist cloth soaked in soap. Use no solvents or petrol for cleaning!
- Clean the saw chain after every use. Use a paint brush or wipe for that. Do not use any liquids to clean the chain. After cleaning, oil the chain lightly with chain oil.
- Clean the ventilation slots and the surfaces of the machine with a paint
brush, whisk or dry cloth. Do not use any liquids for cleaning.
Oiling the saw chain

Clean and oil the chain regularly. In this way, you keep the chain sharp and get optimum machine performance. In case of damage due to inadequate maintenance of the saw chain, the guarantee claim is invalid. Remove the battery and use cut-resistant gloves when working with the chain or with the blade.
- Oil the chain after cleaning, after 10 hours of use or at least once weekly, depending on which comes first.
- Before oiling, the chain bar must be cleaned thoroughly, in particular the teeth of the rail. Use a whisk and a dry cloth for that.
- Oil the individual chain links with the aid of an oil suction gun with pinpoint tip (available in the specialist trade). Place individual oil drops onto the articulated links and onto the tooth tips of the individual chain links.
Sharpening the saw chain

An incorrectly sharpened saw chain increases the danger of spring-back! Use cut-protection gloves when you are handling the chain or the chain bar.

A sharp chain guarantees an optimal cutting performance. It eats effortlessly through the wood and leaves large, long wooden chips. A saw chain is blunt if you have to
press the cutting equipment through the wood and the wooden chips are very small. In the case of a very blunt saw chain, no chip cuttings result at all, only sawdust.
- The sawing parts of the chain are the cutting elements, which consist of a cutting tooth and a depth limiting projection. The vertical separation distance between these two determines the sharpness depth.
- The following values must be noted in sharpening the cutting teeth:

- Sharp edge angle (30°)
- Breast angle (85°)
- Apex angle (60°)
- Sharpness depth (0.65 mm)
- Round fi le diameter (4.0 mm)

Deviations from the measurement data of the cutting geometry can lead to an increase of the spring-back slope of the machine. Increased danger of accident!
Special tools are necessary for sharpening the chain, which guarantee that the cutting edges are sharpened at the correct angle and to the correct depth. For the inexperienced user of chainsaws, we recommend to have the saw chain sharpened by a specialist or a specialist workshop. If you are familiar with the sharpening of the chain, you can purchase the tools, for example from Parkside (e.g. chain sharpener).

-
Remove the saw chain (refer to the section on operating the saw). The chain should be well-tensioned to ensure proper sharpening.
-
For the sharpening, a round fi le with 4.0 mm diameter is necessary.

Other diameters damage the chain and can lead to danger during work!
- Sharpen only from the inside to the outside. Guide the fi le from the inner side of the cutting teeth to the outer side. Lift the fi le when you are withdrawing it.
- Sharpen first the teeth on one side. Turn the saw around and sharpen the teeth of the other side.
- The chain is worn and must be replaced by a new saw chain if only approx. 4 mm of the cutting teeth is remaining.
- After the sharpening, all cutting elements must now be equal in length and width.
- After every third sharpening, the sharpness depth (depth limitation) must be checked and the height fi led with the aid of a fl at fi le. The depth limitation should be set back about 0.65 mm from the cutting tooth. After the setting back of depth limitation, round it off a little at the front.
Adjusting the chain tension
The adjustment of the chain tension is described in the chapter "Assembly - tensioning chainsaw".
- Switch off the device and remove the battery (16) from the device
- Check the chain tension regularly and re-adjust this as often as possible. When the saw chain is tensioned with 9 N (approx. 1 kg), the gap between the
GBMT
saw chain and the guide rail may not be more than 2 mm.
Starting up a new saw chain
In the case of a new chain, the tensioning force decreases after some time. Therefore, you have to re-tension the chain after the first 5 cuts and no later than after 10 minutes' sawing time.

Approved saw chains:
Oregon 90PX040X,
Trilink CL14340TL,
Trilink CL15040BL,
Trilink CL14340BL.

Never attach a new chain to a worn drive pinion or place onto a damaged or worn chain bar. The chain could spring back or break, potentially leading to serious injury.

Maintaining the chain bar

Use cut-protection gloves when handling the chain or the chain bar.
- Switch off the device and remove the battery (16) from the device.
- Remove the sprocket chain wheel covering (12), the saw chain (7) and the chain bar (8).
- Check the chain bar (8) for wear. Remove burrs and straighten the guide surfaces with a fl at fi le.

If the blade bar is damaged, replace it. Approved blade bars:
Oregon 575271,
Trilink M1431040-1041TL.
-
Clean the oil passages (24), of the chain bar, in order to guarantee a trouble-free, automatic oiling of the saw chain during operation.
-
Mount chain bar (8), chainsaw (7) and sprocket chain wheel covering (12) and tighten the chainsaw.

With the oil nozzles in good condition and the oil regulator set correctly, the saw chain will spray a little oil off after starting.

Turn the chain bar

Use cut-protection gloves when handling the chain or the chain bar.
The blade (8) has to be reversed regularly after a working time of approximately 10 hours in order to ensure even wear.
- Switch off the device and remove the battery (A 16) from the device.
- Remove the sprocket chain wheel covering (12), the saw chain (7) and the chain bar (8).
- Turn the blade around its horizontal axis and install the blade and chain as described under "Installing the sawing chain and blade".
When doing so, pay attention to the correct rotation direction of the saw chain!
Direction of travel of the saw chain
Use the graphical symbol below the chain sprocket (20) as a guide to the alignment of the saw chain (7) when the blade is rotated. The illustrated direction of travel on the blade is no longer true.
Maintenance intervals
Regularly carry out the maintenance operations listed in the following table. The life of the saw is extended by regular maintenance of your chainsaw. Furthermore, you get optimum cutting performance and avoid accidents.
Maintenance Interval Table
| Machine part Action | Before every use | After 10 hours of operation | |
| Components of the chain brake | Check, replace if required | √ | |
| Sprocket chain wheel (20) | Check for wear/indentations, replace if necessary | √ | |
| Saw chain (7) | Check oil, regrind or replace if required | √ | |
| Guide bar (8) Check | clean and oil | √ | |
| Guide bar (8) Turn around | √ | ||
| Automatic oil system | Check, clean oil aperture if necessary | √ | |
Storage
- Clean the equipment before putting it away.
- Put on saw bar protection sheath.
- Always empty the oil tank before pauses in operation lasting several weeks because the bio chain oil can become resinous and block the oil outlet channel (H 24).
Dispose of used oil in an environmentally-responsible way (see „Disposal/Environmental Protection“). - Store the appliance in a dry place well out of reach of children
Waste disposal and environmental protection
Remove the battery from the device and take the device, battery, accessories and packaging for environmentally friendly recycling. Instruction on how to dispose of the rechargeable battery and charger can be found in the separate instruction manual.
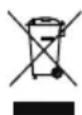
Machines do not belong with domestic waste.

Li-Ion
Do not dispose of batteries in household waste, fi re (risk of explosion) or water. Damaged batteries may damage the environment and your health if toxic fumes or liquids leak out.
Directive 2012/19/EU on waste electrical and electronic equipment: Consumers are legally obliged to recycle electrical and electronic equipment in an environmentally sound manner at the end of its life. In this way, environmentally friendly and resource-saving recycling is ensured.
Depending on the implementation in national law, you may have the following options:
- Return to a shop,
- Hand over to an offi cial collection point,
- Return to the manufacturer/distributor. This does not affect accessories enclosed with the old devices or tools without any electrical components.
- Defective or used batteries must be recycled in accordance with Directive 2006/66/EC.
- Dispose of batteries in discharged condition. We recommend covering the pole with adhesive tape to prevent a short circuit. Do not open up the battery.
- Dispose of batteries in accordance with the local regulations. Take batteries to an old battery collection point where they will be recycled in an environmentally friendly manner. For information about this, ask your local waste management company or our service centre.
Replacement parts/Accessories
Spare parts and accessories can be obtained at www.grizzlytools.shop
If you have issues ordering, please use the contact form. If you have any other questions, contact the "Service-Center" (see page 61).
Pos. Pos. exploded Description Order No. manual drawing
| A 8 63 Blade Trilink 30091628 | ||
| A 7 64 Saw chain Trilink 30091629 | ||
| A 12 66-76 Sprocket cover | 91105709 | |
| A 15 65 Blade encasing | 91105765 | |
| A 4 42-44 Oil tank cover | 91105758 | |

Trouble shooting
| Problem Possible | cause Fault correction | |
| Device does not start | Battery (16) empty or not inserted | Check the charge level, and have repairs carried out by a qualified electrician, if necessary. |
| Defective On/Off switch (2) Repair by customer service | ||
| Defective motor Repair by customer service | ||
| Chain does not turn and warning tone sounds | Chain brake blocks saw chain (7) | Check chain brake.Possibly release chain brake |
| Inferior cutting performance | Incorrectly mounted saw chain (7) | Mount saw chain correctly |
| Saw chain (7) blunt | Sharpen cutting teeth or place on new chain | |
| Chain tension insufficient Check chain tension | ||
| Saw runs with diffi culty, chain comes off | Chain tension insufficient Check chain tension | |
| Chain becomes hot, smoke development during sawing, discoloration of the rail | Too little chain oil | Check oil level and, where appropriate, refi ll with chain oil, check oil automatic system and, where appropriate, clean oil outfl ow duct or have repaired by customer service |
Guarantee
Dear Customer,
this equipment is provided with a 3-year guarantee from the date of purchase. In case of defects, you have statutory rights against the seller of the product. These statutory rights are not restricted by our guarantee presented below.
Terms of Guarantee
The term of the guarantee begins on the date of purchase. Please retain the original receipt. This document is required as proof of purchase.
If a material or manufacturing defect occurs within three years of the date of purchase of this product, we will repair or replace – at our choice – the product for you free of charge. This guarantee requires the defective equipment and proof of purchase to be presented within the three-year period with a brief written description of what constitutes the defect and when it occurred.
If the defect is covered by our guarantee, you will receive either the repaired product or a new product. No new guarantee period begins on repair or replacement of the product.
Guarantee Period and Statutory Claims for Defects
The guarantee period is not extended by the guarantee service. This also applies for replaced or repaired parts. Any damages and defects already present at the time of purchase must be reported immediately after unpacking. Repairs arising after expiry of the guarantee period are chargeable.
Guarantee Cover
The equipment has been carefully produced in accordance with strict quality guidelines and conscientiously checked prior to delivery.
The guarantee applies for all material and manufacturing defects. This guarantee does not extend to cover product parts that are subject to normal wear and may therefore be considered as wearing parts (e.g. saw chain) or to cover damage to breakable parts (e.g. switches).
This guarantee shall be invalid if the product has been damaged, used incorrectly or not maintained. Precise adherence to all of the instructions specified in the operating manual is required for proper use of the product. Intended uses and actions against which the operating manual advises or warns must be categorically avoided.
The product is designed only for private and not commercial use. The guarantee will be invalidated in case of misuse or improper handling, use of force, or interventions not undertaken by our authorised service branch.
Processing in Case of Guarantee
To ensure quick handling of you issue, please follow the following directions:
- Please have the receipt and identification number (IAN 497682_2204) ready as proof of purchase for all enquiries.
- Please find the item number on the rating plate.
- Should functional errors or other defects occur, please initially contact the service department specified below by telephone or by e-mail. You will then receive further information on the processing of your complaint.
- After consultation with our customer service, a product recorded as defective can be sent postage paid to the service address communicated to you,
with the proof of purchase (receipt) and specifi cation of what constitutes the defect and when it occurred. In order to avoid acceptance problems and additional costs, please be sure to use only the address communicated to you. Ensure that the consignment is not sent carriage forward or by bulky goods, express or other special freight. Please send the equipment inc. all accessories supplied at the time of purchase and ensure adequate, safe transport packaging.
Repair Service
For a charge, repairs not covered by the guarantee can be carried out by our service branch, which will be happy to issue a cost estimate for you. We can handle only equipment that has been sent with adequate packaging and postage.
Attention: Please send your equipment to our service branch in clean condition and with an indication of the defect.
Equipment sent carriage forward or by bulky goods, express or other special freight will not be accepted.
We will dispose of your defective devices free of charge when you send them to us.
Service-Center
GB Service Great Britain Tel.: 0800 404 7657
E-Mail: grizzly@lidl.co.uk
IAN 497682_2204
MT Service Malta Tel.: 80062230 E-Mail: grizzly@lidl.com.mt IAN 497682_2204
Importer
Please note that the following address is not a service address. Please initially contact the service centre specified above.
Service-Center....93
Importateur ......93
(L_pA) 85,0 dB; K_pA = 3,0 dB
Service-Center....121
Importeur ......121
Motorspanning 20 V =
! Deviations from the measurement data of the cutting geometry can lead to an increase of the spring-back slope of the machine. Increased danger of accident!
Service-Center....150
Importer 150
Service-Center......203
Dovozca....203
Vyhládávaniechýb ......204
natural_image
Two technical diagrams showing mechanical components and a tool interacting with a surface (no text or symbols present)Service-Center......230
Importør 230
(L_pA) 85,0 dB; K_pA = 3 dB
Lydeffektniveau (L _WA )
Den grønne LED lyser:
Service-Center......260
Importador....260
Service-Center......288
(L_pA) 85,0 dB; K_pA = 3 dB
misurata....93,9dB;K _WA =2,40dB
garantito....98 dB
Vibrazione (ah) su
impugnatura anteriore .....1,41 m/s ^2
impugnatura posteriore......3,97 m/s ^2
K = 1,5m / s^2
(L_pA) 85,0 dB; K_pA = 3 dB
natural_image
Two technical diagrams showing mechanical components: (a) a cam mechanism with rotation arrow and shaded area, (b) a lever mechanism with upward force and curved trajectory below (no text or symbols)Pooblaščeni serviser:
Tel.: 0800 80917
E-Mail: grizzly@lidl.si
(Birotehnika, Hodošček Renata s.p., Lendavska ULICA 23, 9000 Murska Sobota)
Garancijski list
Service-Center......371
Proizvođač......371
Traženje greške......372
Prijevod originalne CE Izjave o podudarnosti....472
Sklopni crtež......477
Uvod
Srdačno Vam čestitamo na kupnji Vašega novog uređaja. Time ste se Vi odlučili za jedan visokokvalitetni proizvod.
Tijekom proizvodnje ispitana je kvaliteta ovog uređaja i podvrgnut je završnoj kontroli. Time je osigurana funkcionalnost Vašeg uređaja.

Uputa za upravljanje sastavni je dio ovoga proizvoda. Ona sadrži
(L_pA) 85,0 dB; K_pA = 3 dB
Razina zvučnog učinka (L _WA )
izmjerena......93,9 dB; K_WA=2,40 dB
zajamčena....98 dB
Vibracije (a _h ) na
natural_image
Mechanical component diagram showing a chain with rotational arrows (no text or symbols)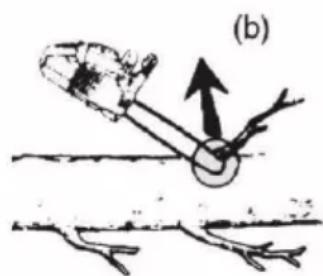
natural_image
Diagram of a mechanical or structural component with an arrow indicating upward motion, no visible text or symbols(L_pA) 85,0 dB; K_pA = 3 dB
(L_pA 85,0 dB; K_pA = 3 dB
Service-Center......458
Εισαγωγέας......458
(L_pA) 85,0 dB; K_pA = 3 dB
natural_image
Technical diagrams showing mechanical components and a lever mechanism (no text or labels)| GBMT | Translation of the originalEC declaration of conformity |
| We hereby confi rm that theCordless Chainsaw 20 VDesign Series PKSA 20-Li C3Serial number000001 - 177000conforms with the following applicable relevant version of the EU guidelines : | |
| 2006/42/EC • 2014/30/EU • 2000/14/EC & 2005/88/EC2011/65/EU* & (EU) 2015/863 | |
| In order to guarantee consistency, the following harmonised standards as well asnational standards and stipulations have been applied: | |
| EN 62841-1:2015 • EN 62841-4-1:2020EN IEC 55014-1:2021 • EN IEC 55014-2:2021 • EN IEC 63000:2018 | |
| We additionally confi rm the following in accordance with the 2000/14/EC emissions guideline: Sound power levelguaranteed: 98 dBmeasured: 93,9 dBCompliance evaluation process carried out in accordance with Appendix VI,2000/14/ECRegistered Offi ce: NB 0123, TÜV Süd, Ridlerstraße 65, 80339 München, GermanyDesign Type Certifi cate No.: M6A 036607 1314 Rev. 00 | |
| This declaration of conformity is issued under the sole responsibility of the manufacturer: | |
| CE Grizzly Tools GmbH & Co. KGStockstädter Straße 2063762 GroßostheimGermany05.11.2022 | Christian FrankDocumentation Representative |
* The object of the declaration described above satisfies the provisions of Directive 2011/65/EU of the European Parliament and the Council of 8 June 2011 on limiting the use of certain harmful substances in electrical and electronic appliances.


- Akku-Kettensäge 20 V / Cordless Chainsaw 20V / Tronçonneuse sans fi l 20 V PKSA 20-Li C3
- FR BE
- Inhalt
- Introduction
- Intended purpose
- General description
- Extent of the delivery
- Function description
- Overview
- Technical Data
- Charging time
- Notes on safety
- Symbols used in the instructions
- Symbols used on the saw
- GBMT
- General Safety Directions for Power Tools
- 2) Electrical safety
- 3) Personal safety
- General safety instructions for chainsaws
- Kickback causes and how to avoid them
- Further safety directions
- Residual risks
- Charging
- Recharging the battery
- Overview of the control display on the charger:
- Assembly
- Mounting the saw chain and blade
- Tensioning the saw chain
- Chain lubrication
- Filling up with chain oil:
- Operating
- Switching on
- Battery charge level indicator
- Checking the chain brake
- Checking the oil automatic system
- Changing the saw bar
- Sawing techniques
- General
- Bucking
- Log is lying on the ground:
- Log is supported at one end:
- Log is supported at both ends:
- Sawing on a sawhorse:
- N Limbing
- Felling trees
- Removal of branches:
- Escape area:
- Cutting notch (A):
- Never step in front of a tree which is notched.
- Felling back cut (B):
- For safety reasons, we advise inexperienced users not to fell any logs with a rail length which is smaller than the trunk diameter.
- Maintenance and cleaning
- Cleaning
- Oiling the saw chain
- Sharpening the saw chain
- Deviations from the measurement data of the cutting geometry can lead to an increase of the spring-back slope of the machine. Increased danger of accident!
- Other diameters damage the chain and can lead to danger during work!
- Adjusting the chain tension
- Starting up a new saw chain
- Maintaining the chain bar
- Use cut-protection gloves when handling the chain or the chain bar.
- Turn the chain bar
- Maintenance intervals
- Storage
- Waste disposal and environmental protection
- Replacement parts/Accessories
- Spare parts and accessories can be obtained at www.grizzlytools.shop
- Trouble shooting
- Guarantee
- Terms of Guarantee
- Guarantee Period and Statutory Claims for Defects
- Guarantee Cover
- Processing in Case of Guarantee
- Repair Service
- Service-Center
- Importer
- Garancijski list
- Uvod
Brand : PARKSIDE
Model : PKSA 20-Li C3
Category : Electric saw